Odoo 14 Accounting is considered a vital aspect for any organization to meet various strands of finance in the organization. With the help of accounting, a company can earn a maximum profit for investment and future growth. This time, in version 14, Odoo has made remarkable changes that are integrating all the accounting modules in one place.
Resequence
In Odoo V14 we have a new feature called Resequencing, in which we can configure the sequence of invoices after creating at least one invoice.
Before doing resequencing here can see the sequences of the current invoices are started with (INV/2021/6/0000).
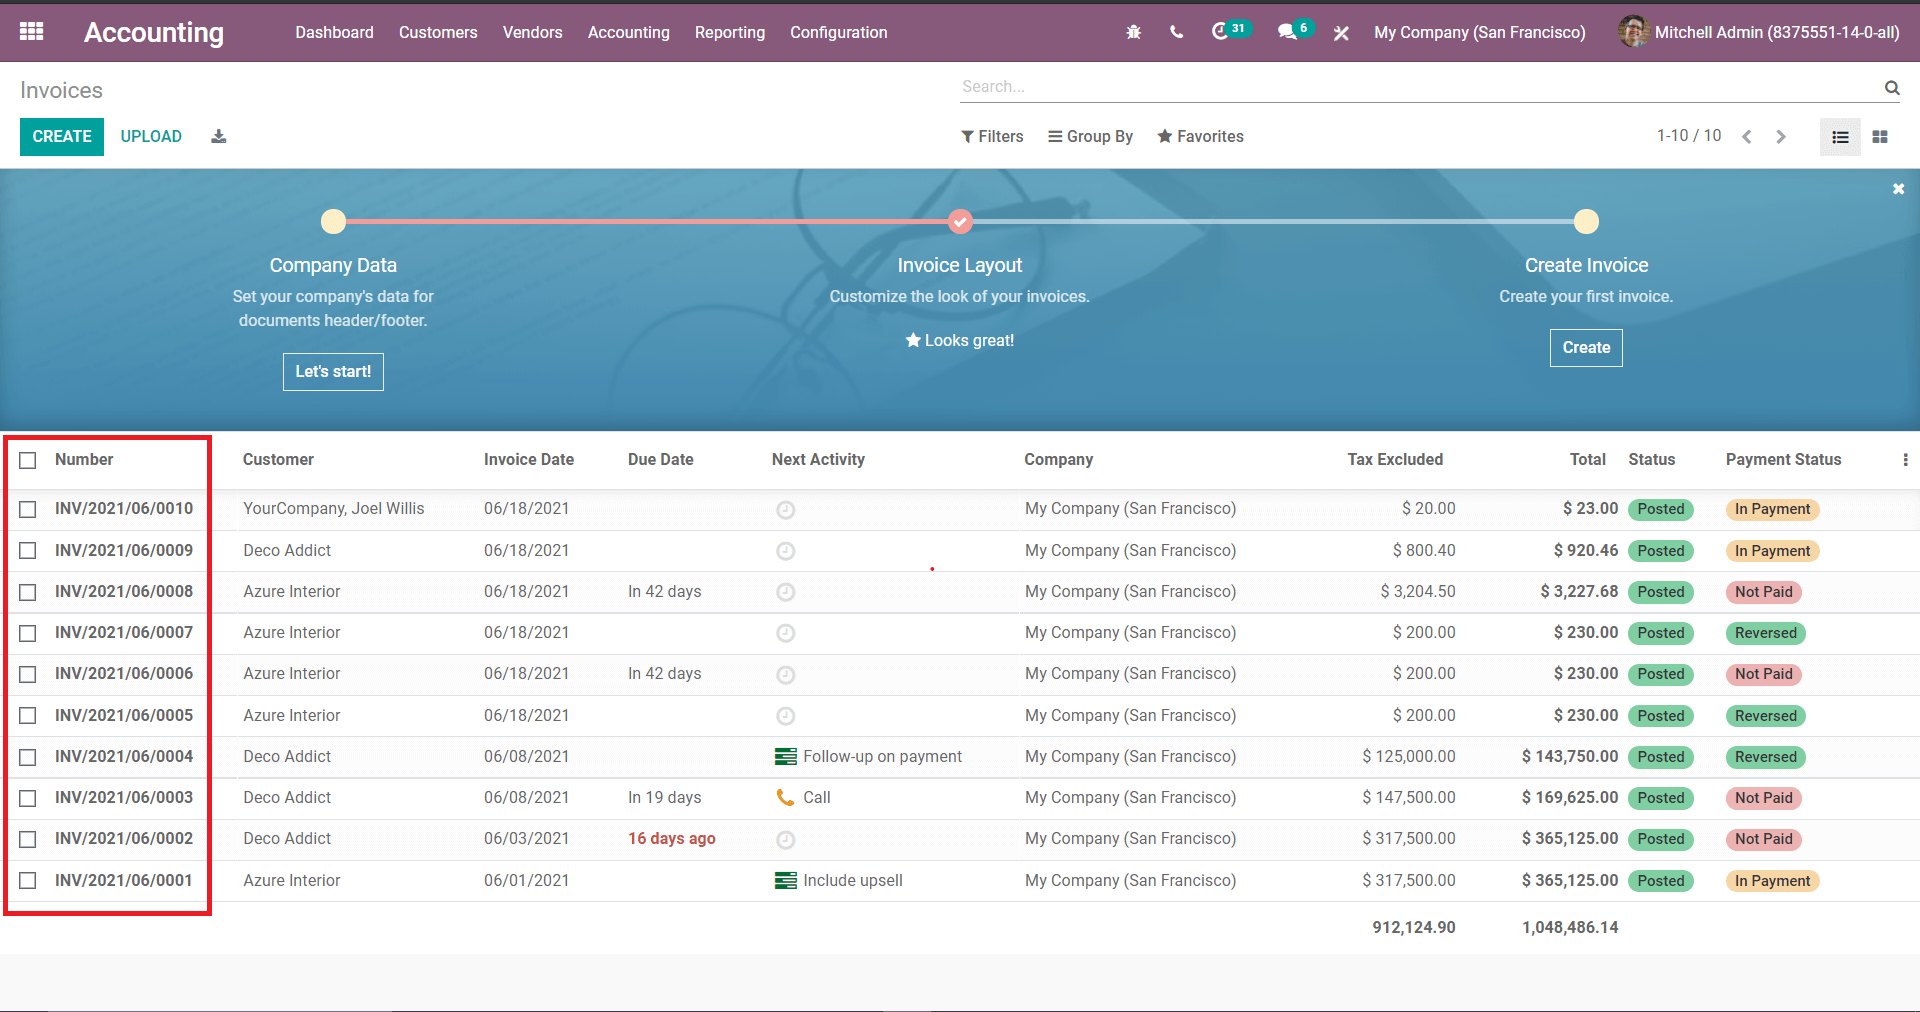
For resequencing the records, first have to select the records and go to action and click Resequence.
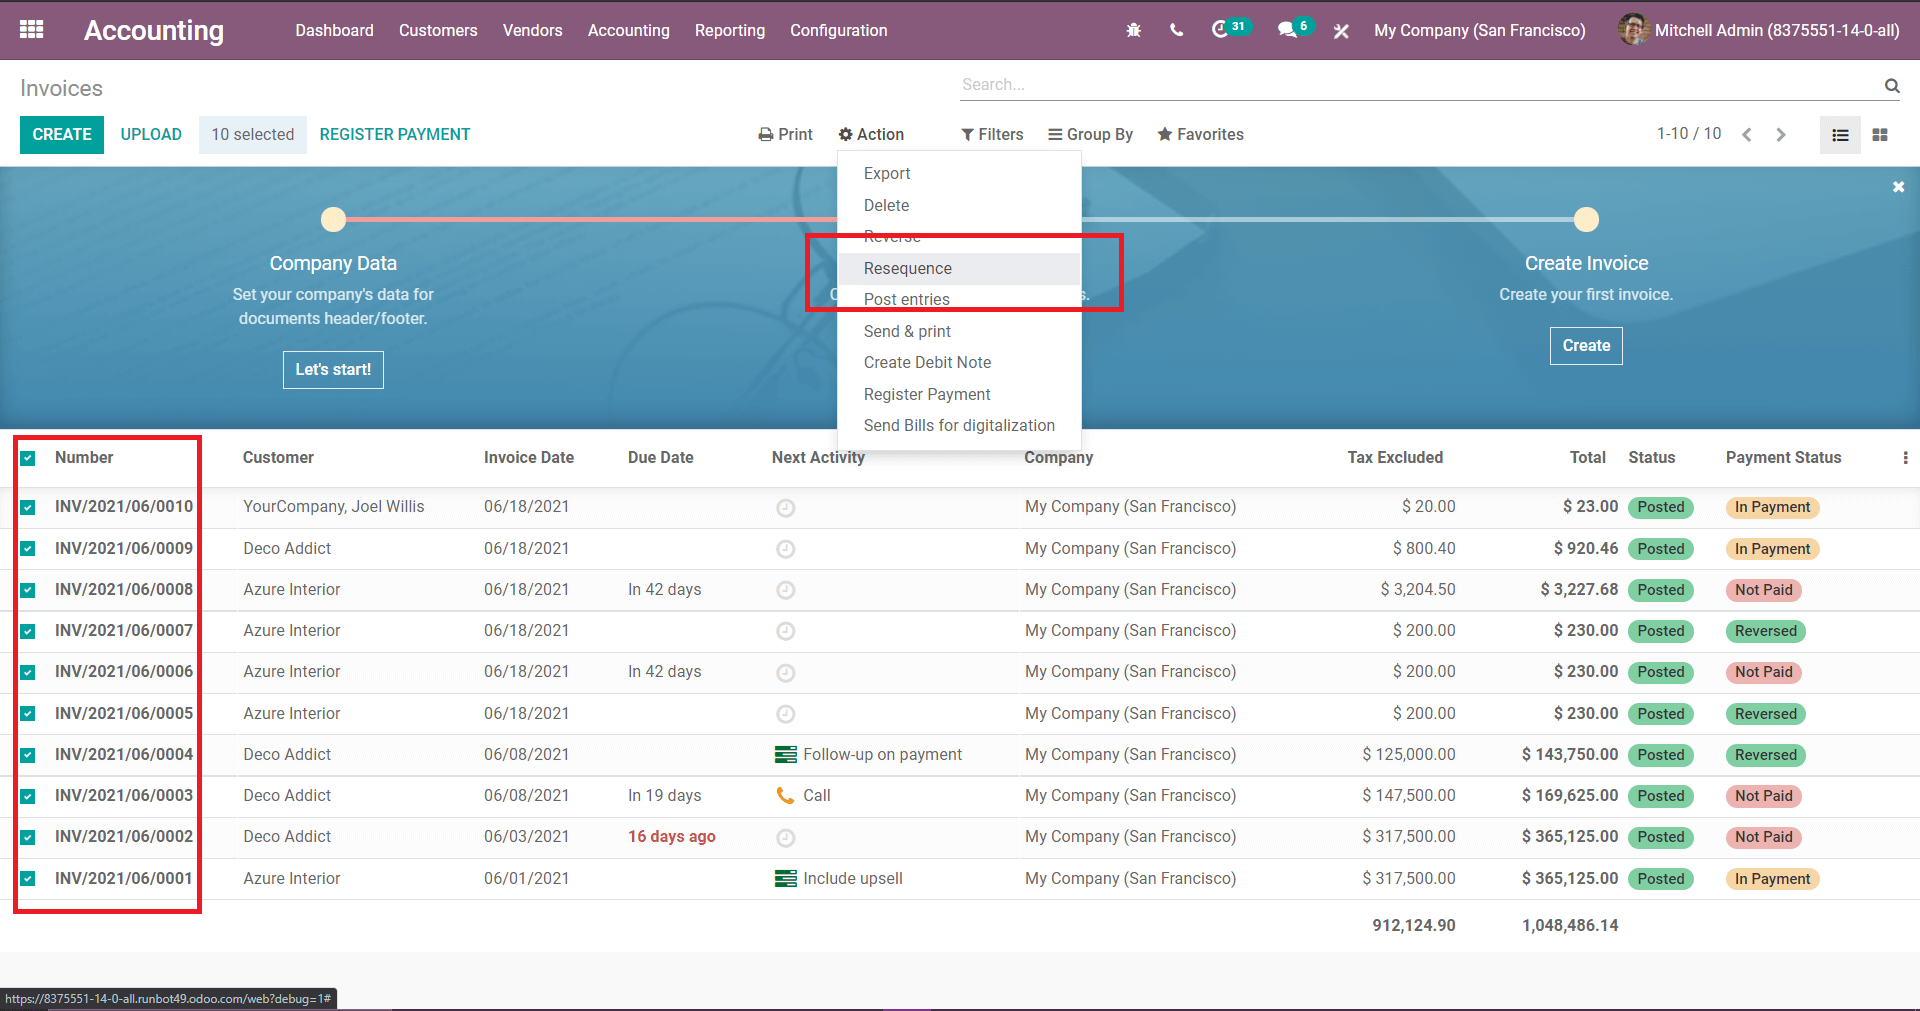
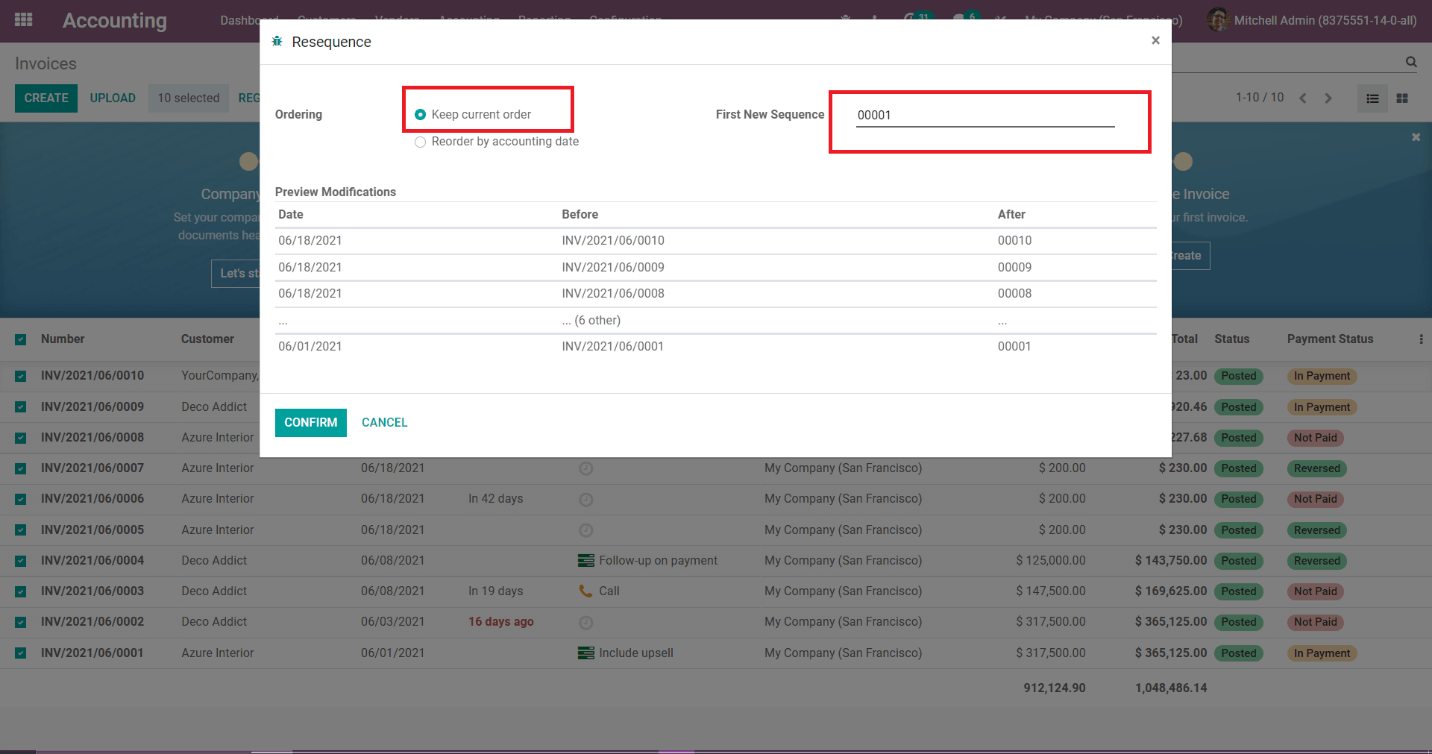
Here you can see two types of sequences which keep order and reorder by accounting date. Here you have to choose the option to keep the current order and enter the first sequence as 00001.
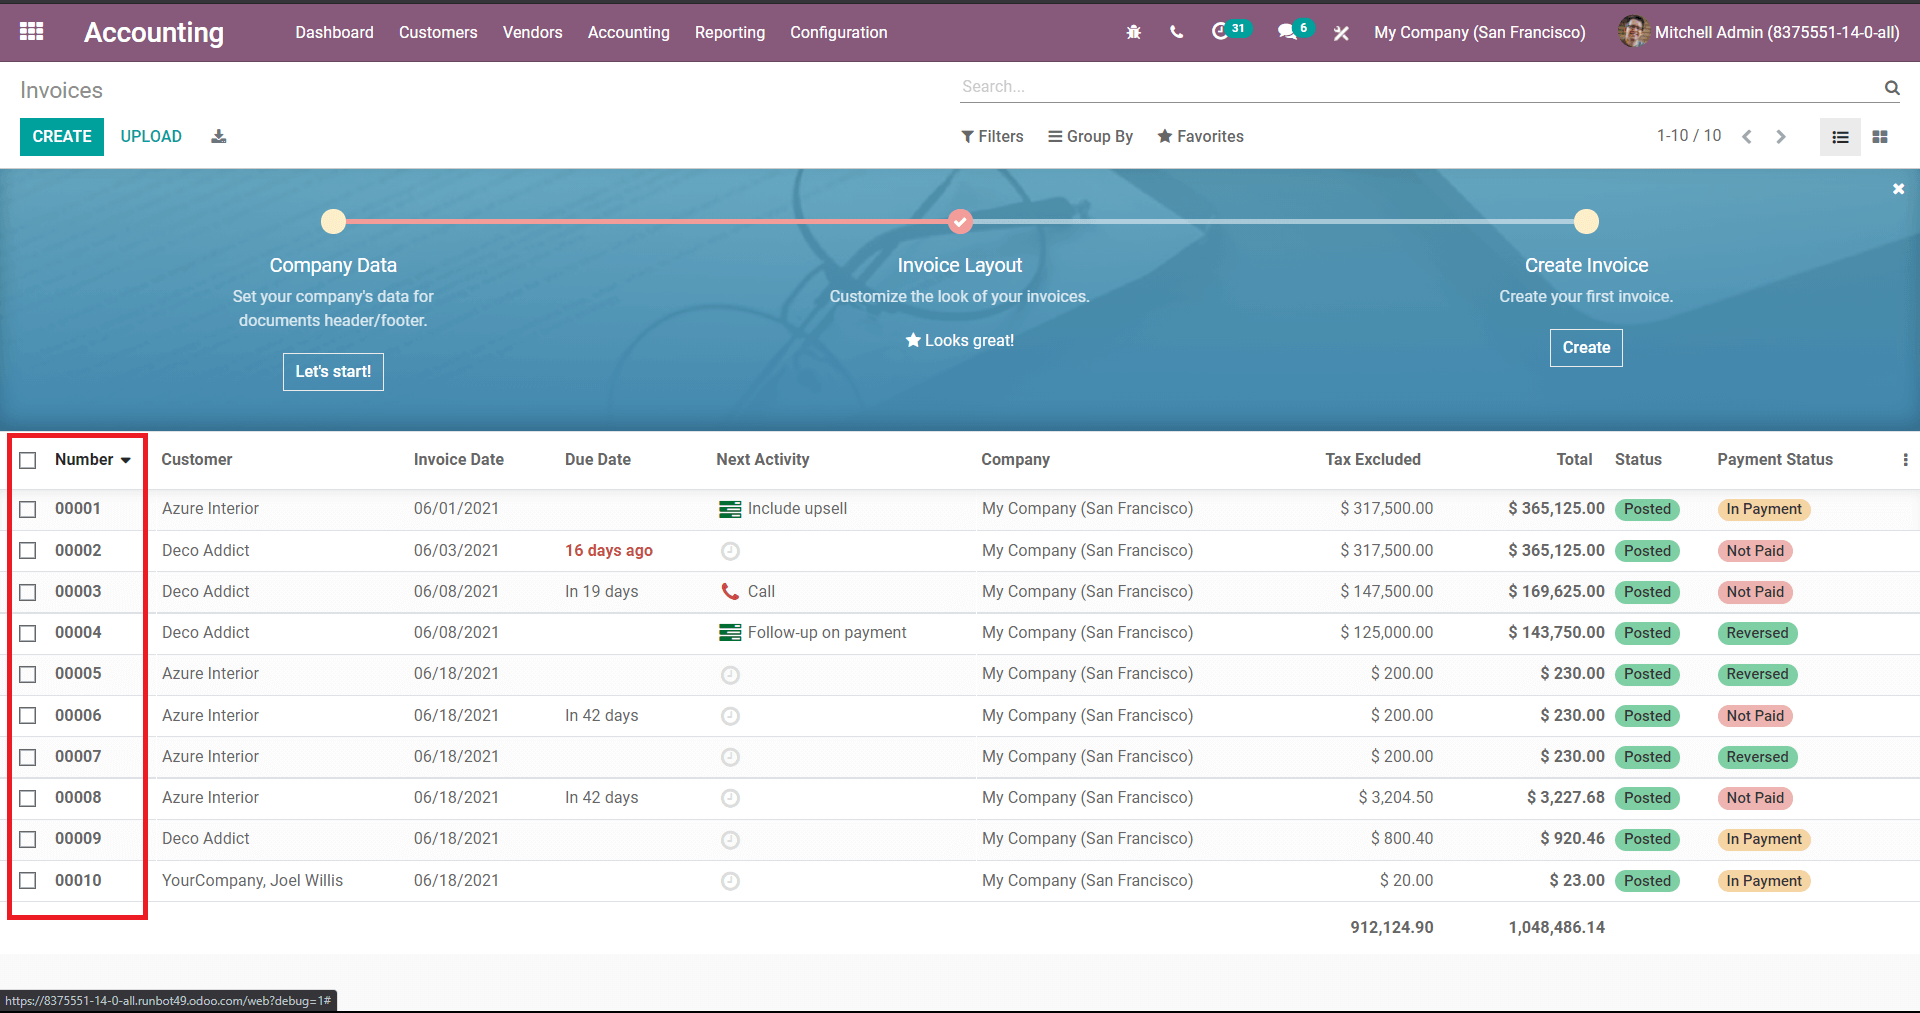
After confirming resequencing, the records sequence has been resequenced.
Cutoff Journal
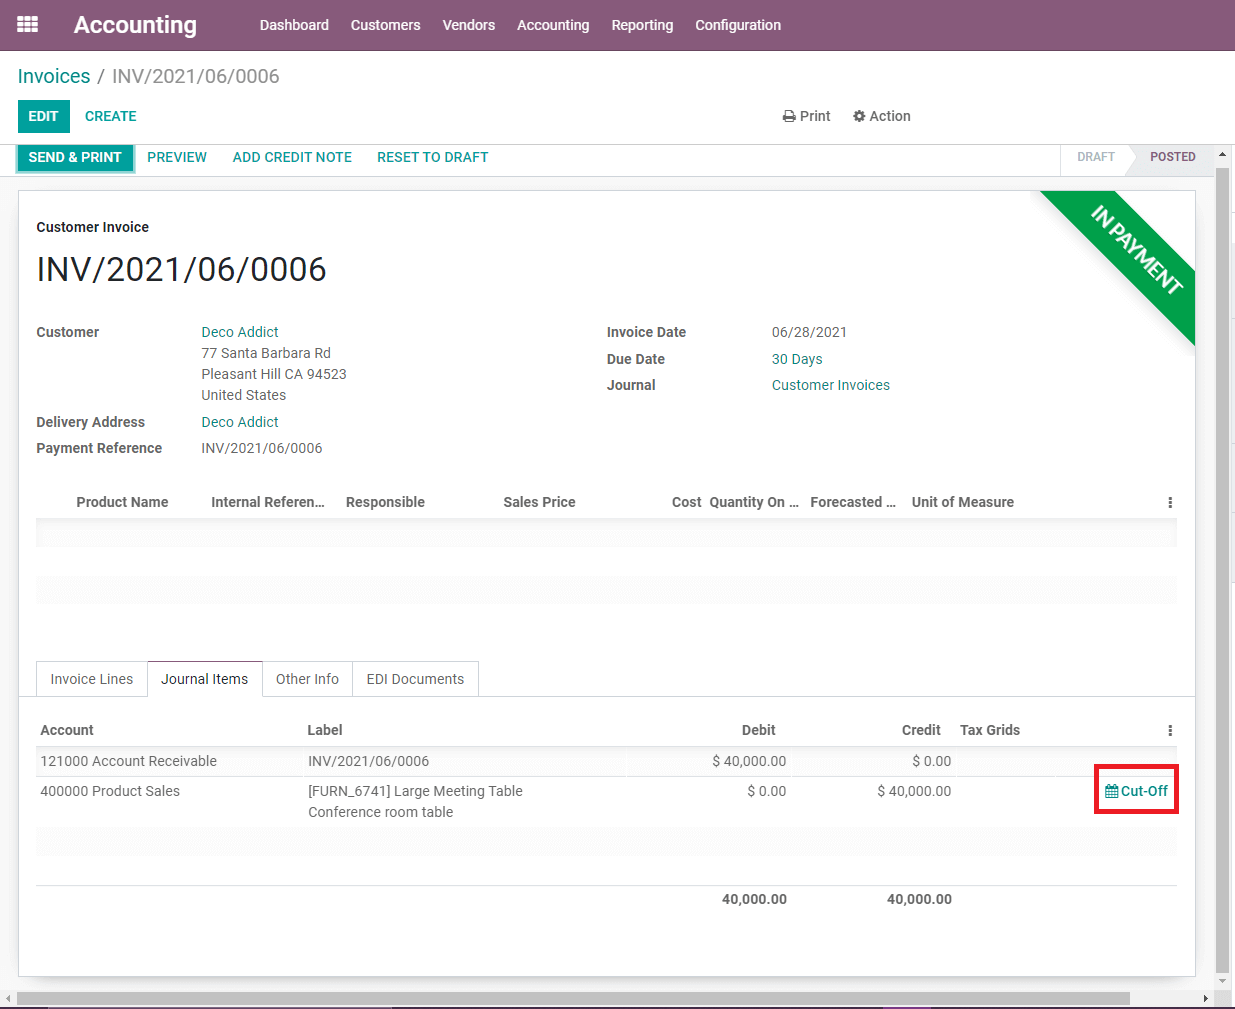
Cut-off refers to the end of a bill or invoice's agreement's validity period.
There will be some vendor payments that have not yet been validated or fully matched at the ending of each accounting period. As a result, these funds will be missing from the Accounts Receivable account (and the related expense or asset account). These records should be checked in order to assess if the company has incurred a liability or a cost as of the end of the accounting period.
For example, if one invoice is created to a customer with the amount of 40,000 but the customer is paid only 80% of the invoice amount, so in this case, one can adjust the entries using the cut-off feature and add that adjusted balance amount of 20% to a company loss account.
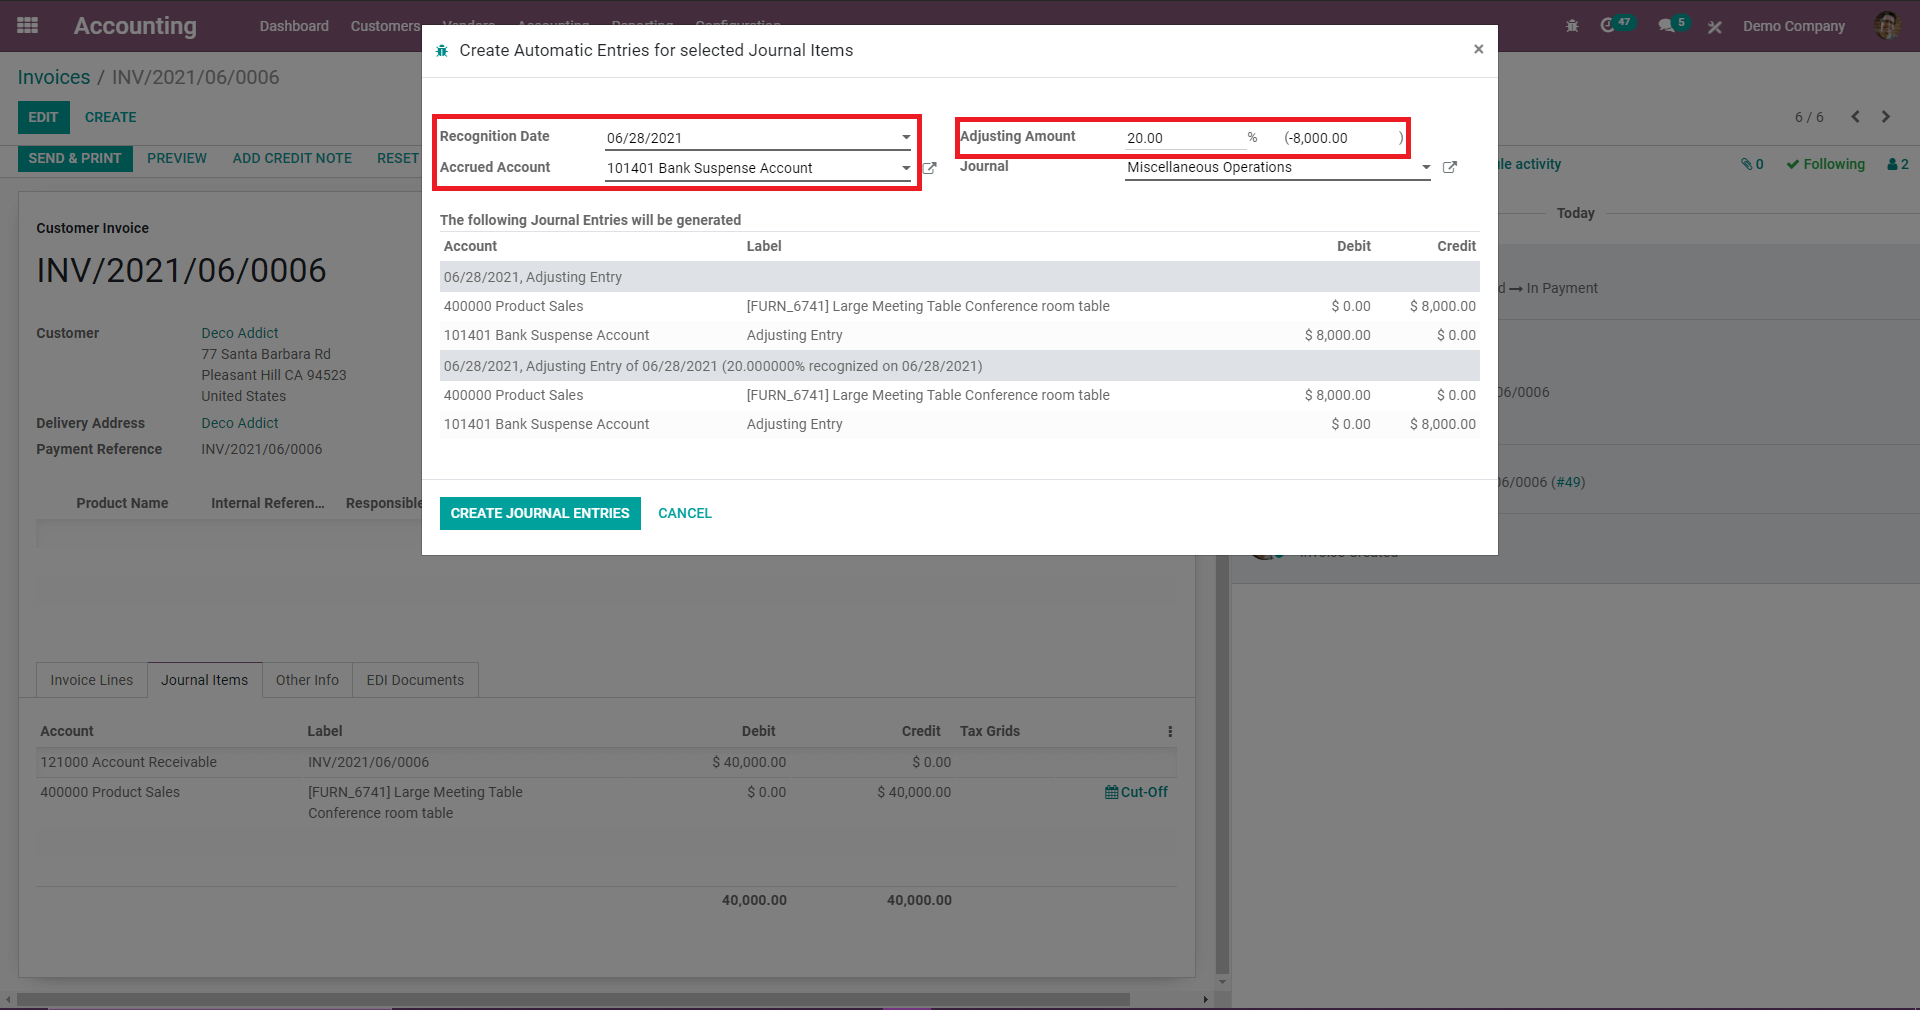
Companies should create an accrual-type adjustment entry at the end of the financial period since the accrual method of accounting requires that all of the debts and liabilities and expenses be recorded on the financial statements. For amounts incurred but not yet included in Accounts Receivable, this adjustment entry will credit Accrued Liabilities and debit the relevant expense/other accounts. After Accounts Receivable, the sum in Accrued Liabilities will be presented in the Current Liability part of the balance sheet. As a result, the Cut-off function will help in creating the Adjustment entry in the system as necessary.
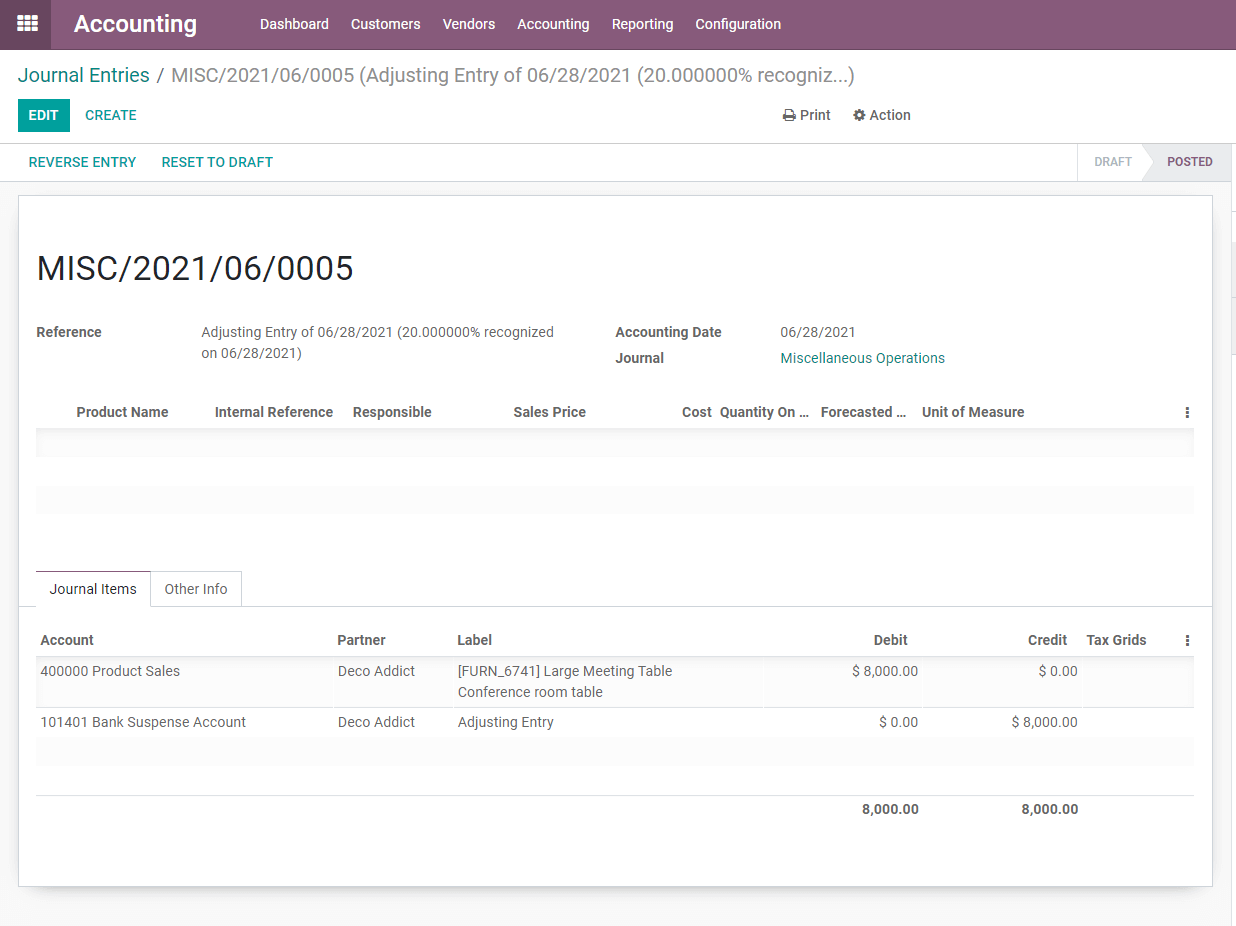
For the adjustment, the corresponding journal entry will look just as depicted in the following image.
Unrealized currency Gain/Losses
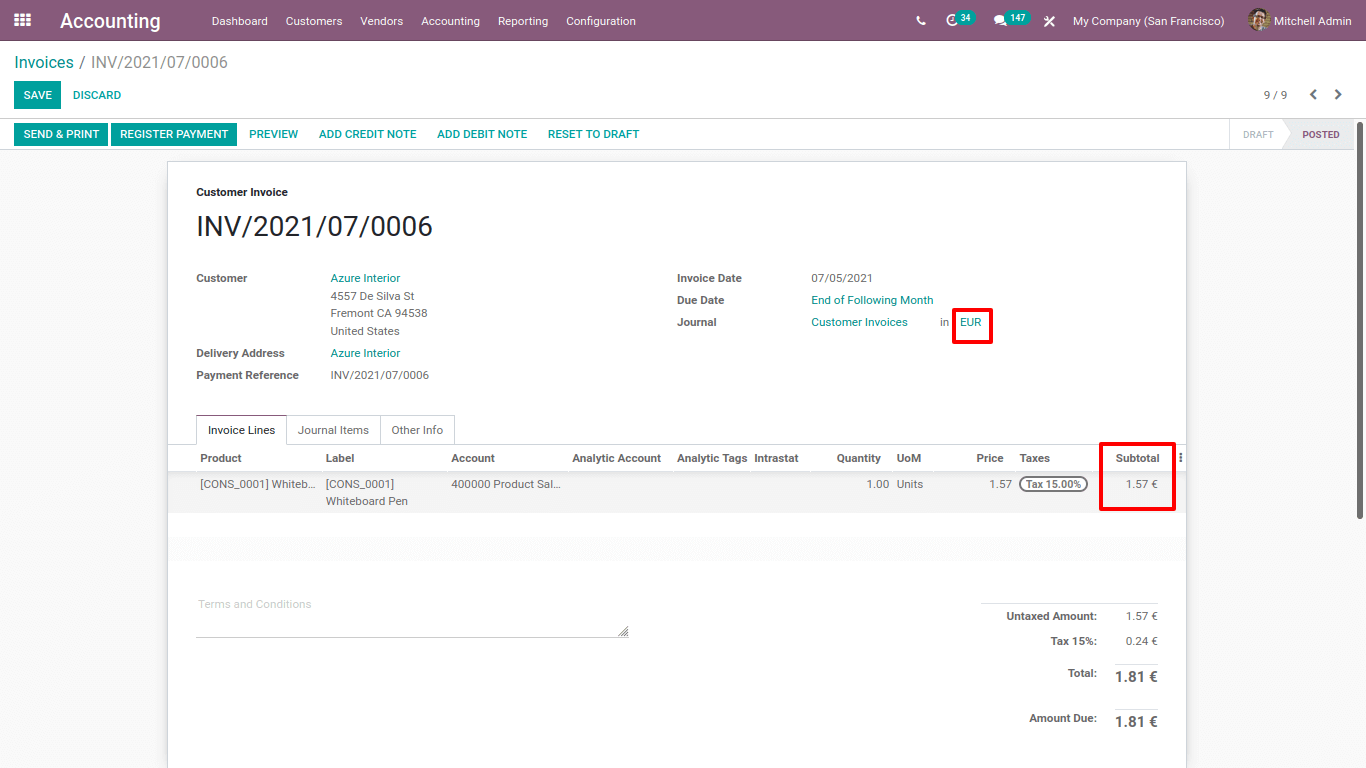
For an example of unrealized currency gain/losses, one has to create an invoice or vendor bill, that invoice or vendor bill has to be created in an amount of currency EUR and the payment is done by the customer after a few days. There might be some exchange rate differences of the currencies when payment is done on a separate day, which will be seen in the report of unrealized currency gain/losses report.
Here is the example invoice. This invoice is created with EUR with the invoice date 5th July 2021.
The customer has been made payment by 9th July 2021.
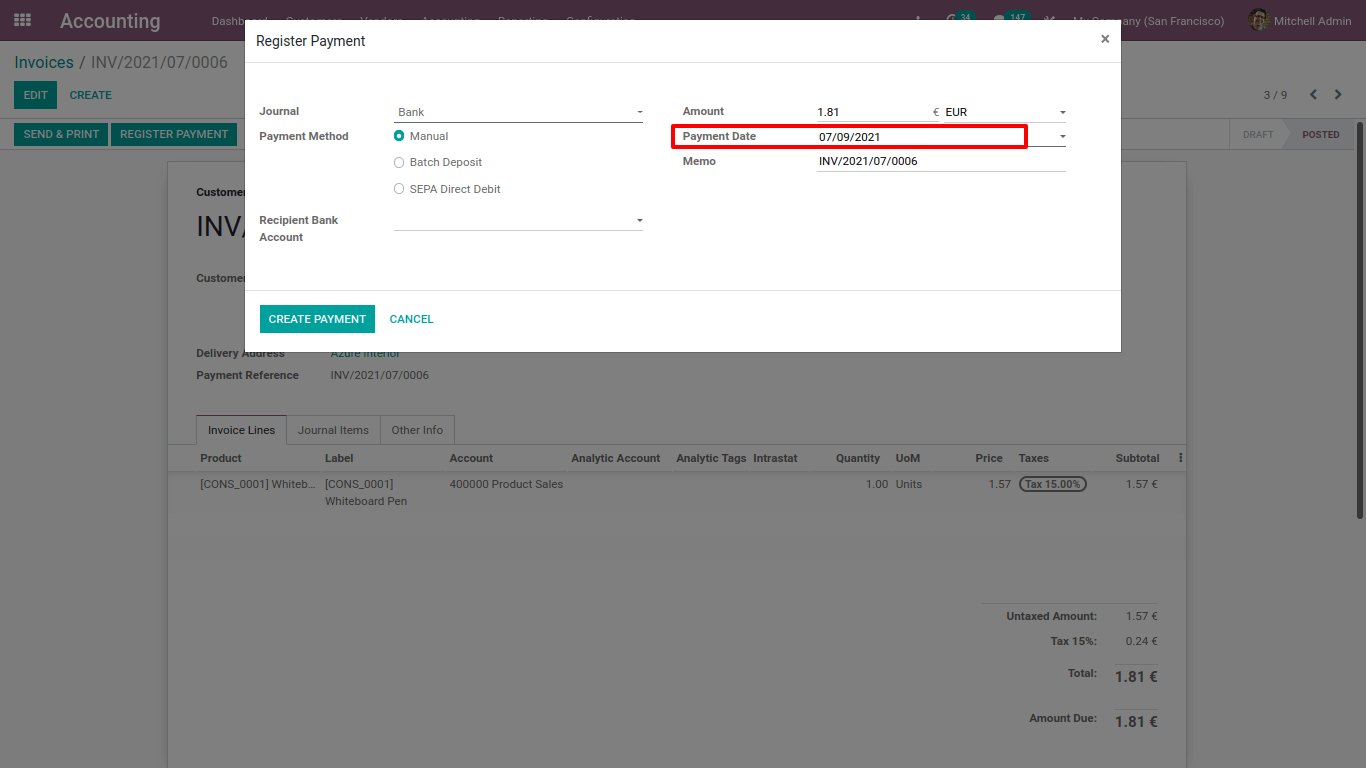
Between these days the rate of currency may vary.
The unrealized currency gain/loss report will give you an overview of all unrealized amounts in foreign currency on the balance sheet and will be able to revalue and edit immediately from there. Go to Accounting > Reporting > Unrealised Currency Gain/Loss.
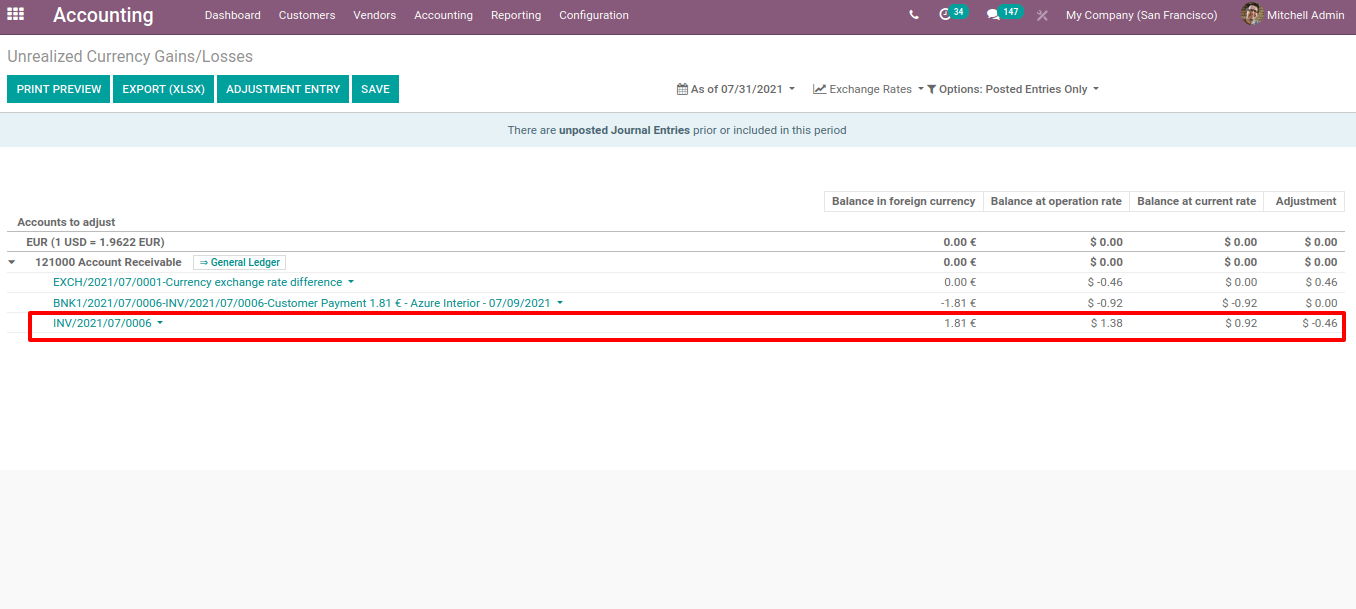
So the accounting is always up to date with the unrealized gain and losses.
In each journal item, you can see the amount so here balance in foreign currency means it is a value that came from within the invoice.
Then the balance at the operation rate is the balance calculated in your currency at the time you receive the bill at the operation date. Then balance at the operation rate that is the amount we would get if we paid right now it’s a current value at the time of the report. Then you can see the adjustment that the value should be added to the accounting in order to update your accounting reports with this new information so we can adjust your amount from here.
Then if you want to adjust the entry you can balance it and you can update your balance sheet. Select which journal you are going to process this accounting entry, then select the expense account or income account and after adding these details you can create an entry and mark it.
Disallowed Expenses
Disallowed expenses are those expenses that cannot be deducted in the fiscal result but can be deducted in your bookkeeping result. So you can get the financial results in real-time by setting disallowed expense categories and obtaining periodic changes.
So, first of all, we have to install disallowed expenses.
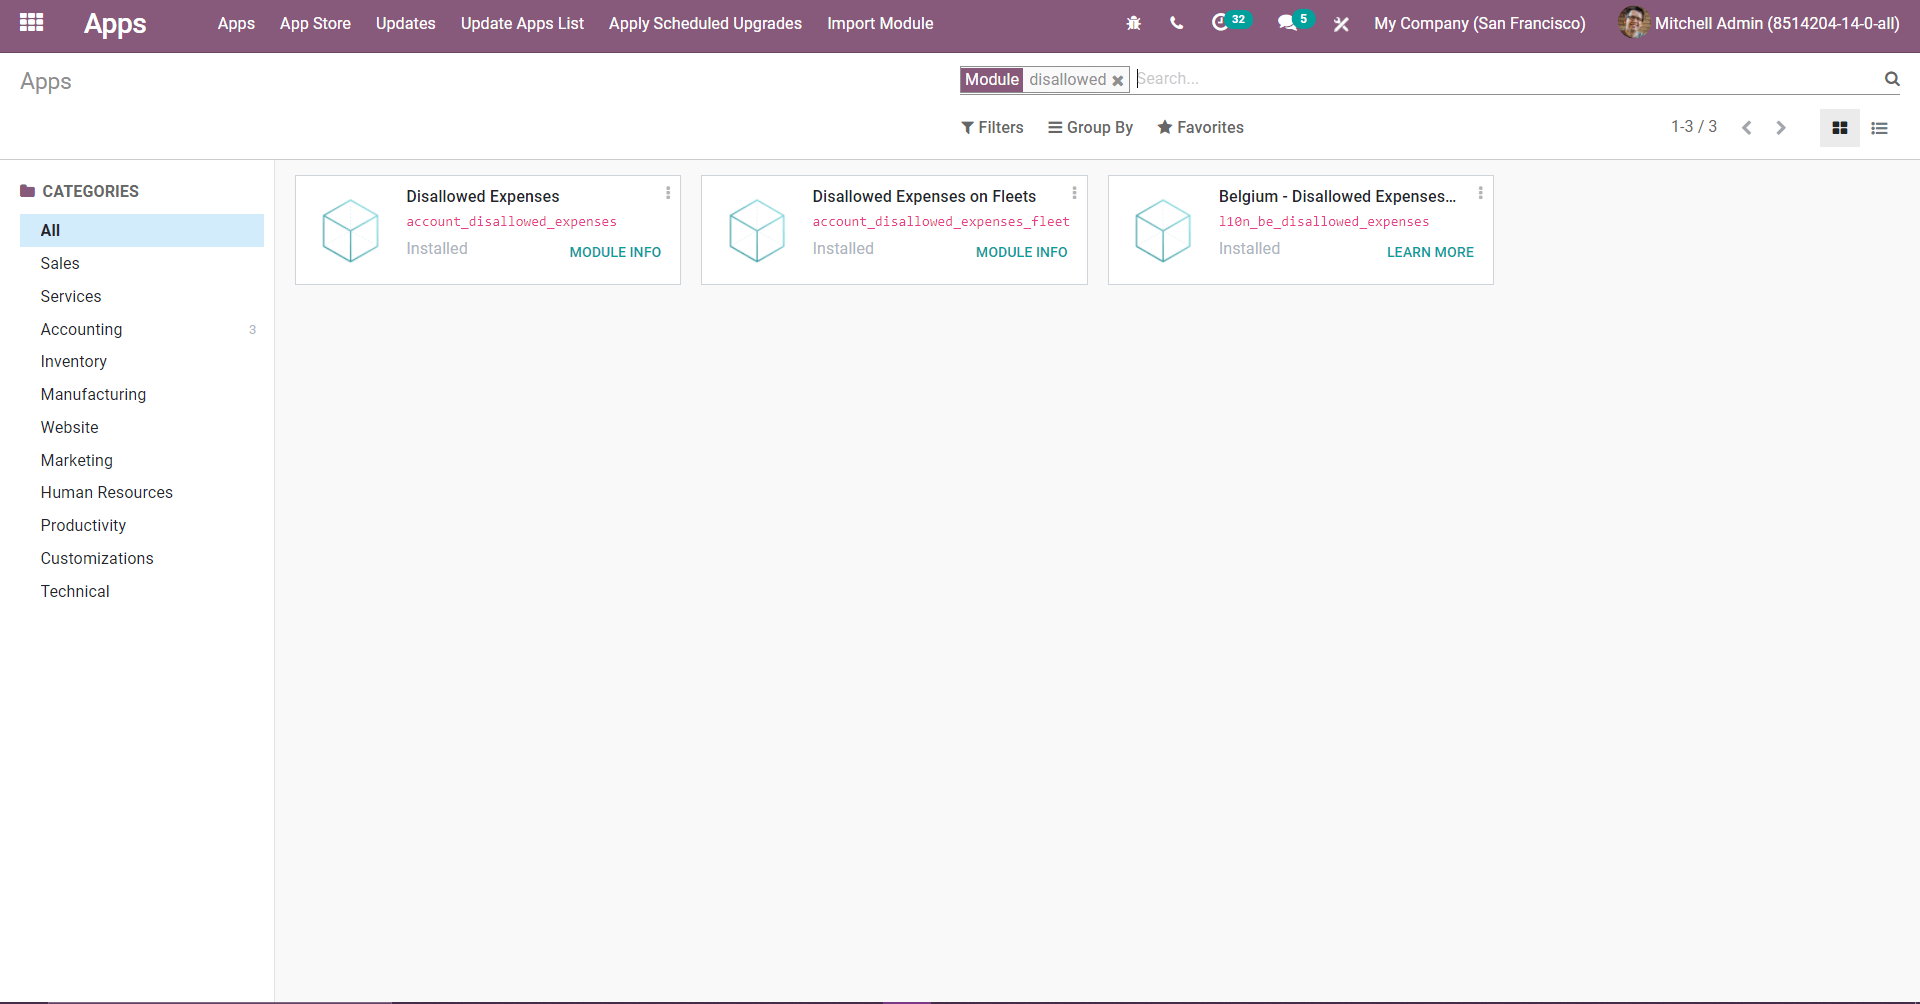
After installing this module then only you can see disallowed expenses category in accounting.
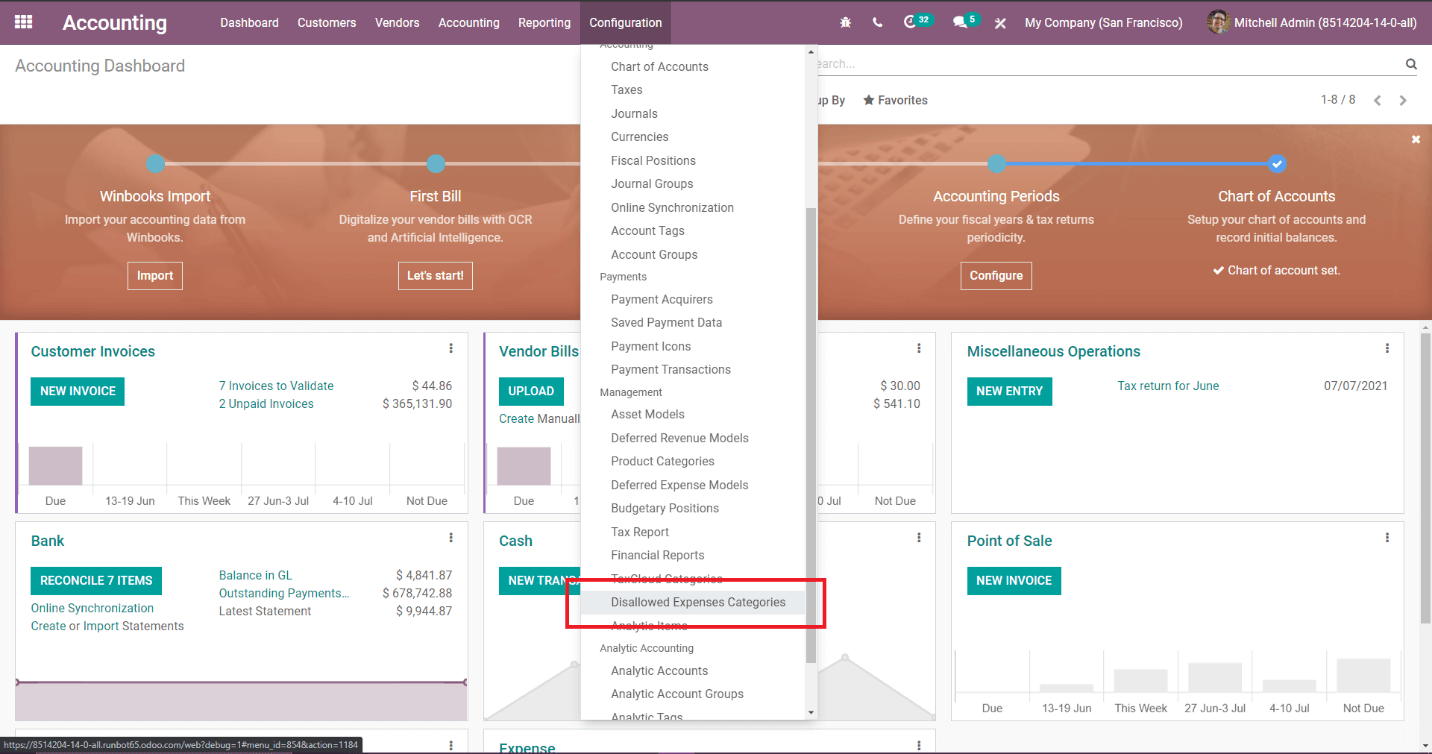
Then create a new disallowed expenses category, for that, you need to fill in all the details like code, name, car category, company, and start date and the rate which is the main part, and also need to link an expense account to this disallowed expenses category.
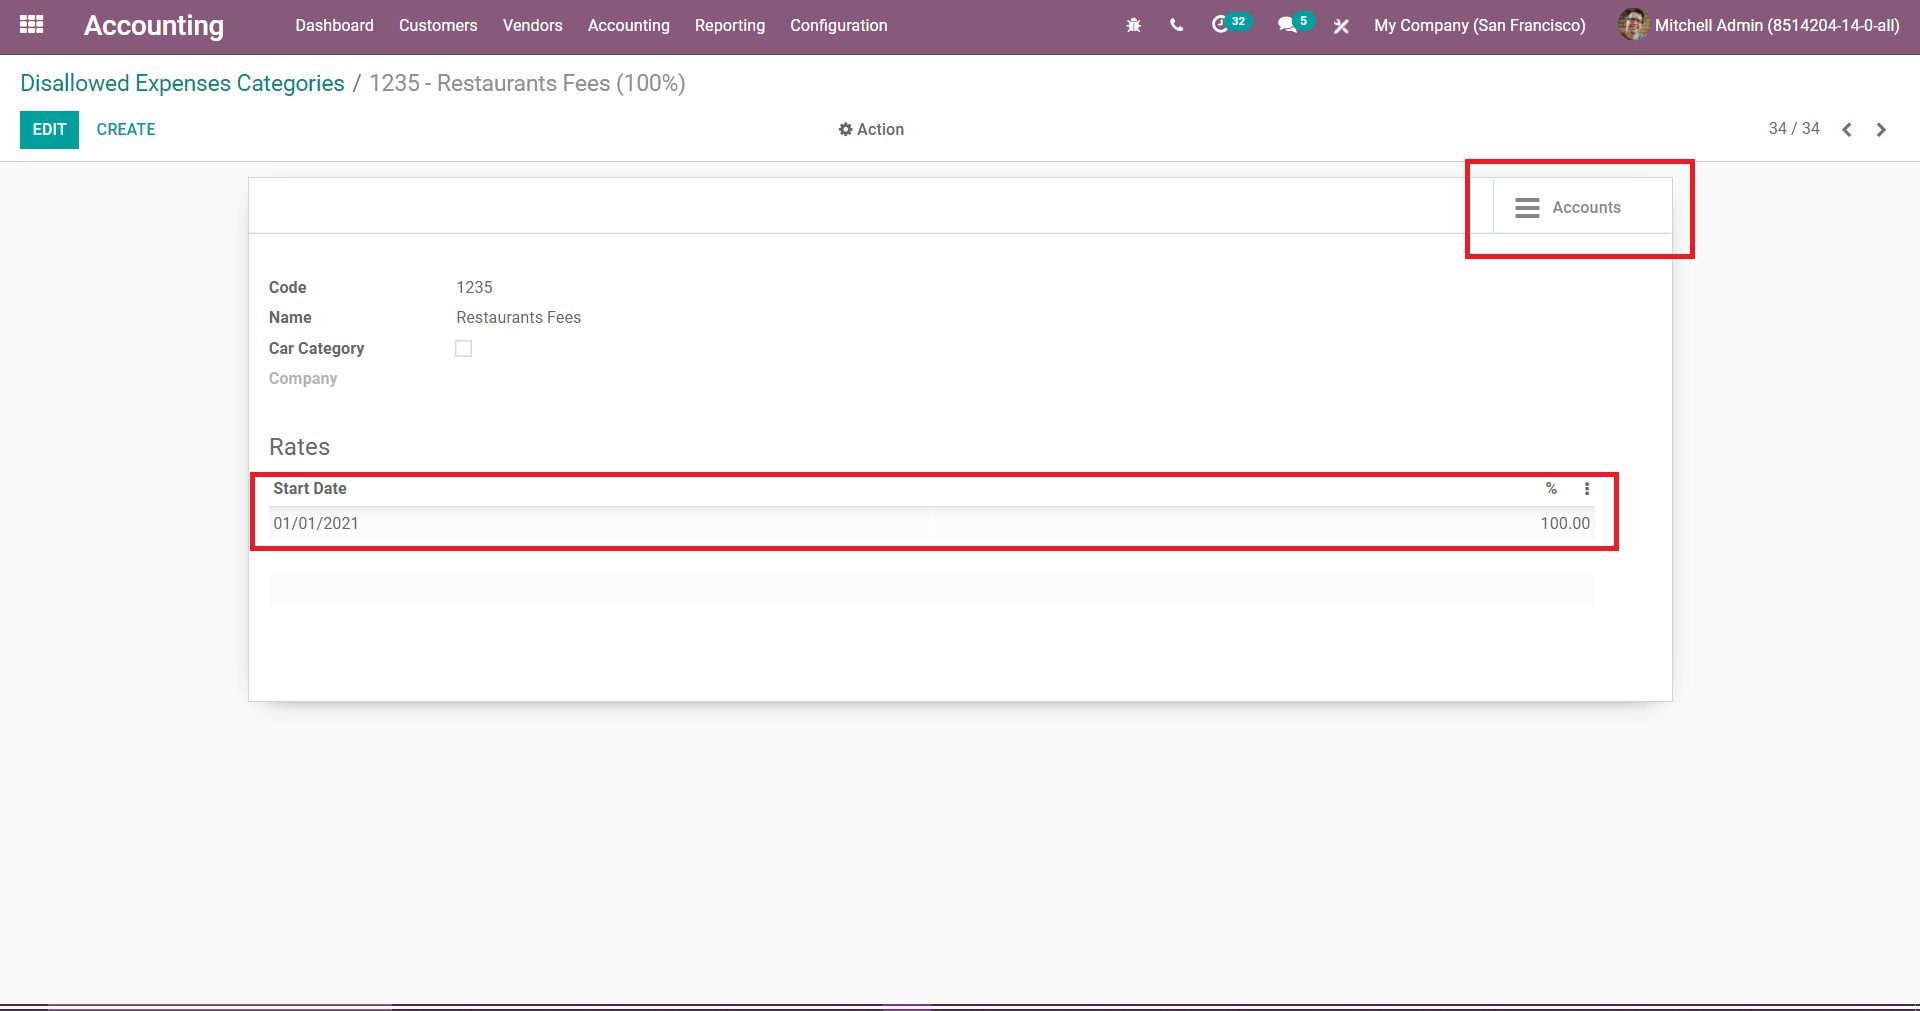
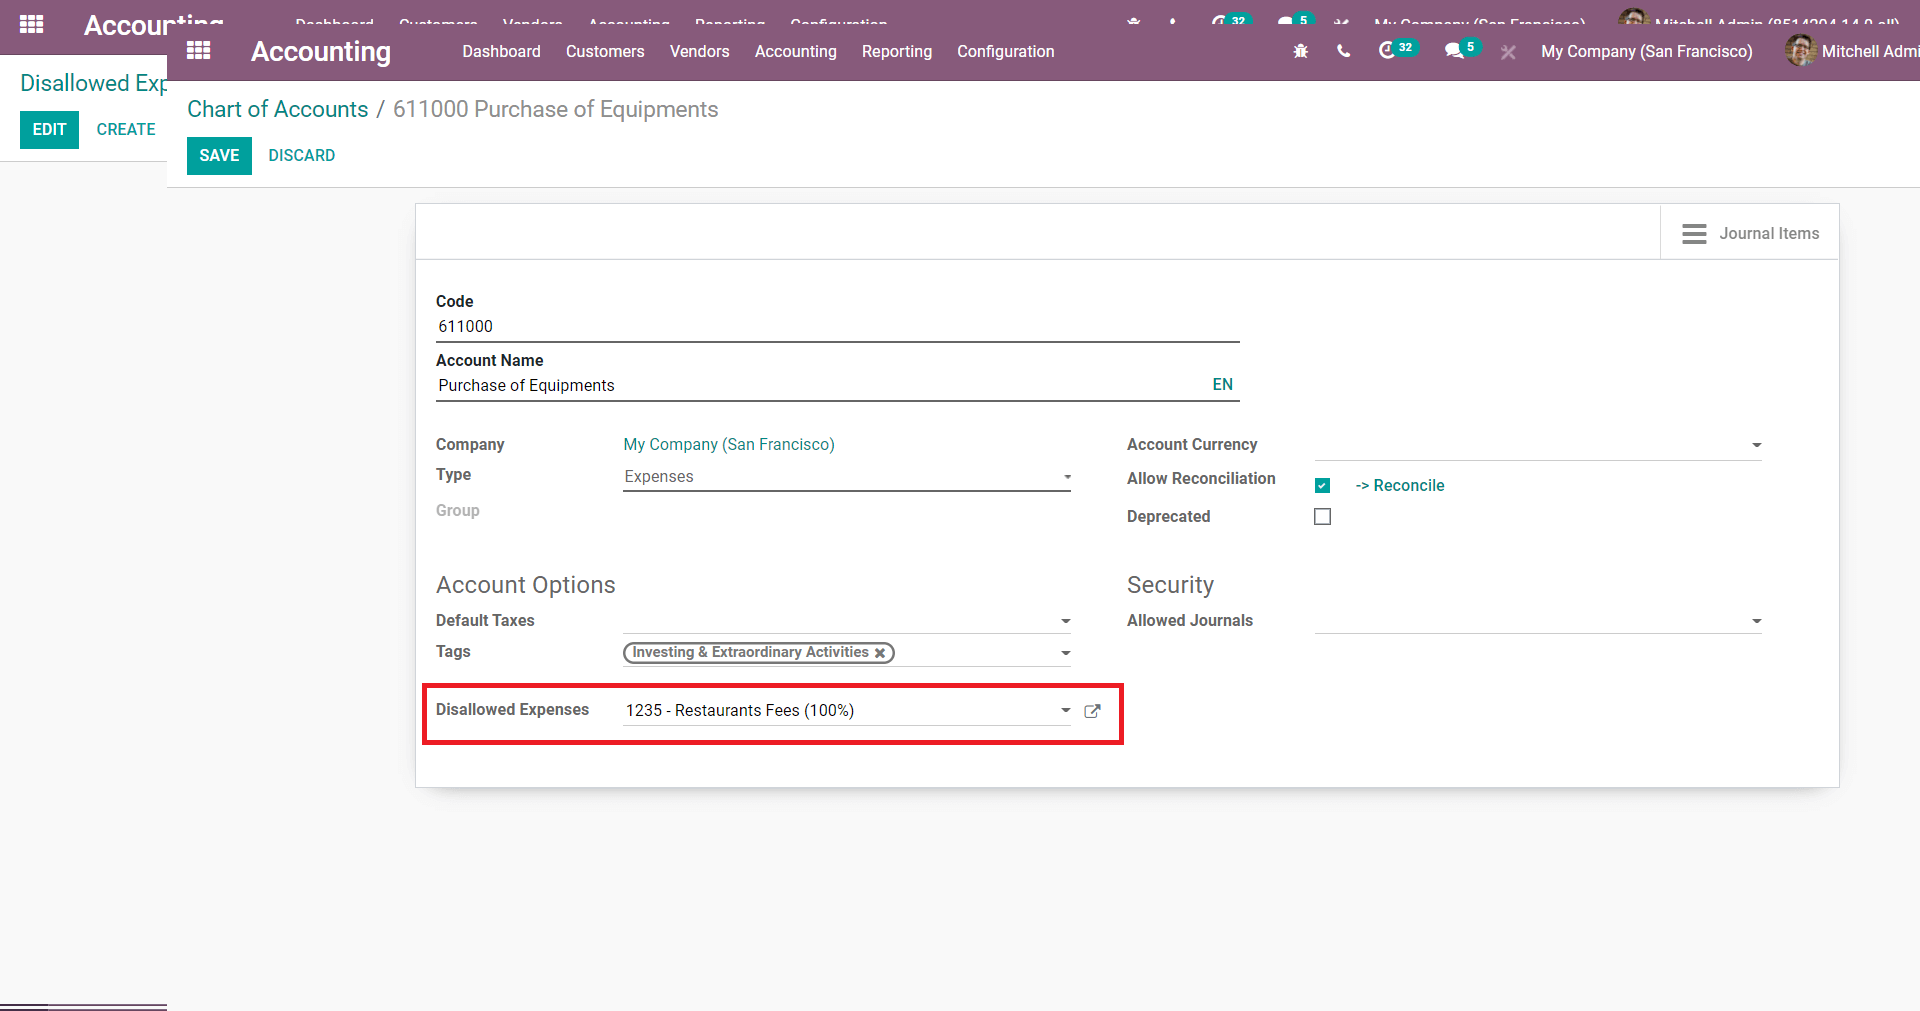
For linking the disallowed expenses category with an expense account(Chart of account) here you can link the disallowed expense category with an expense account, in the window you can see an option for disallowed expenses. Now add the created disallowed expenses category then it will be linked with the account.
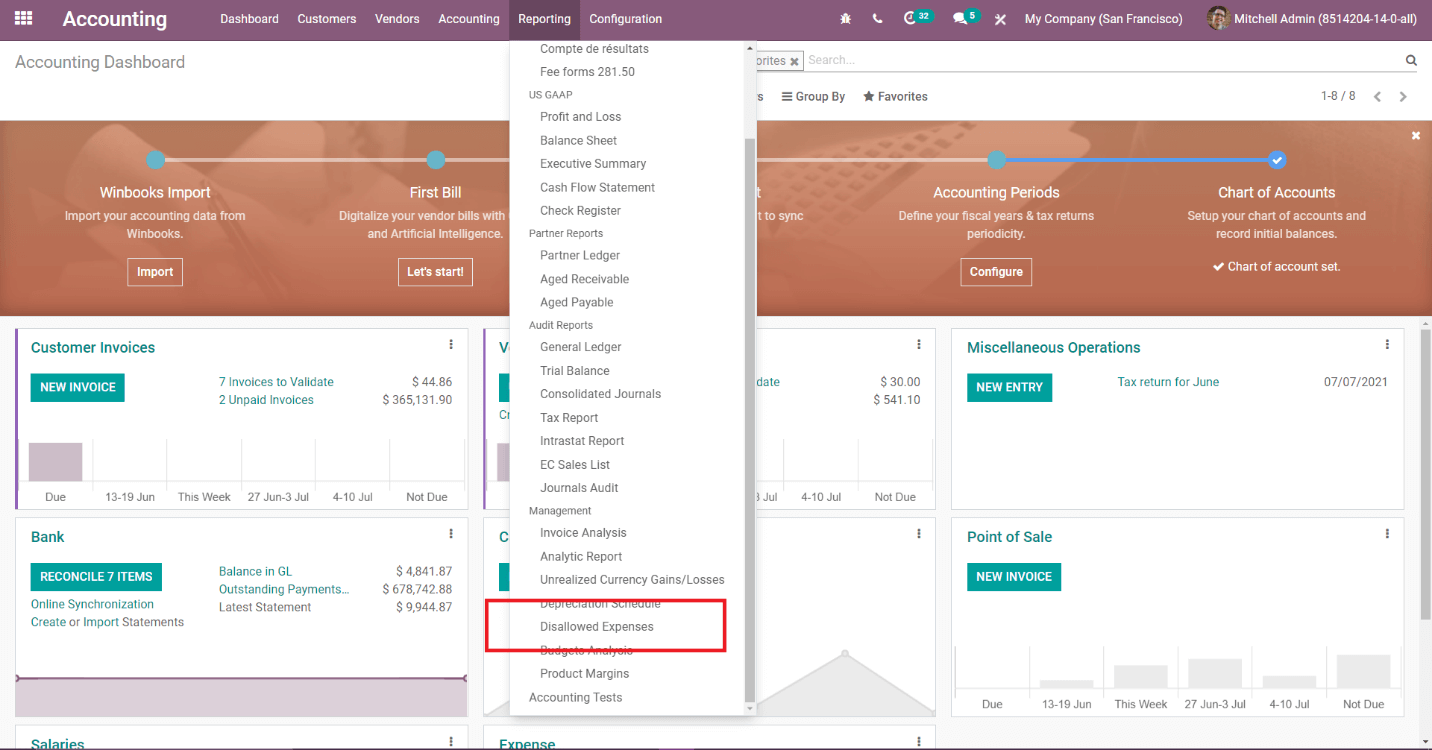
And also we got a new report which is called the disallowed expenses report.
After creating the disallowed expenses category here the disallowed expense category report can be seen in this report all the results of expense categories created when only after linking them with the expense account
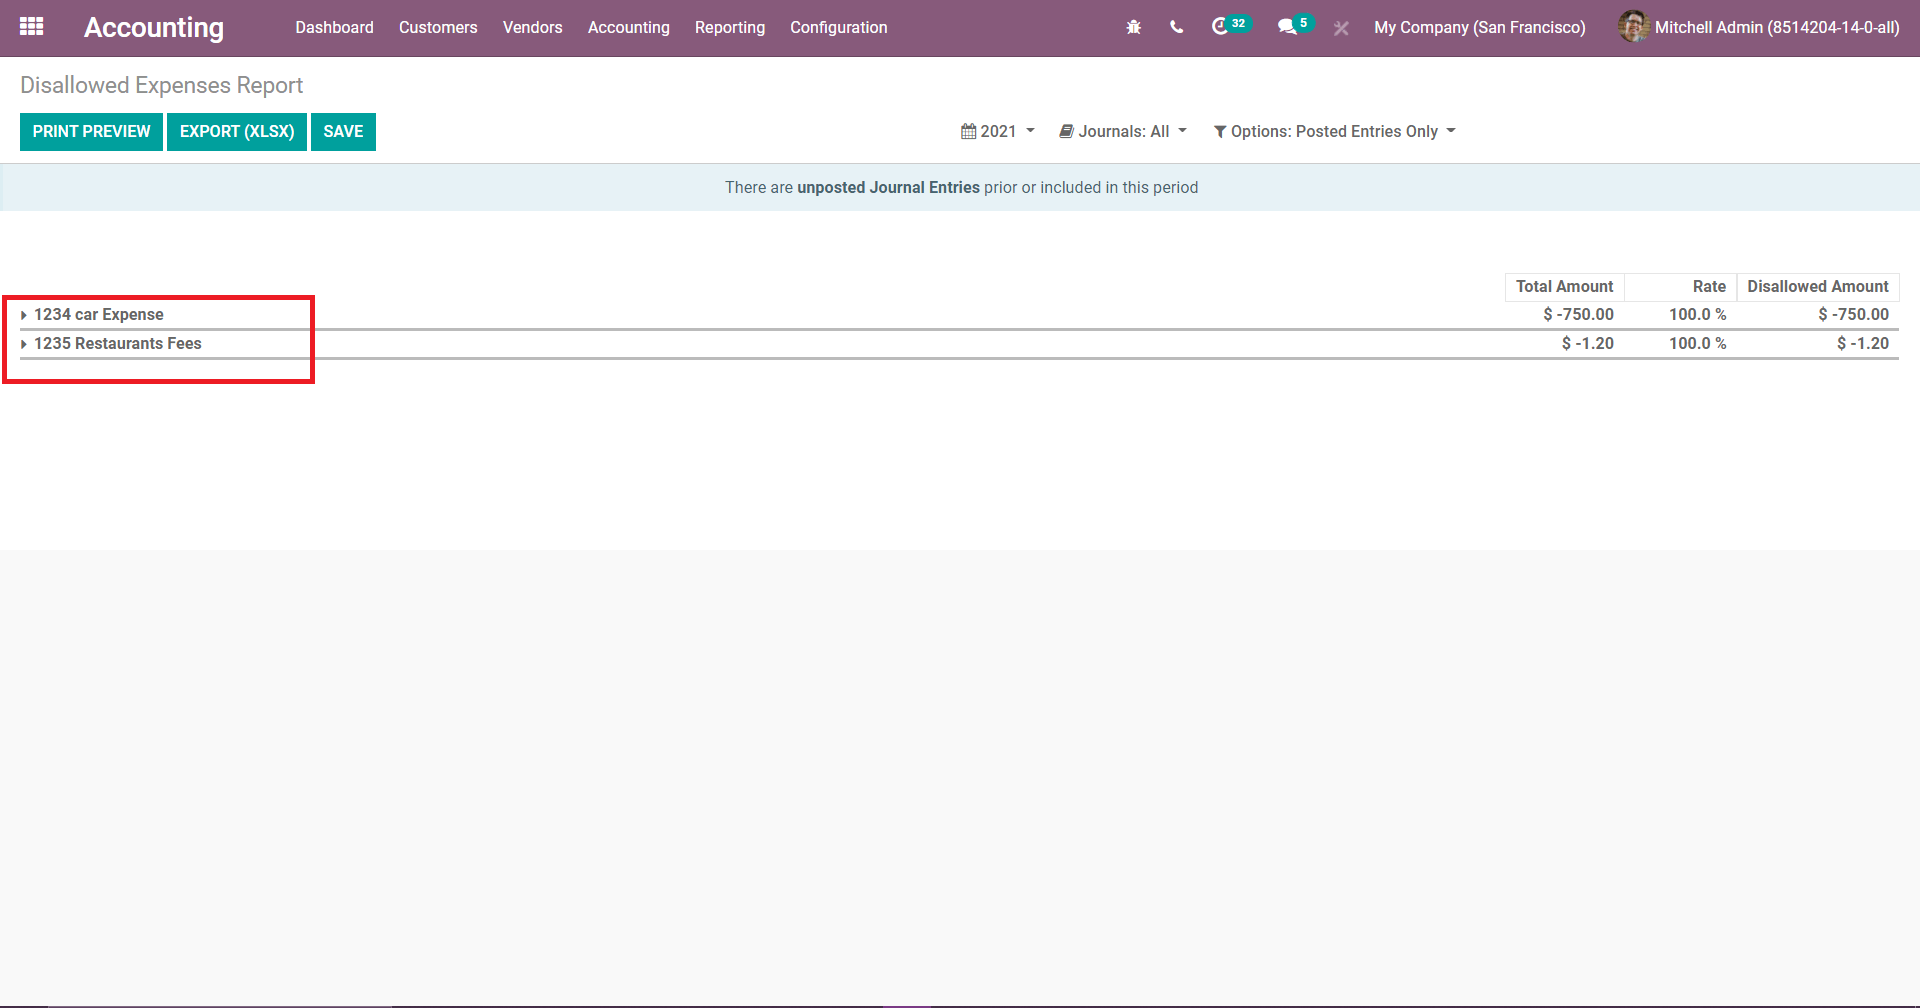
For example, to get one sample entry for the corresponding expense category report, create one purchase bill.
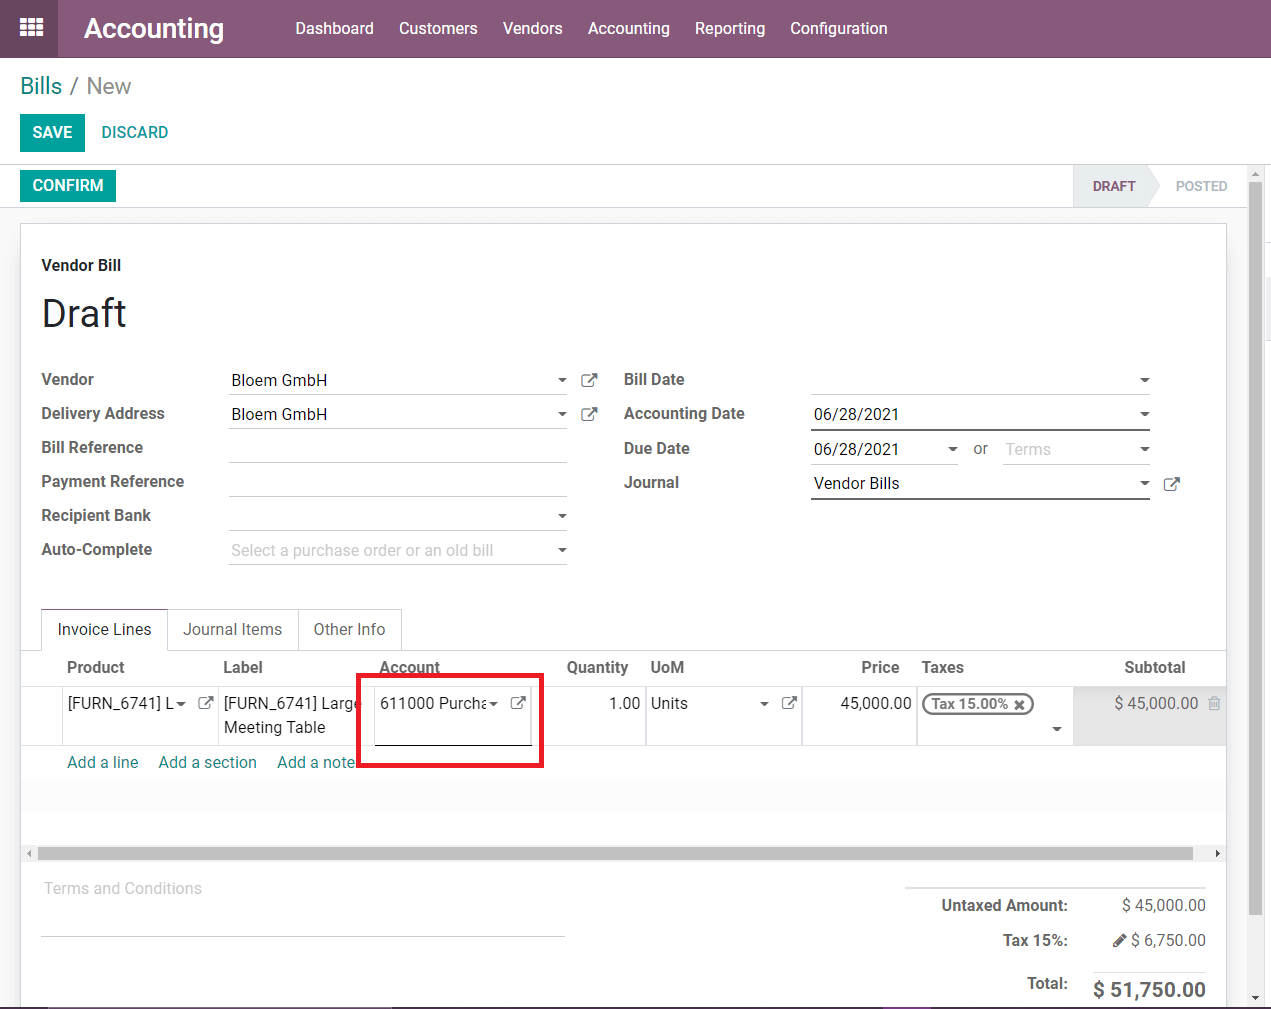
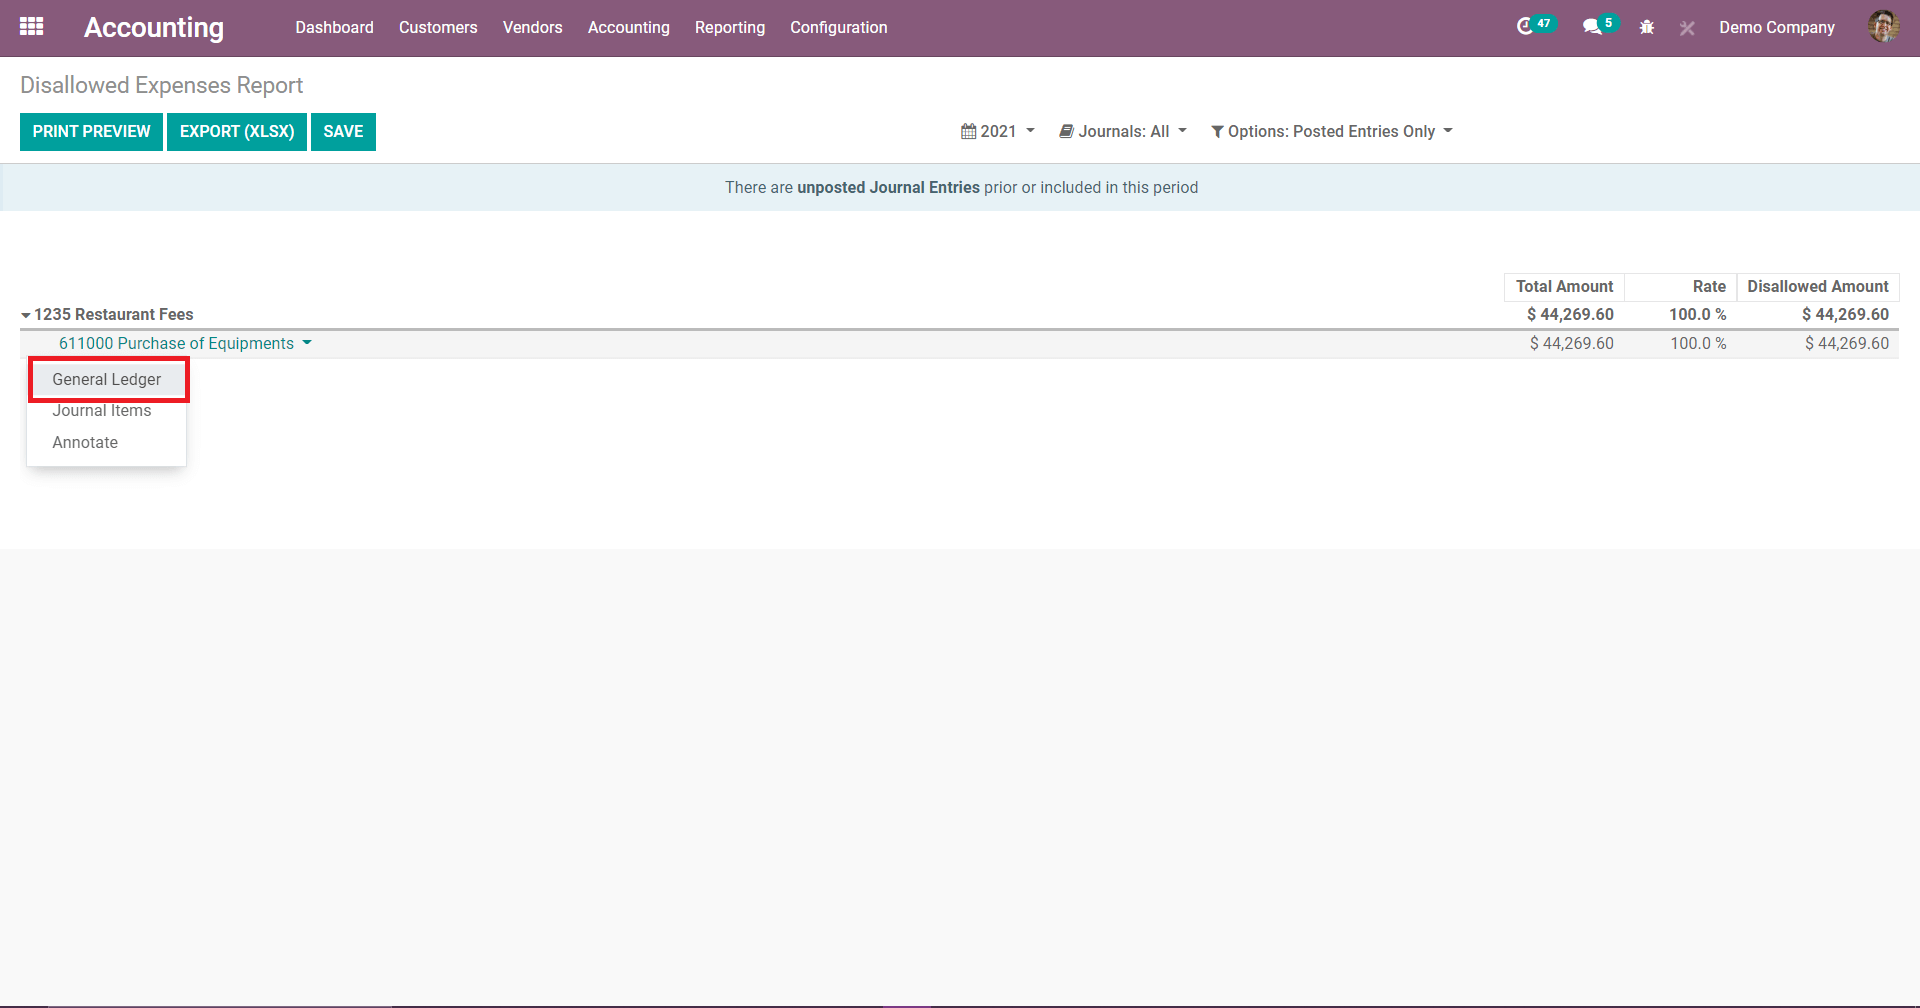
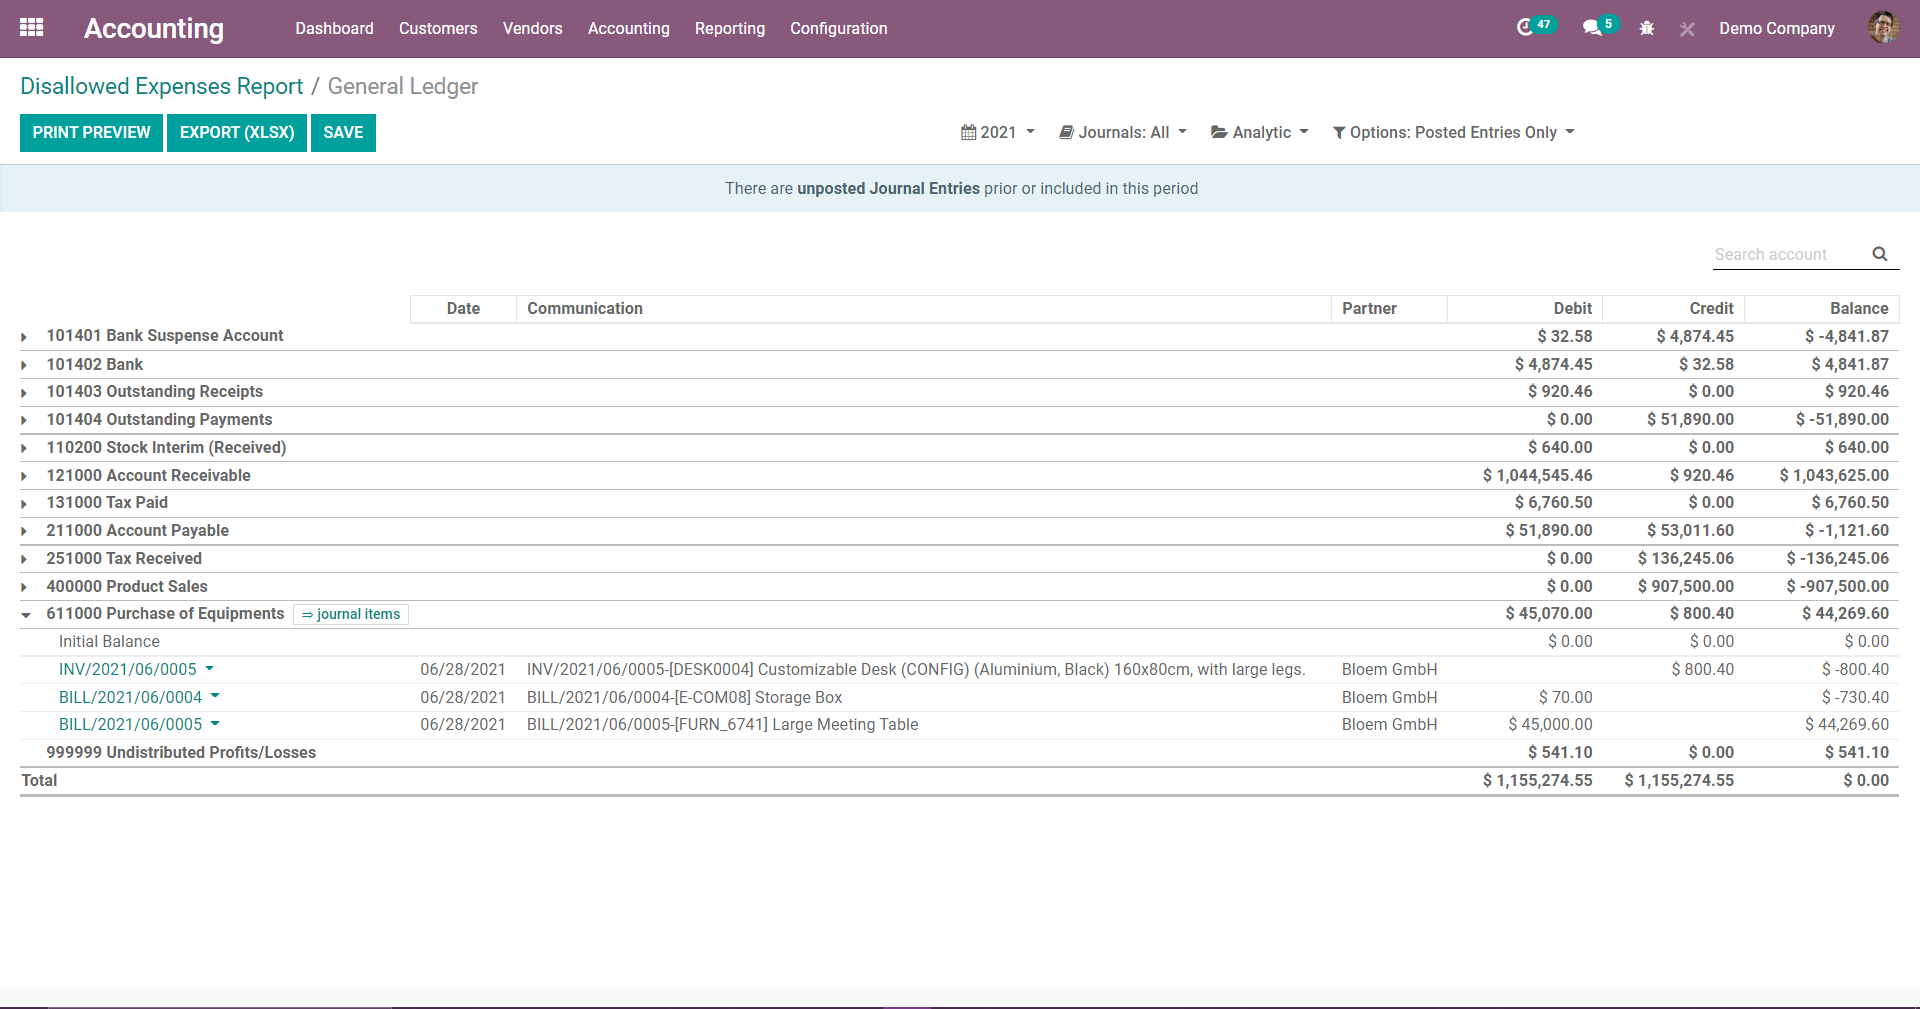
To check the report of the disallowed expenses goes to Reporting-> Disallowed expenses Here you can see the disallowed expense category that you have added, unfold it to see the General ledger with the journal items. If any expense product is created or any journal entry under these expense accounts then only you can see the report on the disallowed expense report.
digitalization allows to scan the physical bill and hence to create the soft bill corresponding to it in the system. This will reduce the time complexities of creating individual bills.
For setting up the Bill digitalization you have to go to Accounting ? Settings ? Bill Digitalization and choose whether the bills should be processed automatically or manually.
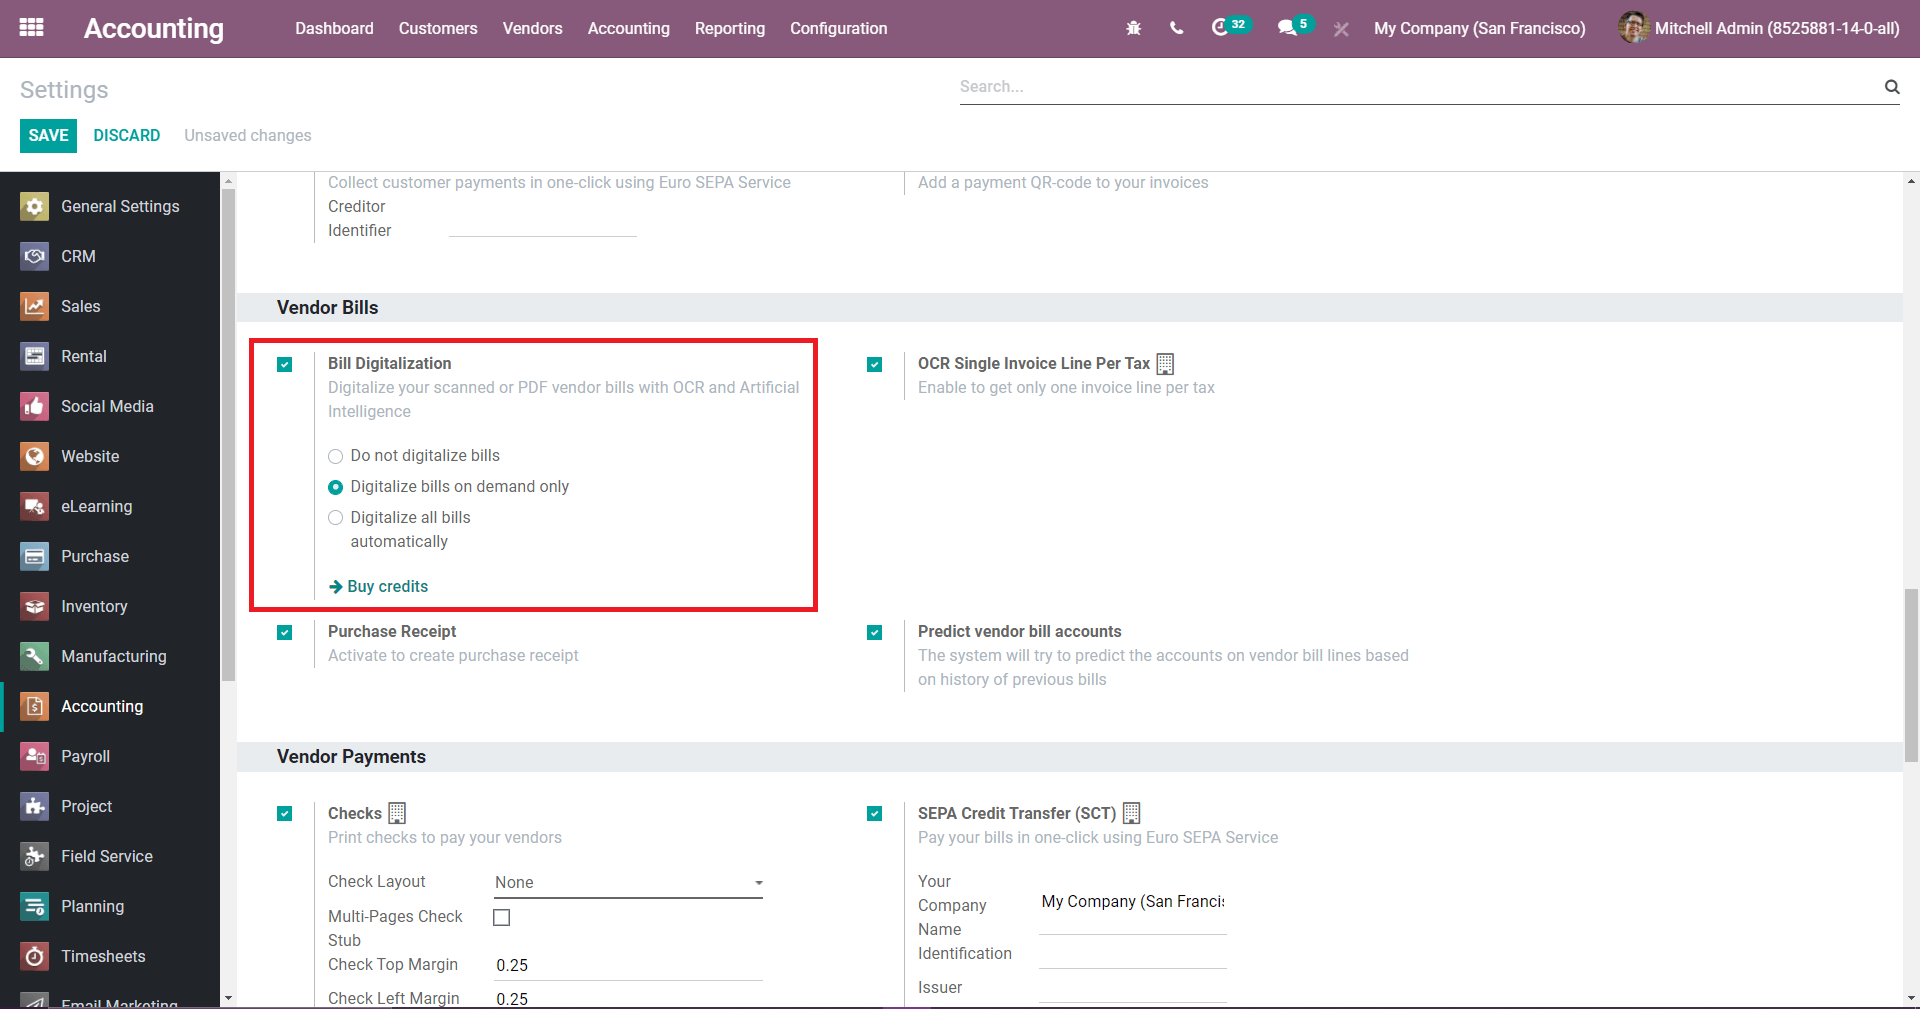
After enabling these features scan your bills and then go to Accounting ? Vendors ? Bills and upload your document. Based on your configuration, it either processes the documents automatically, or you need to click on Send for Digitalization to do it manually. Once the data is extracted from the PDF, you can correct it if necessary by clicking on the respective tag (available in Edit mode), and selecting the right information instead.
The Bill Digitalization is an In-App Purchase (IAP) service that requires prepaid credits to work. Digitalizing one document consumes one credit. To buy credits, go to Accounting ? Configuration ? Settings ? Bill Digitalization and click on Buy credits, or go to Settings ? Odoo IAP and click on View My Services.
Payment Refactoring
Payment Refactoring is the latest feature added in Odoo 14 Accounting. The user can update the balance sheet in real-time and synchronize it with bank statements. Now In Bank/Cash Journal, you can set a suspense account that will help keep track of the real-time bank transactions. Using this users can maintain a relation between bank account and balance sheet. From the moment you synchronize with their bank, it will import all the bank transactions i.e. they are immediately posted and the bank account is immediately updated on the balance sheet. Suspense accounts will be automatically updated as soon as the user reconciles their bank entries.
Odoo has added new Payment transfer accounts in its v14 accounting module, and they are Incoming Payments and Outgoing Payments. Create a bank journal with a suspense account, so the suspense account bank statement transactions will be posted on the suspense account until the final reconciliation allows finding the right account.
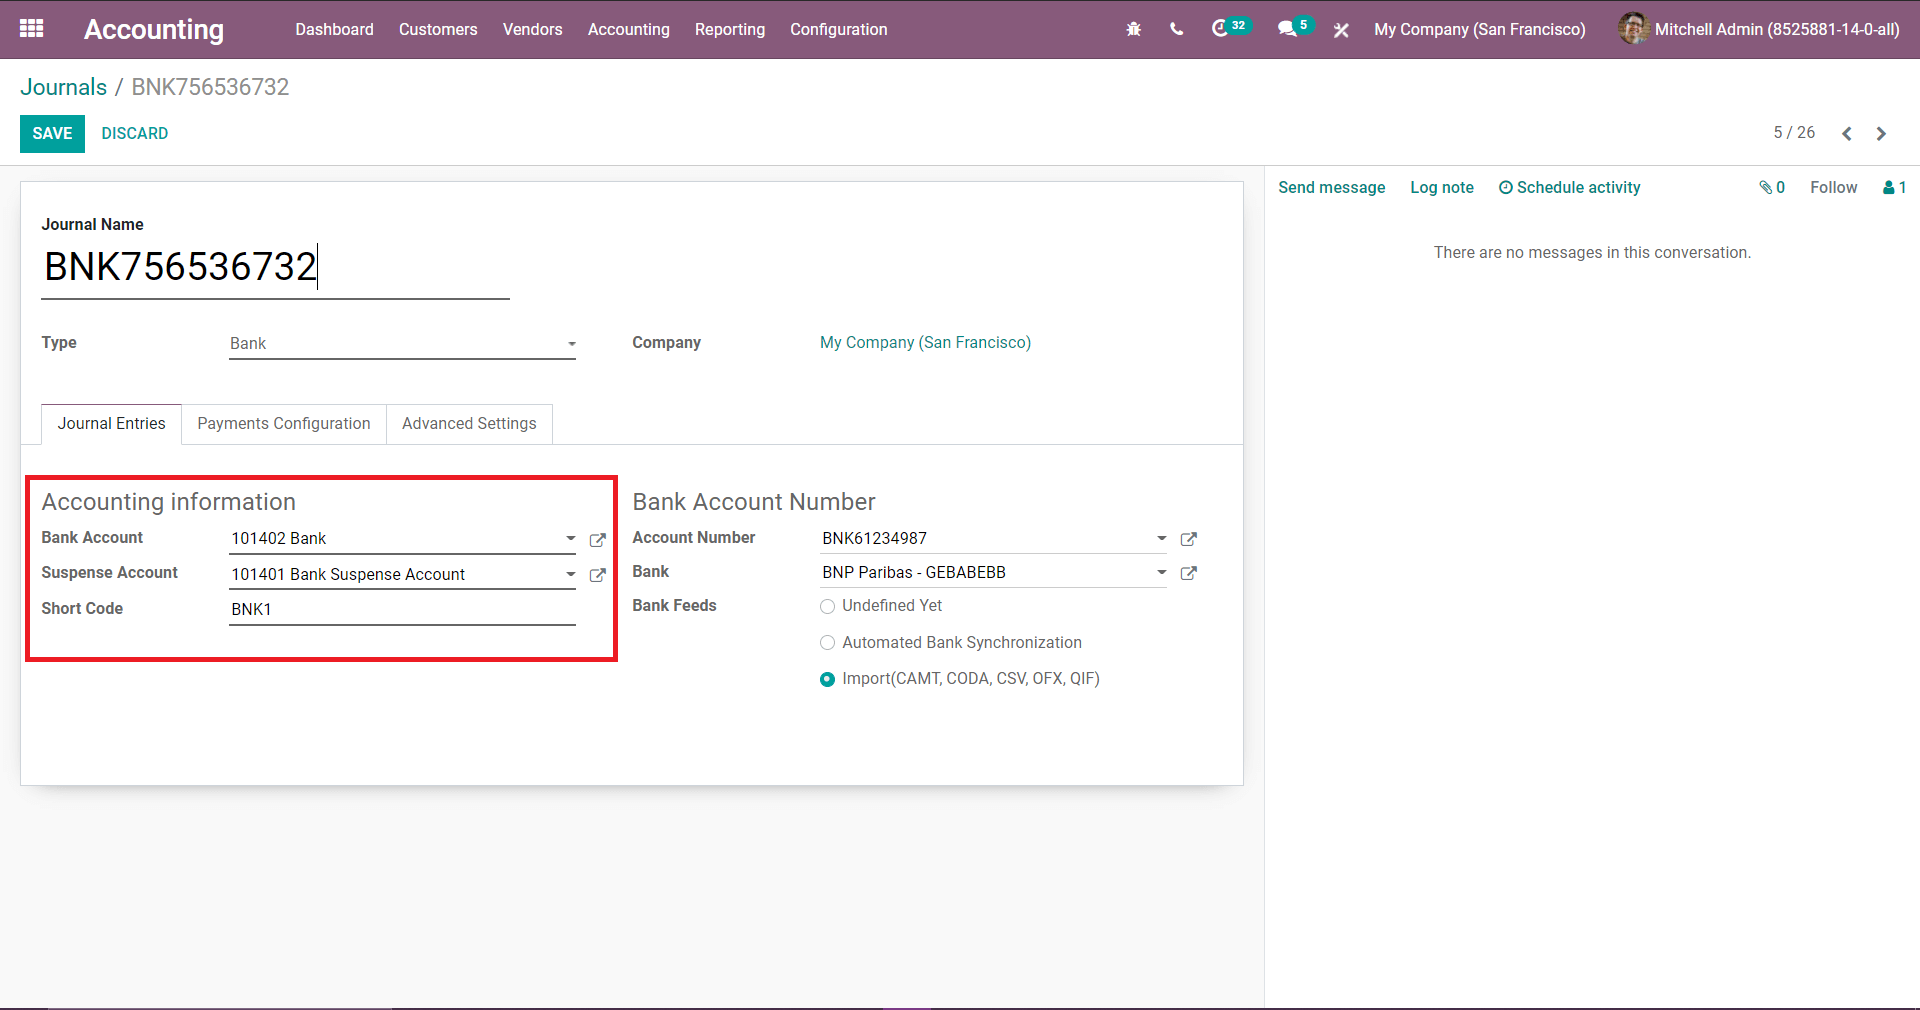
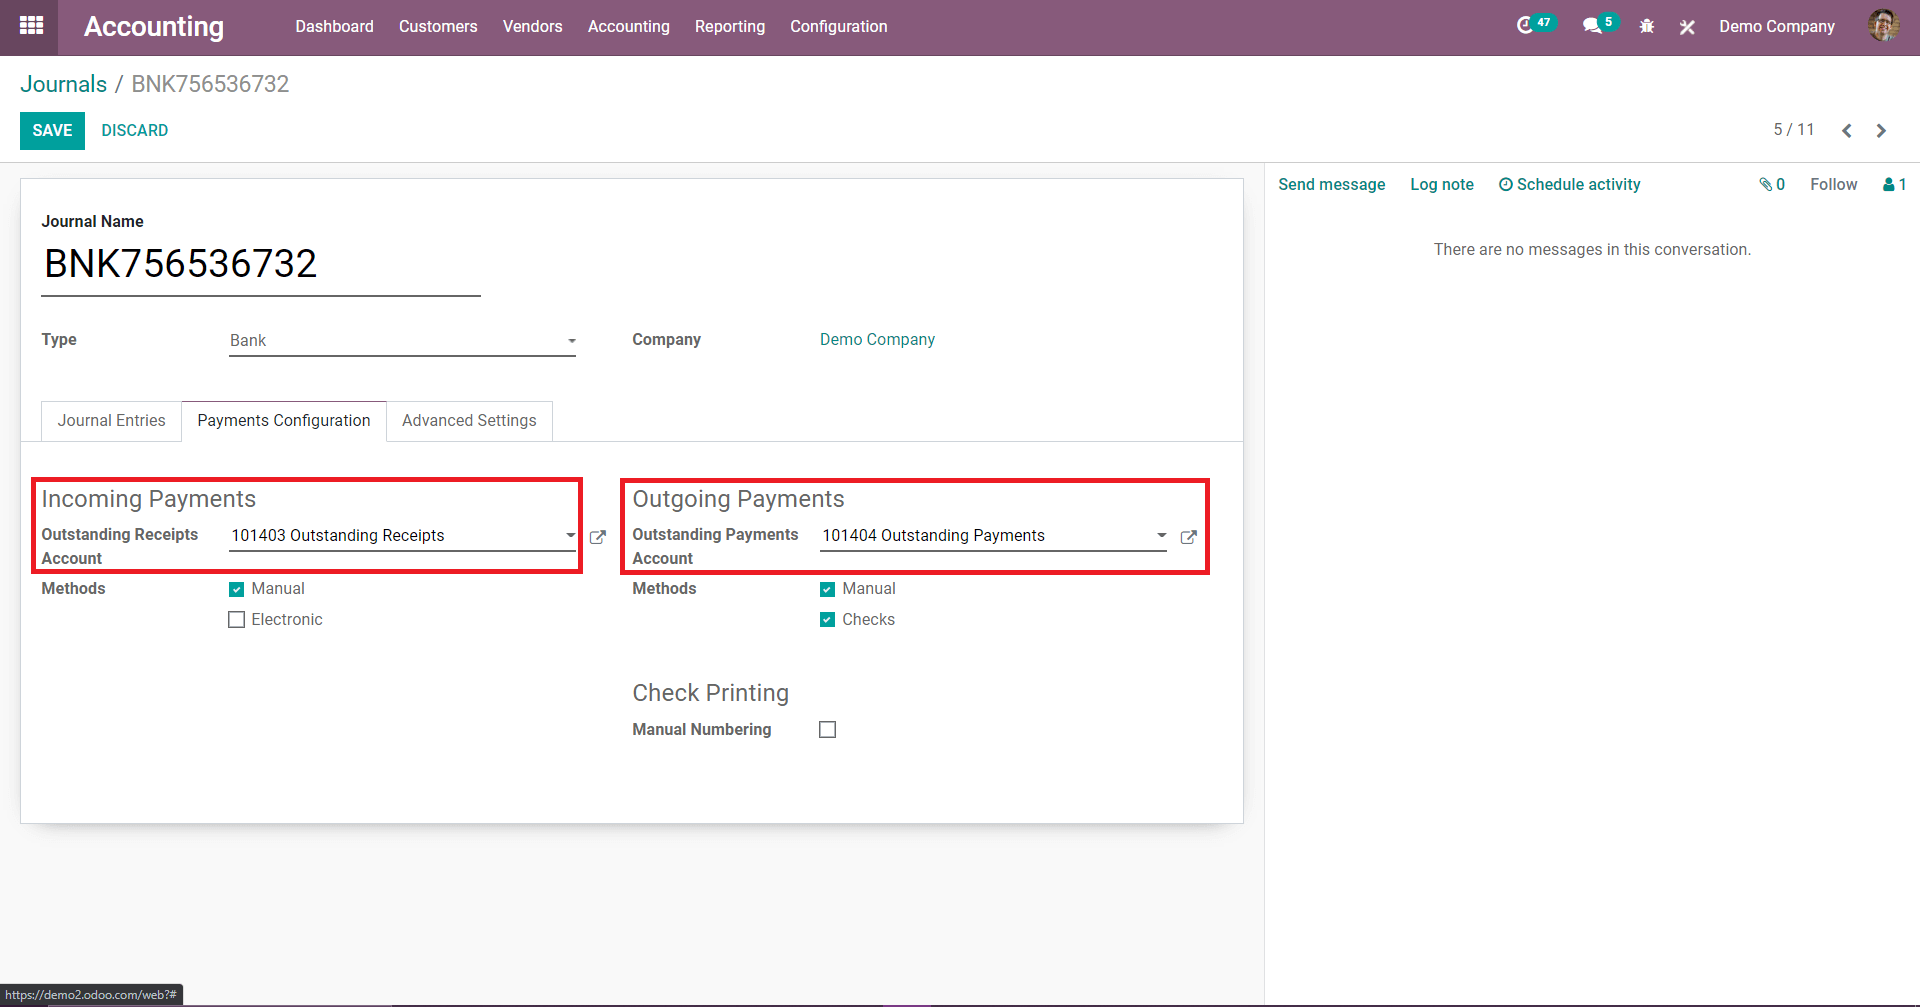
There is another tab on the created bank journal called payment configuration, where you can check the accounting information for the Incoming payments and outgoing payments.
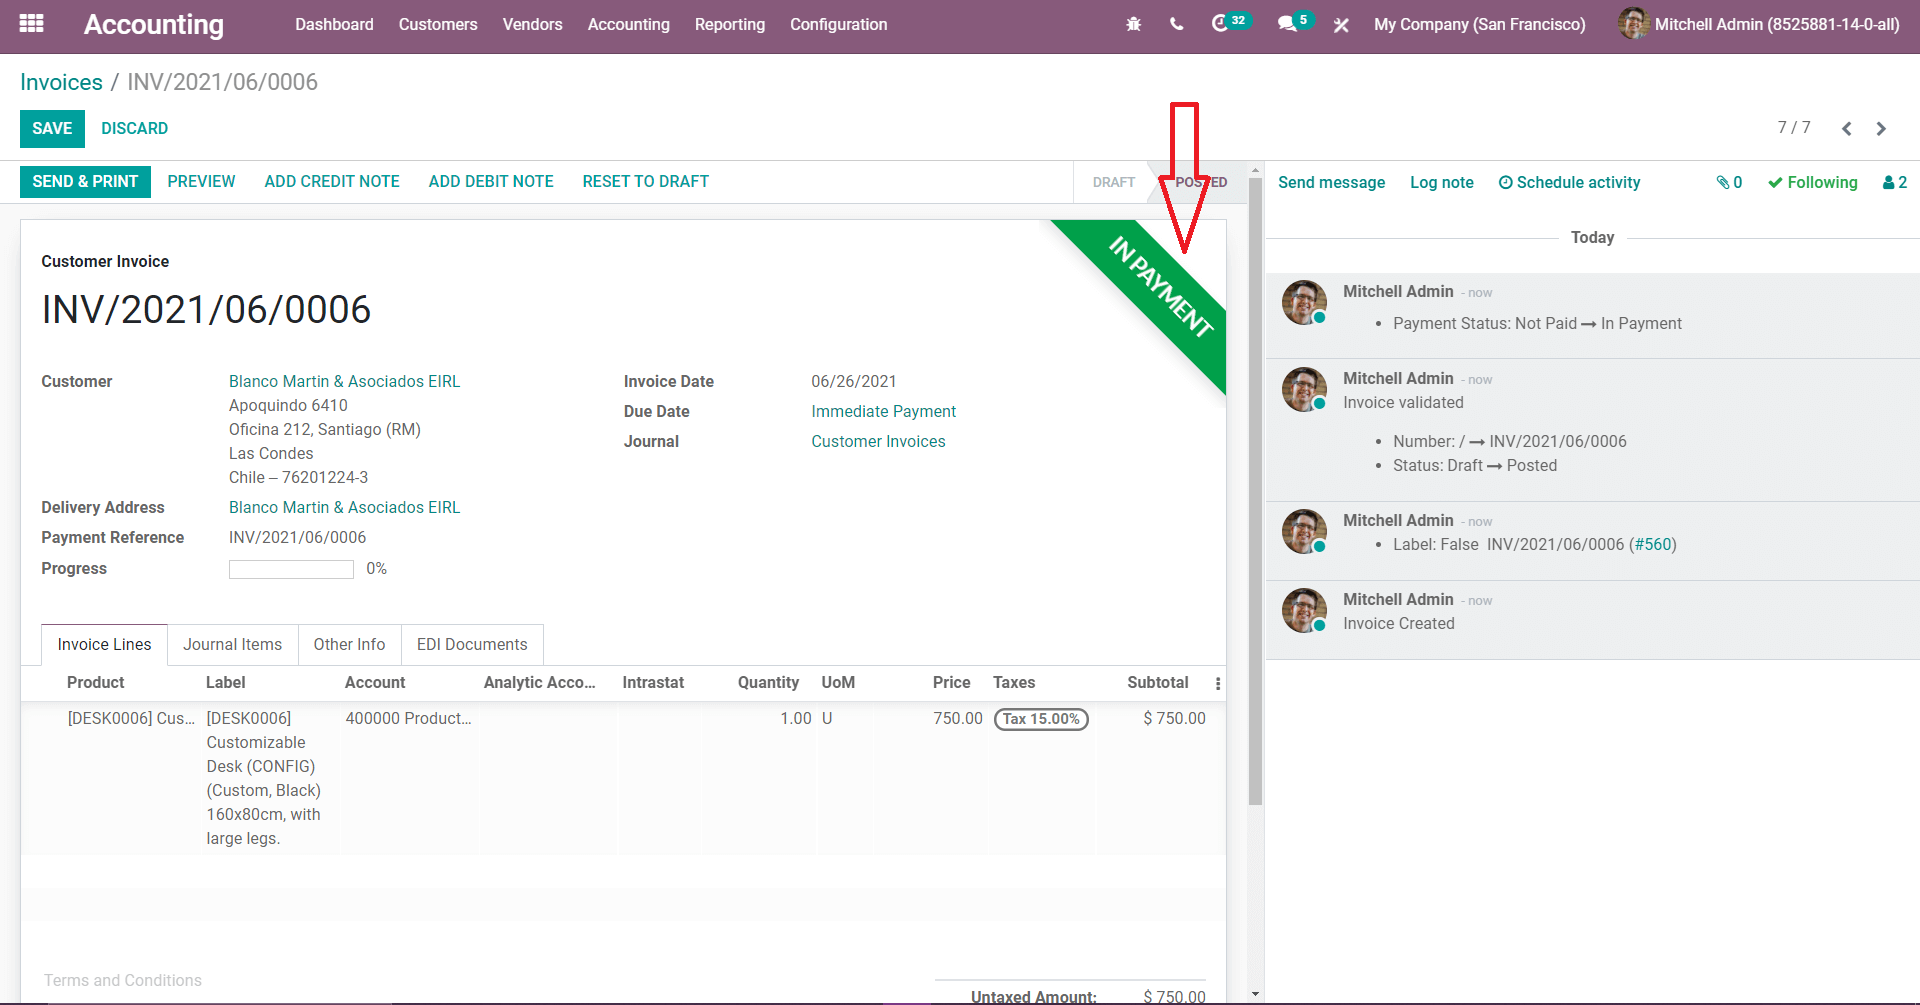
For payment refactoring let us create a customer invoice, after confirming the order make the payment to the suspense account the bank journal has created. After the payment the ribbon which is in INPAYMENT this is because the reconciliation is not done the payment is done but have to reconcile the invoice with the bank. Without reconciling, when you go to a bank and cash journal you can see that the amount is debited in outstanding receipts accounts.
From the dashboard, there can find the bank journal lets click create to create the statement. Add the reference, and add the transitions like date, label, partner, and the total amount that you want to reconcile. Edit the ending balance and save it.
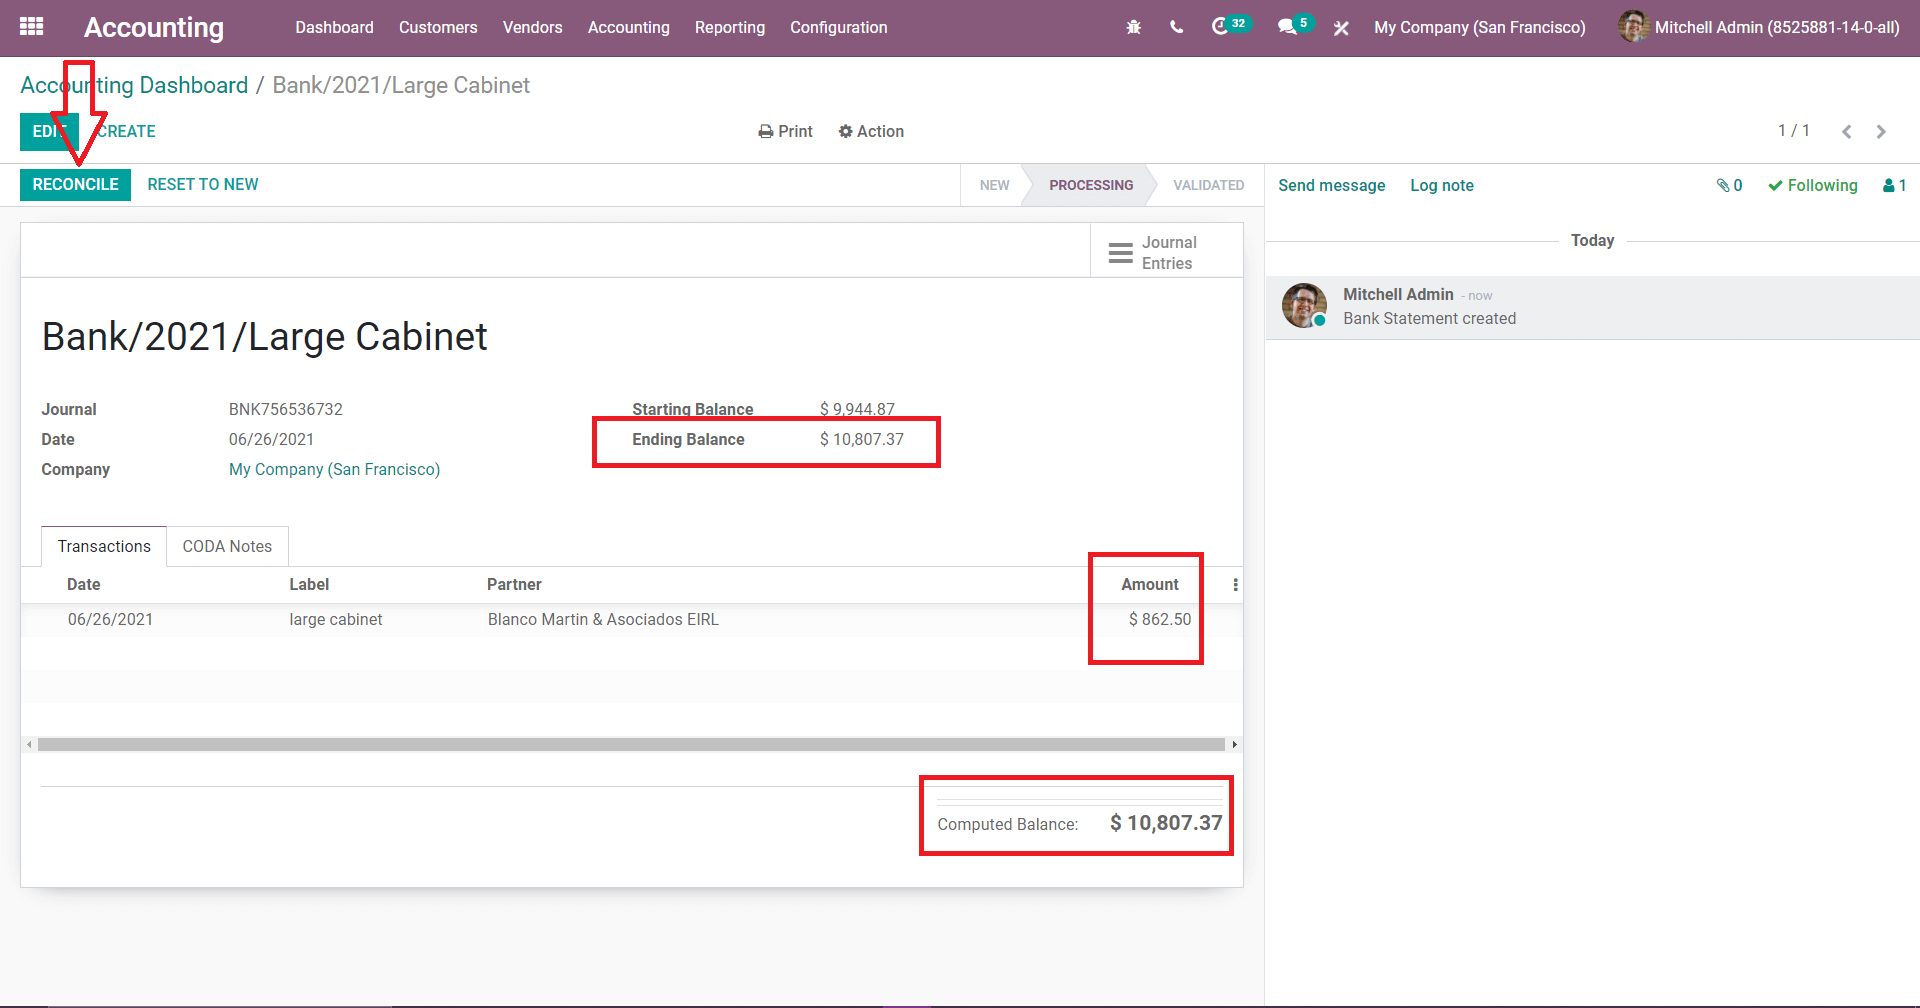
After posting and reconciling here you can see that the line is added, that is the bank customer payment invoice number and amount then just click on validate to validate this so the reconciliation is done.
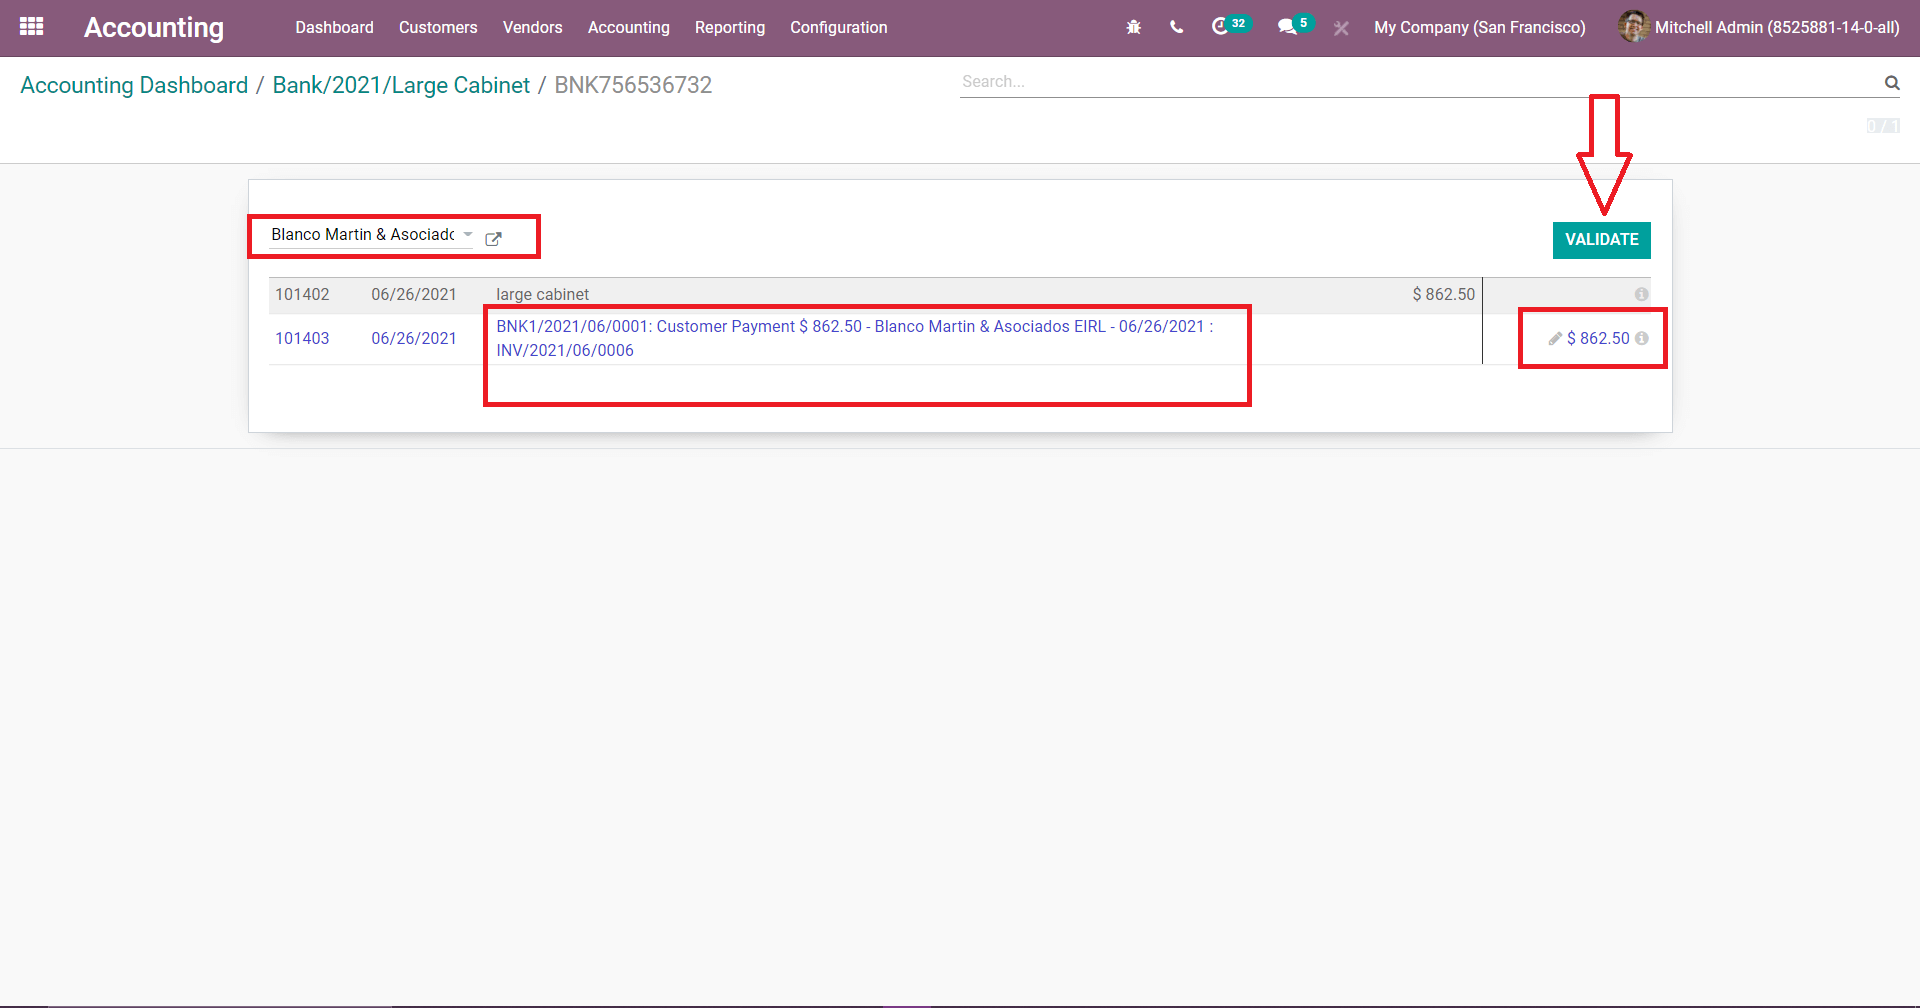
After completing those processes, open the customer invoice and see that the ribbon is updated to PAID because the invoice is reconciled with the bank statement.
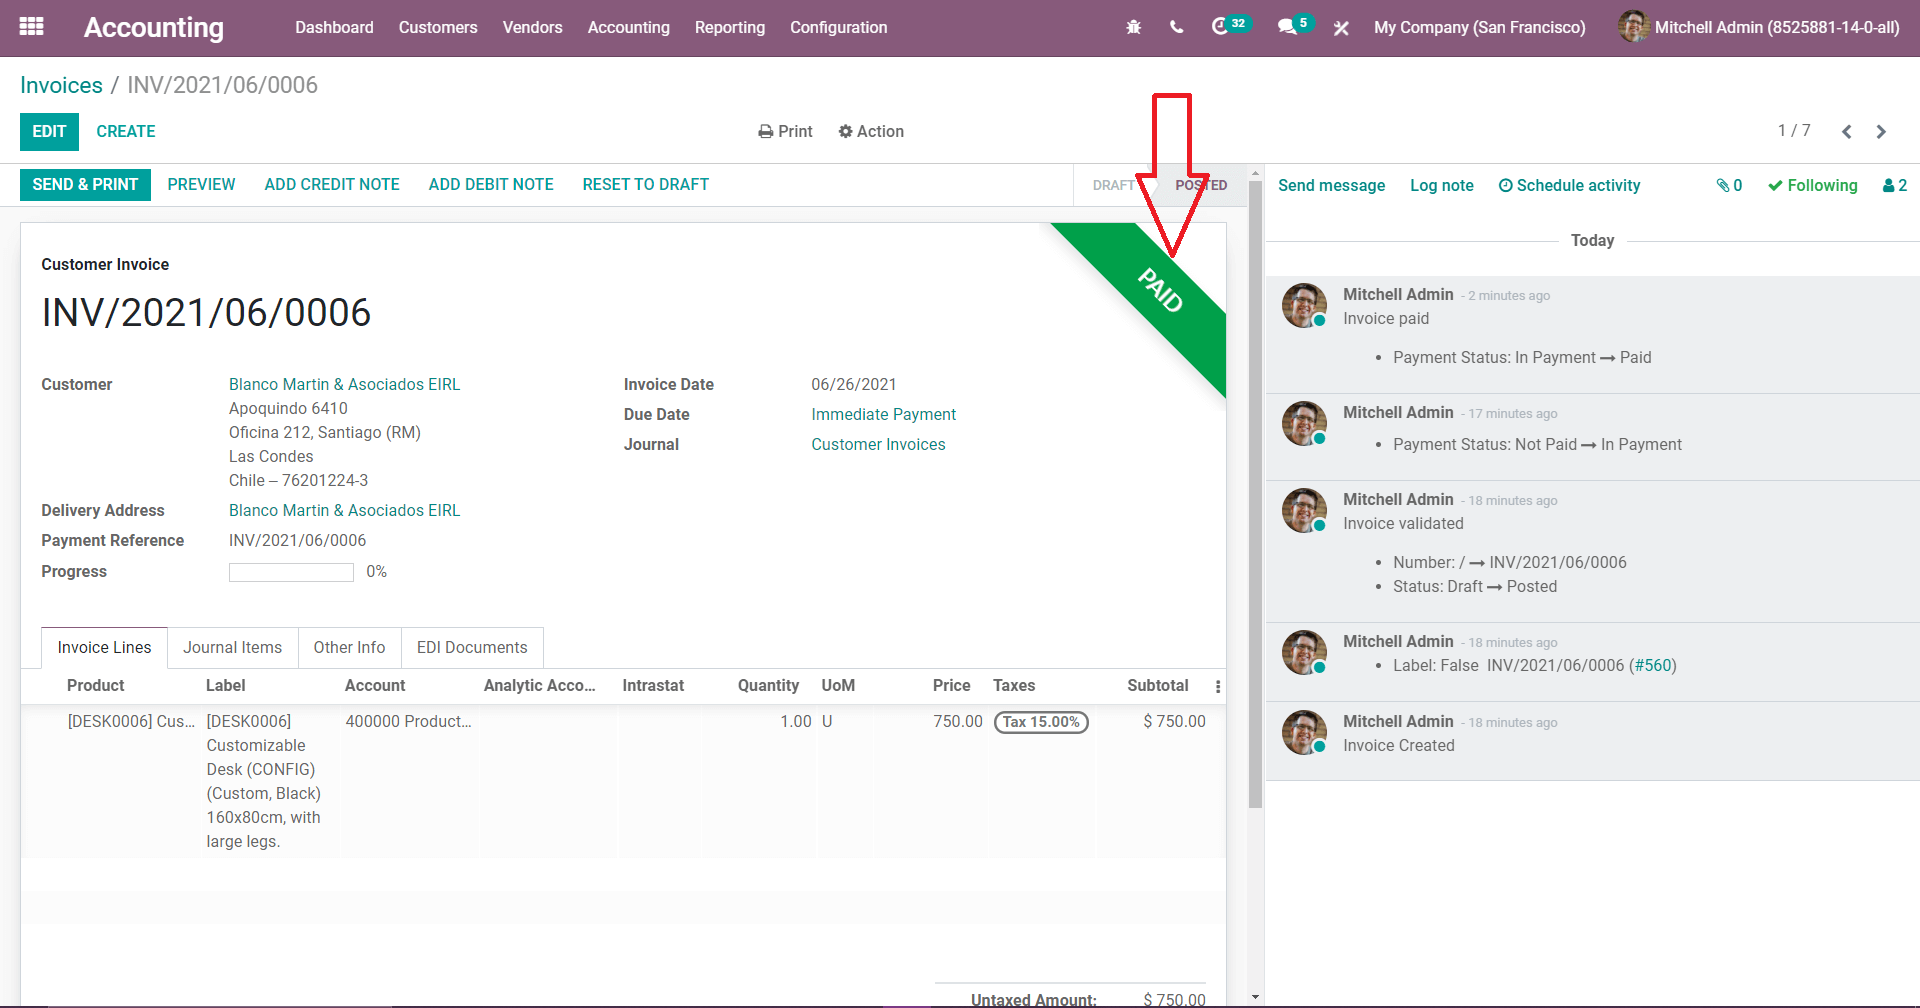
And check the bank and cash journal here to see it is updated to the account and partner, label, debit, credit, and amount.
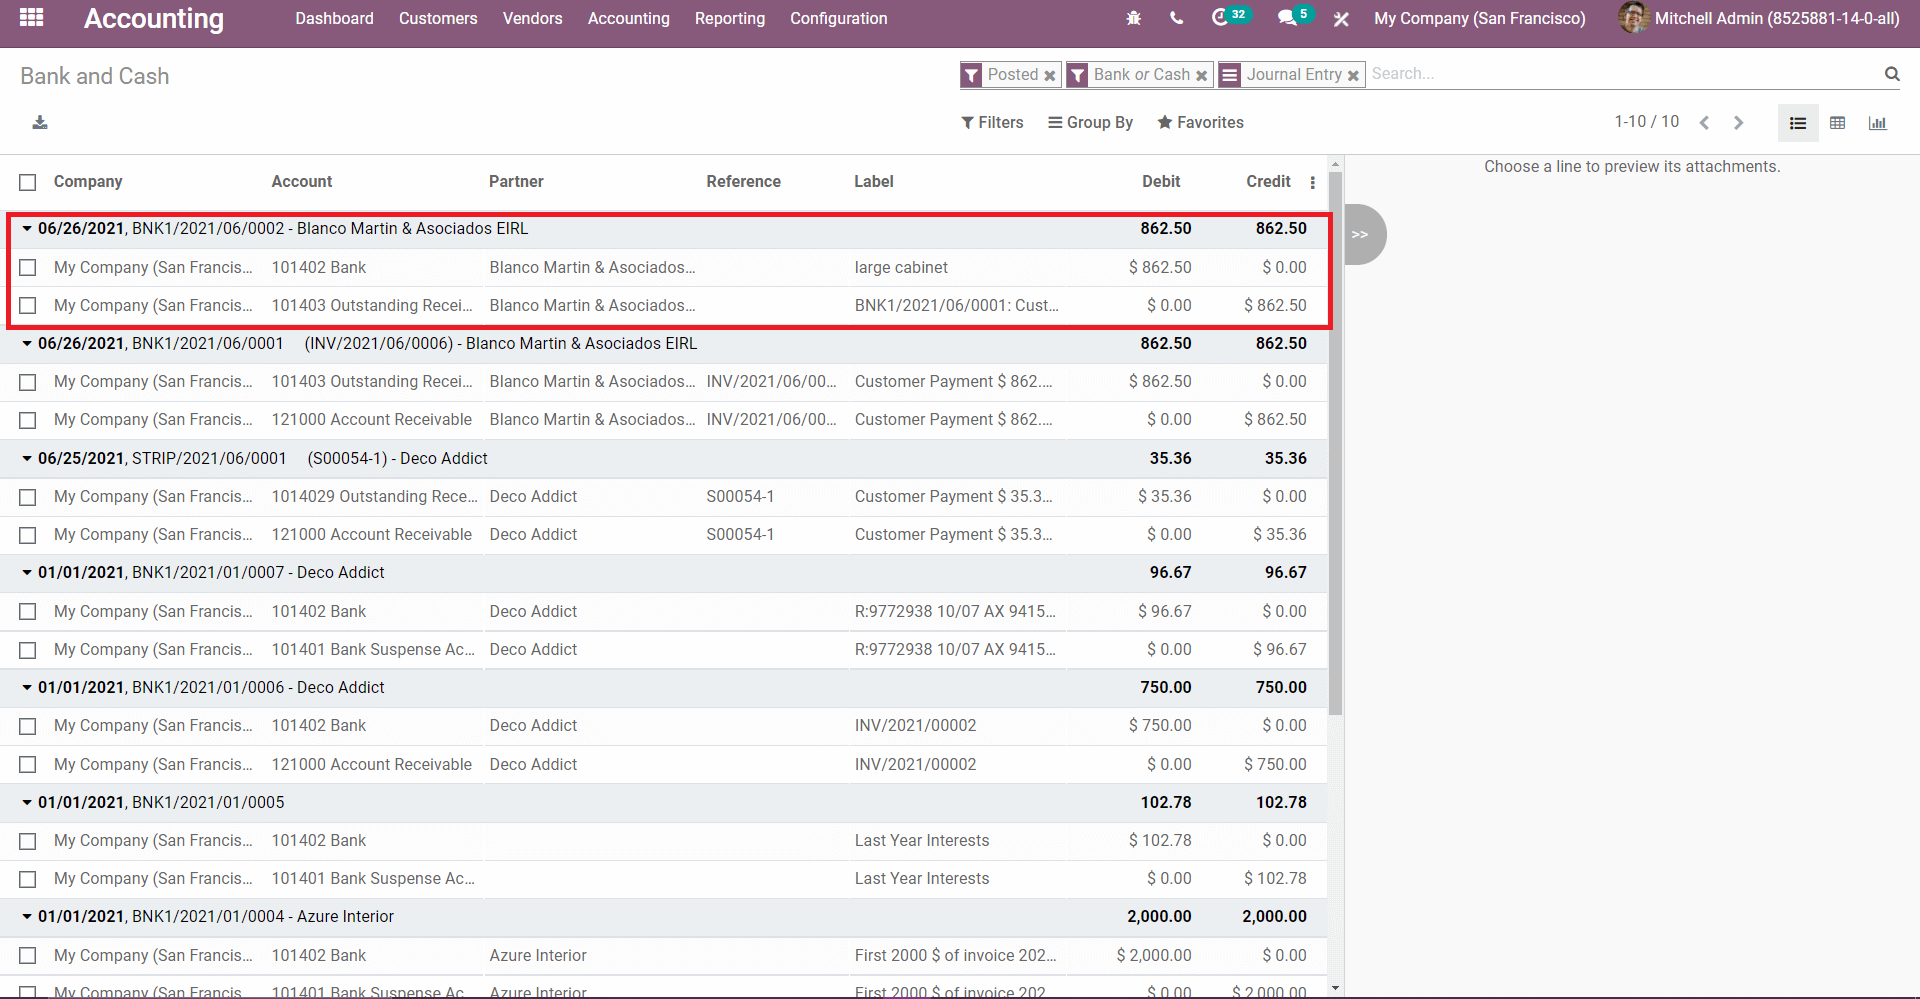
Invoicing Switch Threshold.
Using this Invoicing switching threshold you can start afresh accounting. For example, the posted test entries of the production database can be canceled and its effect on accounts can be eliminated by providing the invoicing switch threshold date.
To accomplish these tasks, the invoicing switch threshold comes in useful. So go to Configuration-> Settings-> invoicing switching threshold and add a date.
Here the date is to start new accounting. Now what will happen means it will cancel all transactions and their corresponding accounting effects in reports.
After that just take a look at the customer invoice, and you can see that the invoices are canceled.
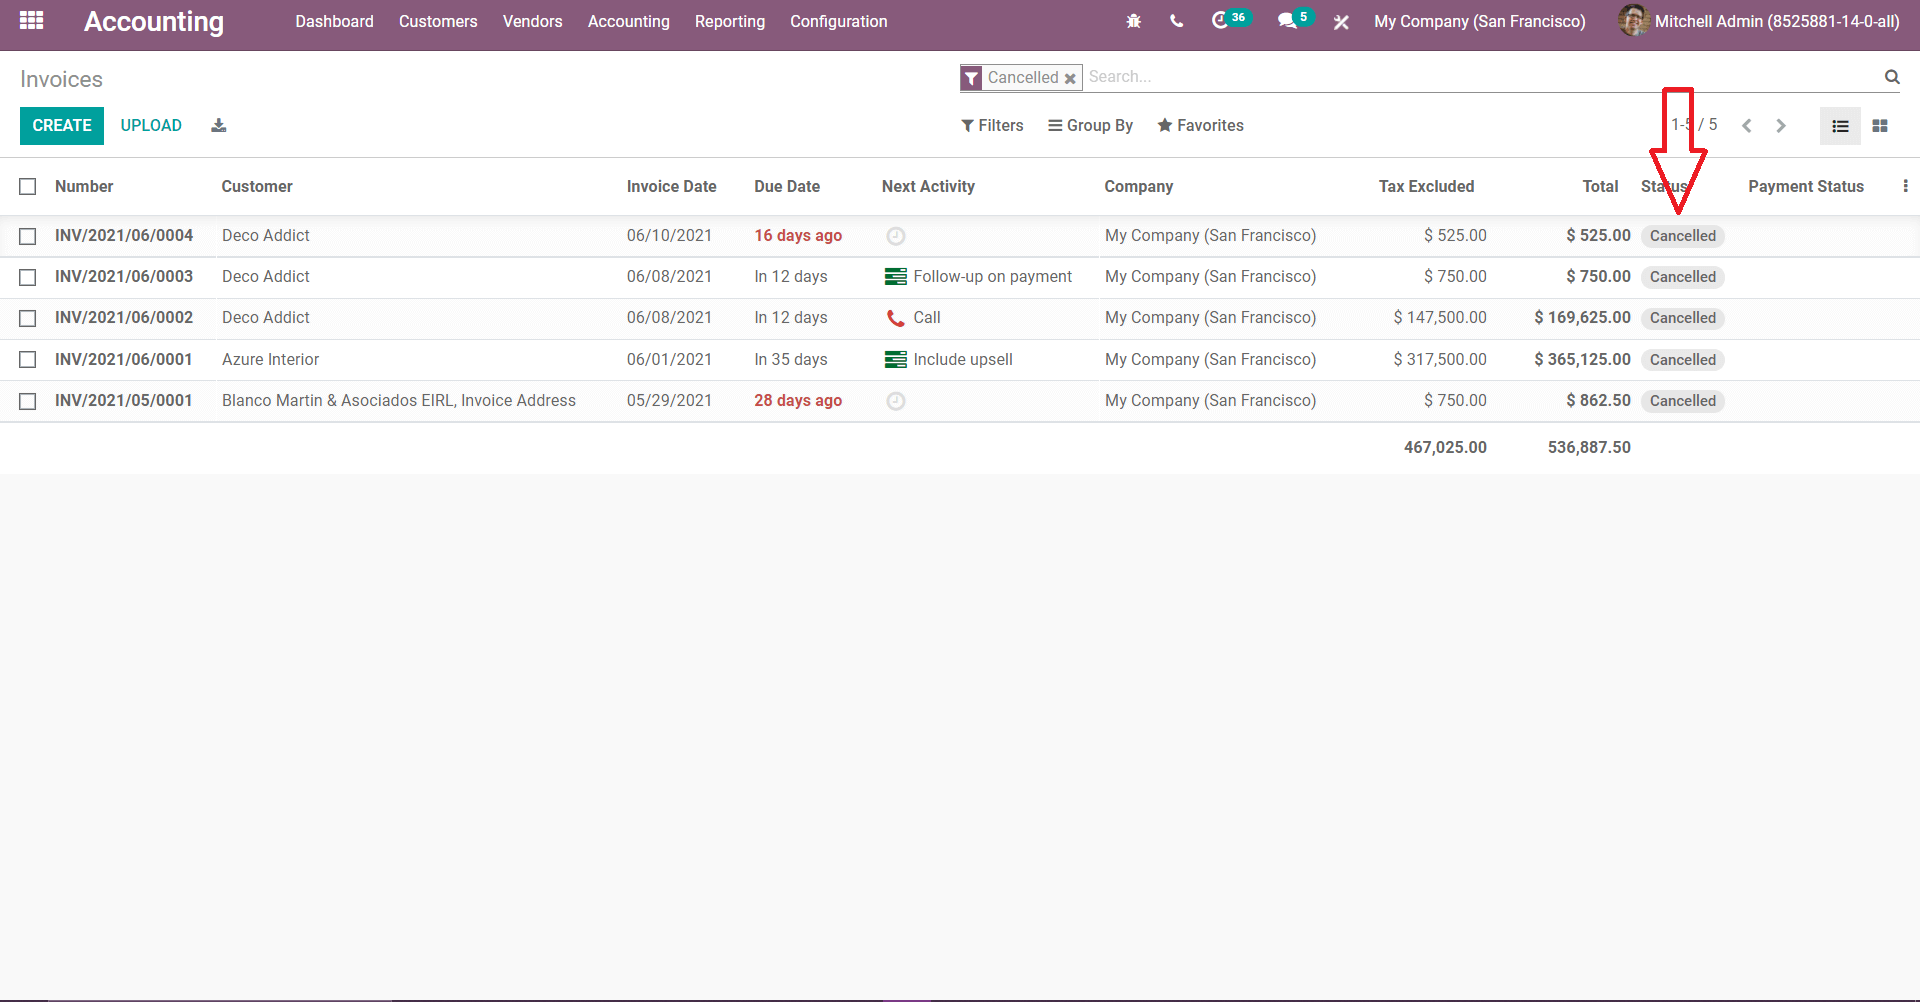
So just open one invoice to see the changes: the invoice state is defined by a new ribbon called INVOICING APP LEGACY has been added, and the vendor bills have been canceled.
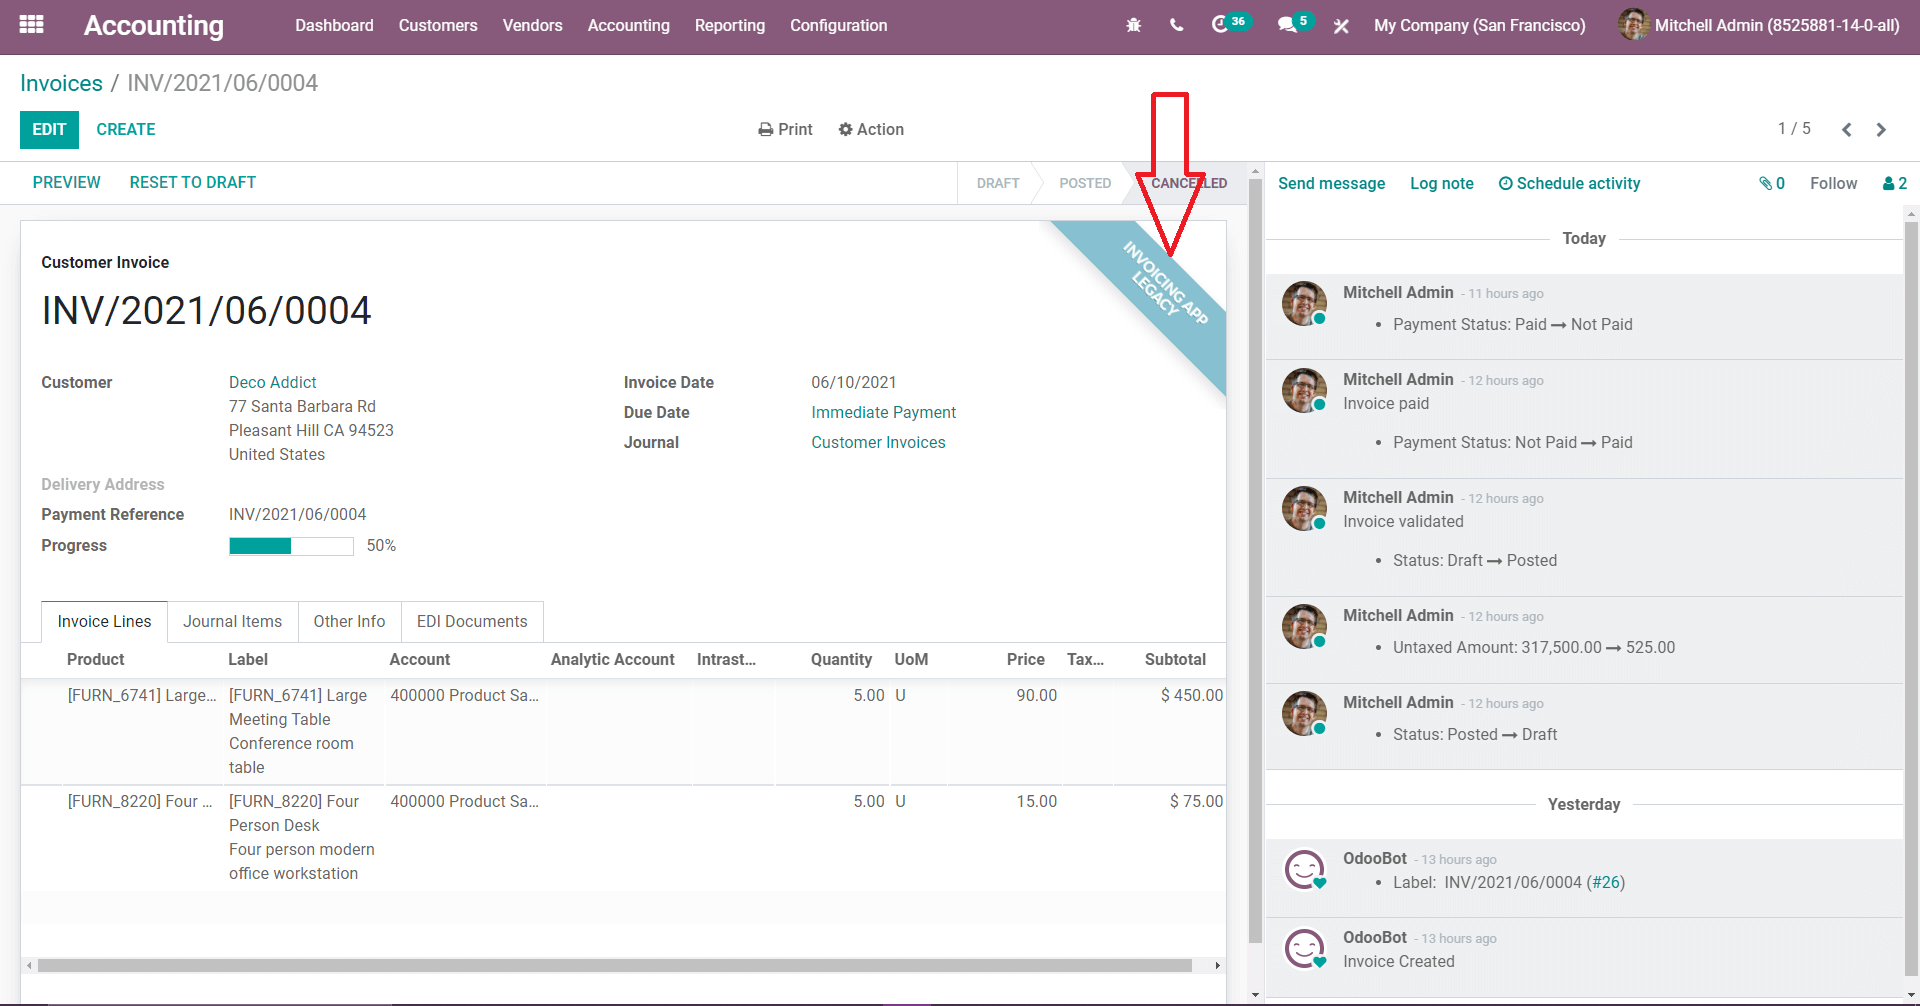
Preview of Accounting Entries
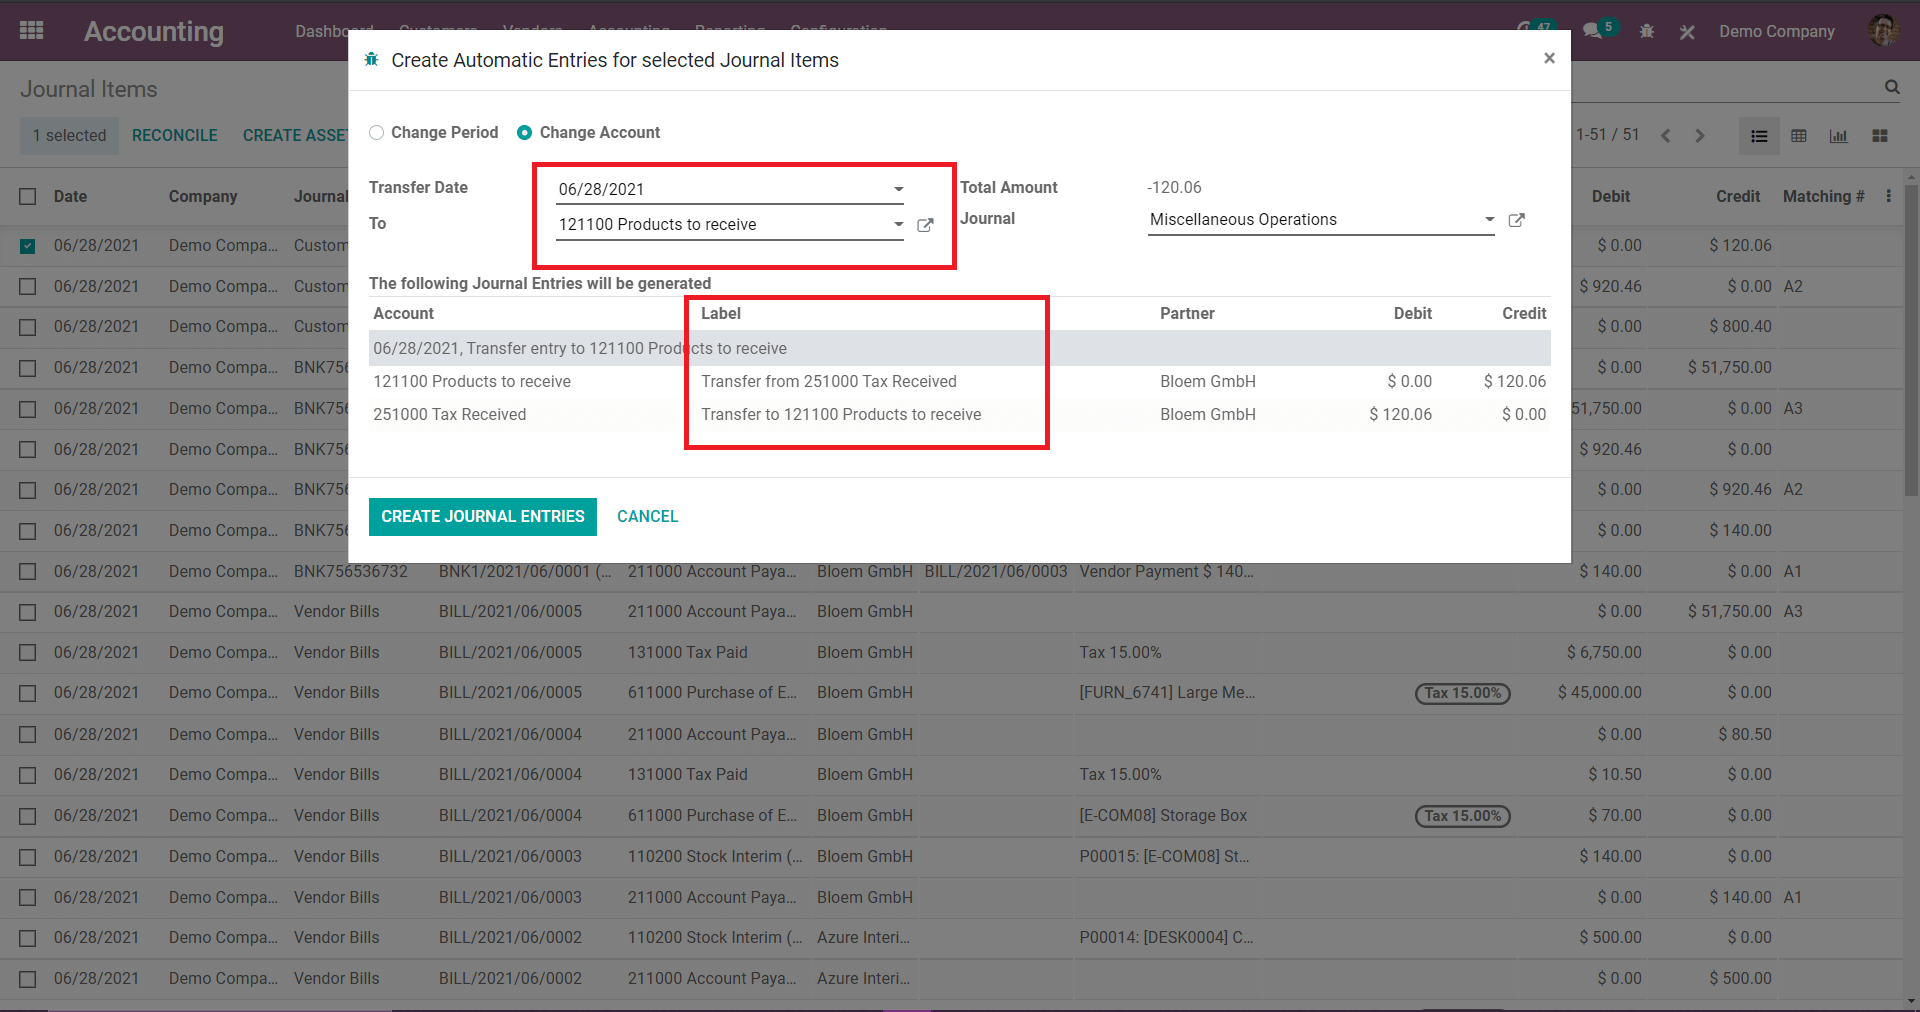
These features will automatically produce accounting entries for you; first, there's a new position you may assign to your Auditor, and you can restrict their access to read-only. As a result, you won't have to worry about the audit altering any of your current values. The second feature is the ability to preview accounting entries before validating them.
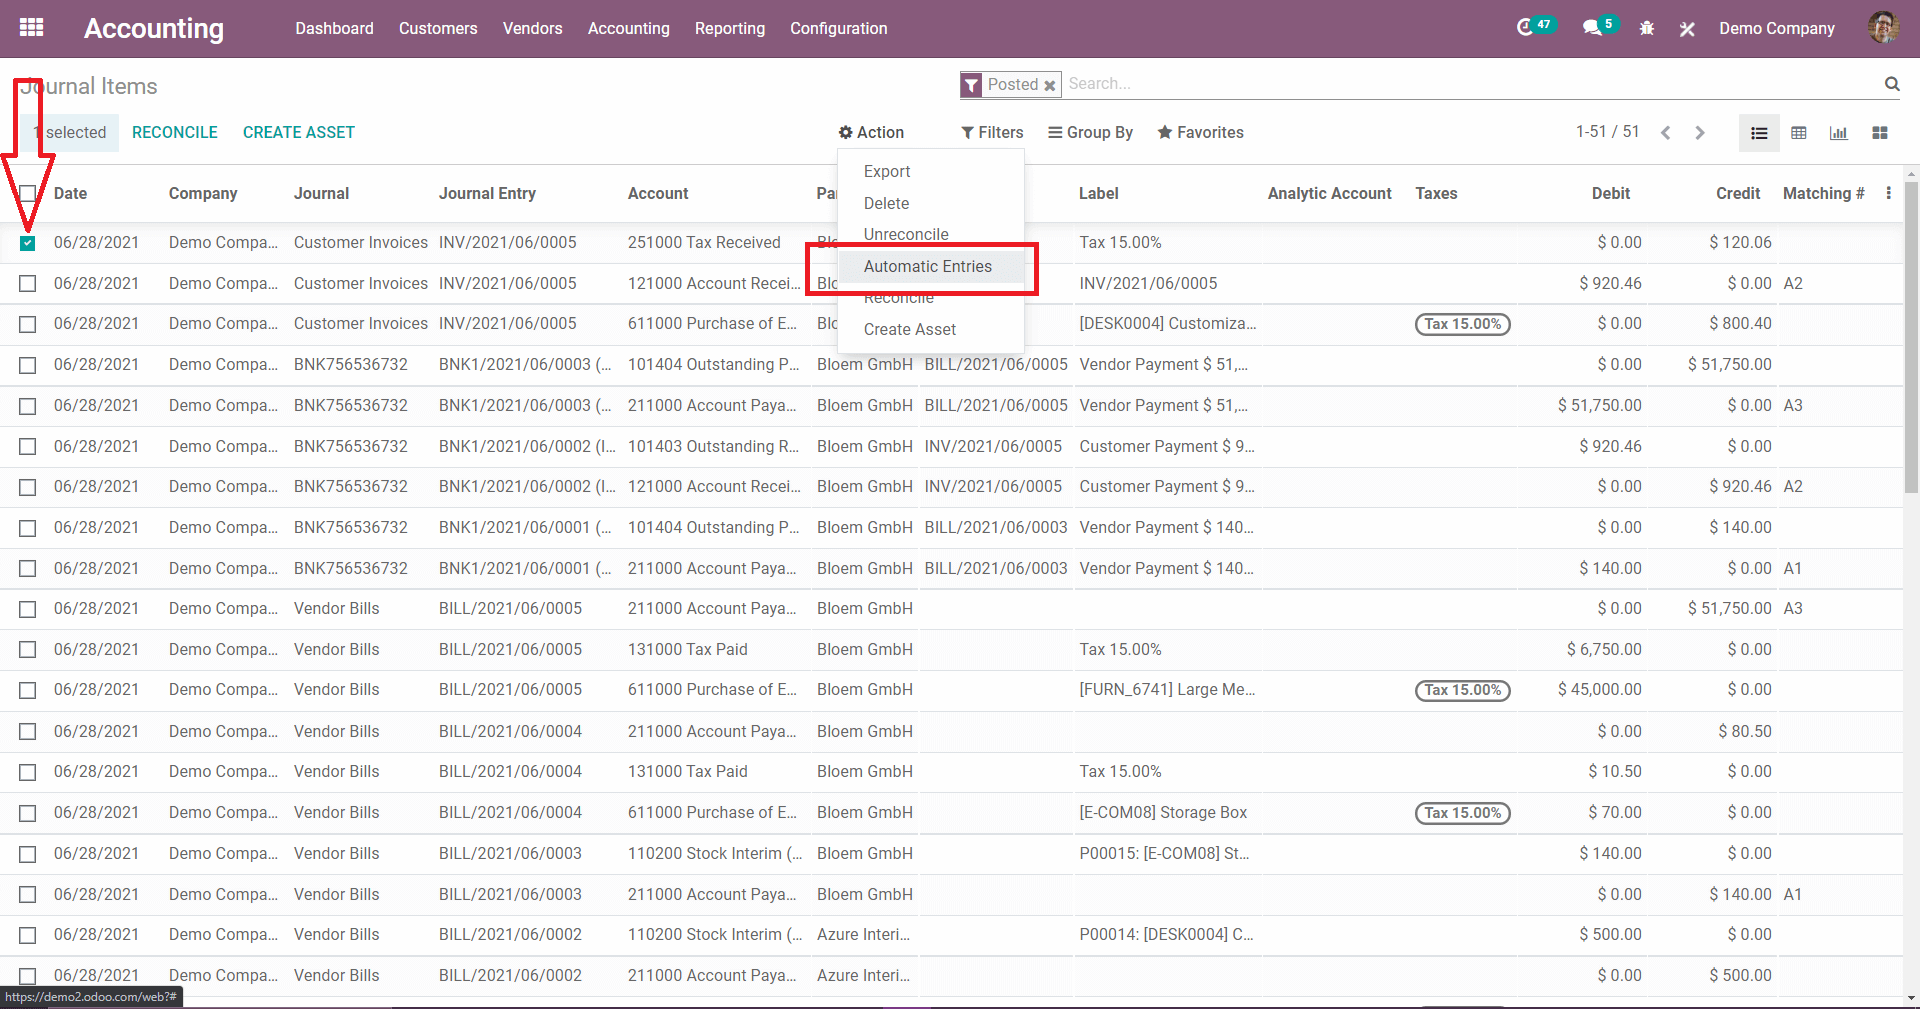
So doing this process first go to Accounting > Journal items and select the journal item whose accounting preview to be viewed. Then click on Actions > Automatic entries.
For example, if one makes a transfer from one account to the destination account as the movement that you select the account which is at the bottom.
Report Subtotal
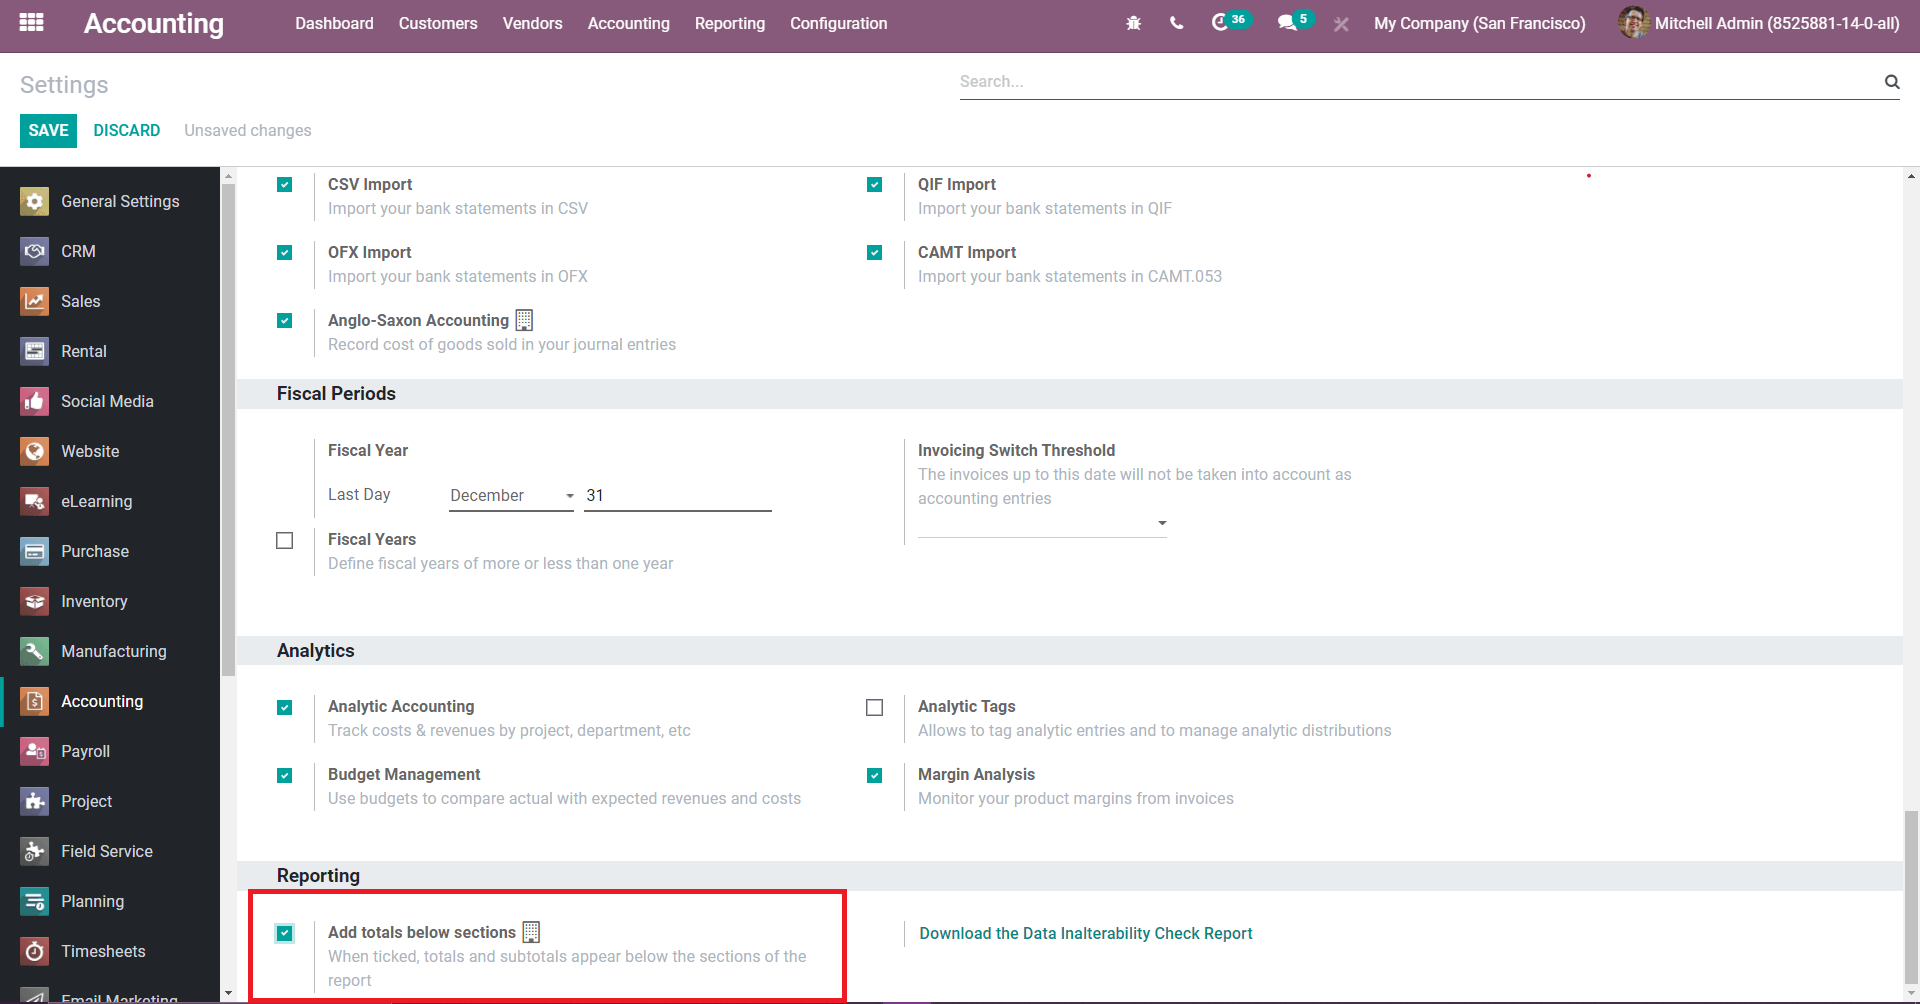
Report subtotal is the feature that will show the subtotal for all kinds of reports. For that have to enable Add totals below sections in configuration.
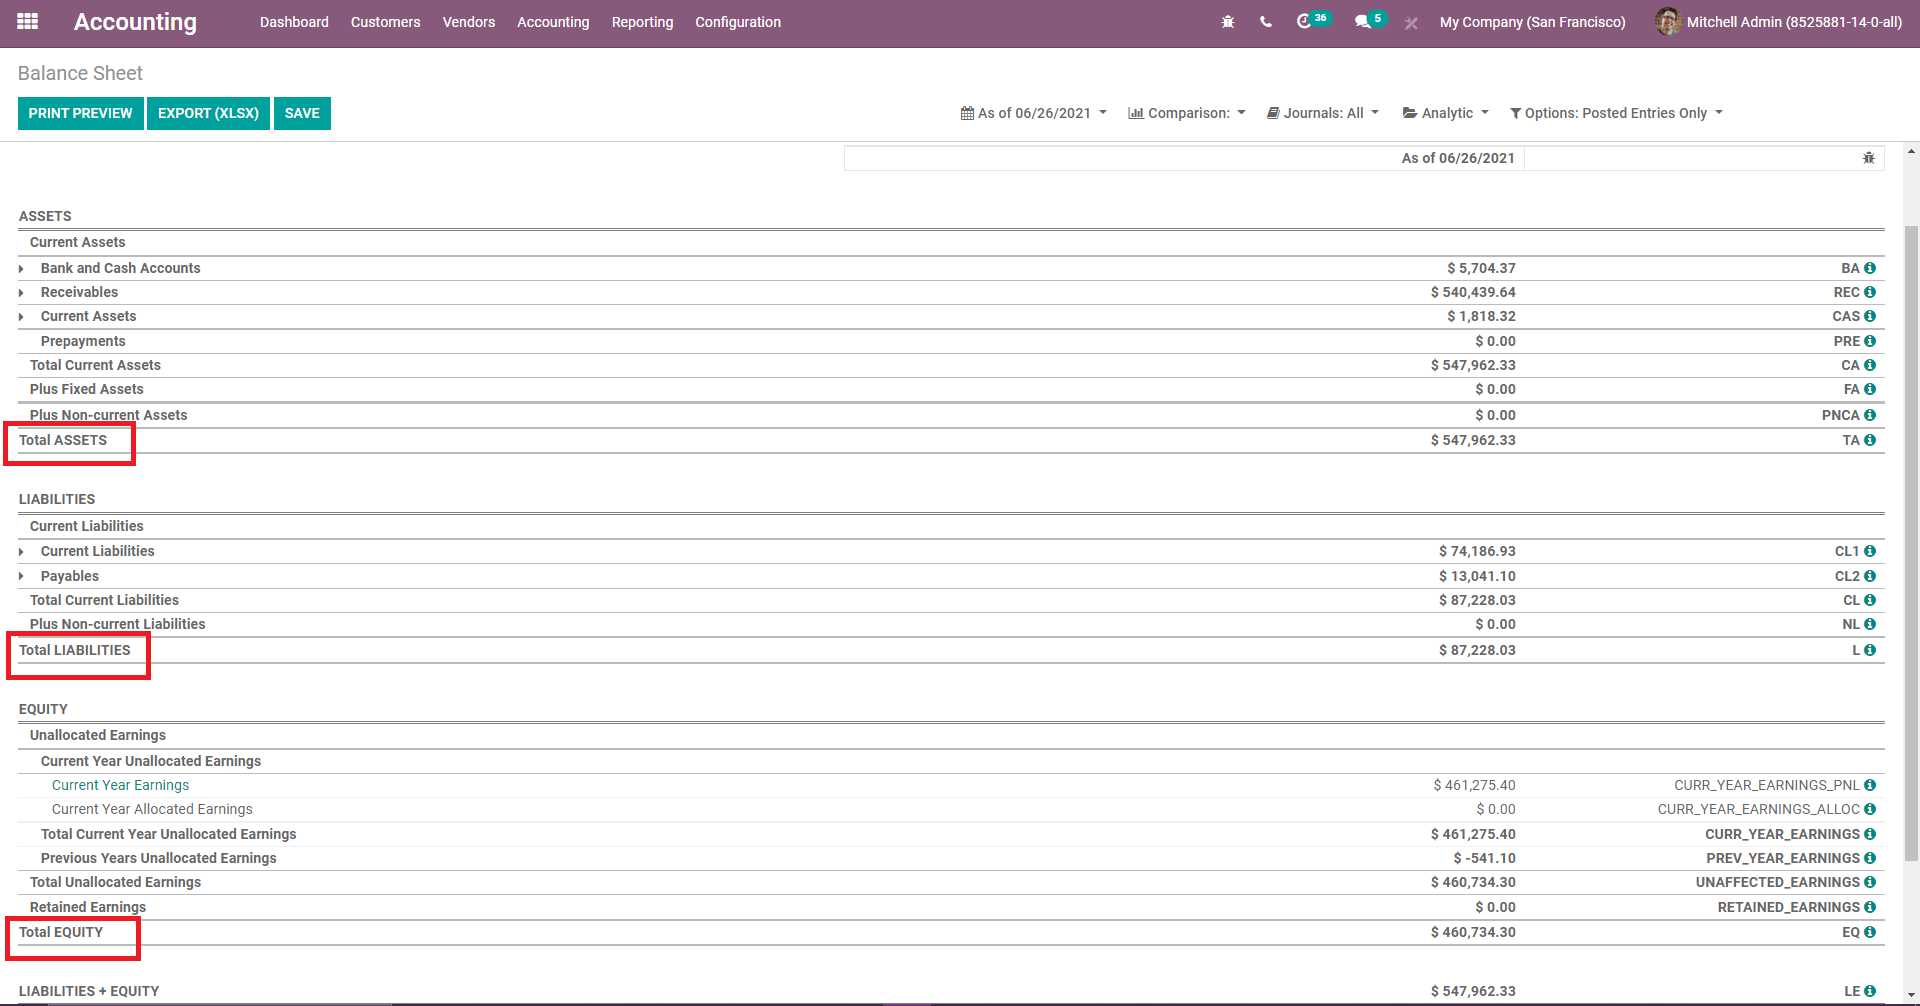
For example this is the report of balance sheet here you can see the subtotal for ASSETS, LIABILITIES, and EQUITY, after enabling the option Add totals below sections
In conclusion, Odoo 14 has an explicit accounting management module which is attached with all the distinctive features which were mentioned in this blog making is the complete finance management tool for business all around the world.