In today's data-driven business environment, Excel reports remain an essential tool for analyzing and presenting business data. Excel's familiar interface and powerful features make it an ideal format for reviewing financial data, inventory reports, and various business metrics. In this comprehensive guide, we'll explore how to implement XLSX report generation in Odoo 18 using controllers, providing a flexible and maintainable solution that doesn't rely on additional modules.

Understanding the Process
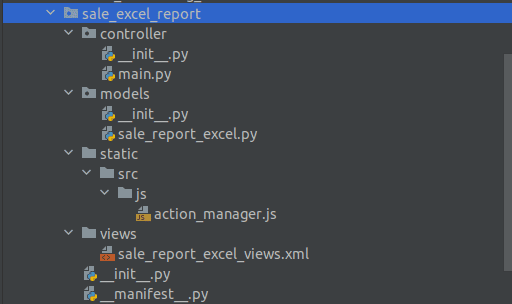
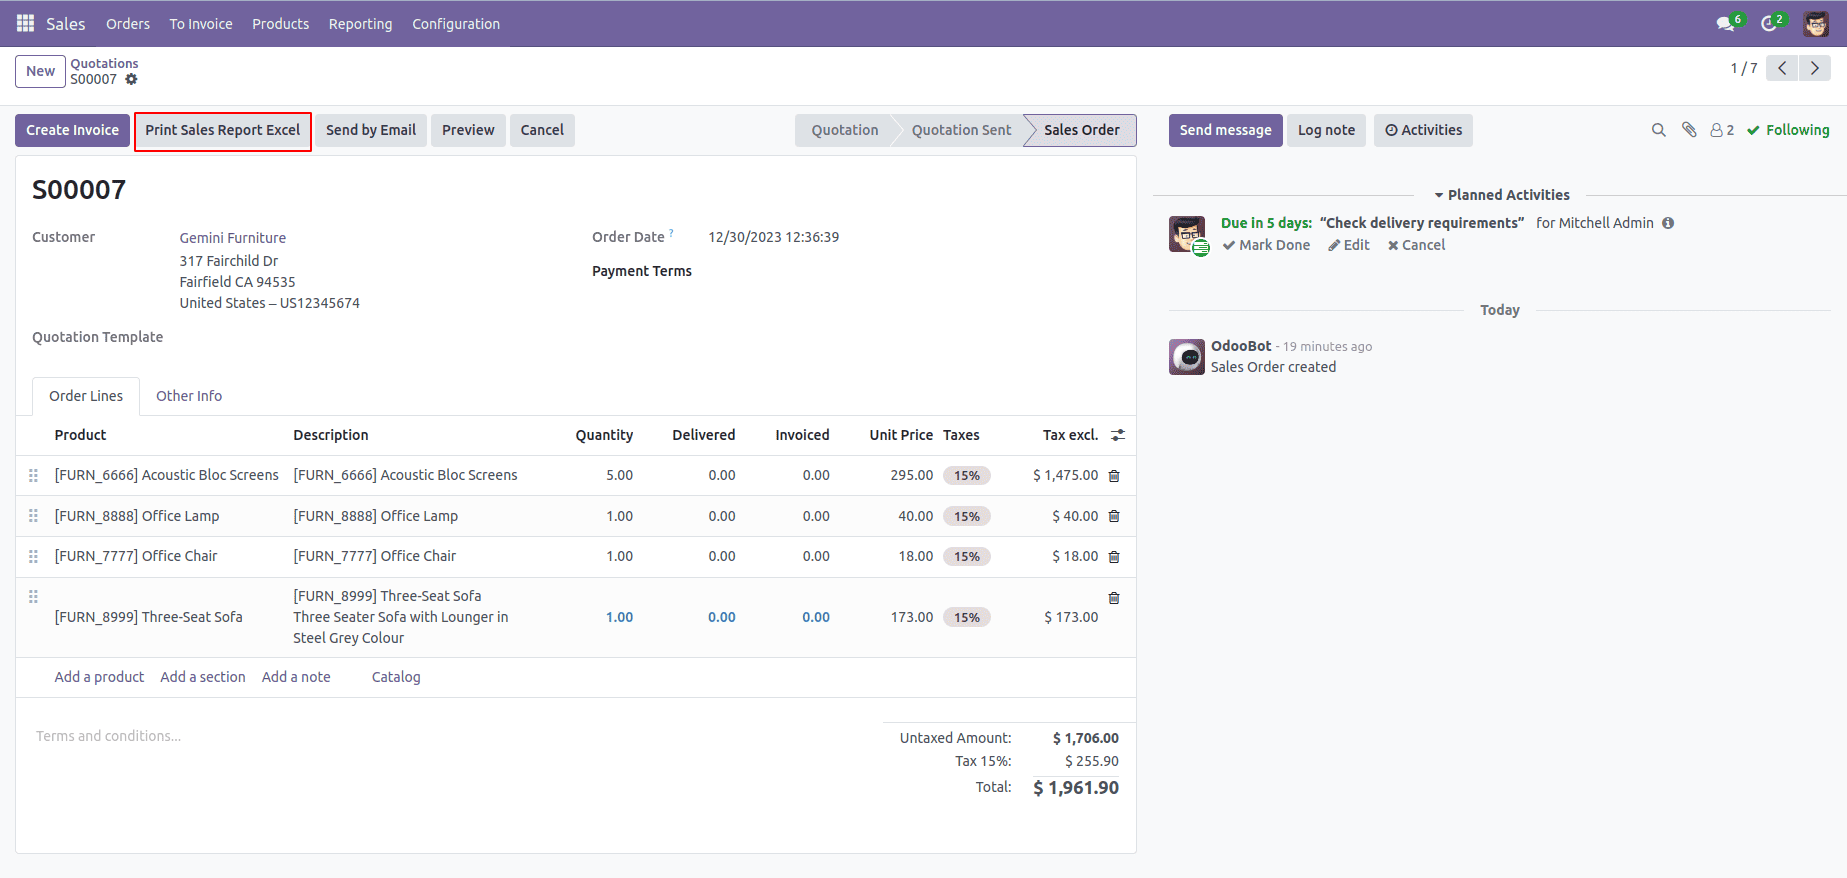
The process of generating XLSX reports in Odoo 18 involves creating a custom button within the Sale Order module and implementing the necessary backend logic to generate the report. This implementation requires coordinating several components:
1. Python models for data handling
2. XML views for the user interface
3. JavaScript for action management
4. Controllers for report generation
1. Python Model Implementation (sale_report_excel.py)
First, we'll create the Python model that handles the report generation logic. This file defines the core functionality for creating our XLSX reports.
import io
import json
import xlsxwriter
from odoo import models
from odoo.tools import json_default
class SalesOrder(models.Model):
   _inherit = 'sale.order'
   def sale_report_excel(self):
       products = self.mapped('order_line.product_id.name')
       data = {
           'model_id': self.id,
           'date': self.date_order,
           'customer': self.partner_id.name,
           'products': products
       }
       return {
           'type': 'ir.actions.report',
           'data': {'model': 'sale.order',
                    'options': json.dumps(data,
                                          default=json_default),
                    'output_format': 'xlsx',
                    'report_name': 'Sales Excel Report',
                    },
           'report_type': 'xlsx',
       }
   def get_xlsx_report(self, data, response):
       output = io.BytesIO()
       workbook = xlsxwriter.Workbook(output, {'in_memory': True})
       sheet = workbook.add_worksheet()
       cell_format = workbook.add_format(
           {'font_size': '12px', 'align': 'center'})
       head = workbook.add_format(
           {'align': 'center', 'bold': True, 'font_size': '20px'})
       txt = workbook.add_format({'font_size': '10px', 'align': 'center'})
       sheet.merge_range('B2:I3', 'EXCEL REPORT', head)
       sheet.merge_range('A4:B4', 'Customer:', cell_format)
       sheet.merge_range('C4:D4', data['customer'],txt)
       sheet.merge_range('A5:B5', 'Products', cell_format)
       for i, product in enumerate(data['products'],
                                   start=5):  # Start at row 6 for products
           sheet.merge_range(f'C{i}:D{i}', product, txt)
       workbook.close()
       output.seek(0)
       response.stream.write(output.read())
       output.close()
2. View Definition (sale_report_excel_views.xml)
Next, we'll create the XML view that adds our report generation button to the Sales Order form:
<?xml version="1.0" encoding="UTF-8" ?>
<odoo>
    <record id="view_order_form" model="ir.ui.view">
        <field name="name">sale.order.view.form.inherit.sale.excel.report</field>
        <field name="model">sale.order</field>
        <field name="inherit_id" ref="sale.view_order_form"/>
        <field name="arch" type="xml">
            <xpath expr="//button[@name='action_confirm']" position="after">
                <button name="sale_report_excel" string="Print Sales Report Excel" type="object"/>
            </xpath>
        </field>
    </record>
</odoo>
3. JavaScript Action Handler (action_manager.js)
The JavaScript handler manages the report generation action and handles the download process:
/** @odoo-module **/
import { registry } from "@web/core/registry";
import { BlockUI } from "@web/core/ui/block_ui";
import { download } from "@web/core/network/download";
registry.category("ir.actions.report handlers").add("xlsx", async(action)=> {
   //Passing data to the controller to print the excel file
  if (action.report_type === 'xlsx') {
          BlockUI;
await download({
               url: '/xlsx_reports',
               data: action.data,
               complete: () => unblockUI,
               error: (error) => self.call('crash_manager', 'rpc_error', error),
           });
           return true
  }
});
4. Controller Implementation (main.py)
Finally, we implement the controller that coordinates the report generation process:
import json
from odoo import http
from odoo.http import content_disposition, request
from odoo.tools import html_escape

class XLSXReportController(http.Controller):
    @http.route('/xlsx_reports', type='http', auth='user',
                csrf=False)
    def get_report_xlsx(self, model, options, output_format, report_name,
                        token='ads'):
        """ Return data to python file passed from the javascript"""
        session_unique_id = request.session.uid
        report_object = request.env[model].with_user(session_unique_id)
        options = json.loads(options)
        try:
            if output_format == 'xlsx':
                response = request.make_response(
                    None,
                    headers=[('Content-Type', 'application/vnd.ms-excel'), (
                        'Content-Disposition',
                        content_disposition(f"{report_name}.xlsx"))
                             ]
                )
                report_object.get_xlsx_report(options, response)
                response.set_cookie('fileToken', token)
                return response
        except Exception:
            error = {
                'code': 200,
                'message': 'Odoo Server Error',
            }
            return request.make_response(html_escape(json.dumps(error)))
When the Print button is clicked, the controller triggers the get_xlsx_report() function in the associated Python file for the button

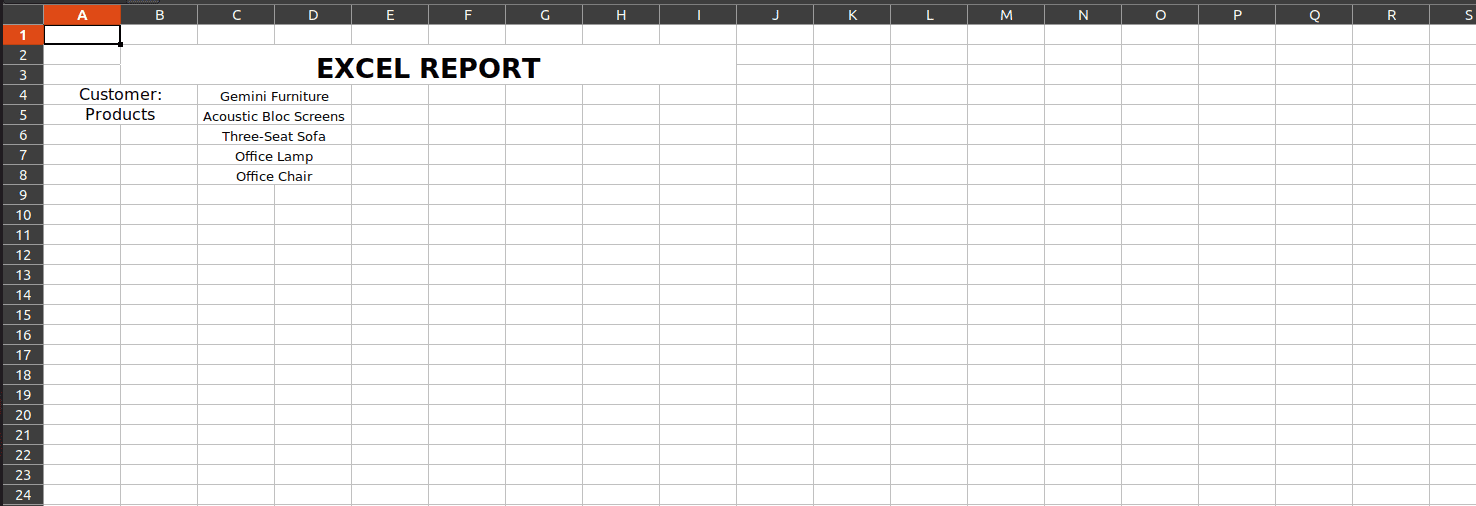
The output will look like the screenshot below.

This implementation provides a robust foundation for generating XLSX reports in Odoo 18. The controller-based approach offers flexibility and customization options while maintaining good performance and security. By following this guide, developers can implement custom XLSX report generation that meets their specific business requirements while adhering to Odoo's best practices.
To read more about How to Generate XLSX Report Using Controller in Odoo 17, refer to our blog How to Generate XLSX Report Using Controller in Odoo 17.