The handle widget is mostly used to move the line up and down. One of the most commonly requested add-ons by customers is the ability to reorganize kanban and tree data. The widget is most useful in the kanban view. The handle is a widget that is specified simply as widget="handle."
What is the functionality of the Handle widget?
In Odoo, there are several sorts of widgets. One of them is the handle widget. It is mostly utilized inside the views. It will help to change the order and make it easier to use. It does not delete a record; instead, it drags lines up and down. In some circumstances, we must make the first record second and the second record first. In such circumstances, we must employ this widget. A cross indication will be seen in the tree view. We can reorder the records by dragging. Please keep in mind that while the kanban view will lack symbols, we may still adjust the order of the data.
Creating Fields and Model
In the following example, we'll make a new custom model. There, we must declare a sequence field of an integer type. We may additionally specify the required fields.
# -*- coding: utf-8 -*-
from odoo import models, fields
class HandleWidget(models.Model):
   _name = "handle.widget"
   _description = 'Handle'
   name = fields.Char(string="Name")
   image = fields.Binary(string="Image")
   sequence = fields.Integer(string="Sequence")
To update or replace the order of the photos, we first require a kanban view. As a result, the kanban view must be defined in XML. We need to specify a comparable sequence inside the Kanban view. The sequence must be defined in the XML view and must be an integer field. We can relocate objects or change their order by using the sequence field. Images are often displayed as new attachments in their attachment according to the sequence in which they were posted. In these circumstances, we may utilize this widget, and changing the order is quite helpful for the user.
<record id="handle_kanban" model="ir.ui.view">
        <field name="name">handle.widget</field>
        <field name="model">handle.widget</field>
        <field name="arch" type="xml">
            <kanban>
                <field name="sequence" widget="handle" invisible="1"/>
                <field name="id"/>
                <field name="image"/>
                <templates>
                    <t t-name="kanban-box">
                        <div style="width: 150px; height: 185px;">
                            <div t-attf-class="oe_kanban_global_click">
                                <b>
                                    <div class="o_kanban_image">
                                        <img
                                        t-att-src="kanban_image
                                        ('handle.widget',
                                        'image',
                                         record.id.raw_value)"
                                         alt="Image"  style="width:100%;
                                         height:166px;"/>
                                    </div>
                                    <br/>
                                </b>
                            </div>
                        </div>
                    </t>
                </templates>
            </kanban>
        </field>
    </record>
OUTPUT

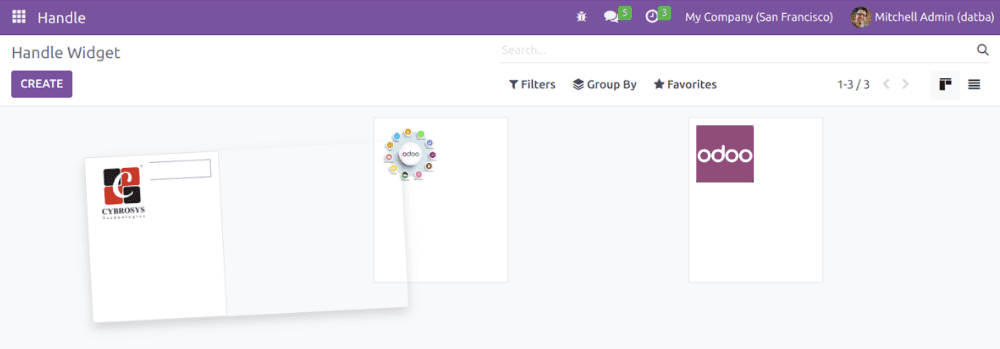
We must first upload an image and then enter the name of the relevant file. Each file is given a unique name. It should be placed over the field name if the user wants to give the file a different name. Following that, the kanban view will look like follows:

Consider including three distinct photos. If the user needs to change the order of the records, a widget will make this easy.

We can change the records, like in the example shown above. Likewise, you can alter the saved records' order. The result should resemble the example presented below when the records have been exchanged.

Handle widget for tree view
The handle widget's function is to modify the records' original order. The widget for the kanban view has been covered. We'll talk about the tree view widget in this section. If the user wants anything in a specific order, they can build it in a certain order and then, with the aid of the handle widget, change it to the desired order.
Create Tree view
<record id="handle_widget_tree" model="ir.ui.view">
   <field name="name">handle.widget</field>
   <field name="model">handle.widget</field>
   <field name="arch" type="xml">
       <tree default_order='sequence'>
           <field name="sequence" widget="handle"/>
           <field name="name"/>
           <field name="image" invisible="1"/>
       </tree>
   </field>
</record>
We must have a tree view first. It's simpler to use. Click the appropriate symbol in the tree view to modify the records' order. We must enter a sequence inside the tree view. That order allows us to swap records around and adjust the order of the records.
OUTPUT:
We must first upload the required image. In this example, we'll add three files with the designations File1, File2, and File3. Along with the file name, a sign indicating that we can alter the order of the created records will be there. Every time this handle widget is used, that symbol will appear. The tree view should look like the example below after adding the files.

Hold the symbol and replace it if the user needs to switch the records in a tree view. Utilizing it is pretty simple. Hold the symbol and swap as desired by the user.

As a result, we will now replace File3 with File2 in the sequence. FILE1 and FILE2 are switched. And the outcome should be as follows:

This is how we can able to manage the order of records with the help of the handle widget in Odoo16.