Odoo 18 introduces new enhancements to website customization, making it easier to create dynamic and interactive snippets. Dynamic snippets allow developers to display data-driven content, such as top-selling products, customer testimonials, or latest blog posts, in an engaging way. In this guide, we will walk through the steps to create a dynamic snippet in Odoo 18, leveraging the power of OWL and Odoo's modern JavaScript framework.
Steps to Create a Dynamic Snippet
1. Define the Snippet View in XML
The first step is to define the snippet structure in an XML file. This will determine how the snippet appears on the website. Create a new XML file inside views/snippets/category_template.xml and define the layout:
<template id="category_template_highlight" name="Category Highlight">
        <section class="categories_section">
            <div class="container">
                <div class="alert alert-info">
                    <h4>Your Category Highlight Tab snippet will be displayed here...
                        Please save to view the snippet
                    </h4>
                </div>
            </div>
        </section>
    </template>
2. Register the Snippet in the Website Editor
To make the snippet available in the website editor, extend the website. snippets template and include the snippet:
<template id="category_highlight_snippet" inherit_id="website.snippets"
              name="Category Highlight Snippet">
        <xpath expr="//snippets[@id='snippet_groups']" position="inside">
            <t t-snippet="dynamic_snippet.category_template_highlight"
               t-thumbnail="/dynamic_snippet/static/src/images/snippets/banner.jpg"/>
        </xpath>
    </template>
3. Add the Snippet File to __manifest__.py
Ensure the XML file containing the snippet definition is added to the data section in the module manifest:
{
    'name': 'Website Dynamic Snippet',
    'version': '18.0.1.0.0',
    'category': 'Website',
    'depends': ['website_sale'],
    'data': [
        'views/snippets/category_template.xml',
    ],
}
4. Install or Upgrade the Module
Once the module is installed or upgraded, navigate to the website editor, click on "Edit", and find the snippet under the "Categories" section. You can now drag and drop it onto your webpage.

5. Create a Python Controller to Fetch Data
A controller is required to retrieve dynamic data from the backend. Create a new Python file in controllers/product_category_snippet.py and define an endpoint:
from odoo import http
from odoo.http import request

class WebsiteProduct(http.Controller):
    @http.route('/get_product_categories', auth="public", type='json',
                website=True)
    def get_product_category(self):
        """Get the website categories for the snippet."""
        public_categs = request.env[
            'product.public.category'].sudo().search_read(
            [('parent_id', '=', False)], fields=['name', 'image_1920', 'id']
        )
        values = {
            'categories': public_categs,
        }
        return values
6. Define the OWL Template
To render dynamic content after saving the snippet, define an OWL template in static/src/xml/category_highlight_content.xml:
<?xml version="1.0" encoding="UTF-8" ?>
<!--Product Category tab content template-->
<templates xml:space="preserve">
    <t t-name="dynamic_snippet.category_data">
        <section class="categories_section">
            <div class="container">
                <h3 class="section_heading">Shop by Categories</h3>
                <div class="categories_wrapper">
                        <t t-foreach="result.categories" t-as="category" t-key="category.id">
                            <div class="categories">
                                <div class="img_wrapper">
                                    <t t-if="category.image_1920">
                                        <img t-att-src="'data:image/png;base64,' + category.image_1920"
                                             class="img img-fluid rotate-center"
                                             t-att-alt="category.name or 'Category Image'"
                                             loading="lazy"/>
                                    </t>
                                    <t t-else="">
                                        <img src="/theme_og_store/static/src/img/default_category.svg"
                                             class="img img-fluid rotate-center"
                                             alt="Default Category Image"
                                             loading="lazy"/>
                                    </t>
                                </div>
                                <div class="type">
                                    <t t-esc="category.name"/>
                                </div>
                            </div>
                        </t>
                </div>
            </div>
        </section>
    </t>
</templates>
7. Use OWL for Rendering the Data
Odoo 18 leverages OWL (Odoo Web Library) for efficient UI rendering. Create a new JavaScript file inside static/src/js/product_category.js to handle the dynamic rendering:
/** @odoo-module */
import { renderToElement } from "@web/core/utils/render";
import publicWidget from "@web/legacy/js/public/public_widget";
import { rpc } from "@web/core/network/rpc";
publicWidget.registry.get_product_tab = publicWidget.Widget.extend({
    selector : '.categories_section',
    async willStart() {
        const result = await rpc('/get_product_categories', {});
        if(result){
            this.$target.empty().html(renderToElement('dynamic_snippet.category_data', {result: result}))
        }
    },
});
8. Add Assets to Manifest
Finally, include the XML and JavaScript files in your module’s __manifest__.py file:
{
    'name': 'Website Dynamic Snippet',
    'version': '18.0.1.0.0',
    'category': 'Website',
    'depends': ['website_sale'],
    'data': [
        'views/snippets/category_template.xml',
    ],
    'assets': {
        'web.assets_frontend': [
            '/dynamic_snippet/static/src/xml/category_highlight_content.xml',
'/dynamic_snippet/static/src/js/product_category.js',
        ],
    },
}
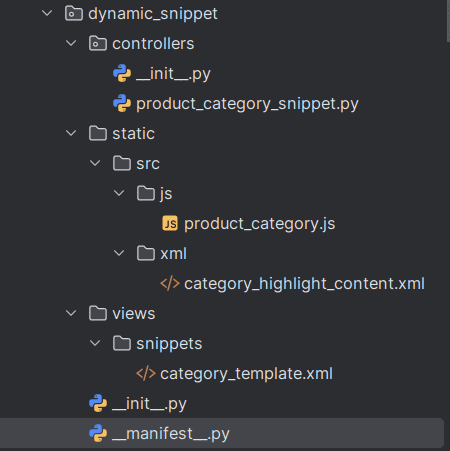
Now the Module Structure should look like this:

9. Install or Upgrade the Module
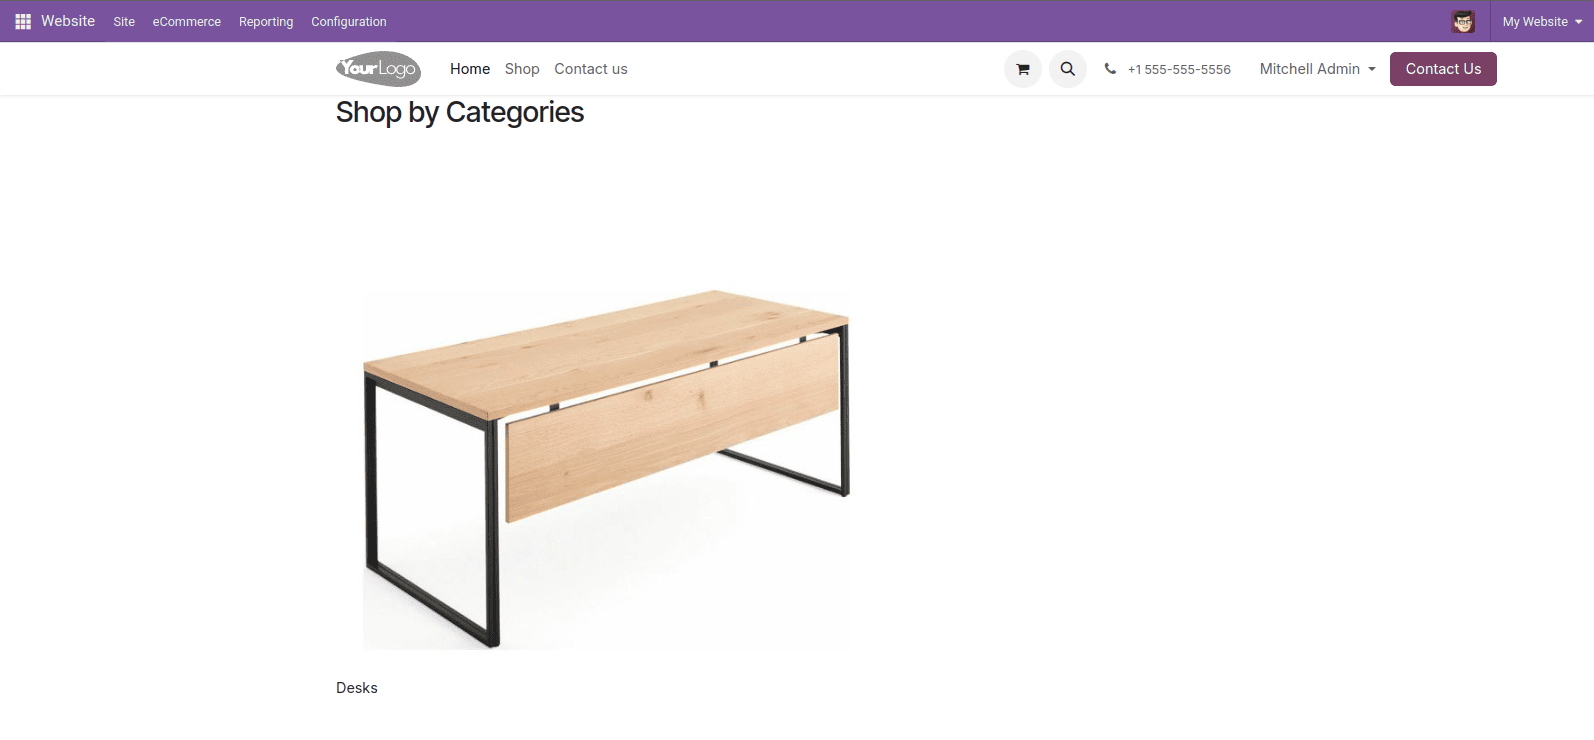
Once the module is installed or upgraded, navigate to the website editor, click on "Edit", and find the snippet under the "Categories" section. You can now drag and drop it onto your webpage and Click on the Save button.

Conclusion
Dynamic snippets in Odoo 18 provide an innovative way to enhance website content with real-time data and user interactivity. By following the steps outlined in this guide, developers can create powerful and customizable snippets that improve engagement and functionality. Embrace the potential of dynamic snippets to elevate your website and deliver a richer user experience.
To read more about How to Create a Dynamic Snippet in Odoo 17, refer to our blog How to Create a Dynamic Snippet in Odoo 17.