In the ever-evolving world of business operations, efficient management of vendor bills is essential for maintaining financial stability and ensuring smooth procurement processes. Odoo 18, the latest version of the robust open-source ERP platform, introduces enhanced features to simplify the creation and management of vendor bills. In this blog, we will guide you through the steps to create vendor bills using Odoo 18's Accounting module, showcasing how it helps businesses streamline their financial workflows with ease and precision.
A vendor bill refers to an invoice received from a supplier for goods or services purchased, documenting payables like sales taxes, freight charges, and delivery fees. In Odoo, vendor bills can be generated at different points in the procurement workflow, influenced by the bill control policy set within the Purchase app's configuration. Odoo 18 streamlines vendor bill management through its accounting module, serving as a centralized platform for tracking vendor invoices and payments. This integration provides businesses with a comprehensive overview of all vendor-related financial transactions, ensuring transparency and easy accessibility.
Vendor Bill Creation
Creating vendor bills in Odoo 18 is a straightforward and efficient process. Start by navigating to the Accounting module and selecting the ‘Bills’ option under the ‘Vendors’ menu. This section provides an organized list of all recorded bills in the Accounting module, including details such as the Bill Number, Vendor, Bill Date, Due Date, Reference, Activities, Tax Excluded Amount, Total, Currency, Payment Status, and more.
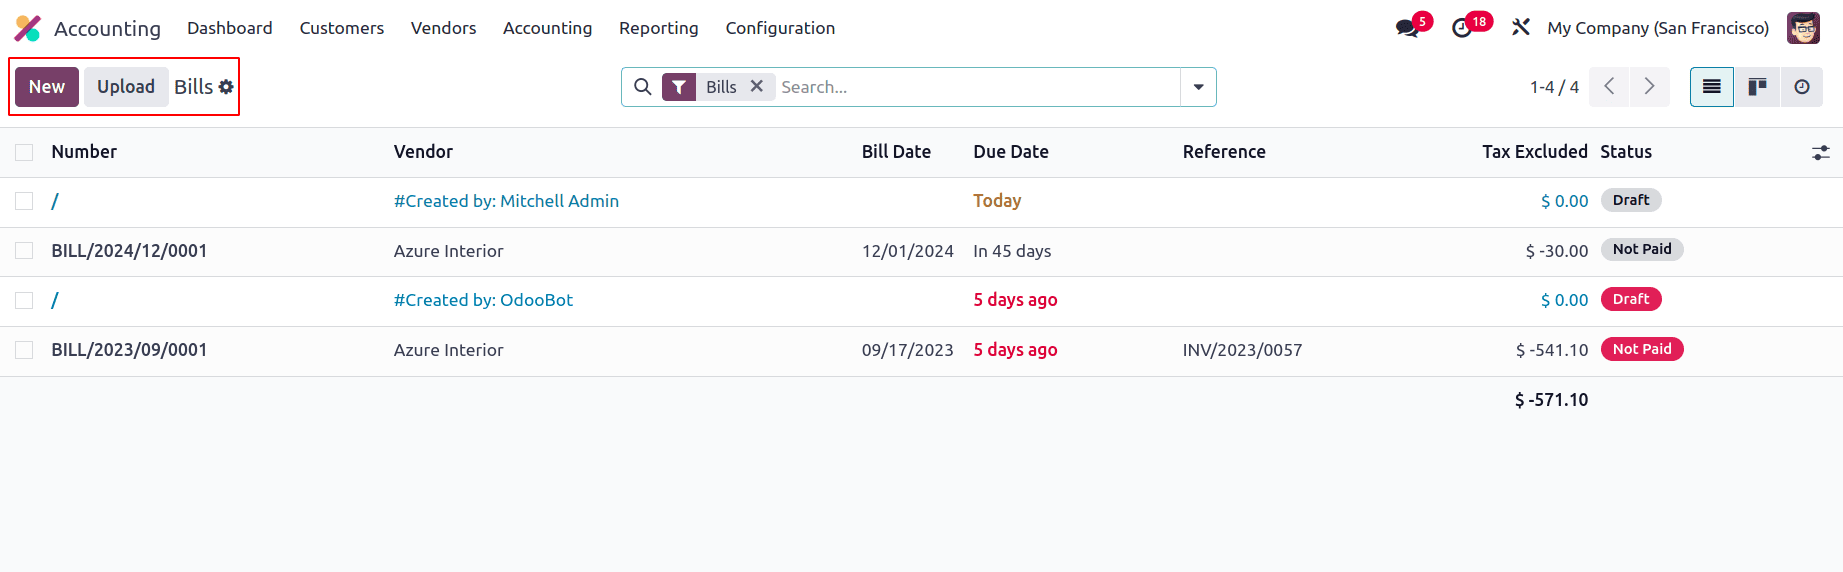
To generate a new vendor bill, click on the "New" button. This action opens a form view where you can input all the necessary details related to the vendor bill.
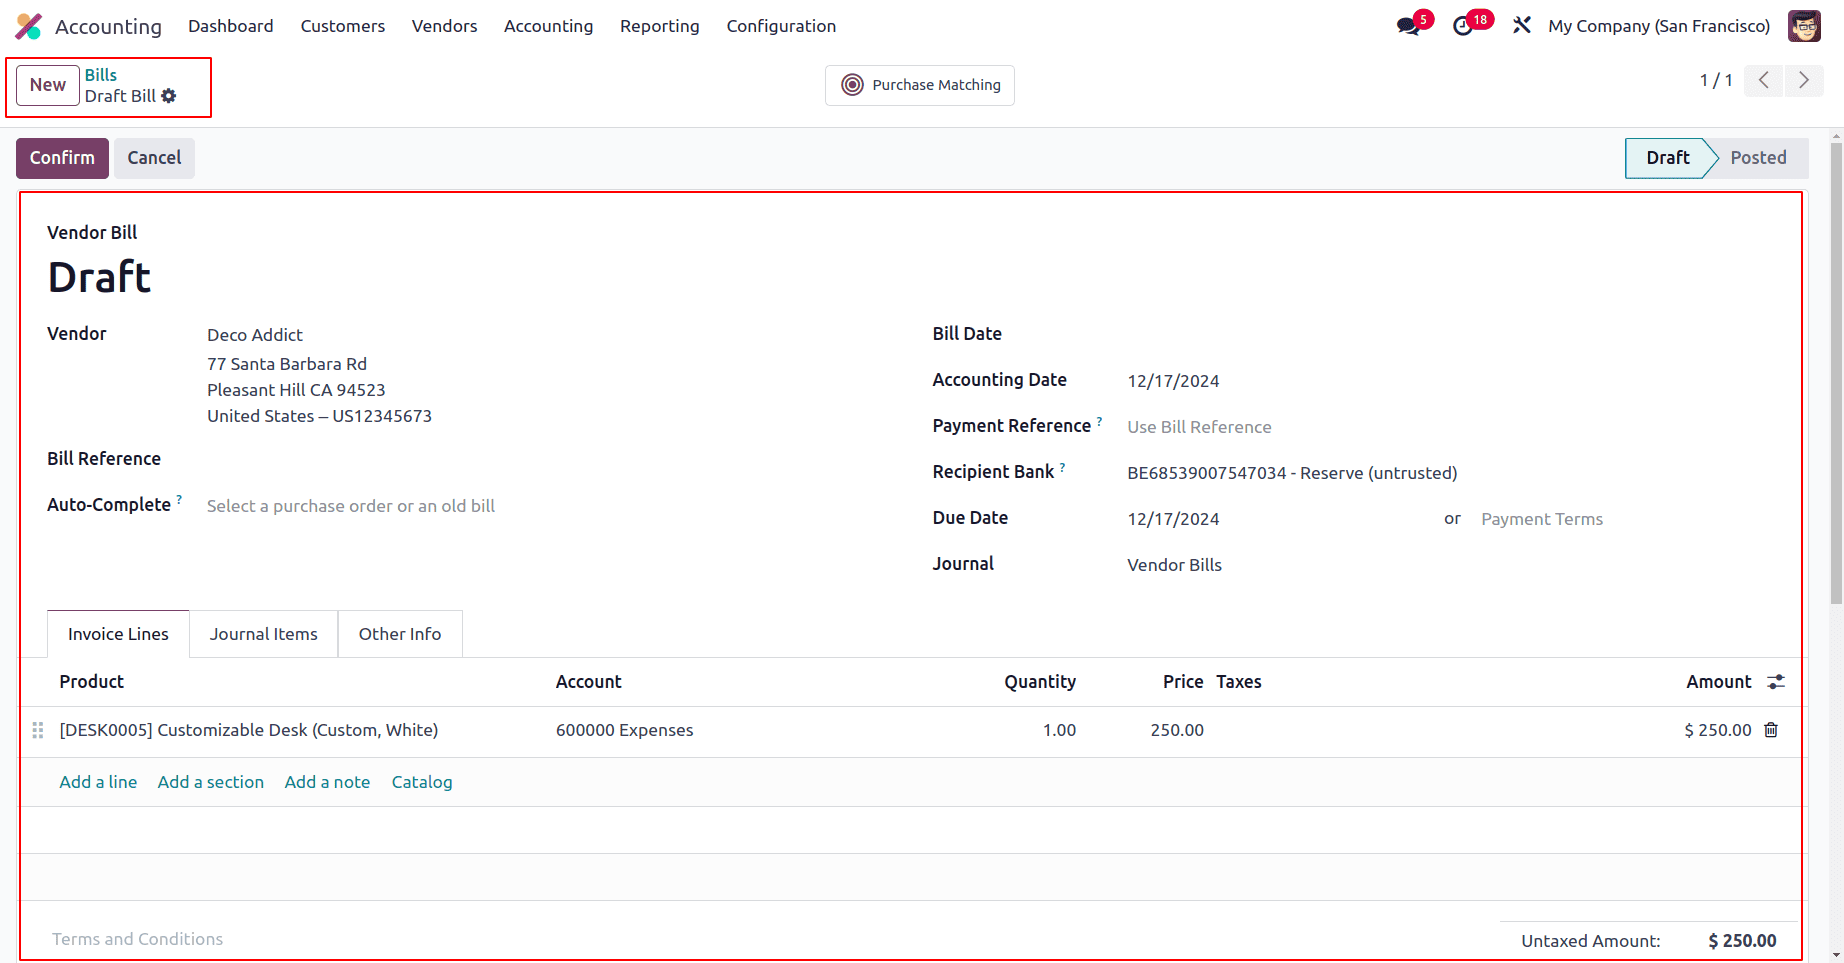
The vendor bill form includes various essential fields that allow for precise management of supplier transactions. These fields are designed to capture critical details such as the supplier's information, billing dates, payment terms, and references for easy identification of invoices. Additionally, the line items within the bill cover details about the goods or services provided, their quantities, pricing, taxes, and total amounts.
Important Fields to Note:
* Vendor: The name of the supplier issuing the bill.
* Bill Reference: The unique invoice or reference number issued by the vendor.
* Bill Date: The date on which the vendor created and issued the bill.
* Due Date: The last date to pay the bill without penalties.
* Journal: The accounting journal where the bill is recorded.
* Accounting Date: The date on which the vendor bill is recorded in the company's accounting books.
* Payment Reference: A reference used to identify the payment associated with the vendor bill.
* Recipient Bank: The bank account details of the vendor to which payments for the bill will be sent.
* Auto-Complete: Automatically populate the remaining fields by referencing a previous bill or purchase order. In Vendor Bills, this functionality allows users to quickly select relevant data—such as vendors, products, or taxes—by dynamically filtering and displaying options from linked records.
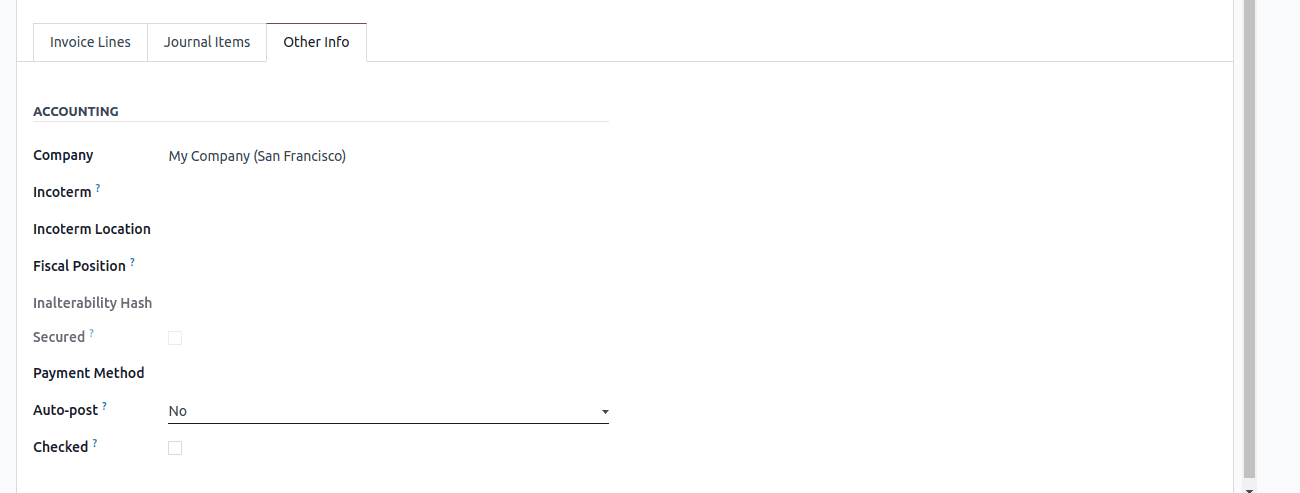
The vendor bill form in Odoo includes a dedicated notebook tab named Other Info, which houses additional fields designed to enhance the functionality and customization of vendor bill management.
Fields in Other info :
* Company: This field identifies the company linked to the vendor bill. In Odoo, if multiple companies are used, it allows users to specify which company is associated with a given bill.
* Incoterm: Short for International Commercial Terms, this field outlines the delivery conditions agreed upon by the buyer and the seller. It clarifies the responsibilities and risks of both parties in cross-border transactions.
* Incoterm Location: This specifies the geographic location related to the Incoterm. For example, for "FOB" (Free on Board), this might refer to a specific port or airport where goods are transferred.
* Fiscal Position: This field determines how taxes are applied to the vendor bill. It adjusts tax settings based on local regulations, such as those governing intra-EU sales, domestic taxes, or export exemptions.
* Inalterability Hash: This feature ensures that the transaction data remains unchanged after it has been recorded, meeting specific legal and compliance requirements. It generates a unique hash to verify the data's integrity.
* Secured: A checkbox that marks whether the bill is secured. Enabling this option might be linked to regulatory requirements related to protecting sensitive financial data.
* Payment Method: This field defines the method used to settle the vendor bill, such as through bank transfer, credit card, or cash. It allows users to track and manage different payment methods within Odoo.
* Auto Post: This field allows users to automate the posting of vendor bills When enabled, the vendor bill will be automatically posted without manual intervention based on At Date, Monthly, Yearly, and Quarterly.
* Checked: The Checked field acts as an internal validation tool. When marked, it indicates that the vendor bill has been reviewed and verified by an authorized individual.
The next tab in the vendor bill is the Journal Items section, which displays the ledger postings related to the bill. This section provides a detailed breakdown of how the bill affects the accounts in the general ledger.
The ledger postings for the vendor bill will differ between Anglo-Saxon and Continental accounting systems. These differences stem from the distinct approaches each system takes to recognizing and recording transactions in the general ledger.
Ledger Posting of Vendor bill in Anglo-Saxon Accounting
In Anglo-Saxon accounting, Odoo records the financial transactions associated with goods or services purchased. When a vendor bill is created for stockable products, the interim accounts are used instead of directly affecting the expense account at the time of purchase. This ensures that costs are appropriately matched with revenues when the goods are sold.
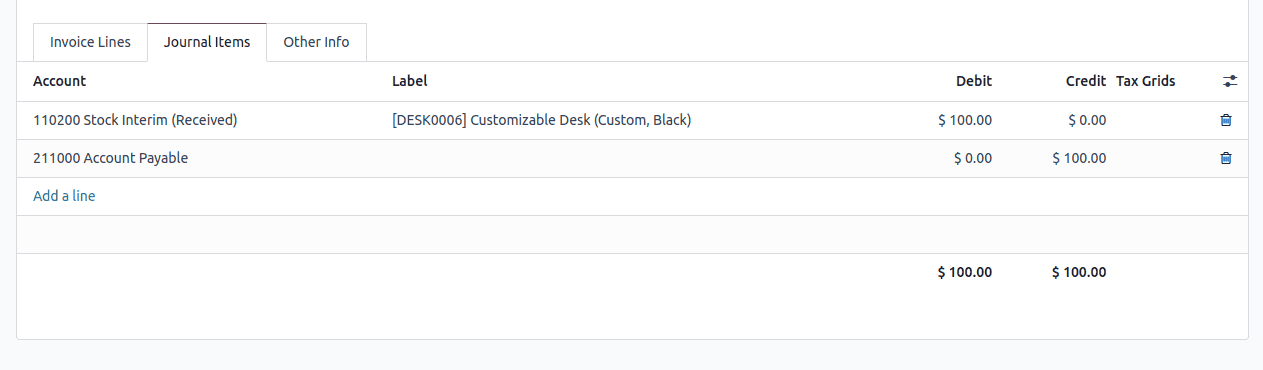
Here, the debit to the Stock Interim account reflects the value of inventory received (the customizable desk in this case). This ensures that the value of the inventory on hand is accurately recorded in the balance sheet, and the credit to Accounts Payable acknowledges the company's obligation to pay the vendor for the purchase.
Ledger posting of Vendor bill in Continental Accounting
In Continental accounting, expenses are immediately recognized when a vendor bill is created for stackable products. This is in contrast to the Anglo-Saxon method, which defers the recognition of costs until the goods are sold.
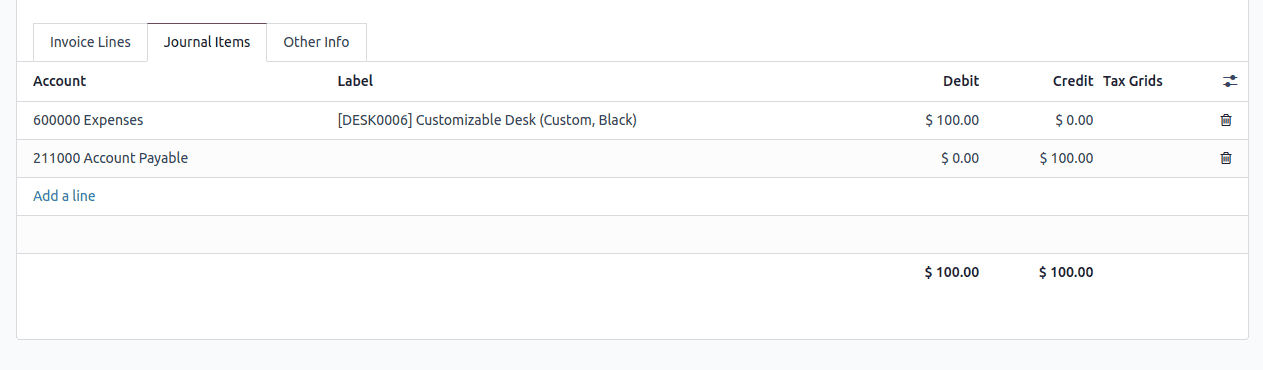
Here, the Expense account is debited with $100.00 to record the expense immediately upon receipt of the vendor bill. The debit to the Expenses account reflects the recognition of costs for the customizable desk. This entry immediately recognizes the cost as an expense in the profit and loss account, regardless of whether the goods have been sold. The credit to Account Payable acknowledges your obligation to pay the vendor for the goods received. This records a liability in the balance sheet, reflecting the amount payable to the supplier.
Creating vendor bills in Odoo accounting is a simple yet powerful process that ensures accurate financial management. With Odoo’s flexible accounting system, businesses can efficiently record expenses, track liabilities, and maintain clear records of their vendor transactions.
Odoo automates journal entries for vendor bills, making it easier to handle expenses and accounts payable without the need for manual adjustments. By properly configuring your accounting settings, the system ensures that all entries are recorded accurately in line with your operational and regional accounting requirements.
With its intuitive interface and advanced features, Odoo streamlines vendor bill management, helping businesses enhance their financial operations and gain better insights into their payables. Mastering this process enables your company to stay organized, maintain accurate reporting, and improve overall financial health.
To read more about How to Configure Vendor Bills & Payments Management in Odoo 17 Accounting, refer to our blog How to Configure Vendor Bills & Payments Management in Odoo 17 Accounting.