OAuth for Gmail from Google is compatible with Odoo. It only takes a few settings on Google’s Workspace platform and the back end of the Odoo database to enable sending secure emails from a custom domain. A personal email address and an address generated by a custom domain can be used in this scenario.
OAuth
An OAuth 2.0 client ID, which your application uses while requesting an OAuth 2.0 access token, is required to use OAuth 2.0 in your application.
To create a client ID for OAuth 2.0 in the console:
1. You should visit the Google Cloud Platform Console.
2. Choose a project from the list of projects or start a new one.
3. Open the console's left-side menu and choose APIs & Services if the page for APIs & Services isn't already visible.
4. Click Credentials on the left.
5. Select OAuth client ID after clicking New Credentials.
6. Choose the correct application type for your project, then fill out any other fields that are needed.
Google Setup
Visit the Google API Console to get started. If you have a Google Workspace account, sign in with it. If not, sign in with your Gmail account (which should correspond to the email address you want to set up in Odoo).
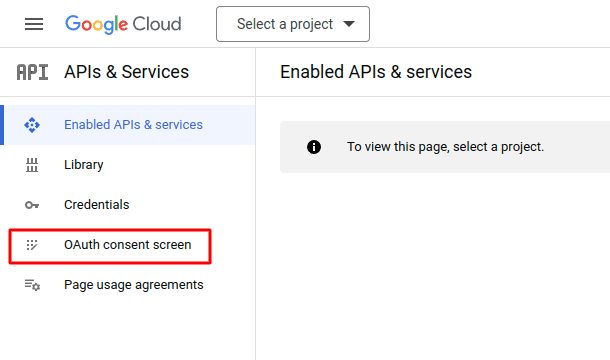
After that, on the OAuth consent screen's far right, select Create Project. The New Project option will be included under the ‘Select a project’ drop-down menu in the top right corner if a project has already been created in this account.
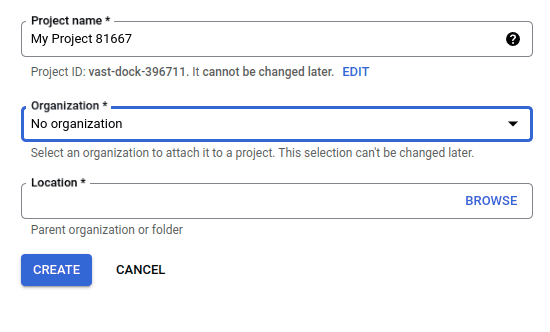
Change the Project name to Odoo and search for the Location on the New Project screen. Choose the Google Workspace organization as the location. Leave the Location blank if you are using a personal Gmail account.


Credentials
Now that the project has been set up, create credentials containing the Client ID and Client Secret.
? To begin, select Credentials from the menu on the left sidebar.
? Next, select OAuth client ID from the dropdown menu by clicking on Create Credentials in the top menu.
? Choose Web Application from the dropdown menu under Application Type.
? Put Odoo in the Name field.
? Click the ADD URI button under the Authorized redirect URIs label, and then enter (https://yourdbname.odoo.com/google_gmail/confirm in the URIs 1 area. Make Sure to change your_db_name in the URL to the name of your database.
? To create an OAuth Client ID and Client Secret, click Create after that. Last, but not least, duplicate each generated value for usage when customizing in Odoo.

How to Setup in Odoo
? Open Odoo and go to the Apps module first.
? After that, enter Google in the search field without the Apps filter.
? Install the Google Gmail module.
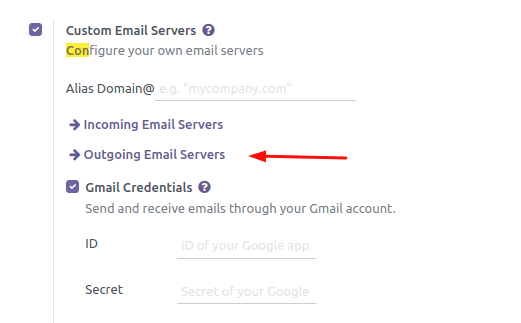
? Next, go to Settings, General Settings, and tick the box next to Custom Email Servers or External Email Servers in the Discuss section.
? This adds a new selection for "Use a Gmail Server" or "Gmail Credentials."
? After that, save the settings by copying and pasting the appropriate values into the Client ID and Client Secret columns.
Configure email server

? Return to the Custom Email Servers setting top, and then click the Outgoing Email Servers link to configure the external Gmail account.
? After that, click New or Create to create a new email server and enter the essential information for the email username, description, and name.
? After that, click Gmail (under the Authenticate with or Connection section) or Gmail OAuth Authentication. Click Connect Your Gmail Account to finish.
? To finish the authorization process, a new window with the label "Google" opens. Choose the correct email address that is currently set up in Odoo.
? Click Continue to accept verification and link the Gmail account to Odoo if a second step appears if the email address is a personal account.
? Then select Continue or Allow to permit Odoo to access the Google account. The page then reroutes to the newly set up outgoing email server in Odoo. The setting automatically inserts the token into Odoo, and a tag declaring "Gmail Token Valid" appears.
? Now that Google OAuth authentication is used, the Odoo database can send secure emails.