Odoo 18 offers a flexible invoicing system that allows businesses to bill customers based on timesheets. This ensures accurate billing for services by tracking the time spent on tasks or projects. Understanding how timesheets are billed helps businesses manage their finances efficiently and maintain transparency with clients.
Invoicing Policies for Timesheets in Odoo 18
Odoo allows businesses to set different invoicing policies for timesheets depending on the nature of the services offered. When it comes to timesheets, businesses can choose from two primary invoicing policies:
1. All Recorded Timesheets: Bill customers based on all logged work hours, regardless of approval status.
2. Validated Timesheets Only: Invoices are generated only for timesheets that have been reviewed and approved by a manager.
All Recorded Timesheets
To configure the Invoicing Policy for timesheets, navigate to the Timesheets > Configuration > Settings.
Under the Billing section, there is a feature called Invoicing Policy, which determines which timesheets are considered for invoicing. This setting allows businesses to choose whether to bill customers based on All recorded timesheets or Validated timesheets only.
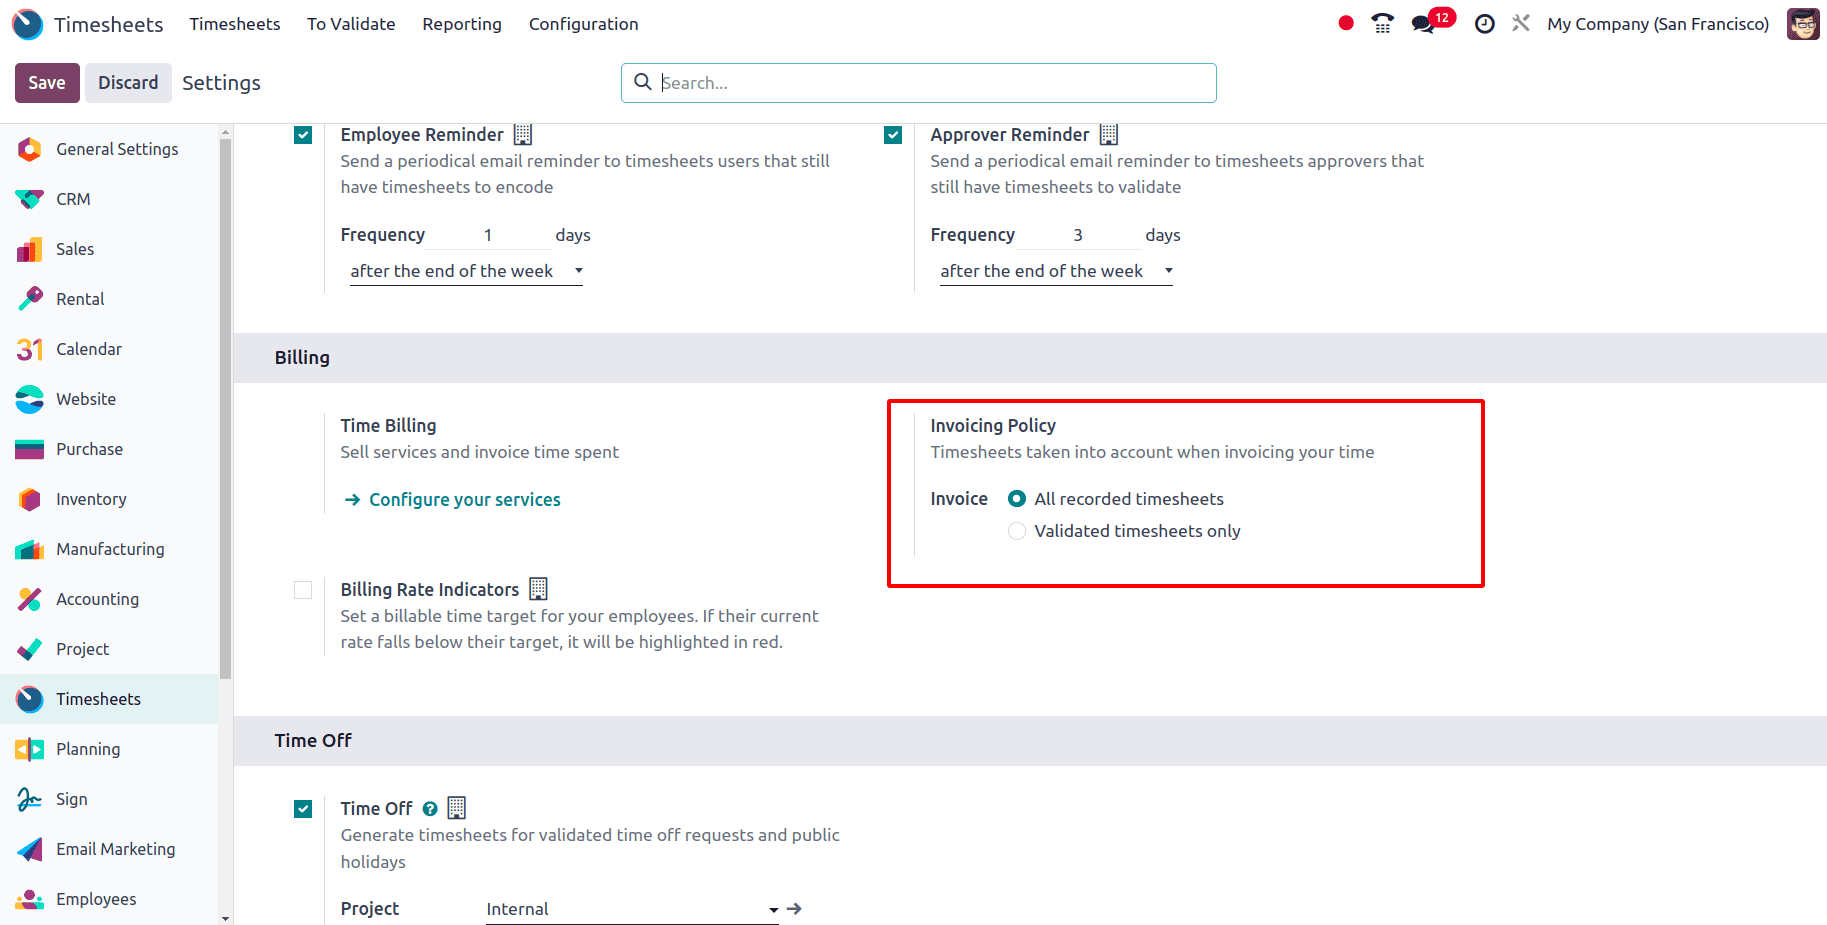
If All recorded timesheets have been selected, all the timesheets that has been logged for the project can be invoiced. There is no need of approval from the manager to invoice the timesheet. But if the invoicing policy is set to validated timesheets, the timesheet can only be invoiced if it has been approved by the manager.
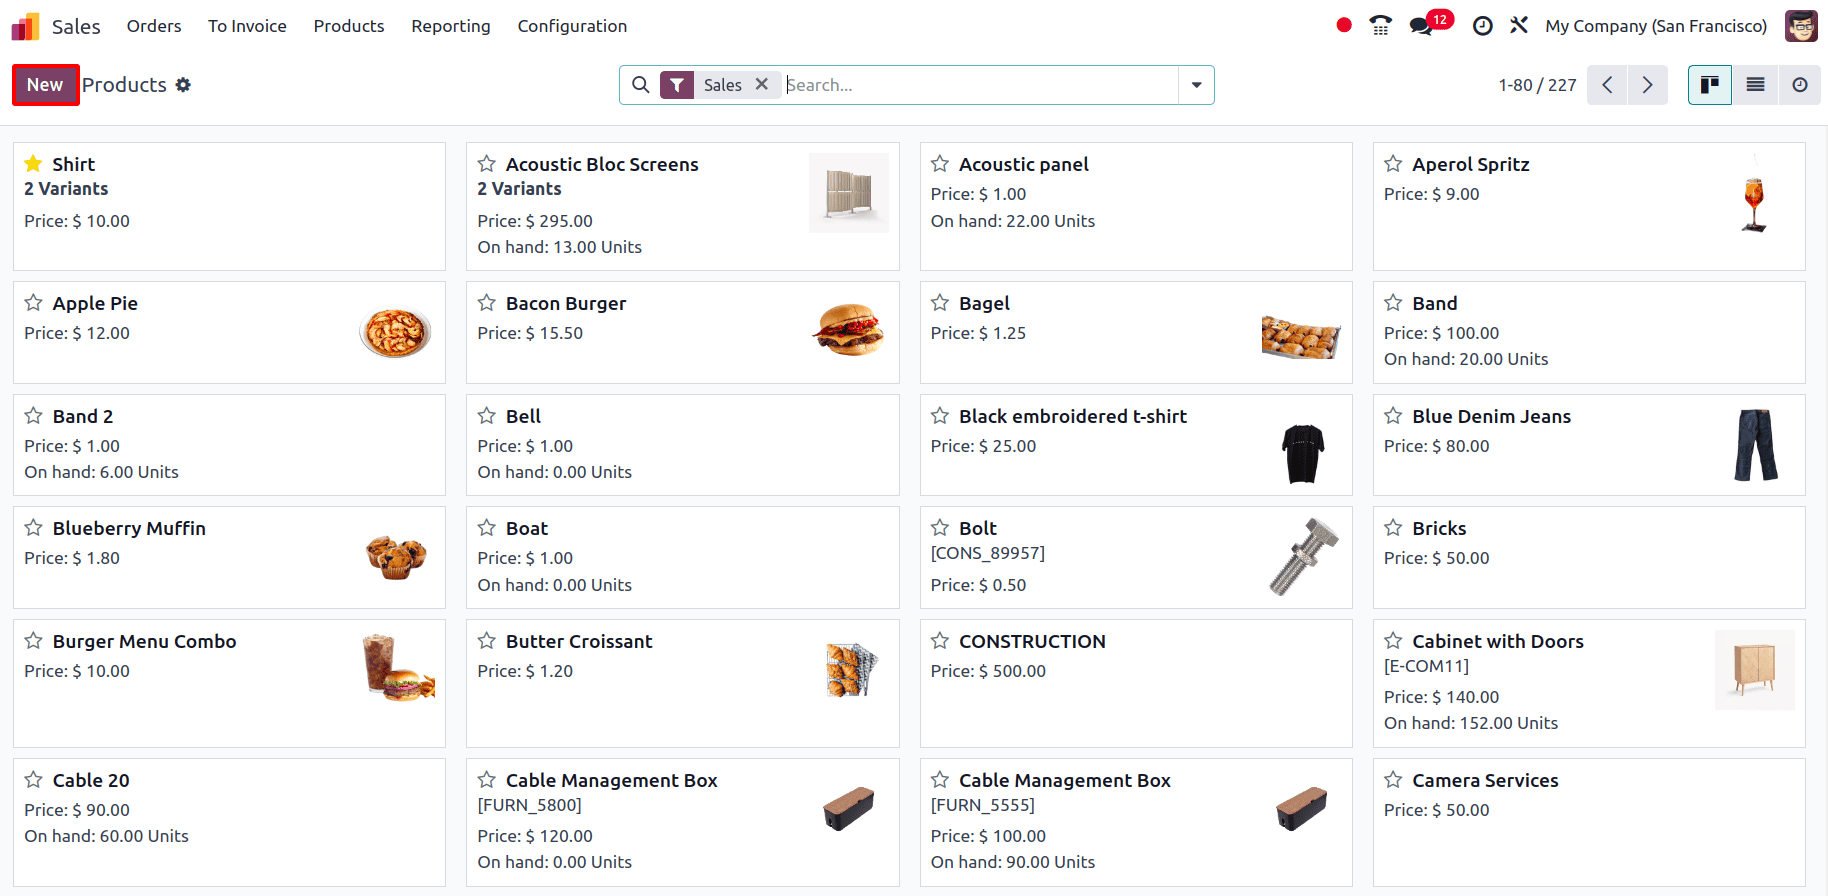
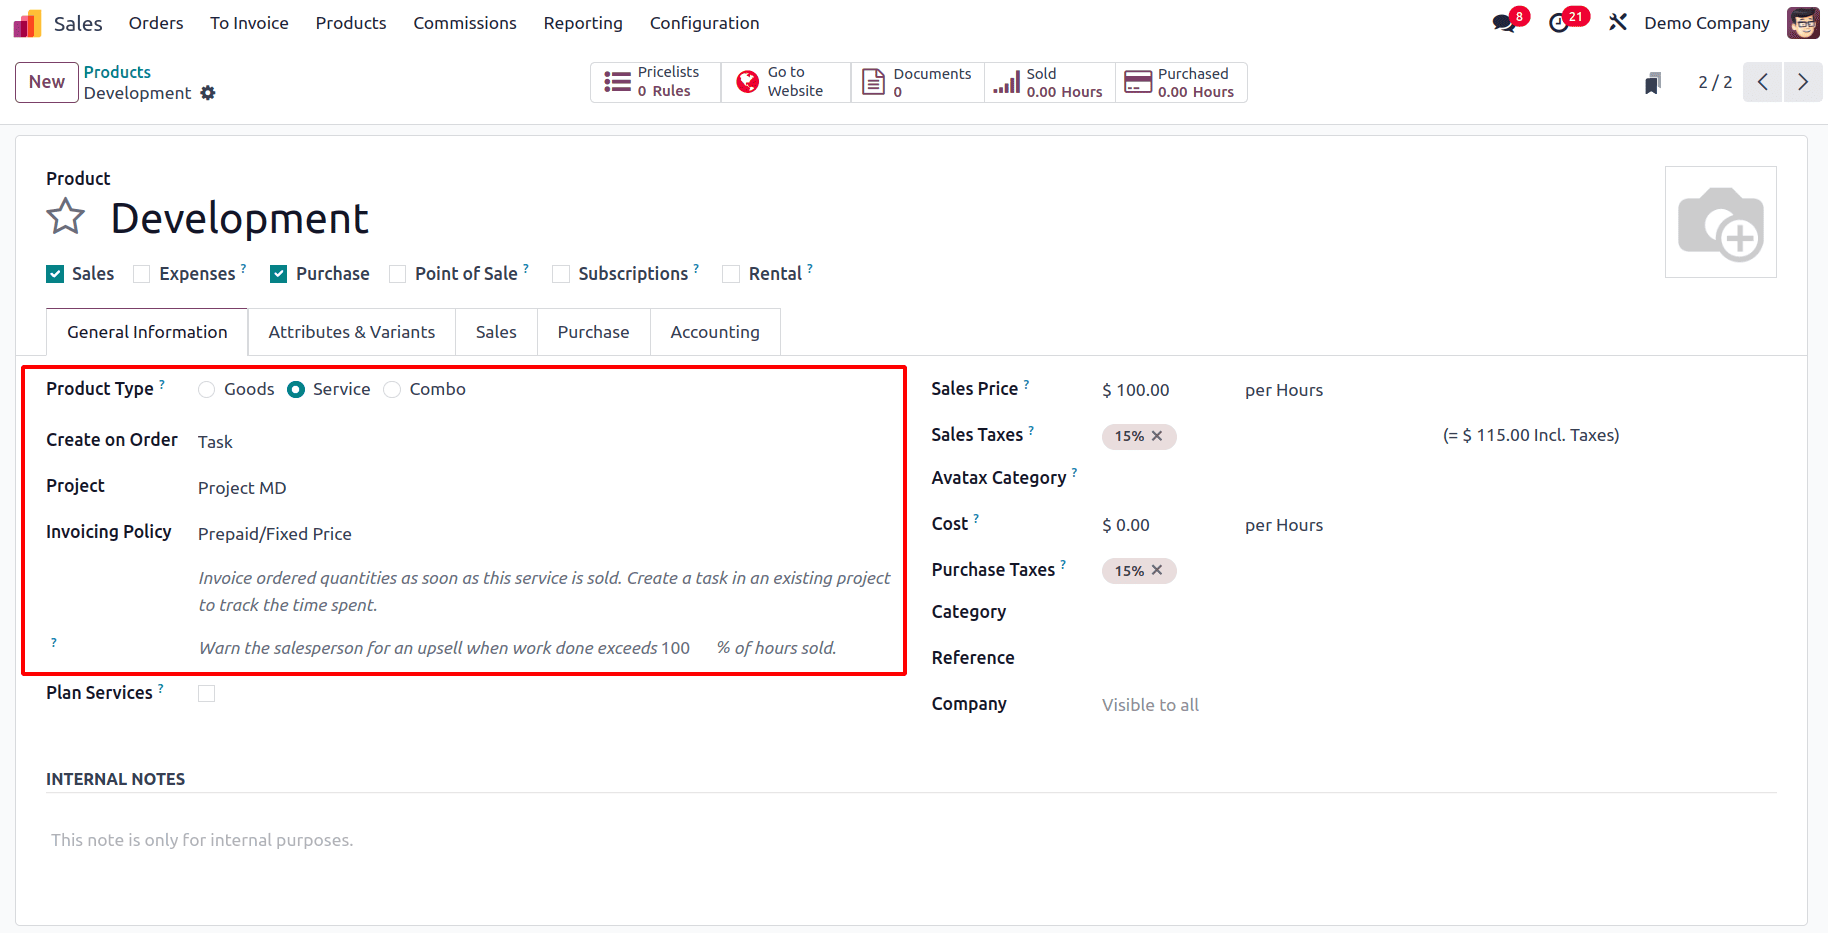
So here, the Invoicing Policy is set to All recorded timesheets. To check how it works, let's create a Service product with its invoicing policy set to Based on Timesheets. For that, navigate to the sales module and goto Products > Products and click on New to create a new product.
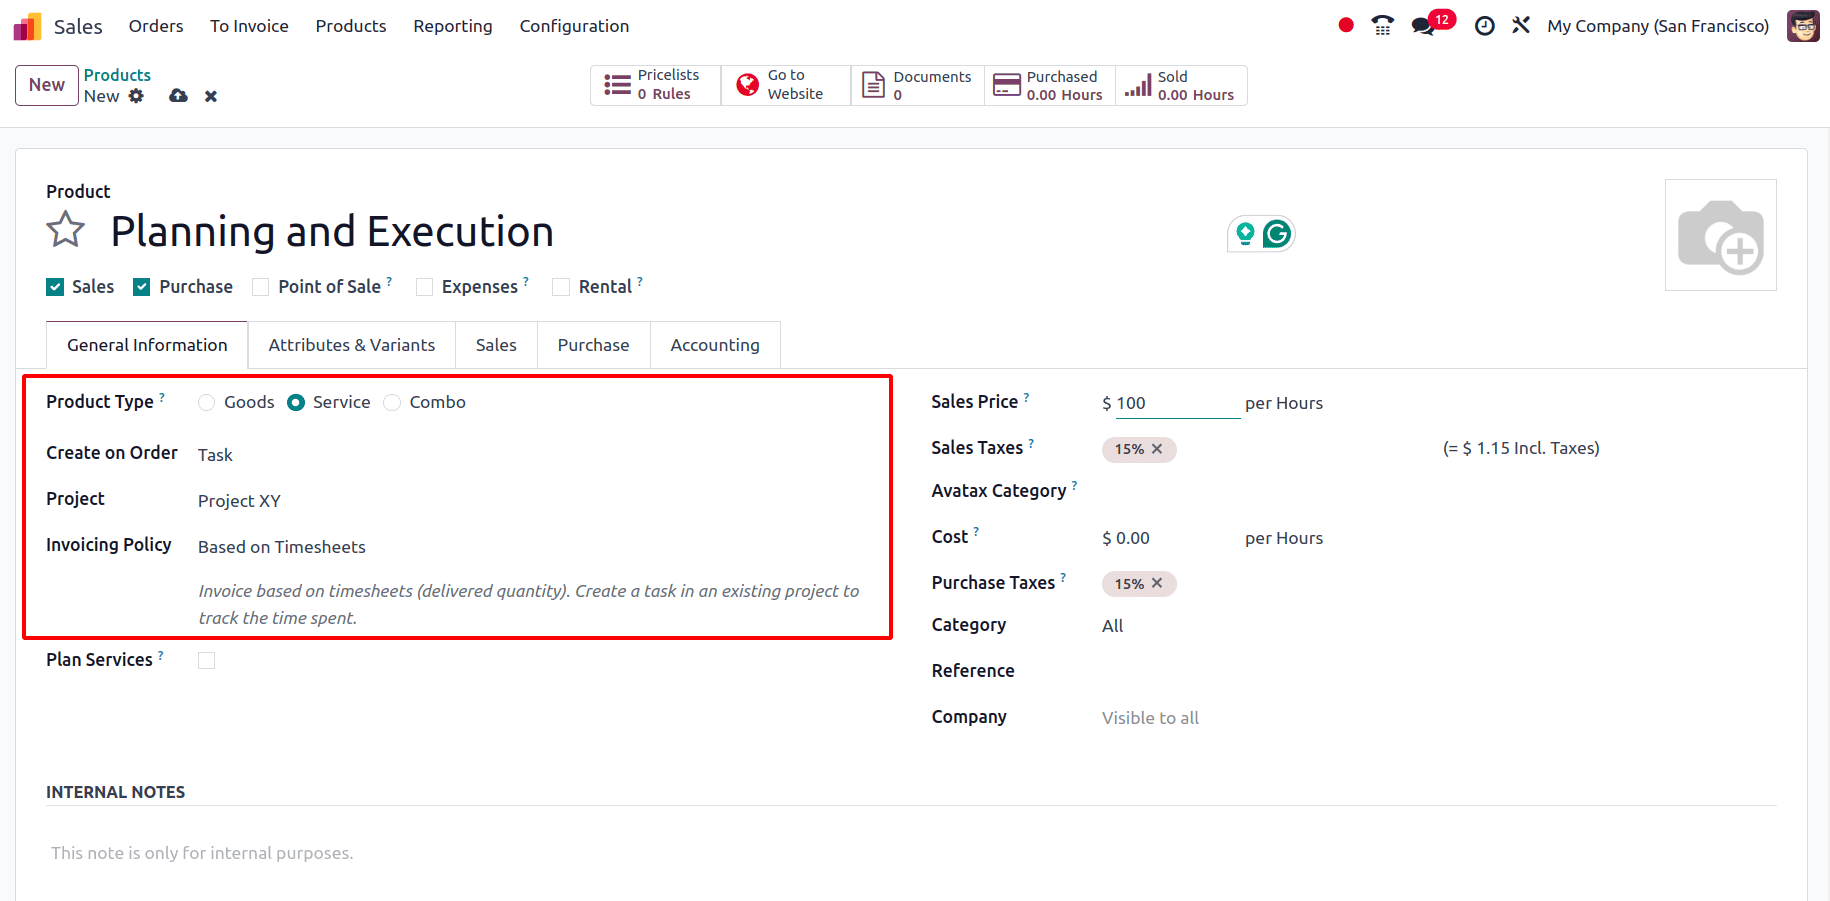
In the product form, enter the product name and set Create On Order to Task, then select the appropriate project for task creation. This configuration ensures that when an order containing this product is confirmed, a task is automatically generated under the chosen project. Next, set the Invoicing Policy to Based on Timesheets and provide the sales price per hour.
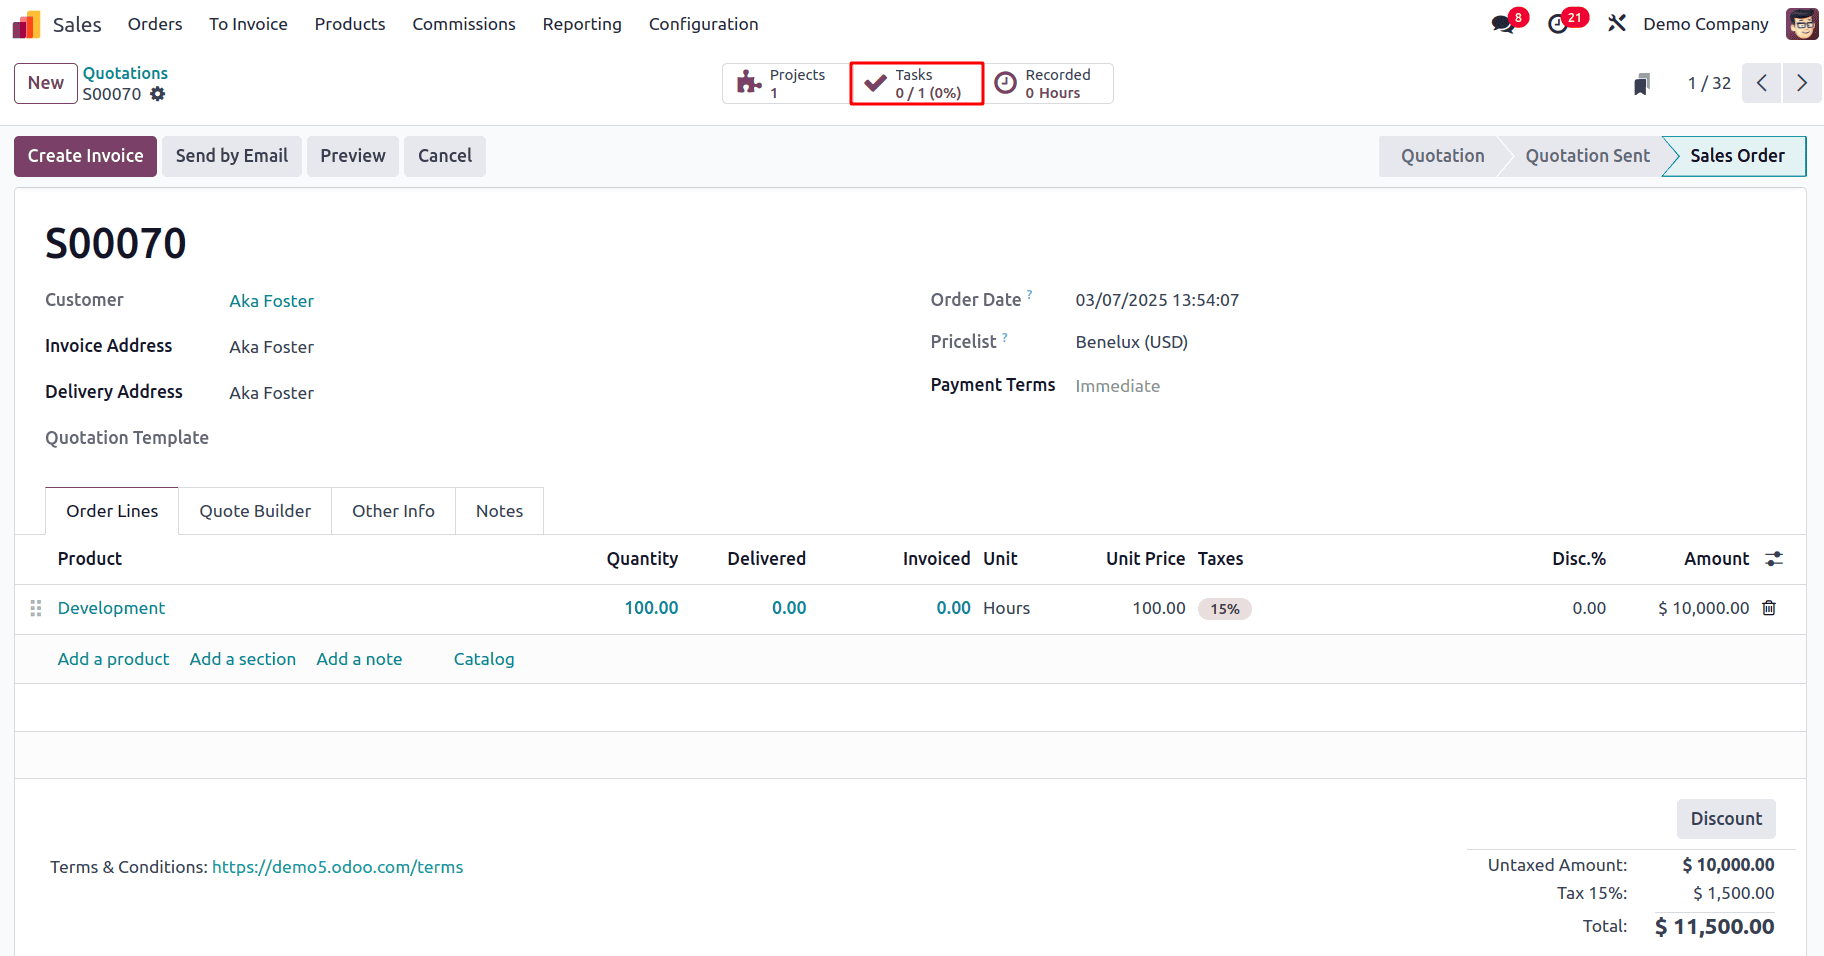
Create a new sales order via Orders > Quotations and add the customer details along with any other necessary information. Add the "Planning and Execution" product in the order so that the corresponding task is created under the designated project, and specify the quantity as the number of hours required for the task, which will serve as the allocated hours. Now, when the sales order is confirmed, the task is automatically created under the selected project, and a smart tab displaying the task appears.
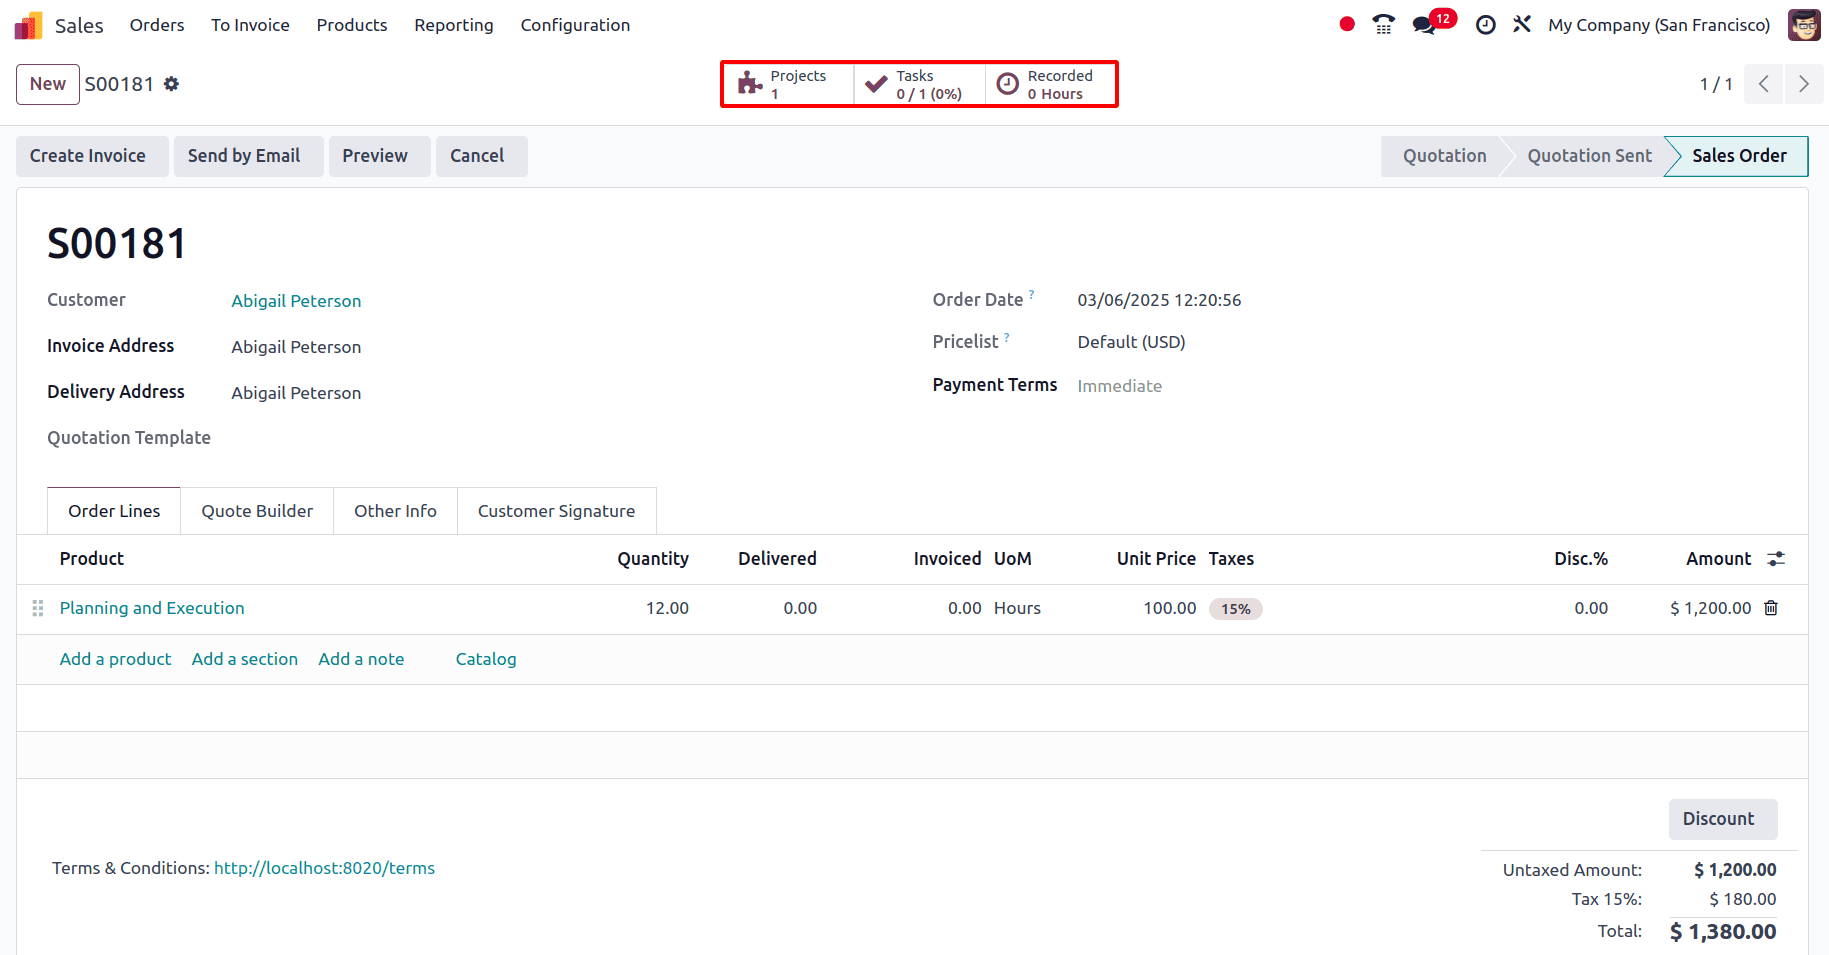
Go to the task through the smart tab, and for the task, add the time that has been spent by the employee under that task.
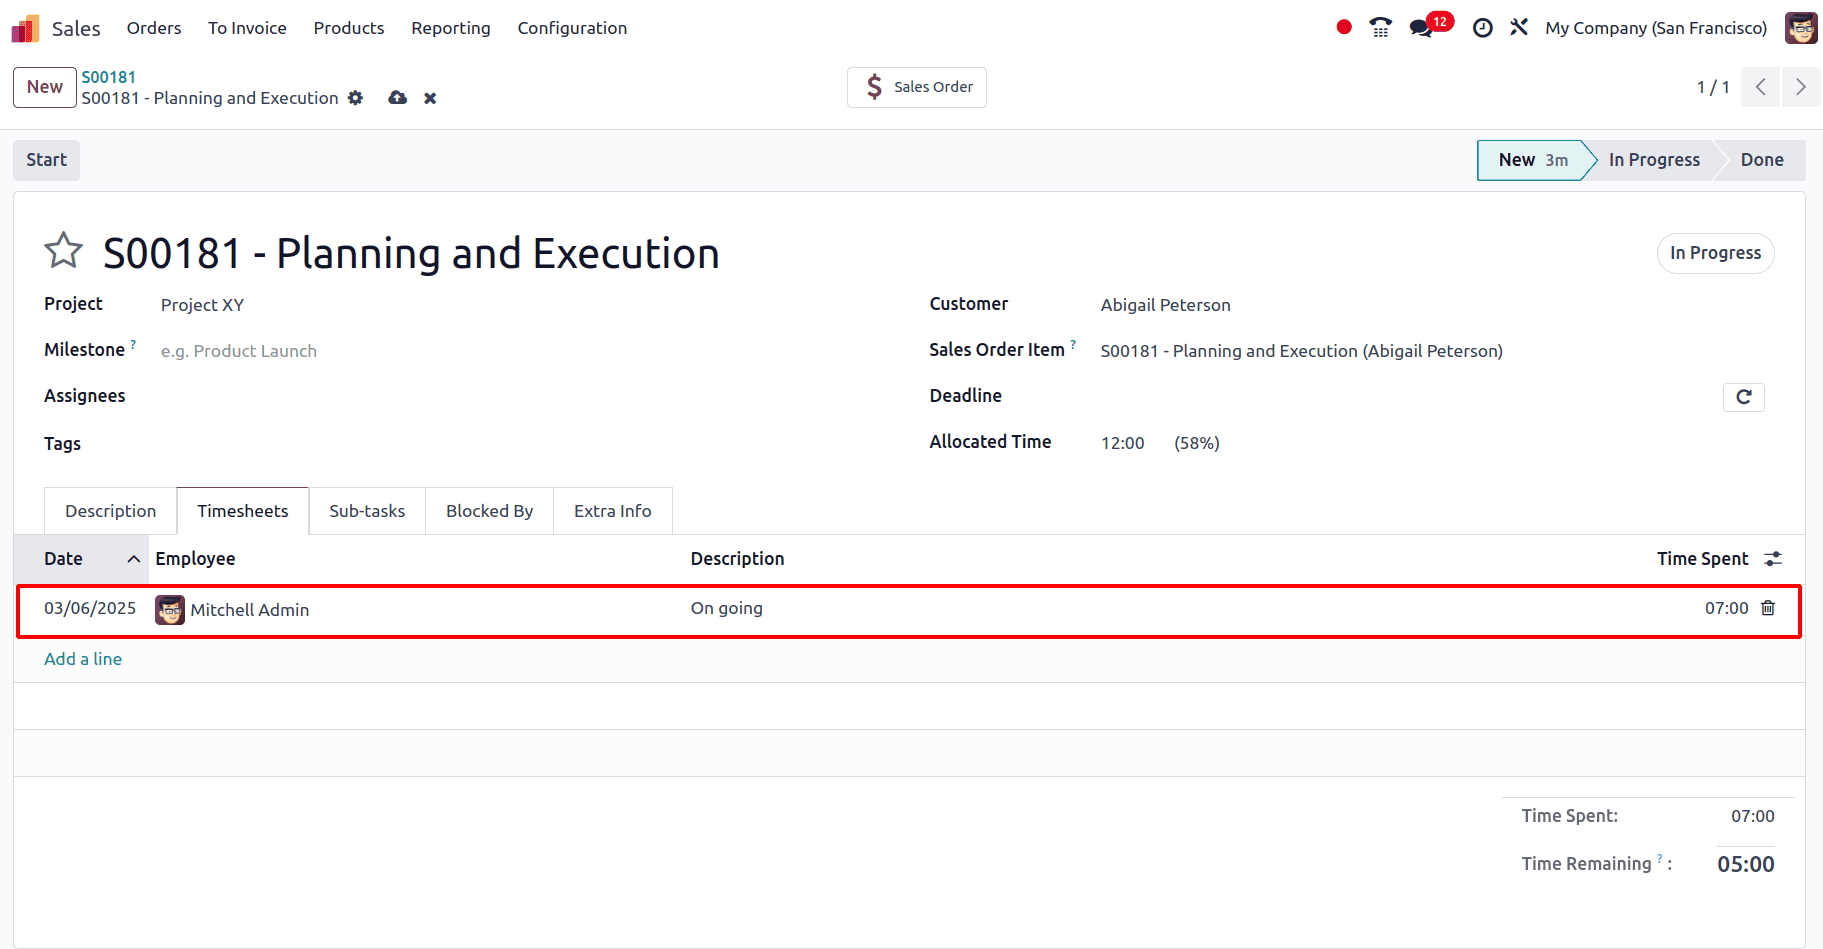
Once the time has been logged under the Timesheets tab of the task, this timesheet can be billed. For that, go back to the sale order.
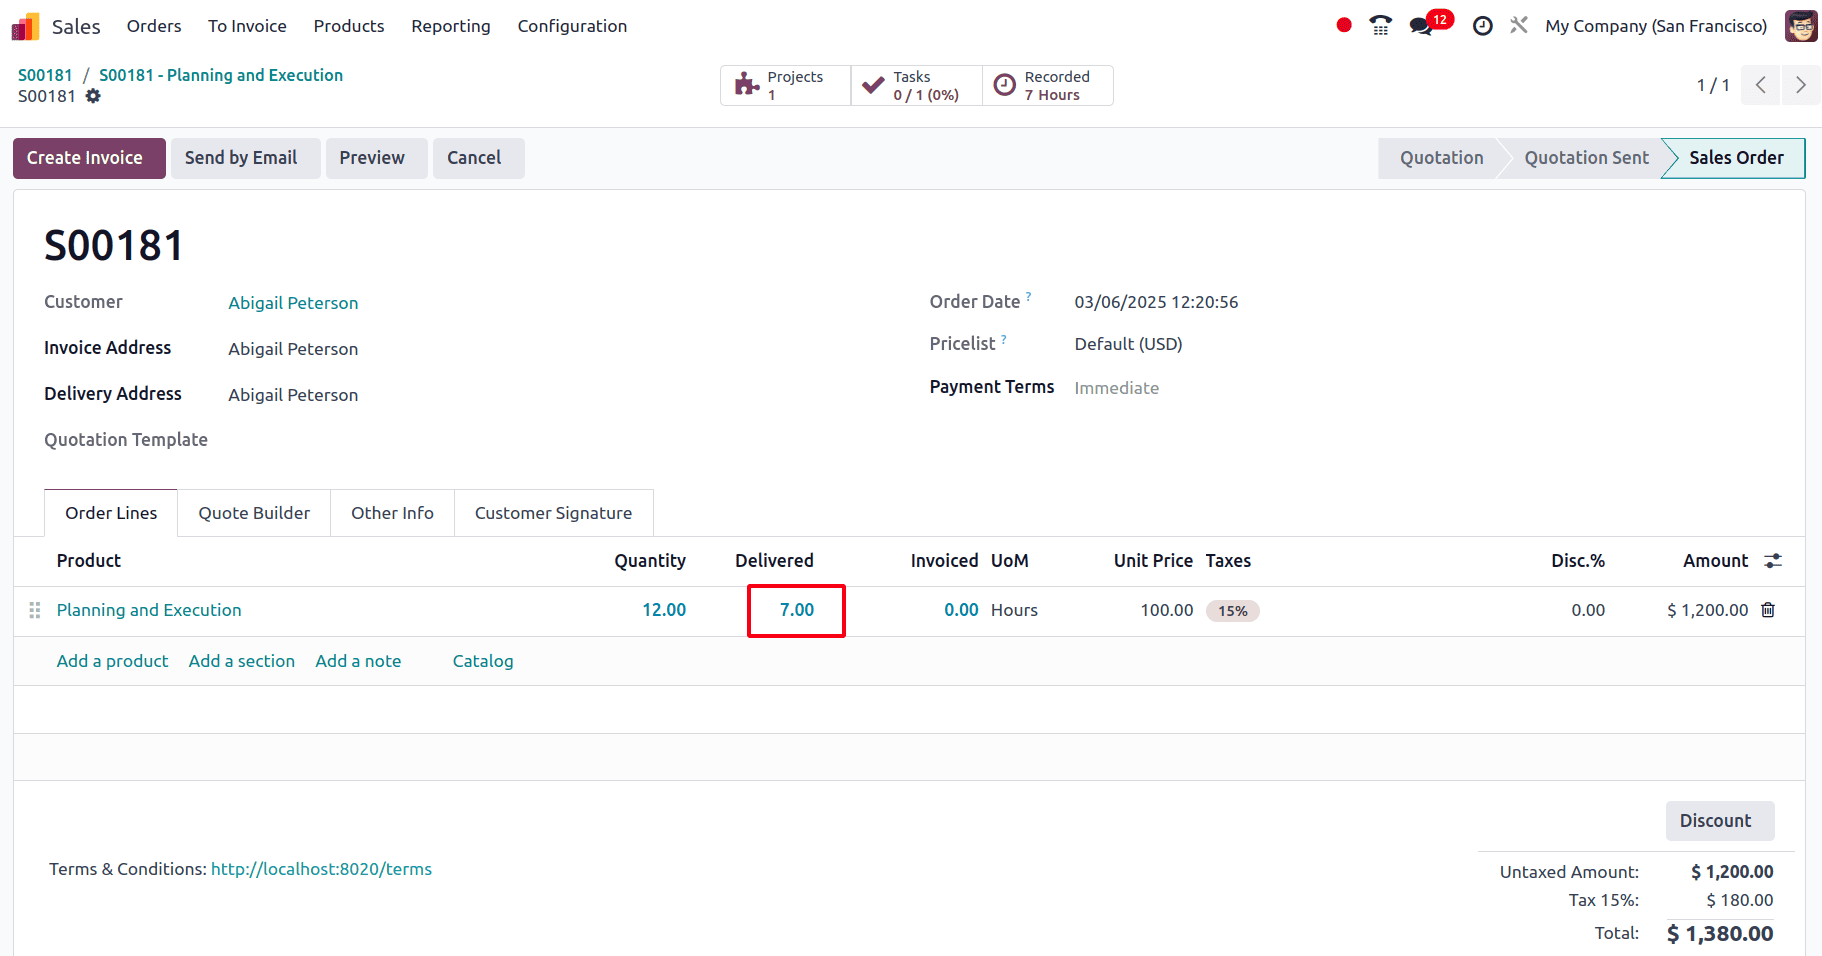
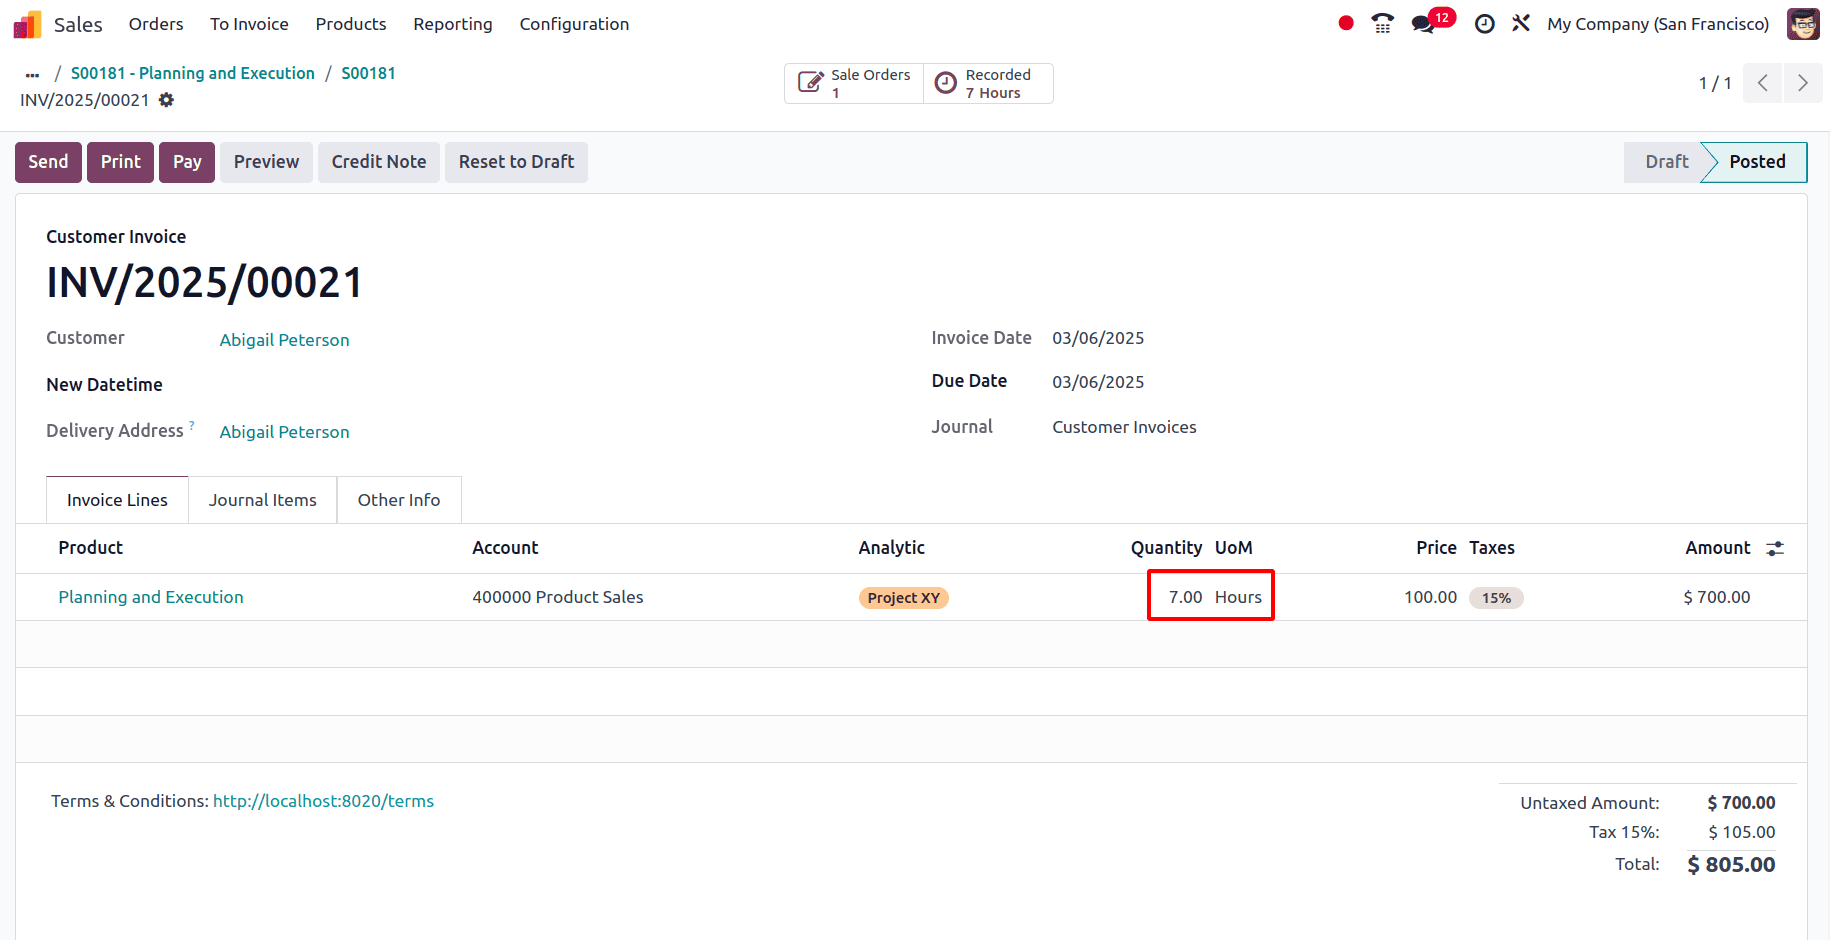
Now, since the invoicing policy is set to ‘All recorded timesheets, ’ an invoice can be generated for the timesheets that have been logged under the task. In the sale order, it can be seen that the time is considered to be delivered, and the Create Invoice button is active. Click on that to create a draft invoice, and then click on the Confirm button to validate the invoice and post it.
Validated Timesheets Only
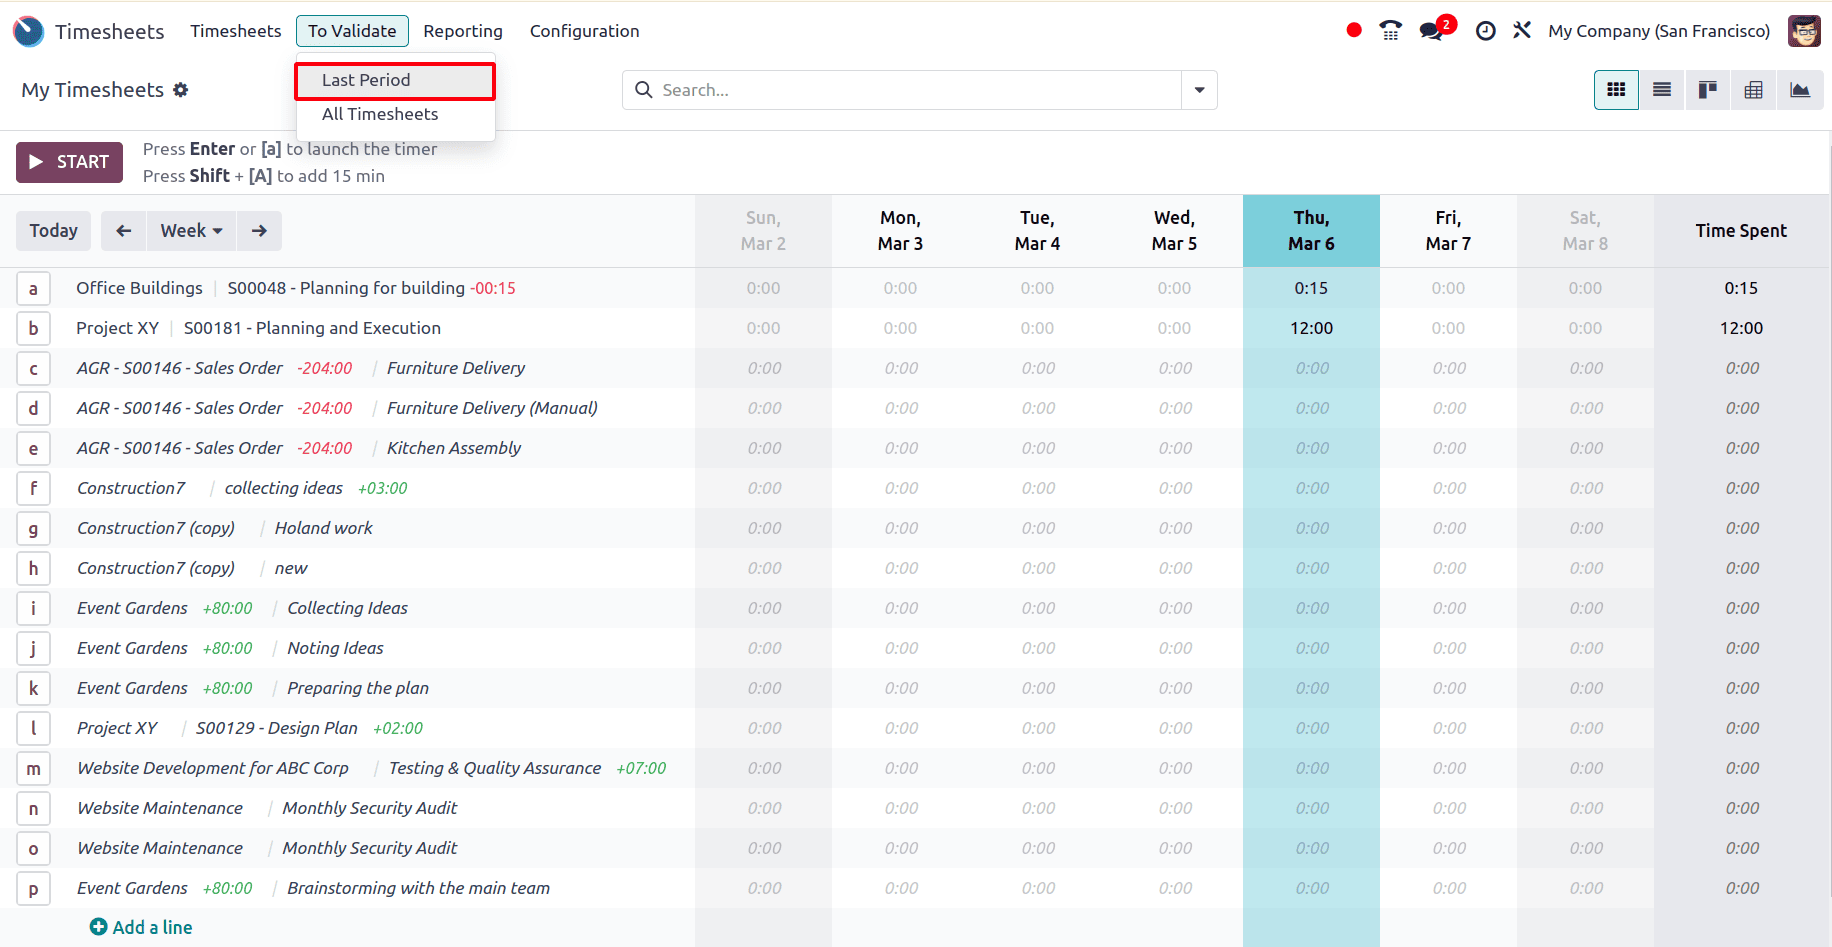
Now, let's say three employees are working on a project, and one among the three employees provides internal support for the task under the project, so the time spent by that employee on the task need not be invoiced to the customer. In such cases, the Invoicing Policy can be set to Validated timesheets only, and the manager can approve the timesheets of the other two employees who are directly involved in the project and whose time has to be invoiced to the customer. For that, navigate back to the Timesheets module, go to settings, select Validated timesheet only as the invoicing policy, and save.

Create a service product for which the Create on Order is set to Task, and select the project under which the task must be created. And set the invoicing policy to Based on Timesheets.
Now, when a sale order is confirmed with this product, a task will be created under the project that has been mentioned. Go to Orders > Quotations and create a new quotation. Add the customer and other relevant details, and also add the product that was created earlier. Click on the Confirm button to confirm the quotation. Once it has been confirmed, the task is created, and a smart tab for the task appears.
Click on the smart tab to go to the task and add under the timesheets tab of the task add the timesheets for the employees who have worked under the task.

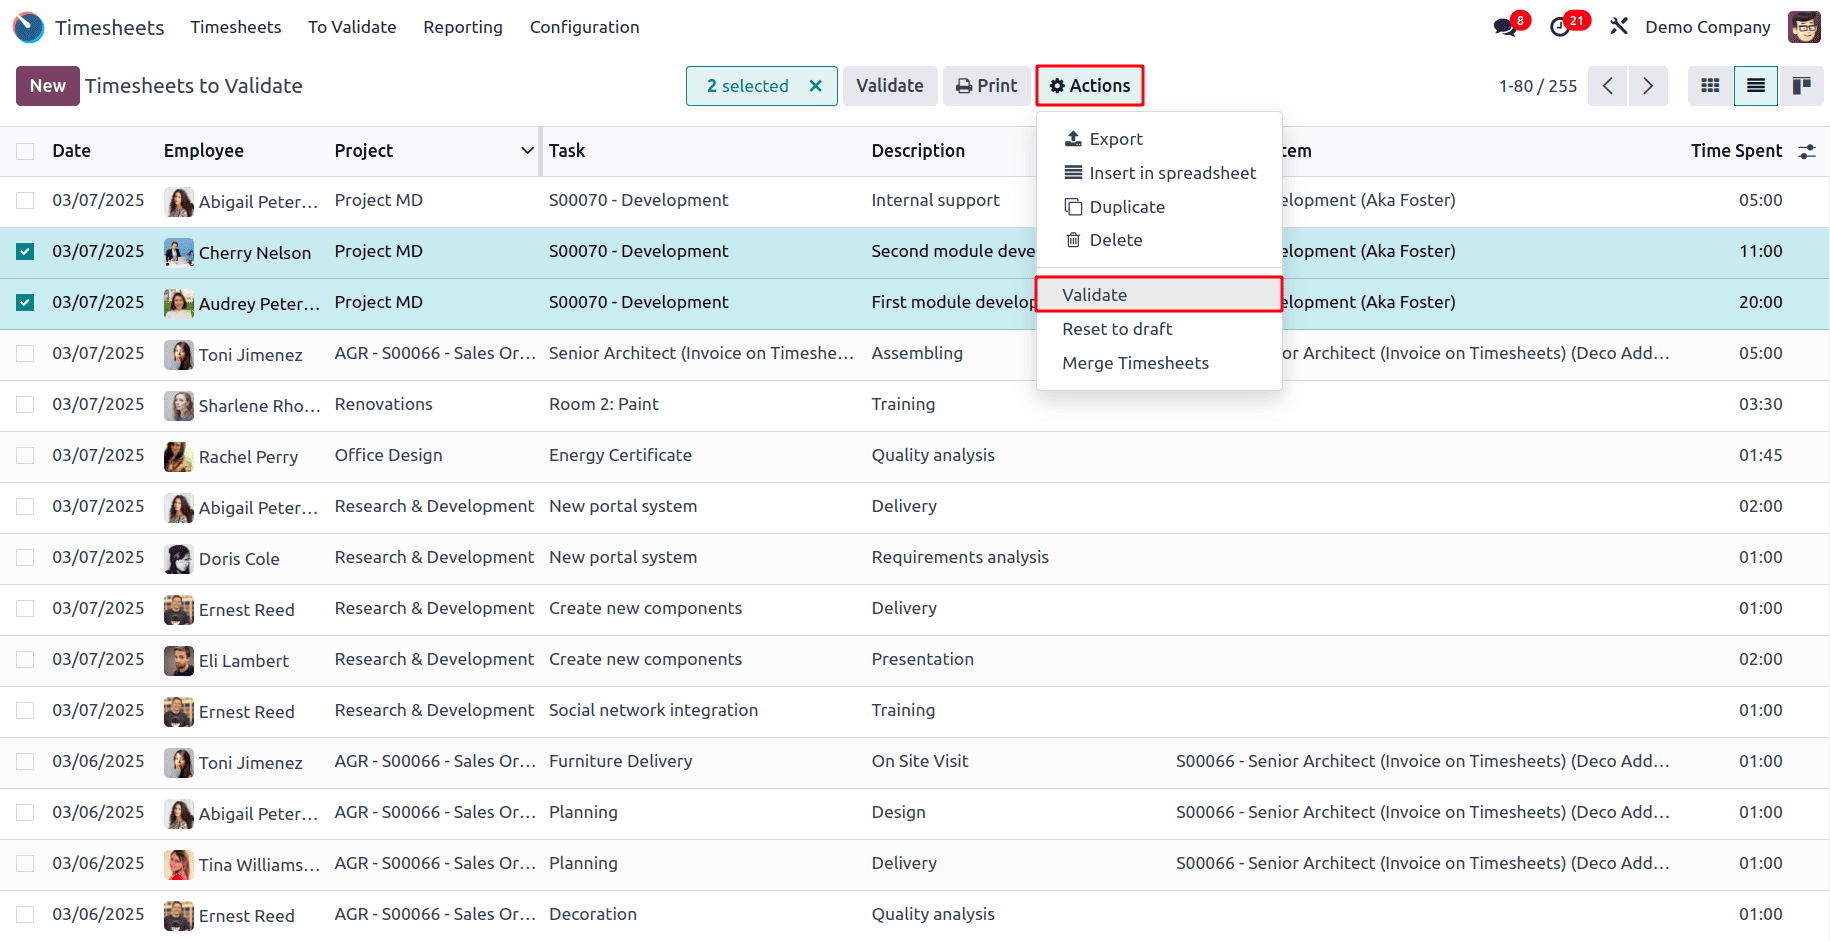
The timesheet has been added, and since the invoicing policy is set to ‘Validated timesheets only,’ it can only be invoiced after manager approval. The manager can review the timesheet and decide whether to approve it. In this case, the time spent on internal support by the employee, ‘Abigail Peterson,’ does not need to be invoiced to the customer. However, the other two timesheets must be invoiced, so the manager must approve them. So to approve the timesheet, go to the Timesheets module and navigate to To Validate > Last Period, where the timesheets that need to be validated can be viewed according to the week, month, or year, and by default, the view will be set to ‘Last Period’.
To validate particular timesheets, go to the list view of the Timesheets to validate and, from there locate the timesheets that have been added.
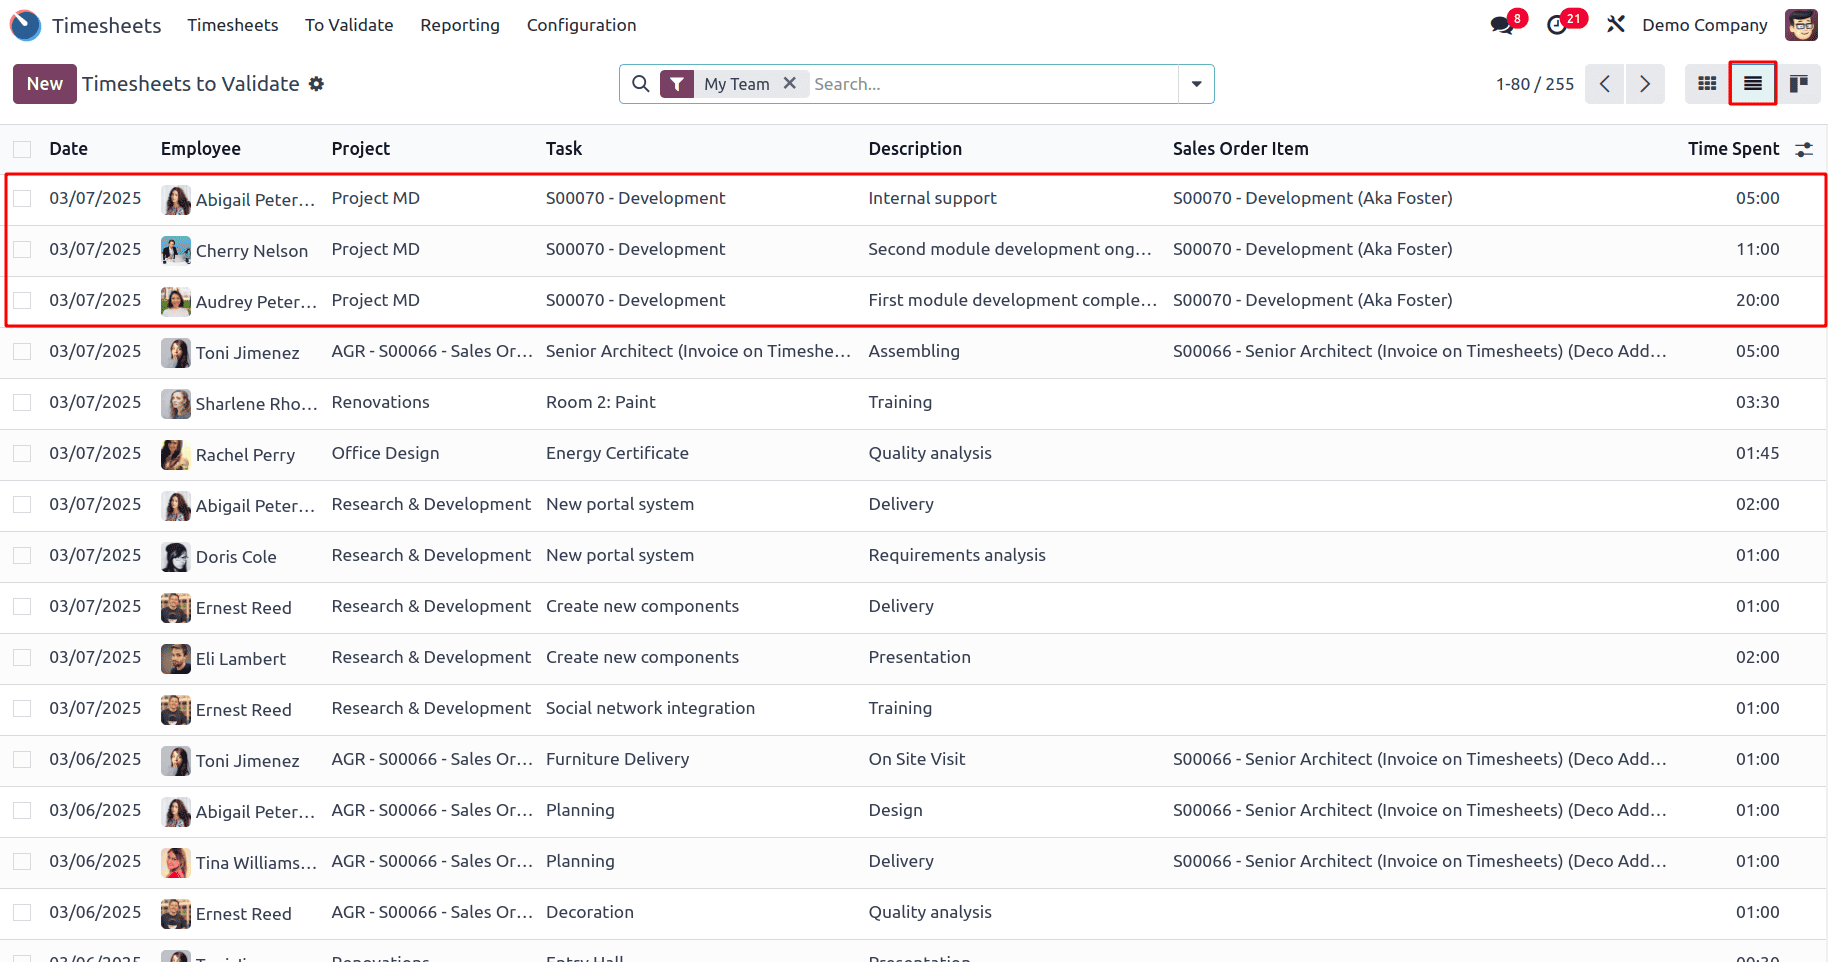
From here, select the timesheets that need to be validated. In this case, an invoice does not need to be created for Abigail Peterson. So, select the other two timesheets and click the Actions button. Then, choose the Validate option to approve and process the timesheets for invoicing.
So once the timesheets have been validated, go to the tasks, and under the timesheets tab, it can be seen that the validated timesheets can no longer be edited. Also, the total time spent on the task has been given as 36 hours. From here, click on the sale order smart tab to got the associated sale order.
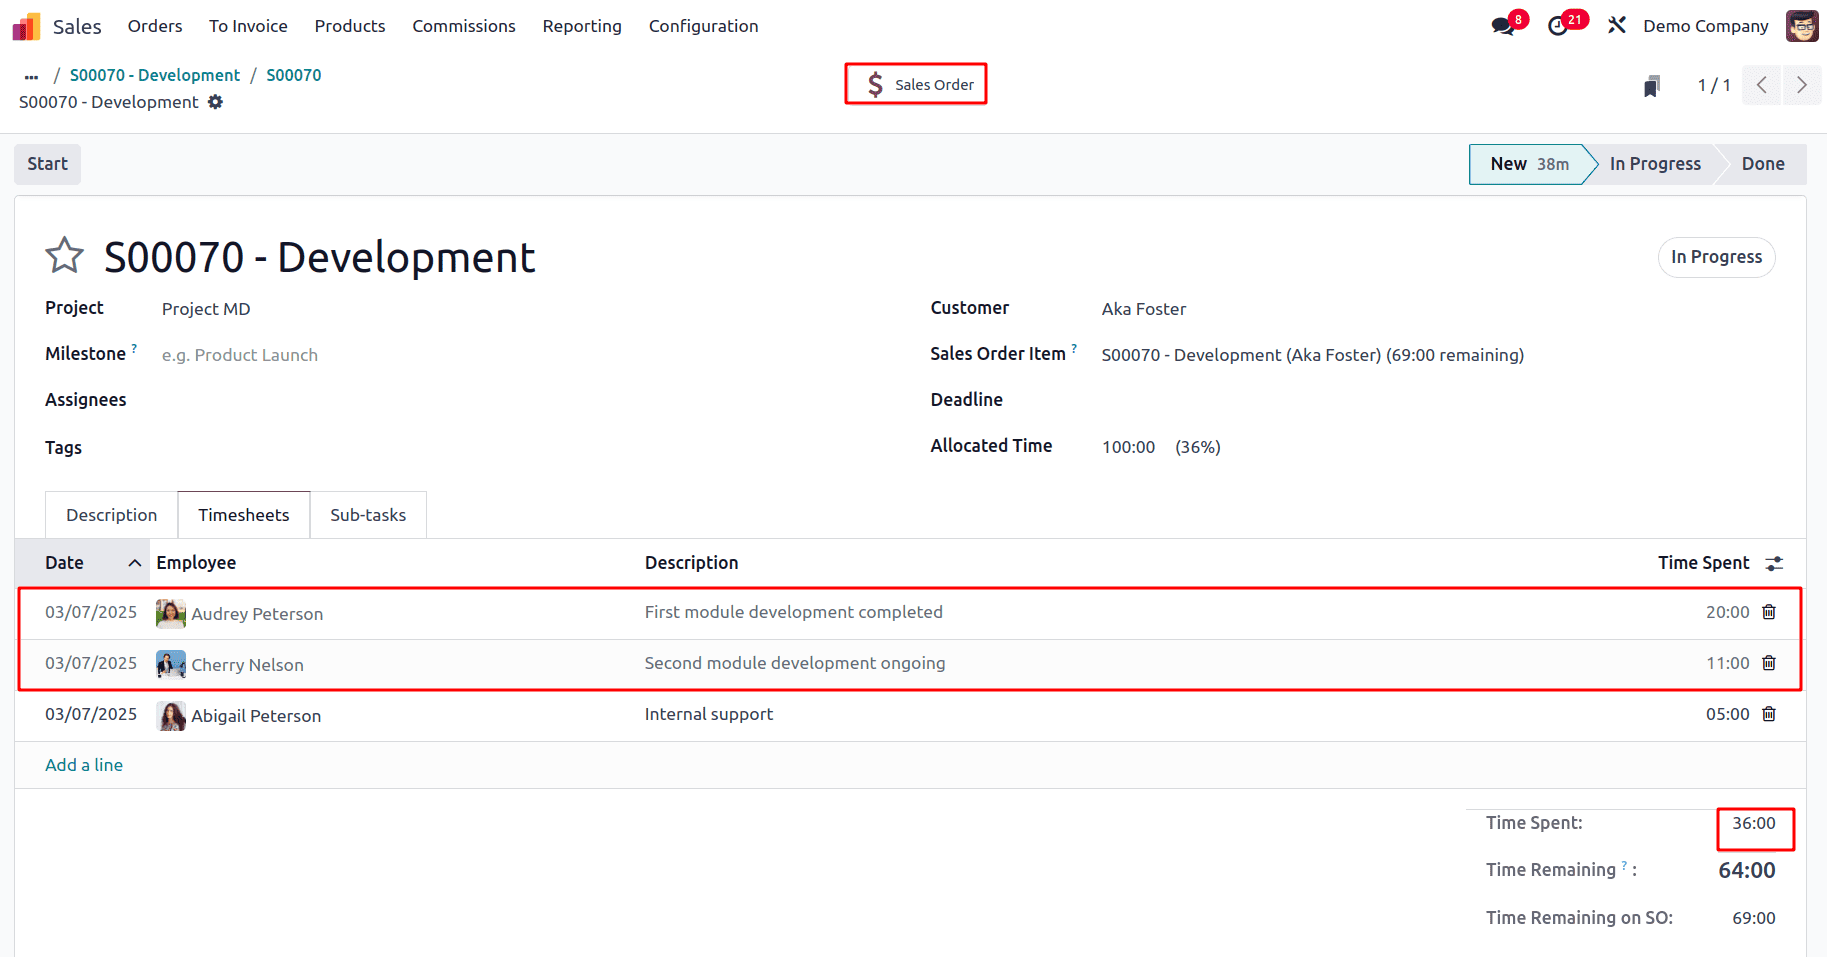
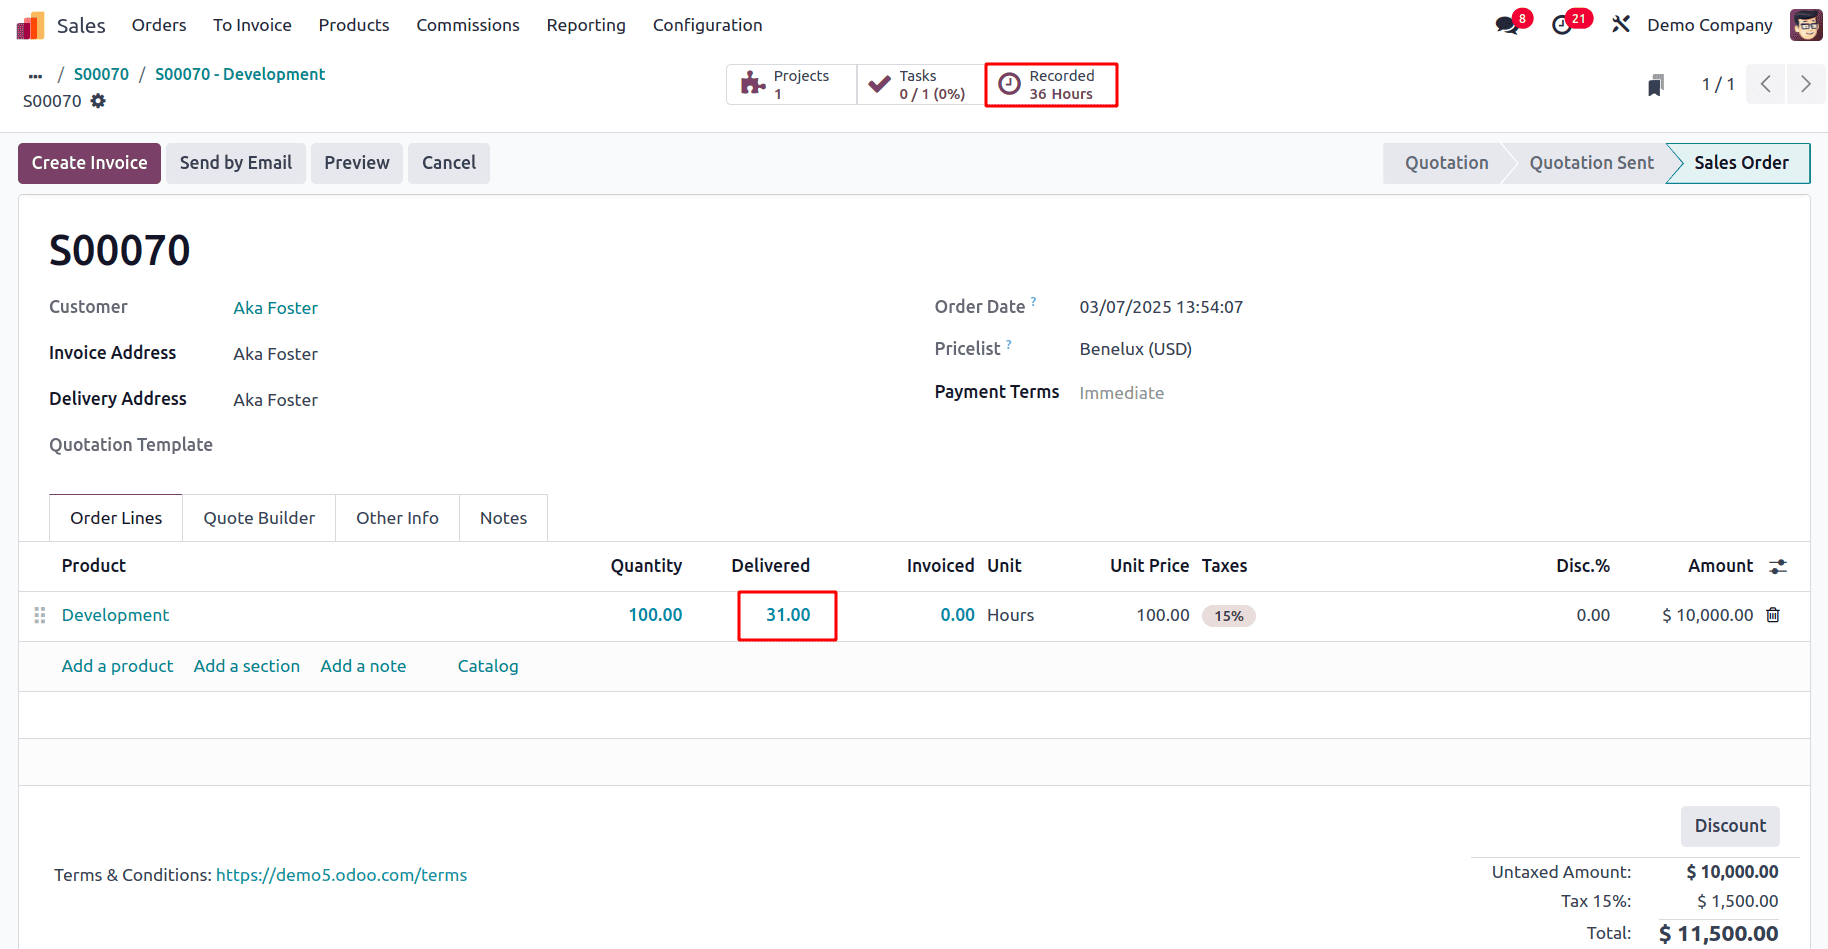
In the sale order, it can be seen that the Delivered time has been given as the 31, although recorded hours for the task is 36 hours. This is because only the timesheet for 31 hours has been validated by the manager. So now an invoice can be created for the delivered time. Click on the Create Invoice button.
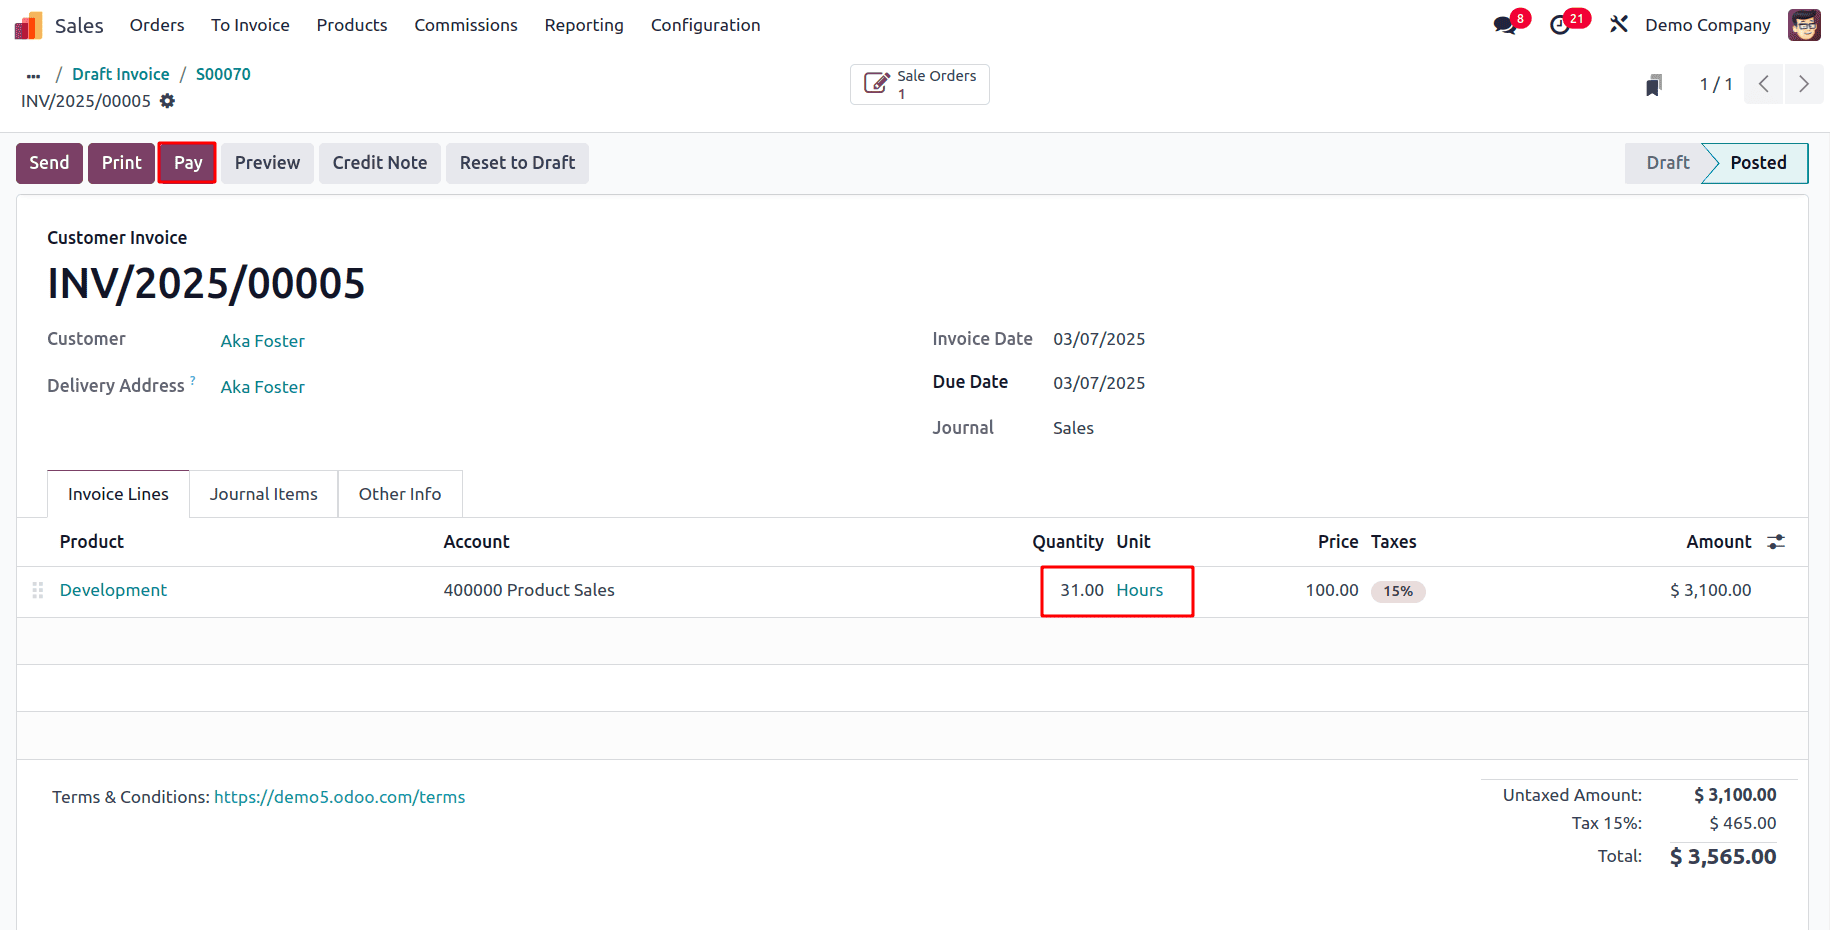
Create a draft invoice and confirm the invoice to post it. Once the invoice has been posted, payment can be processed for it.
With this feature, businesses can choose how timesheets are billed, either all recorded timesheets or only validated ones. This flexibility ensures accurate invoicing based on their needs, making the billing process smooth and reliable.
To read more about An Overview of Time Billing & Invoicing Policies in Odoo 16 Timesheet, refer to our blog An Overview of Time Billing & Invoicing Policies in Odoo 16 Timesheet.