Odoo is a powerful and flexible ERP system that provides various ways to display and interact with data. In Odoo 18, views play a crucial role in defining how users see and manage records within different modules. These views help enhance user experience by offering structured and visually appealing layouts.
Odoo 18 introduces multiple view types, each serving a specific purpose, whether it's listing records, displaying detailed forms, or presenting data in an interactive dashboard. Understanding these view types is essential for developers and functional users to optimize workflows and improve efficiency.
In this blog, we will explore the different view types available in Odoo 18 and their key functionalities.
Form View
The Form View is used to display detailed information about a single record, allowing users to view and edit data in an intuitive interface. This view is defined using the <form> tag, which structures and organizes the record’s fields for better readability and usability.
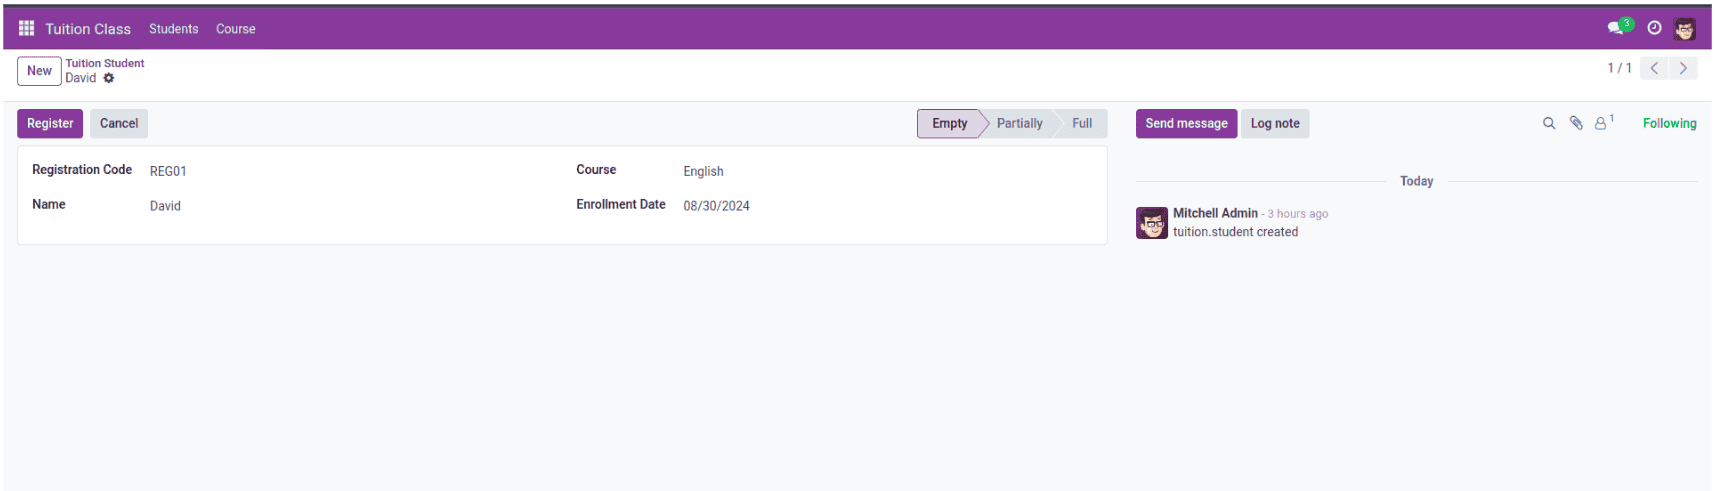
Fields within a Form View are defined using the <field> tag. To enhance the layout, you can use the <sheet> and <group> tags, where <group> helps arrange fields into columns for a structured presentation.
Example of a Form View Definition:
<?xml version="1.0" encoding="UTF-8" ?><odoo> <record model="ir.actions.act_window" id="action_tuition_student"> <field name="name">Tuition Student</field> <field name="res_model">tuition.student</field> <field name="view_mode">list,form</field> </record> <record id="tuition_student_view_list" model="ir.ui.view"> <field name="name">tuition.student.view.list</field> <field name="model">tuition.student</field> <field name="arch" type="xml"> <list> <field name="registration_code"/> <field name="name"/> <field name="course_id"/> <field name="enrollment_date"/> </list> </field> </record> <record id="tuition_student_view_form" model="ir.ui.view"> <field name="name">tuition.student.view.form</field> <field name="model">tuition.student</field> <field name="arch" type="xml"> <form string="Tuition"> <header> <field name="state" widget="statusbar"/> <button name="action_book" type="object" string="Register" class="btn btn-primary me-1"/> <button string="Cancel" class="btn-default" special="cancel"/> </header> <sheet> <group> <group> <field name="registration_code"/> <field name="name"/> </group> <group> <field name="course_id"/> <field name="enrollment_date"/> </group> </group> </sheet> <div class="oe_chatter"> <field name="message_follower_ids"/> <field name="message_ids"/> </div> </form> </field> </record> <menuitem id="tuition_student_menu_root" name="Tuition Class"/> <menuitem id="tuition_student_menu" name="Students" parent="tuition_student_menu_root" action="action_tuition_student"/></odoo>
In the above code, another record is created to define a window action, which determines how users interact with the tuition.student model within Odoo.
Understanding the Window Action
A window action in Odoo allows users to access and manage records within a specific model. The key attributes in this action include:
* Name: The action is labeled as "Tuition Student."
* Model: It operates on the tuition.student model.
* View Mode: The default view mode is set to list (tree), but users can switch to form view for detailed records.
If you define a specific view type for a model, you must specify it in the view_mode attribute. For example, Pivot View: Add pivot, Graph View: Add graph, Kanban View: Add kanban, Activity View: Add activity, Calendar View: Add calendar, Hierarchy View: Add hierarchy.
By defining a window action, users can efficiently manage and navigate records within the Tuition Student model, ensuring a seamless experience in Odoo.
List View
The List View, also known as the List View, is used to display multiple records in a structured format, similar to a table. Each row represents a record from the database, while the columns correspond to different fields within those records.
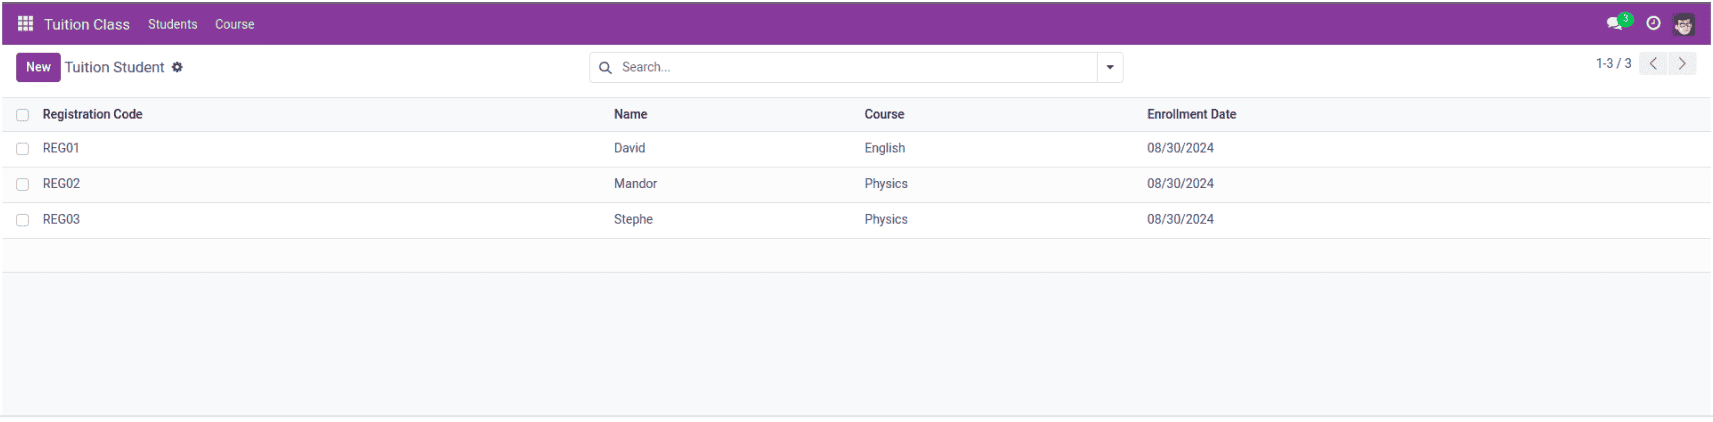
This view supports essential functionalities such as sorting, filtering, and grouping, making it easier to navigate and analyze data efficiently. It is defined using the <list> tag, which serves as the root element.
Below is an example of how a List view is defined:
<record id="tuition_student_view_list" model="ir.ui.view">
   <field name="name">tuition.student.view.list</field>
   <field name="model">tuition.student</field>
   <field name="arch" type="xml">
       <list>
           <field name="registration_code"/>
           <field name="name"/>
           <field name="course_id"/>
           <field name="enrollment_date"/>
       </list>
   </field>
</record>
Once the Tree view is created in the ir.ui.view model, you must set the view mode to 'list' in the window action to ensure it is displayed correctly.
Pivot View
The Pivot View is a powerful tool for data analysis, enabling users to generate, filter, and organize reports dynamically. It is particularly useful for users who need to extract reports in formats like XLSX for further analysis.
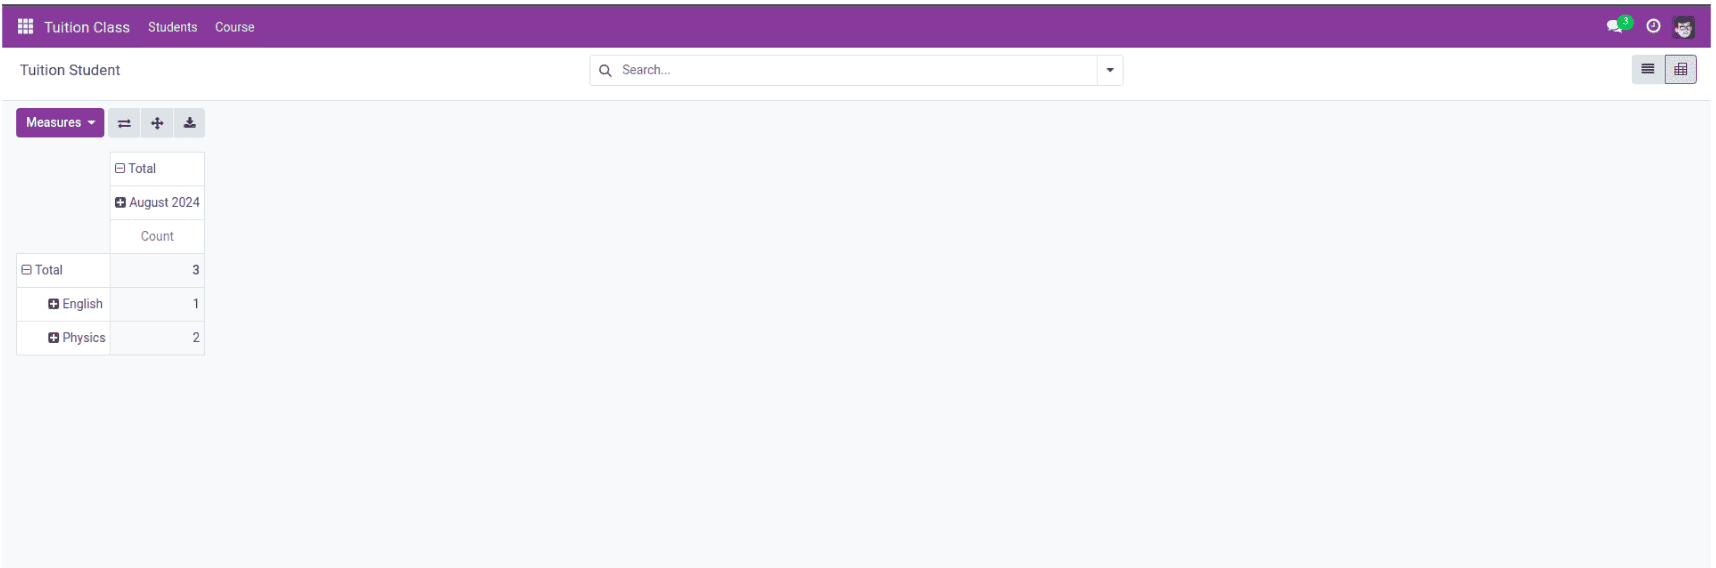
In a Pivot view, data can be structured into rows and columns based on specific fields, making it easier to analyze trends, compare metrics, and gain insights from large datasets. This view is defined using the <pivot> tag, where fields and their types are specified.
Example of a Pivot View Definition:
<record id="tuition_student_view_pivot" model="ir.ui.view">
  <field name="name">tuition.student.view.pivot</field>
  <field name="model">tuition.student</field>
  <field name="arch" type="xml">
      <pivot string="Student Enrollment Analysis">
          <field name="course_id" type="row"/>
          <field name="enrollment_date" type="col"/>
      </pivot>
  </field>
</record>
By leveraging the Pivot view, users can efficiently manipulate and summarize data, making it an essential feature for reporting in Odoo.
Graph View
The Graph view provides a visual representation of data, making it easier for users to analyze trends and gain insights at a glance. It supports different chart types, including bar charts, pie charts, and line graphs, allowing for intuitive data interpretation.
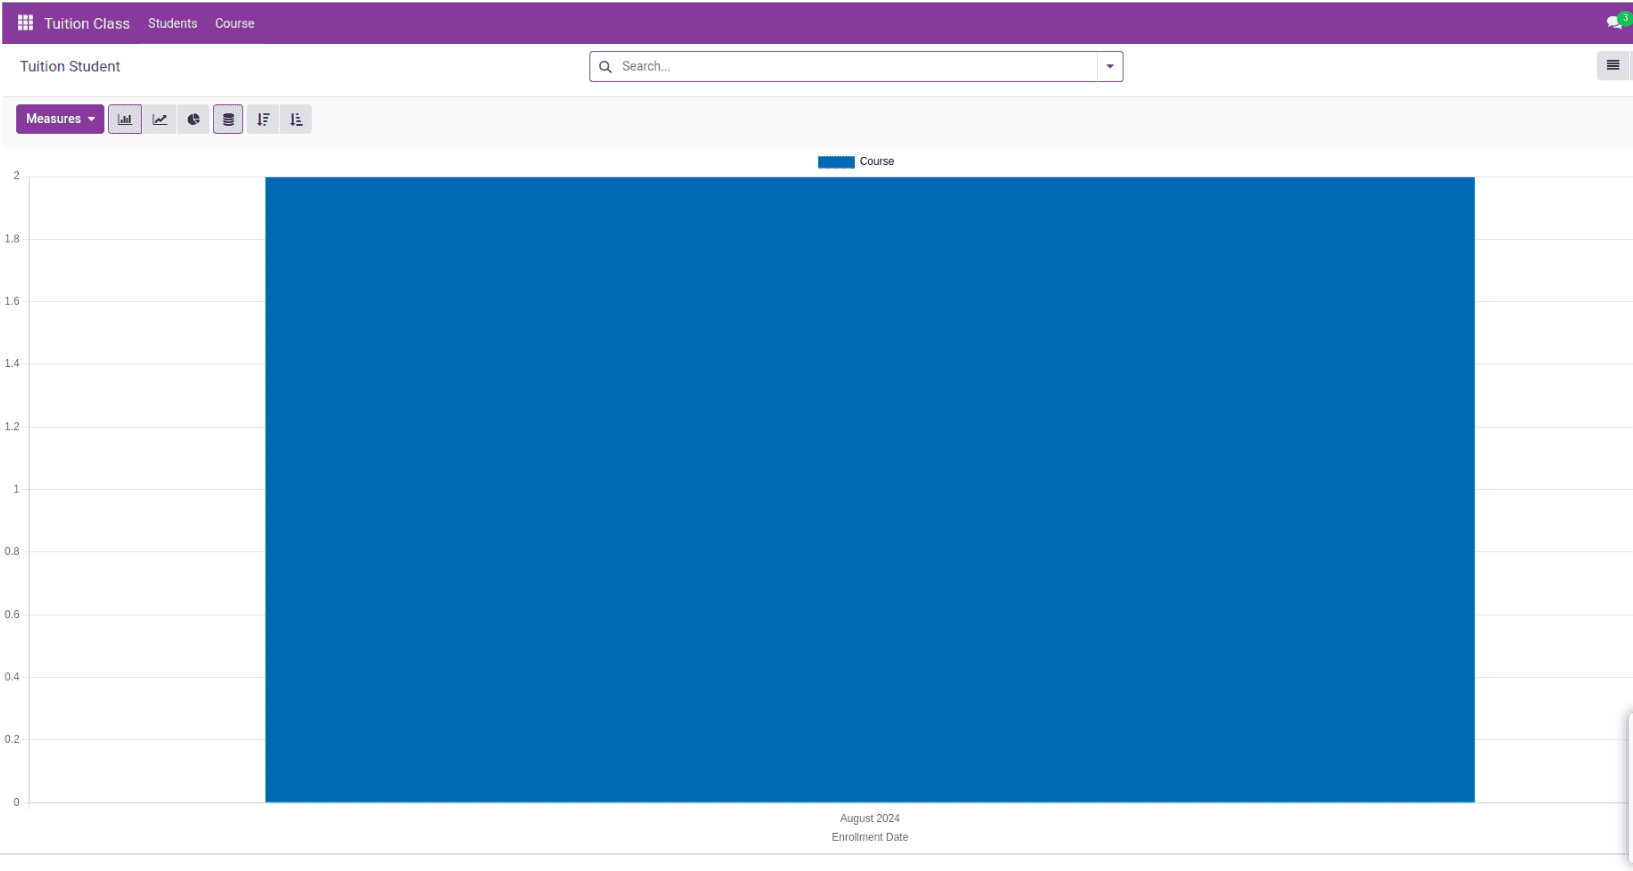
This view is defined using the <graph> tag, where attributes specify the type of chart and the fields to be visualized.
Example: Graph View for Student Enrollment Trends
<record id="tuition_student_view_graph" model="ir.ui.view">
  <field name="name">tuition.student.view.graph</field>
  <field name="model">tuition.student</field>
  <field name="arch" type="xml">
      <graph string="Enrollment Statistics" type="bar">
          <field name="course_id" type="measure"/>
          <field name="enrollment_date" type="row"/>
      </graph>
  </field>
</record>
Understanding Field Types in a Graph View
Each field in a Graph view can have a type attribute that determines how data is grouped or measured:
* type="row" - Defines the grouping of records by rows.
* type="col" - Groups records by columns for comparison.
* type="measure" - Used for numerical data (integers or floats) to define values that will be measured or aggregated.
By leveraging these attributes, the Graph view provides a flexible and dynamic way to represent data, making it an essential tool for data visualization in Odoo.
Kanban View
The Kanban view presents records as cards, organized into columns for easy visualization and workflow management. This view is especially beneficial for project management, sales pipelines, helpdesk tickets, or any scenario where tasks and records need to be tracked visually.
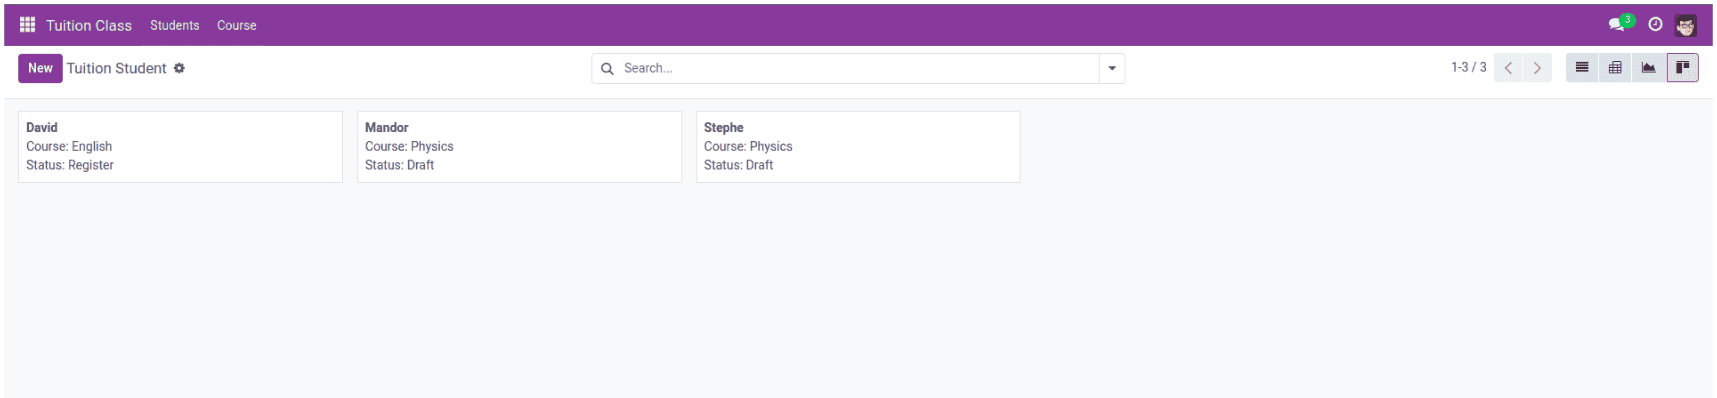
Defined within the <kanban> tag, the view consists of a list of QWeb templates. The root template, typically named kanban-box, contains the fields and HTML classes that structure each Kanban card.
Example: Kanban View Definition
<record id="tuition_student_view_kanban" model="ir.ui.view">
  <field name="name">tuition.student.view.kanban</field>
  <field name="model">tuition.student</field>
  <field name="arch" type="xml">
      <kanban class="o_kanban_view" string="Student Progress">
          <templates>
              <t t-name="kanban-box">
                  <div t-attf-class="oe_kanban_card oe_kanban_global_click">
                      <div class="o_kanban_content">
                          <strong>
                              <div class="oe_kanban_title">
                                  <field name="name"/>
                              </div>
                          </strong>
                          <div>Course: <field name="course_id"/></div>
                          <div>Status: <field name="state"/></div>
                      </div>
                  </div>
              </t>
          </templates>
      </kanban>
  </field>
</record>
Additional Attributes in Kanban View
To enhance the functionality of the Kanban view, you can use the following attributes:
* default_group_by: Groups records into specific columns based on a field value.
* default_order: Defines the default sorting order of the records within the Kanban view.
By leveraging these features, the Kanban view offers a clear, intuitive, and efficient way to manage and monitor records in Odoo.
Search View
The Search view enhances user efficiency by enabling quick filtering and searching of records. It provides a structured way to locate specific information based on various criteria, improving data accessibility and usability.

Example: Search View for Filtering Student Records
<record id="tuition_student_view_search" model="ir.ui.view">
  <field name="name">tuition.student.view.search</field>
  <field name="model">tuition.student</field>
  <field name="arch" type="xml">
      <search string="Search Students">
          <field name="name"/>
          <field name="course_id"/>
          <field name="registration_code"/>
      </search>
  </field>
</record>
Key Benefits of Search View
* Efficient Filtering: Allows users to refine search results based on specific conditions.
* Quick Data Retrieval: Helps in locating records without manually scrolling through large datasets.
* Customizable Criteria: Enables filtering based on various fields, such as name, date, category, or status.
By leveraging the Search view, users can quickly find relevant records, streamline workflows, and improve productivity in Odoo.
Activity View
The Activity view in Odoo is designed to manage and schedule activities related to records, ensuring users stay organized and track their tasks efficiently. It helps streamline task management by providing a clear visual representation of upcoming, overdue, and completed activities.

Example: Activity View for Scheduling Student Activities
<record id="tuition_student_view_activity" model="ir.ui.view">
  <field name="name">tuition.student.view.activity</field>
  <field name="model">tuition.student</field>
  <field name="arch" type="xml">
      <activity string="Event">
          <templates>
              <div t-name="activity-box">
                  <div>
                      <field name="name" string="Student Name" class="o_text_block o_text_bold"/>
                      <field name="enrollment_date"/>
                  </div>
              </div>
          </templates>
      </activity>
  </field>
</record>
Structure of an Activity View
* Defined within the <activity> tag.
* The root element, activity-box, contains the structure for displaying activity-related information.
* Fields can be specified within the <activity> tag to customize the view and organize content systematically.
By utilizing the Activity view, users can better manage their tasks, set reminders, and ensure timely completion of activities within Odoo.
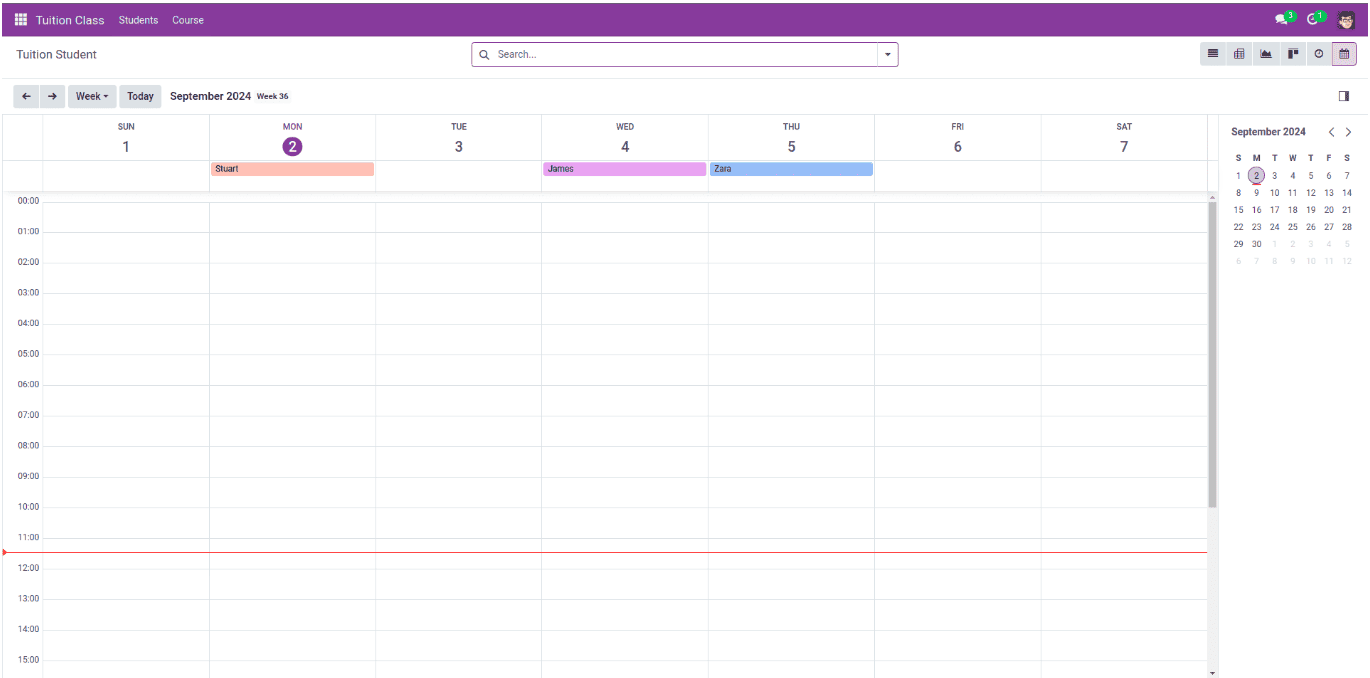
Calendar View
The Calendar view in Odoo is an essential tool for organizations to manage schedules, track important dates, and organize events efficiently. It provides a structured, visual representation of time-based activities, making it easier to oversee deadlines, appointments, and other key events.
This view is defined using the <calendar> tag and can be customized with attributes to control how events are displayed.
Example: Calendar View for Managing Student Enrollments
<record id="tuition_student_view_calendar" model="ir.ui.view">
  <field name="name">tuition.student.view.calendar</field>
  <field name="model">tuition.student</field>
  <field name="arch" type="xml">
      <calendar string="Enrollment Calendar" date_start="enrollment_date"
                color="name">
          <field name="name"/>
          <field name="registration_code"/>
      </calendar>
  </field>
</record>
Key Attributes in Calendar View
* date_start: Specifies the start date of an event.
* date_stop: Defines the end date of an event.
* date_delay: Serves as an alternative to date_stop by specifying the duration instead.
* color: Applies different colors to events based on specific criteria.
* mode: Determines the default view mode (Day, Week, or Month) when the calendar loads.
By leveraging the Calendar view, users can efficiently manage appointments, track enrollment periods, schedule meetings, and maintain an organized workflow in Odoo.
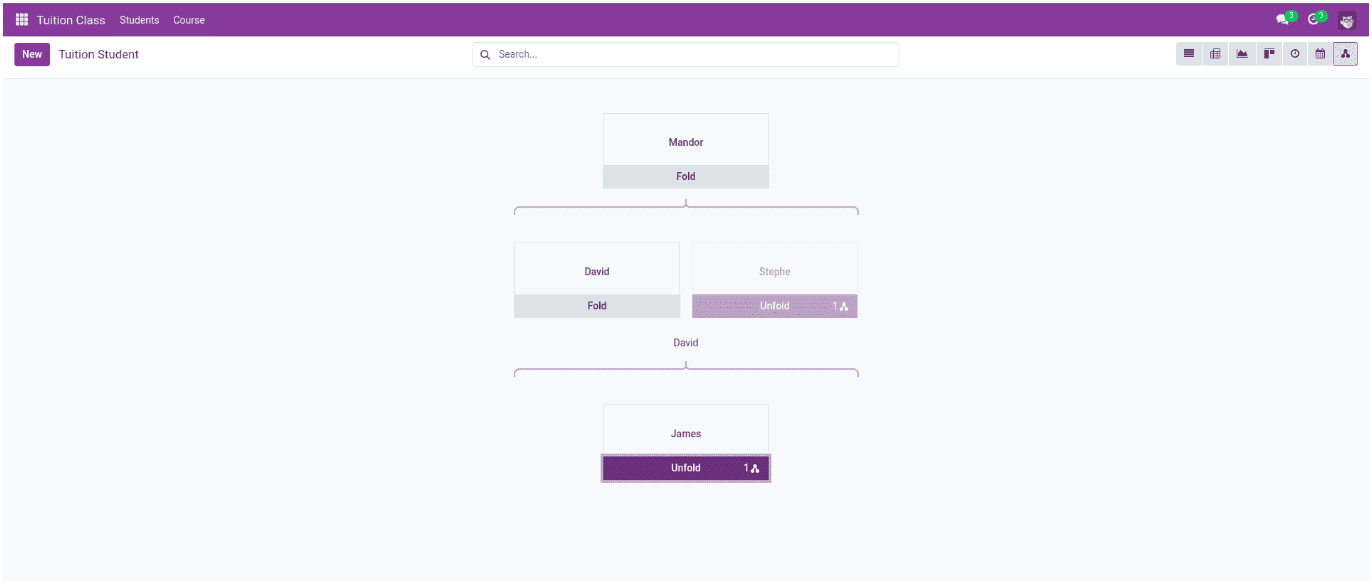
Hierarchical View
The Hierarchical view in Odoo 18 is designed to display records with a parent-child relationship in a structured tree format. This view is particularly useful for organizing data that naturally follows a hierarchy, such as categories, departments, or organizational charts.
By utilizing the Hierarchical view, users can easily navigate and manage complex structures, ensuring seamless data organization within Odoo.
Example: Hierarchical View for the tuition.student Model
<record id="tuition_center_view_hierarchy" model="ir.ui.view">
  <field name="name">tuition.center.view.hierarchy</field>
  <field name="model">tuition.student</field>
  <field name="arch" type="xml">
      <hierarchy child_field="child_ids"
                 draggable="1">
          <field name="name"/>
          <templates>
              <t t-name="hierarchy-box">
                  <div t-attf-class="o_hierarchy_node_header d-flex justify-content-center pb-4"
                       t-att-title="parent_id">
                  </div>
                  <div class="o_hierarchy_node_body d-flex flex-column text-center">
                      <div class="w-100 position-relative">
                          <field class="fw-bold" name="name"/>
                          <br/>
                      </div>
                  </div>
              </t>
          </templates>
      </hierarchy>
  </field>
</record>
Key Features of the Hierarchical View
* Displays records in a tree-like structure, enabling intuitive navigation.
* Facilitates better organization of hierarchical data, such as course categories or company structures.
* Enhances user experience by simplifying access to related records.
The advanced Hierarchical view feature in Odoo significantly improves the efficiency of various menu functions, making it an invaluable tool for business management. It provides users with a clear and interactive way to visualize and manage parent-child relationships across different records.
Additional Enterprise-Exclusive Views
In addition to the Hierarchical view, Odoo Enterprise offers specialized views such as:
* Cohort View: Useful for analyzing data over time, such as student retention or customer behavior.
* Gantt View: Ideal for managing project timelines, scheduling tasks, and tracking deadlines.
These advanced views enhance data tracking and business optimization, providing organizations with powerful tools for strategic decision-making.
Odoo 18 provides a variety of views to efficiently manage and visualize data. From structured lists and detailed forms to analytical and interactive views, each serves a unique purpose. By leveraging the right views, businesses can streamline operations, enhance productivity, and improve decision-making within Odoo.
To read more about What are the View Types in Odoo 17, refer to our blog What are the View Types in Odoo 17.