In Odoo, controllers play a vital role in managing the interaction between the front-end and back-end of web modules. They allow you to define URLs and link web pages, fetching real-time data from the backend and rendering it dynamically on the website. This feature is incredibly useful when you need to display dynamic data, such as sale orders, customer information, invoices, or any other business-related data directly on your website.
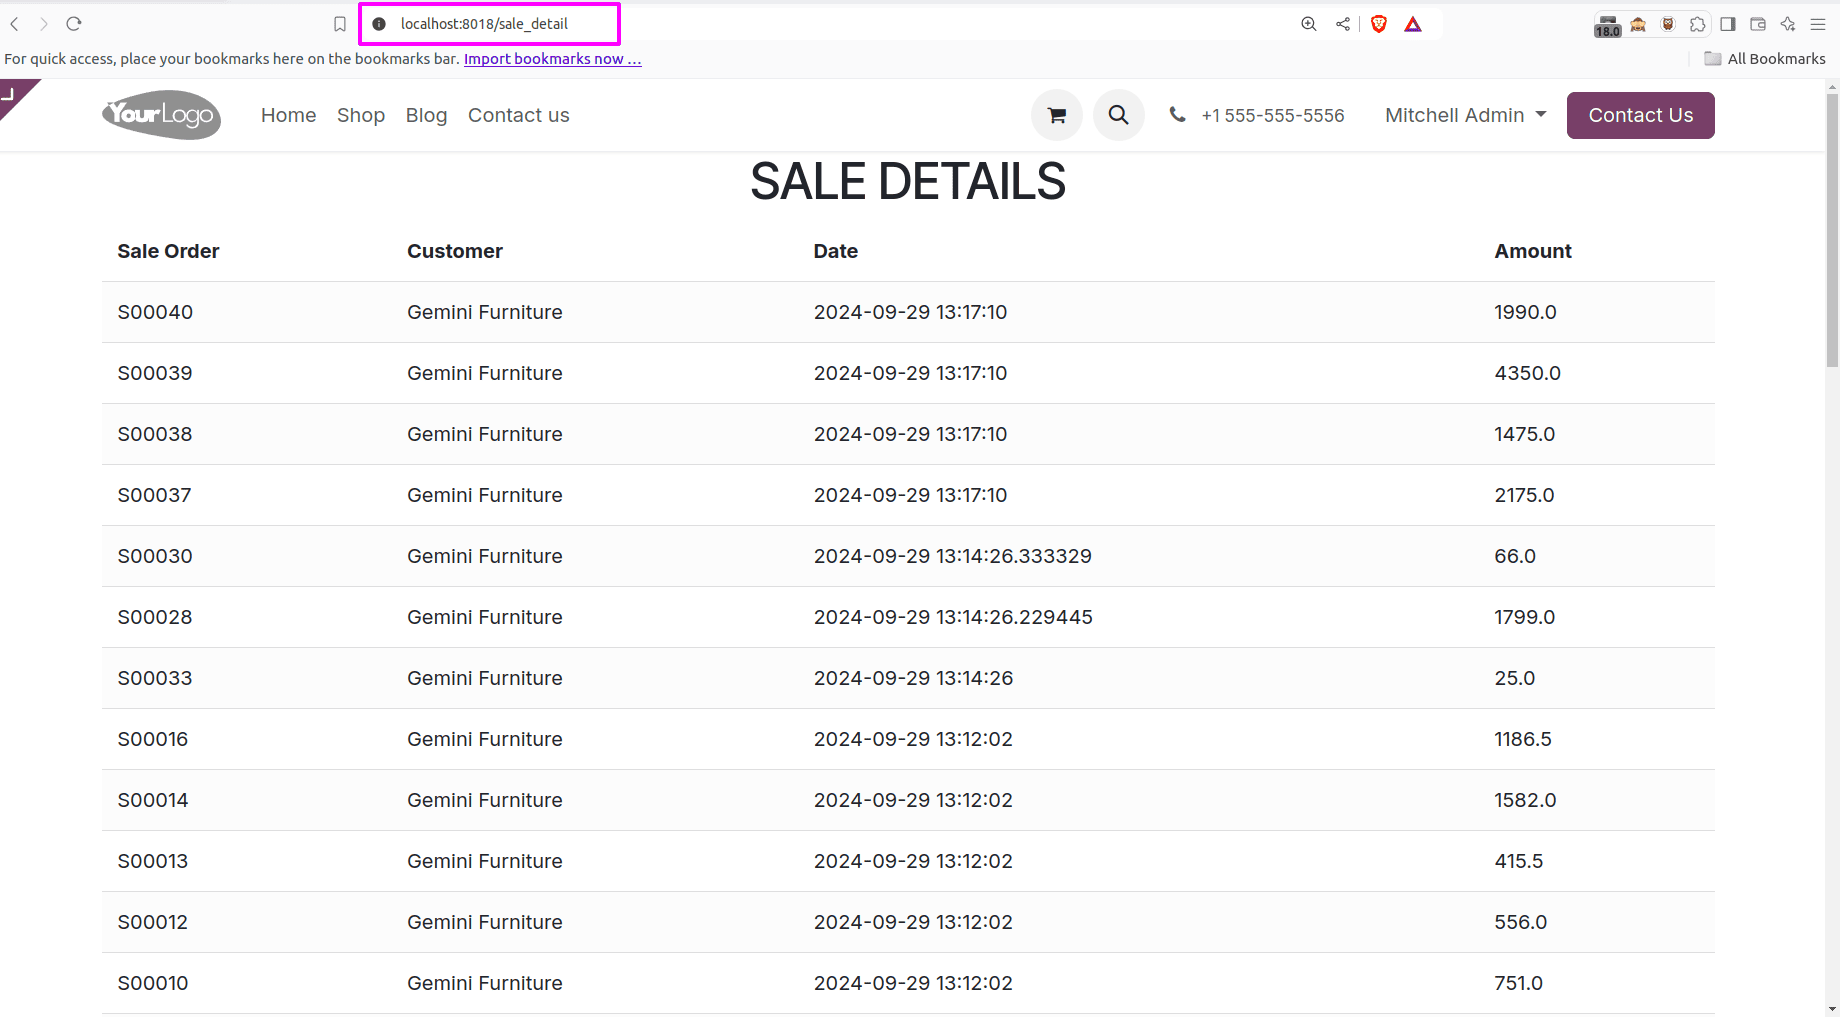
In this blog, we’ll walk through the process of setting up a custom controller and Qweb template in Odoo to display sale order data on a web page. By the end of this guide, you’ll have a fully functional module that retrieves and displays sale order details on the front-end.
Why Use Controllers in Odoo?
Controllers in Odoo are responsible for handling web requests and loading the appropriate content for display. Using controllers, you can:
* Define custom URLs to serve specific web pages.
* Fetch data from Odoo models.
* Render the data on web pages using Qweb templates.
This makes controllers essential for building data-driven web pages, reports, and even portals where real-time information is displayed based on user interaction or system events.
Setting Up a Custom Module to Display Sale Orders
Let’s dive into the steps of creating a simple module called sale_detail, which will allow us to display sale order details on a custom webpage.
Step 1: Creating the Controller in Your Custom Module
A controller in Odoo is simply a Python class that manages how the data is pulled from the backend and displayed on the front-end. In this example, we’ll create a new controller that fetches the sale orders and passes that data to a template.
Step 1.1: Setting up the Controller Directory
Inside your custom module, create a directory called controllers and inside that directory, create two files:
* __init__.py
* main.py
Step 1.2: Writing the Controller
Inside main.py, we’ll define a new class called SaleDetail that extends http.Controller. This class will handle the HTTP requests and fetch the sale order data from the Odoo database.
Here’s the code for the controller:
from odoo import http
from odoo.http import request
class SaleDetail(http.Controller):
   @http.route('/sale_detail', type='http', auth='public', website=True)
   def sale_detail(self, **arg):
       sale_detail = request.env['sale.order'].sudo().search([])
       values = {'record': sale_detail}
       return request.render('sale_detail.all_sales_data', values)
Key Points of the Controller:
* @http.route decorator: This defines the URL that will trigger the controller. In our case, /sale_detail will render the page.
* type='http': Specifies that this is a standard HTTP request.
* auth='public': Ensures the page is accessible to anyone without logging in. You can also set this to user to restrict access to logged-in users.
* website=True: This makes the controller available on the website.
* sudo(): Fetches the data with superuser permissions, ensuring you can access sale order records.
This controller fetches all sale orders from the sale.order model and passes them to a Qweb template for rendering.
Step 2: Creating the Qweb Template to Display Sale Orders
Once the controller fetches the sale orders, the next step is to render this data on the web page. For this, we need to create a Qweb template that will define how the data is displayed.
Step 2.1: Setting up the Template File
Inside your module’s views directory, create an XML file (for example, sale_detail_templates.xml) that will hold the template code.
Step 2.2: Writing the Qweb Template
Here’s a simple example of how to design a Qweb template that will display sale orders in a table format:
<?xml version="1.0" encoding="UTF-8" ?>
<odoo>
    <template id="sale_detail.all_sales_data" name="Sales Details">
        <t t-call="website.layout">
            <div class="container">
                <center><h2>SALE DETAILS</h2></center>
                <table class="table-striped table">
                    <thead>
                        <tr>
                            <th>Sale Order</th>
                            <th>Customer</th>
                            <th>Date</th>
                            <th>Amount</th>
                        </tr>
                    </thead>
                    <tbody>
                        <t t-foreach="record" t-as="so">
                            <tr>
                                <td><span t-esc="so.name"/></td>
                                <td><span t-esc="so.partner_id.name"/></td>
                                <td><span t-esc="so.date_order"/></td>
                                <td><span t-esc="so.amount_total"/></td>
                            </tr>
                        </t>
                    </tbody>
                </table>
            </div>
        </t>
    </template>
</odoo>
Key Points of the Template:
* t-call="website.layout": This ensures the page uses Odoo’s default website layout, including headers, footers, and CSS.
* t-foreach: This iterates over the sale order records and displays each order’s details (Sale Order Name, Customer, Date, and Amount) in a table.
* t-esc: This escapes and displays the value of a specific field, like so.name or so.amount_total.
With this template, the sale orders fetched from the controller will be dynamically displayed on the webpage.
Step 3: Accessing the Custom Web Page
Now that your controller and template are ready, the final step is to test the functionality by accessing the page.
* Go to the Odoo website.
* Navigate to the URL that we specified in the controller: /sale_detail.
* The page should load and display the sale orders in a table format, just as we defined in the Qweb template.

By following these steps, you can create a custom Odoo controller to fetch and display data on a web page using Qweb templates. This powerful feature allows for dynamic, data-driven web pages that can present real-time business information to users. Whether it’s sale orders, customer data, or any other model information, you can easily customize the way Odoo renders your data on the front-end.
To read more about How to Modify Existing Web Pages in Odoo 17, refer to our blog How to Modify Existing Web Pages in Odoo 17.