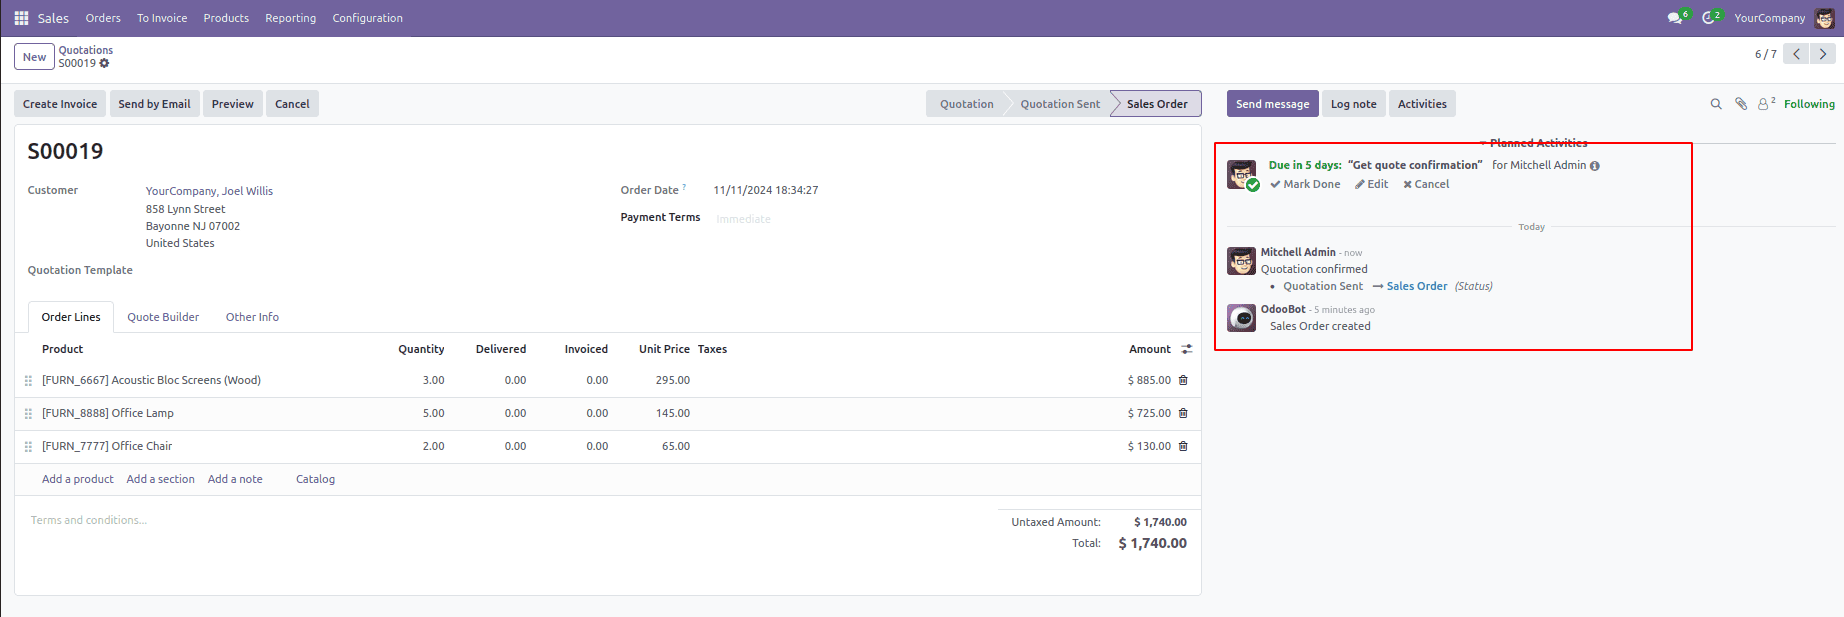
The chatter feature in Odoo plays an essential role in fostering communication and providing insights into different processes. It simplifies interaction and improves collaboration. In Odoo 18, chatter is widely used across modules like Sales, Projects, Tasks, and Invoicing, offering a powerful tool for smooth communication and keeping users updated on ongoing activities.
In the image below, you can view the process details that were communicated through the chatter.

In the image above, we can see from the chatter that the sales order was created, along with the sales order confirmation and the user who confirmed it. Additionally, we can view the activity generated for the user.
In certain situations, it’s necessary to send messages to the chatter programmatically in Odoo 18. For instance, when automating workflows or posting updates based on specific actions, you may need to trigger messages directly through code rather than relying on user input. This can be done by using Odoo's built-in methods to post messages, allowing for automated notifications, alerts, or status updates based on predefined conditions. Customizing the message posting in this way ensures that critical information is communicated promptly, without requiring manual intervention.
For example, we create a model student.student to track a student and their course status (e.g., "draft", "in_progress", "completed"). When a user clicks the "Start Course" or "Complete Course" button, it updates the course status and automatically posts a message to the chatter to notify about the change.
* start_course method: Changes the status to "in_progress" and sends a message saying the course has started.
* _course method: Changes the status to "completed" and sends a message saying the course is finished.
This customization ensures that every time the course status changes, a message is posted in the chatter, keeping everyone updated.
def start_course(self):
   self.state = 'in_progress'
   self.message_post(body=_("Student course started"))
def complete_course(self):
   self.state = 'completed'
   self.message_post(body=_("Student course ended"))
As shown, we included a function to post a message in the related student using self.message_post(body=body), where self refers to the student object. The content of the message is specified in the body attribute, which defines the message that will be displayed. The parameters of the message_post() method is as follows.
Parameters:
1. body: The body parameter (str | Markup) represents the content of the message. If it's a string, it will be escaped. To include HTML content, use a Markup object.
2. message_type: Message type value is picking from the mail.message.type field.
3. parent_id: includes the parent partners in a message as a reply to a previous message when it's a private discussion.
4. attachments: a list of tuples representing attachments in the format (name, content), where content is not encoded in base64.
5. body_is_html: specifies if the body should be interpreted as HTML, even if it's a string.
6. **kwargs: additional keyword arguments are used to set default values for columns in the new mail.message record
7. email_from: Specifies author’s email address.
The result of the above example code is as below:

This is how we can easily add a message to the chatter. Next, let's explore the changes we can make to the appearance of messages in Odoo 18.
For example, if a student's name is included in the message, we can turn it into a hyperlink that directs to the corresponding student record.This can be achieved using the function _get_html_link(). Additionally, we can include the subject, modify the message's style, and add the author to indicate the sender of the message when using the message_post() function. The following is the code to accomplish this.
def start_course(self):
   self.state = 'in_progress'
   self.message_post(body=_("Student %s 's course started.",self.user_id._get_html_link(title=self.name)),
                     author_id=self.env.ref('base.partner_root').id,
                     subject='Course Begin',
                     message_type='comment',
                     subtype_xmlid='mail.mt_comment'
                     )
def complete_course(self):
   self.state = 'completed'
   self.message_post(body=_("Student %s 's course ended.",self.user_id._get_html_link(title=self.name)),
                     author_id=self.env.ref('base.partner_root').id,
                     subject='Course End',
                     message_type='comment',
                     subtype_xmlid='mail.mt_comment'
                     )
The result of the above code is as follows.

Here, we can see the user, message we set up, along with the subject styled according to the template we provided.
This function can be used with any record associated with the chatter. It also allows us to customize the message to meet our specific needs, providing the flexibility to adapt the content to better align with our preferences and requirements.
In conclusion, this blog describes the simple process of posting a message to the chatter in Odoo 18.
For more information on adding new buttons to the chatter, visit our blog How to Add a Custom Button to the Chatter in Odoo 18 .