Odoo 17 platform consists of another ERP Application called Knowledge Module, a tool designed to improve information management and knowledge sharing within organizations. The module allows employees to create, store, and access vital documents, manuals, guides, and other knowledge assets. It becomes part of the Odoo ecosystem, guaranteeing that important data is constantly available and pertinent. Benefits from the module include increased productivity, better teamwork, consistency, and scalability. It centralizes information, reduces time spent searching for documents, fosters teamwork, ensures consistency, and allows for easy scalability to accommodate an increasing volume of information.
Key Features of the Odoo 17 Knowledge Module
1. Centralized Knowledge Base: Store company policies, SOPs, and manuals in one easily accessible location.
2. Intuitive Content Creation: User-friendly interface for drafting articles, embedding multimedia, and organizing information with tags and categories.
3. Advanced Search Functionality: Powerful search capabilities by keywords, tags, or specific phrases within documents.
4. Collaborative Editing: Real-time collaboration for drafting and refining documents with input from various team members.
5. Access Control and Permissions: Granular permissions to control viewing, editing, and deleting documents, ensuring sensitive information is secure.
6. Integration with Other Odoo Apps: Seamless integration with Project Management, CRM, and HR for contextual access to information.
Getting Started with the Odoo 17 Knowledge Module
Implementing the Knowledge Module in your Odoo environment is a straightforward process. Here are the steps to get started:
1. Install the Module
* Installation takes only a few minutes and requires little technological knowledge.
2. Establish Permissions and Access.
* Establish user roles and permissions to limit access to document creation, editing, and viewing.
* This step ensures that your knowledge base is secure and well-organized.
3. Create and Organize Content
* Begin populating your knowledge base with essential documents. Organize the contents rationally using categories and tags to make it simple for users to find what they need.
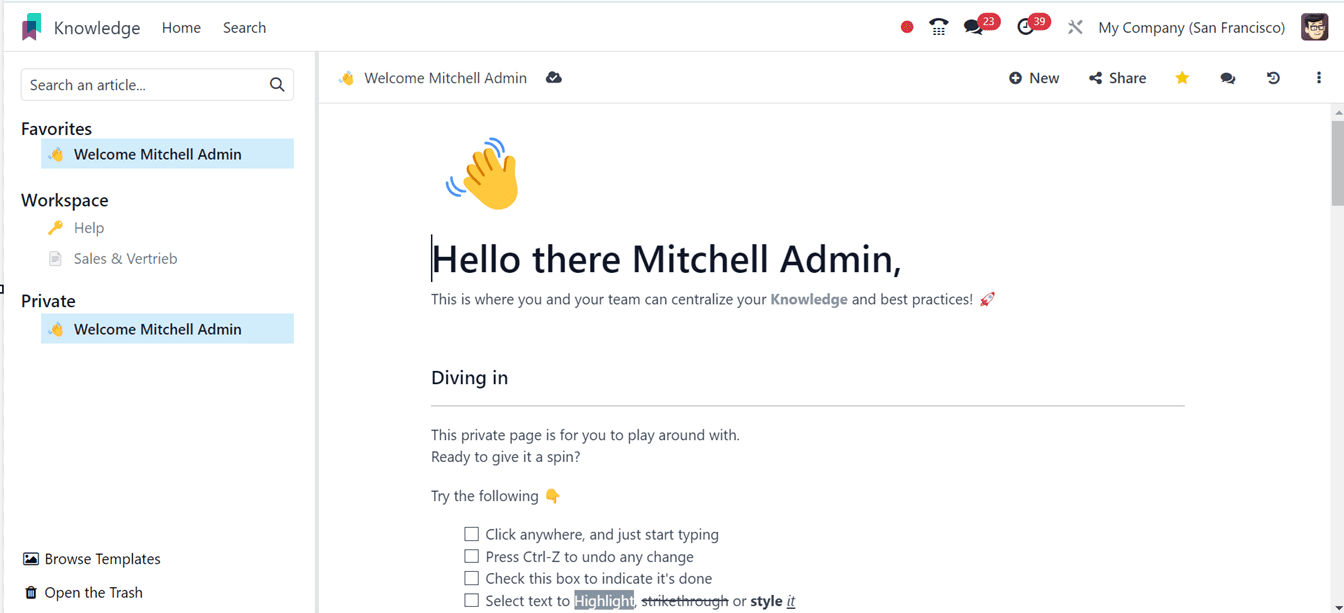
* After opening the application platform, we can see two menu options such as Home and Search as illustrated in the screenshot below.
Articles Editing and Styling in Odoo 17 Knowledge Module
Articles are divided into four categories found on the left sidebar, which determine their default access rights:
* Favorites: You can set any article you can access as a favorite. Click on the star-shaped icon provided in the top-right menu of the articles window. Marking articles as favorites is user-specific and does not affect other users.
* Workspace: Articles in this category are available to all internal users, who have the right to read, modify, or share these articles.
* Shared: Articles in this category are those you shared with internal or external users or those shared with you.
* Private: Articles in this category are only available to you.
Choosing Article Templates
By selecting the Browse Templates button, we can also select from the article templates that the system has to offer.
Adding and Styling Content
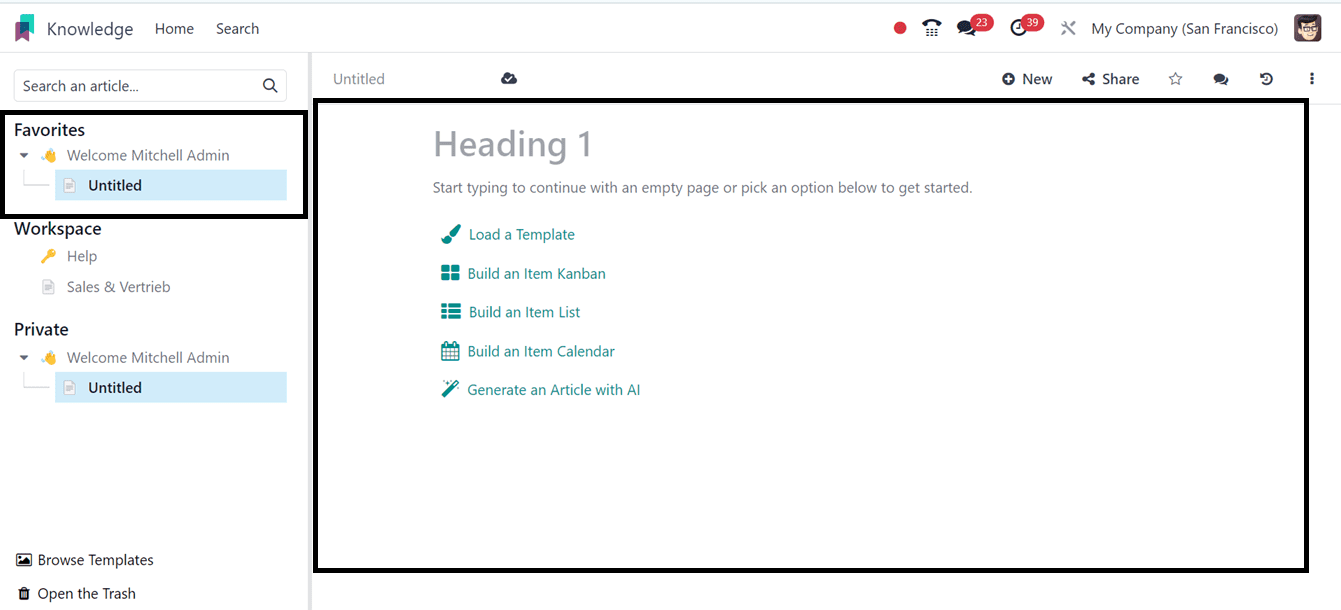
material Addition and Styling Click wherever on the page to start adding material. The first-level header (H1) of the article will be automatically highlighted with your pointer. To go to the next line after writing the title, hit Enter on your keyboard.
Add Article Title
To automatically match your H1 title with the name of the article, click "Untitled" on the left side of the top bar. To change the article's name later, you must do it manually by clicking the name on the top bar and making the modification.
Text Editor
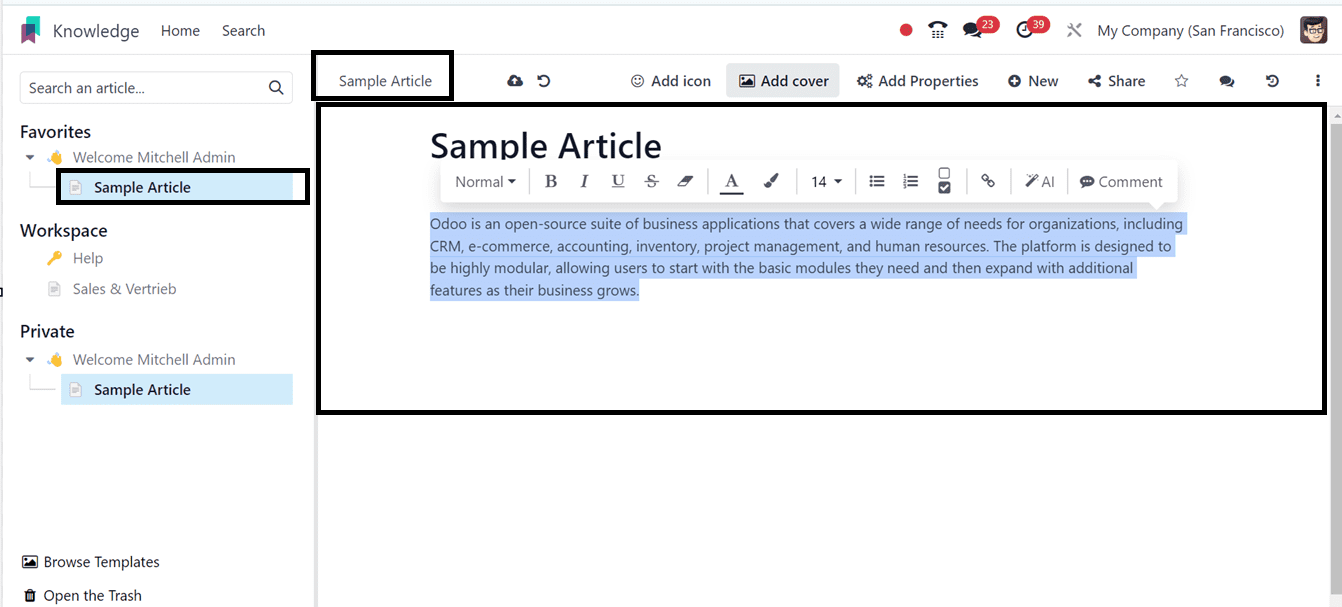
Choose the text you wish to format in order to style it using the text editor. Then, you can:
* Click the "A" icon to change the font's color.
* Click the pencil icon to change the background color.
* Change the style: Click "Normal" to open a dropdown menu with various styles (Normal, Code, Header 1–6, Quote).
* Text Formatting: B for bold, I for italic, U for underline, S for strikethrough.
* Theme colors: "Theme" for predefined color.
* Custom colors: "Solid" for color definition using wheel, hex code, RGBA values.
* Gradients: Click "Gradient" to choose a predefined gradient or create a personalized one.
* Change text size: Click the size number and select the desired size.
* Lists: To make the paragraph into an ordered list, checklist, or unordered list, click the list icons.
* Insert or edit a link: Click the chain icon.
Text Editor's Toolbox
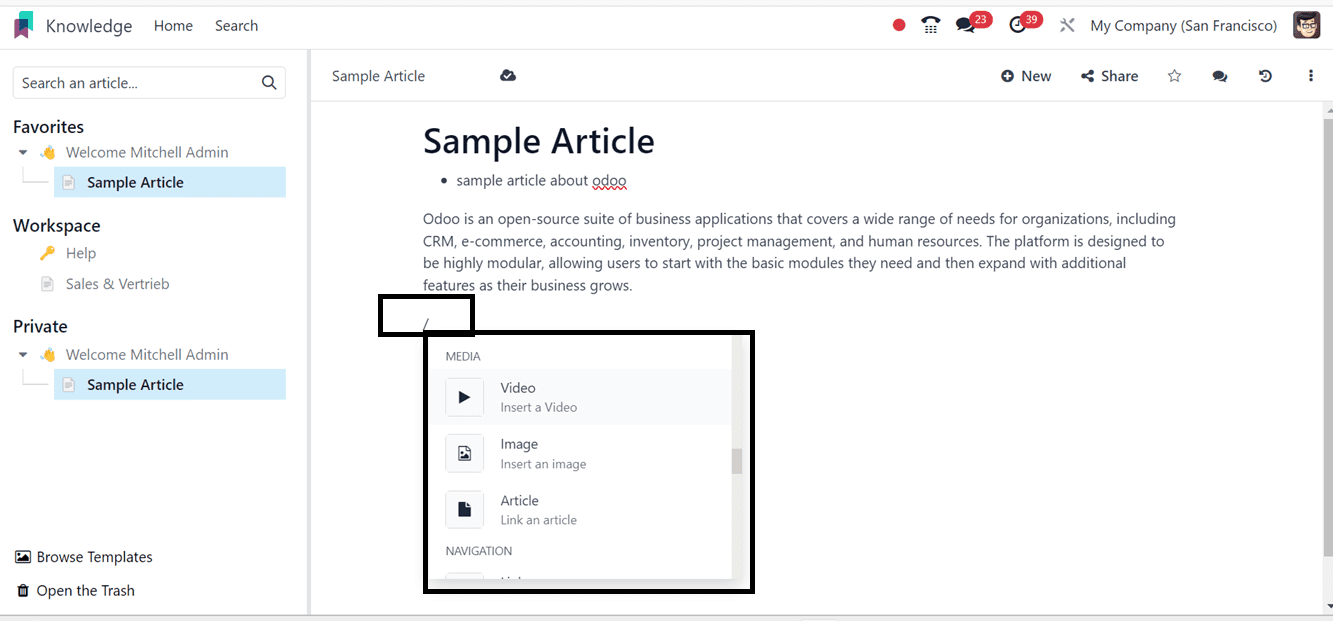
To format a whole paragraph, type "/" anywhere in the text to bring up the powerbox. Enter the command name or choose from a range of options to insert blocks, images, files, and more. Some commands, like "/Image" or "/Article," are available in all apps, while others are specific to the Knowledge app.
List of Commands: Commands are divided into multiple categories:
* Bulleted list: Create a bulleted list.
* Numbered list: Create a numbered list.
* Checklist: Track tasks with a checklist.
* Table: Insert a table.
* Separator: Insert a horizontal rule separator.
* Quote: Add a blockquote section.
* Code: Add a code section.
* 2 columns: Convert into 2 columns.
* 3 columns: Convert into 3 columns.
* 4 columns: Convert into 4 columns.
* Banners
* Format
* Media
* Navigation
* Widgets
* Knowledge
* Knowledge Database and many more.
Cover Pictures
Cover Images Enhance your article by including a cover image and an icon. Simply hover over the H1 title and click "Add Cover."
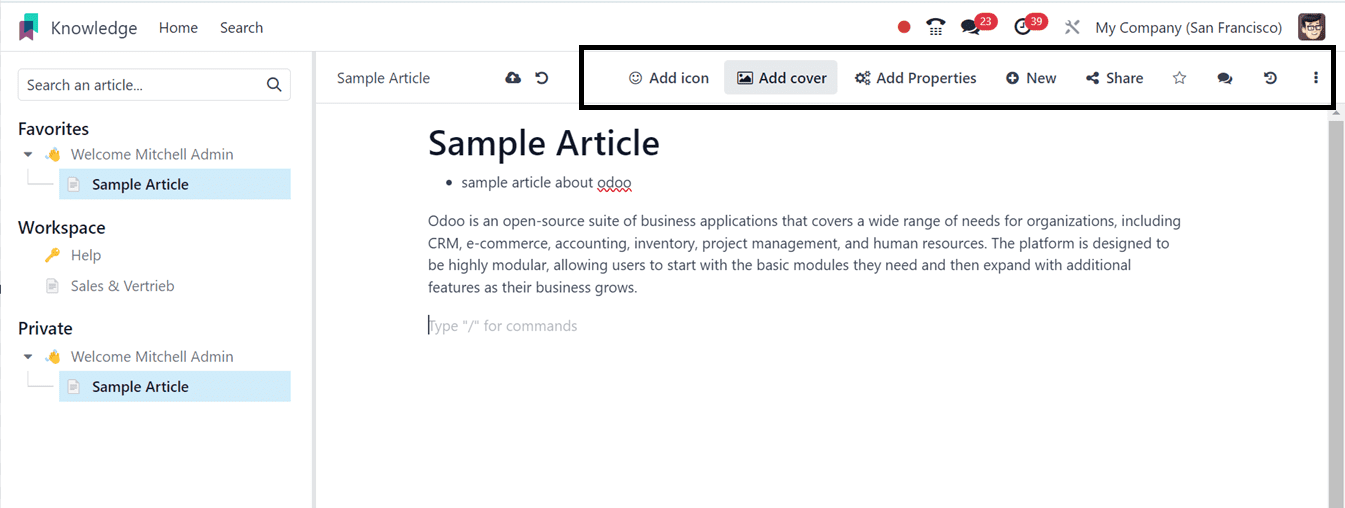
The title of the article determines the cover image automatically if your database is linked to your Unsplash account. To modify it, hover over the picture, click "Change Cover," and select another image. You can retrieve images from various sources:
* Hover your cursor over an image to remove the cover and upload it from your computer. You can also search the Unsplash database for images from other sources.
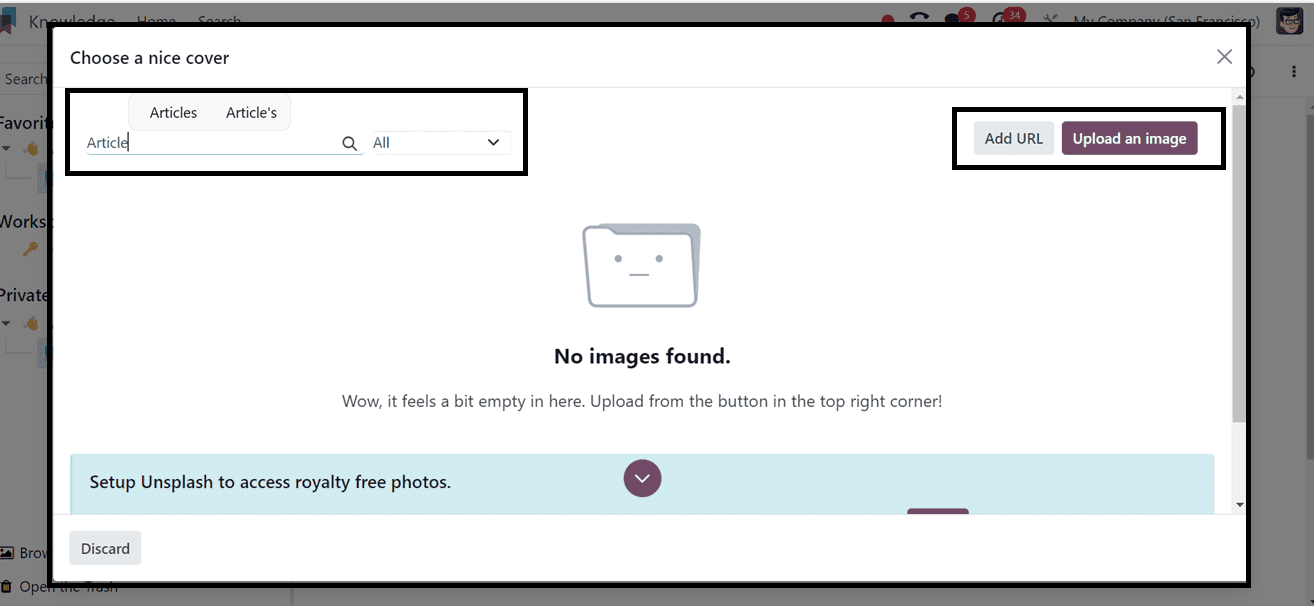
To remove the cover, hover over it, and click "Remove Cover."
Icons: To add an icon, hover above the H1 title and click "Add Icon." This sets a random emoji automatically. To change it, click the emoji and select one from the emoji window. To remove it, click the emoji and then the red-circled X.
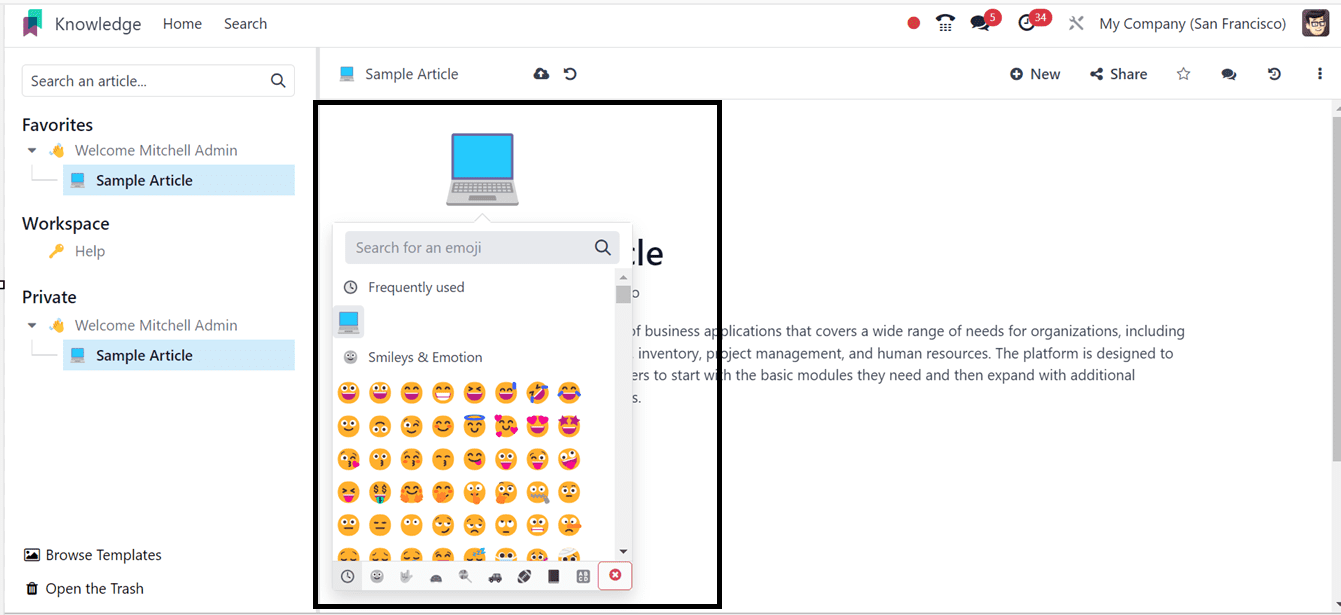
Note: The emoji is also displayed before the corresponding article in the side panel's hierarchical tree. Click the emoji on the side panel to change it without opening the related article.
Adding Property Fields
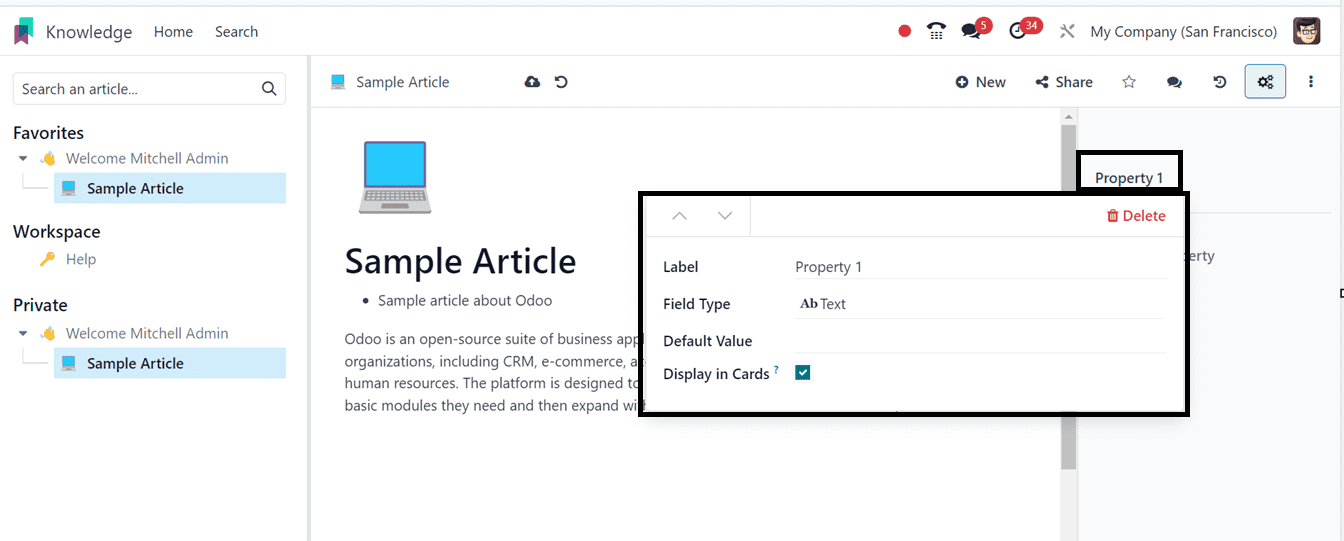
In the Odoo Knowledge module, adding property fields entails making custom fields that may be applied to several articles that belong to the same parent category. So, click on the ‘Add Properties’ button from the top of the editing area and edit the required fields by opening the Add a Property link as shown below.
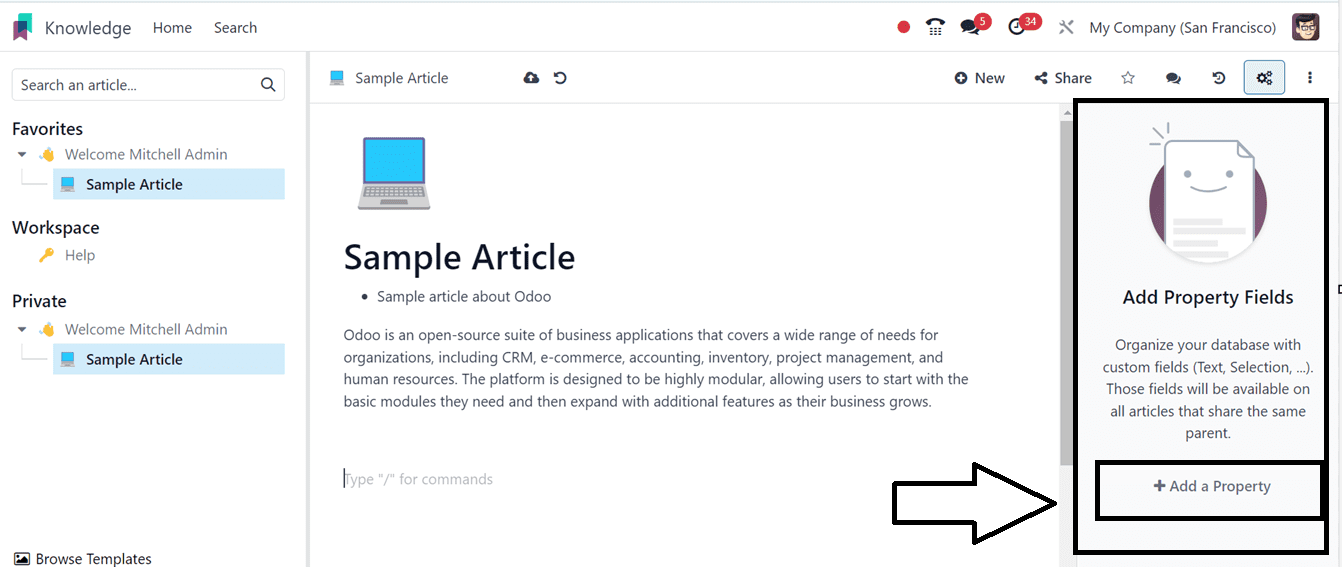
Then, we can provide the field name inside the small pop-up window including its Label, Field Type, Default Value and Display in Cards options as per the nature of the article.
Content from Other Apps
The Knowledge Module allows you to retrieve content views from other applications. Go to the targeted app, create the desired view. Here, I am choosing the Sales Module for the demonstration.
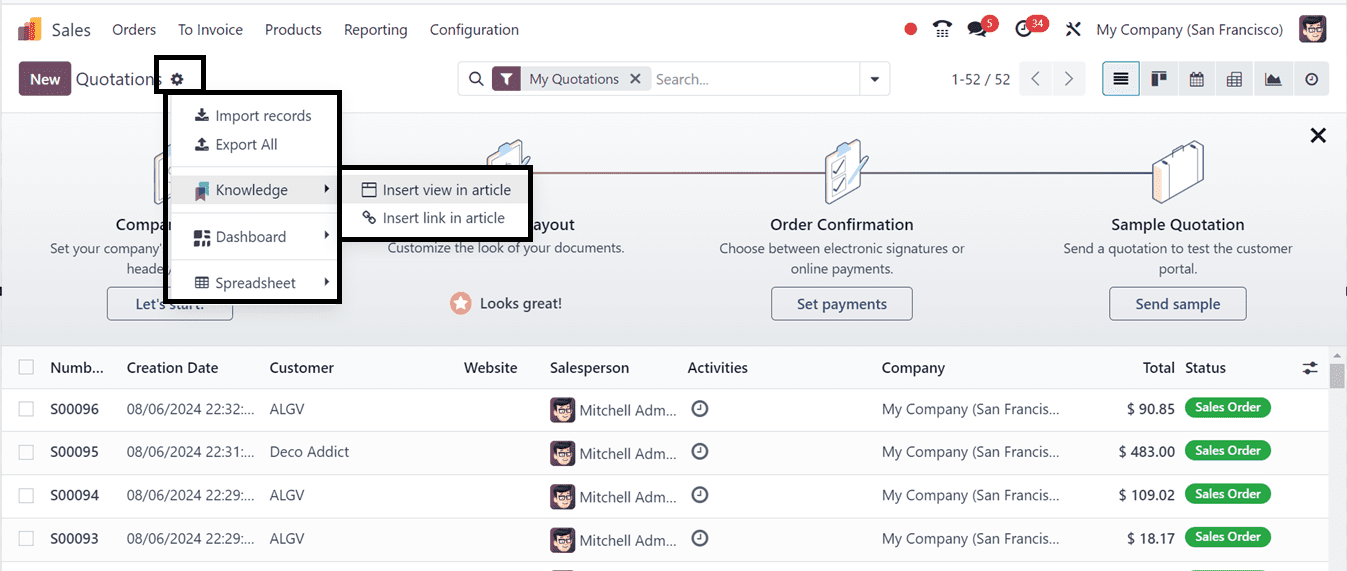
Choose the required article in which you want to add this application view or content from another applications as shown below.
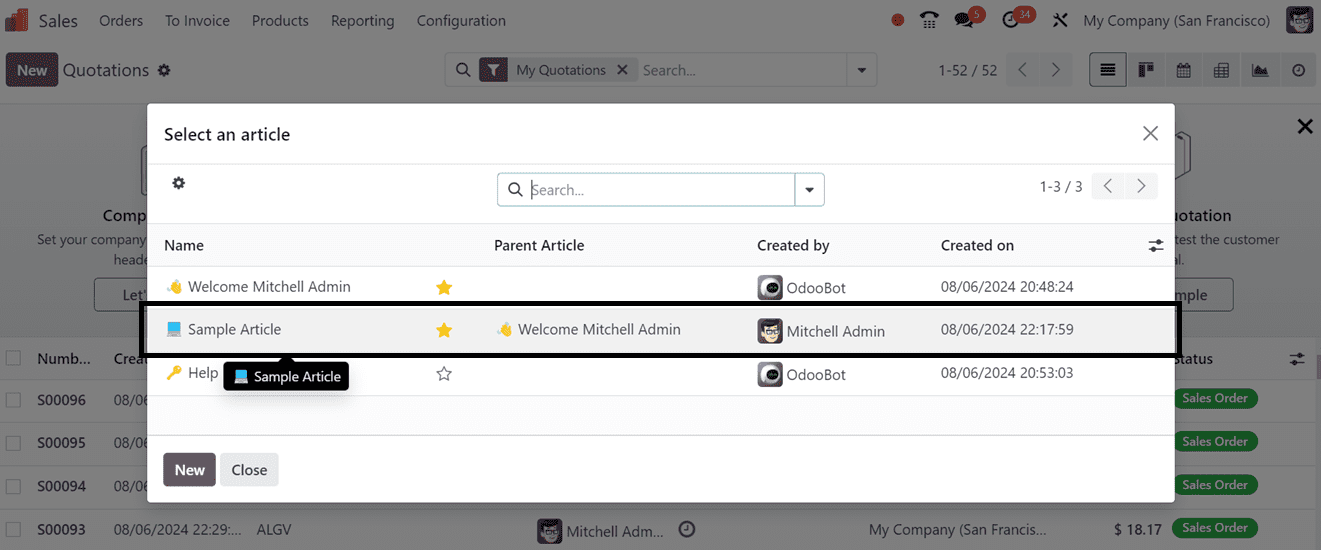
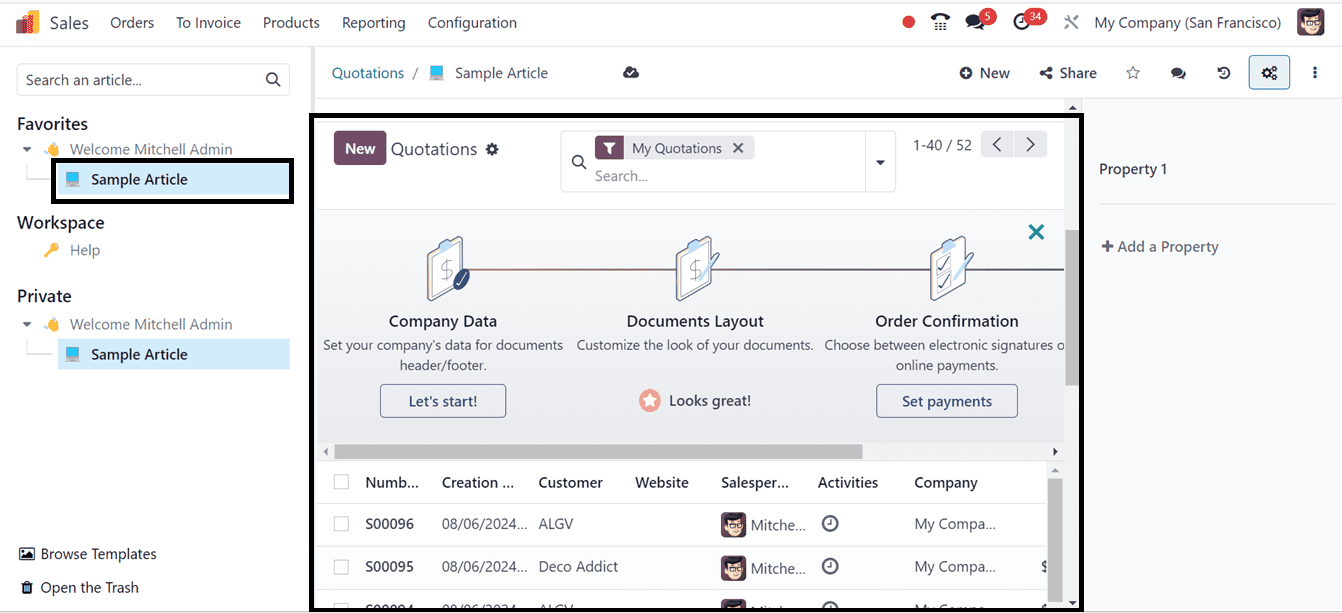
Next, choose an article by clicking "Favorite" ? "Insert view in article". The chosen article's bottom has the view added into it.
Managing Articles
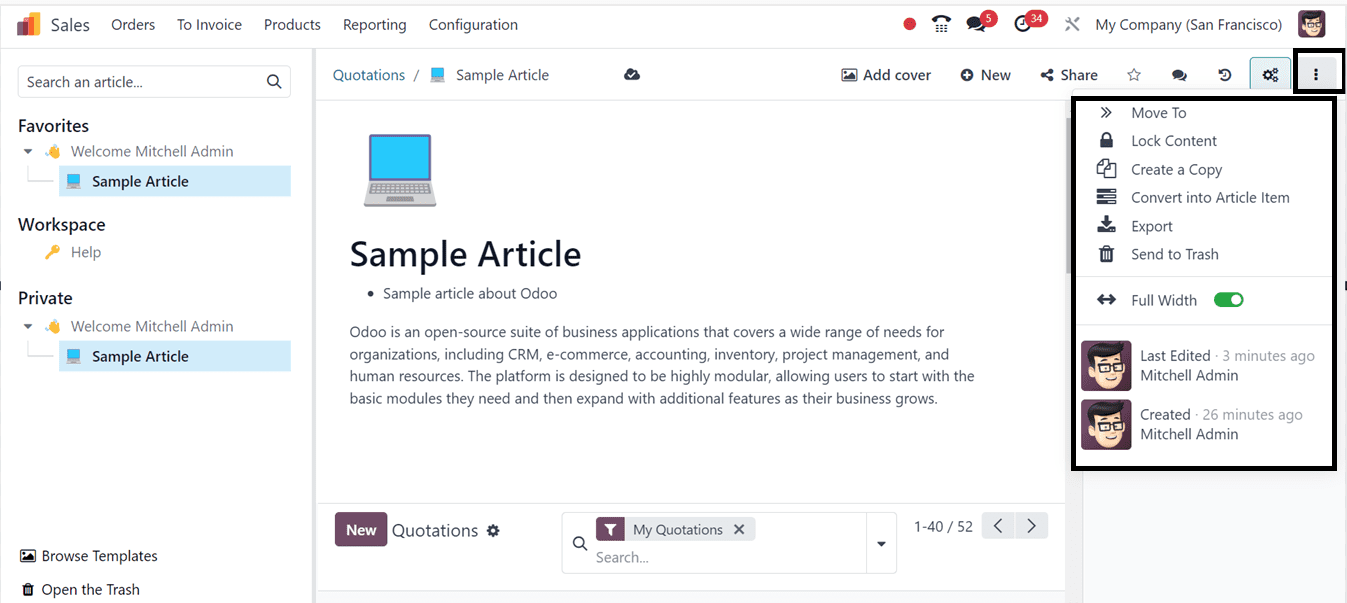
You can access most tools for managing articles by clicking the vertical ellipsis button (?) on the right side of the top bar. This menu allows you to Move, Lock Content, Create Copy, Export, Convert into Article Item, Send to Trash or Full Width view regarding an article as shown below.
Creating, Sharing, and Removing Articles
* Creation: To create articles, click the + New button on the right side of the top bar or the + button next to a category or another article. We can also, create private articles quickly with the Alt/Option + C keyboard shortcut.
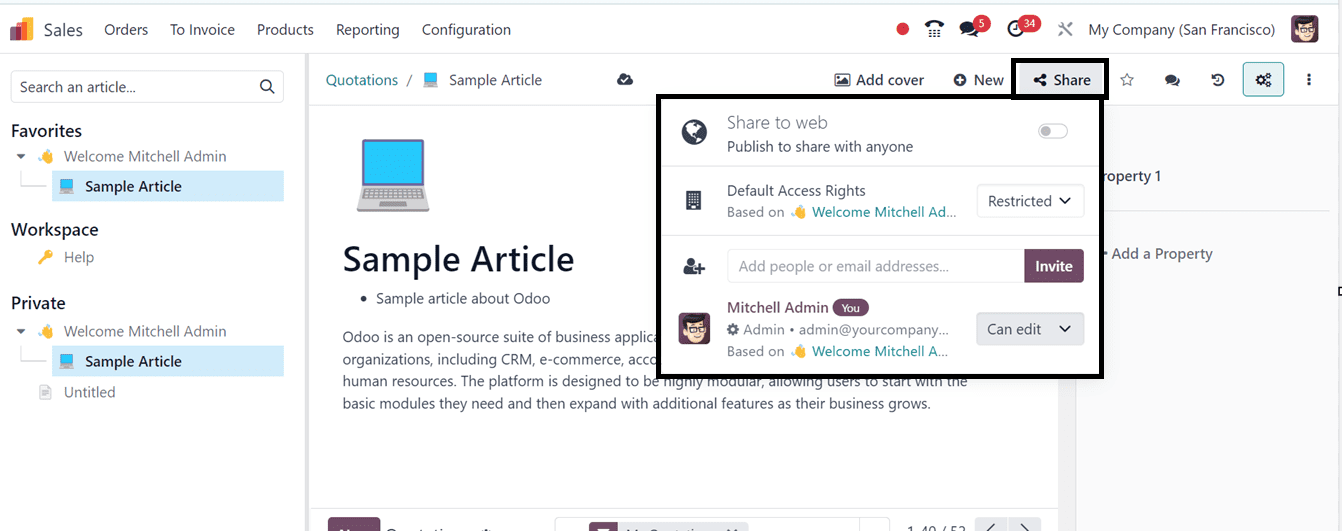
* Sharing: You can share articles with internal or external users. To do so, open the share menu by clicking Share in the top-right menu of articles.
* Invite Users: To share articles with specific users (internal or external, such as a partner or a customer), click Invite. This opens a pop-up window where you can choose the permission level (access rights) and enter the recipients' names or emails. You can also prevent a specific user from accessing the article by selecting the "No access" permission.
* Share Online: To share articles online, activate the Share to web button. This generates a URL link that anyone can use to view the article. The share menu also displays the default permission for internal members and a list of users who have been granted specific permissions as illustrated in the screenshot below.
Structuring Articles
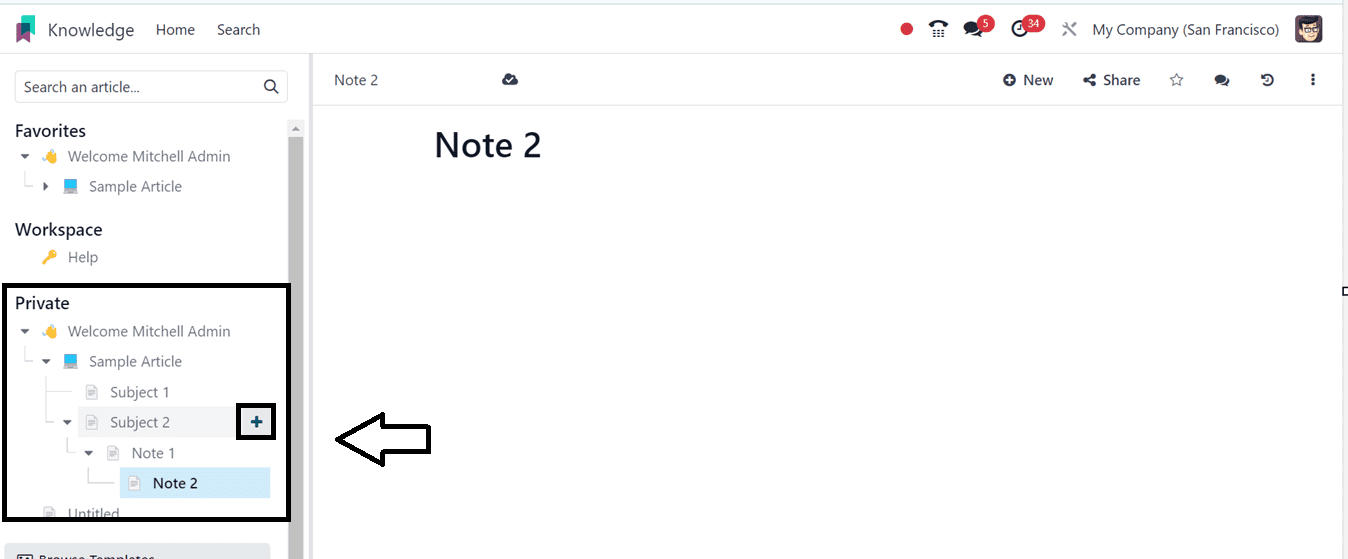
Articles are organized into a hierarchical structure, where the top article is the parent article, and those underneath are nested articles. This structure allows the grouping of related articles. To establish this hierarchy, create new articles by clicking the + button next to the parent-to-be article, or move existing articles by dragging and dropping them under the parent-to-be or by clicking the vertical ellipsis button (?), selecting Move To in the toolbox, and choosing the parent article.
Filtering Articles
The Odoo 17 Knowledge module provides a filtering feature for articles, allowing users to efficiently find and manage content. We can can use the advanced search bar available in the Knowledge Module’s Search Menu to enter keywords and press Enter to filter articles in the Filters section. Predefined filters like "My Articles", "Published", and "Unpublished" are available, while categories like "Tags", "Authors", and "Date" can be organized. Custom filters can be created by clicking on the Add Custom Filter button. Users can save their filter configurations.
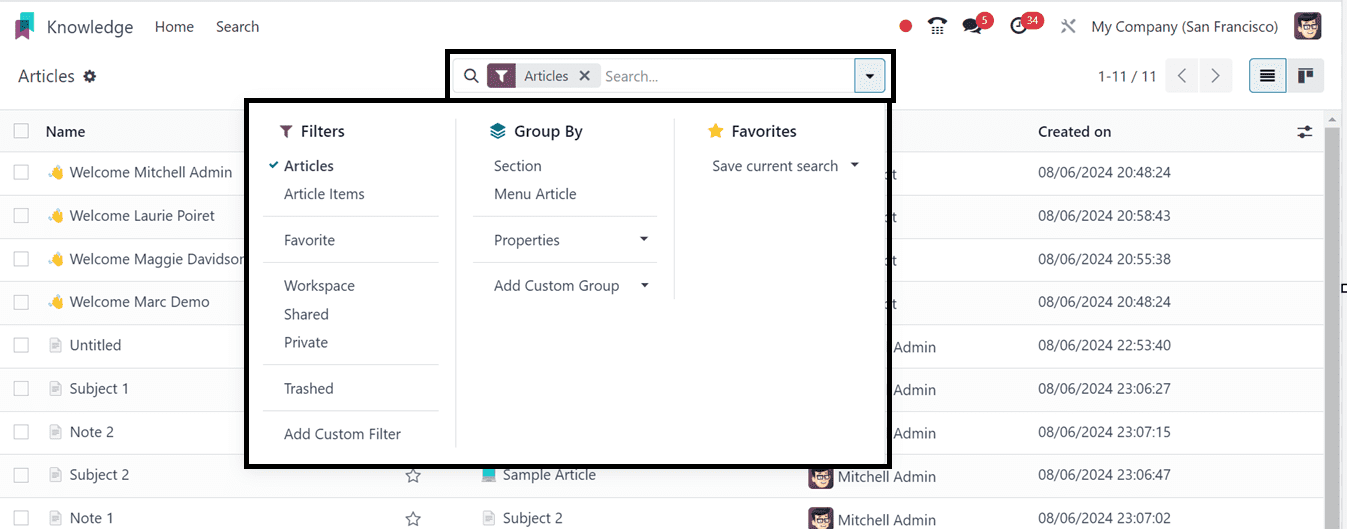
* Users can also use the "Group By" dropdown to organize articles by categories like "Tags", "Authors", and "Date".
* You may also construct custom filters by selecting the Add Custom Group option in the search bar and entering the fields and conditions you want to include, like the author, creation date, tags, and other custom fields.
* After setting up custom filters, users can save their filter configuration by clicking on the "Favorites" dropdown next to the search bar and selecting "Save current search".
Removing an Article:
To remove an article, you can either delete it or archive it.
* Delete: Open the article, click the vertical ellipsis button (?), and select Send to Trash button. The article is moved to the trash for 30 days before being permanently deleted. To restore it, click Open the Trash, select the article, and click Restore.
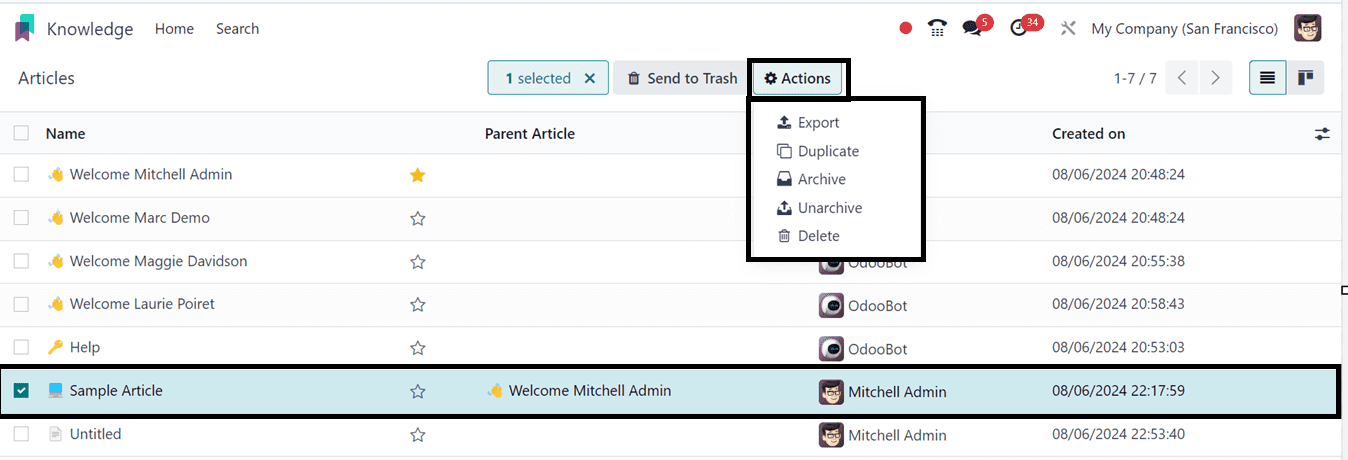
* Delete from Search menu: Go to the Search Menu, choose the article and delete them using the Delete button available inside the Action menu.
* Archive: Go to the Search Menu of the Knowledge Module, select the article(s), and click Action ? Archive. Archived articles are hidden from the search menu. To retrieve an archived article, add a custom filter to display them (Search ? Filters ? Add Custom Filter, and set Active as is No). Then, select the article(s) and go to Action ? Unarchive.
By effectively managing, sharing, and structuring your articles in Odoo 17, you can ensure that your knowledge resources are organized, accessible, and valuable to your organization.
To read more about How to Create a new article in Odoo 16 Knowledge App, refer to our blog How to Create a new article in Odoo 16 Knowledge App.