In Owl JS, view widgets are reusable components that manage the user interface's rendering logic. A view widget dynamically displays data, manages user interactions, and efficiently updates the UI without needing full page reloads. Owl’s reactivity system ensures that any changes in data are automatically reflected in the view, reducing manual DOM manipulation.
Now, we can learn how to create a view widget in Odoo 16.
First of all, we will create a widget using the OWL component. After that, register the widget in the view_widgets category and add it to the view.
First, let's create a JavaScript file that defines our custom widget. This widget will display a popover when triggered.
view_widget.js
/** @odoo-module **/
import { registry } from "@web/core/registry";
import { usePopover } from "@web/core/popover/popover_hook";
Import { ViewWidgetBlogPopover } from "./ViewWidgetBlogPopover";
const { Component, EventBus } = owl;
export class ViewWidgetBlog extends Component {
   setup() {
       this.popover = usePopover();
       this.bus = new EventBus();
       this.bus.addEventListener('close-popover', () =>                                 this.closePopover?.());
   }
   showPopup(ev) {
       this.closePopover = this.popover.add(
           ev.currentTarget,
           ViewWidgetBlogPopover,
           { bus: this.bus, record: this.props.record },
           { position: 'top' }
       );
   }
}
ViewWidgetBlog.template = "view_widget.ViewWidgetBlog";
registry.category("view_widgets").add("view_widget_blog", ViewWidgetBlog);
Here, we create a new component ViewWidgetBlog that uses Owl's usePopover hook. When the button is clicked, a popover is triggered and displayed at the top of the button.
Next, create an XML file that defines the template for the widget setup.
View_widget.xml
<template id="template" xml:space="preserve">
   <t t-name="view_widget.ViewWidgetBlog" owl="1">
       <div>
           <button tabindex="0" t-on-click="showPopup"
                   t-attf-class="btn btn-primary">View Widget</button>
       </div>
   </t>
</template>
This template defines a button that triggers the showPopup function when clicked.
Now, let's create the JavaScript file for the popover widget, which will display additional content when the button is clicked.
View_widget_popover.js
/** @odoo-module **/
import { useService } from "@web/core/utils/hooks";
const { Component } = owl;
export class ViewWidgetBlogPopover extends Component {
   setup() {
       this.actionService = useService("action");
   }
}
ViewWidgetBlogPopover.template = "view_widget.ViewWidgetBlogPopover";
Here, we define a simple popover component, which uses Odoo's action service (useService("action")).
Next, create the template for the popover.
view_widget_popover.xml
<template id="template" xml:space="preserve">
<t t-name="view_widget.ViewWidgetBlogPopover" owl="1">
<div class="card" style="width: 18rem;">
<div class="card-body">
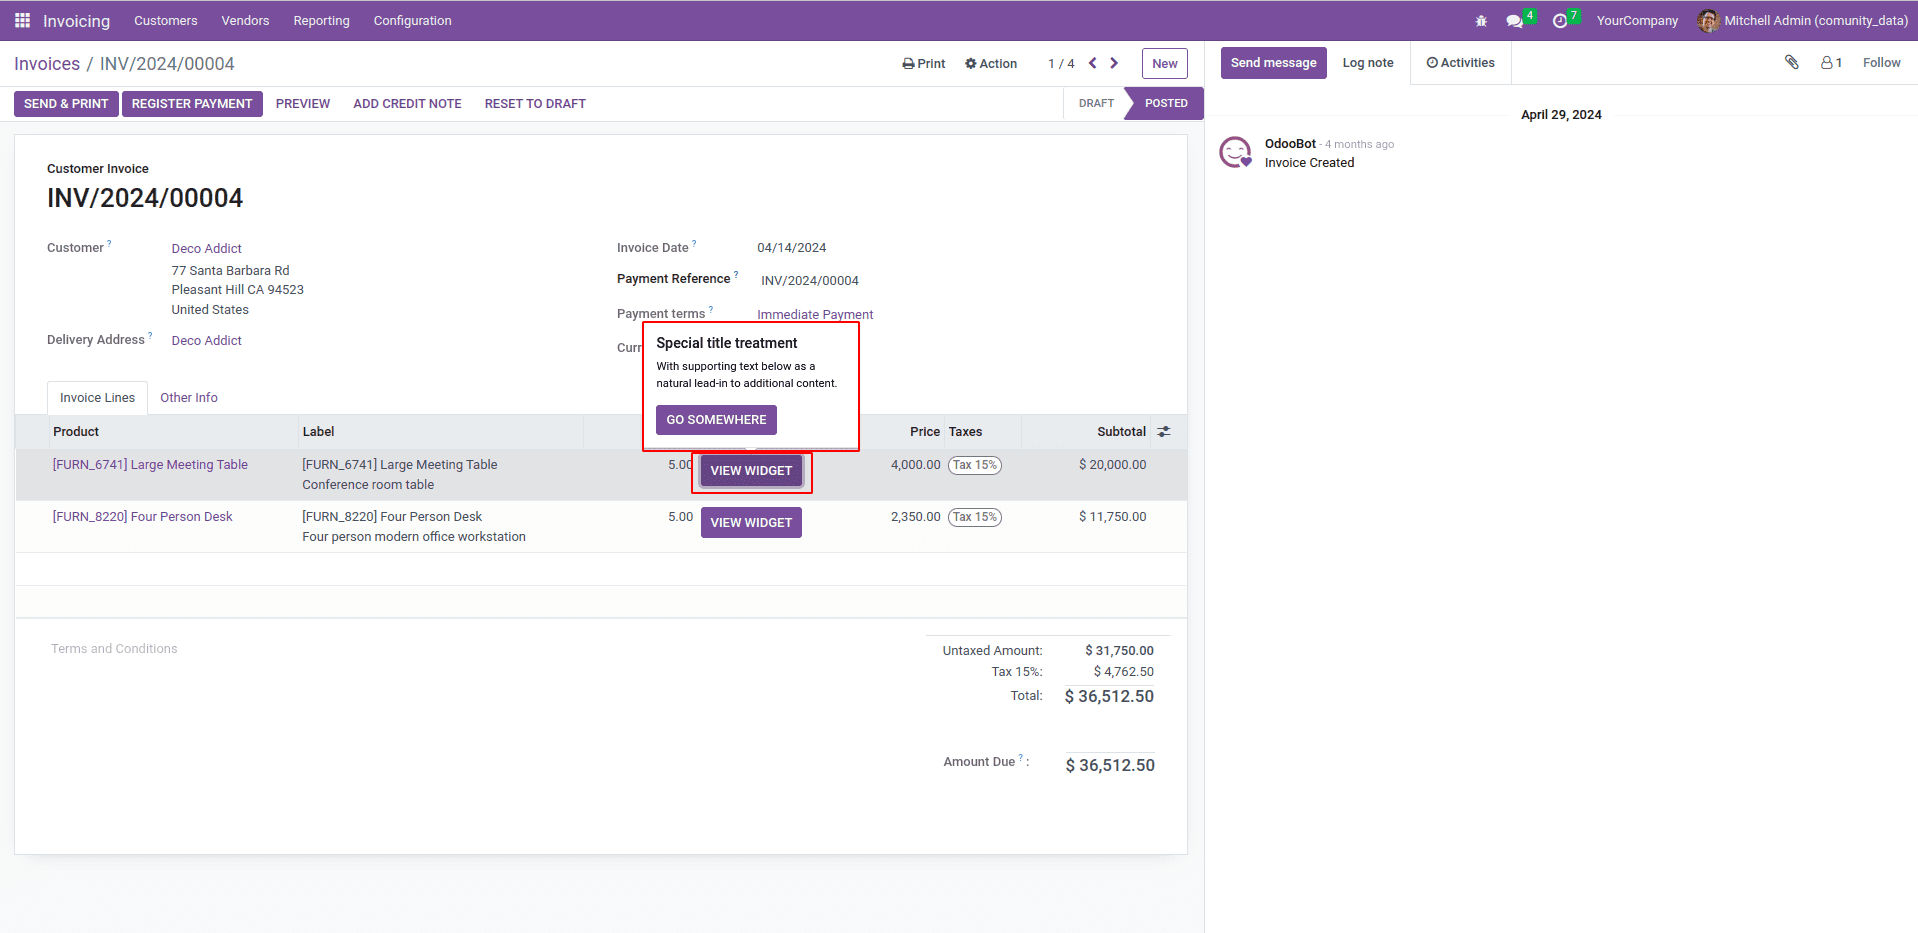
<h5 class="card-title">Special title treatment</h5>
<p class="card-text">With supporting text below as a natural lead-in
to additional content.</p>
<a href="#" class="btn btn-primary">Go somewhere</a>
</div>
</div>
</t>
</template>
This template defines the structure of the popover, showing a card with a title, some text, and a button.
'assets': {
   'web.assets_backend': [
       'view_widget/static/src/js/view_widget.js',
       'view_widget/static/src/js/view_widget_popover.js',
       'view_widget/static/src/xml/view_widget.xml',
       'view_widget/static/src/xml/view_widget_popover.xml',
   ],
},
Now, integrate the widget into an Odoo view by referencing it in the XML definition of the form or tree view.
<odoo>
   <record model="ir.ui.view" id="view_widget">
       <field name="name">view.widget</field>
       <field name="model">account.move</field>
       <field name="inherit_id" ref="account.view_move_form"/>
       <field name="arch" type="xml">
           <xpath expr="//tree/field[@name='quantity']"
                  position="after">
               <widget name="view_widget_blog"/>
           </xpath>
       </field>
   </record>
</odoo>
In this example, the custom view_widget_blog widget is inserted after the quantity field in the account.move model.
Then we can add the view widget to the view and use it in Odoo, which will enhance the platform's functionality.
To read more about How to Create a Field Widget in the Odoo 16, refer to our blog How to Create a Field Widget in the Odoo 16.