Odoo 18 is the latest version of the comprehensive business management software, offering enhanced features and improved performance to streamline operations. With a modular approach, it supports diverse business needs, from sales, accounting and CRM to inventory and e-commerce. The platform introduces advanced tools, a modernized interface, and better automation, making it ideal for businesses looking to optimize efficiency and scalability.
Email templates are pre-designed messages stored in the database for repeated use. They enable users to send consistent and professional communications without rewriting the same content each time. By creating templates customized for specific scenarios, users can ensure that the right message reaches the right audience. This approach improves the quality of communication and enhances customer engagement.
Before creating an email template, it's important to verify that your custom module includes the necessary dependencies. Open the __manifest__.py file and add 'mail' and 'contacts' to the 'depends' list. These dependencies ensure that the module integrates essential features from the mail module. For example:
'depends': ['mail', 'sale_management', 'contacts']
Email Template Creation
In Odoo, email templates are designed using a combination of XML, Jinja2, and Python. To get started, you need to create a new record in your XML file, defining the key attributes of the email template.
Xml code:
<?xml version="1.0" encoding="utf-8"?>
<odoo>
    <!-- Template to send Sale Order email to the customer -->
    <record id="mail_template_sale_order" model="mail.template">
        <field name="name">Sale Order Email Demo Template</field>
        <field name="model_id" ref="sale.model_sale_order"/>
        <field name="email_from">{{ object.company_id.email }}</field>
        <field name="email_to">{{ object.partner_id.email }}</field>
        <field name="subject">Your Sale Order {{ object.name }}</field>
        <field name="body_html" type="html">
            <div style="font-family: Arial, sans-serif; font-size: 14px; color: #333;">
                <p>Dear
                    <strong>
                        <t t-out="object.partner_id.name"/>
                    </strong>
                    ,
                </p>
                <p>
                    Thank you for your order! Please find the details of your sale order below:
                </p>
                <table style="border: 1px solid #ddd; border-collapse: collapse; width: 100%; margin-top: 10px;">
                    <thead>
                        <tr style="background-color: #f2f2f2; text-align: left;">
                            <th style="border: 1px solid #ddd; padding: 8px;">Product</th>
                            <th style="border: 1px solid #ddd; padding: 8px;">Quantity</th>
                            <th style="border: 1px solid #ddd; padding: 8px;">Unit Price</th>
                            <th style="border: 1px solid #ddd; padding: 8px;">Subtotal</th>
                        </tr>
                    </thead>
                    <tbody>
                        <t t-foreach="object.order_line" t-as="line">
                            <tr>
                                <td style="border: 1px solid #ddd; padding: 8px;">
                                    <t t-out="line.product_id.display_name"/>
                                </td>
                                <td style="border: 1px solid #ddd; padding: 8px;">
                                    <t t-out="line.product_uom_qty"/>
                                </td>
                                <td style="border: 1px solid #ddd; padding: 8px;">
                                    <t t-out="line.price_unit"/>
                                </td>
                                <td style="border: 1px solid #ddd; padding: 8px;">
                                    <t t-out="line.price_subtotal"/>
                                </td>
                            </tr>
                        </t>
                    </tbody>
                </table>
                <p style="margin-top: 20px;">
                    <strong>Total Amount:</strong>
                    <t t-out="object.amount_total"/>
                </p>
                <p>
                    Please feel free to contact us if you have any questions about your order.
                </p>
                <p>Best Regards,</p>
                <p>
                    <strong>
                        <t t-out="object.company_id.name"/>
                    </strong>
                </p>
            </div>
        </field>
    </record>
Understanding the Key Fields in Email Templates
* id: A unique external identifier for the email template record.
* model: Specifies the model to which the email template is linked, ensuring consistent usage across templates.
* name: A descriptive name for the email template, making it easily identifiable.
* ref: References data from the related model required for sending the email.
* email_from: Defines the sender's email address.
* email_to: Specifies the recipient's email address.
* subject: Sets the subject line for the email.
* body_html: The main content of the email, crafted using Jinja2 for dynamic rendering.
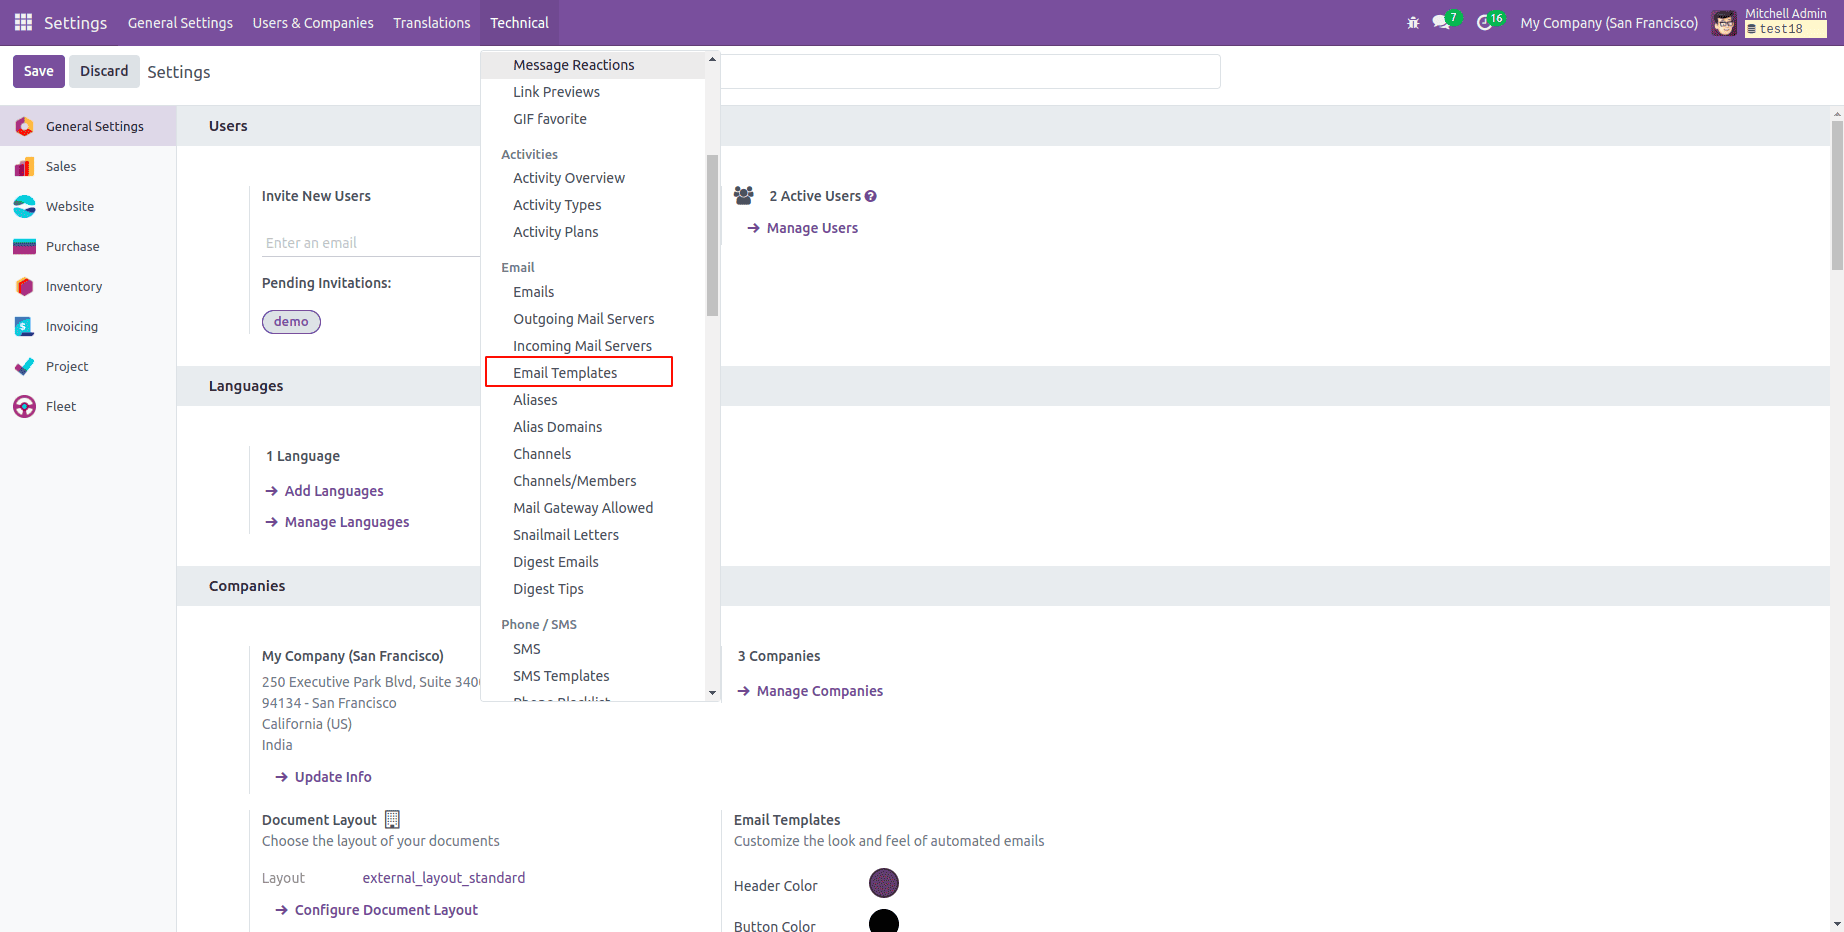
After creating the XML file for the email template and installing the custom module, enable developer mode to access advanced settings. Navigate to Technical > Email Templates (as shown in the figure below) and select the customized template.

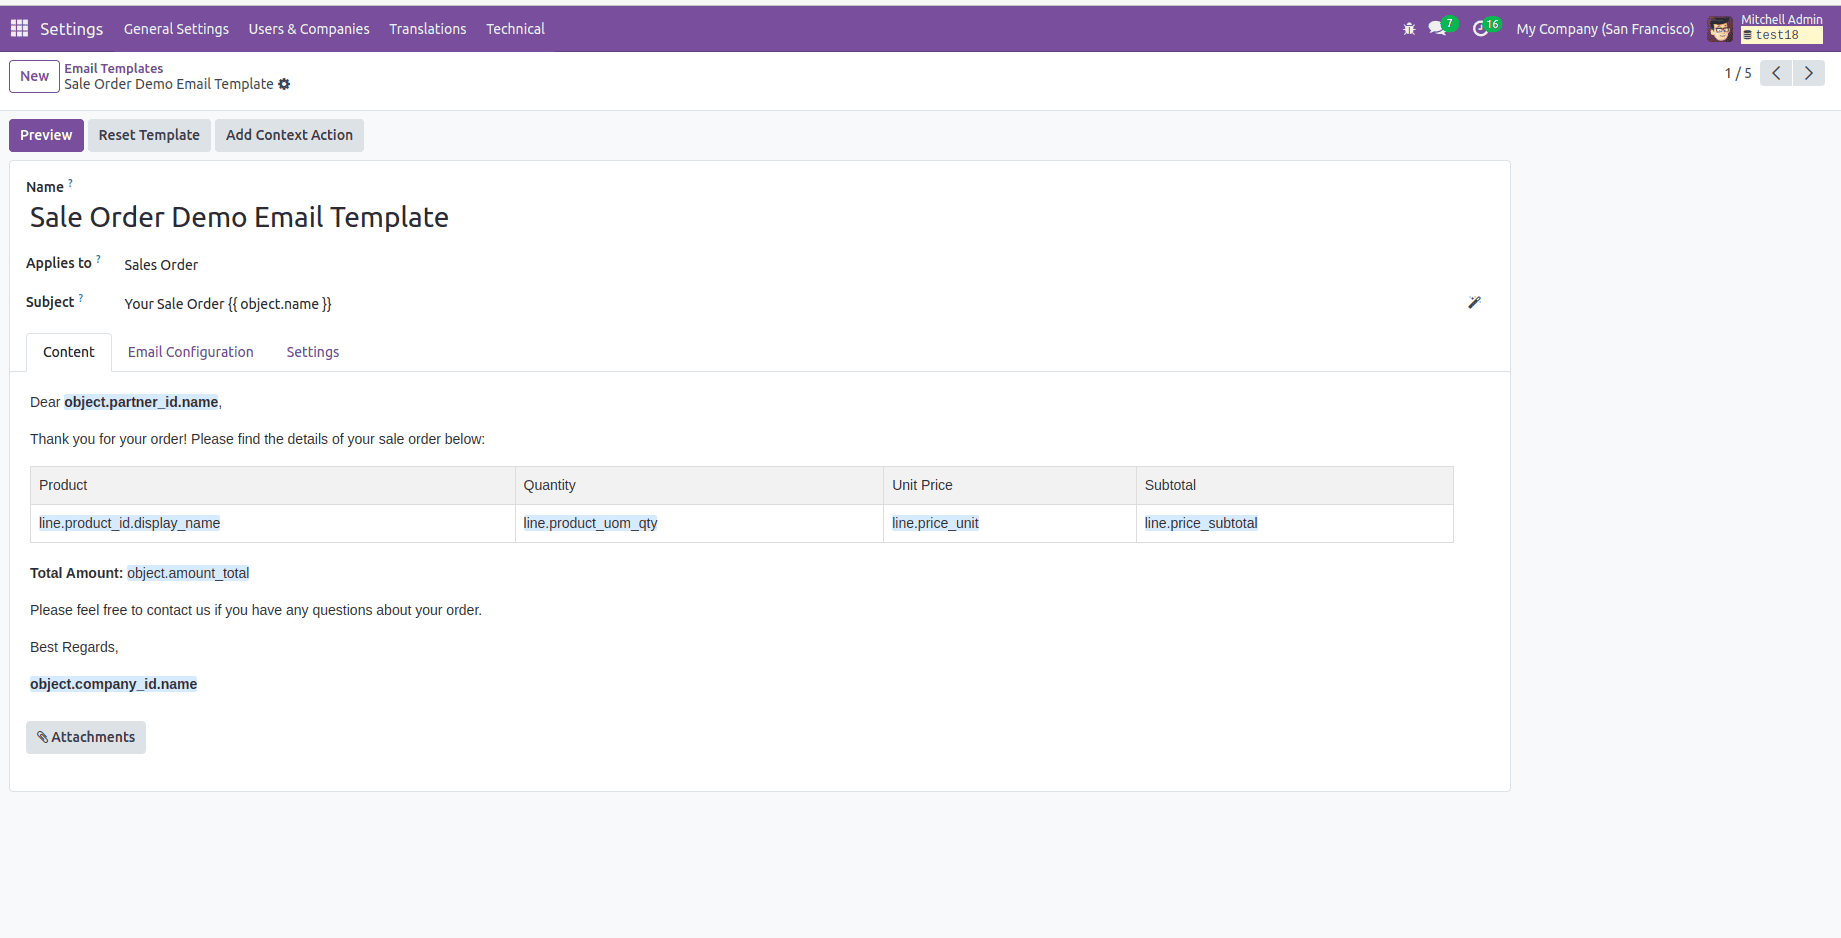
You will see the layout displayed like this, where you can also customize various parts of the mail template according to your preferences. Additionally, you can configure report attachments to include necessary documents (e.g., sale order reports, invoices, or quotations) in the email. You can also set up auto-delete options to ensure that old or unnecessary attachments are automatically removed after they have been sent, optimizing storage and email performance.

Python Function for Sending Emails
To use the email template, define a Python function that triggers the template. Start by adding a button to the desired model and linking it to an action. From this function, the email template can be invoked using the following approach:
Xml code:
<?xml version="1.0" encoding="UTF-8"?>
<odoo>
    <record id="custom_sale_order_form_view" model="ir.ui.view">
        <field name="name">sale.order.form.view.custom</field>
        <field name="model">sale.order</field>
        <field name="inherit_id" ref="sale.view_order_form"/>
        <field name="arch" type="xml">
            <xpath expr="//button[@name='action_quotation_send']" position="after">
                <button name="send_mail" type="object" string="Send Mail Test" class="oe_stat_button"/>
            </xpath>
        </field>
    </record>
</odoo>
Python code:
from odoo import models
from odoo.exceptions import UserError

class SaleOrder(models.Model):
    _inherit = 'sale.order'
    def send_mail(self):
        # Fetch the mail template by its ID
        template = self.env['mail.template'].browse(self.env.ref('custom_module_name.mail_template_sale_order').id)
        # Ensure the template exists
        if template:
            # Send the email using the template
            template.send_mail(self.id, force_send=True)
        else:
            raise UserError("Mail Template not found. Please check the template.")
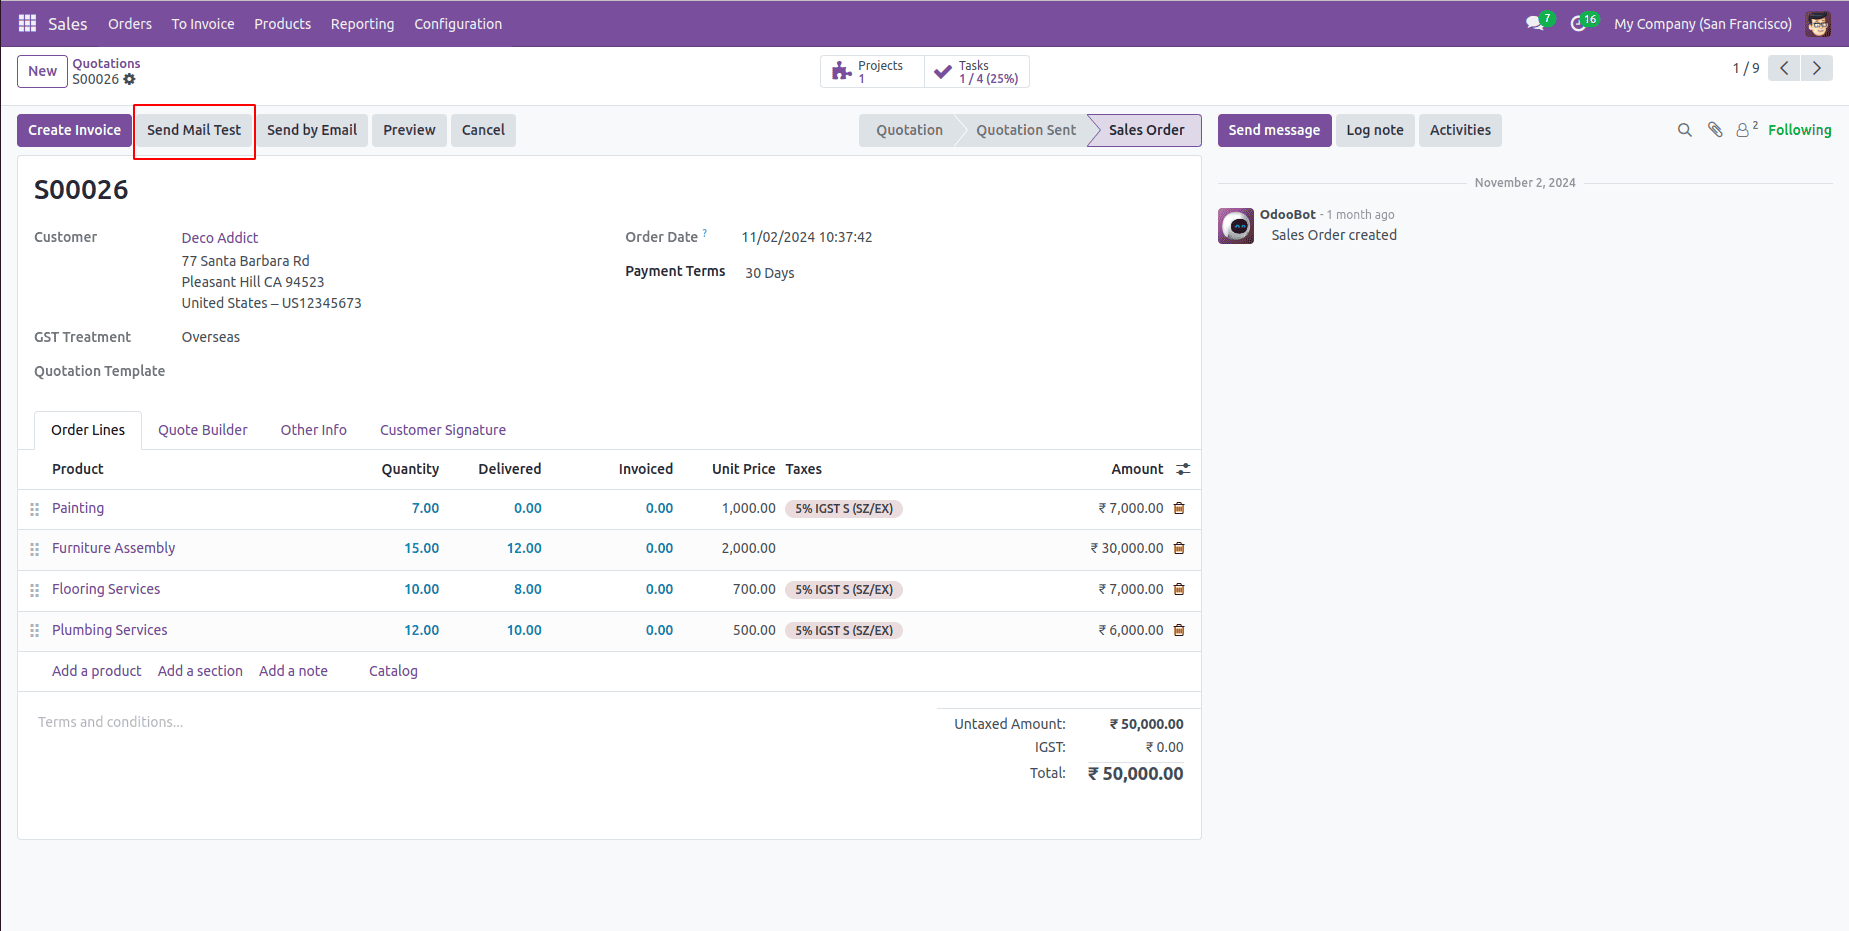
After installing the changes, a button will appear on the Sale Order form view. When clicked, it will send an email to the corresponding customer with the relevant sale order details as per the customization. The following image shows the button (Send Mail Test) on the Sale Order view.

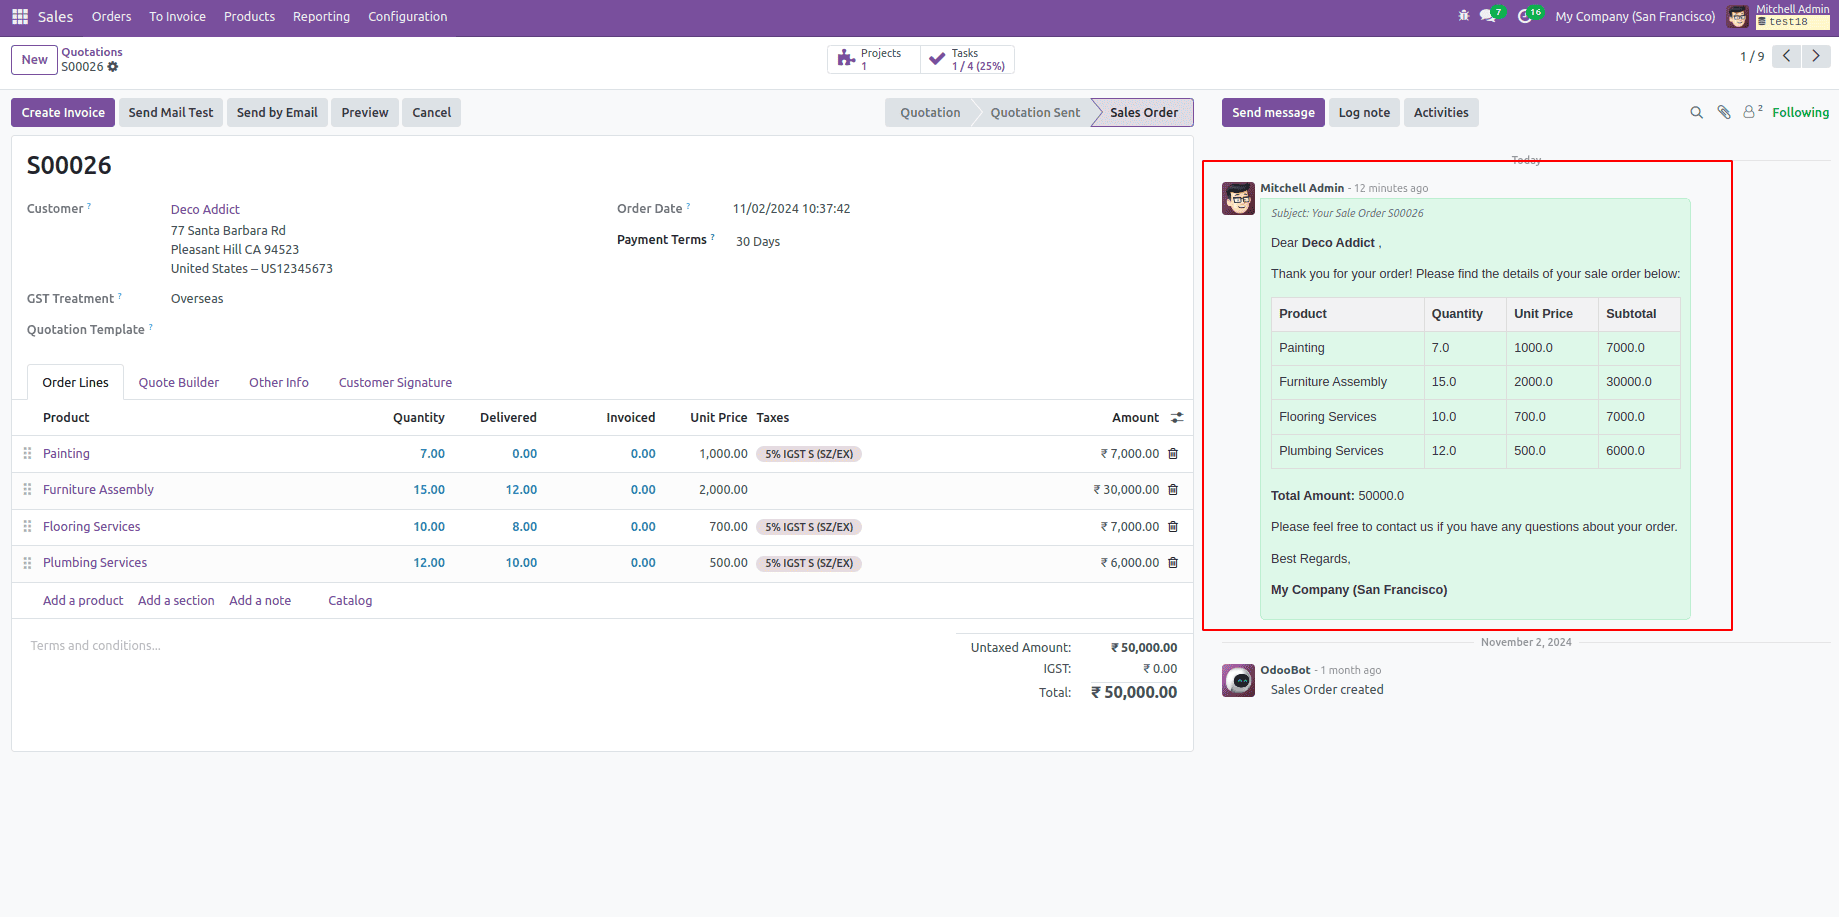
The following image shows the sale order log note. You can see that the email has been sent to the customer, and the email body contains the sale order details as per the customization. This email will be received by the corresponding customer.

Creating email templates in Odoo 18 simplifies communication by automating the process of sending personalized and dynamic emails. With the use of XML and Jinja2, combined with Python for integration, users can easily design templates tailored to their business needs. By connecting these templates to buttons or actions, sending emails becomes quick and seamless. Moreover, options like adding report attachments and enabling auto-delete for old attachments make these emails even more efficient while keeping storage usage in check. Overall, email templates in Odoo 18 save time, maintain consistency and enhance productivity by streamlining communication workflows.
To read more about How to Create an Email Template in Odoo 17, refer to our blog How to Create an Email Template in Odoo 17.