In Odoo, a One2many field can include sections and notes, enabling users to categorize and organize related records into meaningful groups. Notes provide a way to add supplementary information or comments directly within the context of specific records.
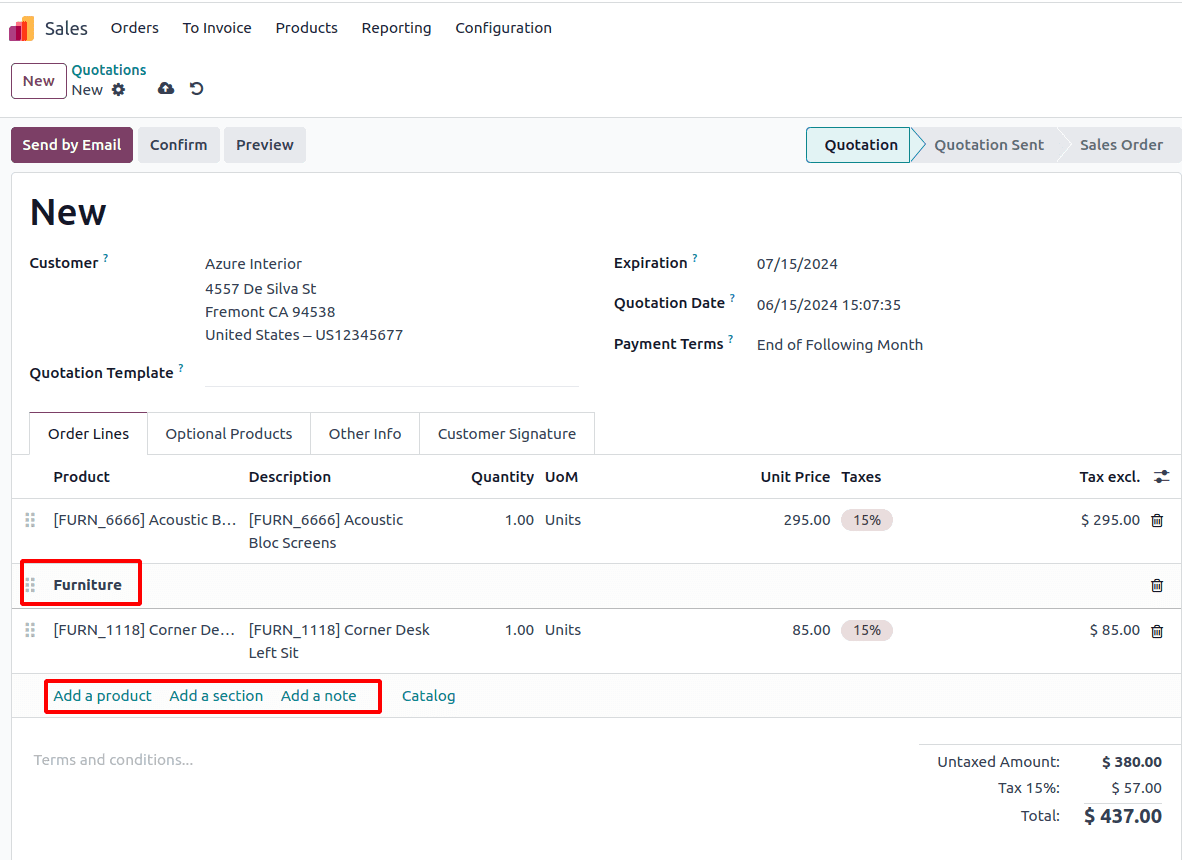
For instance, in a sale order line, users can utilize sections and notes to categorize and manage items more effectively.
In this blog, we can explore how to add sections and notes to our custom model. First, we have to create a new model and add the one2many field.
from odoo import api, models, fields, _class WarrantyRequest(models.Model): _name = 'warranty.request' _description = 'Warranty Request' _inherit = ['mail.thread', 'mail.activity.mixin'] partner_id = fields.Many2one('res.partner', string='Customer') date = fields.Date(string='Date', default=datetime.today()) name = fields.Char(string="Sequence Number", readonly=True, required=True, copy=False, default=_('New')) state = fields.Selection( [('draft', 'Draft'), ('to_approve', 'To approve'), ('approved', 'Approved'), ('cancelled', 'Cancelled')], string='Status', default='draft', clickable=True) warranty_period = fields.Selection( [('3months', '3 Months'), ('6month', '6 Months'), ('1year', '1 Year')], string='Warranty Period', default='3months') warranty_expire_date = fields.Date(string="Expiry Date") warranty_line_ids = fields.One2many('warranty.request.line', 'warranty_id') description = fields.Html(string='Description')And then add the warranty. request.line model,
from odoo import api, models, fields, _class WarrantyRequestLine(models.Model): _name = 'warranty.request.line' _description = 'Warranty Request Line' product_id = fields.Many2one('product.product', required=True) warranty_id = fields.Many2one('warranty.request') description = fields.Char(related='product_id.name') quantity = fields.Integer(required=True) uom_id = fields.Many2one('uom.uom', related='product_id.uom_id') lst_price = fields.Float( related='product_id.lst_price') warranty_charge = fields.Float( compute='_compute_warranty_charge')And then add the corresponding XML file,
<?xml version="1.0" encoding="UTF-8" ?>
<odoo>
   <!--  Warranty request form view  -->
<record id="warranty_request_form_view" model="ir.ui.view">
  <field name="name">warranty.request.form.view</field>
  <field name="model">warranty.request</field>
  <field name="arch" type="xml">
  <form><header>
     <field name="state" widget="statusbar"/>
     <button name="action_to_approve" type="object"
      string="To approve"invisible="state != 'draft'"/>
     <button name="action_approve" string="Approve"
      invisible="state !='to_approve'" type="object"/>
     <button name="action_reset_draft" string="Reset”
      invisible="state == 'draft'" type="object"/>
     <button name="action_cancel"  string="To approve"
      type="object" invisible="state != 'cancelled'"/>
     </header>
     <sheet>
       <div class="oe_title">
<h1><field name="name"/></h1>
</div>
  <group>
     <group>
        <field name='partner_id'/>
      </group>
     <group>
        <field name='date'/>
        <field name='warranty_period'/>
        <field name='warranty_expire_date'/>
     </group>
   </group>
   <notebook>
      <page id="product" name="Product">
         <field name="warranty_line_ids" mode="tree">
           <tree editable='bottom'>
              <field name="product_id"
                 create="false" delete="false"/>
              <field name="name"/>
              <field name="quantity"/>
              <field name="uom_id"/>
              <field name="lst_price"/>
              <field name="warranty_charge"
                 sum="Warranty Charge"/></tree>
         </field>
      </page>
      <page id="product" name="Description">
          <field name="description"
            readonly="state != 'draft'"/>
      </page>
      </notebook>
</sheet>
<div class="oe_chatter">
    <field name="message_follower_ids"
            widget="mail_followers"/>
    <field name="message_ids" widget="mail_thread"/> </div>
</form>
</field>
</record>
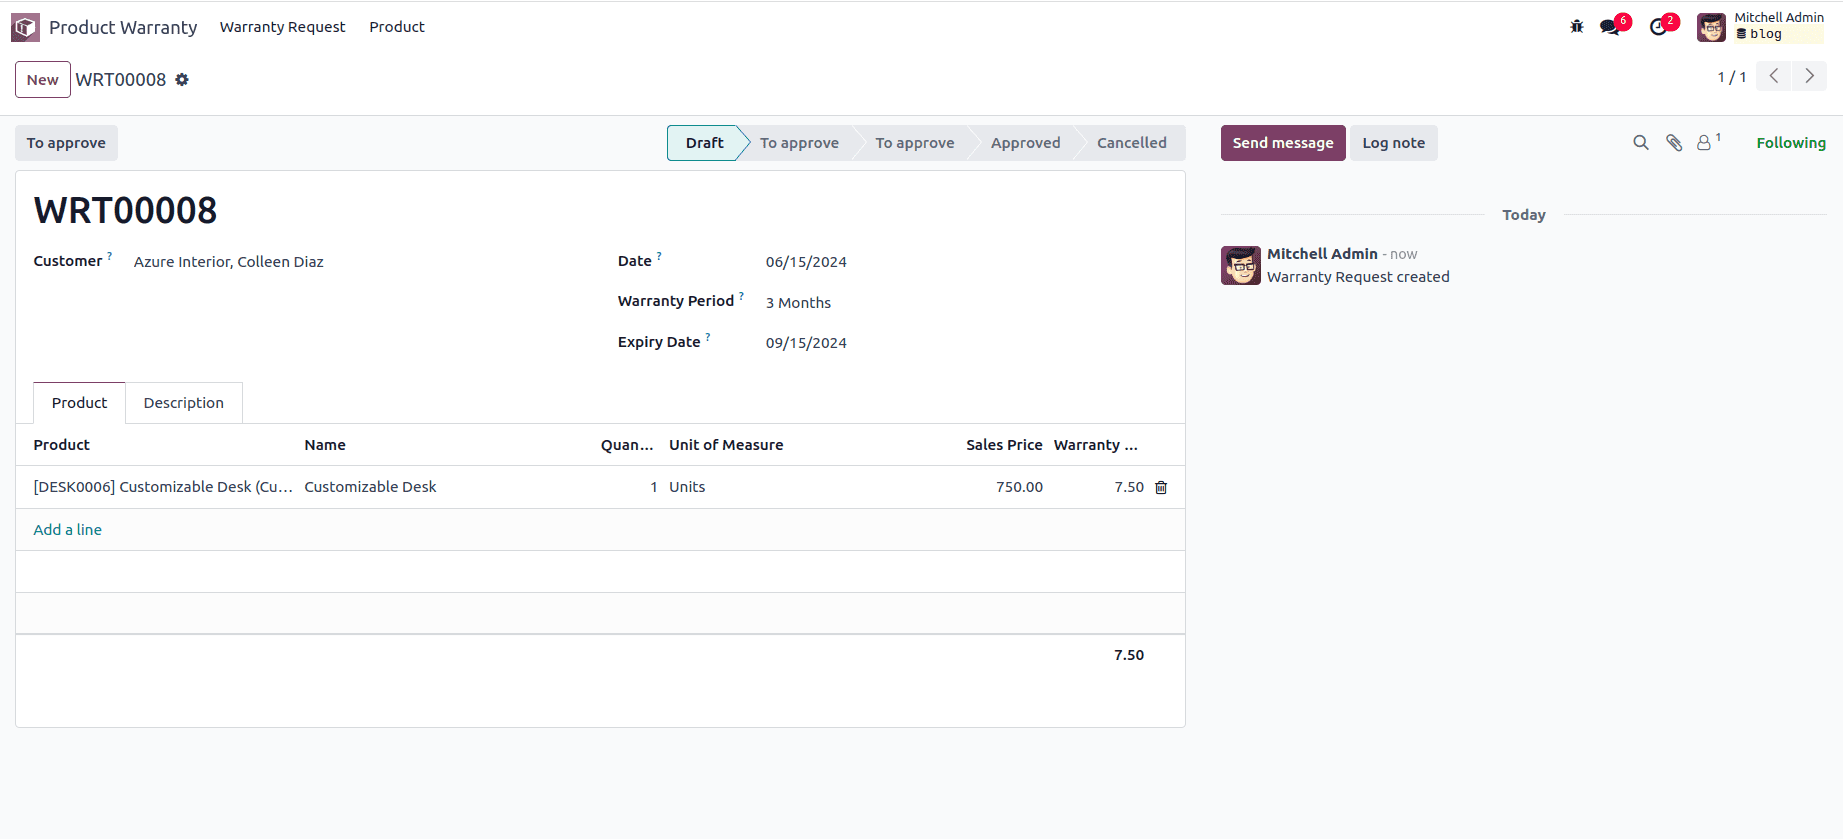
It results following view, By default we get the ‘Add a line’ control button.
To add the section and note in one2many model, follow these steps:
1. Add the display type field in the one2many filed model.
The model should contain the 'name' field for the section and note and display_type filed as follows,
name = fields.Char('Description')
display_type = fields.Selection(
   selection=[
       ('line_section', "Section"),
       ('line_note', "Note"),
   ],
   default=False)
2. Add the create and write function as follows
@api.model
def create(self, vals_list):
   if vals_list.get('display_type'):
       vals_list.update(product_id=False, quantity=0)
   return super().create(vals_list)
Ensures that if display_type is set, product_id is False and quantity is 0, thereby enforcing a rule that lines with display_type should not have product or quantity values.
def write(self, values): if 'display_type' in values and self.filtered( lambda line: line.display_type != values.get('display_type')): raise UserError( _("You cannot change the type of a warranty order line. Instead you should delete the current line and create a new line of the proper type.")) return super().write(values)Then, Prevents changing the display_type of an existing line, enforcing the rule that once a line is created with a certain type, it cannot be changed. If an attempt is made to change the type, it raises an error instructing the user to delete the line and create a new one with the appropriate type.
3. Defines SQL constraints
To help maintain data integrity by enforcing that a warranty request line is either a display line (with display_type set) or an accountable line (with product_id and quantity set), but not a mix of both.
_sql_constraints = [
   ('accountable_required_fields',
    "CHECK(display_type IS NOT NULL OR (product_id IS NOT NULL AND quantity IS NOT NULL))",
    "Missing required fields on accountable warranty request line."),
   ('non_accountable_null_fields',
    "CHECK(display_type IS NULL OR (product_id IS NULL AND quantity = 0))",
    "Forbidden values on non-accountable warranty request line"),
]
The accountable_required_fields constraint ensures that for lines where display_type is not set, product_id and quantity must be provided.
The non_accountable_null_fields constraint ensures that for lines where display_type is set, product_id must not be provided and quantity must be zero.
4. Add the ‘section_and_note_one2many’ widget and control section in the one2many tree view.
a) Add the ‘section_and_note_one2many’ widget in the field:
<field name="warranty_line_ids"
widget="section_and_note_one2many"
mode="tree"  context="{'default_display_type': False}">
b) Add control tag inside tree tag:
These controls allow users to easily add new records with predefined contexts for sections and notes.
<control>
   <create name="add_product_control"
           string="Add a product"/>
   <create name="add_section_control"
           string="Add a section"
           context="{'default_display_type':
                  'line_section'}"/>
   <create name="add_note_control"
           string="Add a note"
           context="{'default_display_type':
                 'line_note'}"/>
</control>
Add Product Control: No specific context, so it will create a standard product line.
Add Section Control: Ensures that the display_type is set to line_section by default.
Add Note Control: Ensures that the display_type is set to line_note by default.
c) Add display_type field in the view
The display_type field is included in the view but made invisible in the list/tree view.
<field name="display_type" column_invisible="1"/>
d) Change the required condition for the mandatory field.
<field name="product_id"
      required="not display_type"/>
<field name="quantity"
required="not display_type"/>
Make the product_id and quantity fields required only when display_type is not set.
After all these changes, our XML code looks like as follows,
<page id="product" name="Product">
   <field name="warranty_line_ids"
     widget="section_and_note_one2many" mode="tree"
     context="{'default_display_type': False}" >
     <tree editable='bottom'>
       <control>
         <create name="add_product_control"
            string="Add a product"/>
         <create name="add_section_control"
            string="Add a section"
            context="{'default_display_type':
                   'line_section'}"/>
         <create name="add_note_control"
            string="Add a note"
            context="{'default_display_type':
                  'line_note'}"/>
       </control>
       <field name="product_id" create="false"
         required="not display_type"  delete="false"/>
       <field name="name"/>
       <field name="display_type"
          column_invisible="1"/>
       <field name="quantity"
          required="not display_type"/>
       <field name="uom_id"/>
       <field name="lst_price"/>
       <field name="warranty_charge"
          sum="Warranty Charge"/>
       </tree>
   </field>
</page>
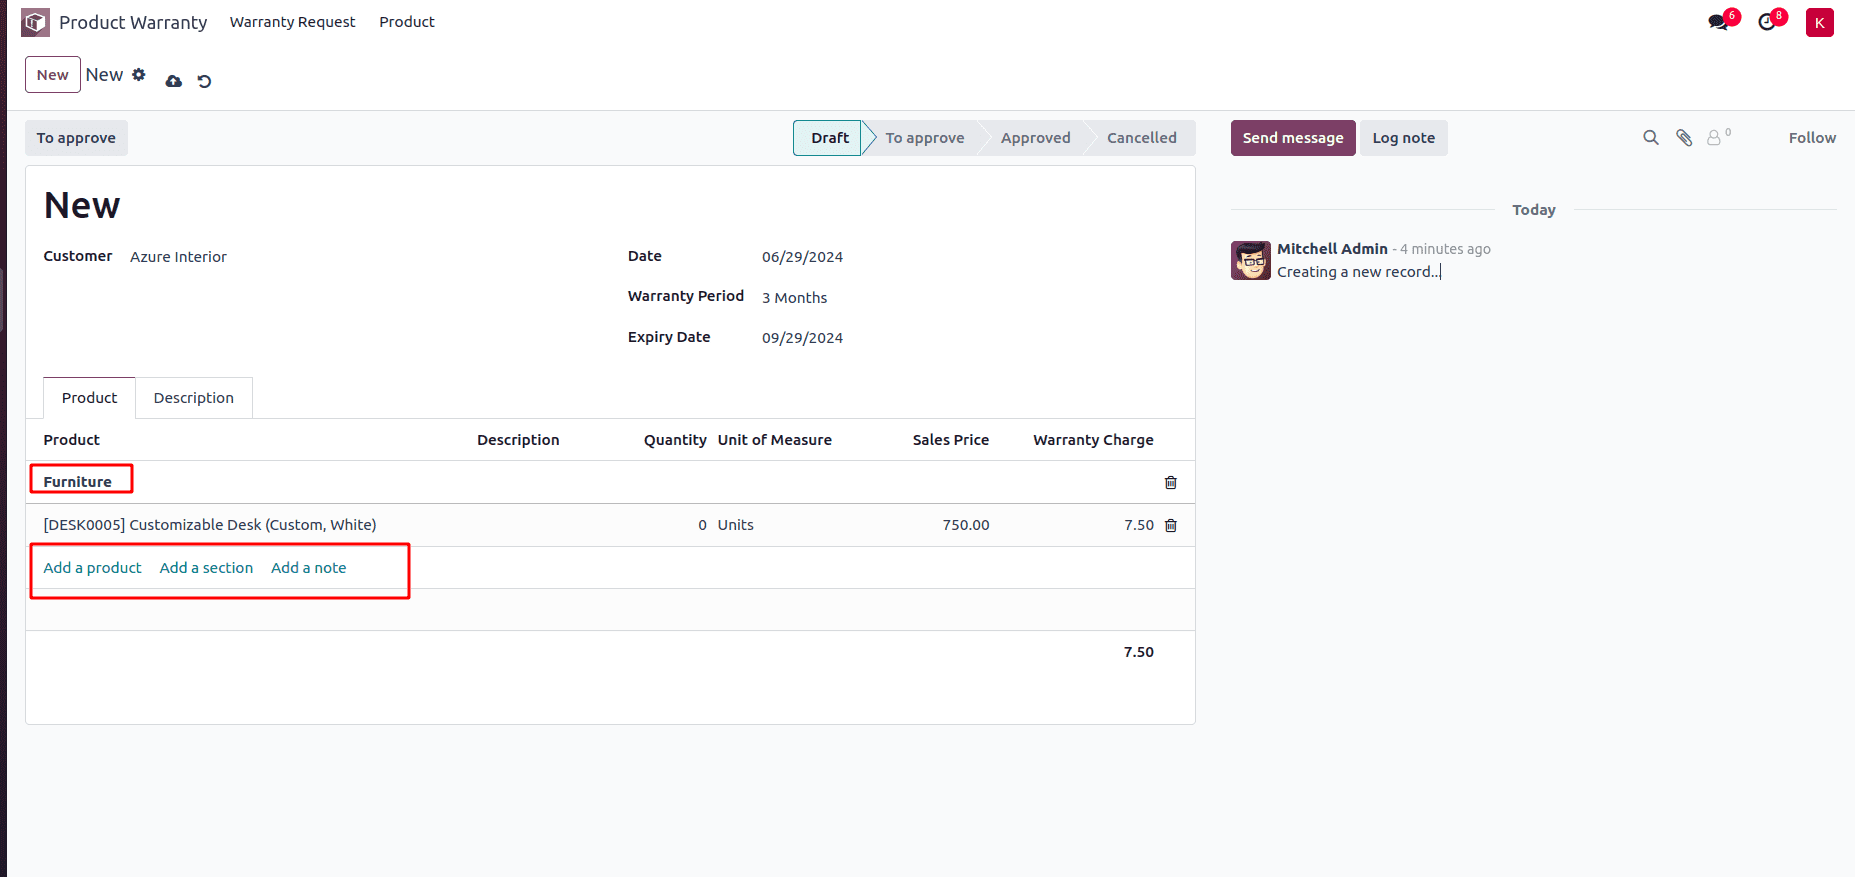
In the One2many tree view, users have the capability to add both sections and notes, as demonstrated in the following screenshot.
In Odoo, sections and notes within the One2many field offer several practical benefits that contribute to a more organized, user-friendly, and efficient system.
By using sections, users can easily distinguish between different sets of data or categories within a form or view. This improves the readability of information; Notes provide a way to add supplementary information or comments directly within the context of specific records.
To read more about How to Add Sections, Notes, & Subtotals in a Quotation Using Odoo 17 Sales, refer to our blog How to Add Sections, Notes, & Subtotals in a Quotation Using Odoo 17 Sales.