Software for manufacturing management is an essential tool for managing and enhancing a manufacturer's business operations. It may enhance organizational efficiency by assisting businesses in better utilizing their resources, which is important in today's fiercely competitive market. Many businesses utilize manufacturing performance software to assist in managing business expansion and profitability.
Businesses, especially manufacturers, frequently utilize enterprise resource planning (ERP) systems to plan, manage, and optimize operations. Software for manufacturing management is particularly created for these businesses, taking into account their particular demands and specifications. These systems provide full insight and control over all corporate processes thanks to their extensive functionality and analytics.ERP systems support manufacturers' company expansion, revenue growth, and quality improvement, eventually boosting output and enhancing customer service. The following are some other benefits of manufacturing management systems:
* Reduced Redundancy
* Automated Processes
* Improved Supply Chain, Warehouse, Transportation, and Inventory Management,
* Risk Mitigation,
* Improved Customer Service,
* Departmental Integration,
* Reducing the need for multiple systems
* Real-time Reporting
* Centralization of Operational and Financial Data
* Adaptation to changes or disruptions in the business environment
To manage manufacturing orders, bills of materials, and work centers and track all manufacturing processes at every stage, organizations can utilize the Odoo 16 Manufacturing Module, an ERP system. You can fully count on Odoo 16 for the effective handling of work orders. Each production stage's scheduling and planning is now easier thanks to the specialised module. To automate Maintenance, Handle Requests, and Simplify Operations, Odoo 16 Manufacturing ERP incorporates Maintenance, Product Lifecycle Management (PLM), and Quality modules. It provides efficient tracking of Requests, Quality Alerts, and Component approval processes. The integration guarantees continual communication and network expansion for industrial companies.
In this article, we'll go through the concept and method of Engineering Change Orders (ECO) updations with the Odoo 16 Manufacturing Module. The Manufacturing Module has been integrated with the PLM (Product Lifecycle Management) Module and other modules, as I've already stated. Now, Let’s get started.
ECO Updations in Odoo Manufacturing
An integral feature of the PLM Module in Odoo Manufacturing is ECO updating. In your production unit, you can utilize this capability to recordably alter any Manufacturing Procedures, Product Designs, or Component Choices of an existing product of your company. This function connects a Product and Manufacturing Order of a manufacturing unit. Open the "Products" menu in the Odoo 16 Manufacturing Module and look inside a product configuration form to check the functionality.
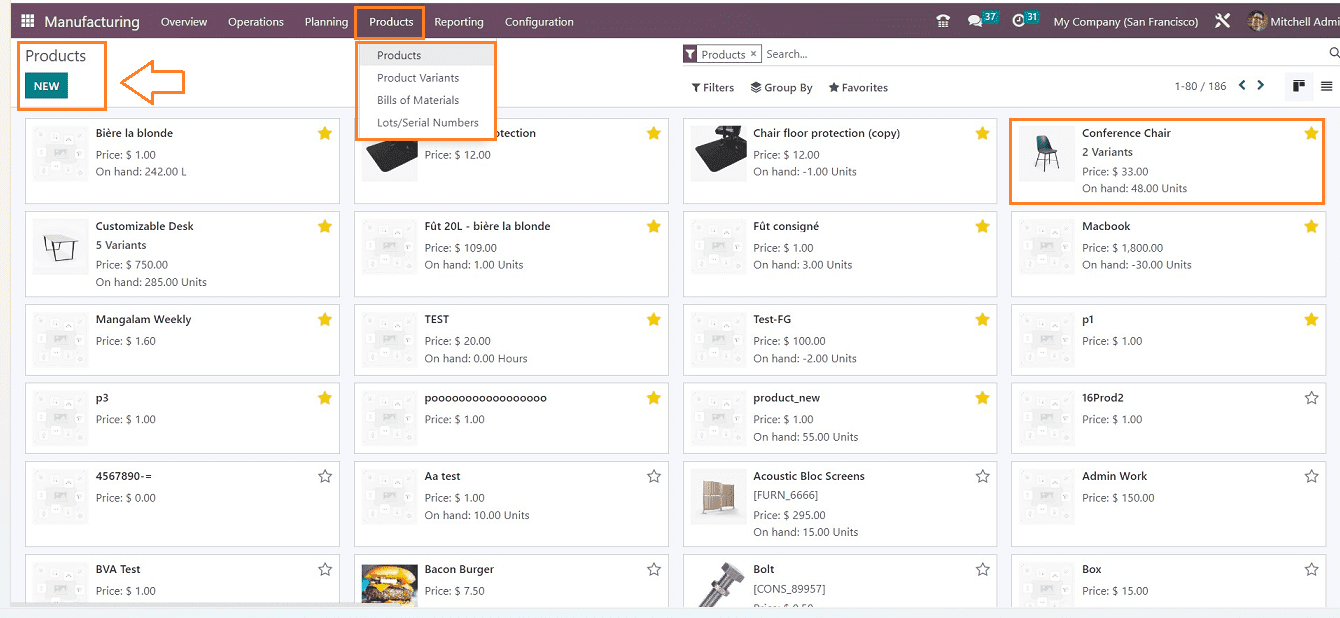
Here, we can see the dashboard of all the available products, so click on the Kanban card of a product, and you can see the form view as shown below.
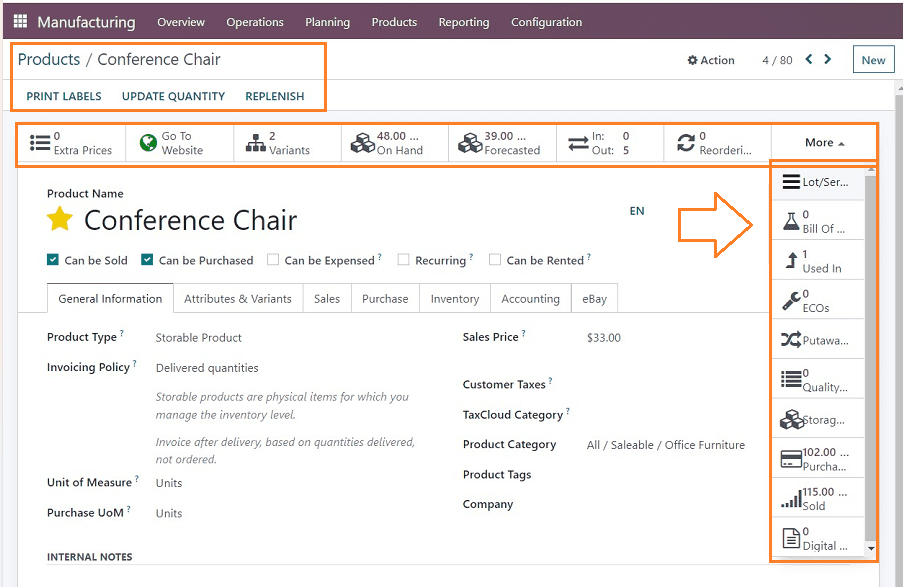
From the displayed smart buttons, open the “Bill Of Materials” button to see the manufacturing Components and Processes. We can examine the detailed Bill of Materials for the given product and its name, Reference, BoM Type, and Company in the dashboard window illustrated in the screenshot below.
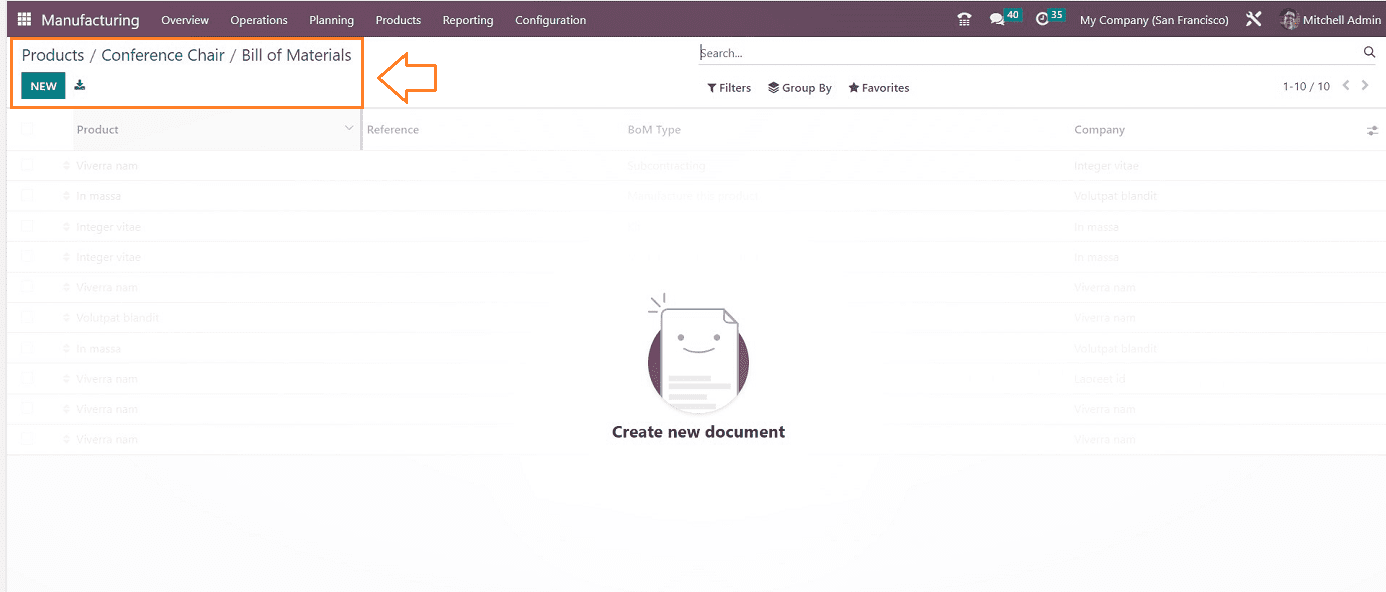
Creating a Bill Of Materials for a Product
You can choose the “Bill Of Materials” option from the “Products” menu of the Manufacturing module in order to produce a Bill of Materials for a product. Here, in this scenario, we are creating the bill of an existing product via the “Products” menu and the Bill Of Materials dashboard of the product “Conference” chair. So we can create new details by clicking on the “NEW” button.
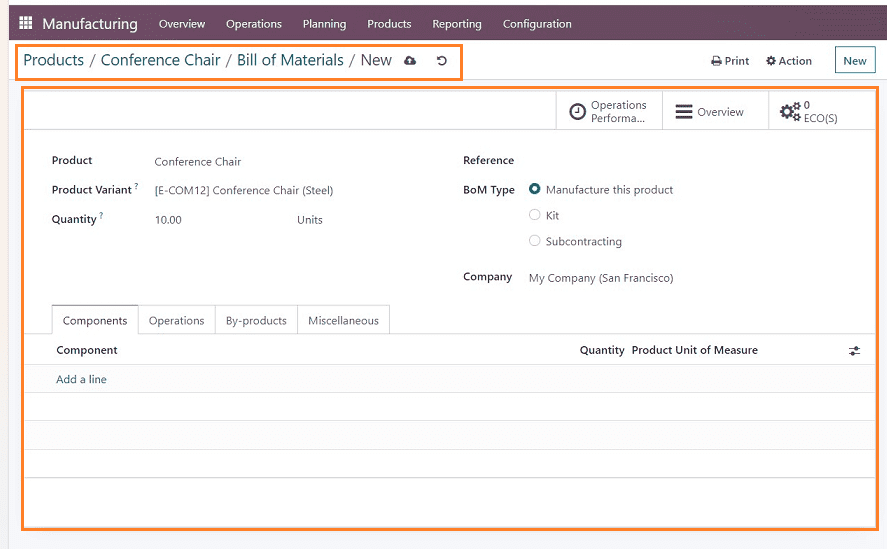
In the displayed configuration form, you can see some data fields and some tab sections. Therefore, you can fill out the relevant information in the fields for the "Product," "Product Variant," "Reference," and "Quantity" that you plan to create.
You can generate three different types of material bills in Odoo. You can choose the type of “Manufacture this product,” “kit,” or “Subcontracting” in the “BoM Type” area. You can use the “Manufacture this Product” option if you are generating this BoM with the purpose of manufacturing this product. You may sell the parts of this BoM as a kit if you choose the “Kit” option. By choosing the “Subcontracting” option, you are telling the allocated subcontractor to use this BOM to produce the product for you. We are gonna manufacture this product, so i am selecting the respective option. Finally, you can mention the company name in the “Company” field.
This form has a few subsections named “Components,” “Operations,” “By-Products,” and “Miscellaneous.”
Components Tab
The "Add a line" button located under the "Components" tab allows you to sequentially list each component or raw material required to create the particular product.
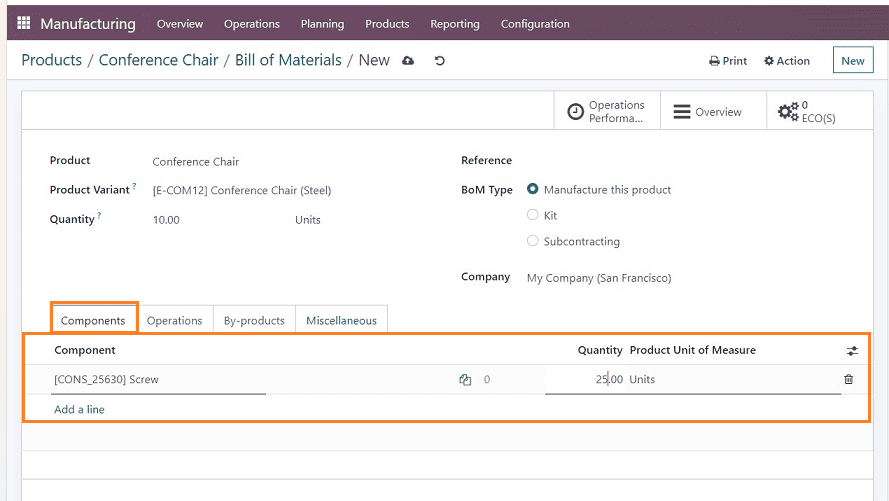
Pressing the “Add a line” button will open the editing line, where you can select a component from the dropdown list or edit it in the designated area. The “Quantity” as well as “Product Unit of Measure” can also be mentioned in the relevant fields. You can add multiple components using the same pattern.

Operations Tab
Users can input the step-by-step manufacturing method for a product under this tab, which helps the work centers properly organize each production stage and the product development process.
To finish the product's manufacturing, you can add or specify the tasks designated for the work centers under the “Operations” tab. Using the “Copy Existing Operations” button included in the tab, you can just replicate the current operations assigned for the product before or select the “Add a line” option to edit new operational steps.
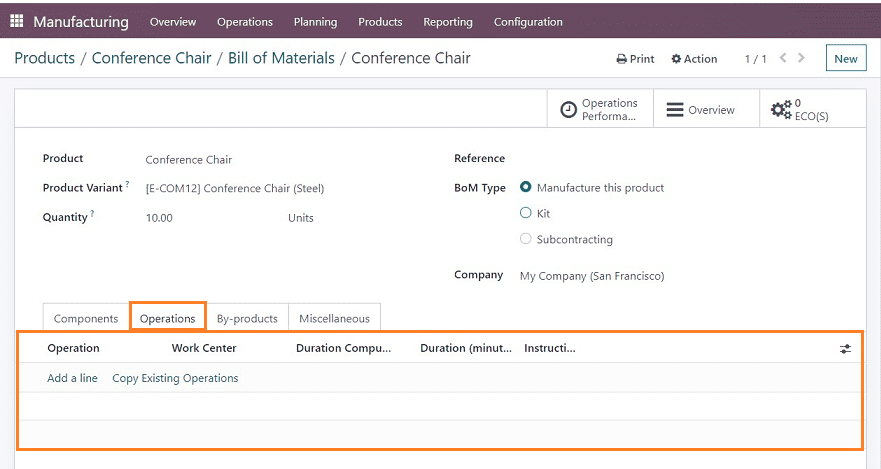
If you want to copy the existing operations, click the respective button. This will display a new window containing the list of all the available operations organized on the basis of the name of the Operation, Bill of Material, Work Center, Duration Computation, Duration in minutes, and Instructions, as shown below.
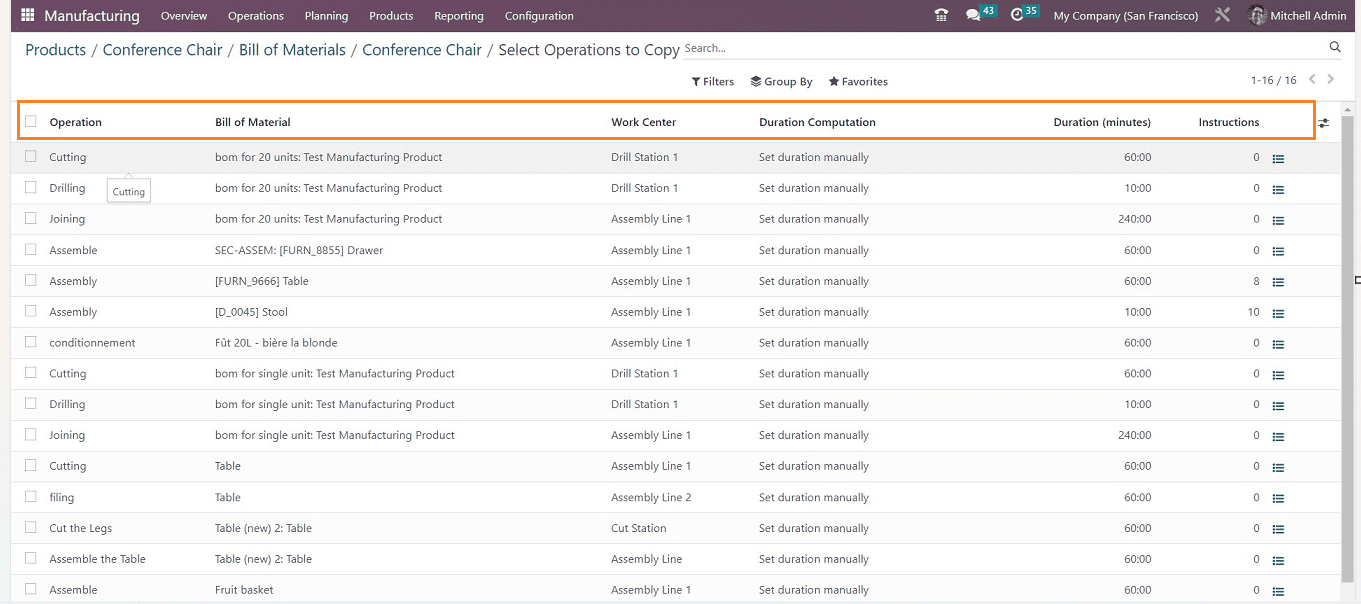
You can select any operation steps according to your requirements. Selecting an option will display a new form view that can be used to configure the Operation settings.
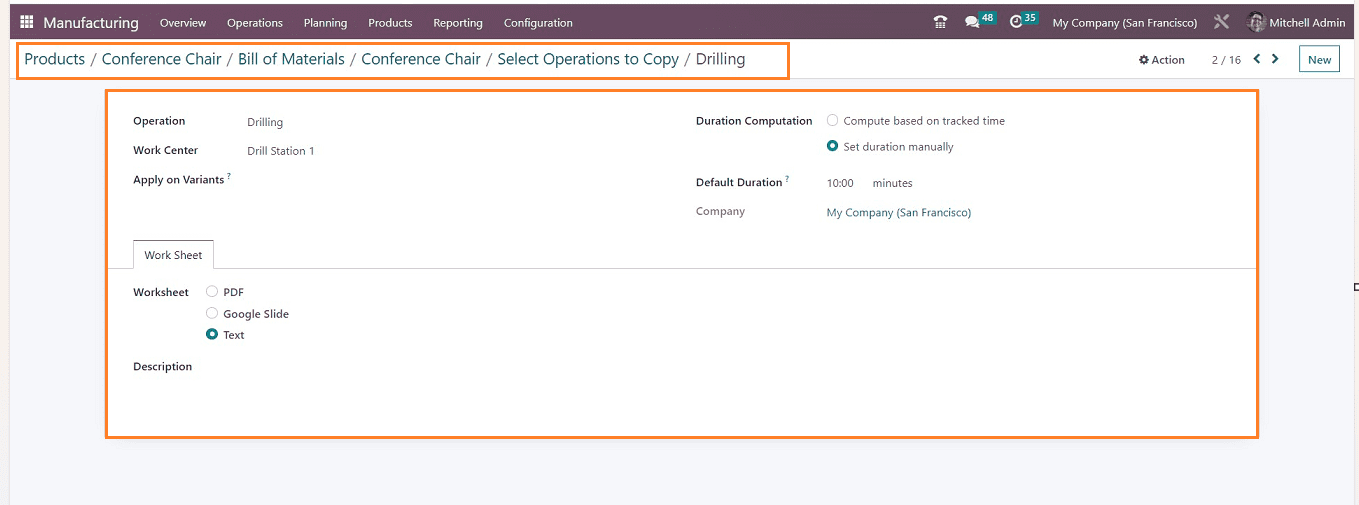
In the fields provided, input the “Operation” and “Work Centre” to conduct an operation in Odoo. If you wish to apply them to the product variations of this particular product, put an entry of the product variants in the "Apply on Variants" field. Adjust the “Duration Computation” field to suit your needs. It is possible to specify the operation's duration manually or to calculate it based on recorded time by selecting the relevant option. The “Default Duration” area will display the default duration of the task. Finally, your company name will be displayed in the “Company” field. The operation's Work Sheet can be added as a PDF, Google Slide, or Text inside the “Work Sheet” tab, and any description pertaining to the operation's methods in the “Description” area.
To choose the sequence of work orders, select Work Sequence Dependencies from the Settings menu. To choose the order of operations on the Miscellaneous section of the BoM, use the Operation Dependencies button. To give one operation priority over others, block other operations. An arrow to show the order in the Gantt view may be seen on work orders in Work Orders Planning. After saving the details, we are going to select a few operations and add them to the Operations tab using the same procedures as shown below.
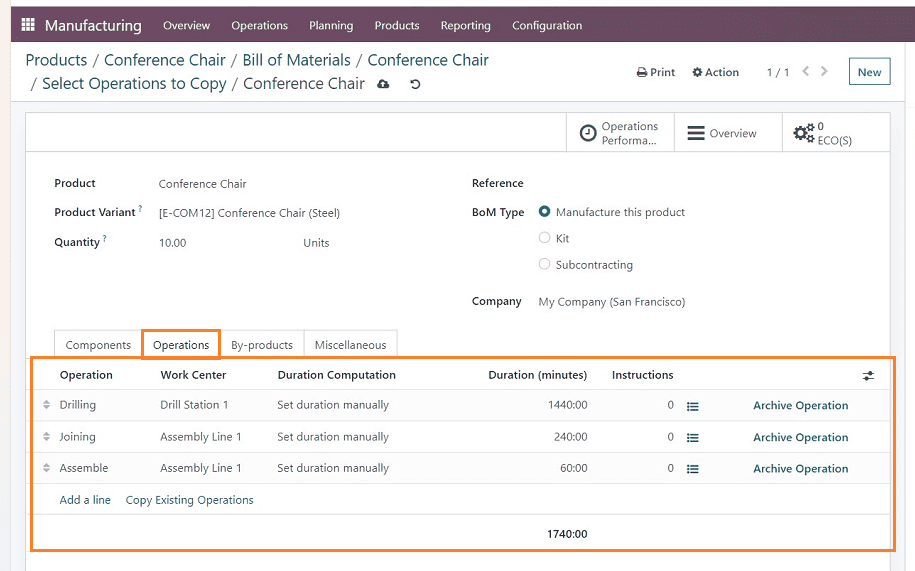
I have selected just three simple operations such as; “Drilling,” “Joining,” and “Assemble.” You can add any operations according to the product manufacturing process.
By-Products Tab
The by-products of the main manufacturing product can be specified inside the “By-products” tab.
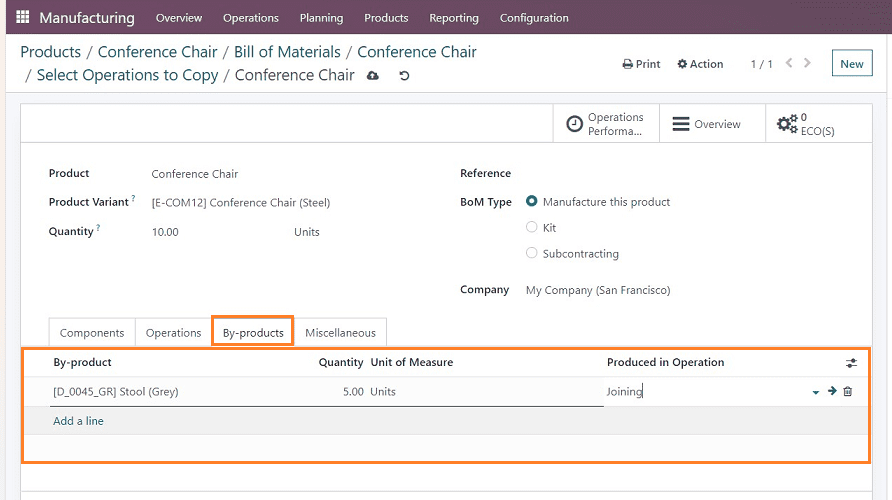
Just click on the “Add a line” button to add by-products and enter the product name, Quantity, and “Produced in Operation” in the appropriate fields as illustrated in the above screenshot. Move on to the next tab section after saving the data.
Miscellaneous Tab
The "Manufacturing Readiness" column in the "Miscellaneous" page allows you to specify the start date for product manufacturing. Manufacturing may start right away if every component is accessible if you choose the “When all components are available” option. The manufacturing process will start only if there are enough parts available for the initial operation when you have selected the “When components for 1st operation are available” option.
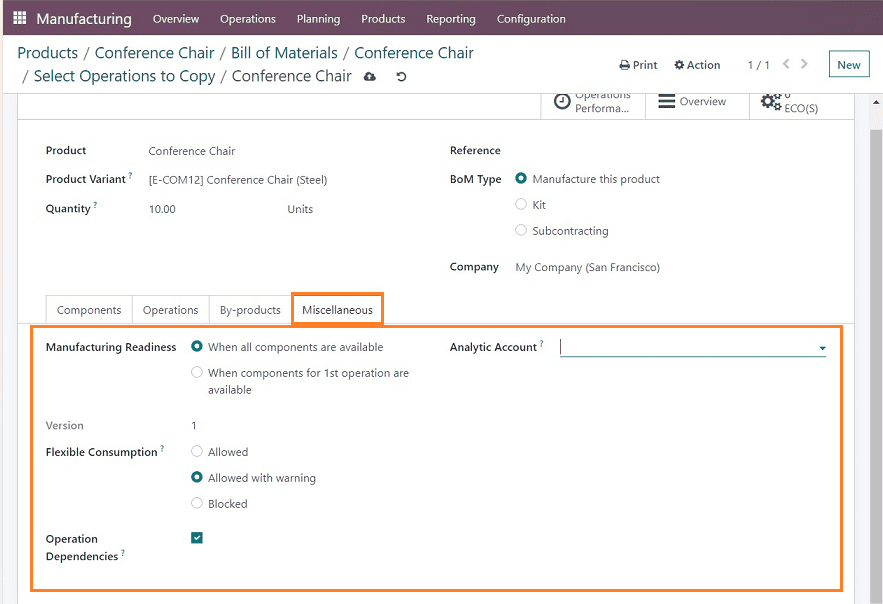
You can use more or fewer components than those listed in the BoM by using the “Flexible Consumption” option. You can specify the sequence of BoM activities by activating the “Operation Dependencies.” When a purchase has a "Manufacture" route with an operation type established, set the operation type for the BoM, and the system will generate a manufacturing order for the product using the same operation type. Finally, create an analytical account to keep track of the BoM's expenses and earnings inside the “Analytic Account” area and save the form data.
Now, we can examine how to initiate a new manufacturing procedure for this specific product as well as how to modify or update the product's ECO. So go to the "Operations" menu of the Manufacturing Module.
Manufacturing of a New Product Order
To check and perform a product ECO updation, we need to create a manufacturing order for the product. This can be done from the “Manufacturing Orders” section of the “Operation” menu. You can see the dashboard of all the available orders from the Manufacturing Orders window as shown below with their Reference, Scheduled Date, Product, Next Activity, Source, Component Status, Expected Duration, and so on.
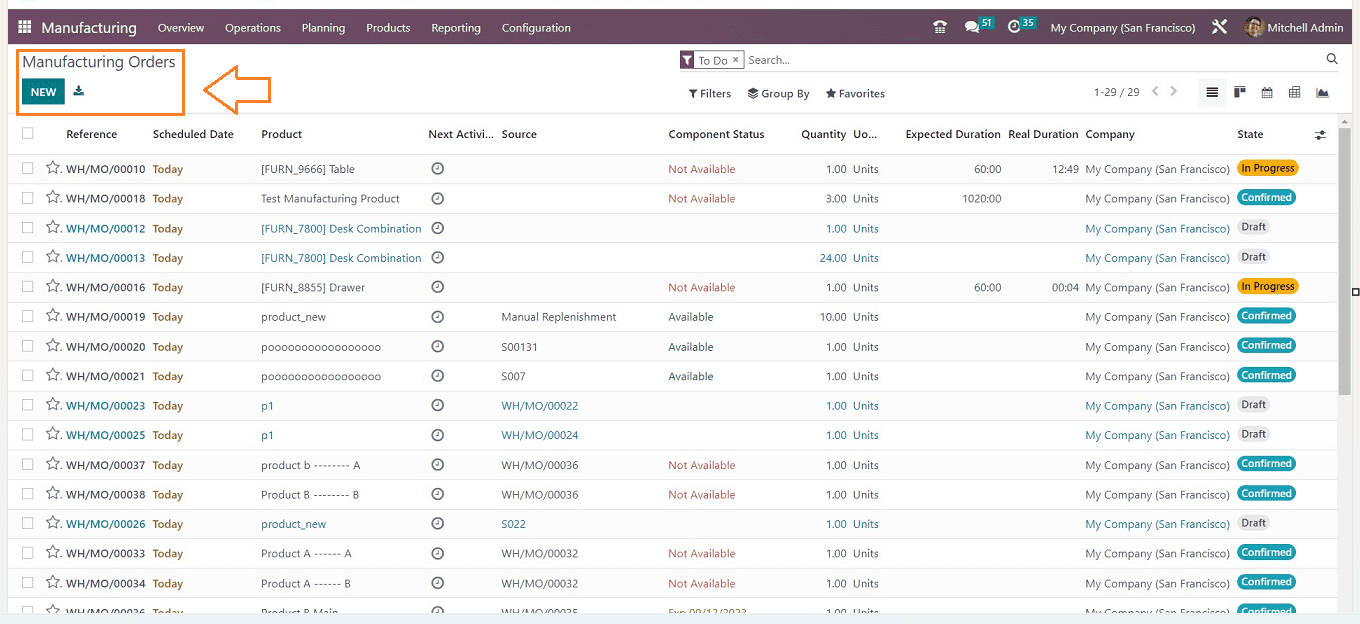
We can create a new manufacturing order for the previously edited product named “Conference Chair Steel” using the “NEW” button.
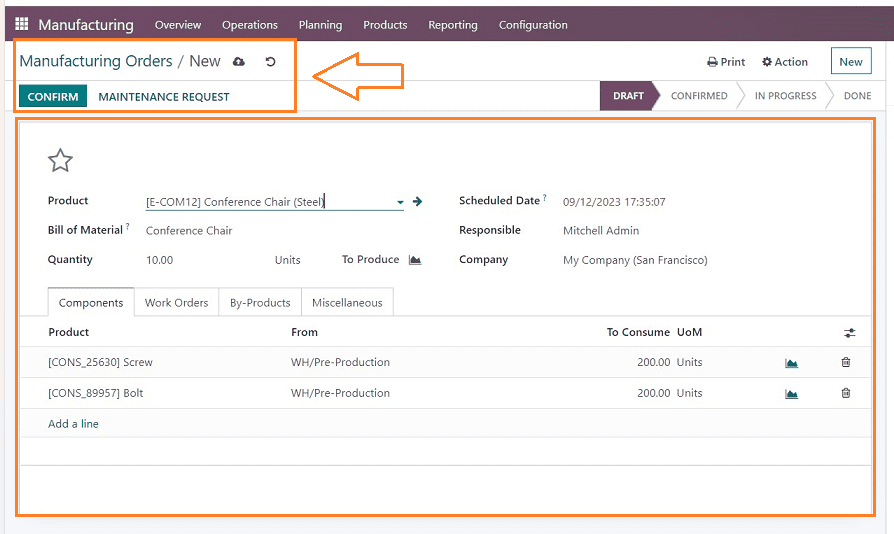
The product name can be provided inside the “Producct’ field of the form. All other areas will automatically fill in with the appropriate information when you enter the product name. If necessary, you can modify them.
The “Bill of Material” area shows the necessary parts for a finished product. The “Scheduled Date” column identifies the production start date, while the “Quantity” field indicates the product quantity going to be produced. The “Responsible” field designates an employee to keep track of the production order, and the “Company” field specifies the firm.
After entering the Product Name, every data field will be auto-filled, including the form tab sections named “Components,”’ “Work Orders,” and “Miscellaneous.” These tab sections are the same as we discussed in the previous sections. After editing the required details, save your details and click on the “CONFIRM” button to confirm the manufacturing order.
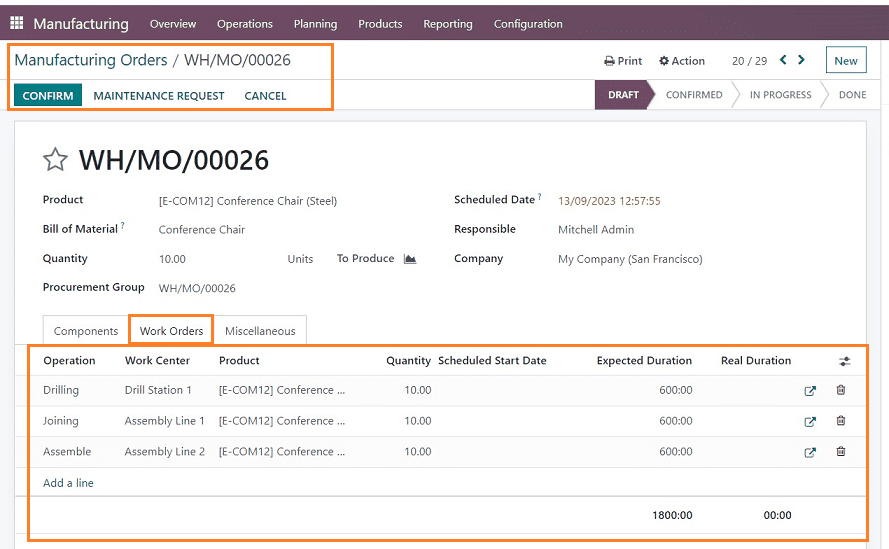
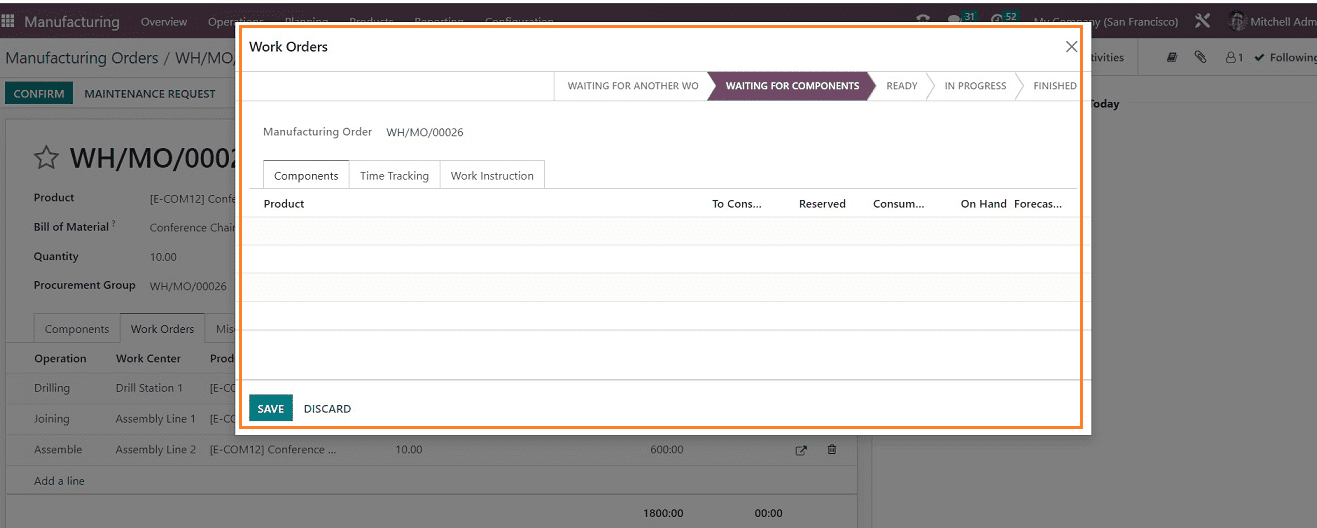
After confirming the order, you can see some changes in the “Work Orders” tab. The status of each operation will be displayed corresponding to the operation, and you can start or block a particular work process using the “Start” and “Block” buttons. You can modify the Components, Timetracking, and Instructions for the employees working on this work order by selecting the 'Open Work Order' link and editing the work order details of an operation in the displayed window as shown below.
After this above step, you can start the process using the Start button provided in the “Work Orders” tab and check the progression of the process by opening the Tablet view of the process using the respective icon provided near the “Block” button.
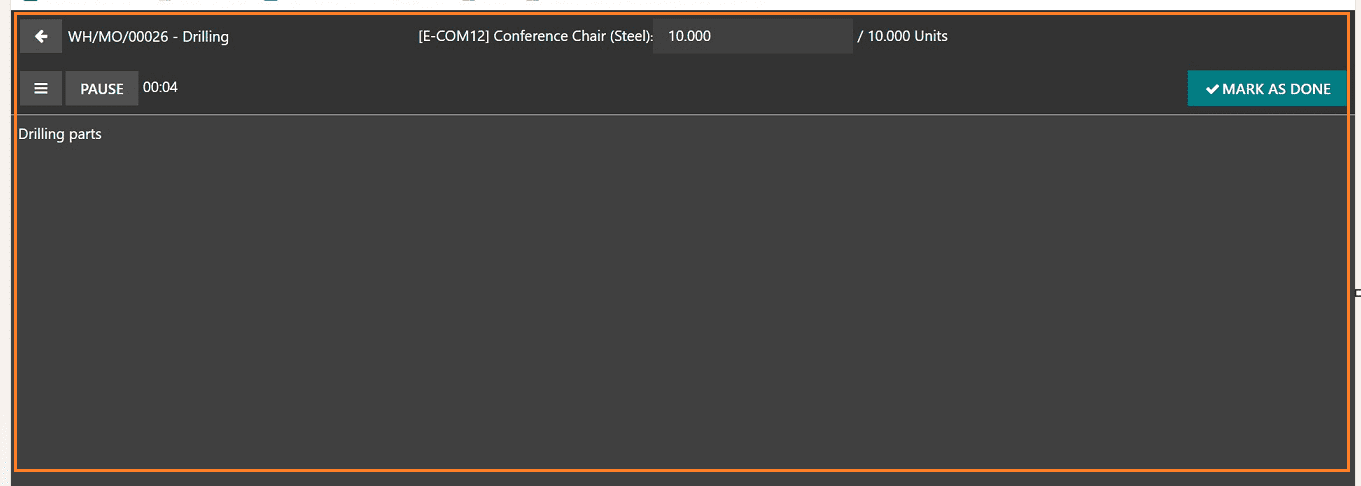
The tablet view will display the details of the ongoing process and a timer. You can Pause and continue the timer function. Also, you can declare the process as completed by pressing the “MARK AS DONE” button, and this will open the next operation details, as shown below.

You can declare the manufacturing order as done by clicking the “Mark as Done” option when the manufacture is finished inside the manufacturing order configuration form.
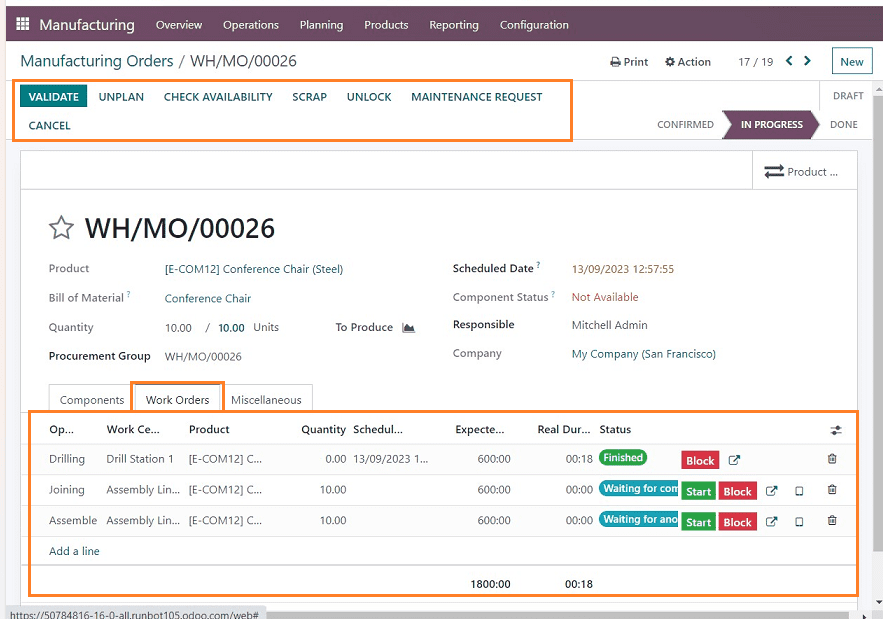
You can see the status of each operation from the Manufacturing order configuration window. The “VALIDATE” button can be used to validate work orders. Now, we can check the process of updating the product ECO during a manufacturing cycle.
Suggesting a new Product ECO Updation
Updating or changing a product's manufacturing Process, Components, and Designs can be easily done using the Manufacturing Order Configuration form itself. In this scenario, our manufacturing process has three operations named Drilling, Joining, and Assembly so that we can update the “Assembly” operation of this particular product.
To start with the process, open the tablet view of the desired work order. Here, I have selected the “Assemble” work order.
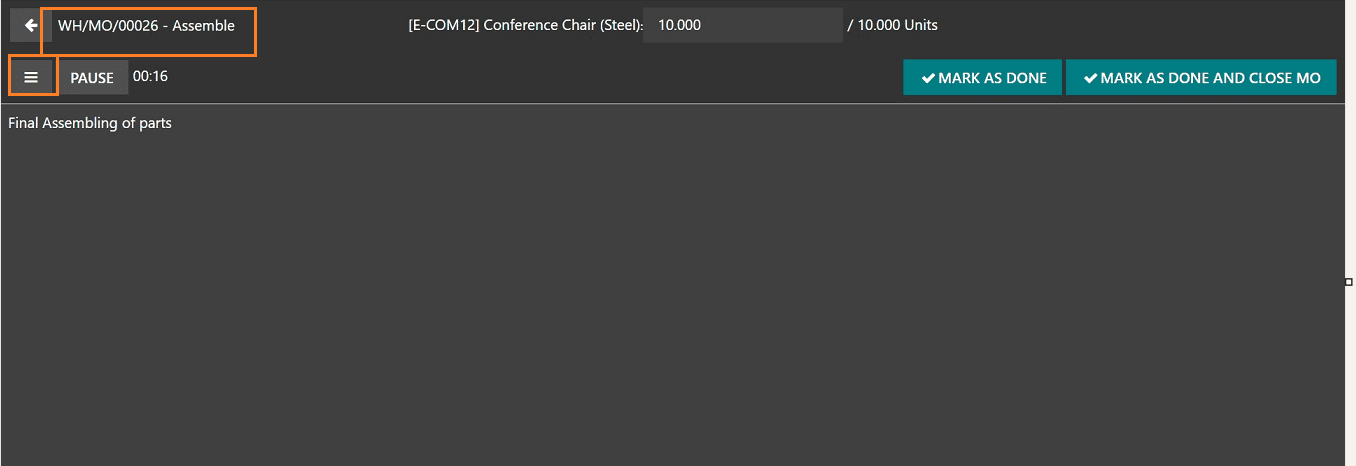
In the displayed tablet view, click on the three-lined menu as illustrated in the above screenshot. A pop-up window will appear with a few button options, including “BLOCK,” “SCRAP,” “ADD COMPONENT,” “ADD BY-PRODUCT,” “MAINTENANCE REQUEST,” “QUALITY ALERT,” “ADD A STEP,” and ‘CANCEL.”
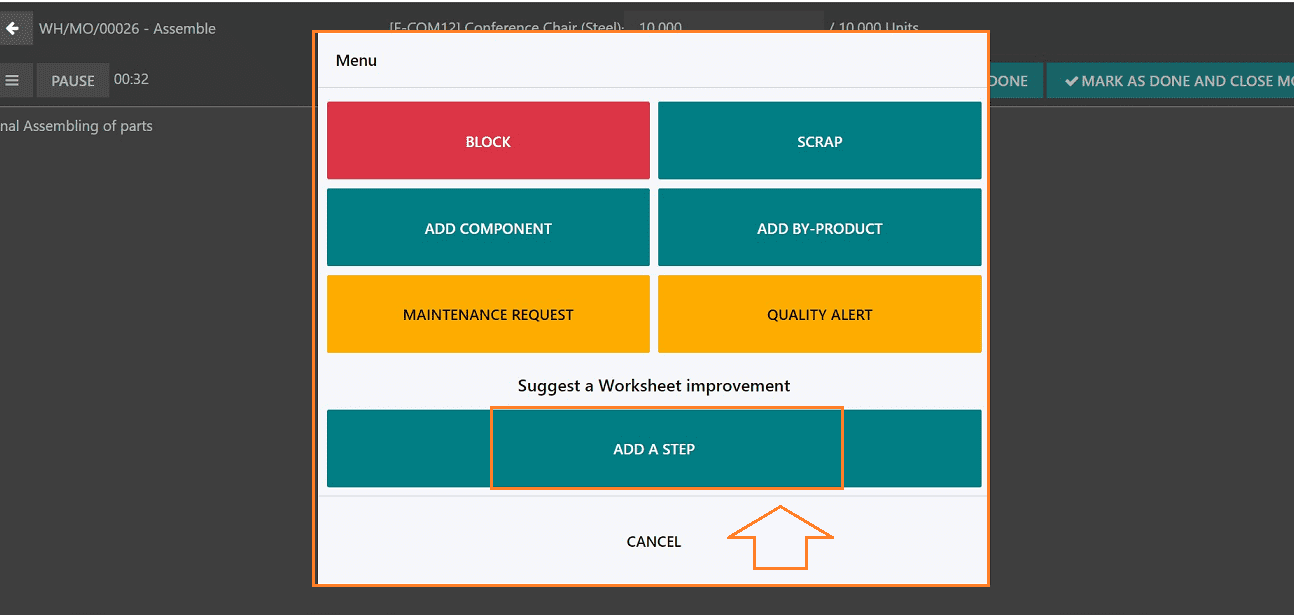
BLOCK: Used to block the manufacturing process or Work order without exiting the Tablet View
SCRAP: Make the product scrap if the manufacturing goes wrong.
ADD COMPONENT: Helps to add any extra components during the manufacturing process.
ADD BY-PRODUCT: Used to add any by-products received during the manufacturing.
MAINTENANCE REQUEST: Used to make a maintenance request.
QUALITY ALERT: Used to send a quality check alert.
ADD A STEP: Used to add any new process steps
Here, we can update an ECO using the “ADD A STEP” button. This button will trigger a pop-up window where you can set the specifics of the new step.

In the "Title" column, edit the new step's procedure, and then add notes and instructions to the procedure in the "Instructions" section. To make the chair more comfortable, I'm asking that a headrest part be added above the chair's shoulder area.
Using the "UPLOAD YOUR FILE" button next to the "Document" section, you can also submit any files pertaining to the new method, design, etc. Using this function, you may upload new product design charts, diagrams, and other materials. After editing, click the “PROPOSE CHANGE” button to add the new step to the manufacturing process. Now, our new step has been added to the manufacturing process, and we can continue the process by pressing the “CONTINUE” button.
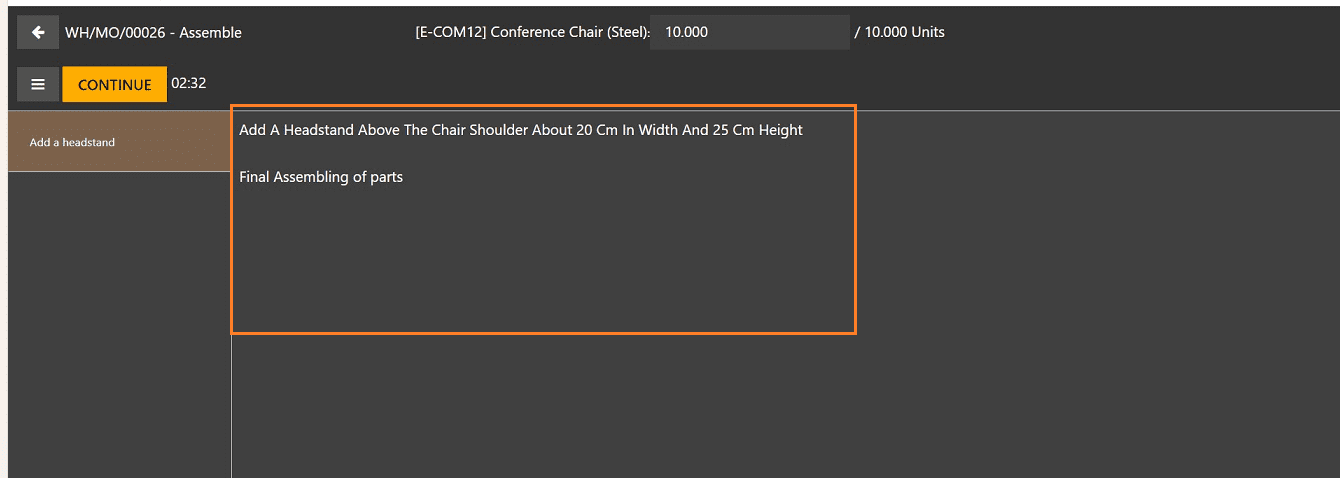
When you're done, click the "NEXT" button on the right side of the page to go to the next step, and then click "MARK AS DONE" to mark the manufacturing order as finished.
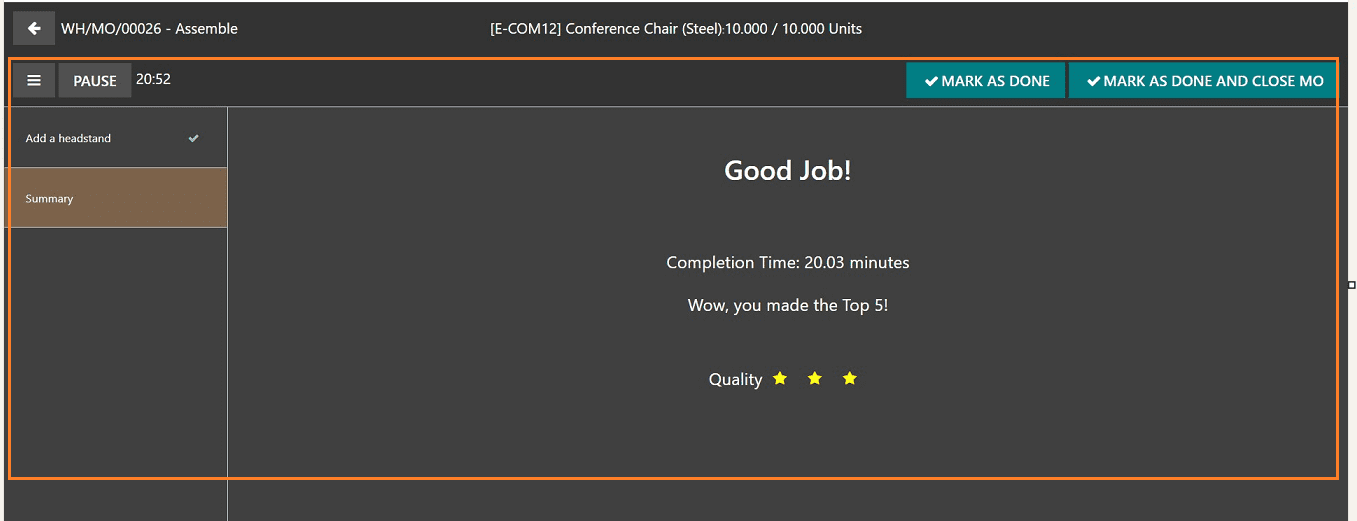
Now, the Manufacturing Order has been completed, and you can see the empty Work Orders dashboard.
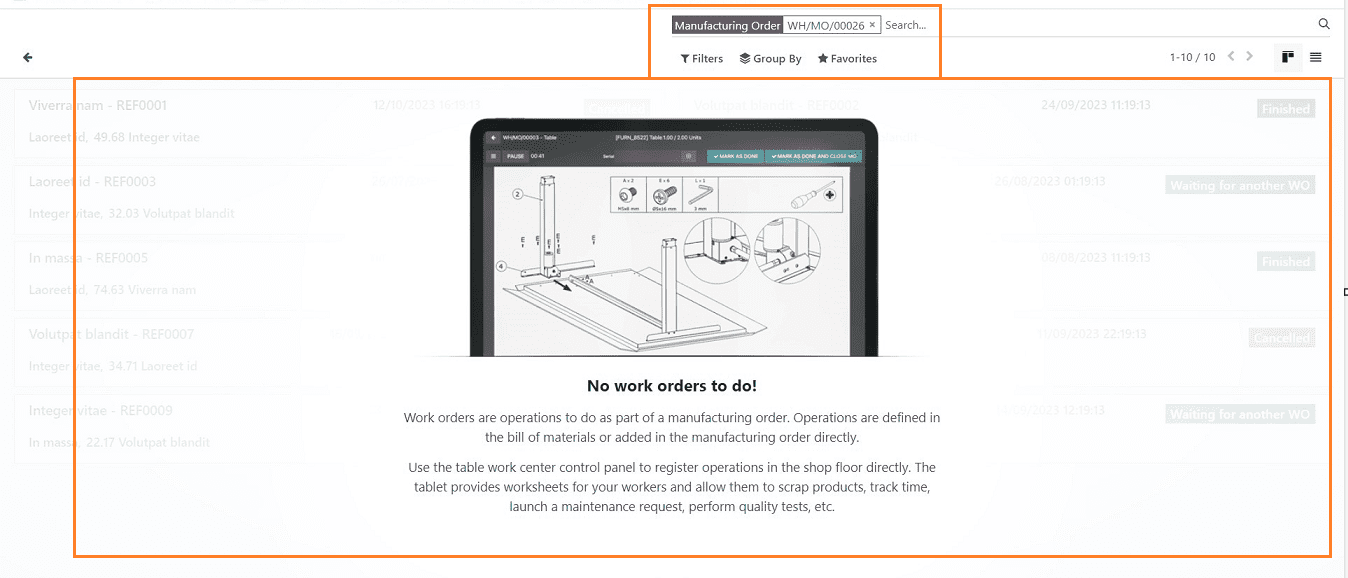
Now, go back to the Manufacture Order configuration page to check further functionalities.
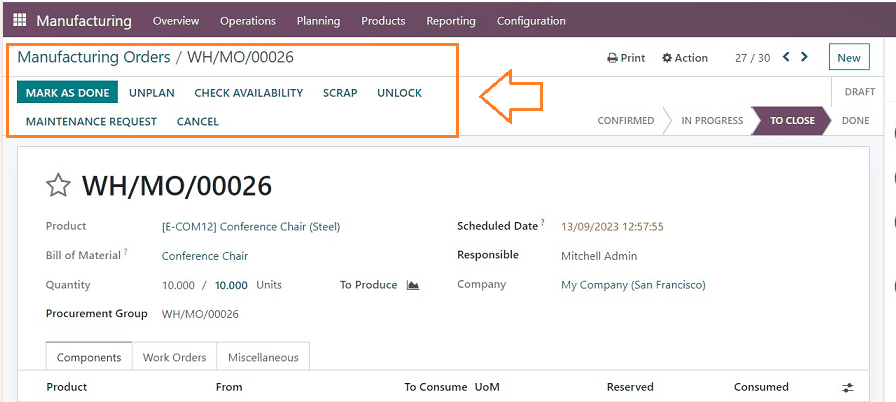
By clicking the "MARK AS DONE" button, you can make sure that the order has been completed. You can unbuild the produced good and log its data by using the ‘UNBUILD” button.
By selecting the ‘SCRAP” option, you can send the product to the scrap pile if it is wholly ruined. You must provide information about the product, amount, packaging, owner, source location, and scrap location in the pop-up window that displays. The “UNLOCK” button allows you to adjust the quantity of the produced goods, while the “UNBUILD” button allows you to unbuild the product and log its data. By clicking on the “MAINTENANCE REQUEST” button, you can send the created goods to maintenance if you discover any defects.
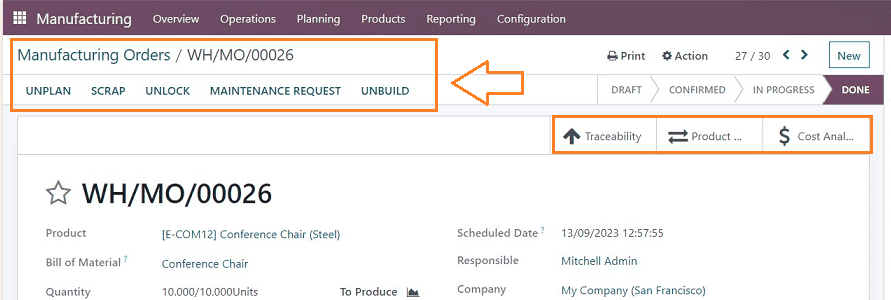
Also, the form view will display some smart buttons named Traceability, Product Moves, and Cost Analysis.
Traceability
The “Traceability” smart button will allow you to create a report detailing the product's traceability. According to the report, the product's Reference, Product, Date, Lot/Serial, From, To, and Quantity information will be displayed. You can print the details using the “PRINT” button.

Product Moves
The “Product Moves” button can be used to see how the product's inventory has changed over time. Information on the product and its components, including the Date, Reference, Product, Lot/Serial Number, From, To, Quantity, Unit, and Status, are shown in the window. The “Export all” icon can be used to download the Inventory Moves data.

Cost Analysis
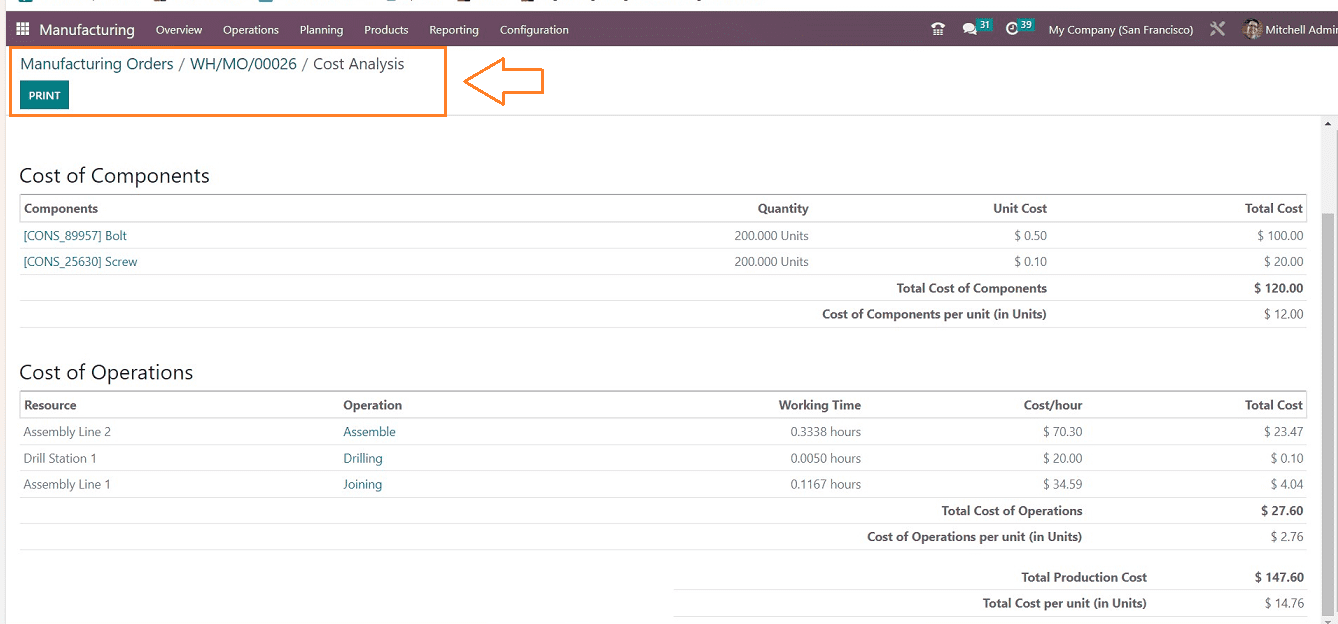
The "Cost Analysis" button will generate a Cost Analysis Report for developing a certain product order, and you can examine the cost of the parts and scraps individually for developing this manufacturing order as illustrated below.
BOM Updations in PLM Module
We have already discussed that the Inventory Module is integrated with the Odoo PLM module. The PLM module included in Odoo 16 consolidates all information and procedures pertaining to the product life cycle and generates reports for the items, components, and products, as well as engineering change orders, documentation, and quality workflow. After completing the ECO updated manufacturing order, you can just check the “PLM Overview” dashboard from the Odoo 16 PLM Module.

The details of the engineering change orders generated inside the Odoo PLM database will be shown on the module's main dashboard. It will be arranged on the dashboard according to their ECO Type. Here, we can see two ECO Types named “New Product Introduction” and “BOM Updates.” It is possible to see from this dashboard how many engineering modifications were done for each ECO category. To obtain a thorough perspective of the ECO under a certain ECO type, click on the appropriate ECO type.
You can view our previously finished ECO updates in the "BOM Updates" area because we have not launched any new items; rather, it was only an additional stage in the manufacturing process for that manufacturing order.

We can easily change the order’s Stage from this window by dragging and dropping to the desired stage section.
We have covered a complete procedure for creating a manufactured order and making an engineering change during the manufacturing process of a specific product using the product ECO feature provided in the Odoo Inventory Module in this blog. You can check out the entire operation process by visiting the URL below.
https://youtu.be/1WXIEeXRa4g?feature=shared