Master Production Schedule or MPS is a long-term planning tool that gives an overall view of the productions in the company. It is based on the company’s overall plan for managing resources and production over a defined period. For efficient planning of the products using MPS, there are certain inputs that are required like Demand Forecast, Inventory Levels, and Customer Orders. MPS calculates the quantity we need to produce the remaining inventory and the overall amount of product you can promise to customers.
MPS is an essential part of the Odoo 17 manufacturing module, which helps companies organize and schedule their production processes. We can plan the manufacturing of products based on several factors, such as demand forecasts, available resources, lead times, and production capacities. Businesses may successfully manage their production processes, maximize resource utilization, and satisfy customer demands by creating a master production schedule. To enable the feature MPS in Odoo 17, navigate to Manufacturing --> Configuration --> Settings.
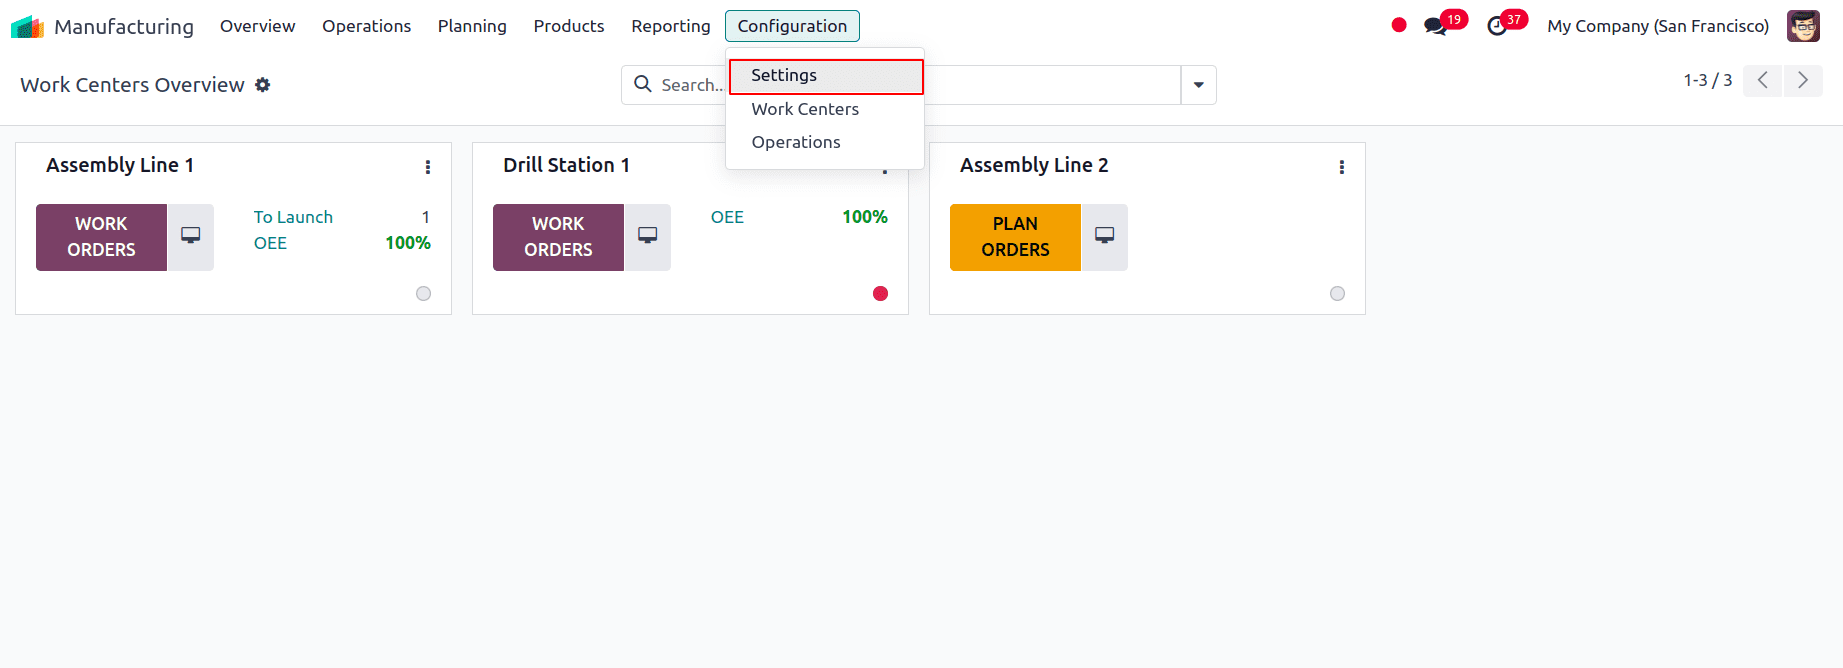
Enable the feature Master Production Schedule. Here we also have the option to choose the Time Range that we want to view in the Master Production Schedule such as Monthly, Weekly, or Daily, and also the Number of Columns that have to be displayed in the Master Production Schedule. Click on the Save button to save the settings.
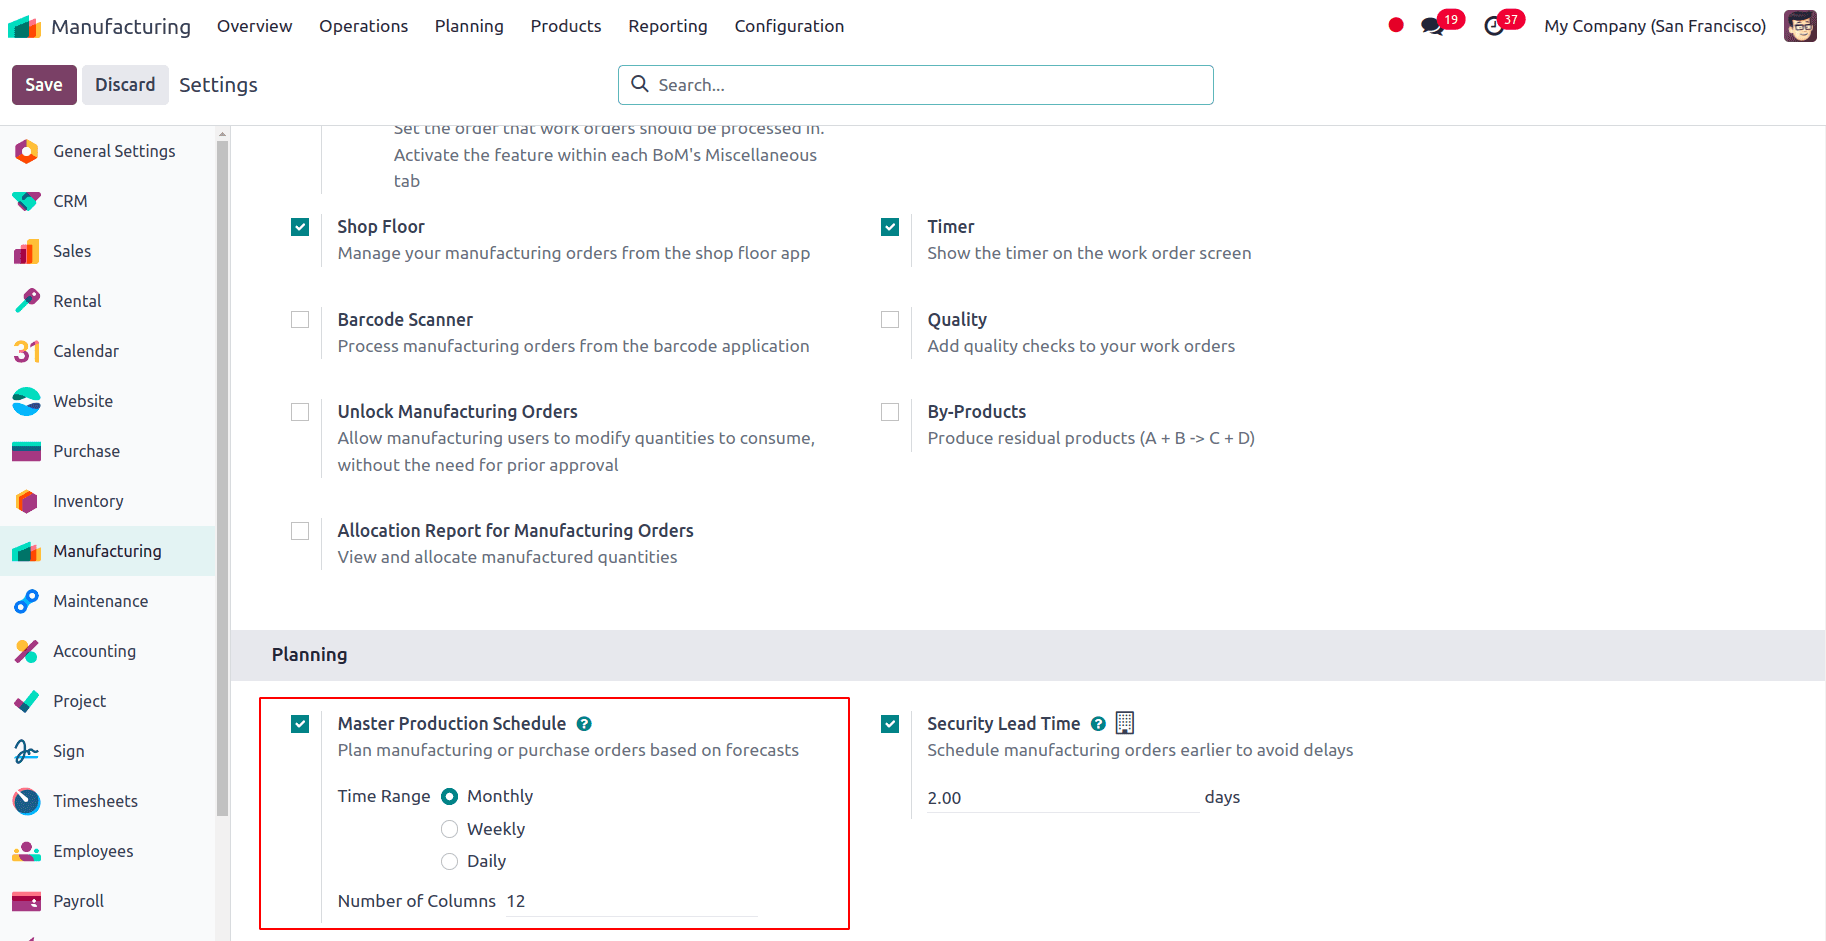
Now to view the MPS we can go to Manufacturing --> Planning --> Master Production Schedule.
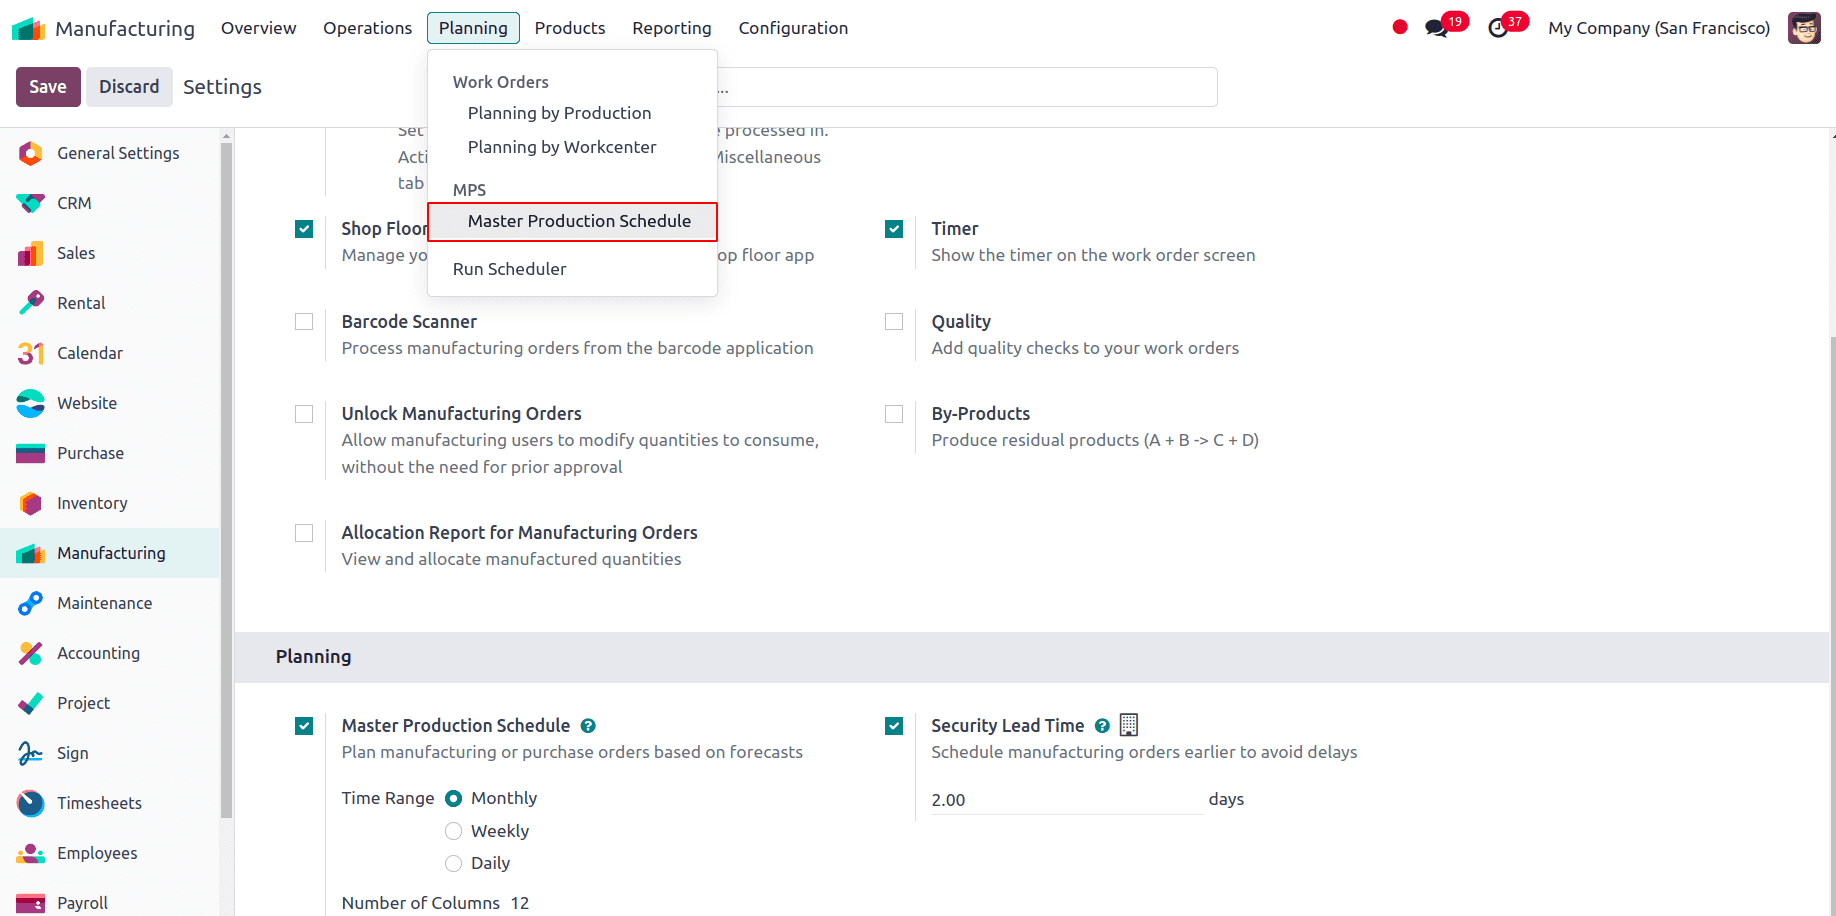
We will be directed to a new MPS page where we can view all the production schedules for different products.
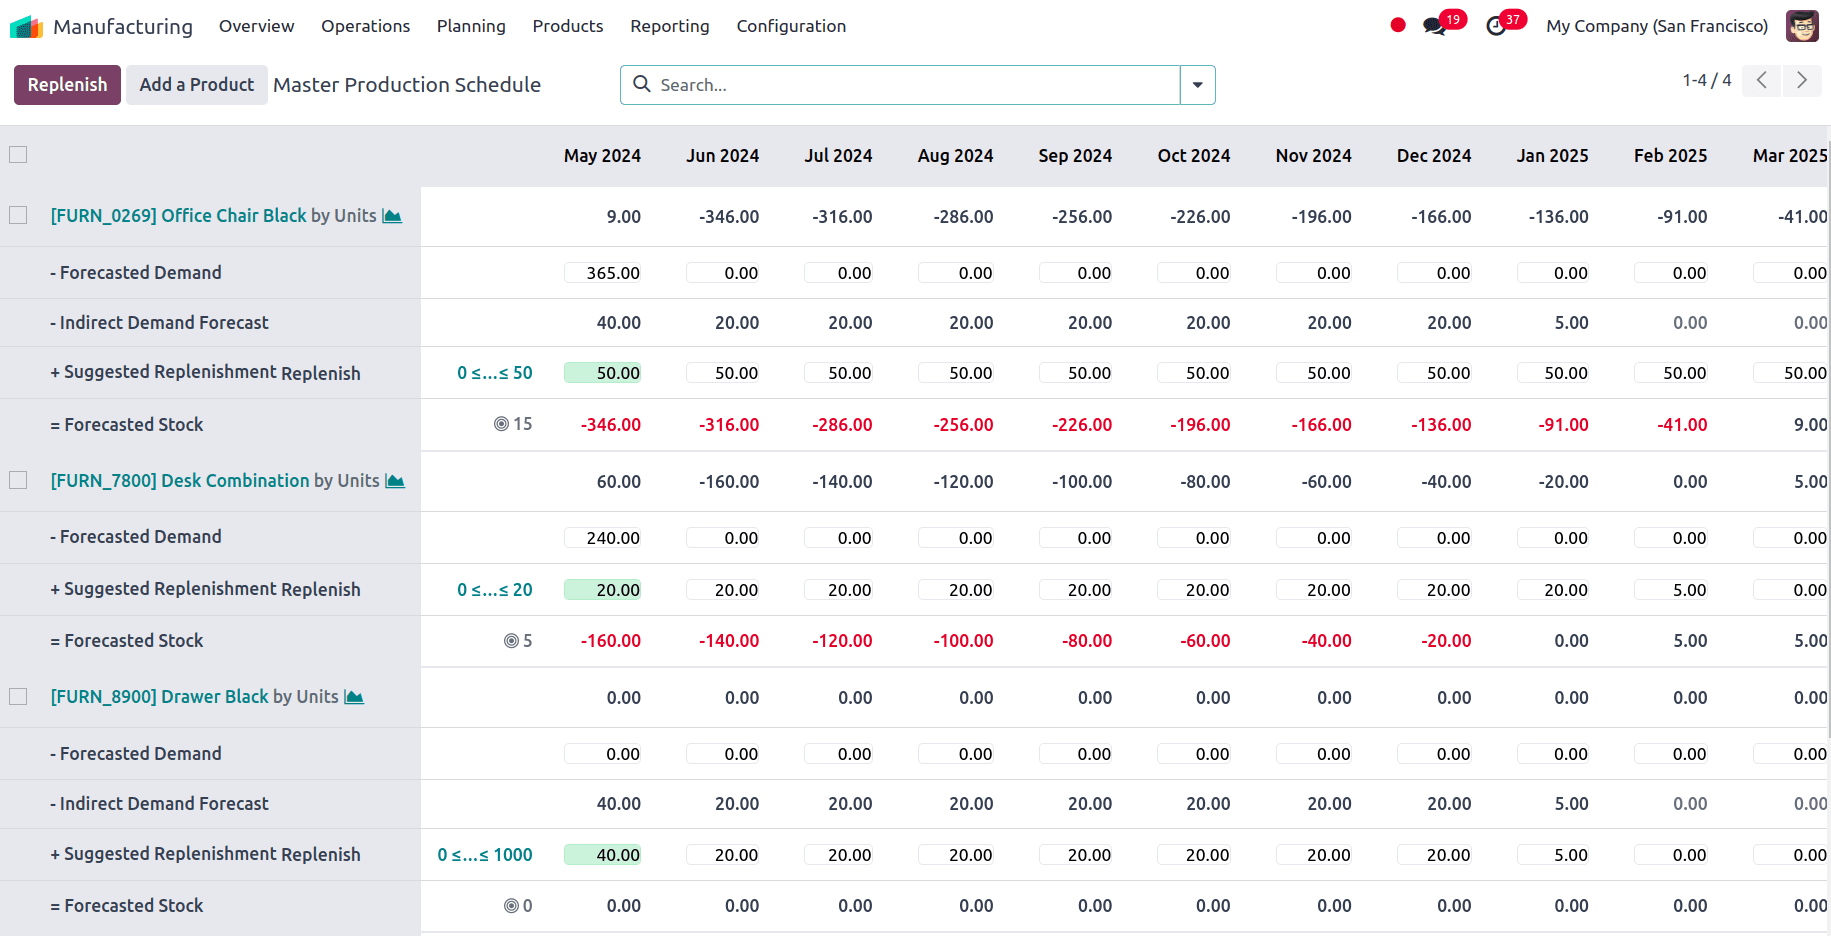
To add a product here, we have to click on the Add a Product button at the top left corner. Before adding a product, we have to make sure that a BoM exists for the product and the route is set to Manufacture for the product. To review the BoM, go to Manufacturing--> Products --> Bills of Materials.
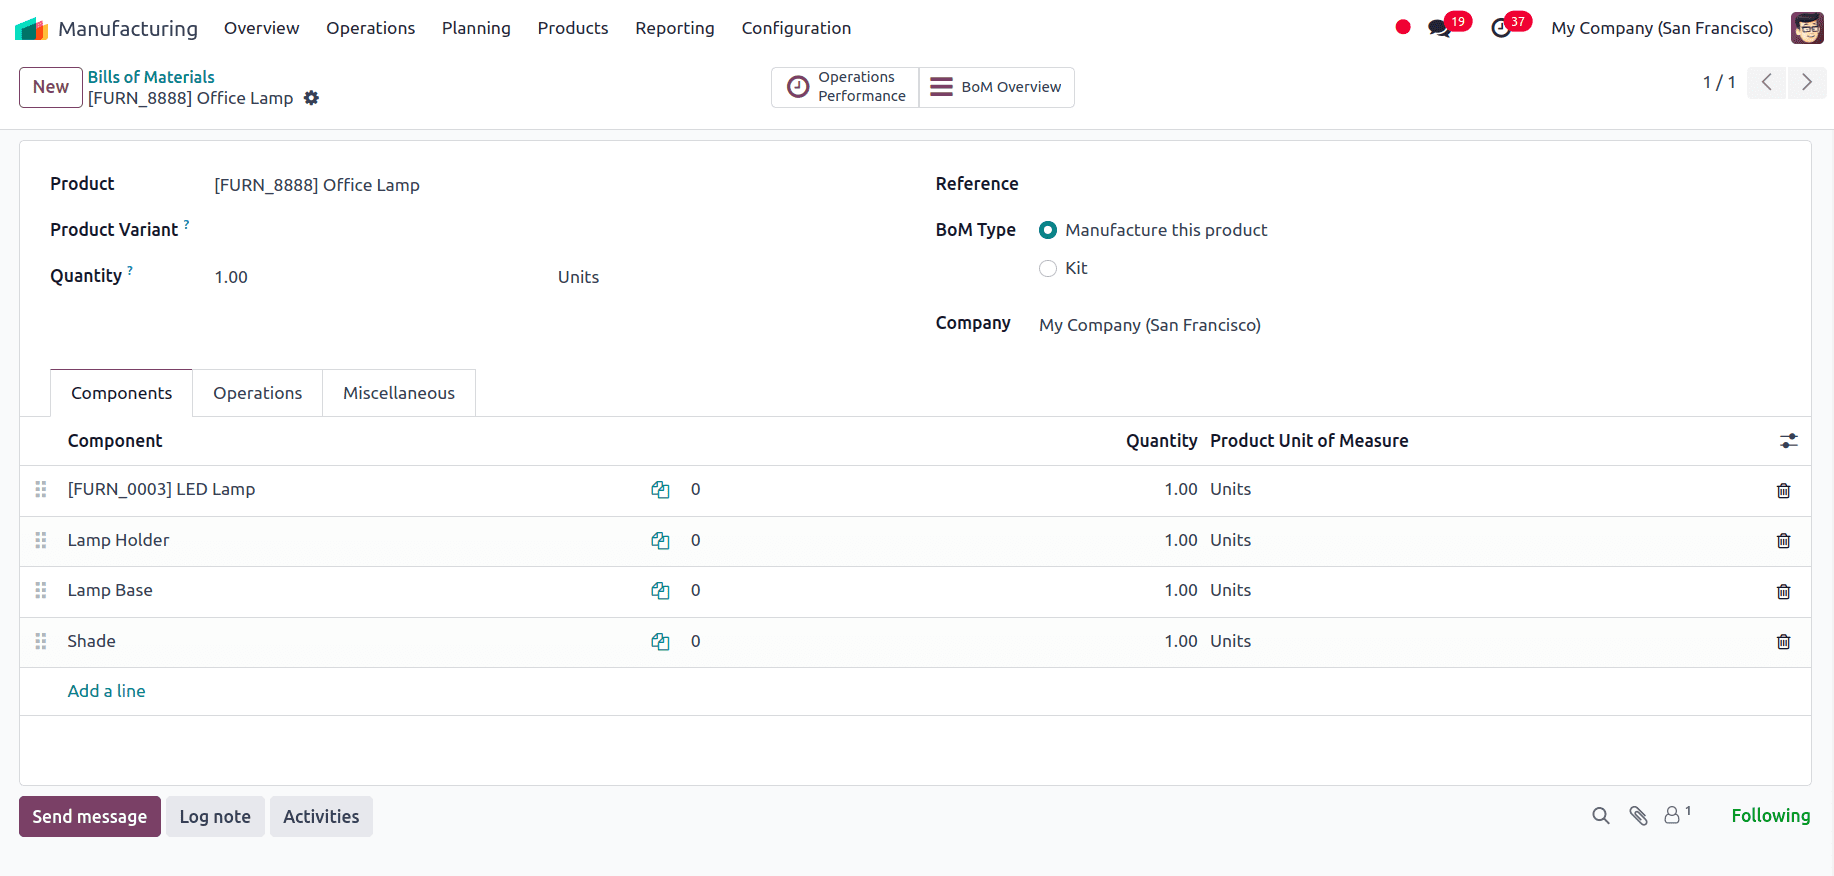
Now we can go to the MPS page and click on the Add a Product button to add the product we plan to schedule Manufacturing for. When we click on the button, a pop-up window appears where we can add details such as Product, Bill of Materials, Safety Stock Target, Minimum to Replenish, and Maximum to Replenish.
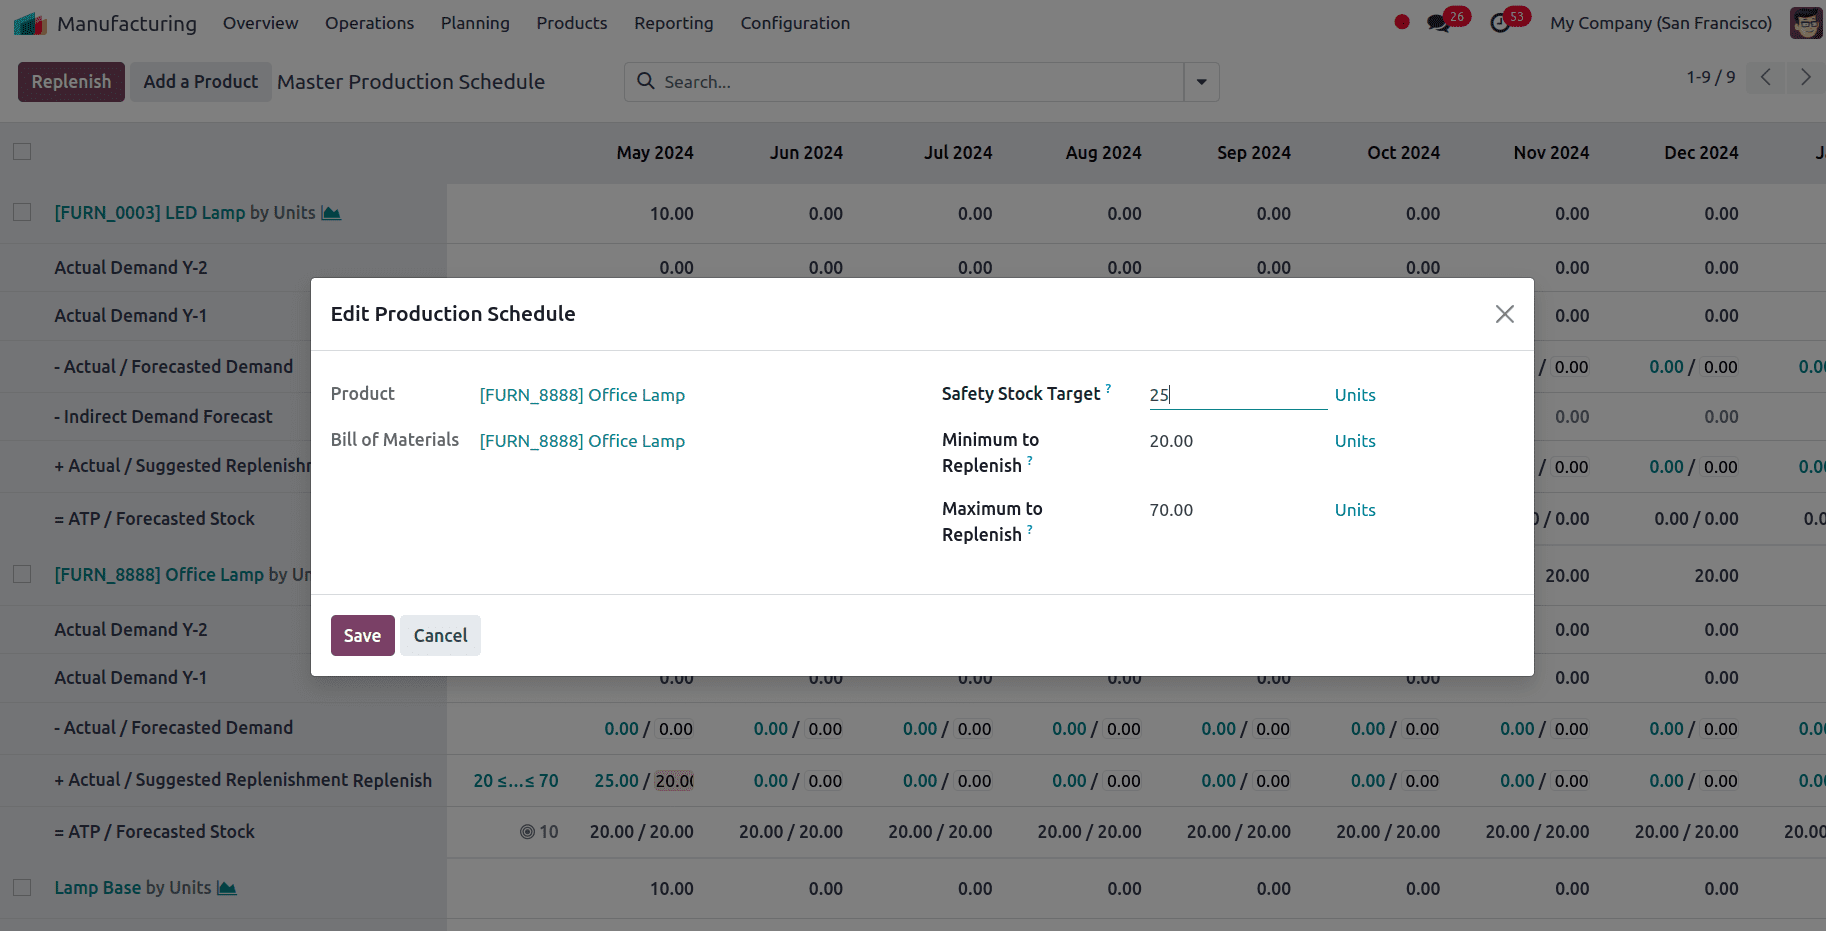
If we have provided the Bill of Materials for the product here the components will be also added to the MPS. the Safety Stock Target is 25, the minimum quantity of the product that should be available in the inventory to avoid the risk of stockout, The Minimum to replenish is 20, and the minimum amount of a product has to be restocked when the inventory levels fall below a certain threshold, Maximum to Replenish is 70, the maximum amount of a product that has to be replenished in a single order. After providing all the details, we can click on the Save button. The product appears on the MPS page along with all of its components.
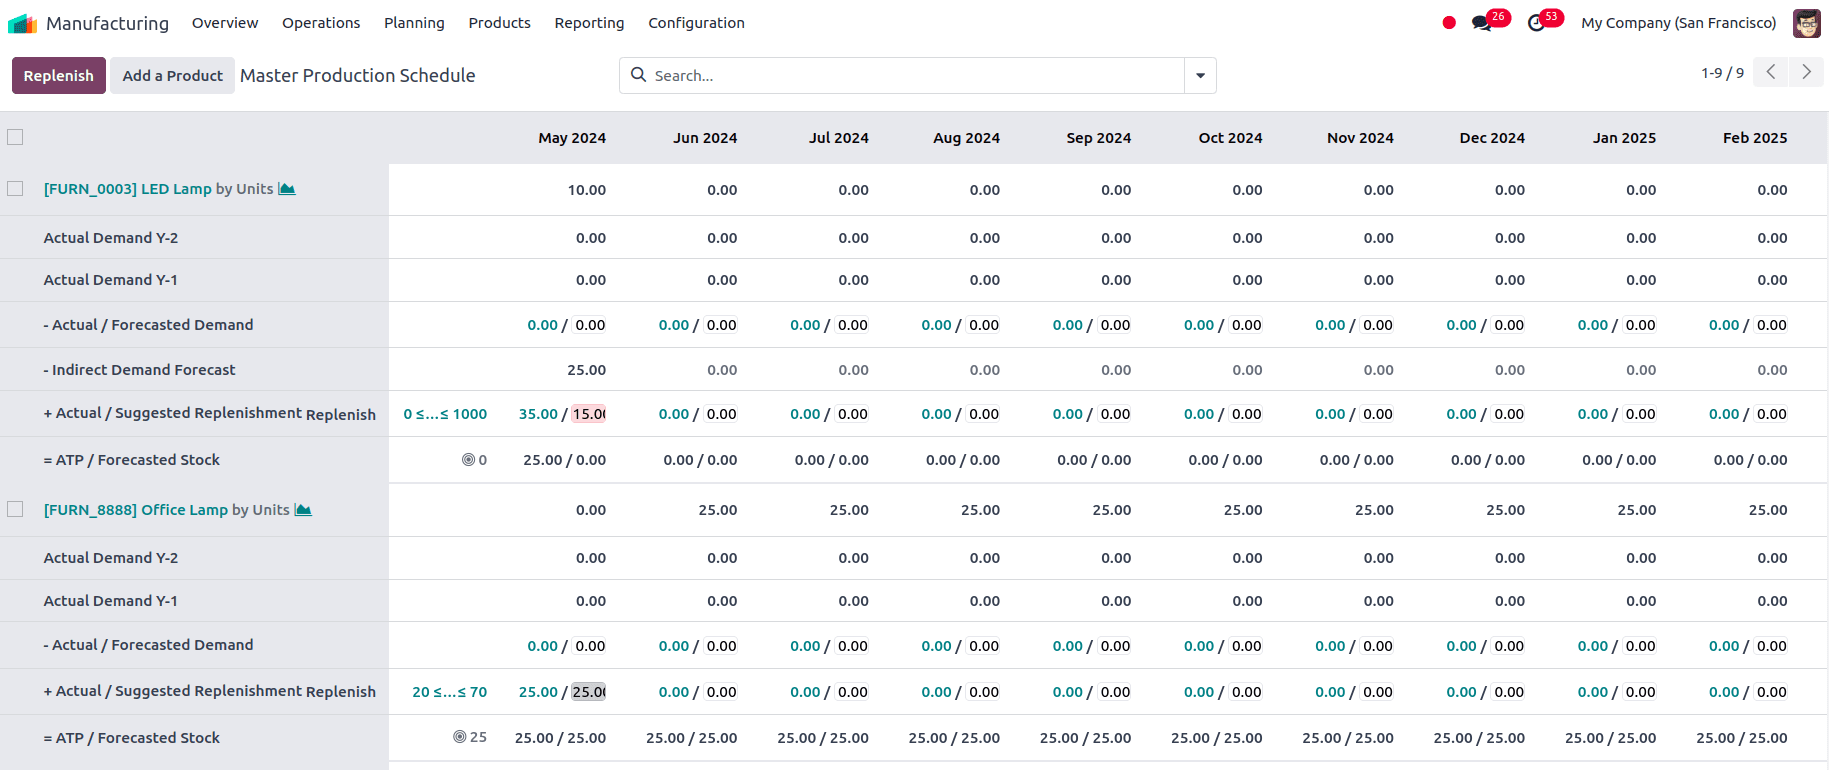
Here we can see different color codes, the color code acts as an indicator of the status of the product's replenishment suggestions.
a. Green: Indicates that the actual replenishment matches the suggested replenishment.
b. Grey: Indicates that a replenishment order has already been generated, but the quantity might not necessarily match the current data. It could be:
* Exactly the same as the suggested replenishment if the order hasn't been modified since creation.
* Greater than the suggested replenishment, indicating you may have over-ordered.
* Less than the suggested replenishment, potentially leading to a stockout if not addressed.
c. Red: Indicates that a replenishment order was generated, but the quantity was too high compared to the current data. This could indicate potential overstocking or an error in the initial order quantity.
d. Orange: Orange usually indicates a replenishment order was generated, but the quantity was too low compared to the current data. This could lead to a stockout if not addressed promptly.
By default, we can view the fields such as Forecasted demand, which is the estimated future demand for the product, Suggested replenishment which tells how much of the product we should order to keep up with the demand and Forecasted Stock which tells how much inventory we should keep to keep up with the demand. For each of the products, we can adjust the safety stock target, and minimum and maximum replenishment quantities whenever we want by clicking on the small icon seen in the screenshot below.

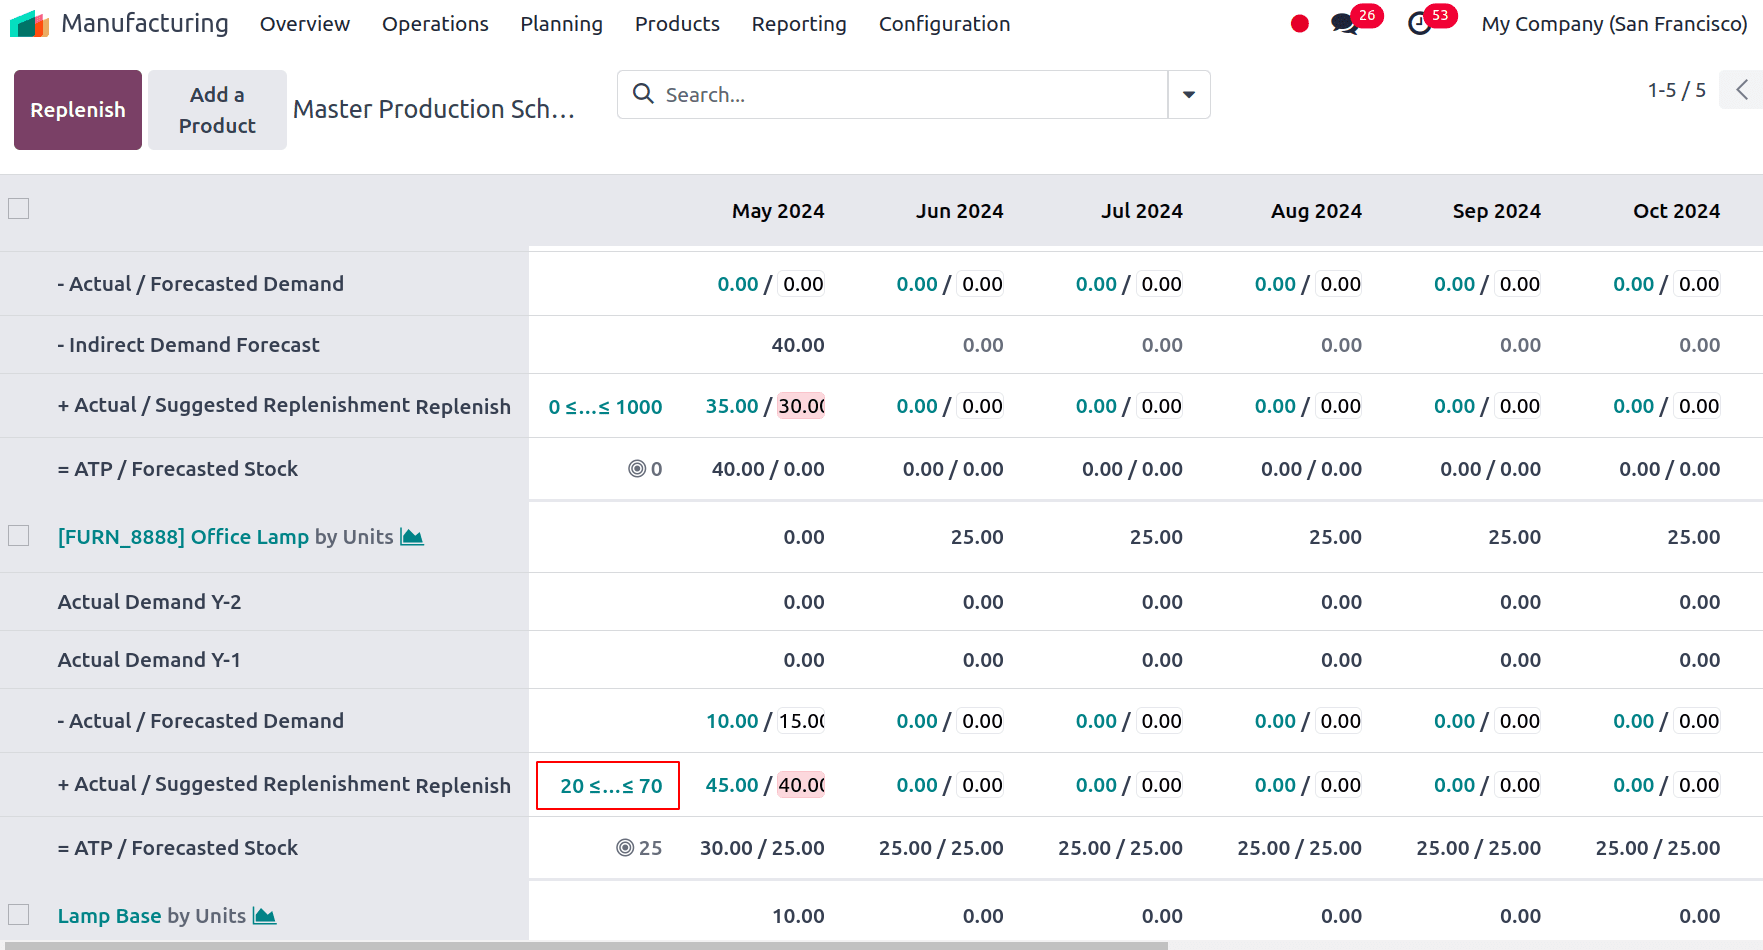
Also, we can see the Minimum to Replenish and Maximum to Replenish set as seen in the screenshot below.
By clicking on the drop-down in the Search bar, we can get the option for more rows.
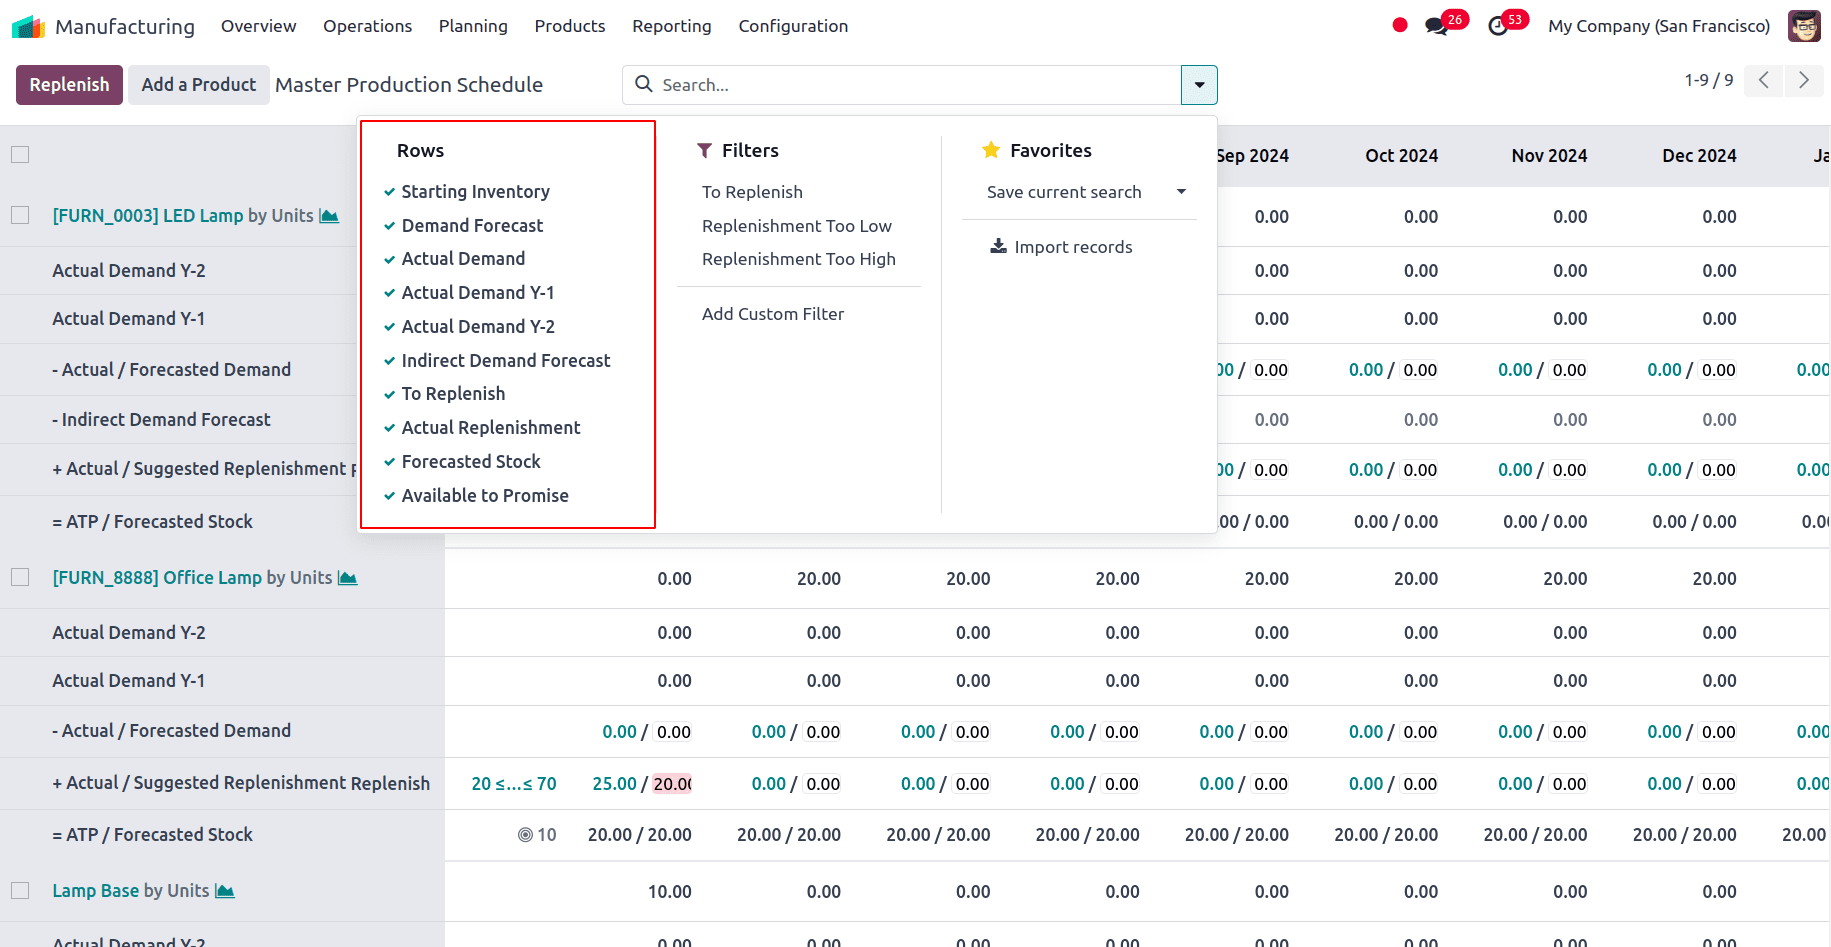
We can enable all the features and see the value of each feature.
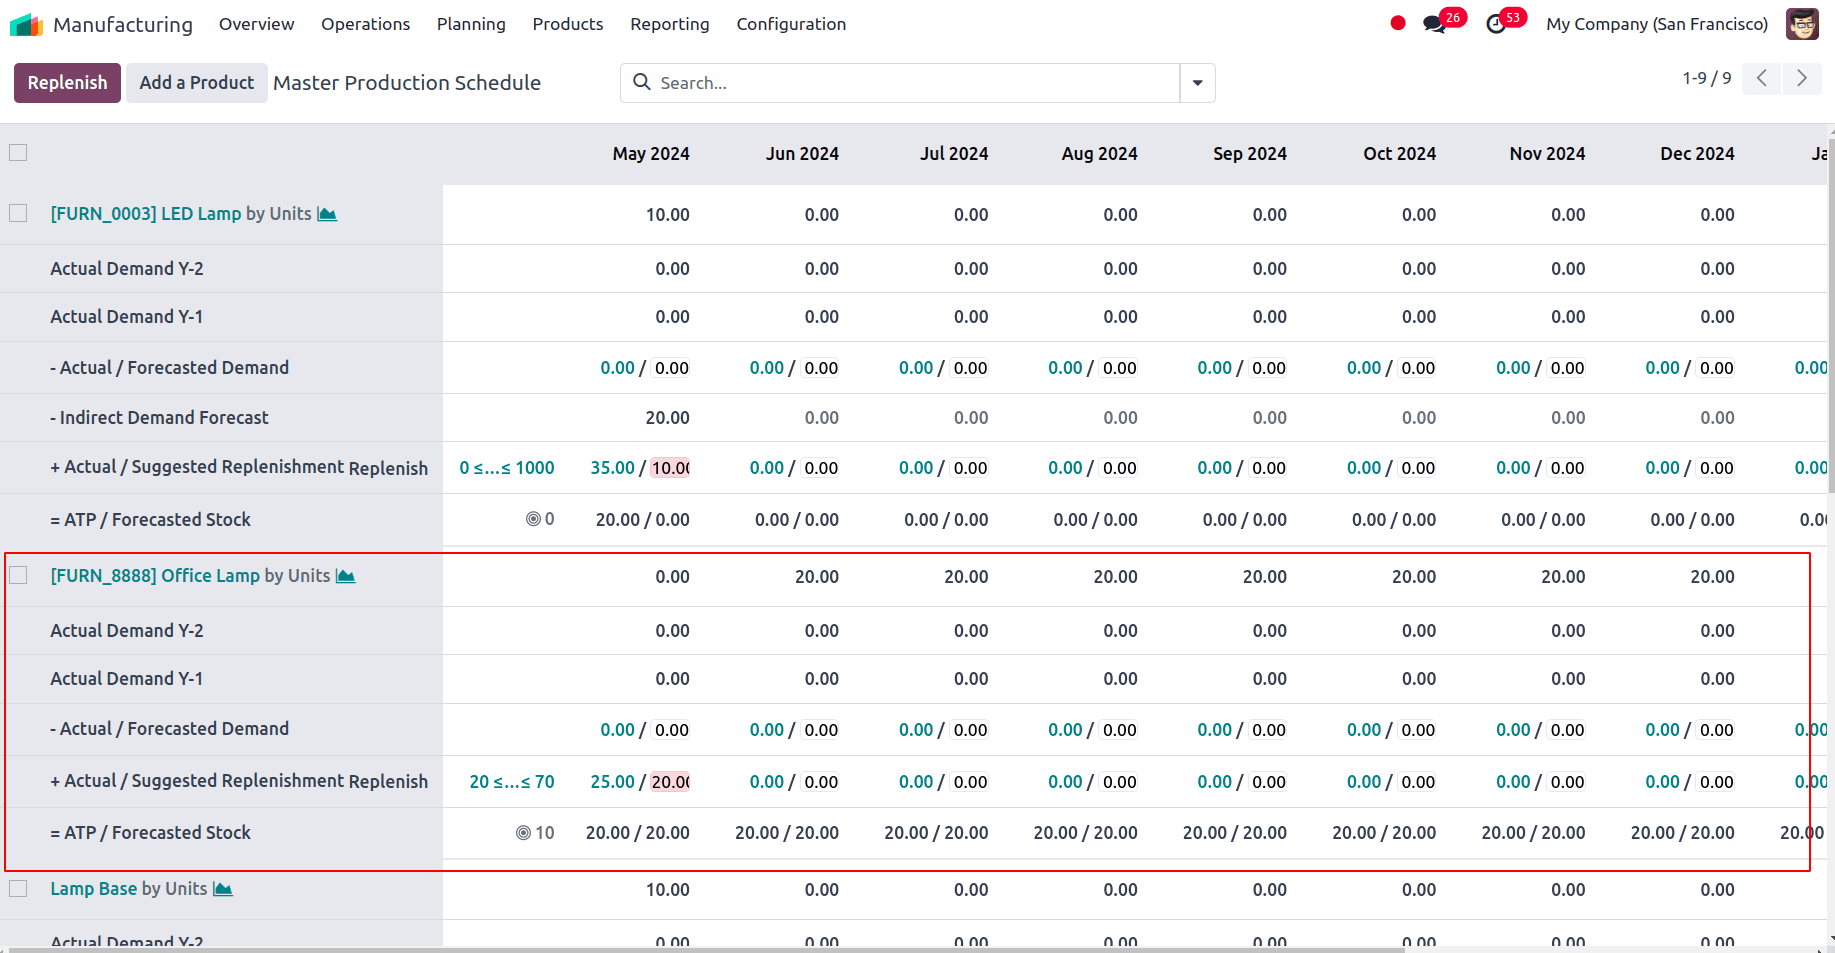
Starting Inventory is the amount of a specific product that is in stock at the start of the planning horizon, or the MPS. Prior to taking into account any incoming supplies, production, or sales orders throughout the planning period, it acts as the starting stock level. Here, since we have enabled the feature, we can see the initial quantity of each product in the first row corresponding to the product. Here, the onhand quantity of the product is 0, which we can see in the first row. For the next time range, we can see the starting inventory as 20, which is the quantity of the product that will be available at the end of the previous period. Here, we have given the safety stock target as 20, so that much quantity has to be there at the end of the specific period.
Actual replenishment is 25 here since the quantity required to reach the Safety Stock Target is 25.
Actual Demand, which is based on confirmed sales orders. When a sale order is created for the product, the quantity of the product will be reflected in Actual Demand. Let's create a sale order for the product for quantity 10.
Now in the MPS, we can see that the actual demand is 10.
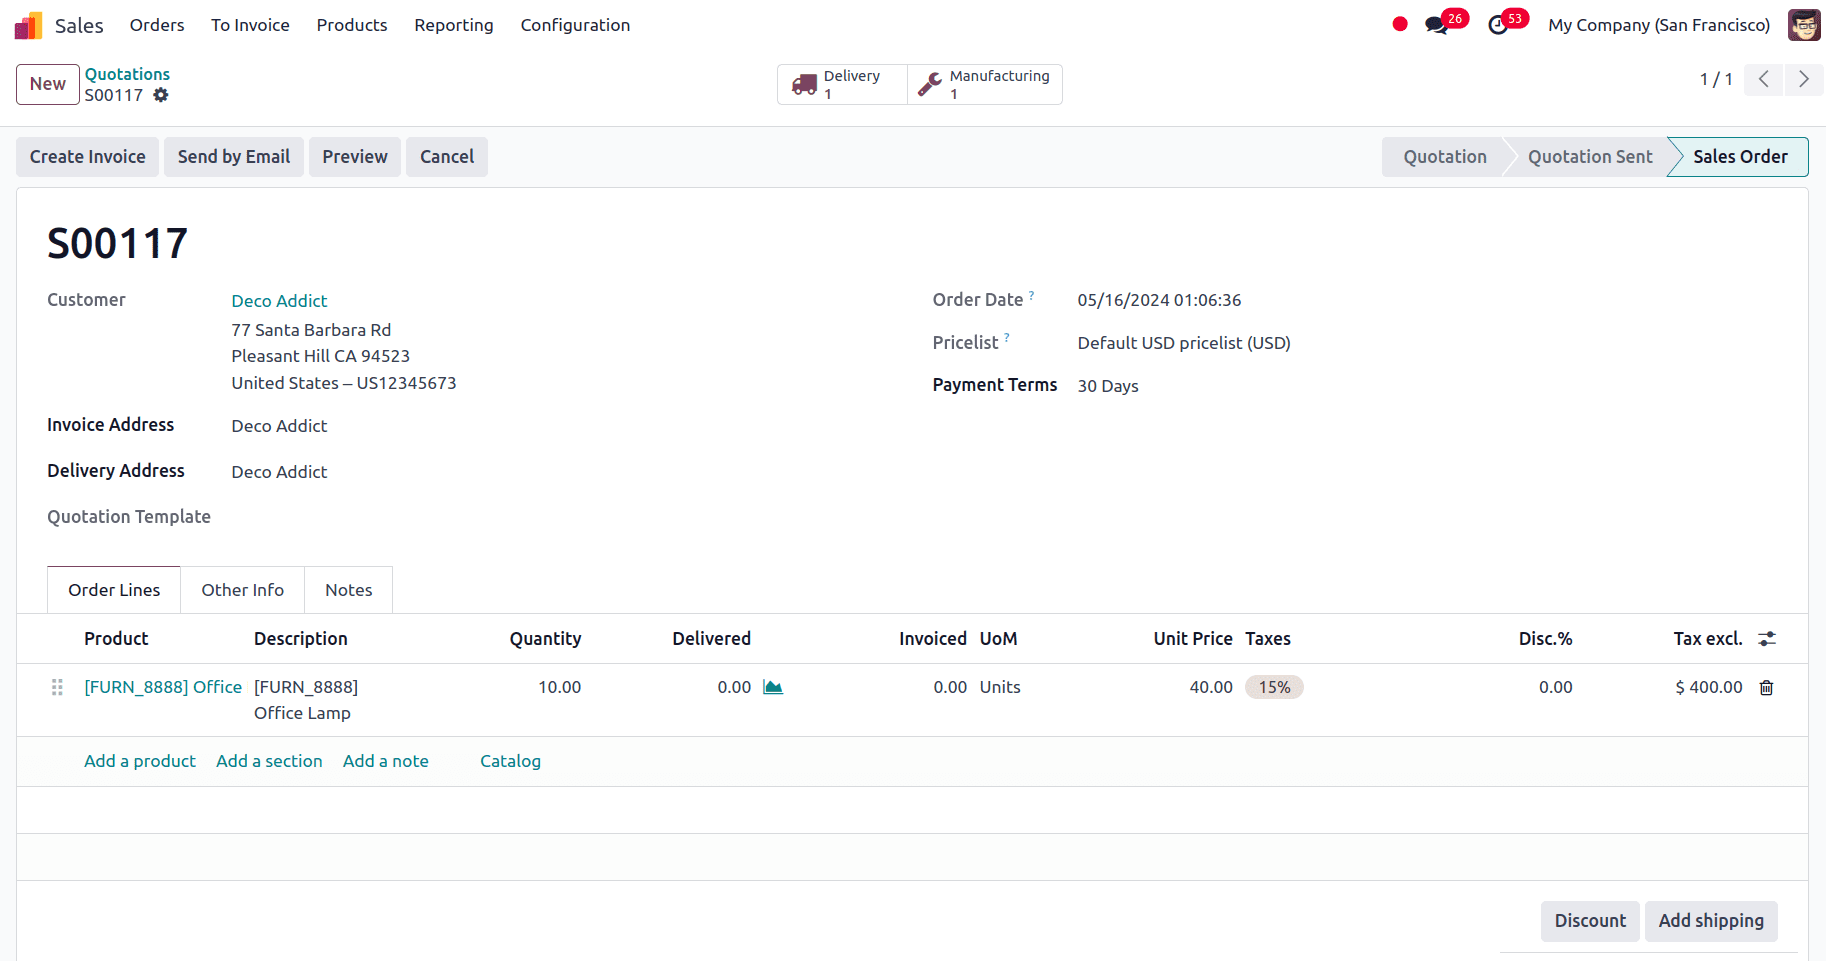
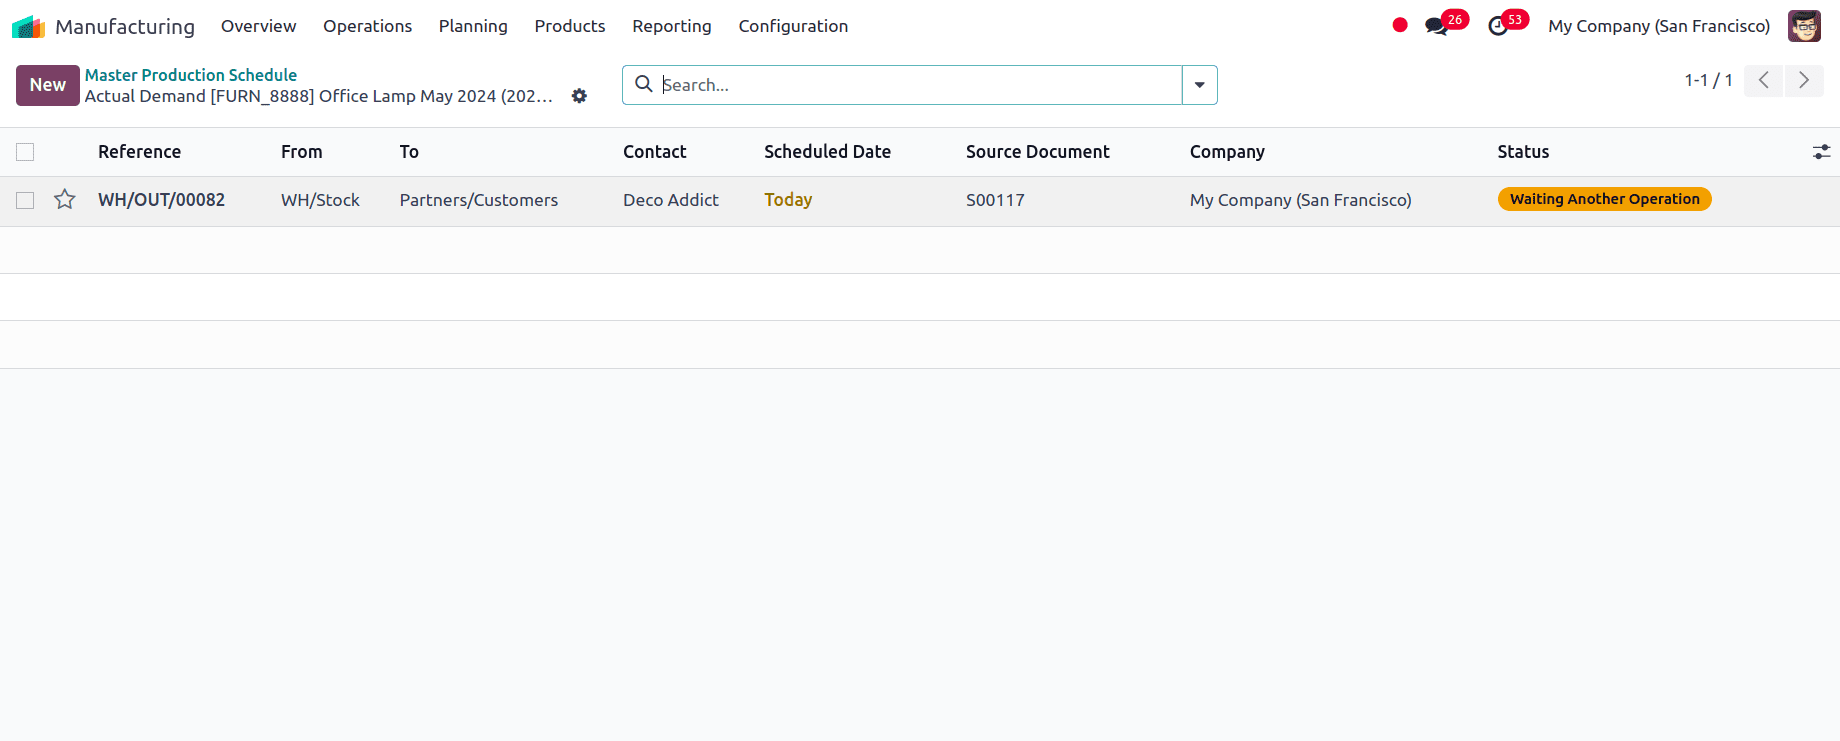
When we click on Actual Demand 10, which is in the green color here, we will be able to view from where this has been triggered. When we click on that, we can view the sale order.
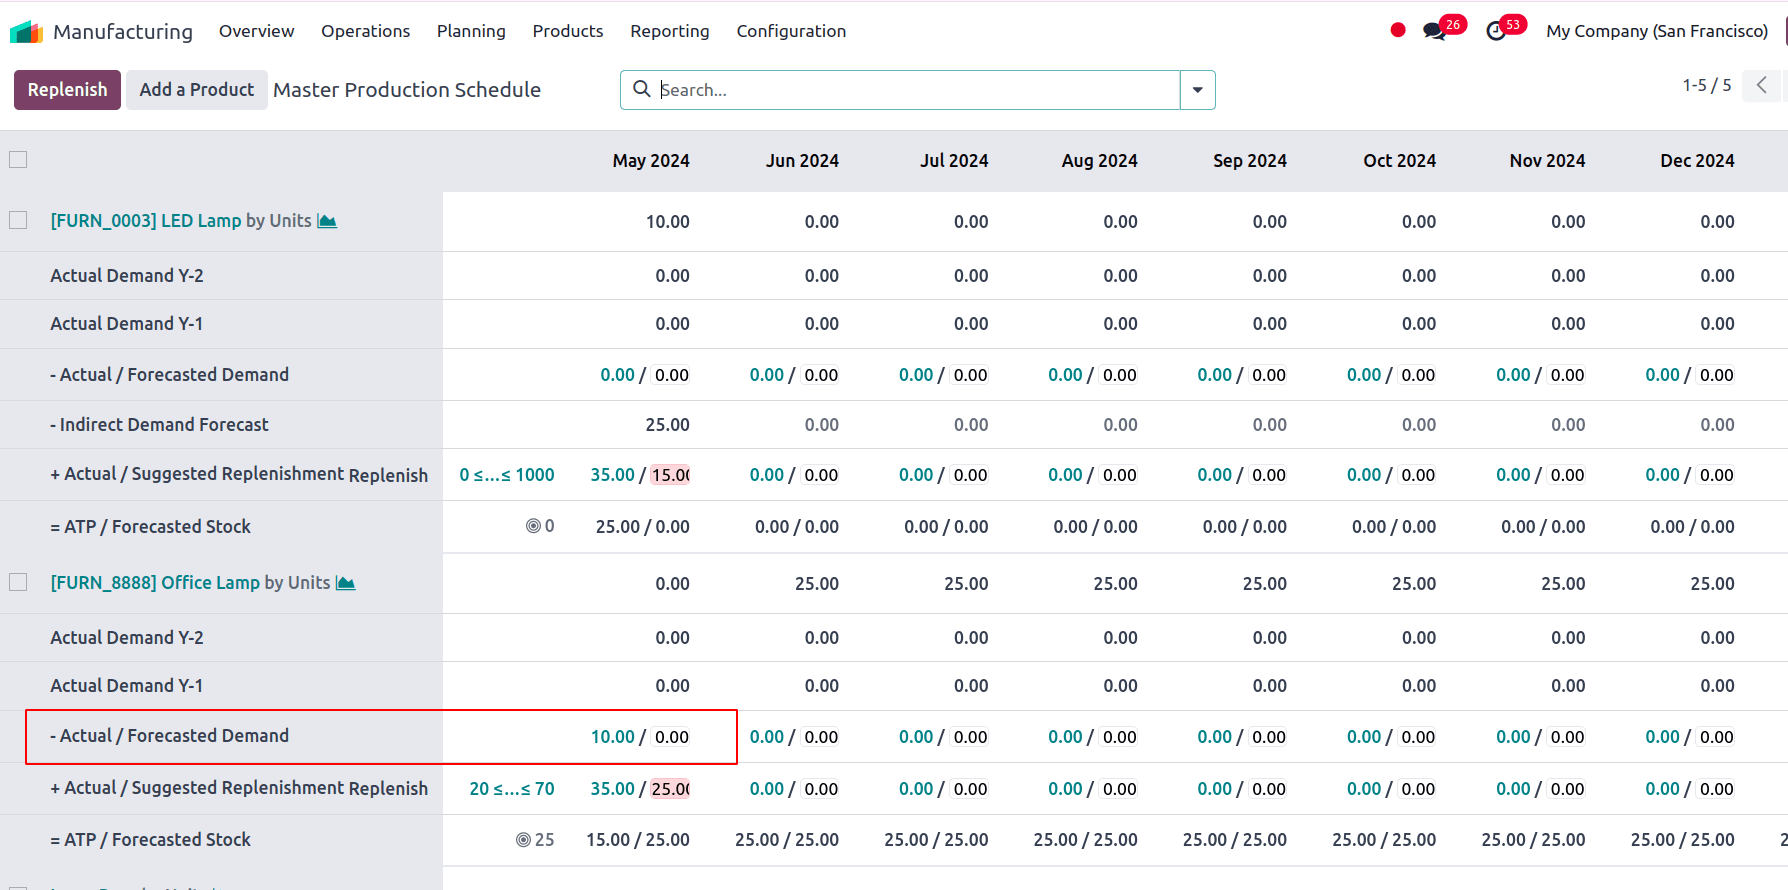
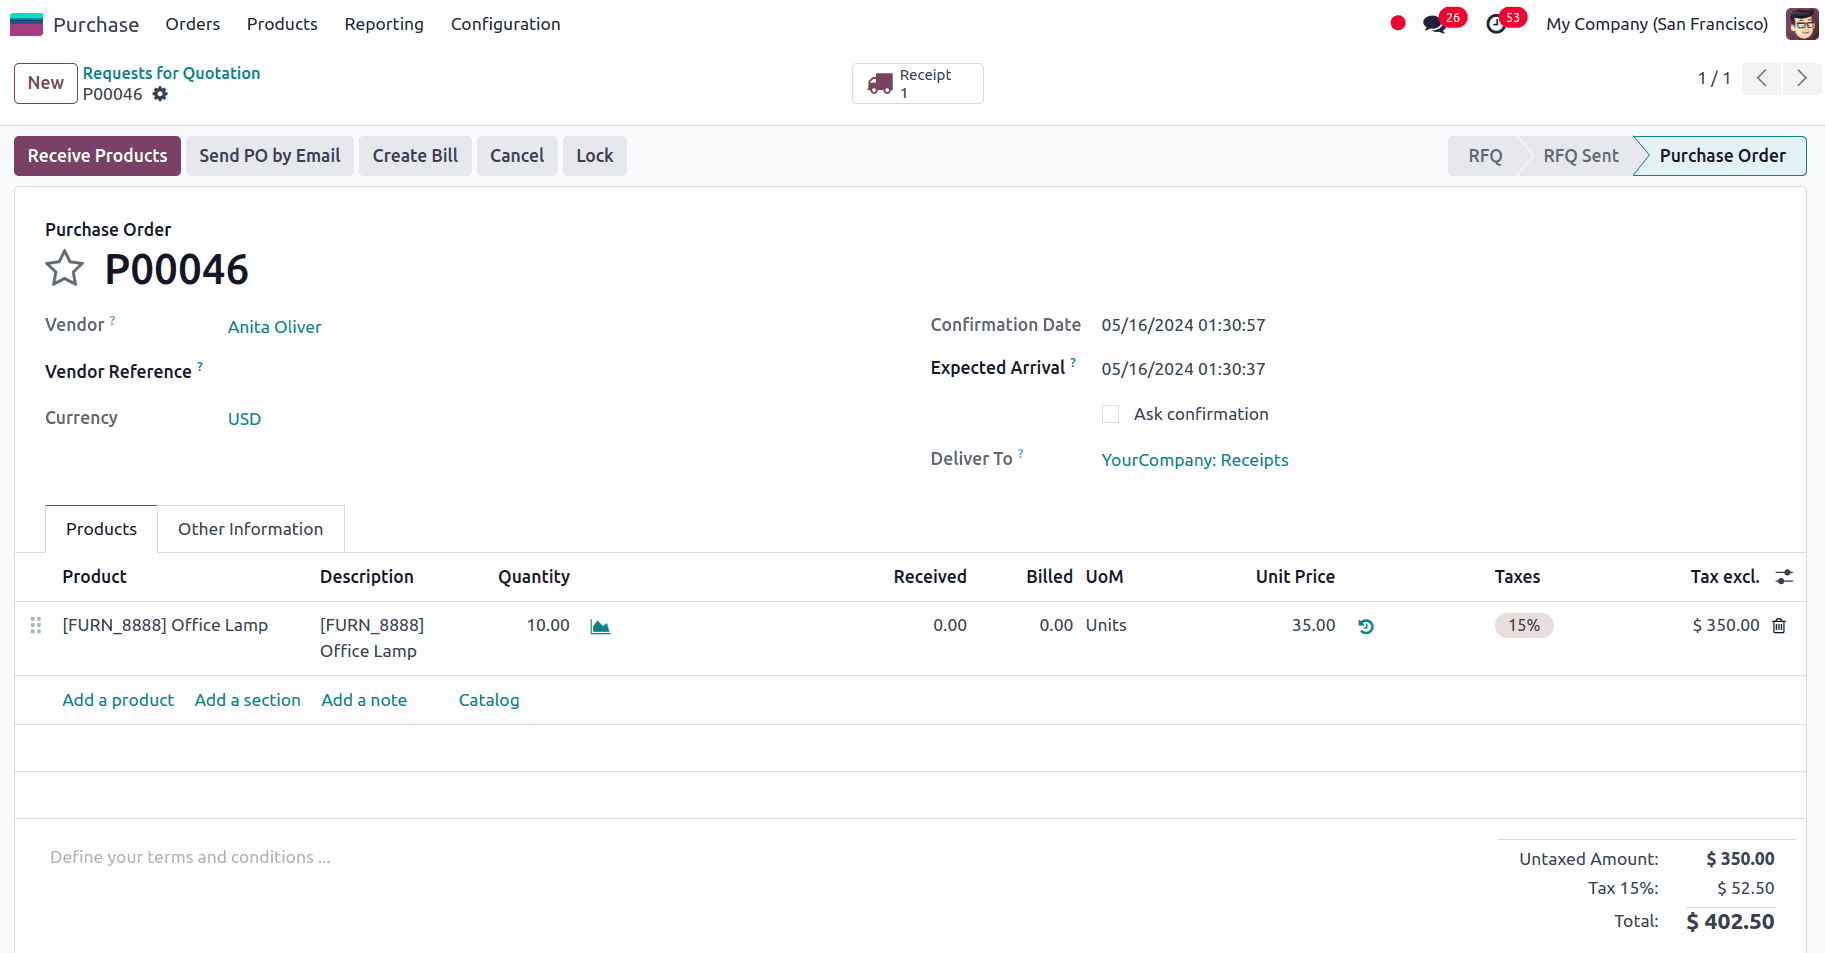
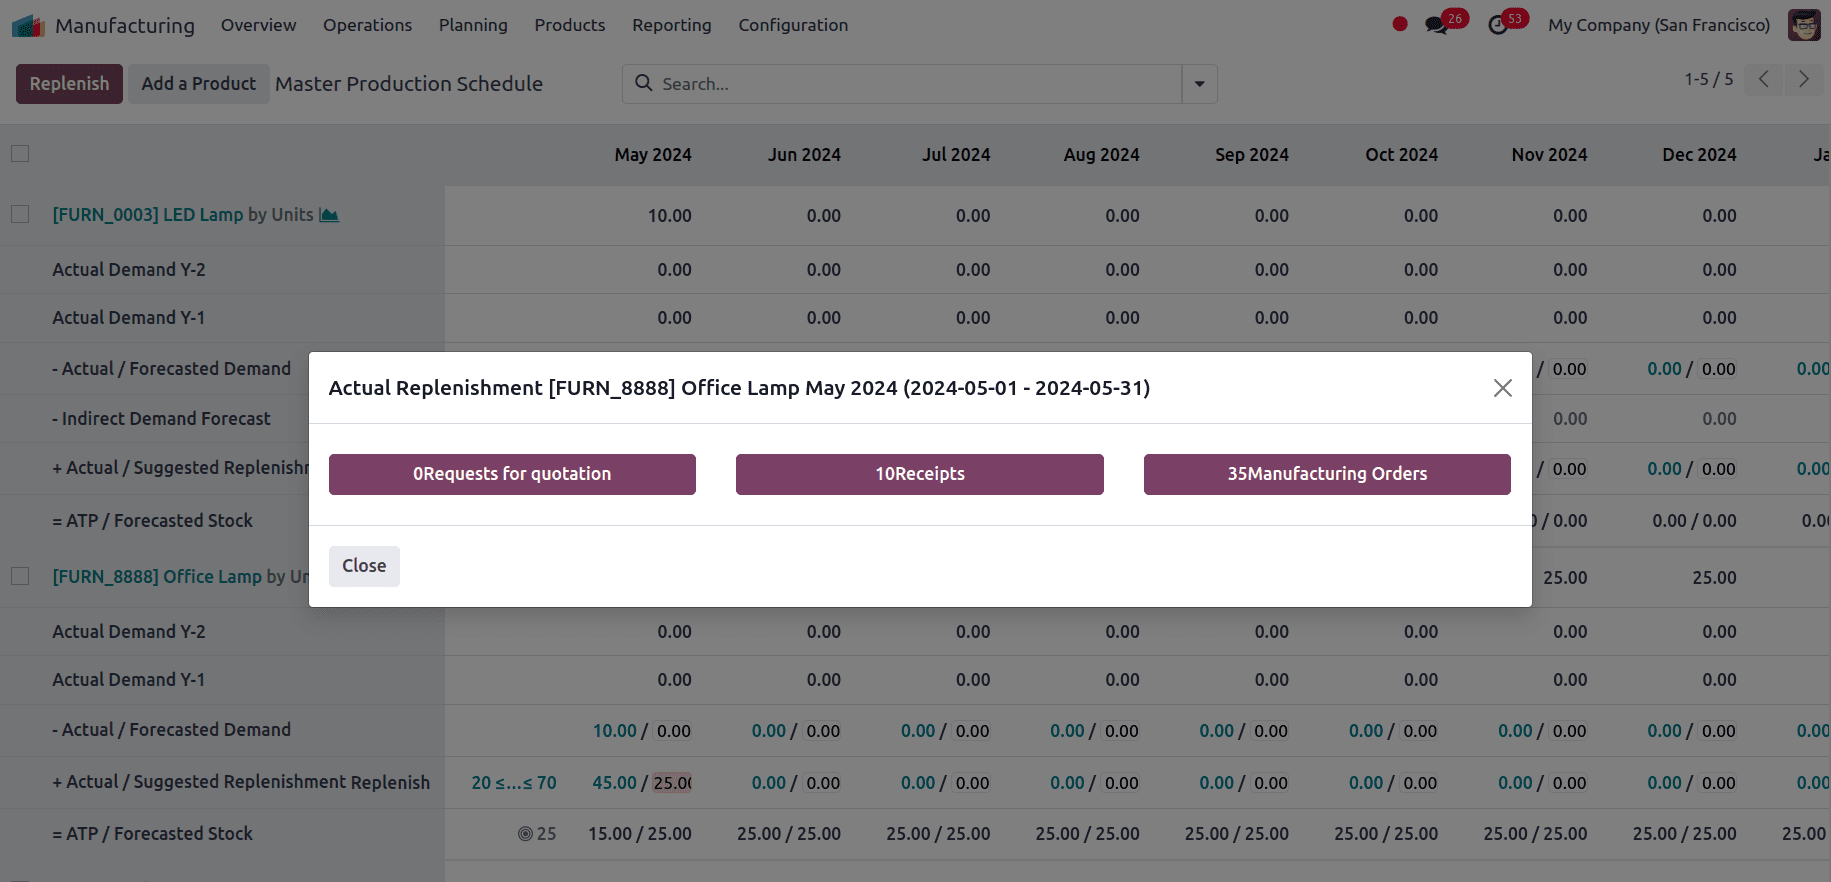
We can also see that the Actual Replenishment has been changed to 35 by adding the actual demand of 10 to the 25. Now let us create a Purchase order for quantity 10 for the product.
We can check the MPS and see that the actual replenishment has been changed to 45 by adding the quantity of 10 replenished by the purchase order.
And when we click on that we can see the details of the route for the replenishment as seen in the screenshot below.
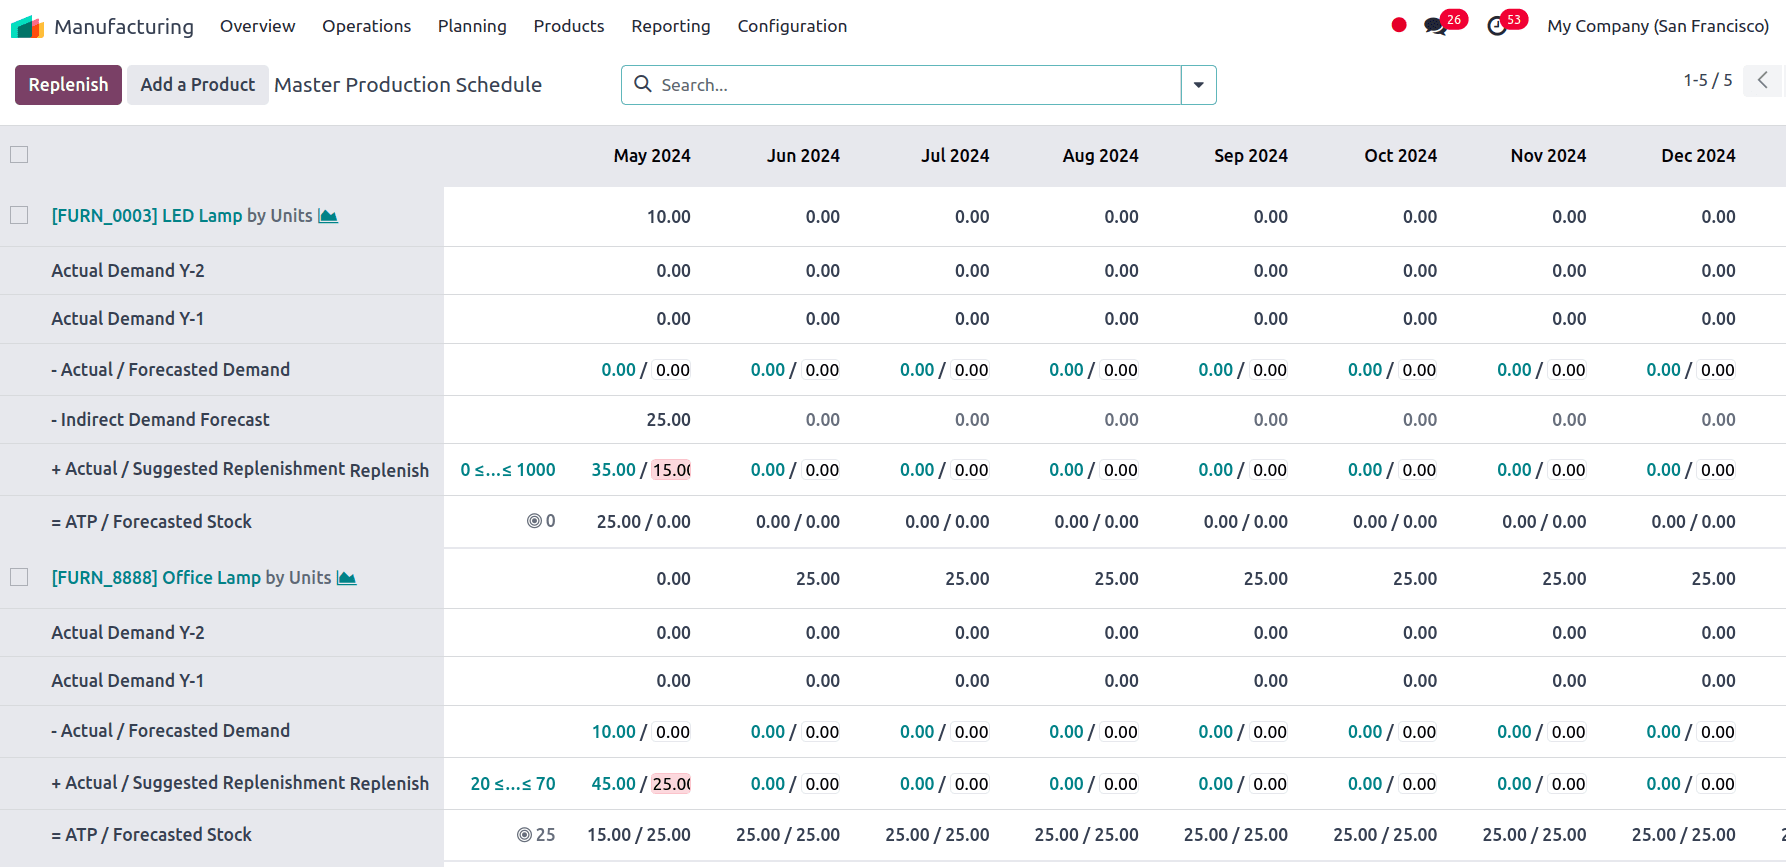
Here since we have a safety stock target of 25 and a sale order for 10 quantities of the product, 35 Manufacturing orders have to be created and there is a purchase order for 10 quantities of the product. That is, Actual Replenishment provides us replenishment values based on confirmed RFQs along with Manufacturing Orders.
And the next field we have is the Actual Demand Y-1 and Actual Demand Y-2 which shows the last 2 year's actual demand.
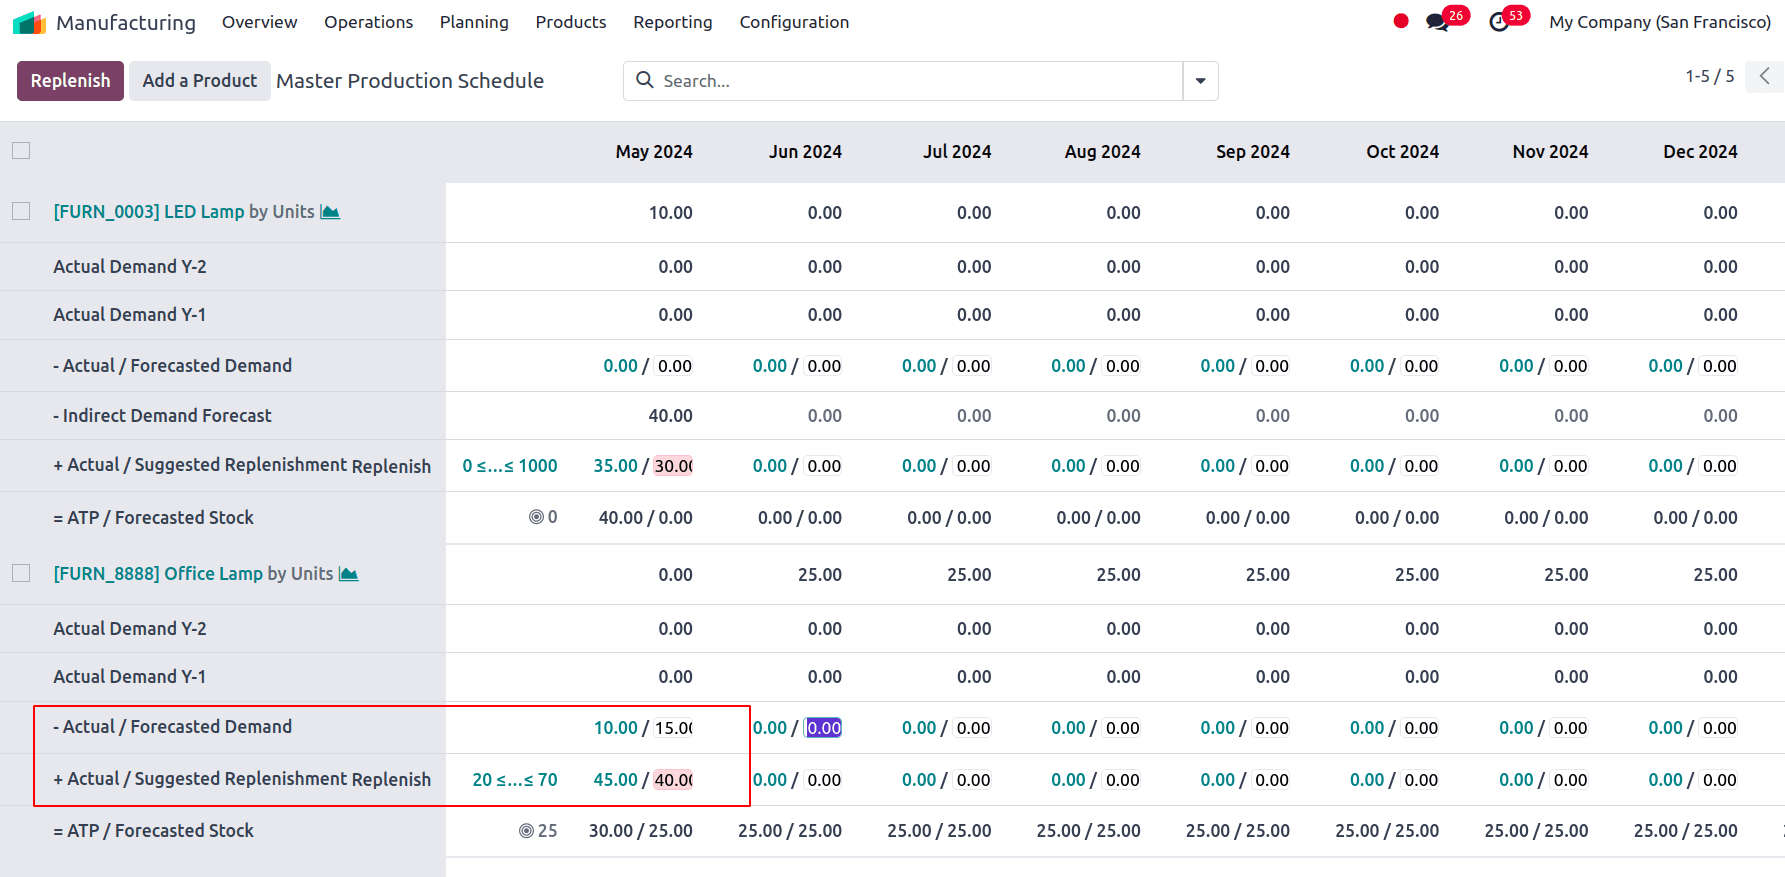
The Forecasted Demand for the product can be manually added for all the time ranges for which we plan to schedule the manufacturing and then the suggested replenishment is automatically computed. The Forecasted Demand is set to 15 here for the first time range and we can see that the Suggested Replenishment is 40 which is the sum of the Forecasted Demand of 15 and the Safety Stock Target of 25.
Forecasted Stock is the quantity that is estimated to be in the inventory till the end of the period, which is calculated as,
Forecasted stock = Starting Inventory - Forecasted Demand +Suggested Replenishment
= 0 - 15 + 40
= 25
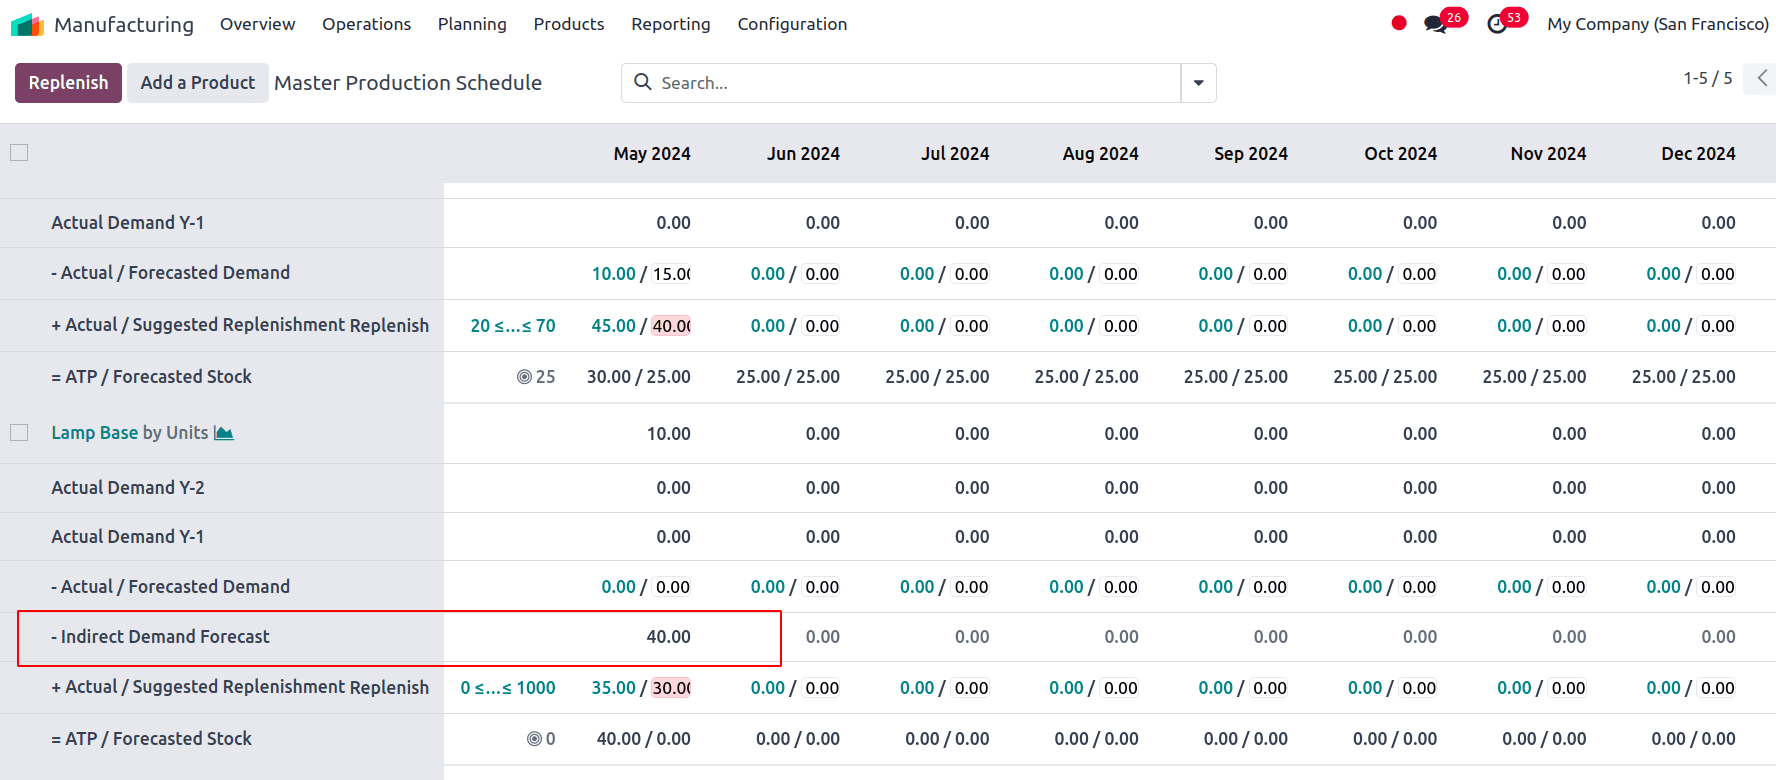
Indirect Demand Forecast refers to the estimated demand for component parts needed to manufacture the finished products included in the MPS. Here, we can see the indirect demand for one of the components as 40.
Now we can click on the Replenish button at the top left, and the product will be set to replenish depending on the route we have set in the product form. So here we set the route for Manufacturing so a manufacturing order will be created. To view the manufacturing order, navigate to Manufacturing --> Operations -->Manufacturing Orders. We can view the manufacturing order created, and the source is given as MPS.
In the MPS, we can see the Starting Inventory is 25, which is the stock that is available at the end of the previous time range, which is 25 here as the Safety Stock Target is set as 25.
So we have seen that the replenishment of the product is an easy task with the help of the Master Production Schedule feature available in Odoo 17. We can plan the production using the Master Production Schedule based on the demand forecast. So the business can streamline its sales and other related operations without any interruptions, such as stockouts, etc. Thus maintaining customer satisfaction is the ultimate aspect of bringing an organization to the forefront. That is, businesses may maintain enough stock levels to meet demand, optimize their inventory management procedures, and reduce the risk of stockouts or surplus inventory by utilizing the MPS settings in Odoo 17 Manufacturing.
To read more about An Overview of Master Production Scheduler in Odoo 17 Manufacturing, refer to our blog An Overview of Master Production Scheduler in Odoo 17 Manufacturing.