A company's sales department is crucial. There are two ways for a firm to deal with sales. They can sell things directly from the company or from their own retail stores. For example, more possibilities wish to use a retail shop for selling if it is done through it. Odoo has a module called Point of Sale that can be used in such a retail store. Odoo wishes to deal with a large number of consumers at a retail store. As a result, they try to impress and attract customers in a variety of ways.
Every version of Odoo added more useful and efficient features. Odoo 15 adds more to an existing one with each update. So in Point of Sale, Odoo added the following new features
Gift Card
Coupons & Promotions
Quotation/Order
Down Payment
Payment method: Customer Payment
Limited Products Loading
Limited Partner Loading
Ship Later
Refund
Customer Display
Coins/Bills
Open Product Info
In this blog, we can go over each one separately.
Gift Card
A gift card is used to attract clients during a Point of Sale session. Customers can use this option to purchase gift cards, which can then be used to exclude the value of the gift card from their final purchase price.
We can make a gift card from the front end or the back end. In the back end, under the product tab, there is a gift card option. We can only use them after enabling them on the backend.
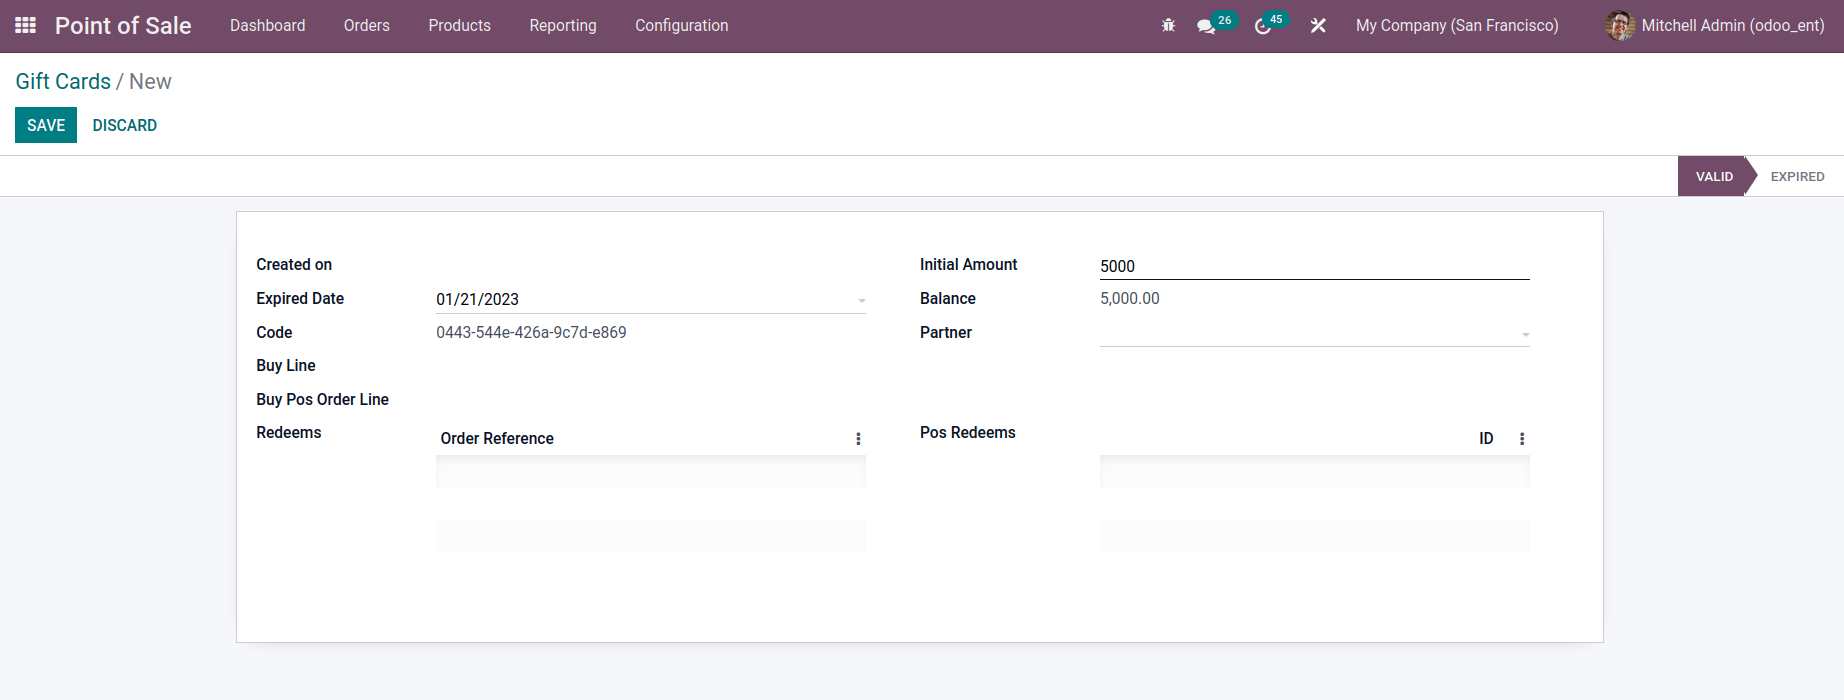
Three different gift card modes are available in an odoo PoS session. We can activate the gift card and select the type while in the PoS settings.
Then save your changes.

Then start a Point-of-Sale session. Select a product and a customer. Then there's a Gift Card button, which should click.
Choose a choice based on the needs of the customer. To use a gift card first put the barcode onto the given space.
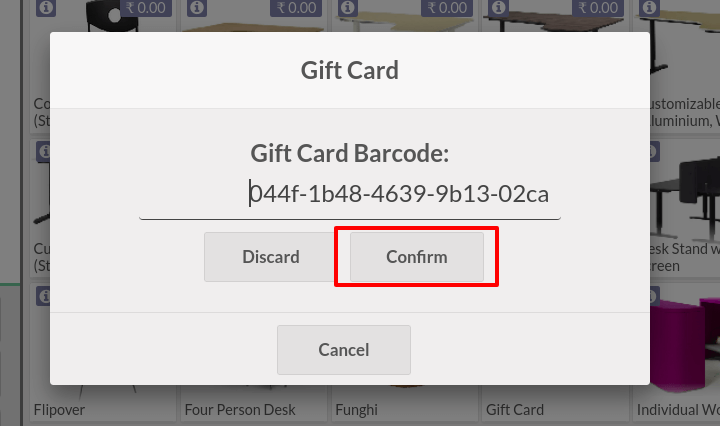
Then add the gift card to the order line automatically and subtract the gift card value from the total.
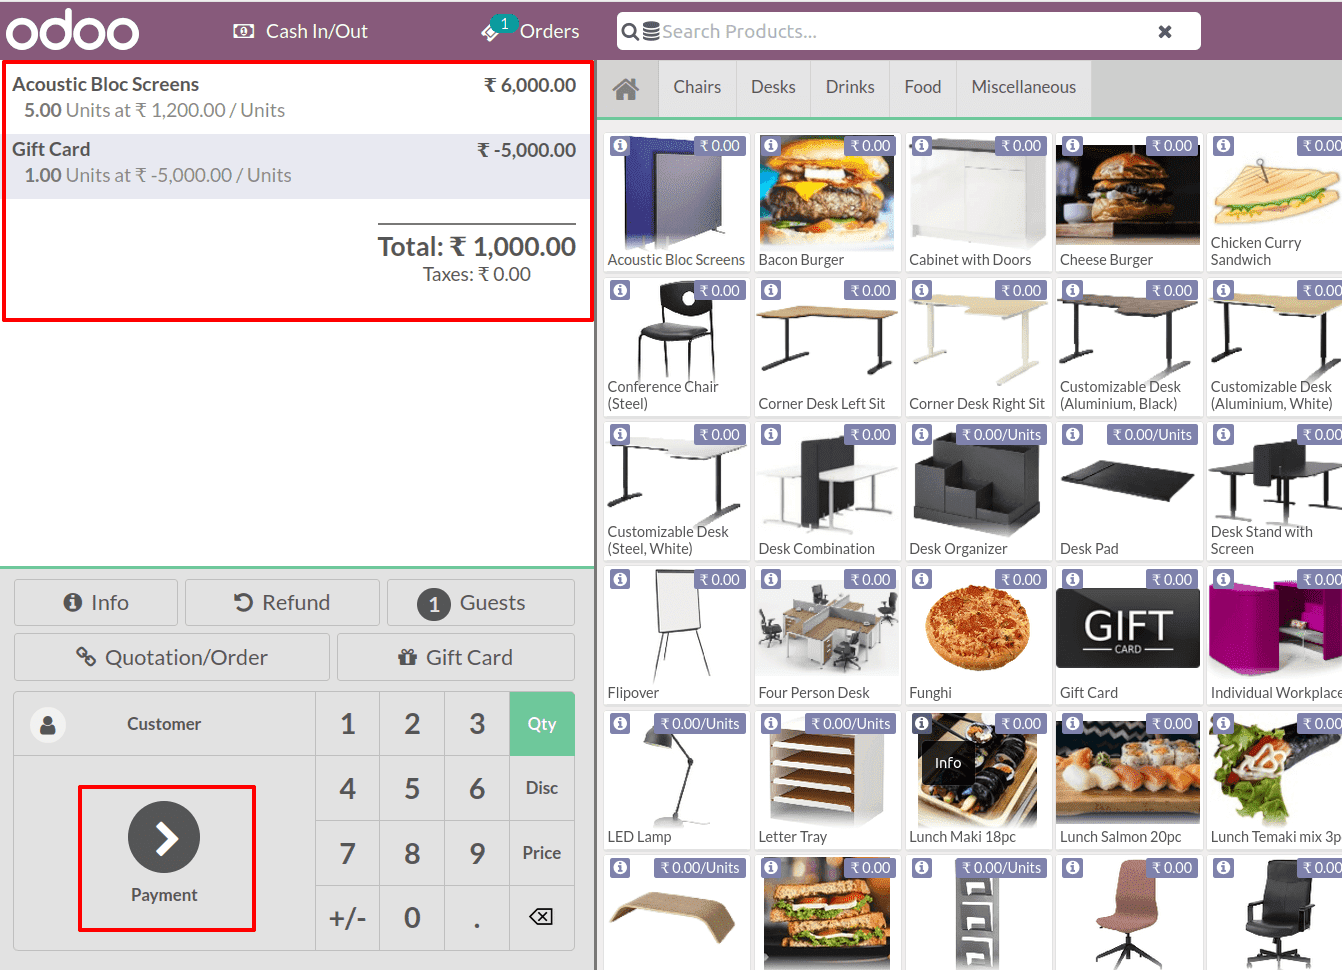
After that, you'll be able to pay for the remaining amount.
A blog on the same topic has already been created. To discover more about Git Cards in Odoo Point of Sale, click the link below.
Managing Gift Cards in Odoo 15
Coupons & Promotions
Another way to entice clients to shop is to use coupons and promotional programme.
A coupon and Promotion programme is similar to a gift card in that it allows customers to save money.
Promotional programmes can be used to promote any product or as part of a seasonal offer. There is a code included in this coupon. We obtain the deal indicated in the coupon programme when we use this code.
From the back end, we can build Coupon and Promotion programs. To do so, go to the product tab and select Coupon Program, then generate a coupon after creating a coupon.
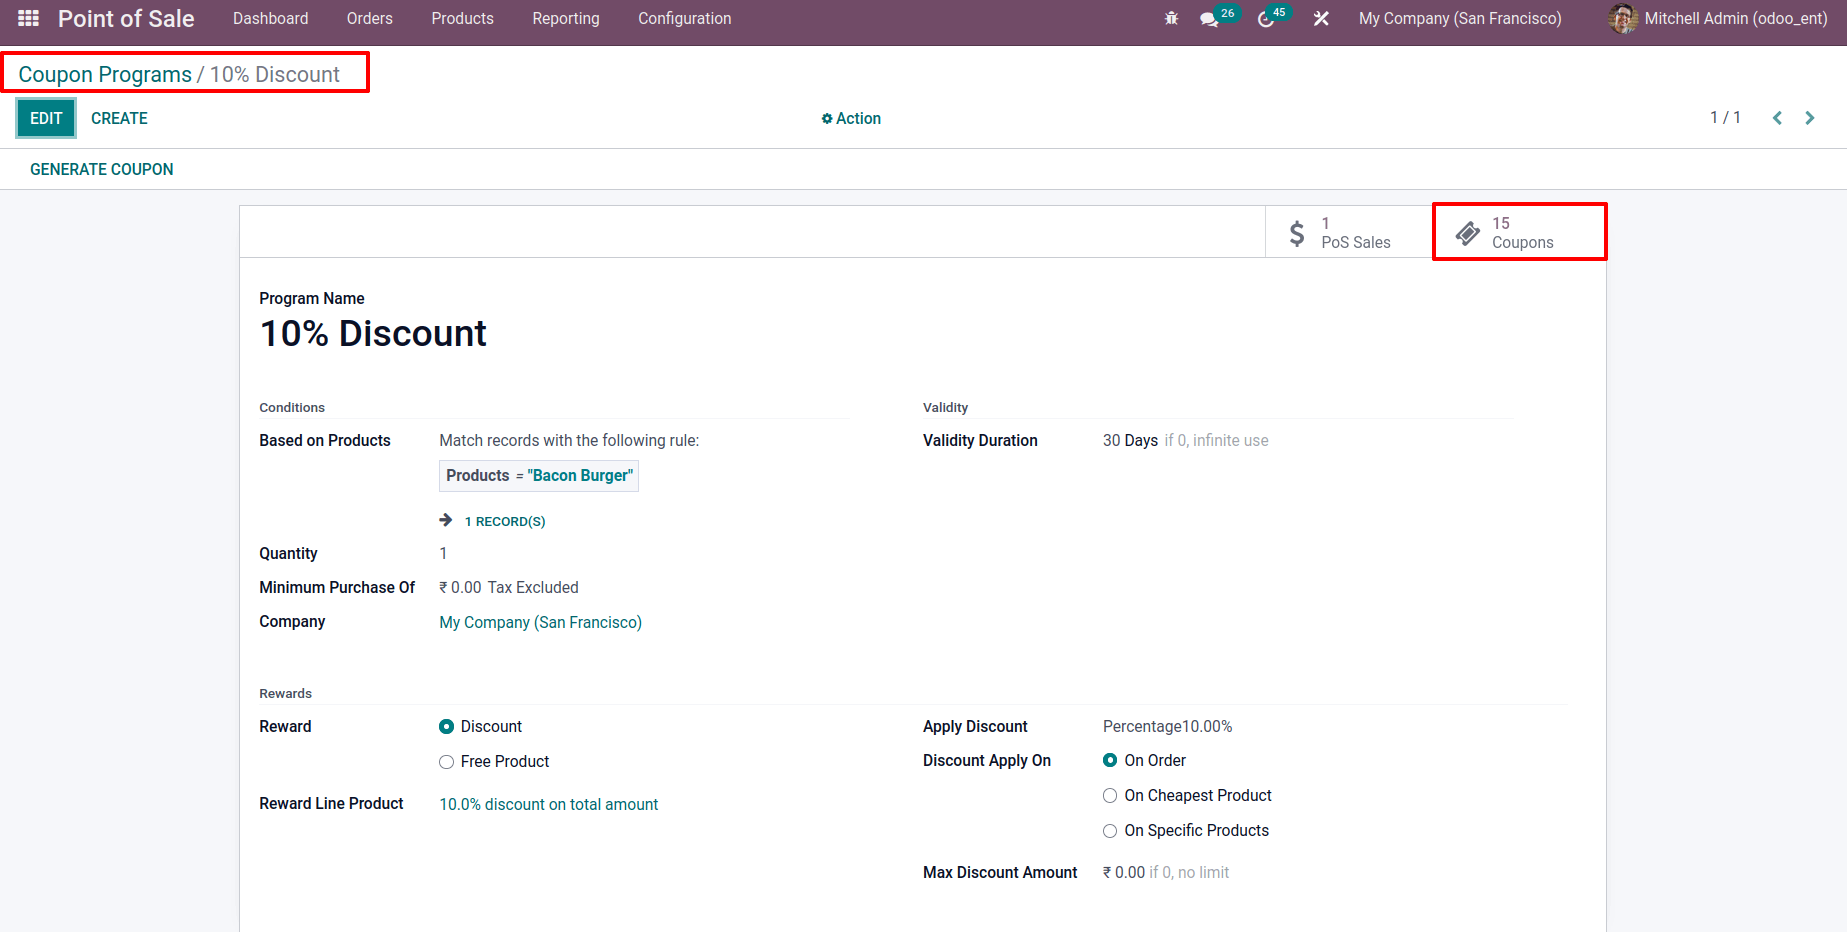
From there, we can design a promotion scheme.
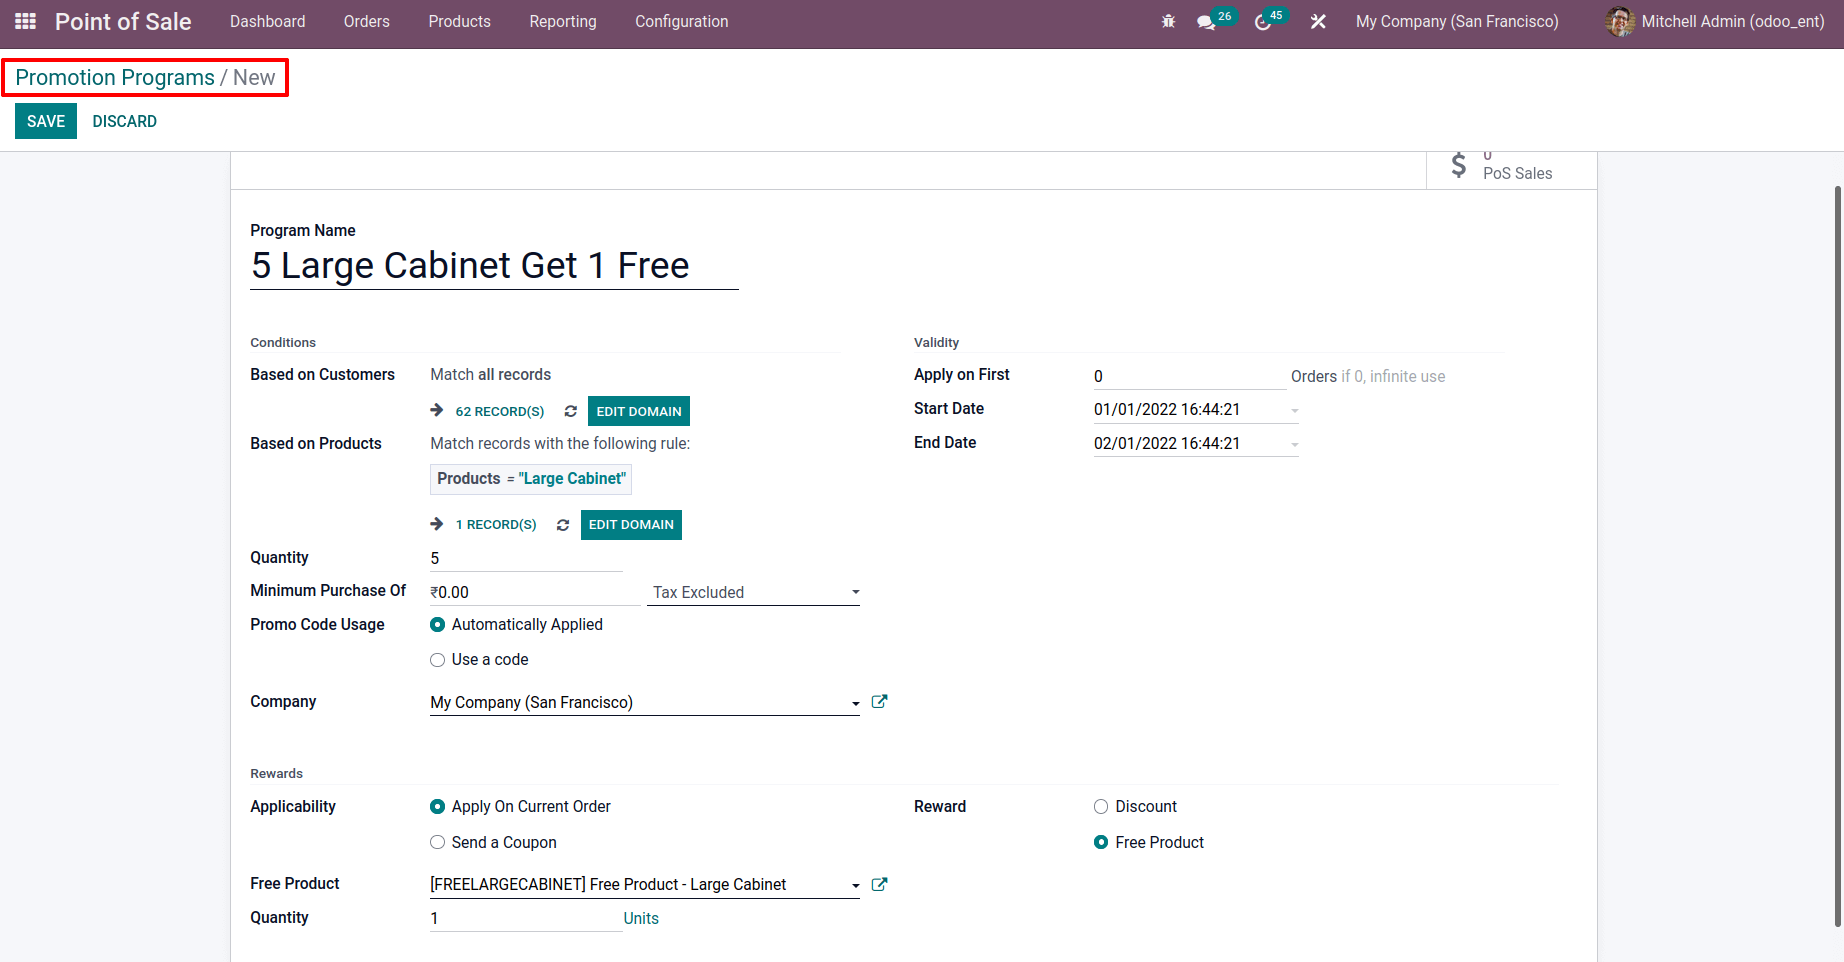
In a PoS Session, we can use them. To begin, go to the Point of Sale session settings and enable the promotions and coupon programme, then select the newly created coupon programme and promotion programme. And then save your modifications.
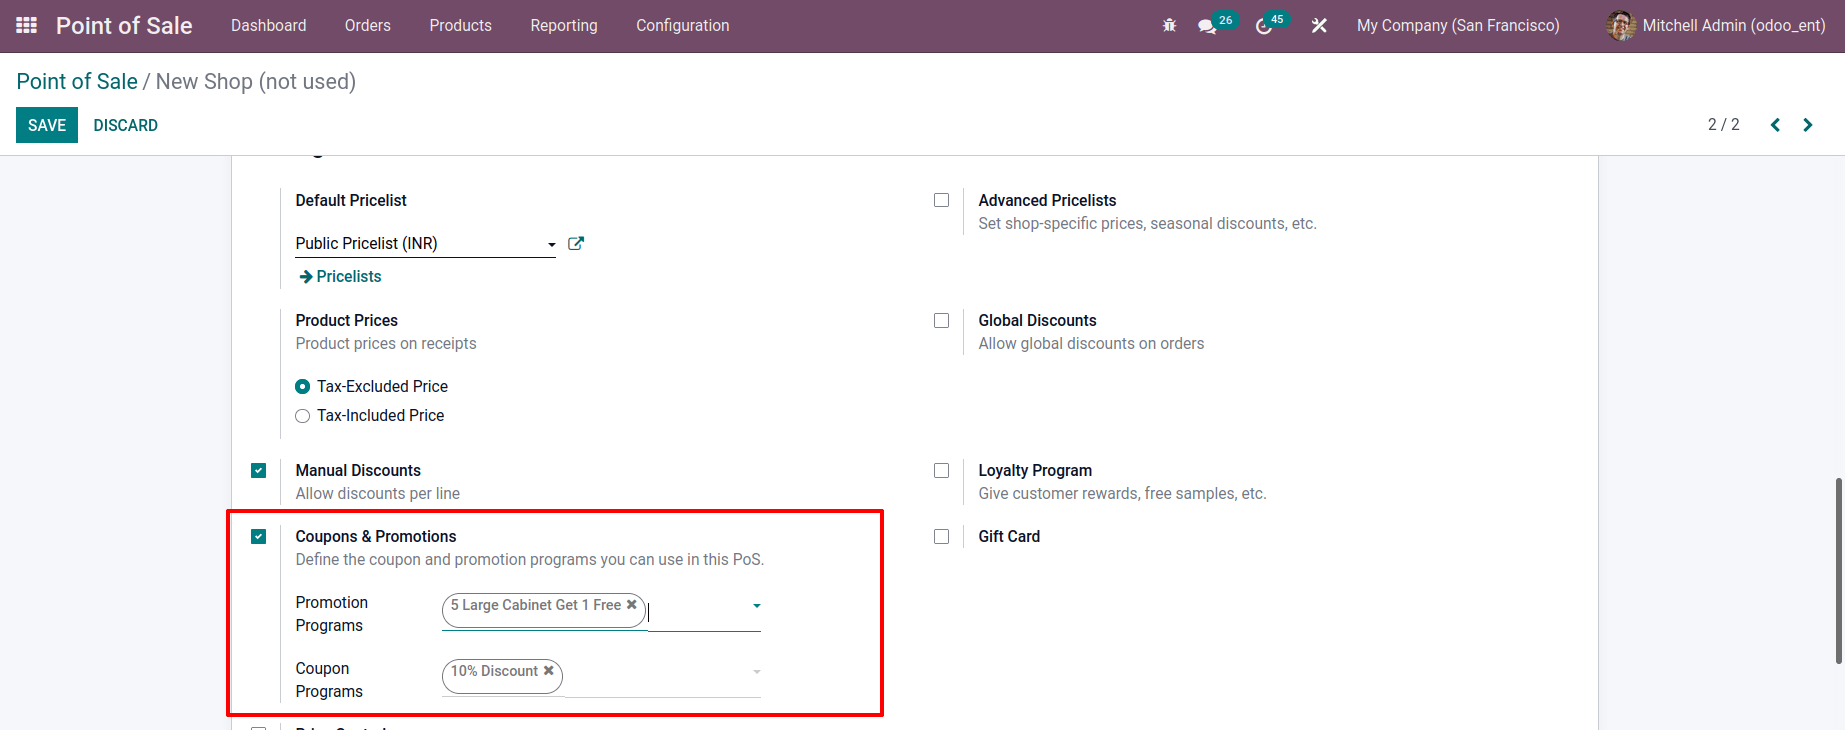
After starting a new session add a customer and a product. Enter the Code option.
Now the reward mentioned on the coupon programme has been automatically added to the order line by pasting the given code into the space. Then make payment.
To learn more about Odoo 15 Point of Sale Coupon and Promotion Programs
Please take a look at the Blog Coupon and Promotion Program with Odoo 15 POS
Quotation/Order
If a customer places a sale order with the company and then decides to pay the bill at a nearby retail store. As a result, the PoS Session must have access to the company's quotations and orders.
As a result, Odoo added the option Quotation/Order to the PoS Session. Get a list of all the orders and quotations that have been produced using those options. Customers can easily pay
their bills from a PoS Session utilizing this.
Using the sales module, create a sale order. Go to the sales module and create a quotation from there.
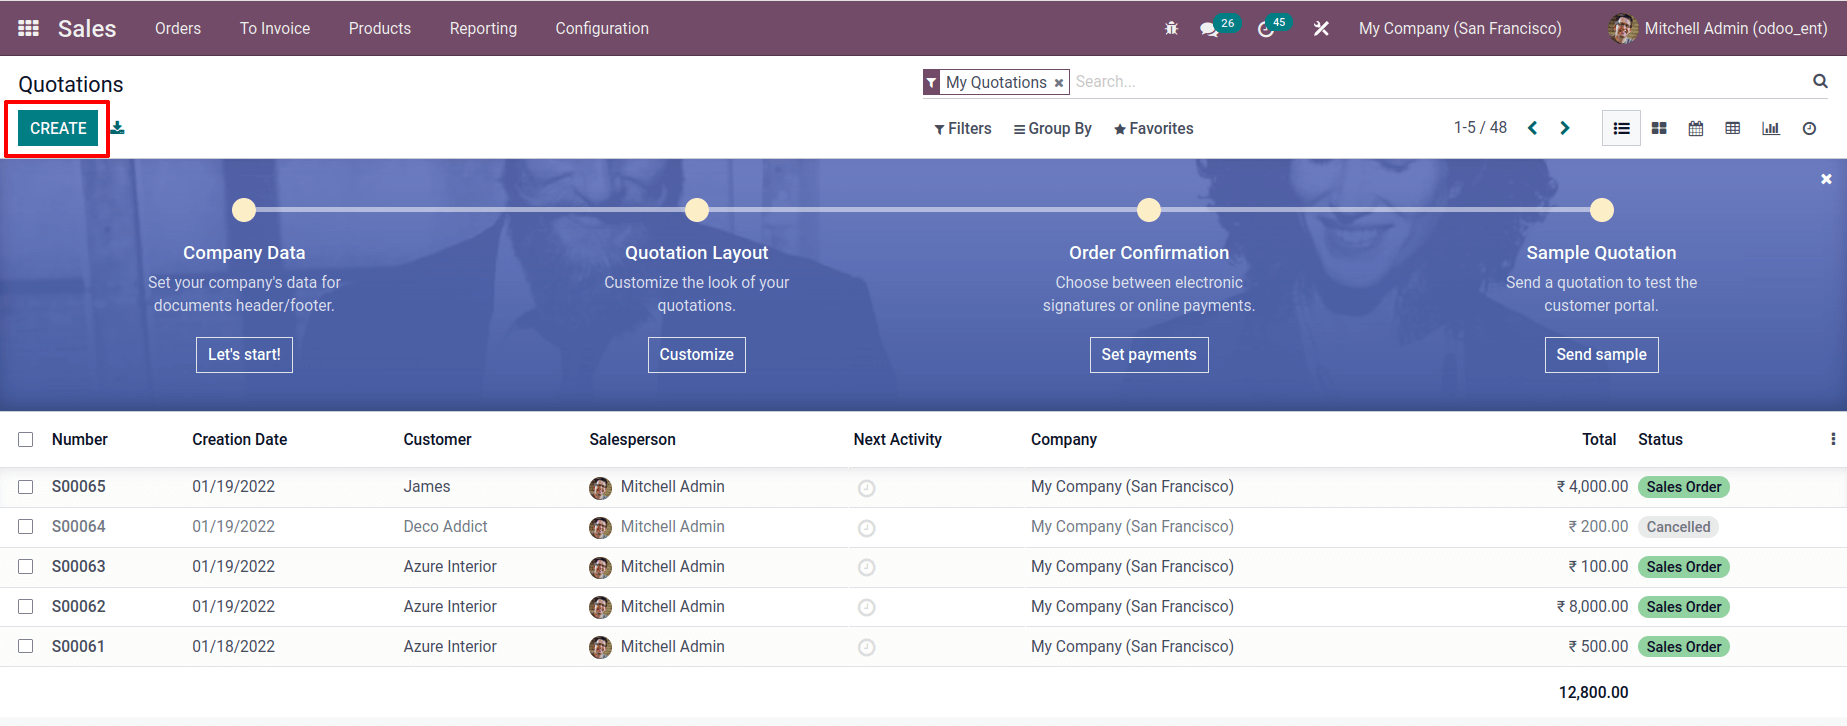
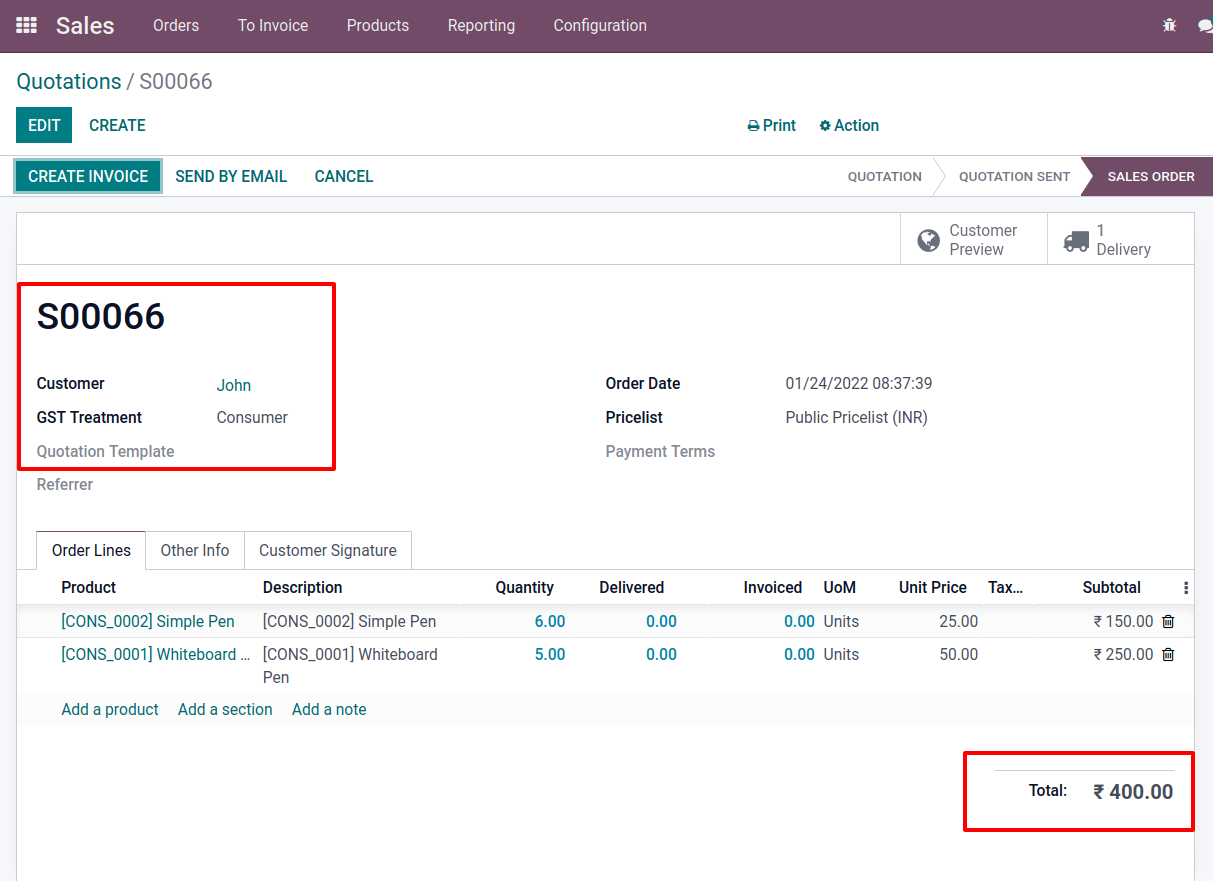
Customer information should be added. In the order line, enter the Product, Quantity, and Price. The quotation should be saved and confirmed.
Here created a sale order for John, with a total value of $400.So, in a PoS Session, let's look for the same order.
start a point-of-sale session. There is a Quotation/Order button. When one click on that, it will display you all of the quotations or orders that have been generated in the company.
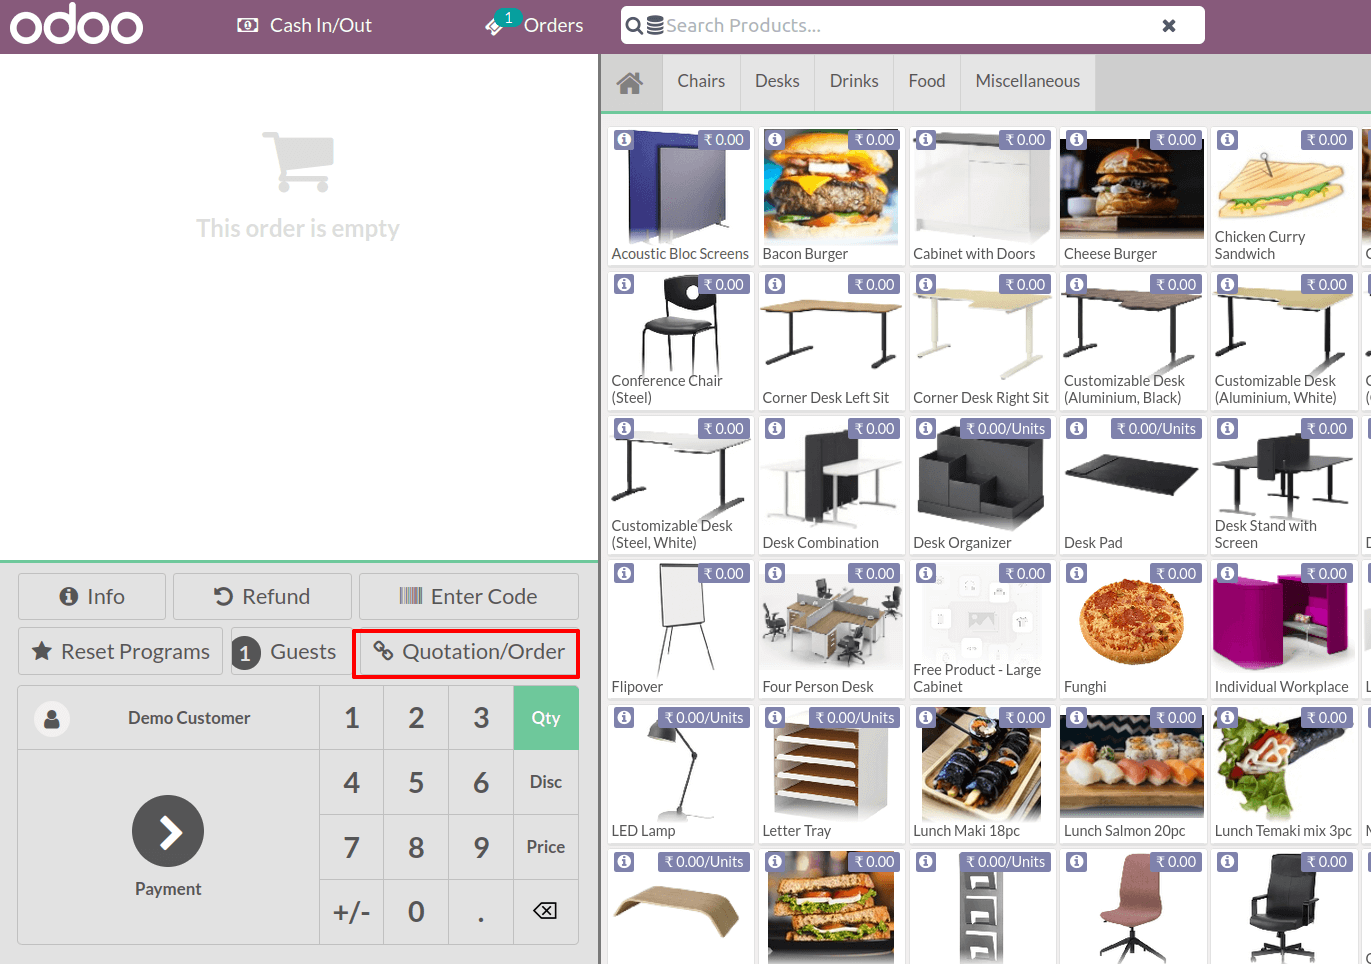
From there, one can make a payment.

Down Payment
A new feature in Odoo 15 is the ability to add down payments to sale orders.
When one chooses a down payment, agree to pay the complete price in two or more installments. It is possible to make down payments on the total amount due.
Customers can add down payments from the retail shop if the sale order is generated from the company.
To do so, go to the Quotation/Order button and select the appropriate customer from the drop-down list. After that, a small window appears, asking if you want to Apply Down Payment or Settle the Order.
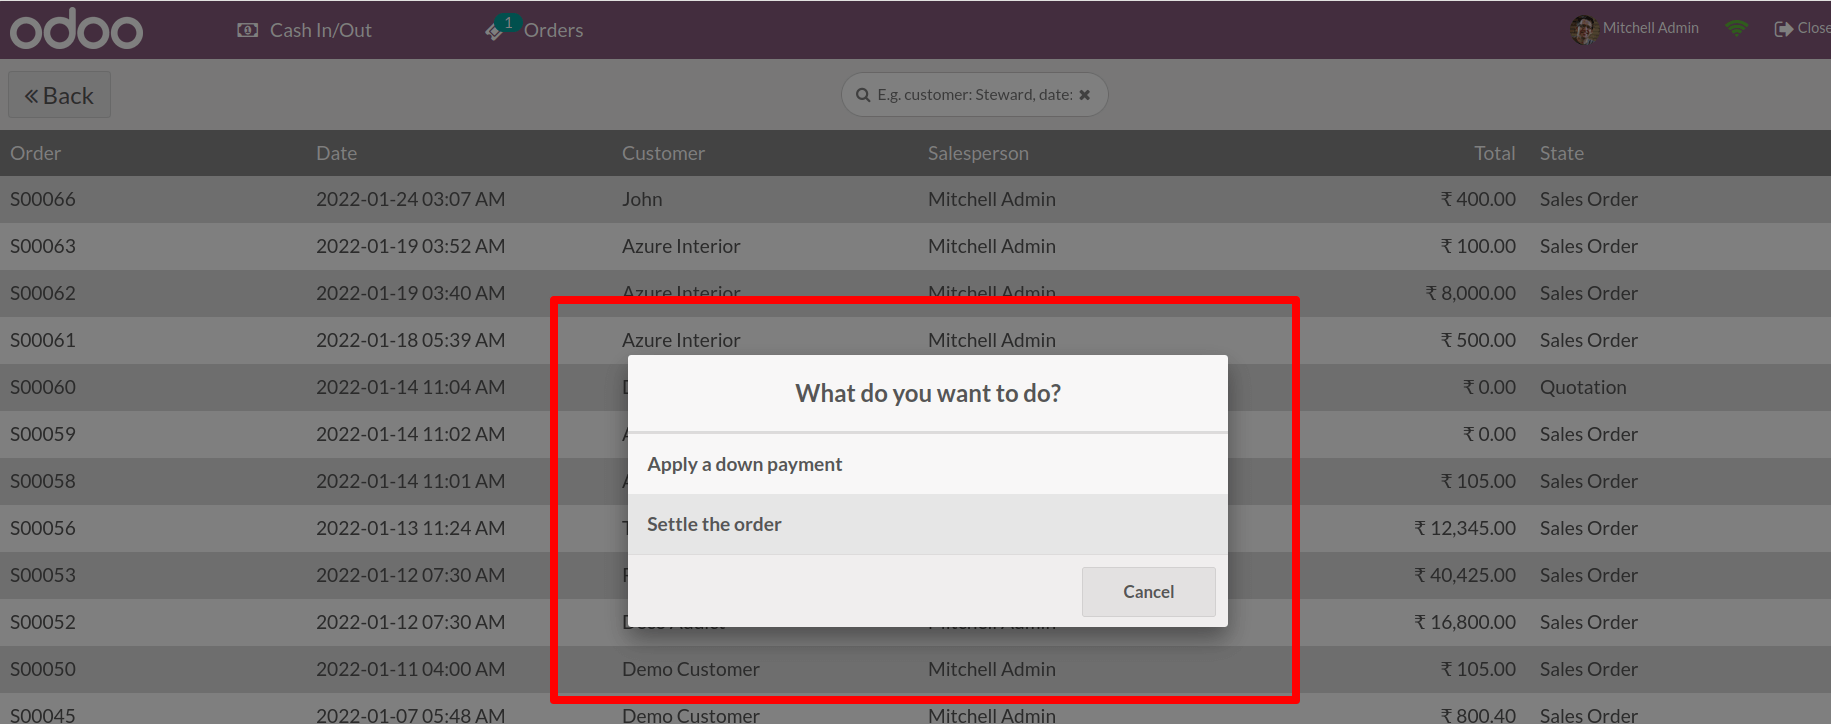
Select a response and begin making payments. It is possible to include a one-time payment.
To read more about the feature down payment technique, visit the blog Down Payment in Odoo 15 PoS
Payment Method: Customer Payment
Odoo accepts a variety of payment methods, including bank, cash, and others.
However, Odoo15 added a new payment method called Customer Account.
Which is used in the same way as a credit card. If a customer selects this payment option, the transaction will be recorded in the Receivable account, and the consumer will be able to make payment later.
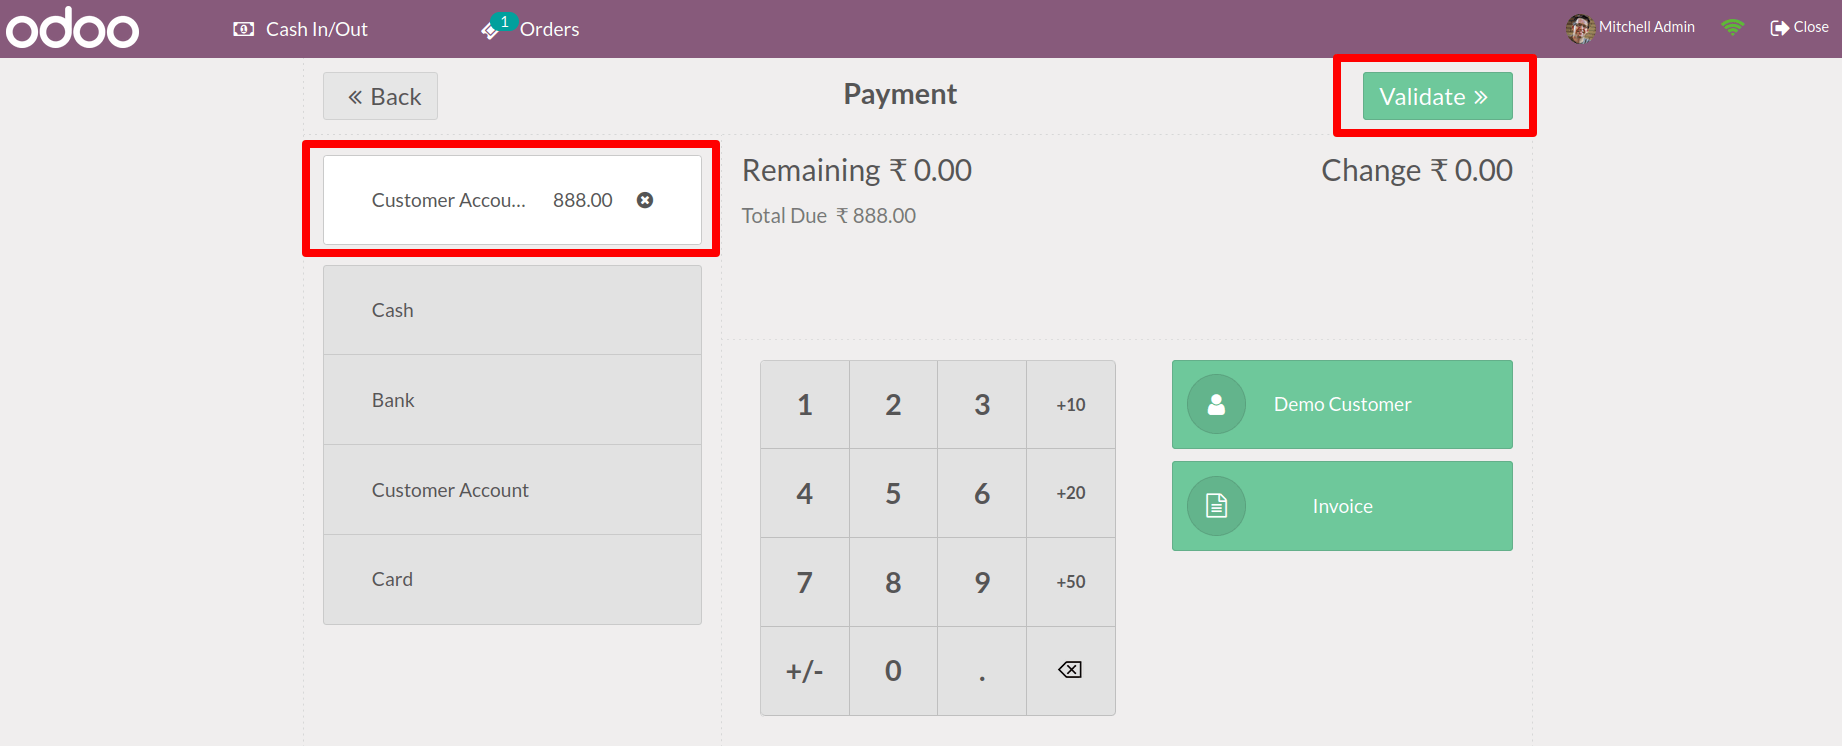
After adding things to the cart, the customer must click the "Payment" option.
From there, one can select a payment option. When you select Customer Account as a payment option, your payment will be confirmed. The payment is then entered in the Receivable Account when checking it.
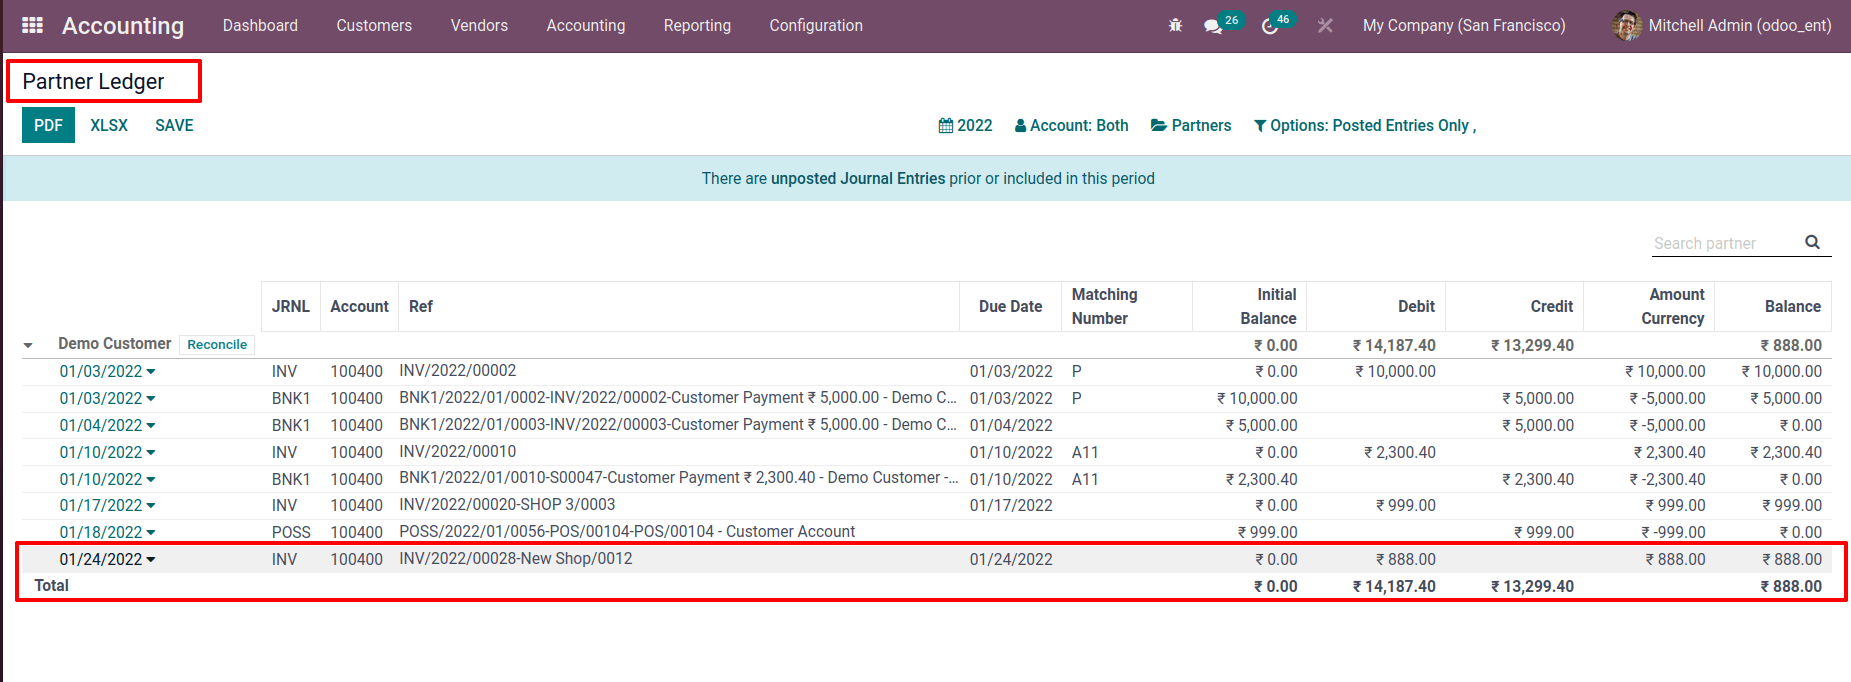
Check out the link below to learn more about the payment options used in a PoS session.
The Customer Account payment method is also briefly mentioned in the blog Payment Methods in Odoo 15 Point of Sale
Limited Products Loading
As previously stated, odoo15 allows us to exclude certain categories within a single session.
Sometimes, we simply needed to display a limited range of products at a time. So, in Odoo 15, a new feature called Limited Products Loading was included. If the salesperson prefers to display the most commonly utilized products during some sessions. The Limited Products Loading option can be used to create such a display. We can specify the number of products to display after enabling the option.
For this go to Point of Sale Sessions' Settings. From there, select Limited Products Loading under the Inventory section. There is a section where you may specify the number of products you want to display during the session.
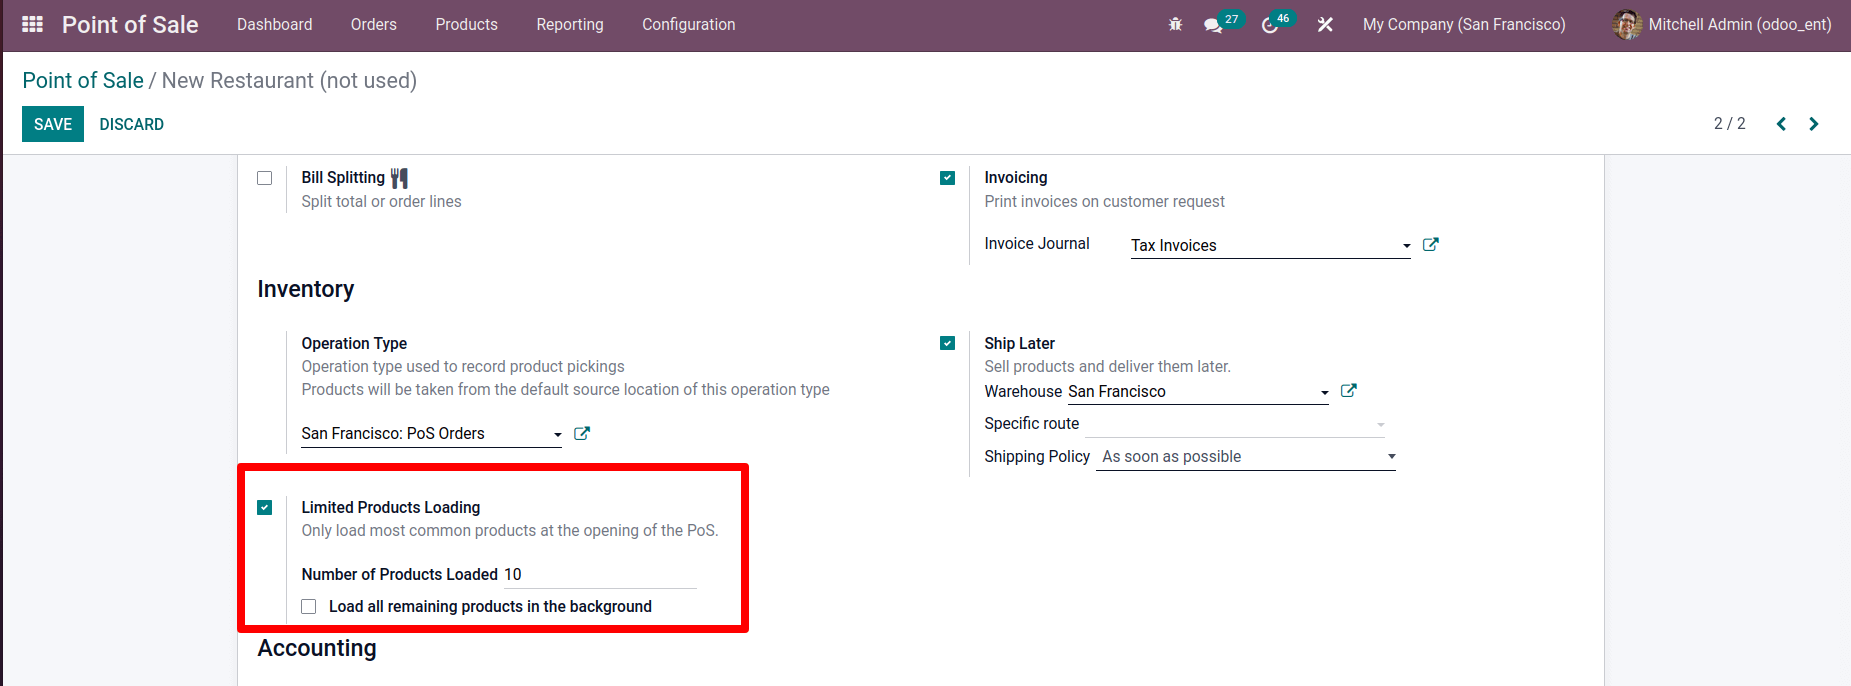
The product number is 10 in this case. As a result, the session displays the top ten most frequently utilized products.
A check box option is shown below it. Check the box below this option if one wishes to load all of the remaining products in the background.
Then, from the dashboard, start a new session. At the time, there were just ten products on display.
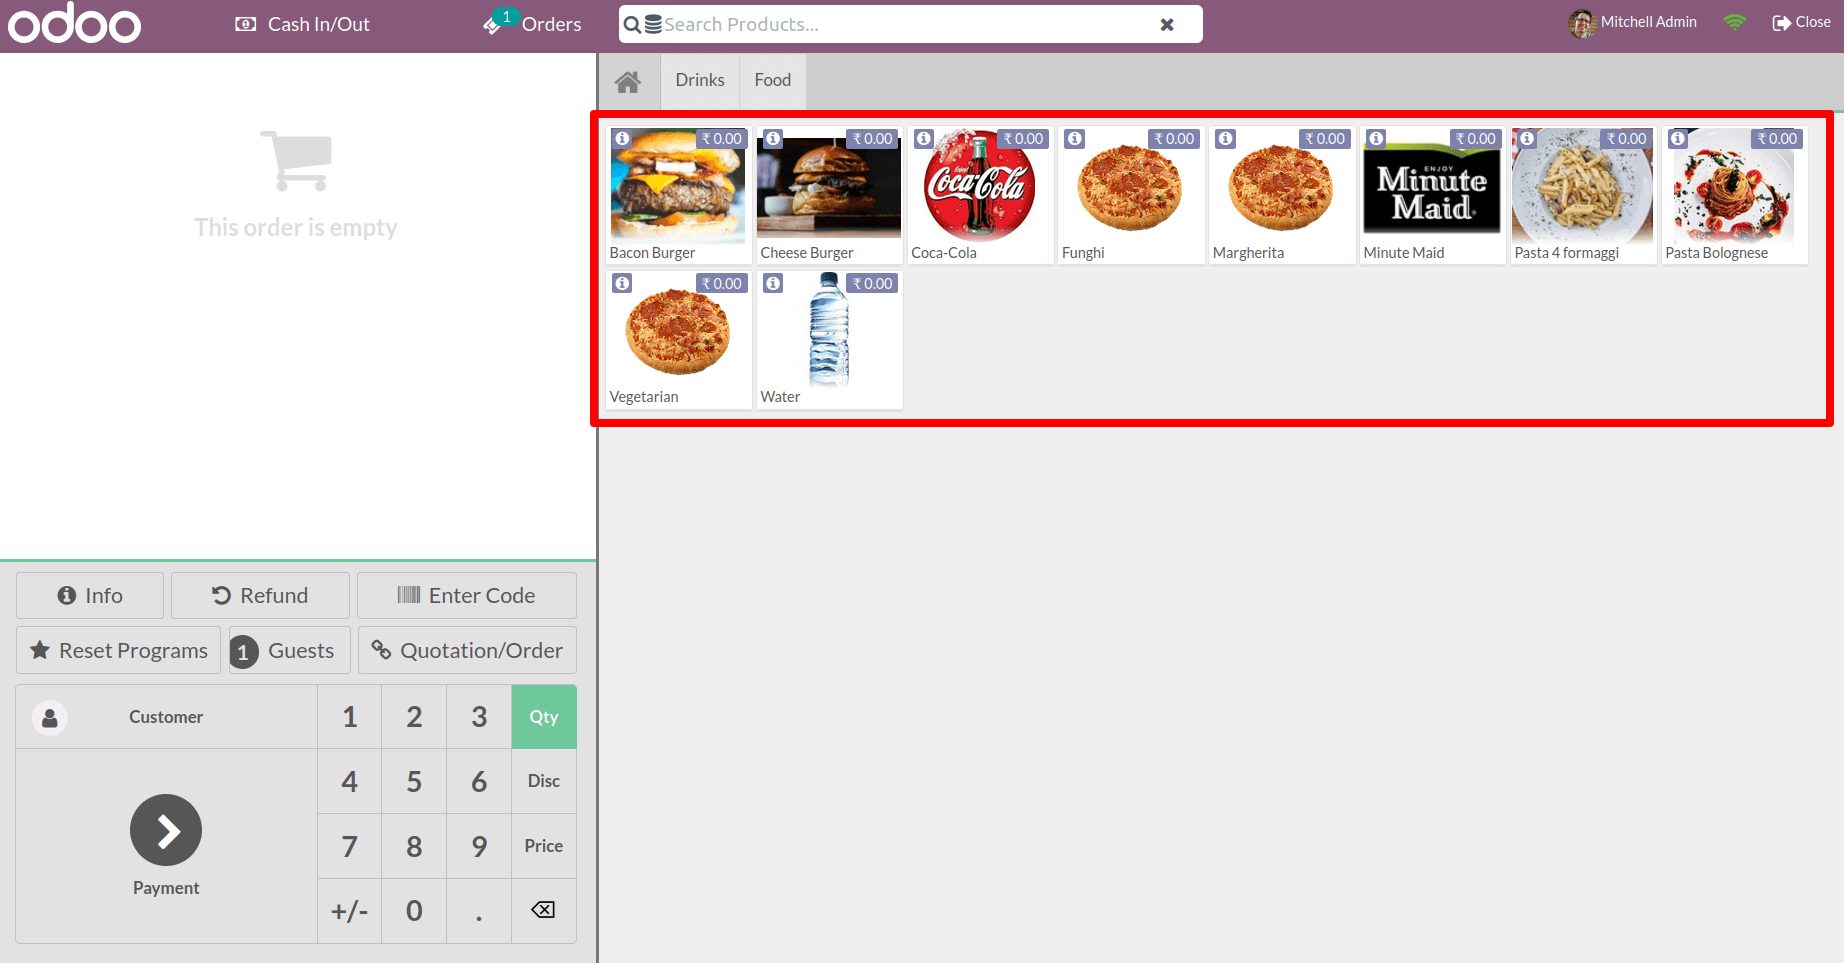
Because only a certain number of items are permitted to load at any given time, only a certain number of products are allowed to load at any given time, and the most recently utilized products in the session are displayed.
Limited Partner Loading
In a shop, there may be a huge number of customers. It is sometimes necessary to save all consumer information. However in each session, which is unnecessary and causes excessive difficulty. As a result, in such instances, salespeople just want to keep their regular customer list. To make it more realistic, Odoo15 added a new feature called Limited Partner Loading.
Limited Partner Loading is similar to the above-mentioned Limited Product Loading.
To get this option must first enable limited Partner Loading in the sessions settings. There appears to be an option to specify the number of partners to load in the session at the start.
Number 5 is set here. As a result, when the salesperson opens the session, he or she only wants to add five recently used customers to the list.
If you want to load others in the background, check the box next to Load all remaining partners in the background

From the dashboard, one can start a new session. The session will then open and will be able to view a list of customers by clicking on the Customer button.
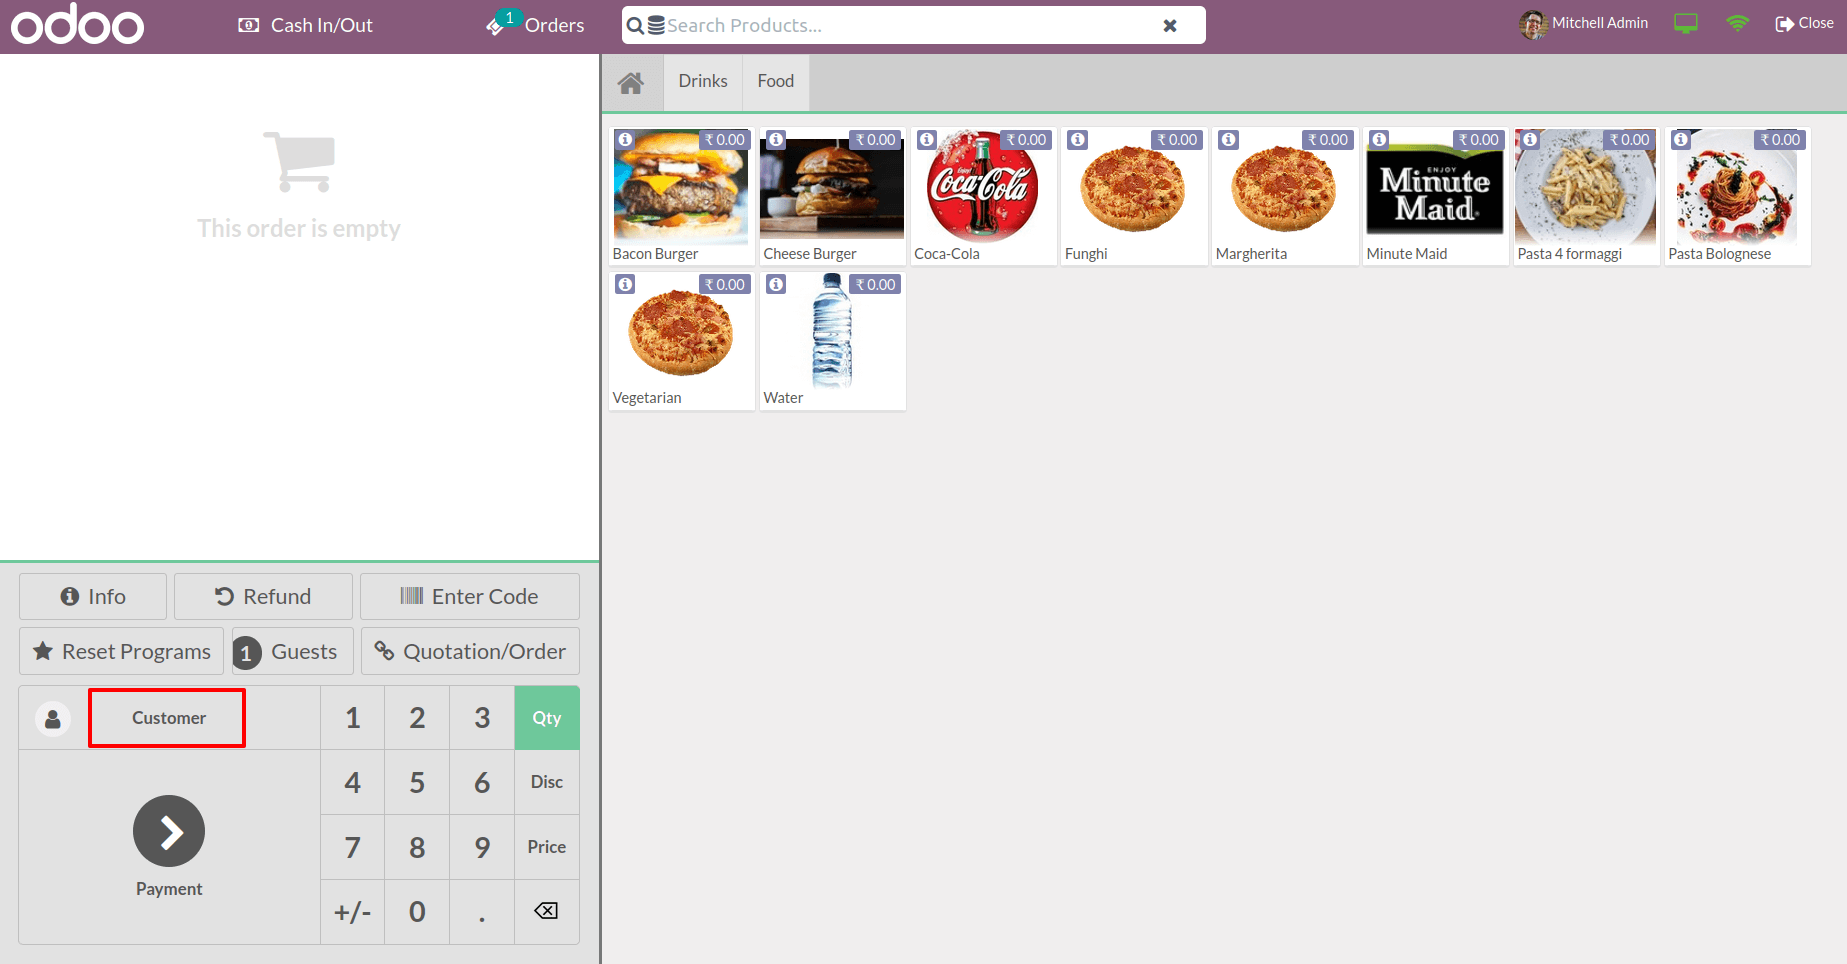
In the list, there are only 5 recently used customers.

It's because the session only allows for 5 customers to be displayed on the backend. As a result, the five most recently used customers are shown first.
Ship Later
It is not always possible to send products at the same time as the order is verified or immediately after payment is received. If the salesperson requires additional time for delivery after payment has been received, select the option Ship Later. This feature was first included in Odoo's 15th version.
Let's have a look at how to use this option.
As previously stated, the option must be enabled in the session settings. Under Inventory, there is an option to Ship Later. Simply select the option.
It is possible to set the warehouse after enabling the Ship Later option. Any specific route for product delivery can be mentioned afterward. Choose the appropriate way from a selection of options such as Buy, Manufacture, and so on.
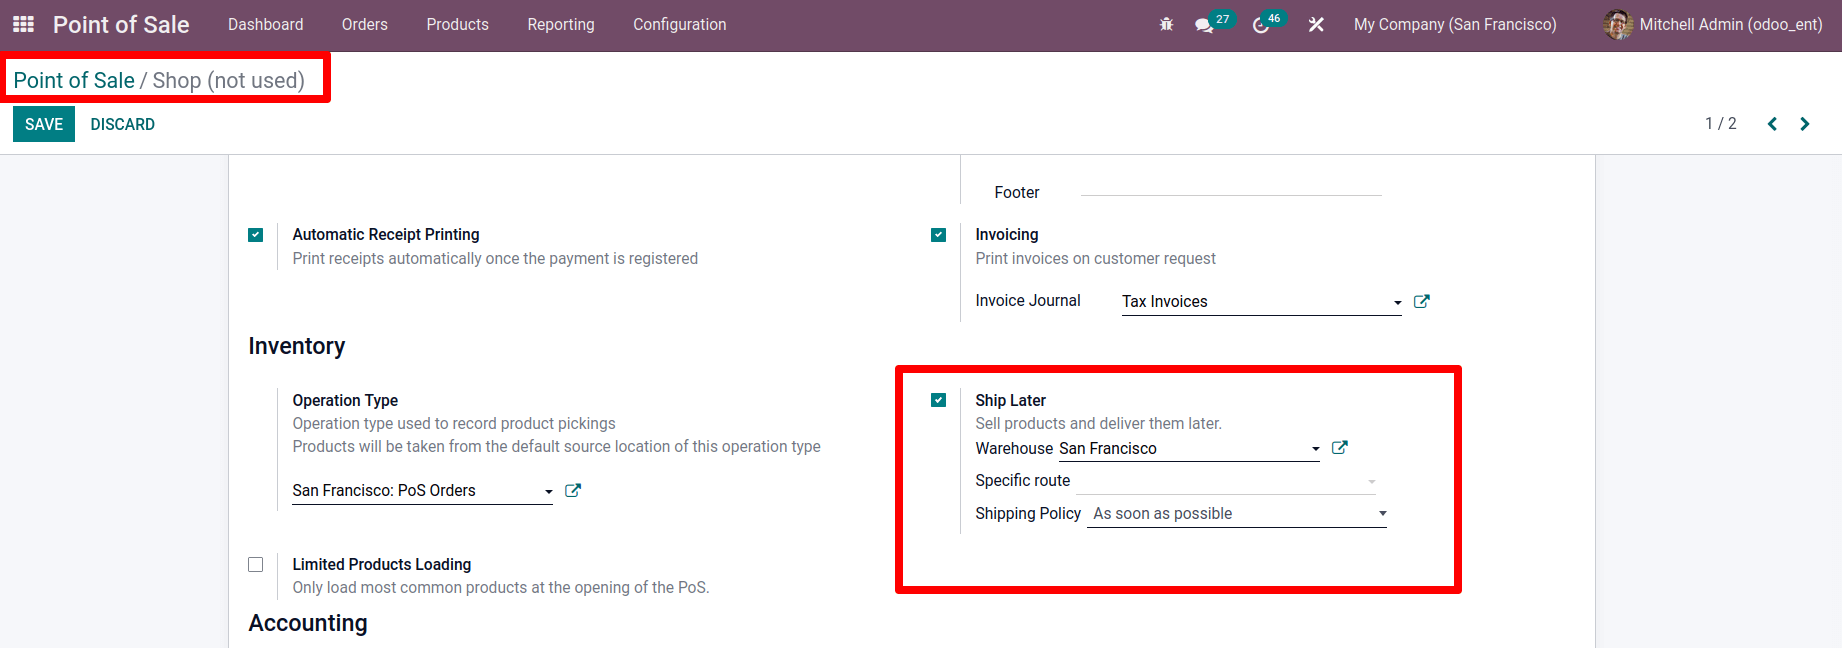
There are two different shipping policies to choose from. The first is as quickly as feasible, and the second is only once all products are ready.
Save the page when you've made the appropriate modifications.
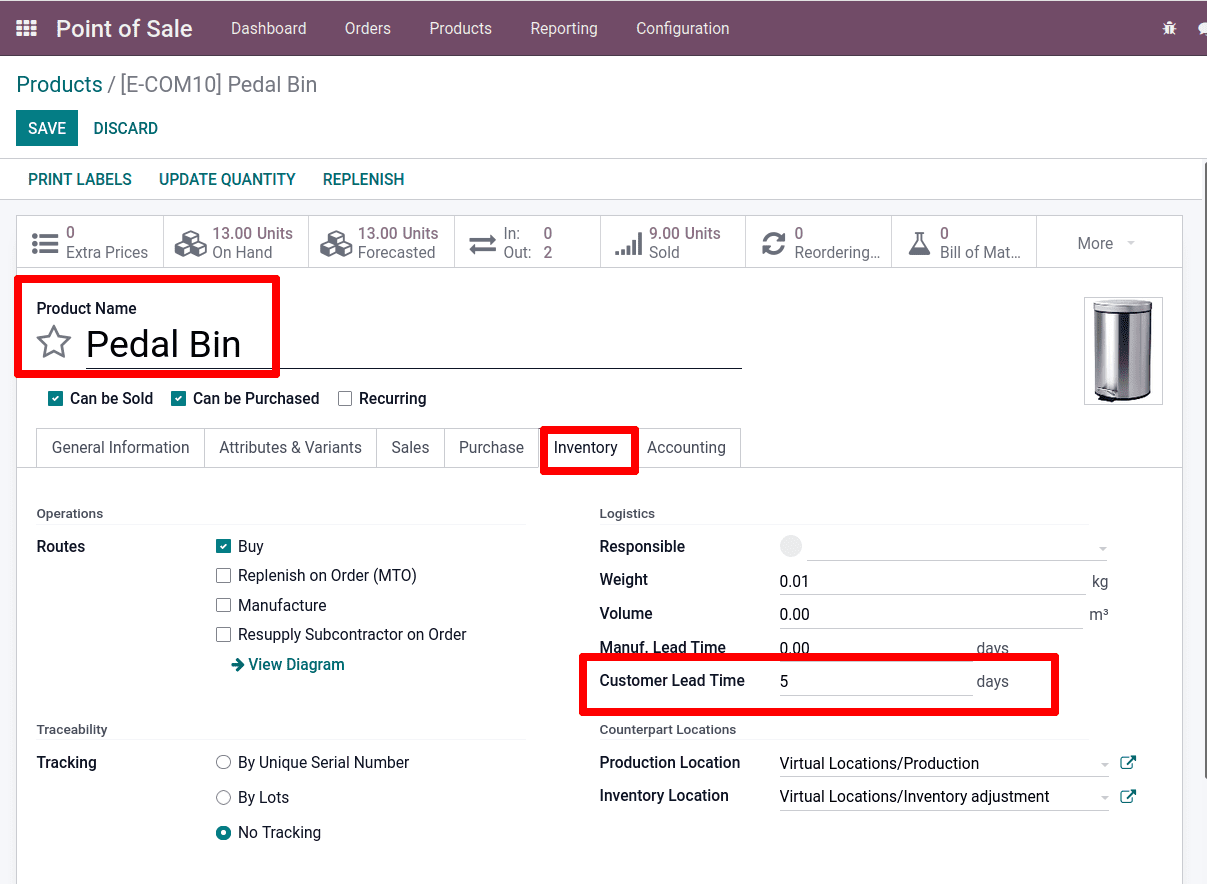
Here's a product called Pedal Bin that has a 5-day customer lead time.
The delivery lead time is referred to as the customer lead time. The time between confirmation of a sale order and delivery is days. The number of days guaranteed to the customer for delivery is known as the customer lead time.
As a result, the delivery dates for this product have been set for 5 days after the sale order has been confirmed.
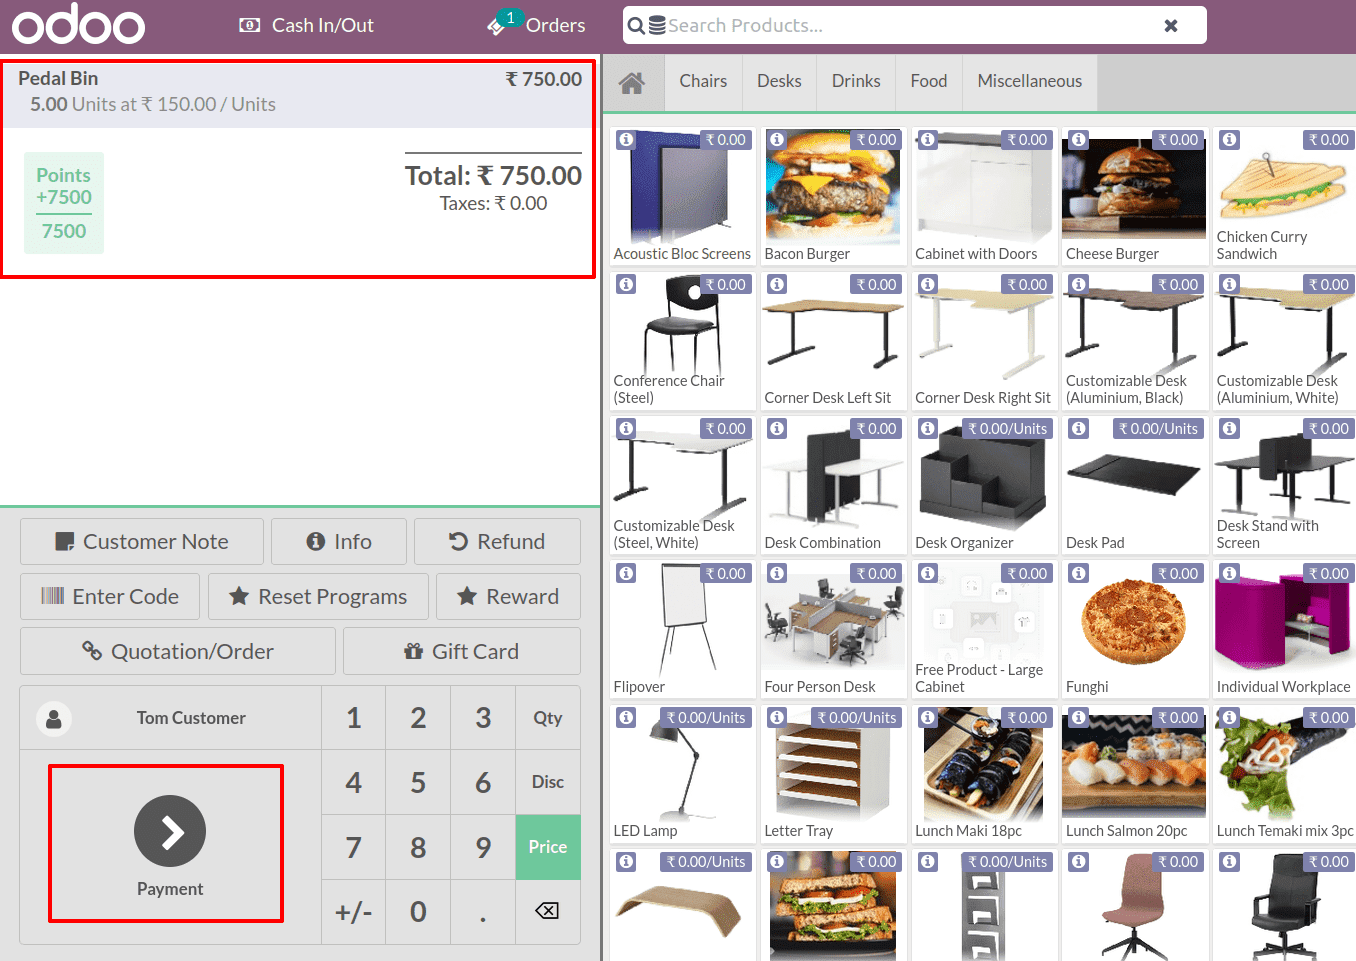
Start a new session from the dashboard to examine the execution of the ship later option while selling this product Pedal Bin. Then go to a session, add a customer, and choose the product Pedal bin. Add a price and quantity to the product, and then go to the payment button to complete the transaction.
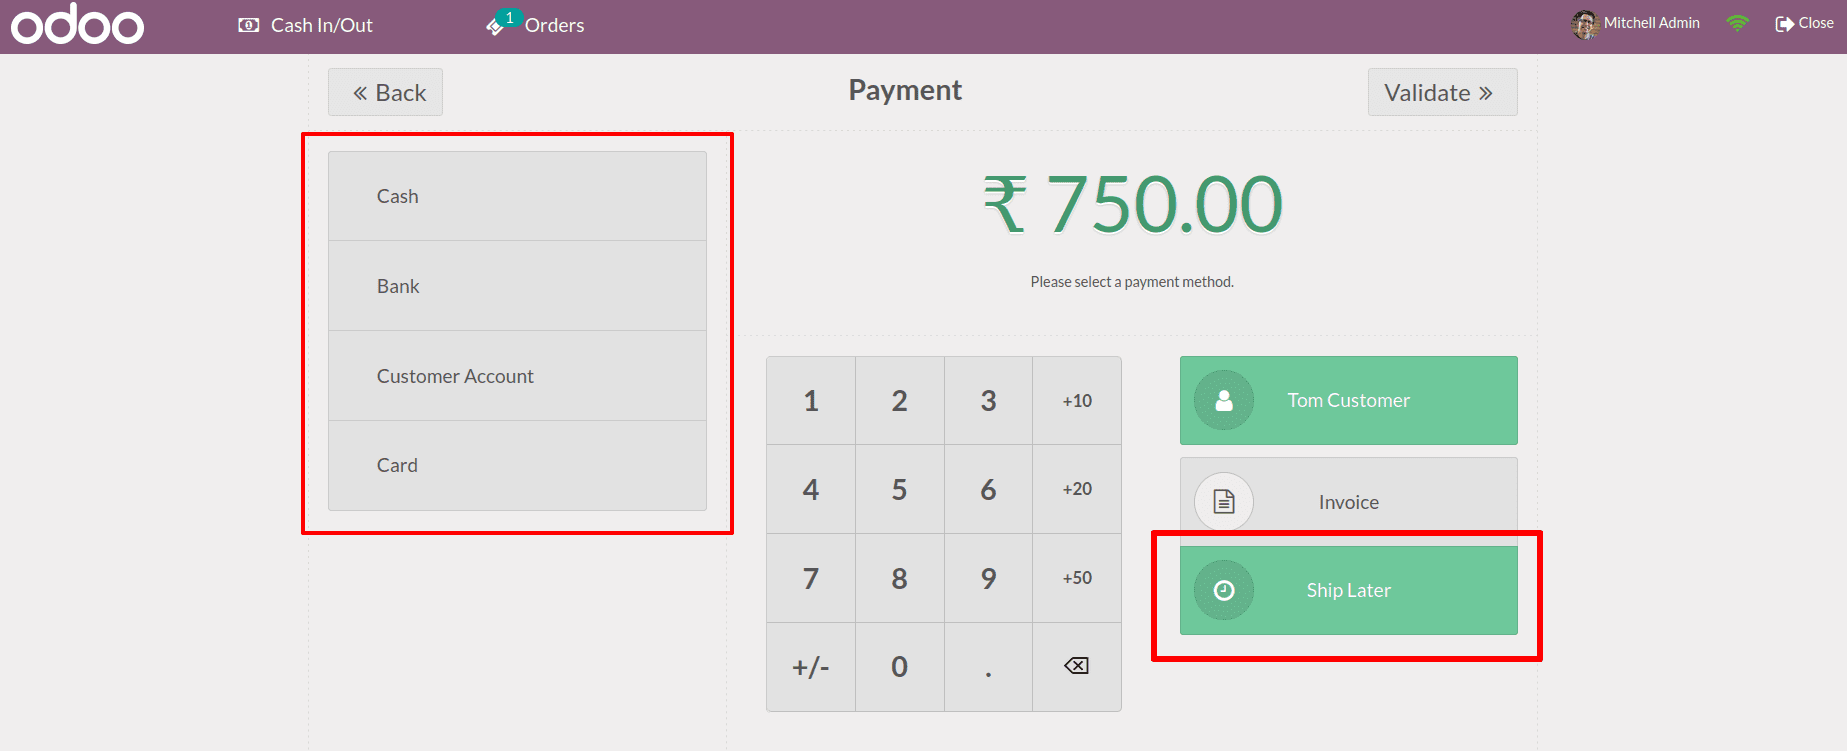
Choose a payment method from the drop-down menu on the payment page. On the right side, under the customer's name, there is a Ship Later option. If it is not possible to deliver the order right now, select this option.
A receipt is displayed after the payment has been completed.
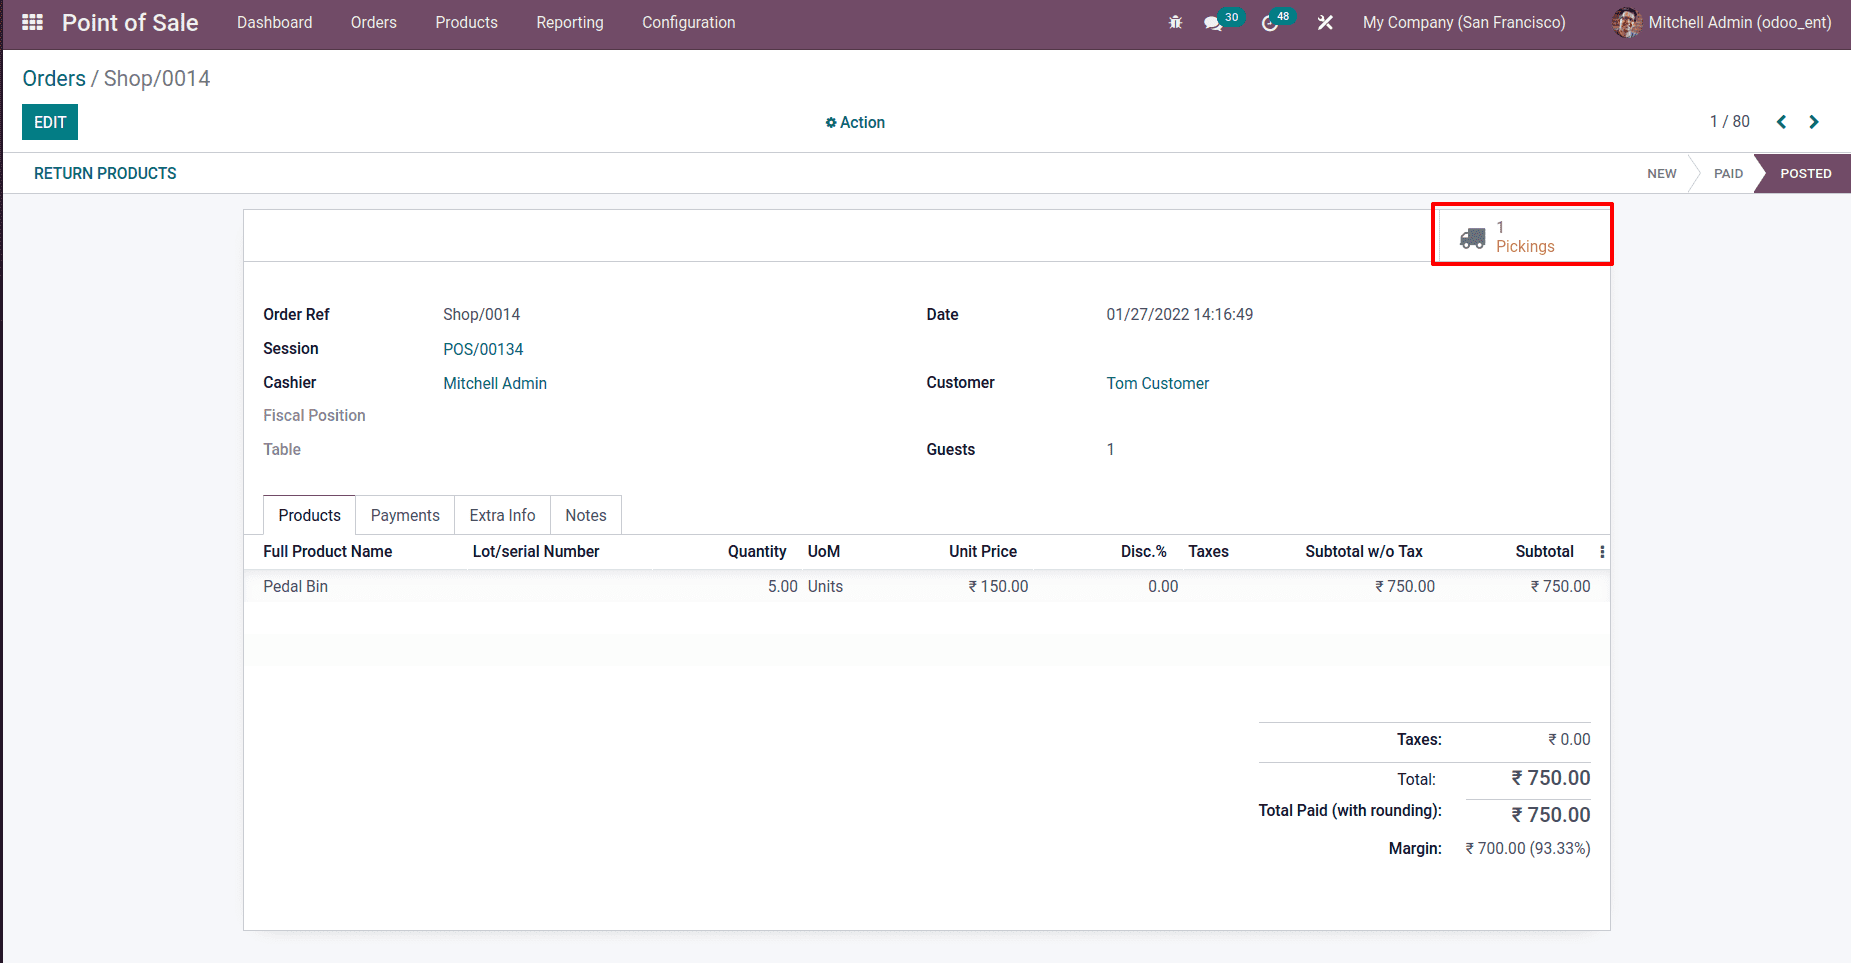
After closing the session, go to the back end and look for the order set. To do so, go to the orders tab and choose orders from there. All of the orders that have been created are displayed there.

Select the created order for Tom Customer from the list. The order should be opened
There's a smart tab called ‘1 Picking’. Open it.
When you open the Picking, a delivery order appears.
From there, one can deliver the product to the consumer on the specified day.
Click the Validate button to finish this delivery.
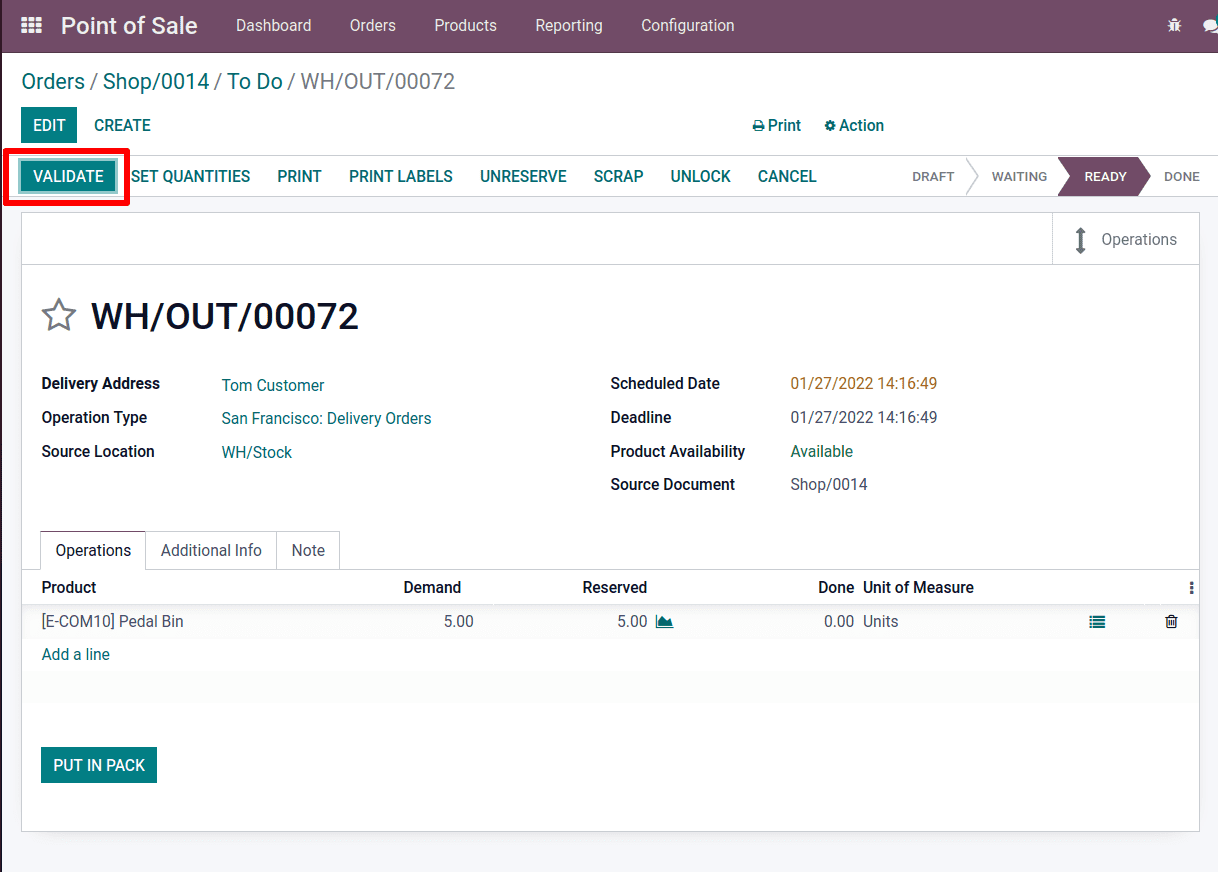
The delivery is then completed. The product is dispatched a few days after the order is placed.
Payment has already been made prior to delivery.

Refund
After a product is sold and payment is received, there is a risk that the product will be returned.
If a buyer returns goods for whatever reason, it is possible to get a refund. They can either return the entire quantity of the product they received or a fraction of it. This may be dependent on the preferences of the customers.
As a result, Odoo15 has a functionality that allows you to perform the action. This product return is also possible from the backend in Odoo 15.
In this case, we're making an order for a customer from the session. Customers and products should be chosen. Here, selling 6 units of the product to a customer.
After that, the customer must make a payment then deliver the product.
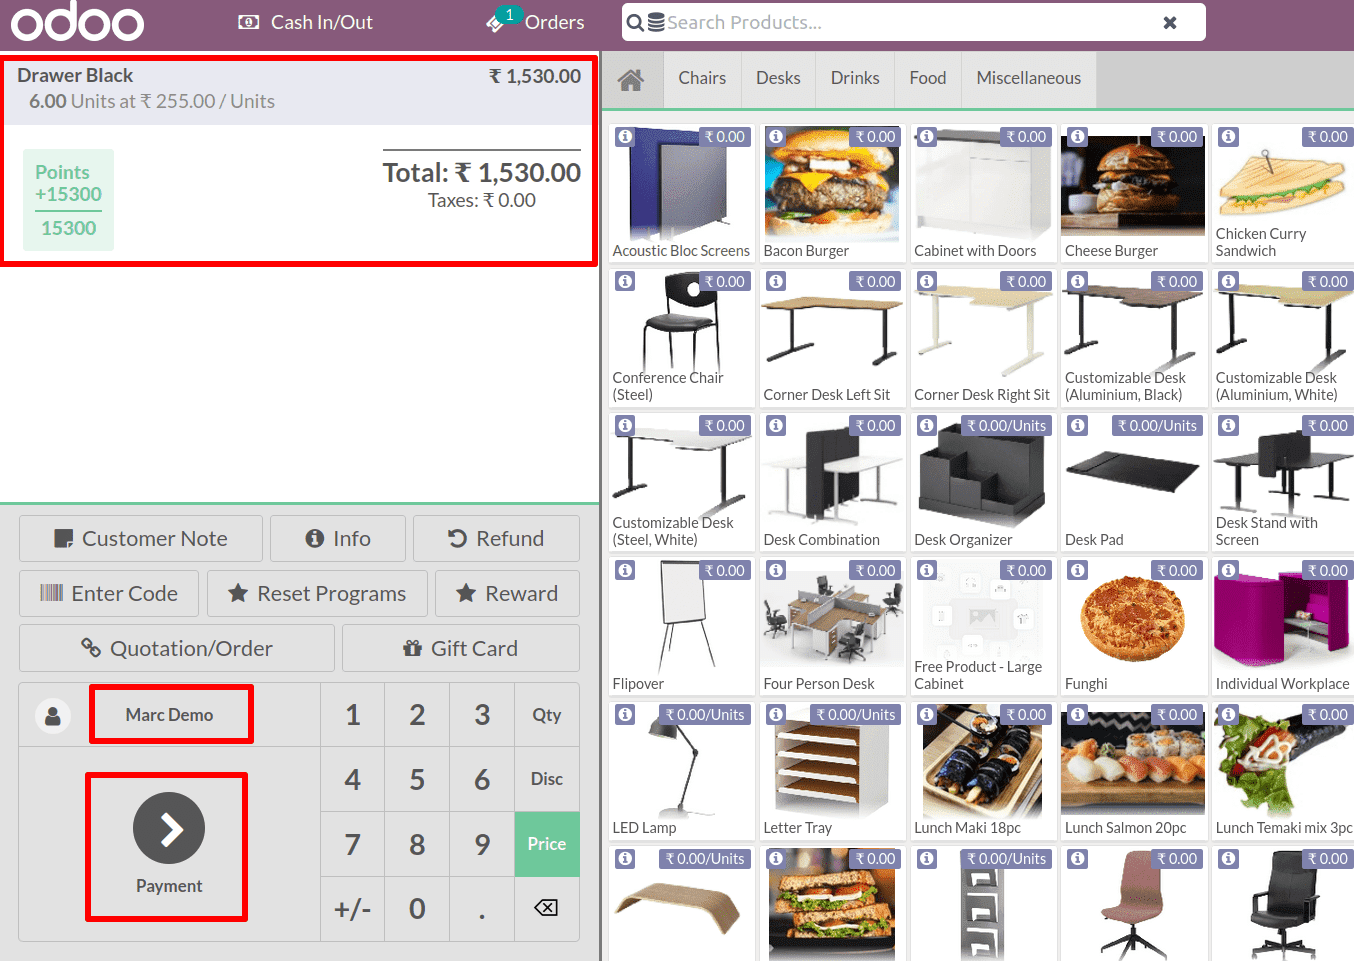
Keep the session open.
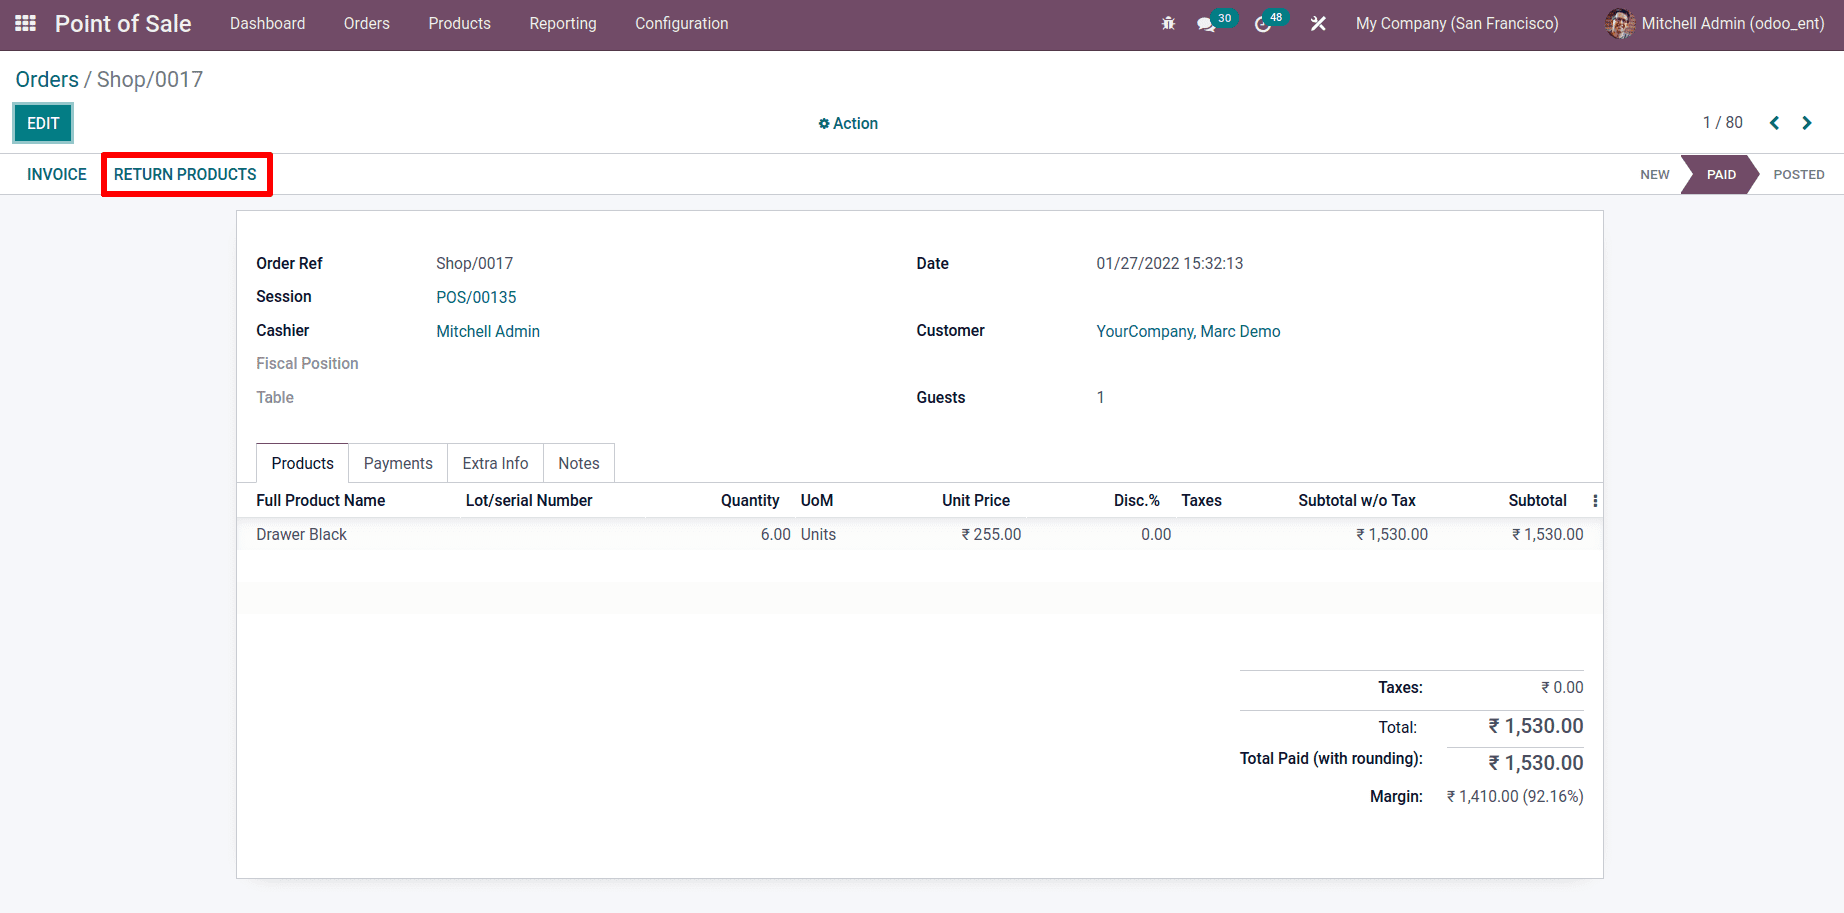
Then, from the back end, double-check the order. Select Order from the Orders tab.
Choose the newly formed order from the list. There is a Return option available. Please click on it.
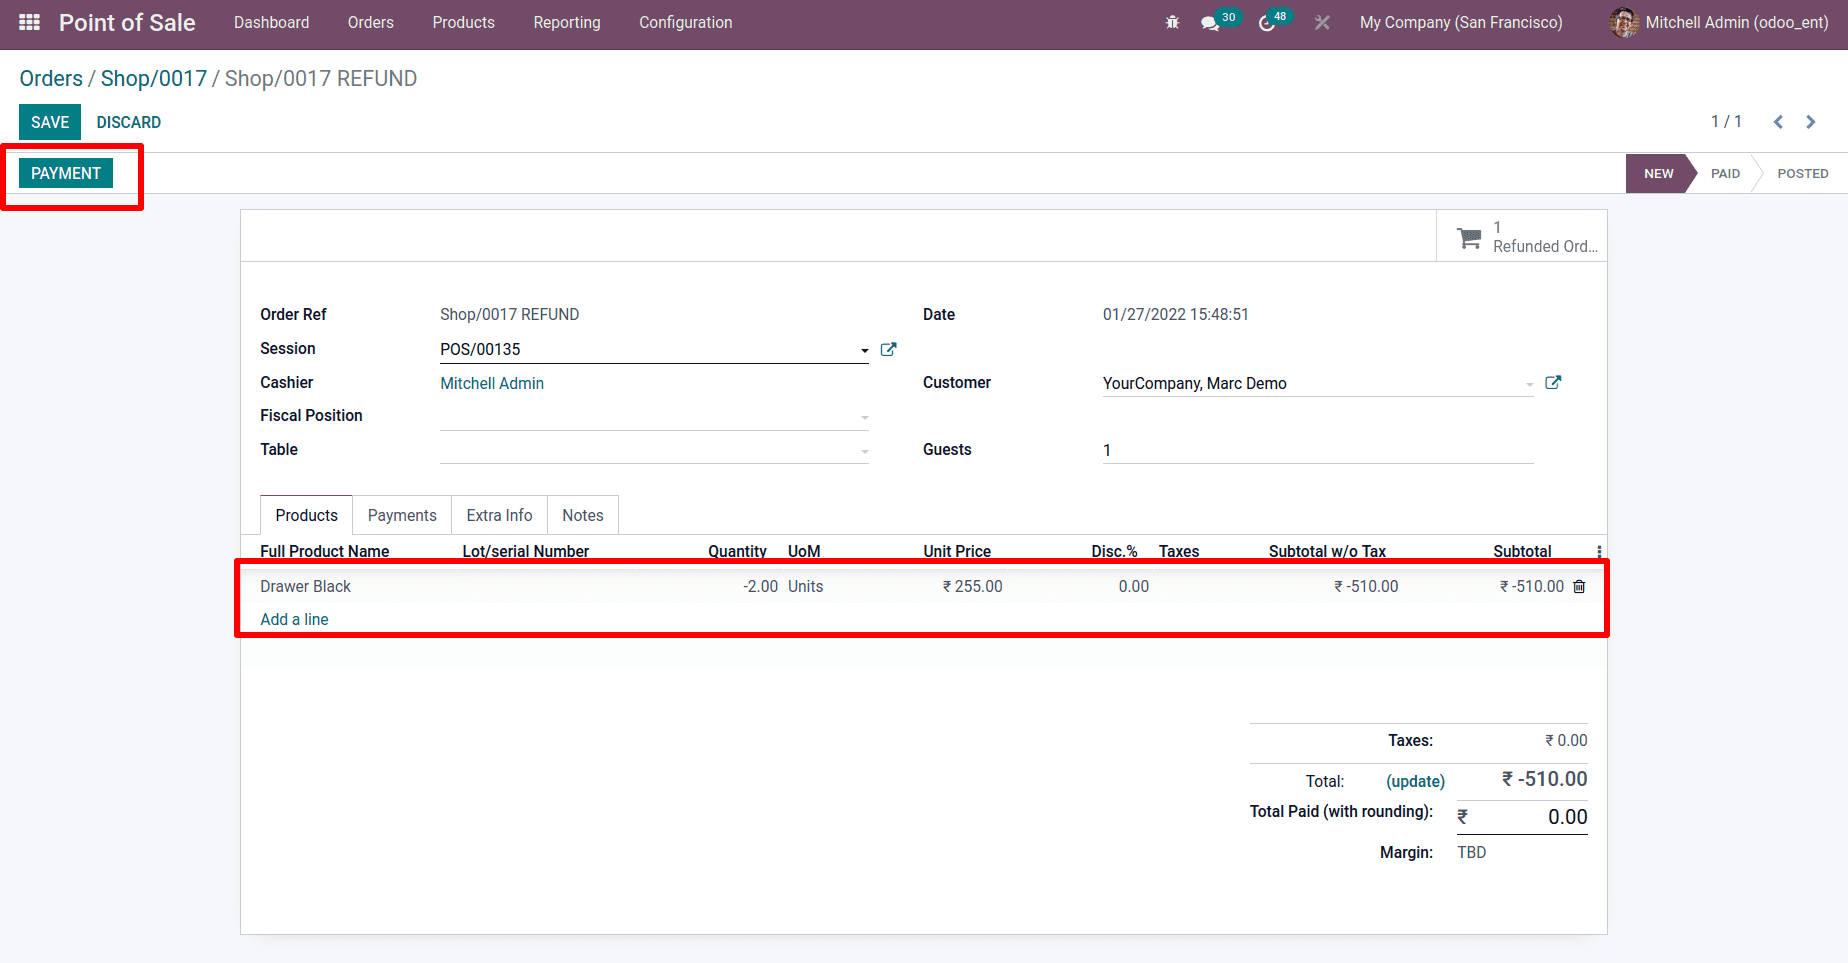
Then there'll be a return order there that can increase quantities to. If the consumer wishes to return the entire product, enter the sales quantity. Only two quantities of product are returned here, thus updating the quantity to two.
Because the product has been returned to stock, the quantity should be listed as a negative number.
When one adds a return quantity, the relevant amount rate is automatically added.
Then there's a Payment button, which can be used to create a credit note by clicking it.
When you click the Payment button, a small wizard displays the payment method and amount displayed.
It might be possible to provide a payment reference there. Then click on the Make Payment.
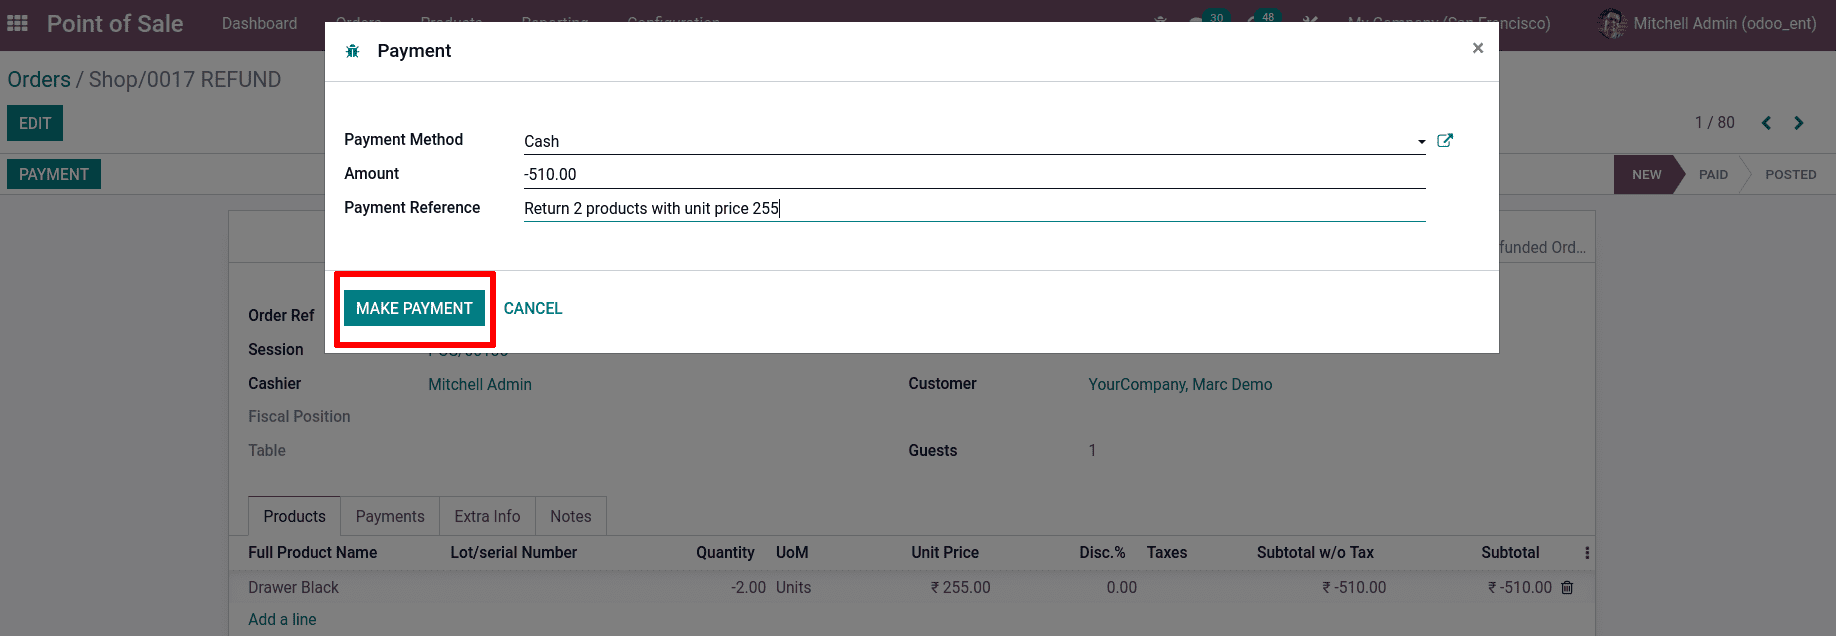
Then return two quantities of product and receive a refund for the difference. Check out the blog Managing Product Return in Odoo 15 PoS
Customer Display
When a customer visits a session, they must first place an order and then pay for it. It is then possible to create an invoice, as well as a receipt. This is the regular course of events throughout a session. The customer enters to make payment after completing selling orders.
It's excellent when customers can see their order on the screen. As a result, Odoo15 added a new feature called Customer Display. This option must first be enabled in the session settings before it can be used. When opening a session's settings, there is a Customer Display option. Activate the option, then save changes. Now through a second display, the customer receives a check-out display.

Then, from the dashboard, start a new session.
Enter into the session. Add a customer and some products. After placing an order, a small green computer symbol appears on the right side of the screen. This is the customer display.
We can see all of the order details there. Make payment after that.
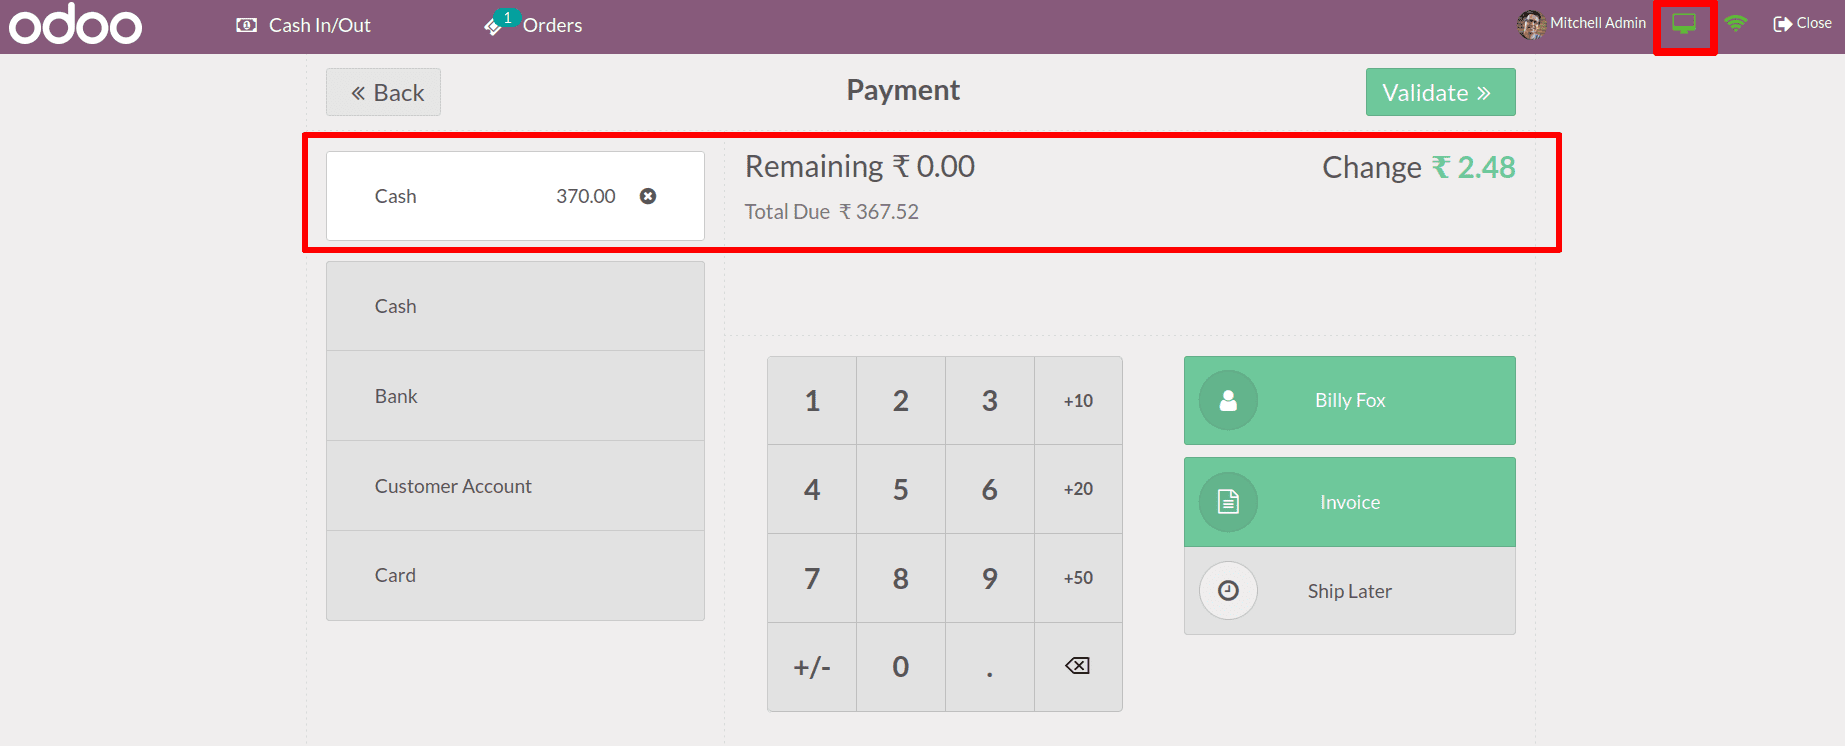
We can also see the display on the payment page.
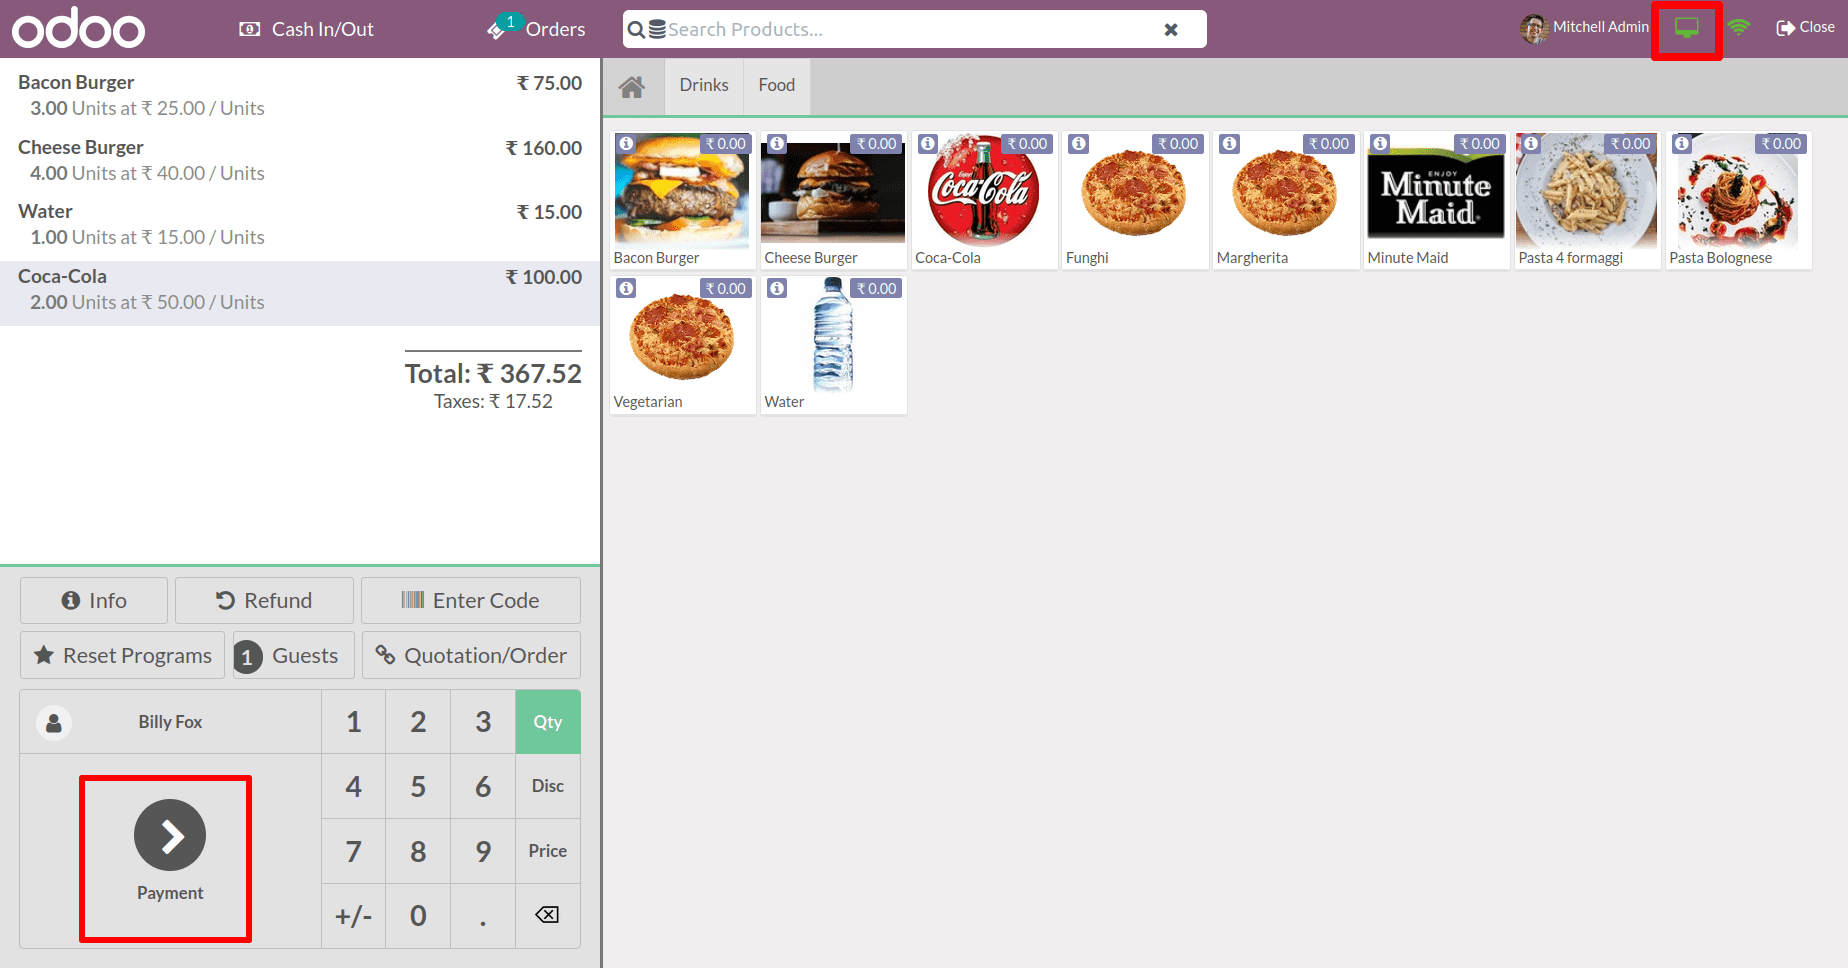
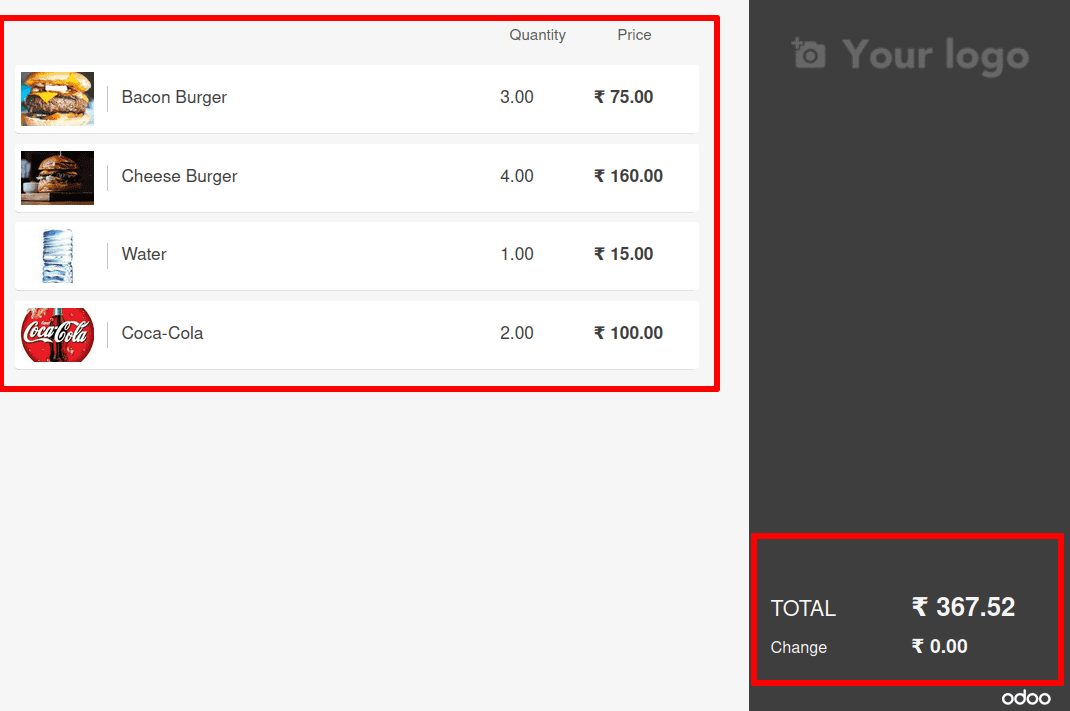
While the customer display is open, it displays the ordered products together with their price and quantity. The entire sum and change are also displayed.
The consumer needs to pay $367.52 in this case. He did, however, pay 370. As a result, there is a change of 2.48. Choose a payment option and validate the transaction.
The receipt is created after the payment has been made. At this time, while checking the customer display, the ordered product, the quantity ordered, and the price of the corresponding product is shown.
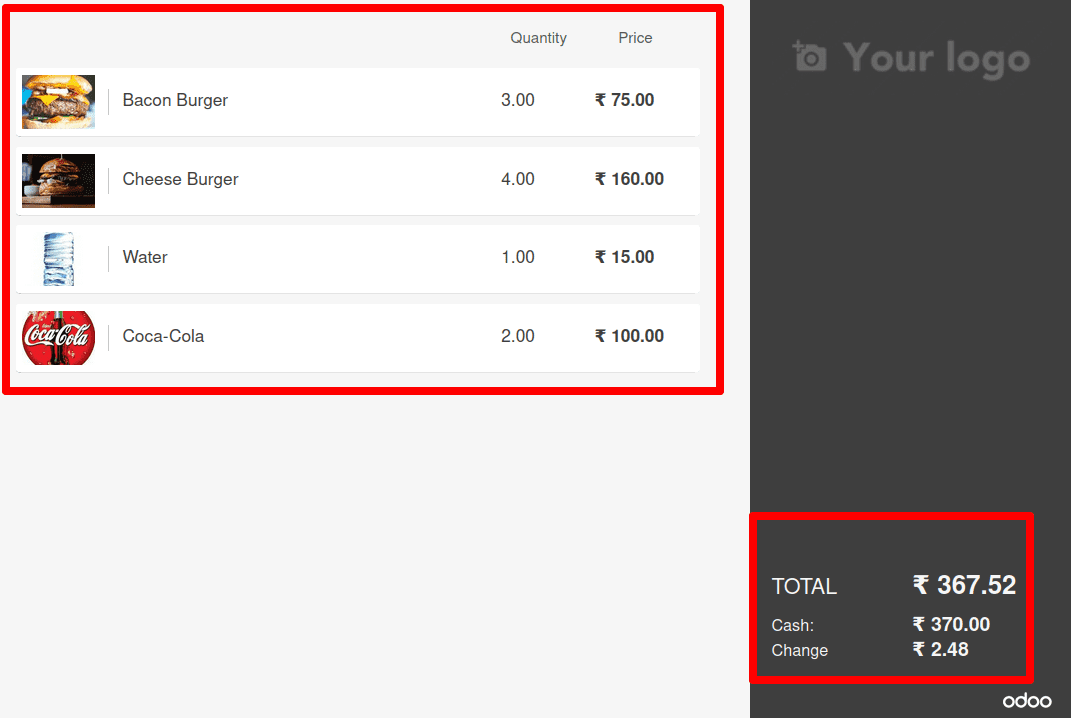
After the payment is completed, the customer's display includes payment details such as the total amount and the payment method selected by the client. If there are any changes, they will be displayed there as well.
Coins/Bills
There may be opportunities to use coins during a session. While starting a new session, the salesperson can add some opening balance. Similarly, while ending a session, he must also enter the session's closing balance. In such instances, it may be necessary to use coins.
Odoo15 included a new functionality called Coins/Bills to help with this.
Let's move on to the session settings options. There is a Coins/Bills option.
From the drop-down menu, one can select coin values.

The chosen coin values are then displayed in the session and can be used to record either an opening or closing balance.
Go to the dashboard after saving modifications. One can then start an fresh session from there.
A little window named OPENING CASH CONTROL appears when a new session.
The shop's opening balance can be added by the salesperson. There is a calculator symbol.
When you open it, the selected coins are displayed.
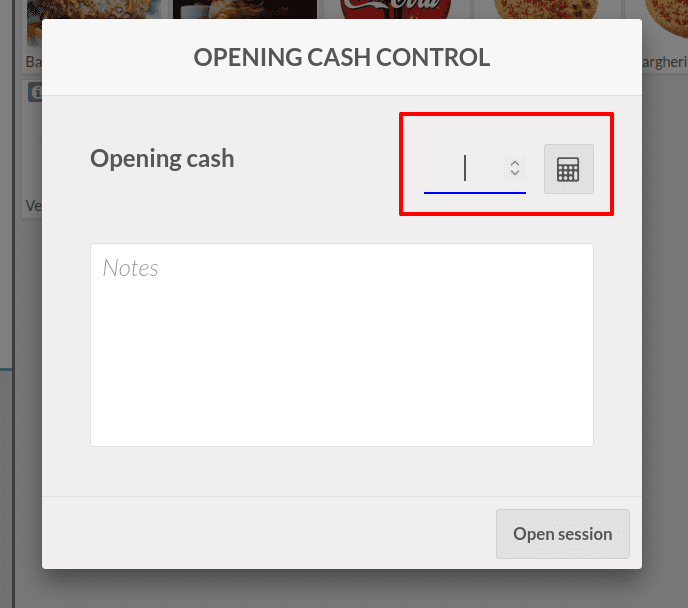
There, one can enter the number of coins to be added. The matching numbers were then updated in the Total field below. So that the salesperson can add the required money to the initial balance. Then double-check it.
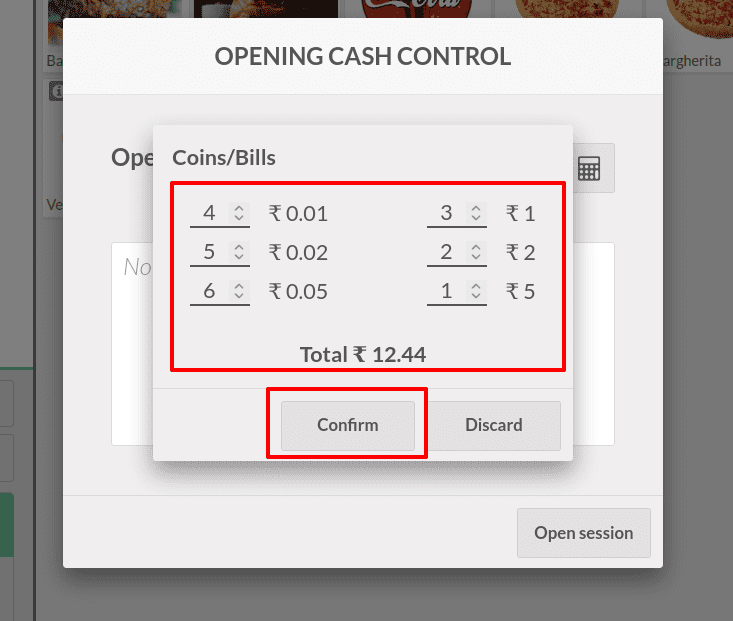
The total quantity of the new coins has now been added to the opening cash.
There are also the details of the new coins and numerals.
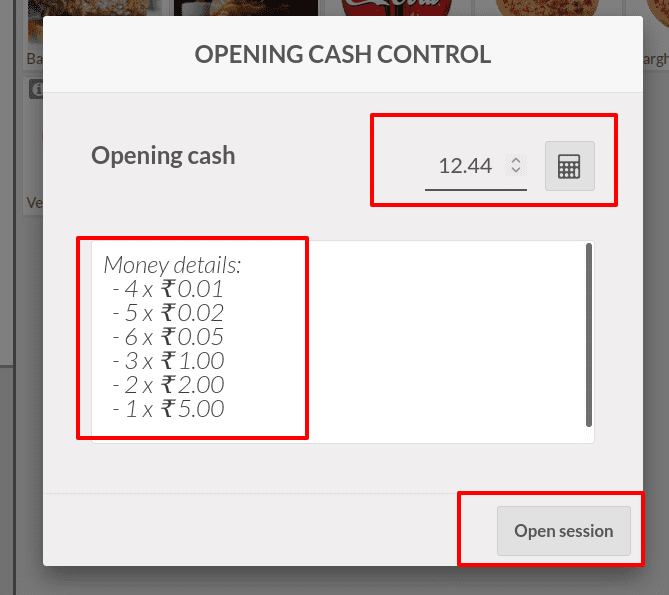
To start the session with this amount click on the button Open session.
Similarly, when a salesperson closes a session, he or she wishes to update the closing balance amount. So use these coins at that time as well. The information of sales made during the session is displayed in the CLOSING CONTROL window.
There is a display of the entire amount in cash, bank, and others. The opening balance as well as the added money details are displayed separately. And, as in the opening balance, there is a calculator symbol. The closing balance can then be added using Coins.
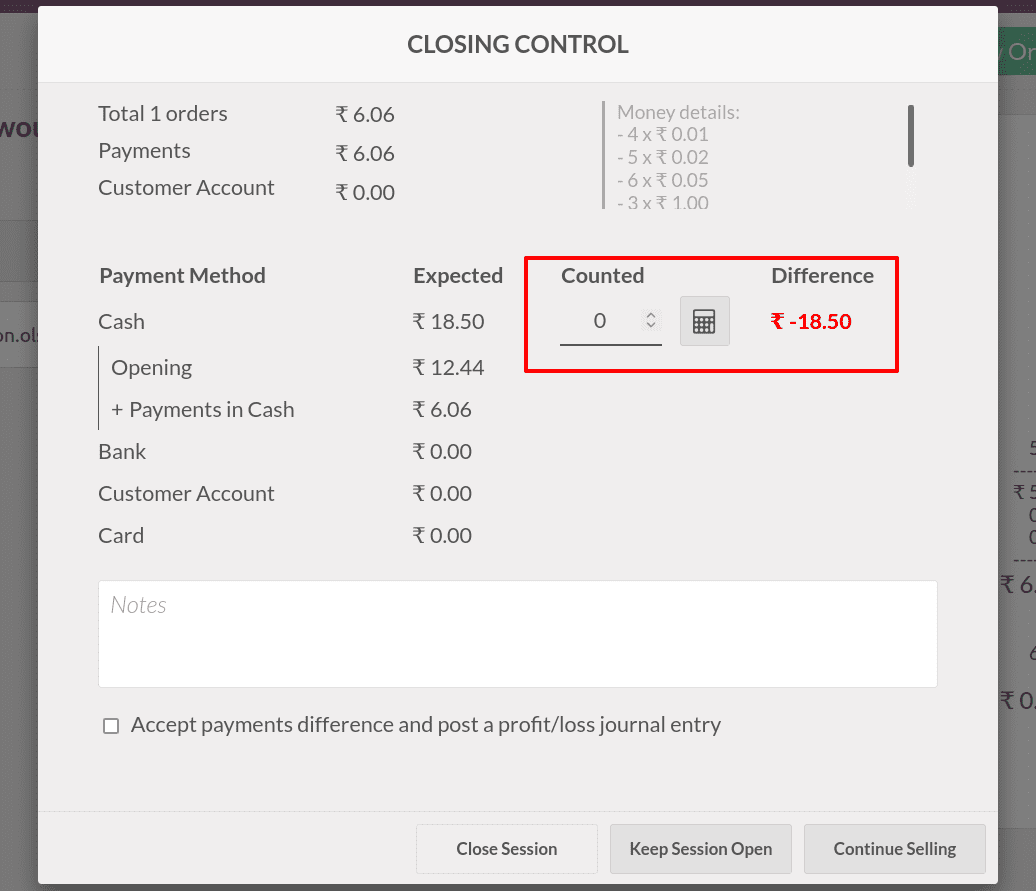
There is an 18.50 balance. As a result, select the number of coins that corresponds to that value.
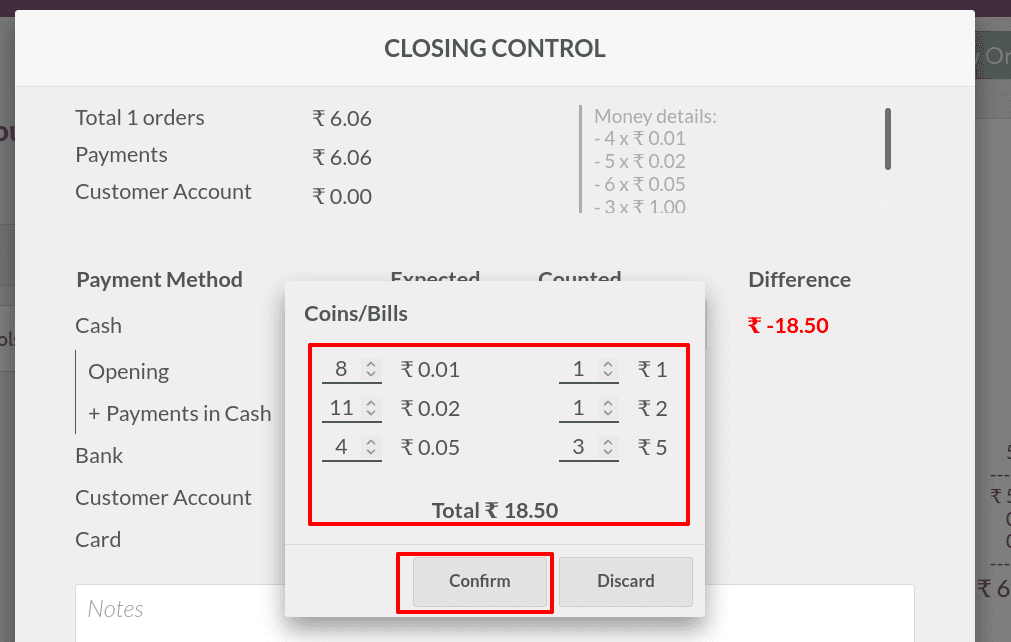
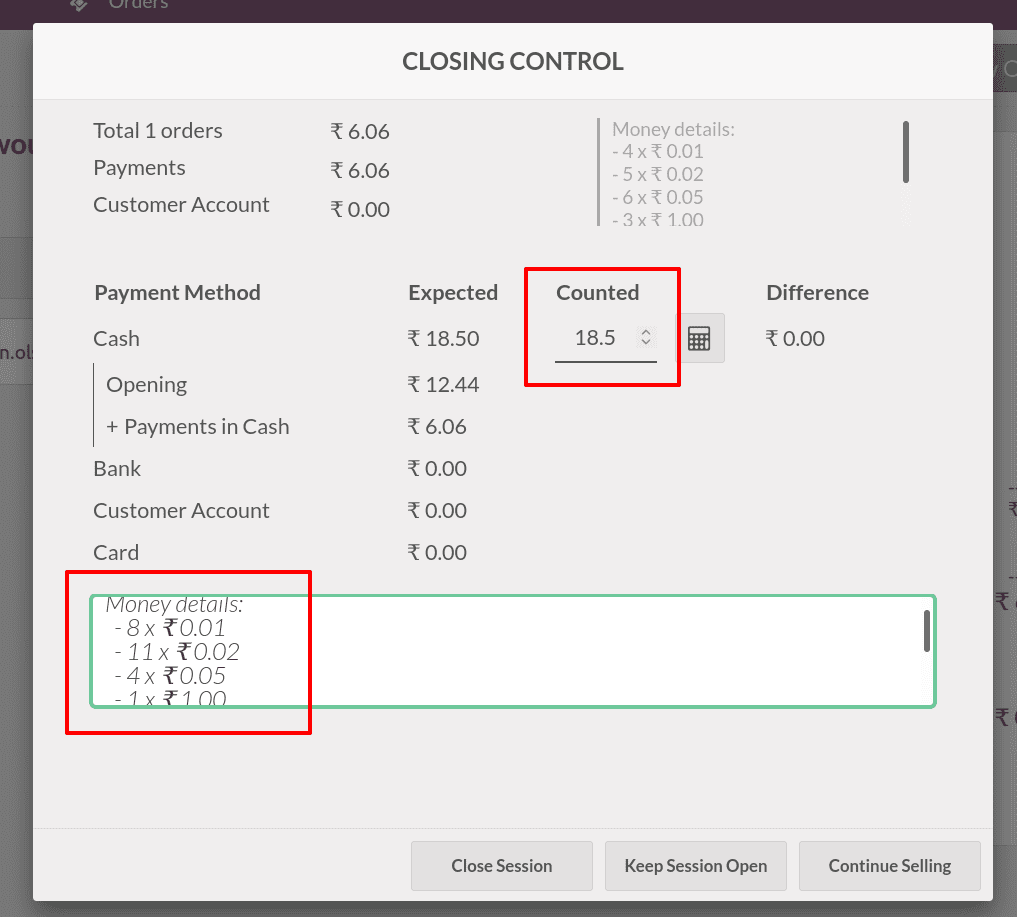
The value in the Counted field is updated when you confirm it. Then the financial information is included. The session can then be closed as desired.
Open Product Info
When a customer enters a session, all of the products are displayed there.
The customer can choose from a list of products. Every product has its own set of characteristics. The product vendor, the time it takes to deliver the product to the customer, the price list, and other factors may differ. If a buyer has chosen a product, he may be interested in learning more about it.
As a result, Odoo15 added a new feature to meet this need. This stands for Open Product Information. When this option is enabled, the customer receives all of the product's details prior to ordering it.
Let's go to the session settings to enable this option. There is an option to Open Product Information from there. From there, one can enable the option. When products are added to the cart, a product information page appears in the session. After adding changes, save the page.
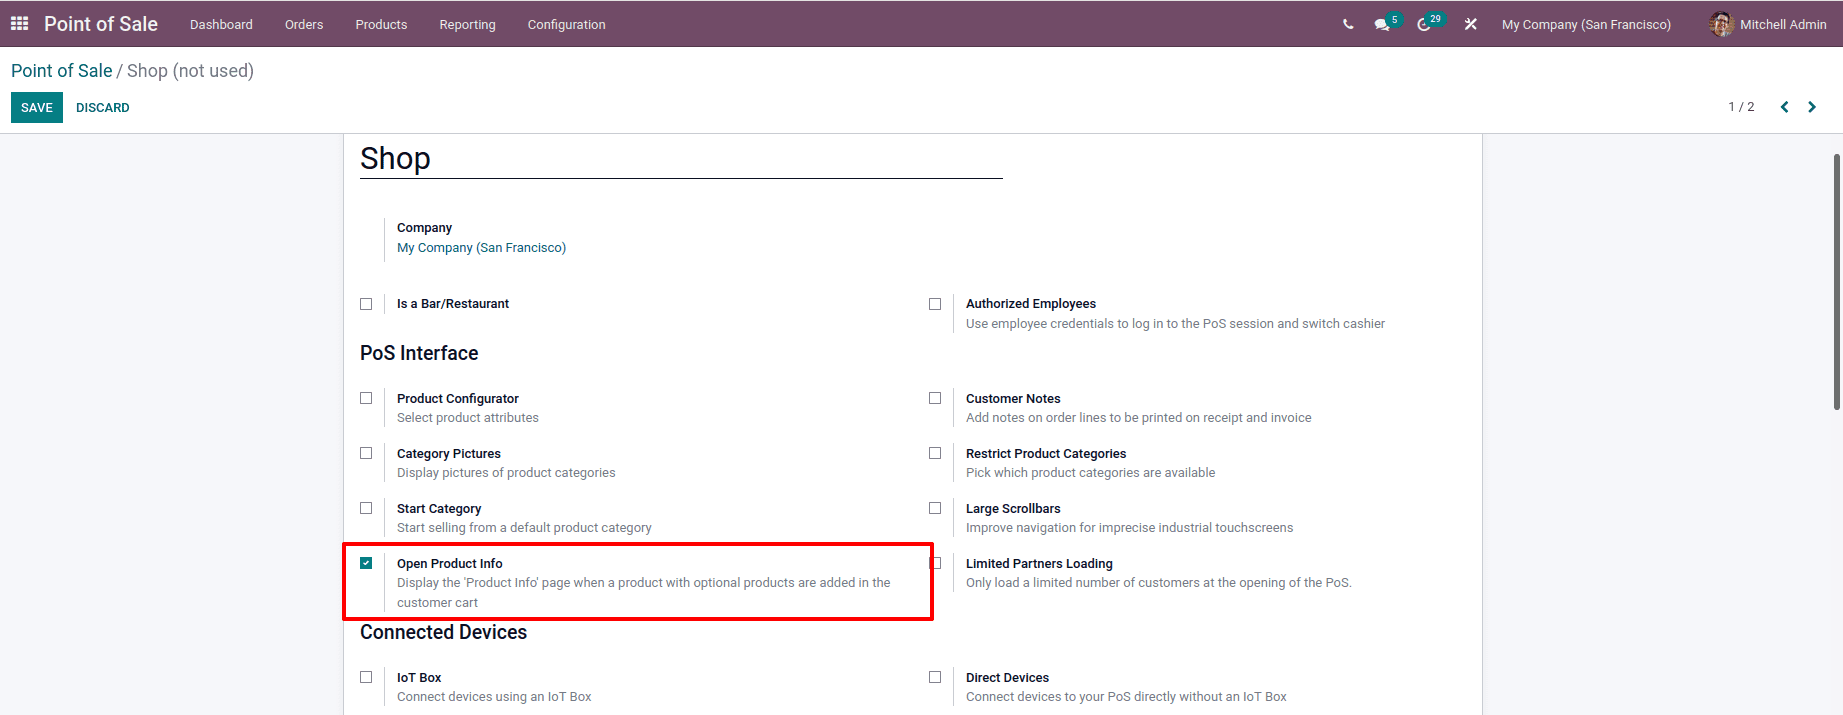
Then, from the dashboard, start a new session. When the session starts, a new button called Info appears.
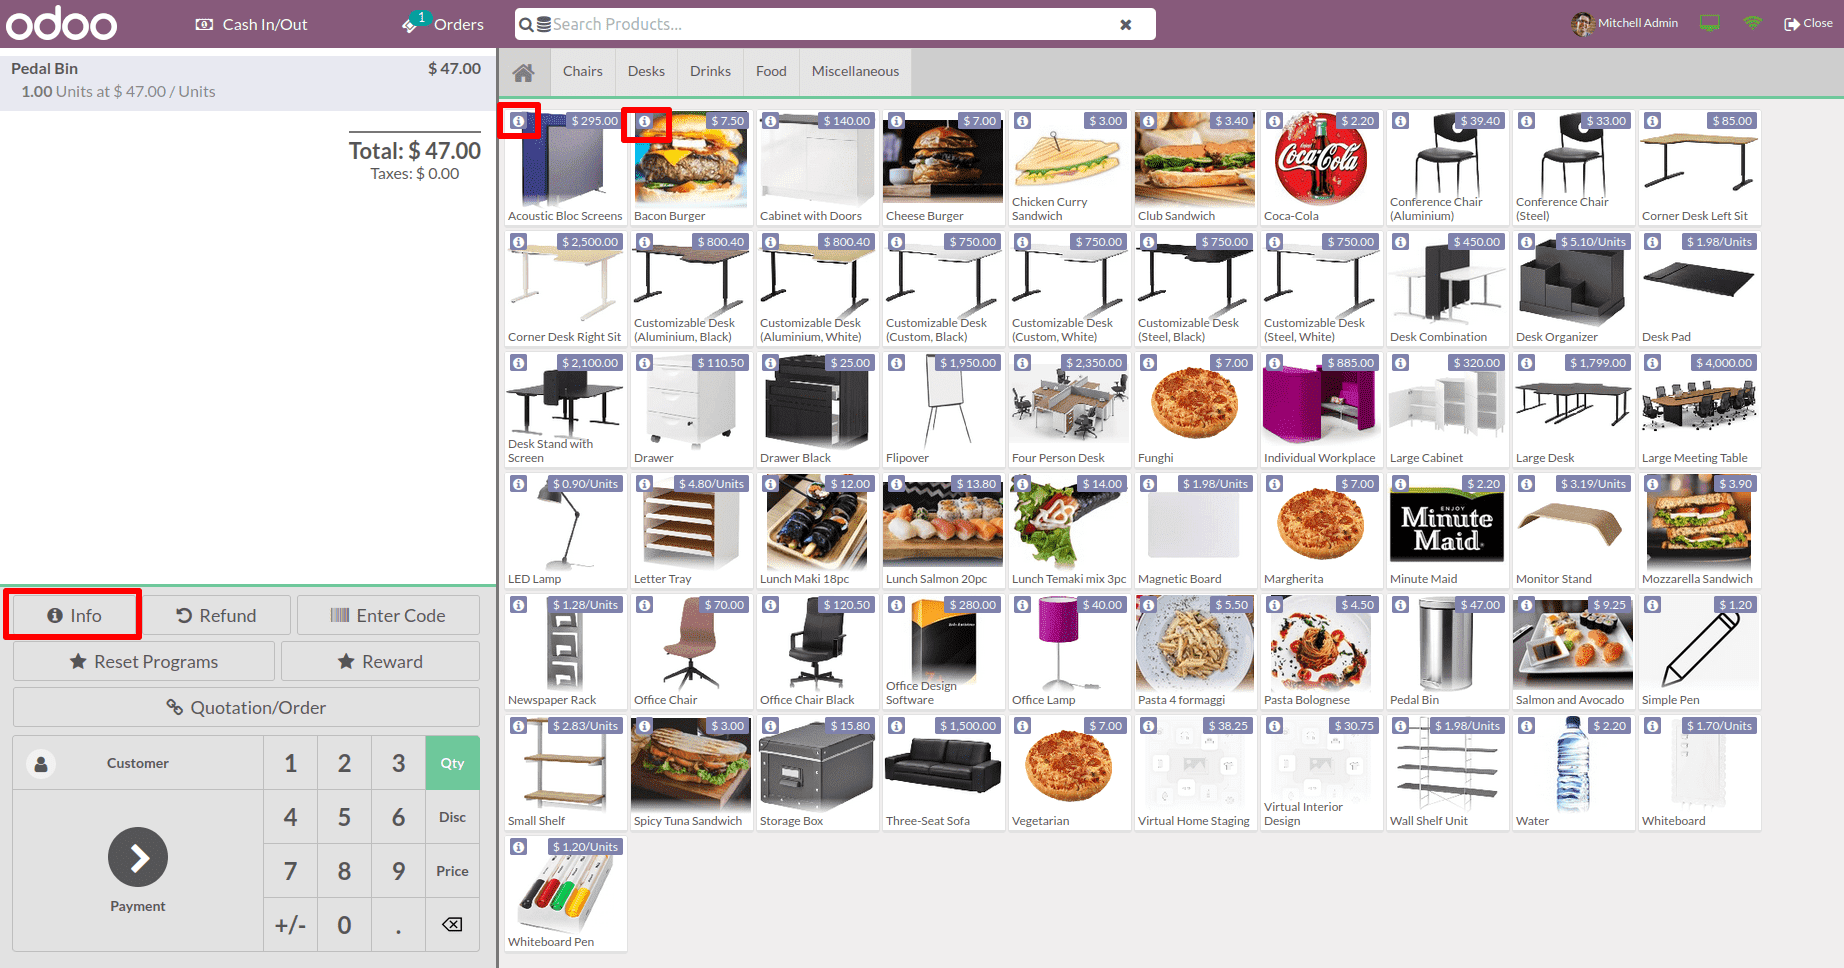
Click the Info button after adding a product to the order line. The product information window appears there.
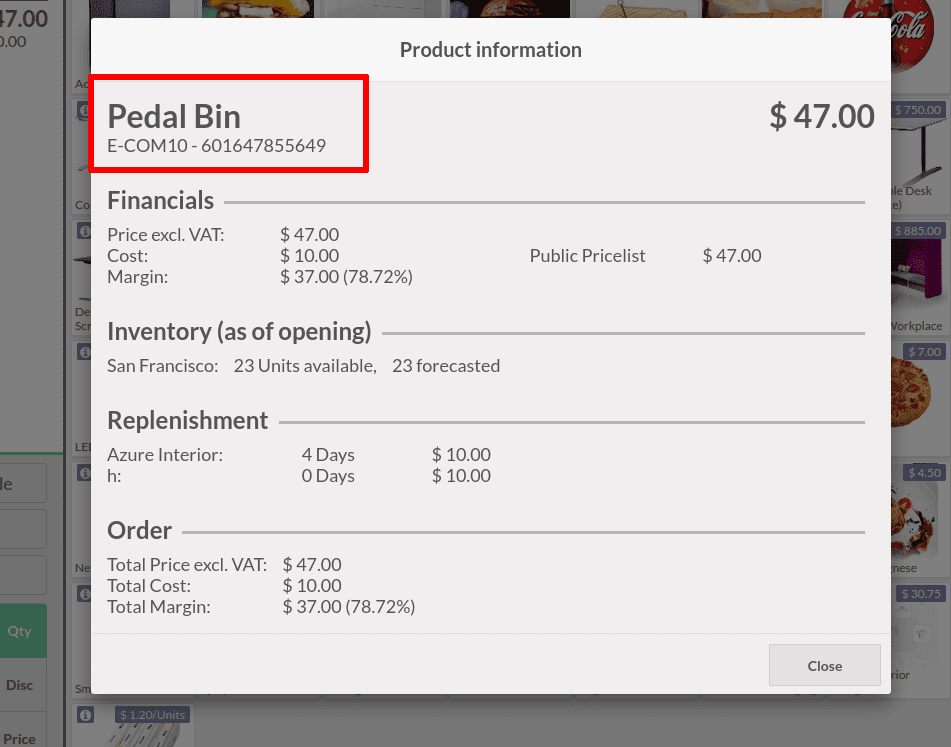
Instead, each product has an information sign attached to it. When you click on the little window appears with all of the product's details. A salesperson can acquire all the information about the product from the window. This provides financial information such as price, cost, price lists, margin, and so on. Details about the inventory, such as the warehouse, the quantity on hand, the number forecasted, and so on. The replenishment information is also available in this section.
Every version of Odoo has new features. As a result, with each new version of Odoo, it becomes more advanced. The advanced features added to Odoo15 Point of Sale were described in this blog. Here's where you'll learn about the implementation and how it works.