For every kind of business, sustainable and feasible growth enhances with uniformity of the team members. This uniformity is maintained with constant interaction among diverse employees working in contrasting departments. A platform to interconnect all crew members simultaneously needs to be implemented. As in this high-tech environment, every task is handled with integrated technologies daily new apps are evolved to enhance business interaction.
To interact with our coworkers, share the vital information that interferes with our work, and maintain a friendly relationship, we must implement a versatile interaction app. Making discussion with your colleagues on behalf of the work they are doing is irrelevant at times, and that may disturb them and their work, so by any kind of medium is upgraded and is planned to make the connection between them is performed without any trouble makes the workflow and workplace more interactive.
The Odoo 15 with its Discuss module plays a crucial role in building rapport with your peer groups, and associating with them improves work consistency. It endures sharing instant messages and responses on time of your doubt clearance. Moreover, during the pandemic severe, most businesses are occupied with remote access work patterns, so Odoo, with its Discuss module, freely connects with your colleagues at instances.
This blog gives you an acumen about the features of Odoo 15 Discuss how it performs the uniformity of our workflow with Odoo ERP integrating with Odoo Apps.
FEATURES OF ODOO 15 DISCUSS MODULE
As Odoo 15 Discuss aids your organisation's productivity with proper interaction with your coworkers, let us see the features of the Odoo Discuss module.
- Odoo 15 Discuss acts as the best interactive tool in your business to solve your doubts instantly as it is integrated with other Odoo Apps.
- You can send and receive messages from group chats and privately easily, even if you use other modules.
- Enhance your chat live from anywhere as it does not interrupt your communication.
- Initiate a chat by creating a public or private channel and discussing it with your team members.
- Personalise the notifications of your messages and check the mailbox by avoiding message congestion and prioritising your messages to be sent to specific persons.
- Make sure the important messages comes through the chatbox, and be sure at what time the message must send to the specific person.
- Get tracked with your messages even in a single window since it is integrated with other modules of Odoo.
- Adjust the notifications of your messages, add followers, and schedule activities on your tasks.
- Observing the respondent's status sends the messages and gets quick responses.
- Enhances to create discussion groups within the employees to keep specific groups for specific projects and discuss your ideas timely.
- Keep your employees informed by creating internal groups for emailing without being manipulated with a specific topic and specify who all are concerned from each department to read the message.
- To make easy public announcements, it also manages the public email lists.
- You can star your messages concerning the vital content for later use and add smileys in your conversations if required.
- You can manage your participants in your channel and restrict the participants' access to the channel.
The Odoo 15 Discuss module with its name is a discussion platform that simplifies your interaction with peer groups and enhances your business targets with uniformity within a particular time.
To get access to the Odoo Discuss, you need to choose the icon from the main dashboard of Odoo.

You will navigate to the module's main dashboard by opening the Discuss icon.
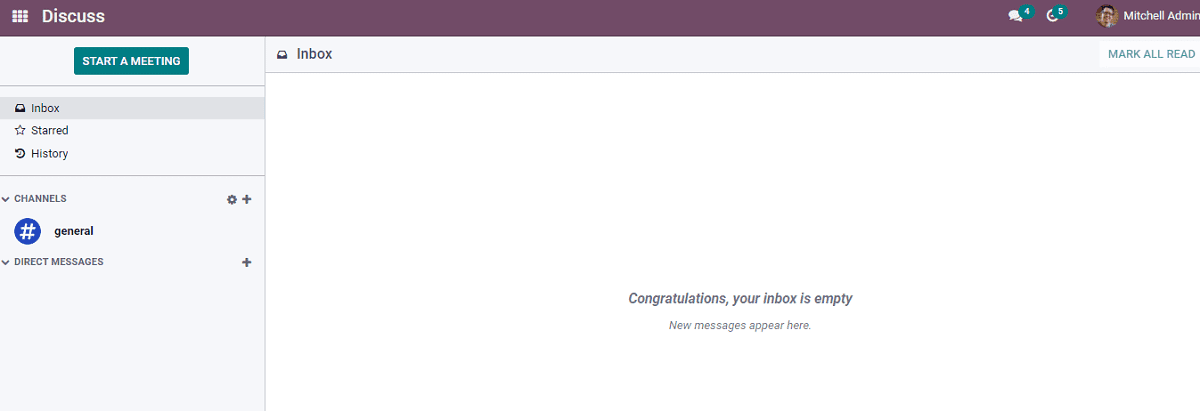
From the above screenshot, you can see the left-hand side of the window filled with a panel including Inbox, Starred, History and above the panel with an option of START A MEETING. While clicking on the Inbox, you get the new messages on this window. You can add your messages into starred by clicking on the respective chat. You will get a star symbol by clicking on it. It will enter into the starred message. And on the right-hand side of the window, you can see the MARK ALL READ button. You can click it by showing the messages all are read. Below the panel, you can see the CHANNELS section where you can create the group chats per your company requirement. And below it, you can see the DIRECT MESSAGES section.
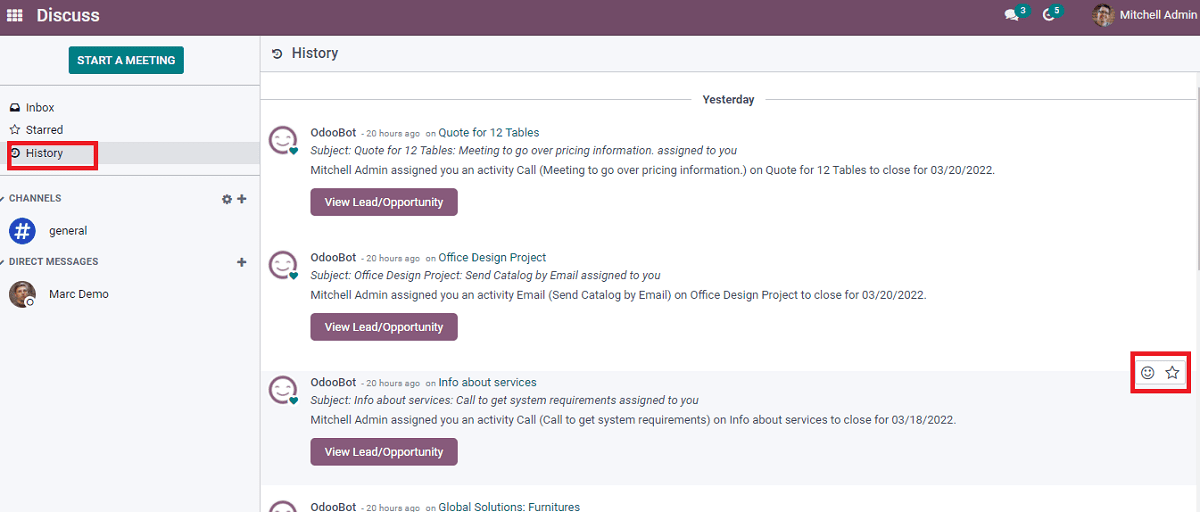
As in the above screenshot, you can notice by clicking on the History in the panel, and you will get the details of the chats. You get the emoji and star icons by clicking on the corresponding chat, as seen in the highlighted image. By clicking on the emoji icon, you can express your reactions with emojis.
You can also differentiate the private and public chats in this module, as seen in the below screenshot.
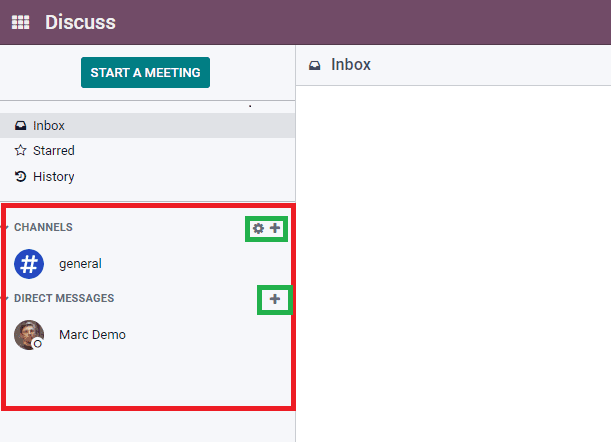
As seen in the screenshot, the highlighted portion, which is segregated with CHANNELS, gives you the public chat section where you can see a section of general illustrating the public announcements; general news regarding your office can be seen in this section. The screenshot shows that you can see a settings symbol and (+) symbol, which denote view or join channels and Add or join a channel, respectively. And for private messages, you can enter a member from your company and personalise your message by clicking on the (+) symbol and adding the individual.
Now by clicking on the Settings icon, it describes View or Joins channels. By going through the below screenshot, you will analyze a window.

Here in this screenshot, you can either by clicking on the JOIN button you can join the channels or click on the LEAVE button, and you can leave the channel you joined. To create a new channel, you need to click on the CREATE button.
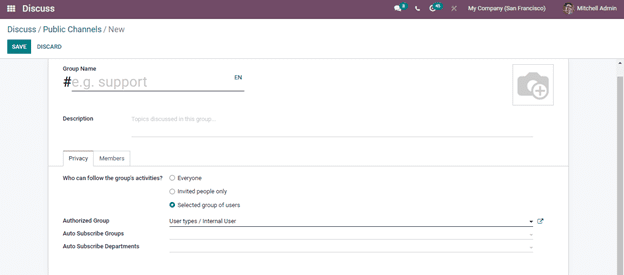
By clicking on the CREATE button, you will get a window, as seen above screenshot. You have to enter the name of the group at the space provided in the Group name, and you can even add an image if needed to the group in the space provided. And on the Description line, you can add the topic which is included in the group discussion or about the group. Under the Privacy tab, you can select the individuals who have to be added to the group and restrict the access of individuals. Also, follow the individuals as enabling the options as Everyone, Invited people only, Selected group of users. Now you need to mention the Authorized Group from the dropdown menu list. And by mentioning the Auto Subscribe Groups and Auto Subscribe Departments, the members from that list will be automatically followed in the group. There is a Members tab where you can add the individuals with their respective email IDs. And here you can restrict the individuals also. And at last, you need to click on the SAVE button, and thus, the group or channel is formed.
An alternative method can also be followed to create the channel. Let us discuss it also.
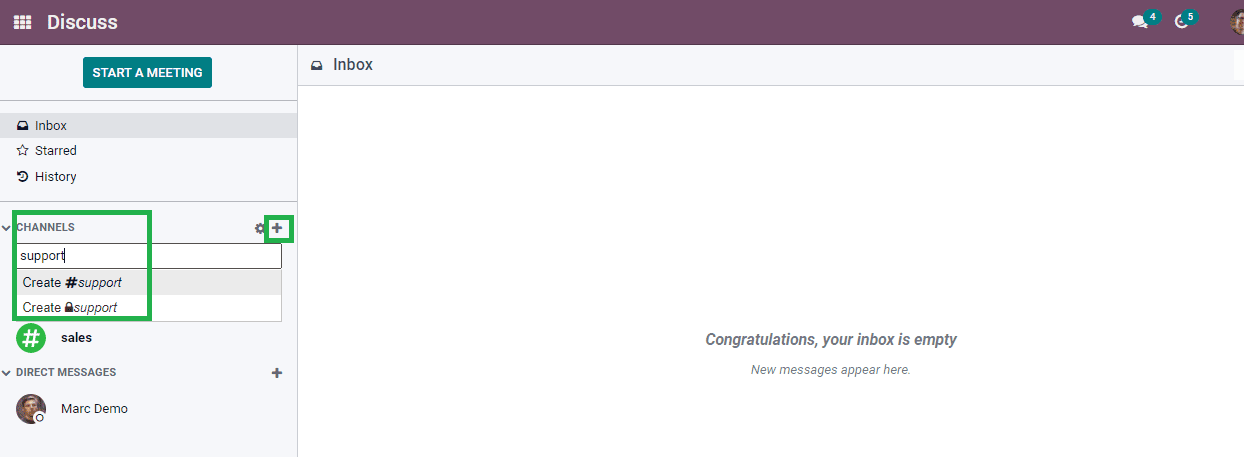
By seeing in the above screenshot, you can see a (+) symbol; by clicking on it, you can see a space to enter the channel you want to enter. You need to suppose if you enter a support channel by entering the channel. You will get two options. The first option denotes with group channel, and second option denotes with a private channel.. And if you need to start a personal conversation, you can click the (+) near DIRECT MESSAGES and enter the person's name from the list given below and start.
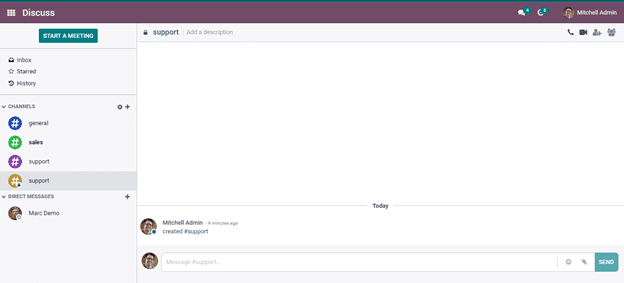
As seen in the screenshot above, you can add the channel's description as the required space. You will also get an audio call at the top right-hand side of the screen and a video call icon. Also, Add users and Show Member list icons as shown above.
In this way, it is easy to manage the chat easily here with the Discuss module.
You can also manage the chat without opening the Discuss module, as you can manage it from anywhere in between you doing work. By working with Odoo in another module, you can access the new messages with an icon of chat appearing at the top of the window.
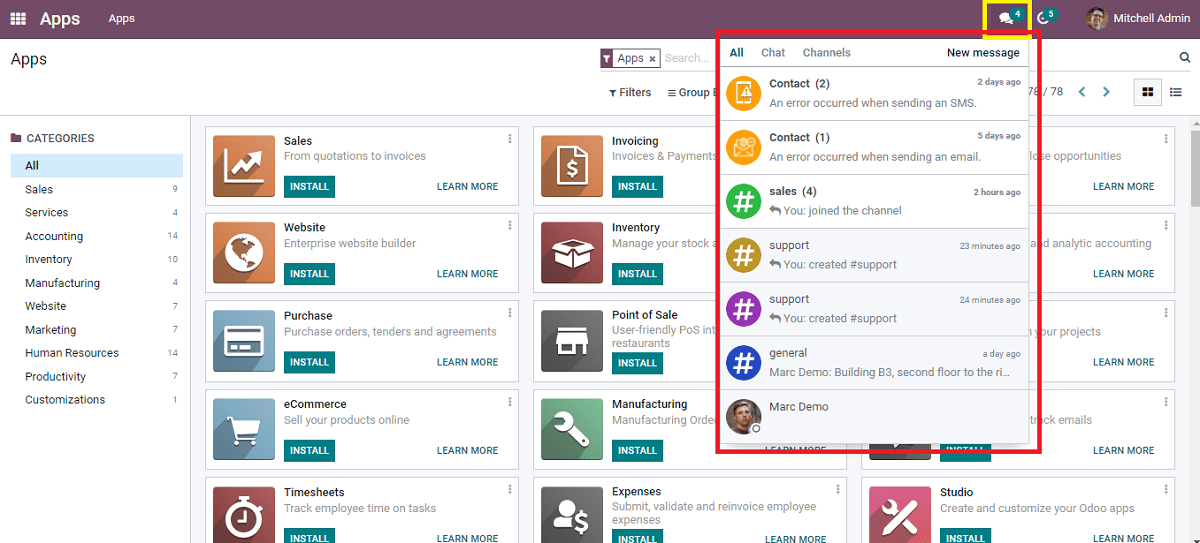
As seen in the above screenshot, you will get the notification on the above in the to discuss icon, and you can open it and see the messages as seen highlighted above screenshot.

By clicking on the START A MEETING button, you can initiate the meeting with any company member and enter the participants. You can join the link to the corresponding meeting with the participant in the chatbox by inviting them.
With this blog, you can get a clear idea that you can effortlessly chat with your peer group and also individually, you can also have a conversation with your colleagues and discuss the project. And also, you can simplify your communication with them by means of working in between another module as it is integrated with other apps in Odoo ERP.