The Odoo Inventory administration package aims to track and manage goods or materials efficiently. It includes demand forecasting, inventory tracking, stock movement control, vendor administration, and warehouse optimization. The package can be customized and synchronized with other Odoo apps, facilitating speedy stock transfers and product delivery. It also provides quality control tools for product inspections. The Inventory app allows for comprehensive lead time configuration to meet consumer expectations.
Odoo's lead time measures the entire process of processing, picking, packaging, and shipping a product from order placement to delivery, helping businesses manage inventories and meet consumer expectations. Proper preparation for tasks like manufacturing orders, delivery, and receptions is crucial for business success. Security Lead Time ensures shipping readiness a few days before the customer's committed date, accounting for unexpected delays and ensuring on-time delivery.
This blog will guide you through a comprehensive overview of configuring Security Lead Time for deliveries inside the Odoo 17 and its workflow functionality.
Configuring Security Lead Times
To configure the security lead times for your sales and purchase orders, go to the “Advanced Scheduling” tab of the “Settings” window of the “Configuration” menu available in the Odoo 17 Inventory Module.
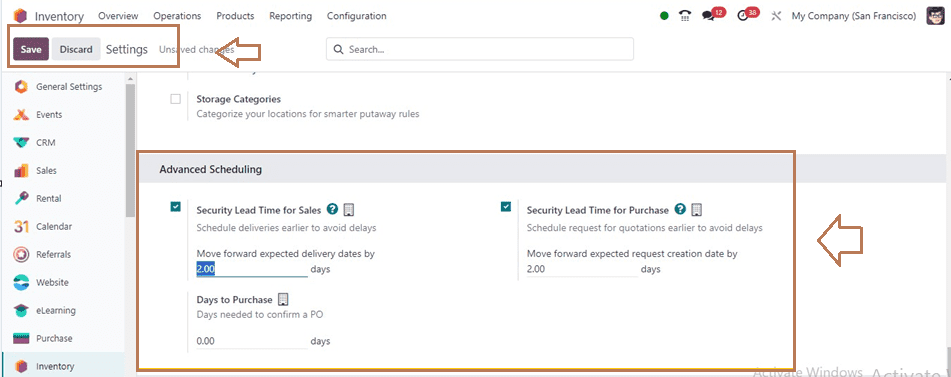
You have to enable the three advanced scheduled features from the tab section that include “Security Lead Time for Sales,” “Security Lead Time for Purchase,” and “Days to Purchase.”
* Security Lead Time for Sales: Just enable the option to set the delivery date of an order to be postponed by a specific number of days. when the “Security Lead Time for Sales” is set to 2.00 days. For instance, a product with a two-day security lead time is supposed to be delivered two days before the actual delivery date.
* Security Lead Time for Purchase: Enable the option, Enter the required number of calendar days, and specify an extra period that allows possible supplier deliveries to modify the security lead time for a purchase. Setting the security lead time to two days will add two days to the actual delivery date.
* Days to Purchase: Once a user sets up a purchase order from your inventory, enable the feature to specify how many calendar days they should wait to confirm the order.
After configuring these security lead times, save the changes inside the settings window, and Let’s have a look at the functional workflow of this facility.
Security Lead Time for Sales
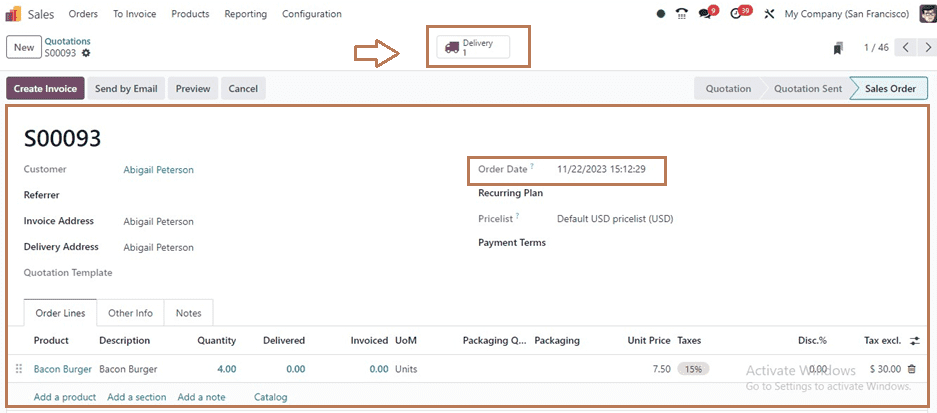
First of all, we can create a new sales order from the Odoo 17 Sales Module. Then, go to the “Quotations” window of the “Order” menu and open or create a sales quotation configuration form. Here, I am creating a new sales quotation.
After editing the quotation details in the configuration form, Save and Confirm the order. To confirm a sales quote, click the "Confirm" button, and a "Delivery" smart button appears. Click the "Delivery" button to view delivery details.
You will be directed to a delivery order form view as shown below. The form view will show the Actual Delivery Date in the “Deadline” field as 11/22/2023. Then, the “Scheduled Date” will provide the expected delivery date, which is 11/20/2023, since we previously set the Security Lead Time to 2 days.
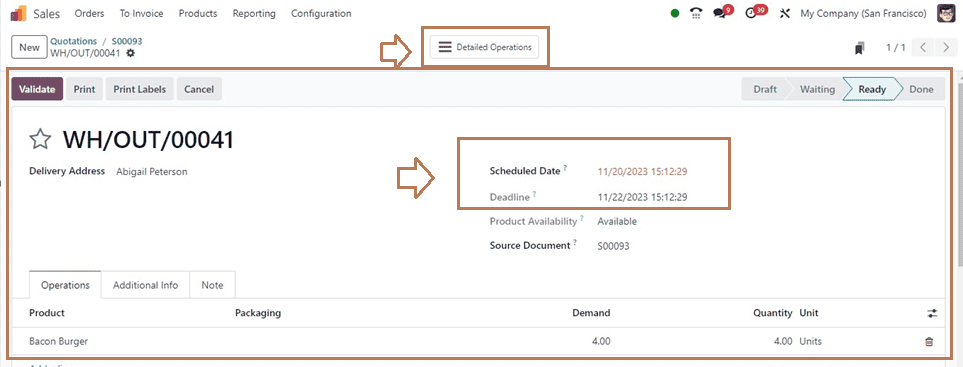
After confirming the delivery details, you can validate the order using the “Validate” button, and the “Detailed Operations” smart tab can be used to understand the inventory movements and tracking of the product. Then, from the quotation configuration form, you can proceed with the other sales order procedures.
Security Lead Time for Purchase Orders
The basic principles of the Security Lead Time for Purchasing and Sales are the same, except that the customer monitors the longer period a supplier needs to manufacture their goods rather than permitting vendor delays to be taken into consideration by assigning a certain date.
Setting Vendor Lead Time
You can set the vendor lead time, which can be done from a product configuration form inside your inventory database. For this purpose, go to the “Products” dashboard of the “Products’ menu. I have chosen a product named “Bacon Burger” and opened its configuration form. Inside its “Purchase” tab, set a vendor delivery lead time in the ‘Delivery Lead Time” section along with the Vendor Name, Price, and Currency.
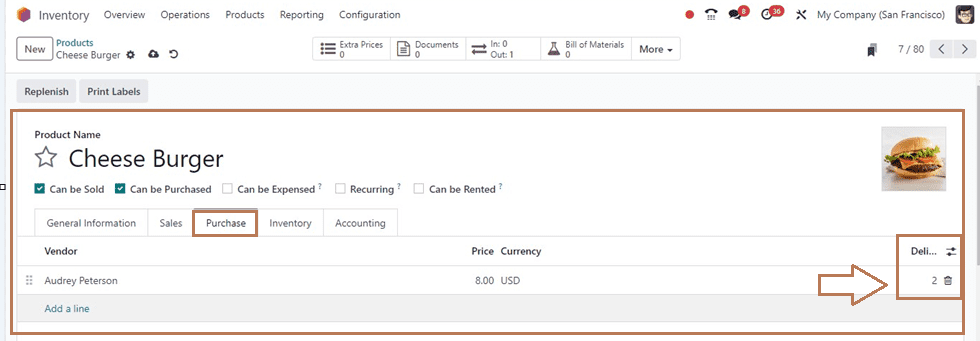
Here, we can set the delivery lead date as 2 days and save the data. Then, create a purchase order from the Purchase Module from the “Purchase Orders” window of the “Orders” menu.
Complete the vendor information on the form that appears. I'm picking the supplier that we decided upon for the lead time on product delivery. You can choose the “Vendor Reference” and a “Blanket Order” so the order “Confirmation Date” and “Expected Arrival” dates in the respective fields. You can also add the product with a vendor lead time inside the “Products” tab section and also fill in the other tab sections named “Other Information,” and “Alternatives” tab.
After editing the form data, save the form data and confirm the order using the “Confirm” button. You will see a “Receipt” smart button inside the form where you can see the product details.
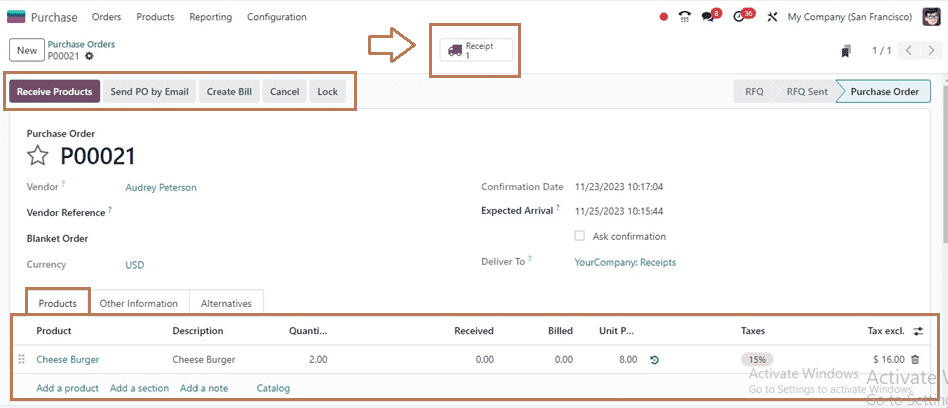
Inside the “Receipt” window will show the product operation details, which can be checked, and the order using the “Validate” button as shown below.

After validating the order, you can see the ordered date in the “Effective Date” and the “Scheduled Date” inside the respective fields. The scheduled date is added with an extra two days, as indicated below, because we confirmed the order for November 23, 2023, and the vendor lead time is already configured for two days.
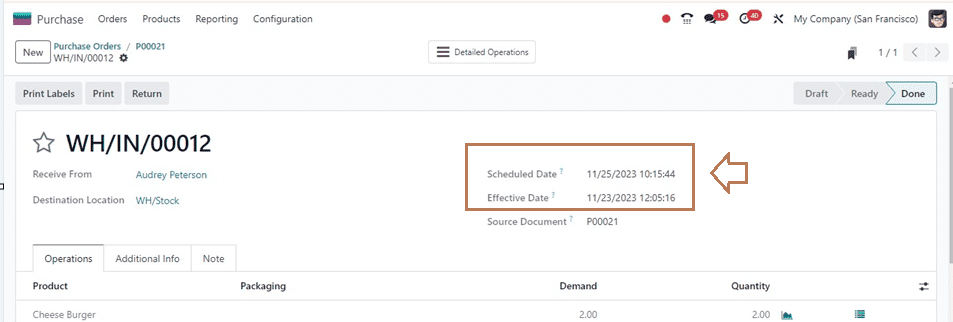
After completing the order validation, you can proceed with the next procedures.
The Inventory Module's Security Lead Time functionality, demonstrated in a blog session, allows customers to know when they will receive their orders and is crucial for obtaining the desired merchandise.
To read more about managing delivery lead time in Odoo 17, refer to our blog How to Manage Delivery Lead Time in Odoo 17