Odoo 18 uses the modern Javascript framework, basically named as Odoo Web Library (OWL), which works on the component-based architecture. It enhances the working of Odoo, allowing ways to create custom widgets, form view management, custom actions, front end features, API calls, event handling, etc. We use the js_class as a key attribute primarily in the context of JavaScript widgets, templates, and views to define and extend the system behavior from the UI. js_class allows the developers to link the javascript classes to the XML elements by enabling the custom interactions dynamically within Odoo.
In Odoo, js_class is actually used in the form views for linking the Javascript classes to the XML views, which eventually paves the way for the extension and customization of Odoo form views by leveraging the power of Javascript.
In this blog, let’s discuss how this js_class is used and explore the step-by-step codes to comprehend how it works.
The first thing we need to do is to register a class in JavaScript for a particular view. Later on, for any form view, if the same class is added, the customized view into the form will be injected there.
For that, we need to
1. Create a custom view as a template
2. Register the view as a component
3. Link it to the form controller
Then, the controller executes the view when it finds the specified class.
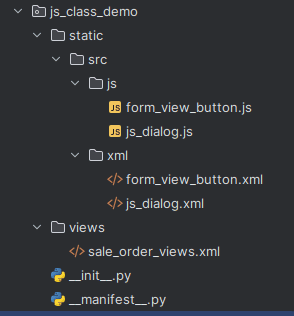
Let’s create a new module named js_class_demo with a structure like
First, under the ‘views’ directory, let’s extend the form view of the model sale. order and add the js_class attribute for the form view with some class name. Here we are going to add the js_class as show_details. This is typed inside the sale_order_views.xml file.
<?xml version="1.0"?>
<odoo>
      <record id="view_sale_order_form_inherit" model="ir.ui.view">
      <field name="name">sale.order</field>
      <field name="model">sale.order</field>
      <field name="inherit_id" ref="sale.view_order_form"/>
      <field name="arch" type="xml">
          <xpath expr="//form" position="attributes">
              <attribute name="js_class">show_details</attribute>
          </xpath>
      </field>
  </record>
</odoo>
Now, the form controller checks if the JS class ‘show_details’ is saved in the registry. For this purpose, we register the class with the custom view in the core registry. To register, we create a new template named showDetailsBtn and give an onclick function using the attribute ‘t-on-click’ named actionDetailsForm for that button. Here, we extend the addon ‘web’ module’s form view to add a new button named Record Details on top of the form view. This template code is saved in the form_view_button.xml file and it is as:
<?xml version="1.0" encoding="UTF-8" ?>
<templates>
 <t t-name="js_class_demo.showDetailsBtn" t-inherit="web.FormView">
  <xpath expr="//t[@t-set-slot='layout-actions']" position="inside">
     <button class="btn btn-primary" t-on-click="actionDetailsForm">
               Record Details
     </button>
  </xpath>
 </t>
</templates>
Now, we need to define the click function for the form using js. Inside the file ‘js_class_demo/static/src/js/form_view_button.js’, we add the following javascript code
/** @odoo-module **/
import { FormController } from "@web/views/form/form_controller";
import { formView } from '@web/views/form/form_view';
import { registry } from "@web/core/registry";
import { jsClassDialog } from "@js_class_demo/js/js_dialog";
class jsClassRecordDetails extends FormController {
  actionDetailsForm(){
      this.env.services.dialog.add(jsClassDialog, {
          resModel: this.props.resModel,
     resDesc: "This is just to show you that the demo pop-up is working with the description added through Javascript Class."
jsClassRecordDetails.template = "js_class_demo.showDetailsBtn";
export const recordDetailsView = {
  ...formView,
  Controller: jsClassRecordDetails,
};
registry.category("views").add("show_details", recordDetailsView);
Here, the below code statement imports a custom dialog box defined in our module’s static/src/xml/js_dialog.xml file.
import { jsClassDialog } from "@js_class_demo/js/js_dialog";Then inside the click function actionDetailsForm, the dialog box is called with values for resModel and resDesc which is to be shown when the ‘Record Details’ button is clicked from the Sale order’s form view.
The new class extended is jsClassRecordDetails, and we assign the template to be loaded for that as:
jsClassRecordDetails.template = "js_class_demo.showDetailsBtn";
The js class ‘show_details’ is registered in the core with the statement
registry.category("views").add("show_details", recordDetailsView);Now, let’s move on to the template creation for the dialog box, which is to be shown by clicking the button. We add the code for it in ‘js_class_demo/static/src/xml/js_dialog.xml’ file as:
<templates>
  <t t-name="js_class_demo.infoDialog">
    <Dialog size="'md'" title="'Record Details'" modalRef="modalRef">
      <div class="">
        <h6>Model:</h6><span><t t-esc="props.resModel"/></span><br/>
        <h6>Description:</h6><span><t t-esc="props.resDesc"/></span>
      </div>
      <t t-set-slot="footer">
      <button class="btn" t-att-class="props.confirmClass"
t-on-click="clickClose" t-esc="props.confirmLabel"/>
      </t>
   </Dialog>
  </t>
</templates>
This dialog box just shows the details of the model name and a custom line of string as a description.
As the last step, let’s add the js code to load the dialog box on onclick as:
/** @odoo-module **/
import { Component } from "@odoo/owl";
import { Dialog } from "@web/core/dialog/dialog";
import { _t } from "@web/core/l10n/translation";
export class jsClassDialog extends Component{
   clickClose() {
       this.props.close()
   }
}
jsClassDialog.template = "js_class_demo.infoDialog";
jsClassDialog.components = { Dialog };
jsClassDialog.title = _t("Record Details"),
jsClassDialog.props = {
   confirmLabel: { type: String, optional: true },
   confirmClass: { type: String, optional: true },
   resModel: { type: String, optional: true },
   resDesc: { type: String, optional: true },
   close: { type: Function, optional: true },
   };
jsClassDialog.defaultProps = {
   confirmLabel: _t("Close"),
   confirmClass: "btn-primary",
};
This assigns the dialog box’s template as ‘js_class_demo.infoDialog’ where ‘js_class_demo’ is our module name and adds the props values for the dialog box for things like title, close button, etc.
Finally, when we can see the dialog box getting opened while clicking on the ‘Record Details’ button from the sale order form view as

As a conclusion, the JS Class feature in Odoo provides flexibility to customize workflows as the developers require. It is an invaluable resource for the Odoo developers, JS Class feature unlocks various possibilities to integrate JavaScript functions and thereby enhance the Odoo form view with JS class functionalities. Ultimately, this maximizes the potential and leads to a more adaptable and efficient system for users.
To read more about How to Use JS Class in Form Views in Odoo 17, refer to our blog How to Use JS Class in Form Views in Odoo 17.