In today's interconnected digital world, the need for secure file transfers is paramount. Whether you're managing sensitive business documents or sharing personal files, security and reliability are non-negotiable. This is where SFTP (Secure File Transfer Protocol) comes into play. If you're a user of Ubuntu 20.04, you're in luck, as it provides an excellent platform for setting up your own SFTP server, ensuring your data remains confidential and protected during transfers.
In this comprehensive guide, we'll take you through the process of creating an SFTP server on your Ubuntu 20.04 system. Whether you want a secure way to share files with colleagues or establish a remote backup system, this step-by-step tutorial will empower you to achieve your goals.
What is SFTP?
Secure File Transfer Protocol (SFTP) is a secure and encrypted file transfer protocol designed to provide a safe way to exchange data between a client and a server. It builds upon the SSH (Secure Shell) protocol, making it an excellent choice for securely moving files over the internet or within a local network.
Features of SFTP
* Encryption: SFTP encrypts both the data being transferred and the authentication process, ensuring that your files are safe from eavesdropping and tampering.
* Authentication: It uses SSH keys or passwords for user authentication, making it easy to control access to your server.
* Portability: SFTP is widely supported on various operating systems, making it a versatile choice for cross-platform file transfers.
* Integrity: Files transferred via SFTP are checked for integrity to ensure that they haven't been altered during the transfer process.
* Remote Access: SFTP allows you to access and manage your files remotely, which is particularly useful for administrators and remote workers.
Now that you understand the significance of SFTP, let's proceed with the installation and setup on your Ubuntu 20.04 system.
Installation Steps
Step 1: Install OpenSSH Server
Ubuntu comes with OpenSSH pre-installed, but it's a good practice to ensure it's up to date. You can do this by installing or updating the OpenSSH server using the following command:
$ sudo apt install ssh
Step 2: Modifying the SSHD Configuration for the SFTP Group
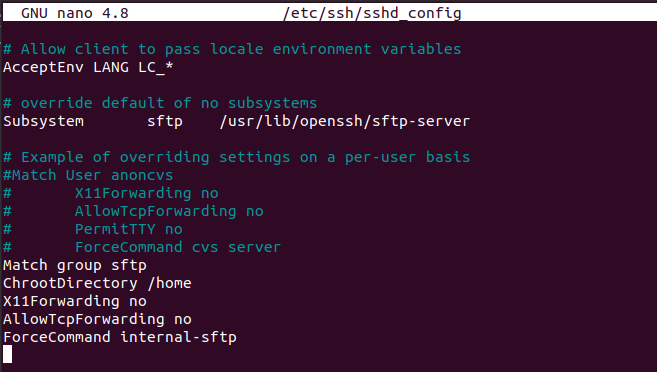
After successfully installing the SSH server, the next crucial step is to make the necessary modifications to the SSHD configuration file located at /etc/ssh/sshd_config. To do this, you can use the nano text editor or any other text editor of your choice. Here's how to open and edit the configuration file:
$ sudo nano /etc/ssh/sshd_config
Now, paste the following lines at the end or bottom of the file:
Match group sftp
ChrootDirectory /home
X11Forwarding no
AllowTcpForwarding no
ForceCommand internal-sftp

Save the file and exit the text editor.
Step 3: Restart SSH services
For making the new changes to take effect, restart the SSH service using the ‘systemctl’ command:
$ sudo systemctl restart ssh
Step 4: Create an SFTP Group
To facilitate SFTP access for users, the initial step involves the creation of a dedicated user group for SFTP users. To streamline the process, all SFTP users will be part of this common group. Execute the following command to create this group:
$ sudo addgroup sftp
Step 5: Create a new SFTP user
Now that you've added the new "sftp" group, it's time to create a new SFTP user and ensure they are a part of the "sftp" group. To achieve this, run the following command:
$ sudo useradd -m sftp_user -g sftp
Set the password for the newly created sftp user by typing the following command:
$ sudo passwd sftp_user
Step 6: Restrict Access to the User's Home Directory
In this step, we will ensure that the SFTP user has exclusive access to their home directory while denying access to other users on the system. To achieve this, set the appropriate permissions using the 'chmod' command as shown below:
$ sudo chmod 700 /home/sftp_user/
This command restricts access to the specified user's home directory, making it accessible only to the owner (the SFTP user) while denying access to others.
The SFTP server configurations have now been successfully finalized. To ensure that everything is functioning as expected, you can proceed to log in using the SFTP credentials.
Login through the SFTP using command line
You can establish an SFTP connection using either the IP address or system hostname. In this example, we'll connect to the SFTP server running on the same system where we configured it.
Step 1: Open a terminal and connect to the SFTP server using the sftp_user's name along with the loopback address 127.0.0.1. Use the following commands:
$ sftp sftp_user@127.0.0.1
Upon your initial connection attempt via SFTP, you will encounter a dialogue prompt on the terminal screen. To proceed with the connection, simply respond by entering 'yes.' Following this confirmation, proceed to set the password for the SFTP user. Once this is accomplished, you will observe the message "connected to 127.0.0.1" displayed in the terminal window, indicating a successful SFTP login.

To navigate to the SFTP user's home directory and create a new directory named 'test-sftp', you can use the following commands:
sftp> cd sftp_user
sftp> mkdir test-sftp
sftp> ls
Congratulations! You've successfully set up an SFTP server on your Ubuntu 20.04 system. This secure file transfer solution is not only practical but also ensures the safety and integrity of your data during transfers. Whether you're sharing files with colleagues or creating remote backups, your SFTP server is ready to serve your needs.