Odoo Field Services is a full-featured software package that offers a vast array of features and procedures to assist in managing the end-to-end operations of any kind of task.
Odoo Field Service is a collection of service management solutions designed to efficiently manage and track a variety of onsite fieldwork and services, such as different field works, repair services, installation works, building works, product deliveries, etc.
The field service platform makes it easier to manage and process a variety of tasks and services as follows.
* Scheduling an appointment with the service provider
Users can schedule time with the customers regarding the task or services and interact with the customers, and enquire about their requirements and queries
* Assigning tasks to employees, teams, etc.
User admins can assign tasks as per employee names and also based on teams.
Planning the tasks
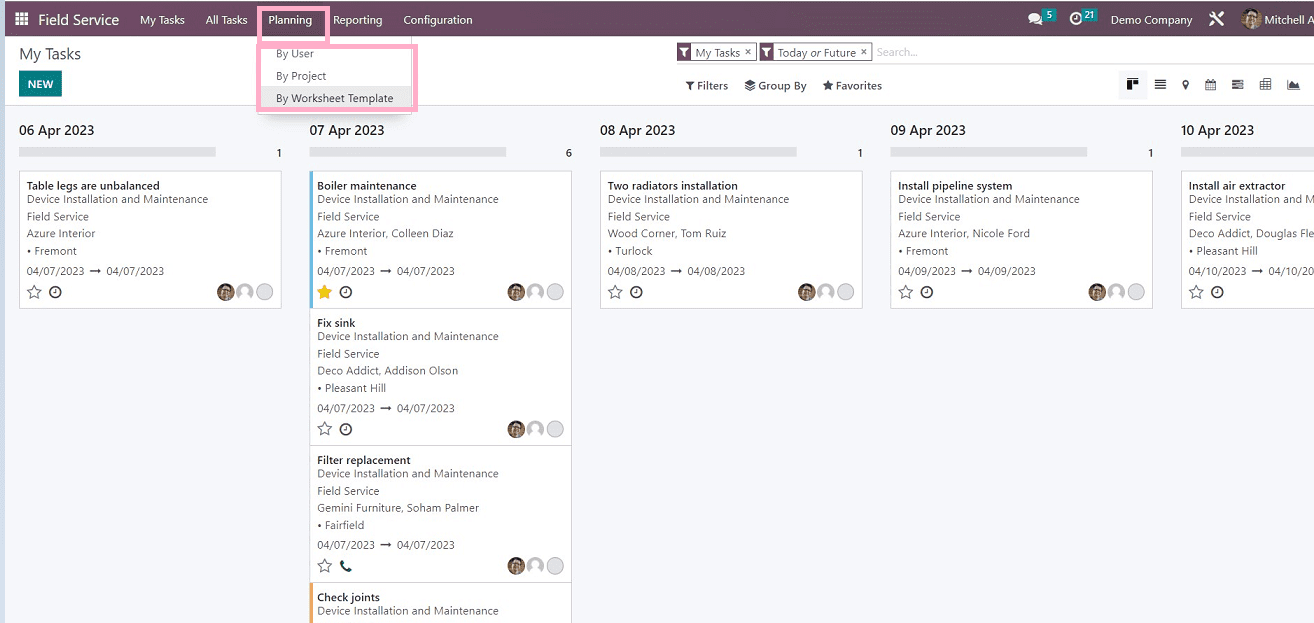
We can plan the tasks by user, by project, and by worksheet template using the planning menu provided in the field service application platform.
* Time tracking
To record how much time they spend on various tasks, employees can use the timer option to create a timesheet. After that, a payment invoice based on the time it took can be generated using this timesheet.
* Location tracking
To improve their work productivity and customer trustworthiness, users can keep track of the whereabouts of assigned tasks or services.
* Sell products
Businesses can sell their products using the same platform according to the customer requirements and invoice the items immediately after completing the assigned task or service.
For instance, users can sell the product right away and fix the component in the appliances if a customer needs any parts of electronic appliances while performing services or repairs. so they can include the cost of the service in their service invoice.
* Timesheet management
Make any kind of report for your tasks based on the measures, filters, and time frames you select, and use the spreadsheet templates for the reports to generate reports.
* Customized invoicing
Create draft invoices directly from the task form with all the products and the monitored working time already prefilled.
* Quotations
Users can create new quotations very easily using field service applications and also use predefined products, price lists, payment terms, and quotation templates.
* Electronic signature
Assigned employees can collect the customer signatures digitally for the invoicing process, which includes a digital signing field, attaching a signature file, etc.,
Planning a task in the field services platform
Using the planning menu provided in the field service application platform, users can plan and display their tasks in a Gantt chart view based on the user, project, and worksheet. Basically, the planning menu helps to analyze and schedule various tasks and to increase effectiveness.
The planning menu provides three options as follows,
1. By user
2. By project
3. By Worksheet template
1. Planning by User
We can see the Gantt view of the tasks arranged on the basis of users. as shown in the screenshot below.
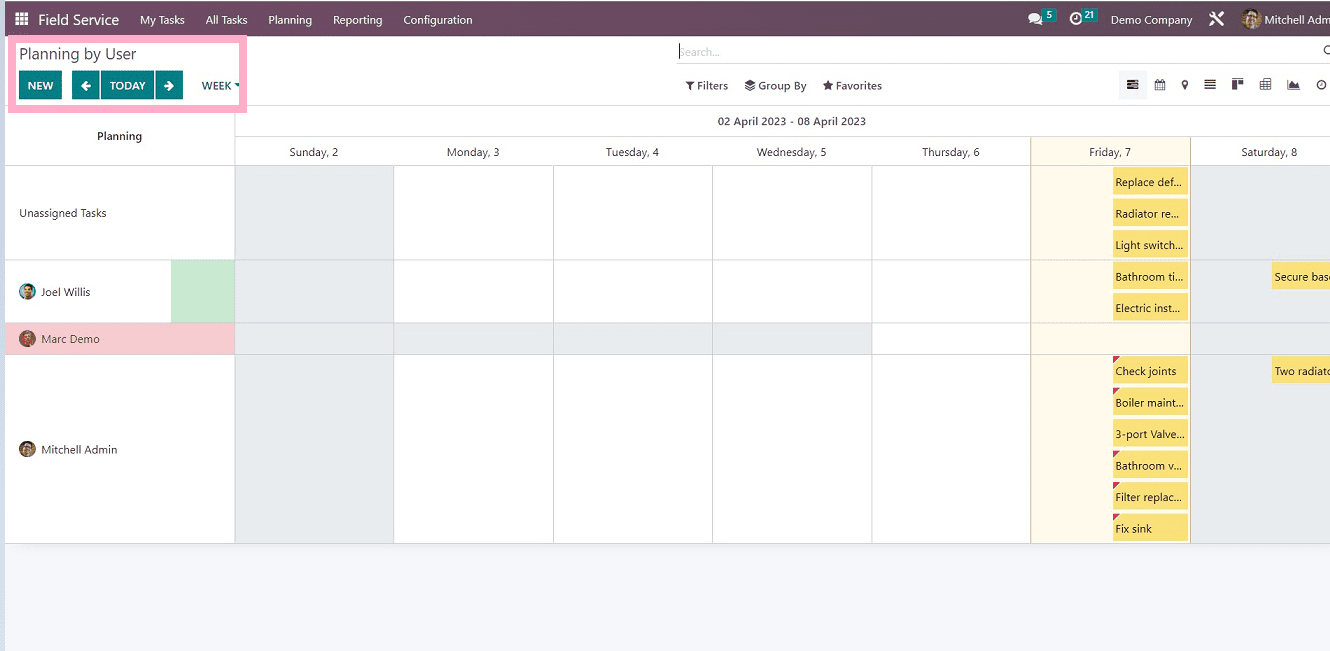
From the Gantt chart representation seen above, we can see that all scheduled tasks with regard to the designated employees will be displayed in the Planning By User window. On the basis of Day, Week, Month, and Year, the perspective can be changed. With the Planning By Project and Planning By Worksheet choices, you will receive information on the scheduled tasks based on the project and worksheet, respectively.
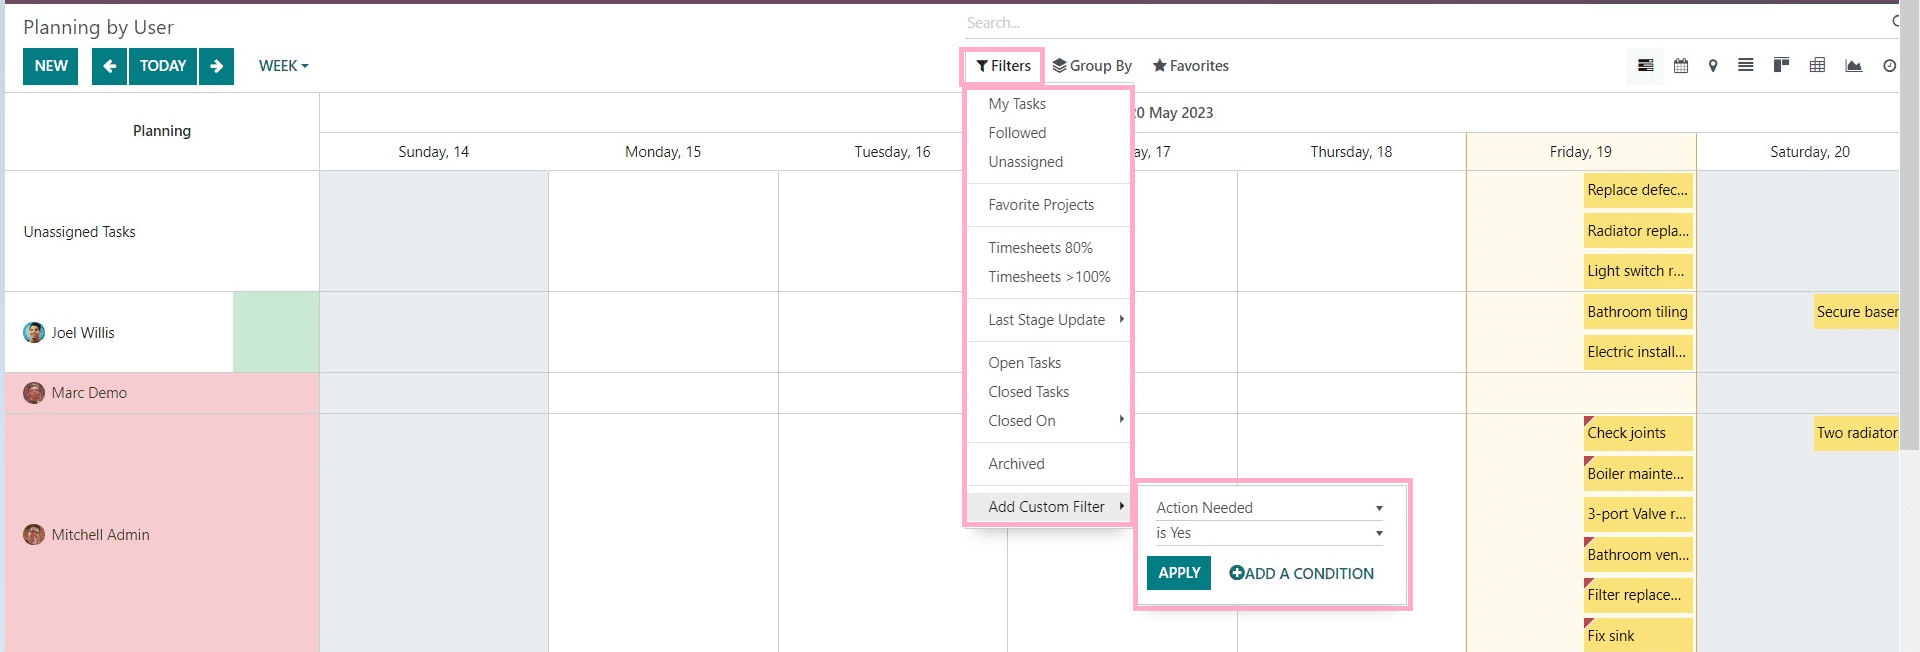
Filter, Group By, and Favourites are just a few of the sorting and filtering options available on each of Odoo's planning pages. By clicking on the respective icons in the page's top right corner, as seen in the screenshot above, you can change the planning page's view to one of the various options, including List, Kanban, Map, Calendar, etc. The filter options can be used to sort the pertinent data, and you can add your own filters by choosing the "Add Custom Filter" option from the dropdown menu available, as you can see from the screenshot below.
2. Planning by Project
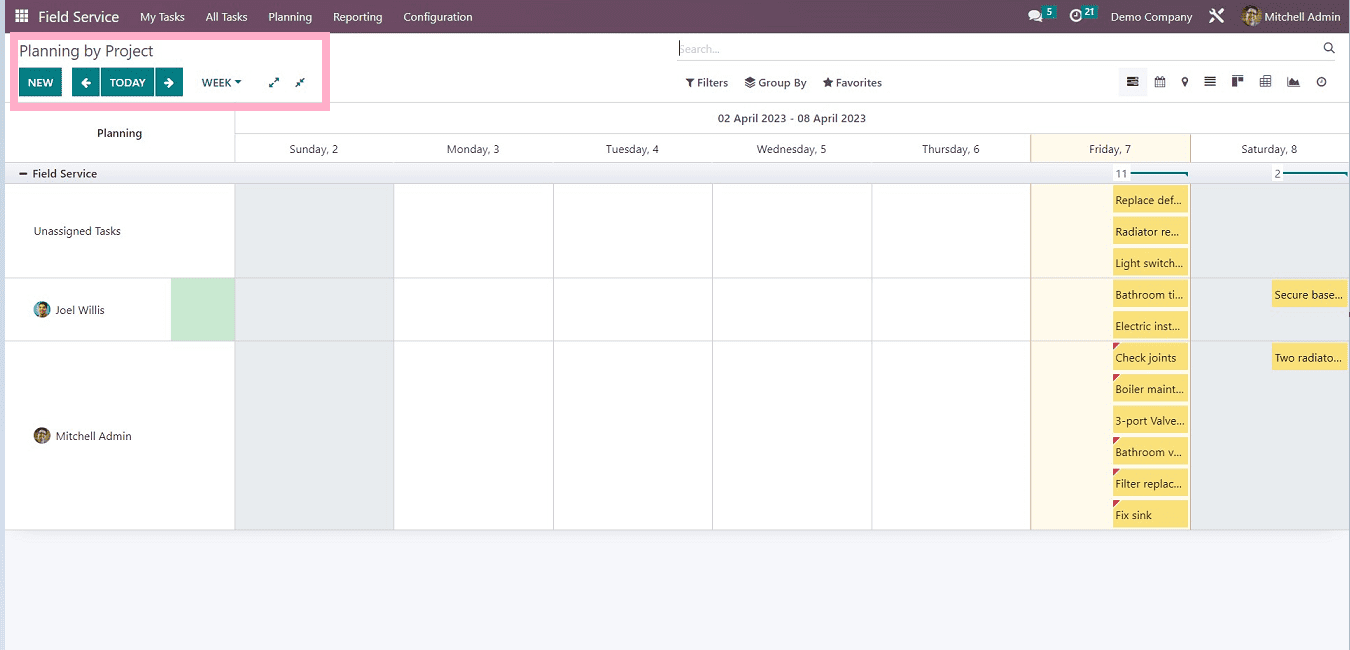
The planning method “By project” is also the same as the previous one. Users can manage their tasks project-wise, as you can see from the above screenshot.
Users can create as many projects as they need to organize all tasks across multiple teams or locations.
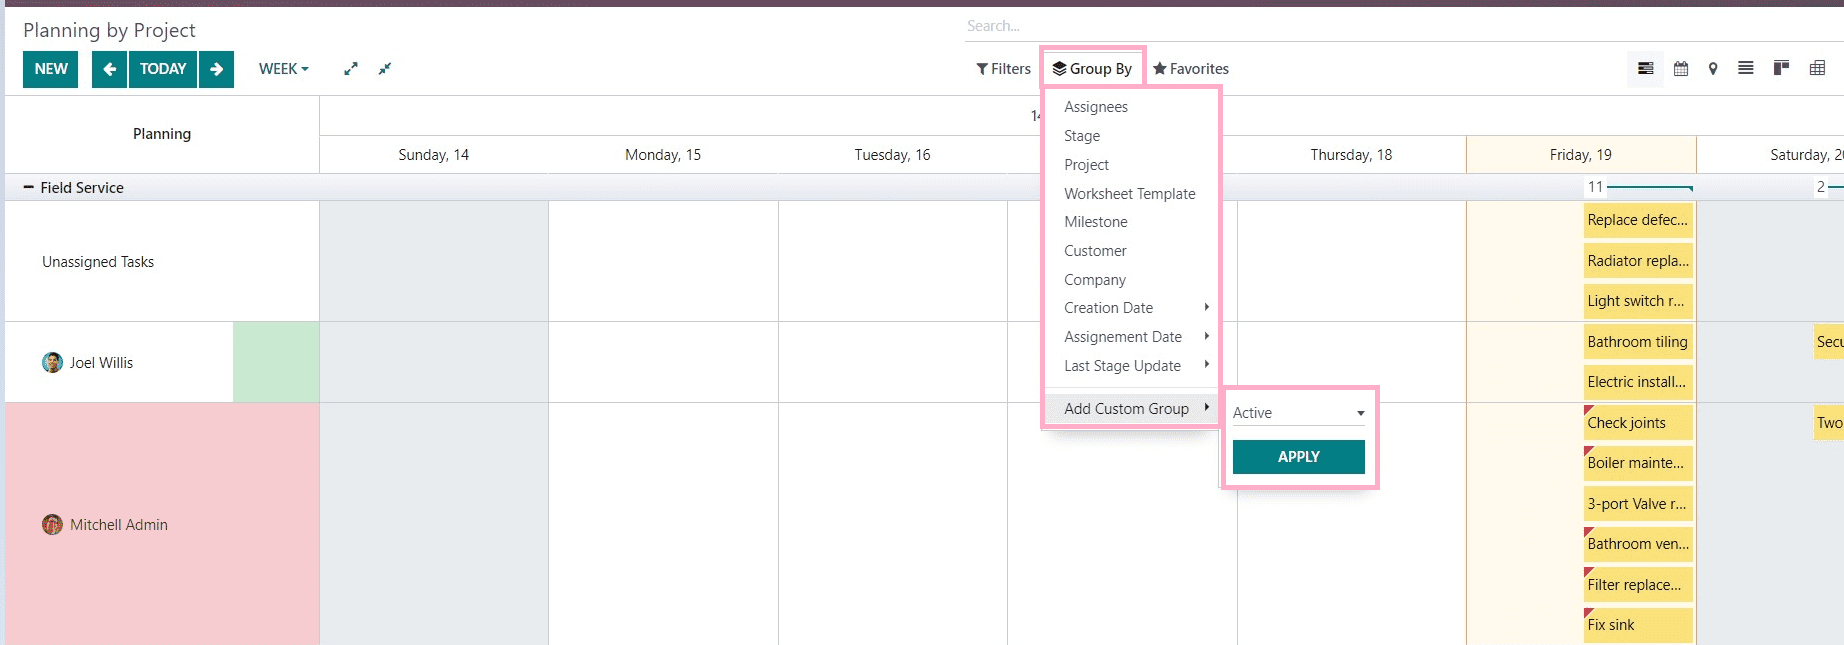
You can switch the planning page view between List, Kanban, Map, Calendar, etc., by clicking on the corresponding icons in the upper right corner of the page, as seen in the screenshot above. Each of the planning pages in Odoo also offers a variety of filtering and sorting options, including Filter, Group By, and Favourites. The relevant data can be sorted using the filter options, and you can add custom filters by selecting the "Add Custom Filter" and “Add Custom Group” options from the dropdown list provided under the respective options. As shown in the screenshot below, we can look at the Group By filter and its parameters.
3. Planning by worksheet Template
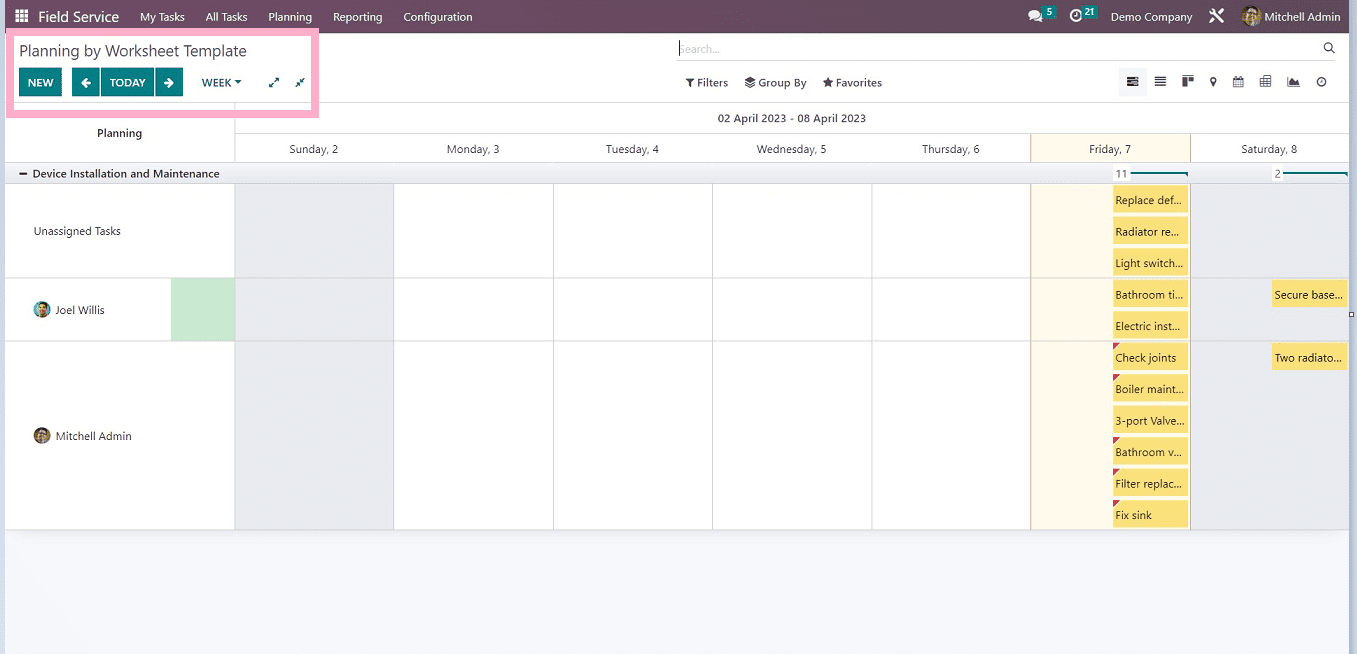
As you can see from the screenshots, the three options are similar, as are their functions and features. This Planning option helps users to add a worksheet template when creating a new task in the Field Service module. We can create a new plan by clicking on the "New" button in the upper left corner of the page. Using the respective icons provided in the top right corner of the page, as you can see from the above screenshot, you can change the planning page view into List, Kanban, Map, Calendar, etc.
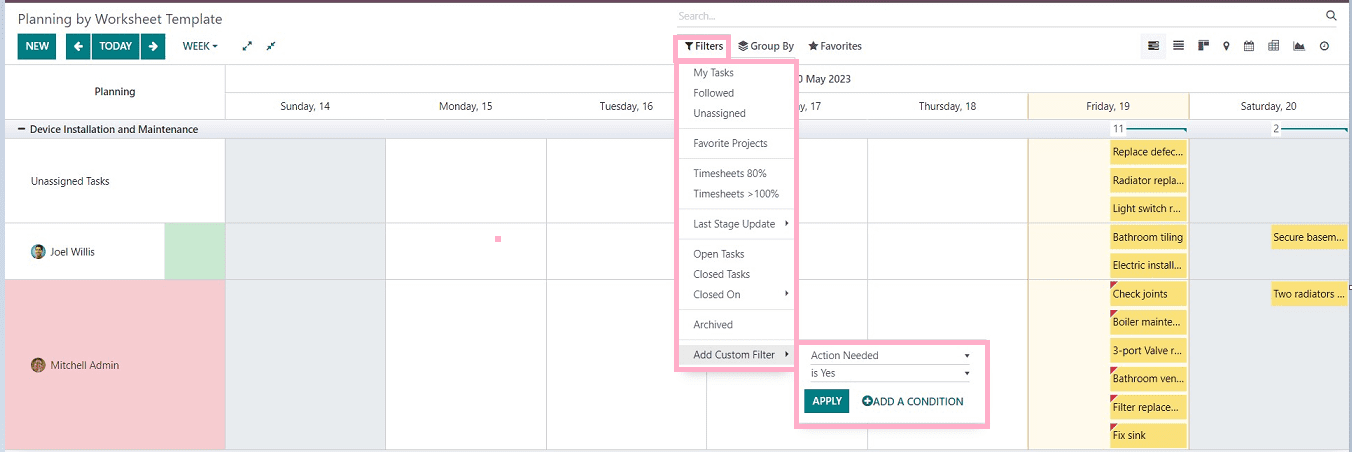
Odoo also provides various filter and sorting options such as Filter, Group By, and Favorites in each of the planning pages. You can sort the relevant data using the filter options and also create customized filters using the “Add Custom Filter” option provided in the dropdown list illustrated in the screenshot below.
Creating new planning.
Let’s discuss the process of creating new planning using the “By Project” menu.
Select “By project” from the planning menu, as shown below screenshot.
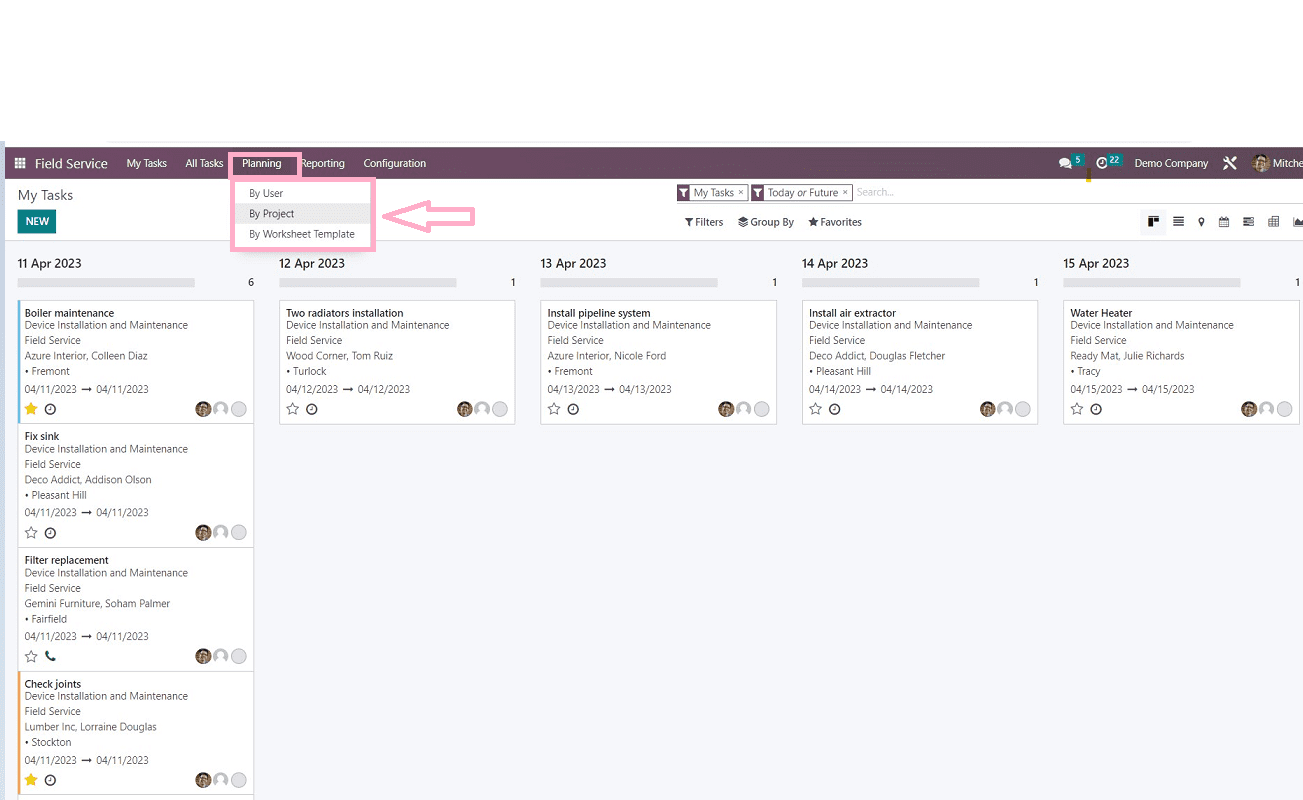
The menu will open a new form view in which we can create new project-based planning, as represented in the screenshot below.
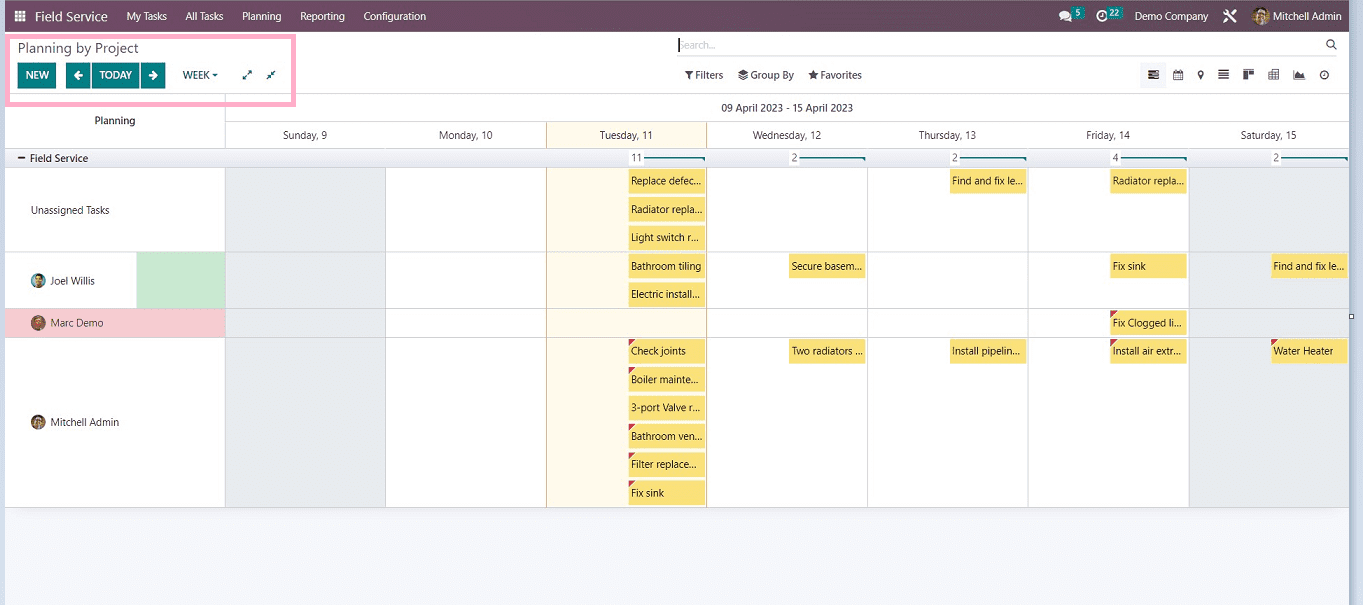
Here, we can see that many tasks are arranged in a Gantt chart view based on various projects, and we can also change the view to another visualization method using the icons given in the upper right corner of the form.
Filter, group by, and favorites options are provided, as seen in every other odoo application.
Now, we can create new planning by clicking on the “New” button.
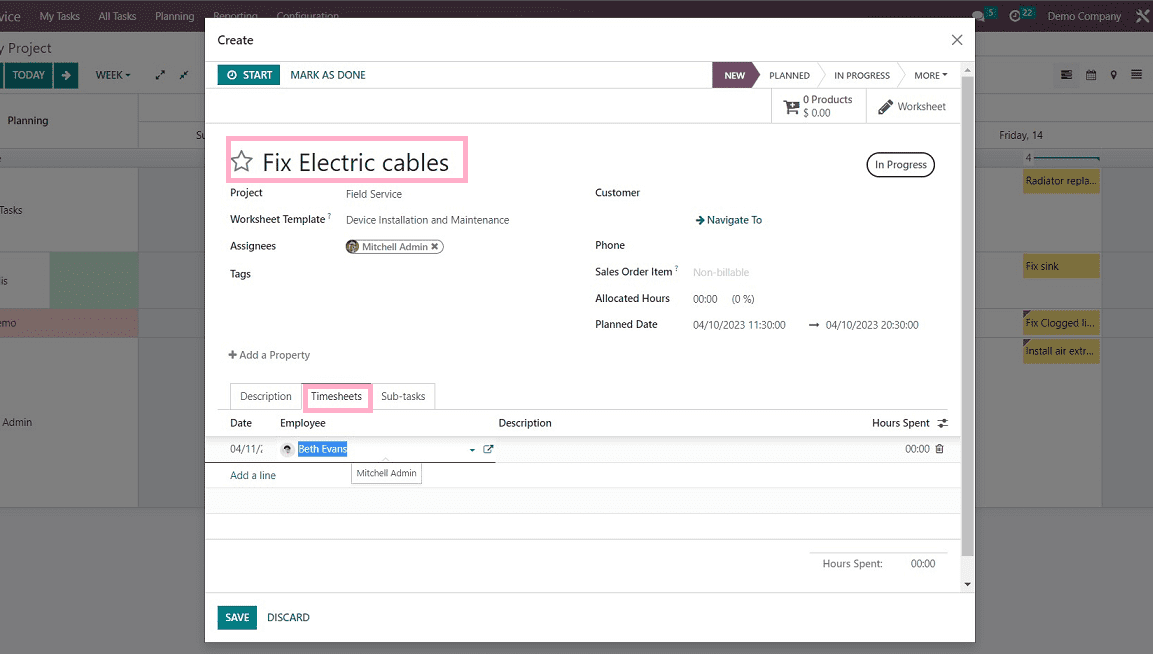
In this form view, we can give a task title, project title, worksheet template, assignee name, and tags as per the task. Also, give the customer details. You can give the assigned hours for the particular task and planned date by selecting the calendar option given.
The form view contains three sections such as,
* Description - You can add any description about the task in this section
* Timesheets - You can add the timesheet for the specific task by clicking on the “Add a line” field, employee name, and hours spent on the specific task.
* Subtasks - Users can add any subtasks required while doing any tasks.
Save the details using the “Save” button once you have completed the details, and also you can use the timer option till completing the task.
After completing the process, We can check the created task on the planning homepage like depicted in the screenshot below.
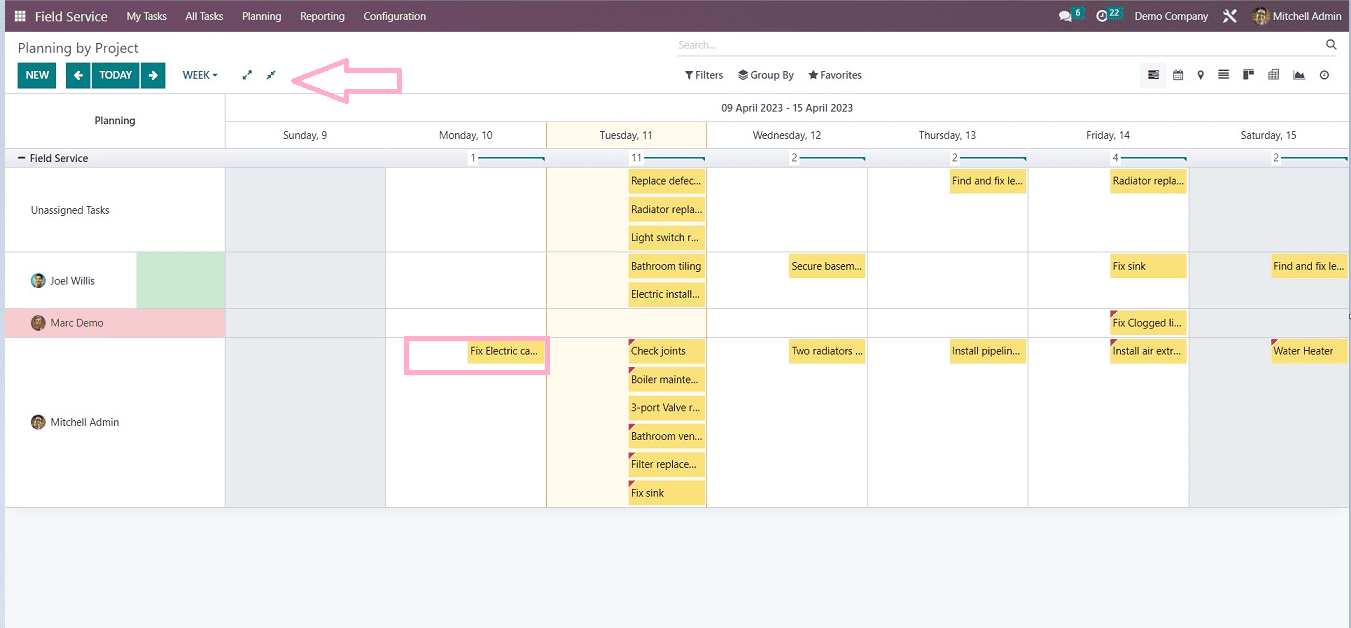
Now users can easily manage their created projects by just dragging and dropping functions.
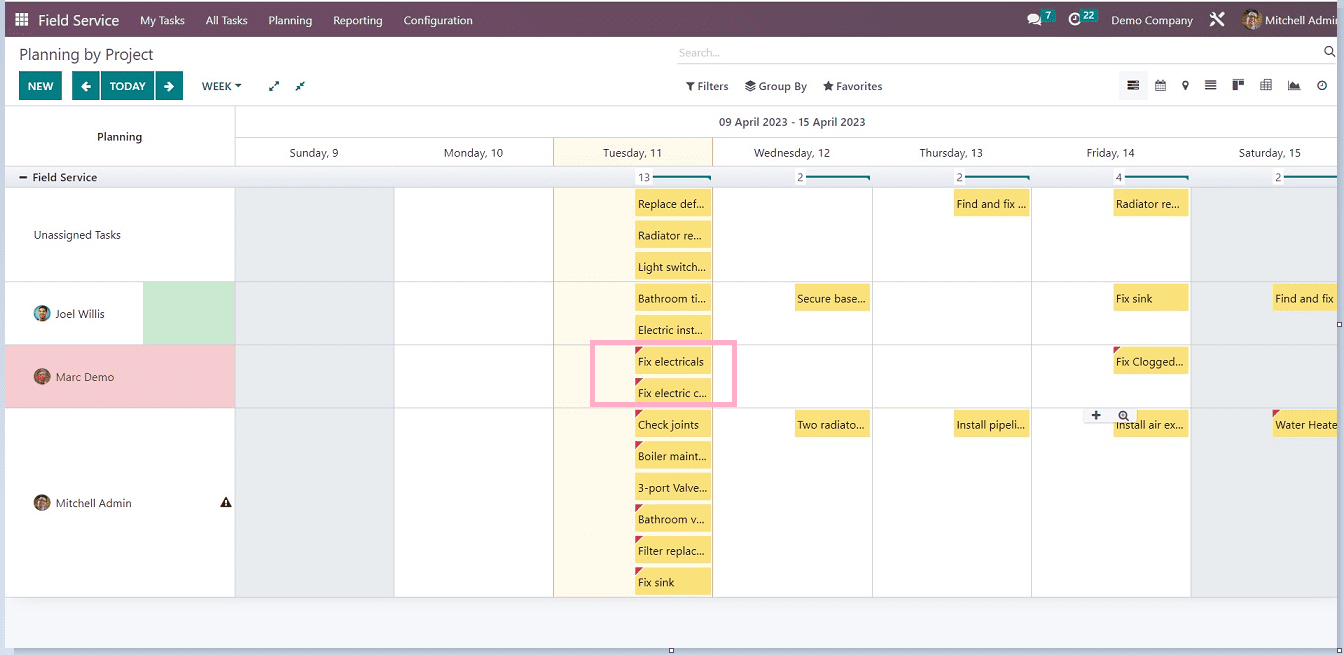
I just dropped the newly created tasks in a different place after dragging them there. You can see that the tasks are arranged in a tidy and organized form.
This blog has covered the planning menu features and functions, as well as the various aspects of task planning, such as by user, project, and worksheet template. The functions and planning views are identical here, but the perspective varies depending on the planning method. The feature allows users to easily manage their tasks and services, even if they have no prior experience with the Odoo platform.