In the ever-evolving landscape of business software, Odoo stands as a powerful and versatile platform, offering a comprehensive suite of applications tailored to meet diverse organizational needs. However, as businesses grow and their requirements become increasingly specialized, the necessity for customization arises. One area where this customization can prove invaluable is in the realm of field widgets – the visual representations of data fields within the user interface.
While Odoo provides a wide array of field widgets out-of-the-box, there may be instances where these pre-existing options fail to align perfectly with your unique business requirements. In such cases, the ability to create custom field widgets becomes a game-changer, empowering developers to craft user experiences that not only meet but exceed expectations.
Creating a Custom Boolean Field Widget
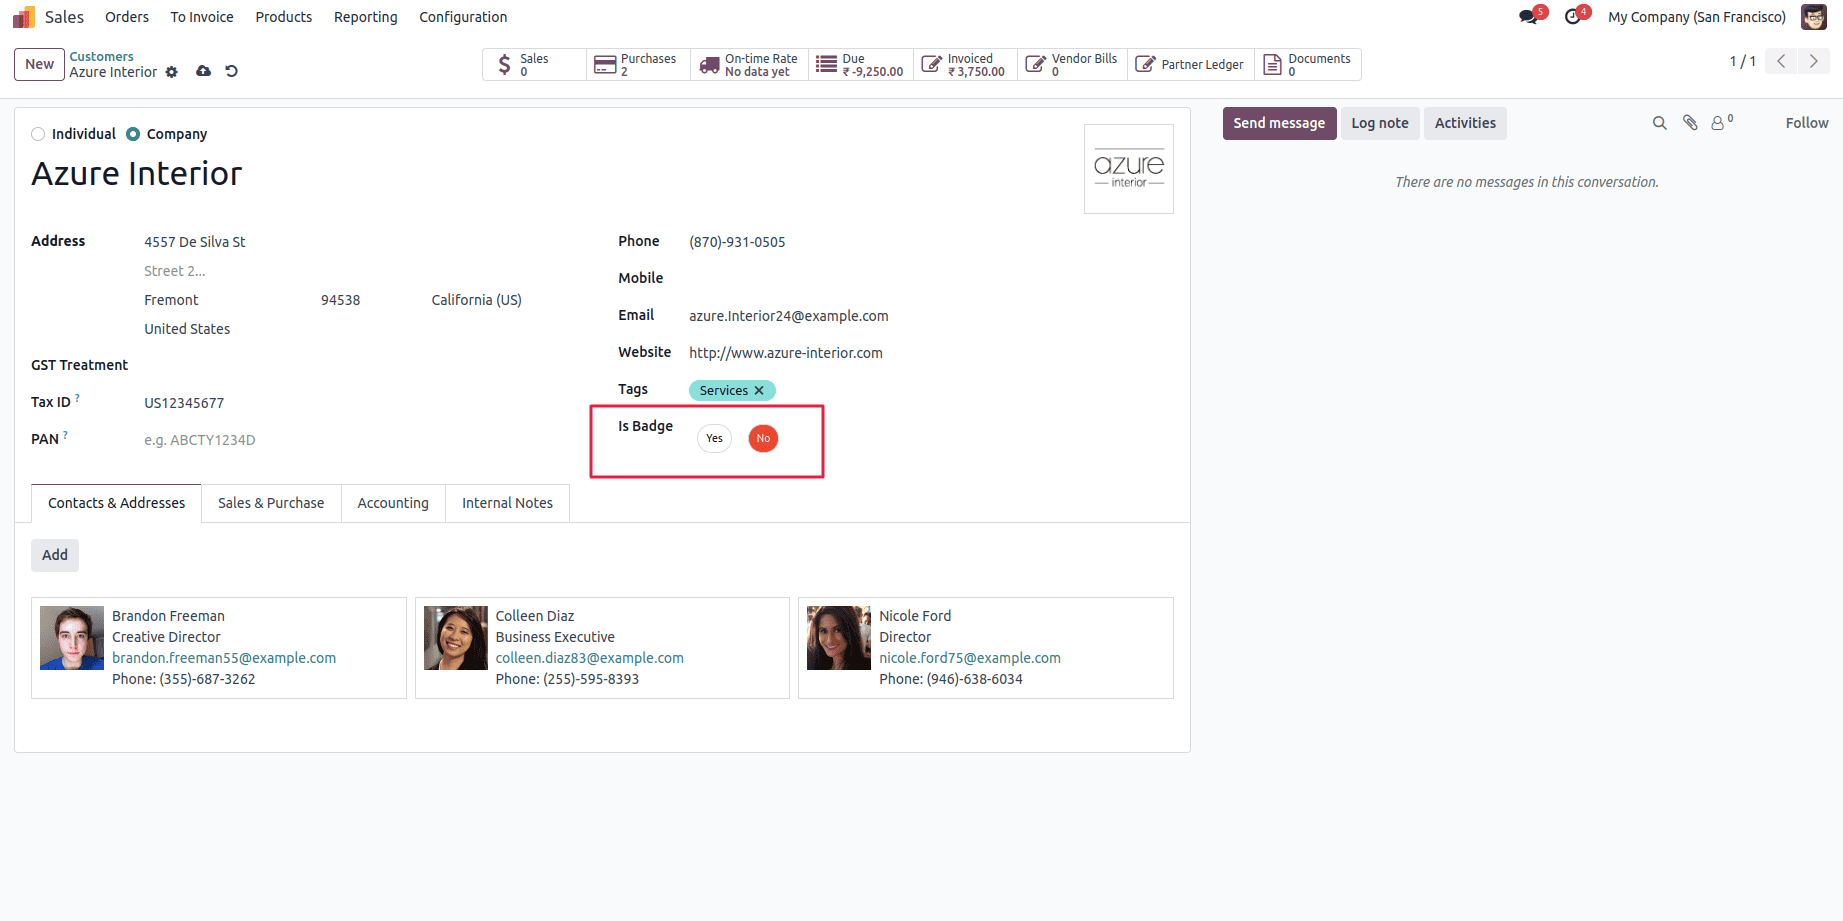
Now that we've laid the foundation, let's embark on the journey of creating a custom Boolean field widget. In this example, we'll create a widget that displays a badge with the text "Yes" or "No," depending on the value of the field.
The first step in creating a custom field widget is to set up a new Odoo module or leverage an existing one. For the sake of this guide, we'll assume you're working within an existing module. If not, you can follow the standard Odoo module creation process.
Creating the JavaScript File
Within your module's static/src/js directory, create a new JavaScript file. This file will house the logic for your custom field widget. For example, let's name it boolean_badge.js.
At the top of your JavaScript file, import the necessary dependencies. These include the registry module from @web/core/registry, the standardFieldProps object from @web/views/fields/standard_field_props, and the Component class from the Owl library.
/**@odoo-module */
import { registry } from "@web/core/registry"
import { standardFieldProps } from "@web/views/fields/standard_field_props";
import { Component } from "@odoo/owl";
Next, define a new class that extends the Component class. This class will contain the logic for rendering the badge and handling user interactions.
export class BoolBadge extends Component{
    setup(){
    const options = this.props.options || {}
    this.trueValue = options.trueValue || "Yes"
    this.trueColor = options.trueColor ||"green"
    this.falseValue =options.falseValue || "No"
    this.falseColor = options.falseColor ||"red"
    this.defaultColor =options.defaultColor || "white"
    }
    updateValue(val){
        this.props.record.update({ [this.props.name]: val })
    }
    get value() {
        return this.props.record.data[this.props.name]
    }
}
In the setup() method, we're setting the default values for the trueValue, falseValue, trueColor, falseColor, and defaultColor properties. These properties will be used to customize the appearance of the badge.
The updateValue() method is called when the value of the field changes. This method updates the state of the widget and re-renders it.
After defining the widget class, you need to register it with Odoo's registry. Add the following code to the end of your JavaScript file:
BoolBadge.template = "BoolBadge"
BoolBadge.props = {
        ...standardFieldProps,
        options: { type:Object, optional: true}
        }
export const boolBadge = {
    component: BoolBadge,
    supportedTypes: ["boolean"],
    extractProps: ({attrs}) =>{
        return {options: attrs.options}
    }
};
registry.category("fields").add("bool_badge", boolBadge)
The template property specifies the name of the template file that will be used to render the widget. The props property specifies the props that are accepted by the widget. The supportedTypes property specifies the types of fields that the widget can be used with. Finally, we register the widget with Odoo's registry using the add method.
Creating the Template File
Next, create a new file in your module's static/src/xml directory called BooleanBadge.xml. This file will contain the template for rendering the widget.
<?xml version="1.0" encoding="UTF-8" ?>
<template>
    <t t-name = "BoolBadge" owl ="1">
    <span class="badge rounded-pill m-2 p-2 border"
          t-att-class="value ? 'text-white':'text-black'"
        t-esc = "trueValue"
          t-attf-style="background-color: {{value ? trueColor : defaultColor }}"
        t-on-click="() => this.updateValue(true)"
    />
    <span class="badge rounded-pill m-2 p-2 border"
          t-att-class="value ? 'text-black':'text-white'"
        t-esc = "falseValue"
          t-attf-style="background-color: {{value ? defaultColor : falseColor }}"
    t-on-click="() => this.updateValue(false)"/>
    </t>
</template>
This template will display two badges, one for the "Yes" value and one for the "No" value. The background color and text color of the badges will be determined by the trueColor, falseColor, and defaultColor properties. The t-on-click attribute is used to bind the updateValue method to the click event of each badge.
Using the Custom Widget
With the JavaScript and XML files in place, you can now use your custom widget in Odoo views. To add the widget to a field, simply add the widget="boolean_badge" attribute to the field in your view definition.
<?xml version="1.0" encoding="UTF-8" ?>
<odoo>
    <record id="view_partner_form_inherit" model="ir.ui.view">
        <field name='name'>partner form</field>
        <field name='model'>res.partner</field>
        <field name="inherit_id" ref="base.view_partner_form"/>
        <field name="arch" type="xml">
            <field name="category_id" position="after">
                <field name="bool_badge" widget="bool_badge"/>
            </field>
        </field>
    </record>
</odoo>
In this example, we're adding the boolean_badge widget to the bool_badge field in the product template form view.

Creating custom field widgets in Odoo 17 is a powerful tool that empowers developers to tailor the user experience to meet the unique needs of their applications. By leveraging the modular architecture of Odoo's web client and the flexibility of the Owl framework, you can craft visually appealing and intuitive field representations that enhance usability and user satisfaction.
To read more about How to Create a Field Widget in the Odoo 16, refer to our blog How to Create a Field Widget in the Odoo 16.