Hadoop is an open-source framework designed for storing and processing large volumes of data across clusters of computers. It provides a scalable and cost-effective solution for handling big data. The core components of Hadoop include the Hadoop Distributed File System (HDFS) for storage and the MapReduce programming model for parallel data processing. Developed by the Apache Software Foundation, Hadoop enables organizations to efficiently manage and analyze massive datasets, making it a crucial tool in the field of big data and analytics.
Hadoop's architecture consists of three main components: HDFS for storage, Yet Another Resource Negotiator (YARN) for resource management, and MapReduce for data processing. HDFS stores data across multiple machines, YARN manages resources and job execution, and MapReduce processes data in parallel. Together, these components enable scalable and efficient processing of large datasets across clusters of commodity hardware.
To install Hadoop on Ubuntu, follow these steps:
1. Prepare Your Environment:
Ensure your Ubuntu system is up-to-date by running:
sudo apt update
sudo apt upgrade
2. Install Java:
Install Java Development Kit (JDK) using:
sudo apt install default-jdk
Verify the installation by checking the Java version:
java -version
3. Create a Hadoop User:
Create a dedicated user for running Hadoop services to enhance security and manage permissions effectively:
sudo addgroup hadoop_test
First, you need to create a user group that will be specifically used for Hadoop operations. You can choose any name.
sudo adduser --ingroup hadoop_test hd_user
Next, create a new user and add this user to the group that you created. You can replace hd_user with any username you prefer.
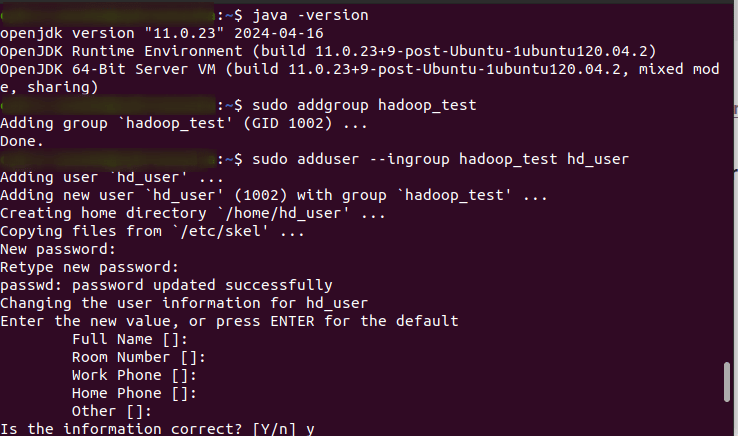
You will be asked to set a password for the new user. After setting the password, you’ll be prompted to enter additional information about the user as shown in the screenshot above. You can enter these details or simply press Enter to accept the default values.
4. Installing SSH:
SSH (Secure Shell) is essential for enabling secure communication between Hadoop nodes. SSH allows you to connect to remote machines securely and is used by Hadoop for managing its distributed nodes. Setting up SSH is crucial for passwordless login, which simplifies the management of a Hadoop cluster.
First, you need to ensure that SSH is installed on your Ubuntu system. If it's not already installed, you can install it using the following command:
sudo apt-get install ssh
To confirm that SSH has been installed correctly, you can check the locations of the SSH client and server executables:
which ssh
which sshd
The output of these commands should show paths like ‘/usr/bin/ssh’ and ‘/usr/sbin/sshd’, indicating that SSH client and server are installed.
Key-based authentication allows you to log in to remote machines without needing to enter a password every time.
5. Creating and Setting Up SSH Key-Based Authentication:
Switch to the created user:
su - hd_user
Generate an SSH key pair:
ssh-keygen -t rsa
During the execution of this command, you will be prompted to specify the file name and passphrase. By default, file name will be ‘/home/hd_user/.ssh/id_rsa’. You can press Enter to accept this default. passphrase is optional but recommended for added security. You can leave it empty by pressing Enter.
Append the public key to the authorized_keys file to enable passwordless SSH login:
cat $HOME/.ssh/id_rsa.pub >> $HOME/.ssh/authorized_keys
Ensure the correct permissions are set for the .ssh directory and the authorized_keys file to maintain security:
chmod 700 $HOME/.ssh
chmod 600 $HOME/.ssh/authorized_keys
Verify that SSH is working correctly by connecting to localhost:
ssh localhost
When connecting for the first time, you may see a message asking you to confirm the authenticity of the host. Type ‘yes’ and press ‘Enter’ to add the localhost to the list of known hosts.
6. Installing Hadoop on Ubuntu:
Navigate to the Apache Hadoop website and download the latest stable version of Hadoop. You can use the wget command to download it directly from the command line:
wget https://downloads.apache.org/hadoop/common/hadoop-3.3.6/hadoop-3.3.6.tar.gz
Once the download is complete, extract the Hadoop archive to a directory of your choice. For example:
tar -xzvf hadoop-3.3.6.tar.gz
Move the extracted Hadoop directory to /usr/local for easier access and management. This may require superuser (sudo) privileges:
sudo mv hadoop-3.3.6 /usr/local/hadoop
If the hd_user doesn't have sudo privileges, switch to a user with sudo privileges and edit the /etc/sudoers file:
sudo visudo
Add the following line to grant hd_user sudo privileges:
hd_user ALL=(ALL:ALL) ALL
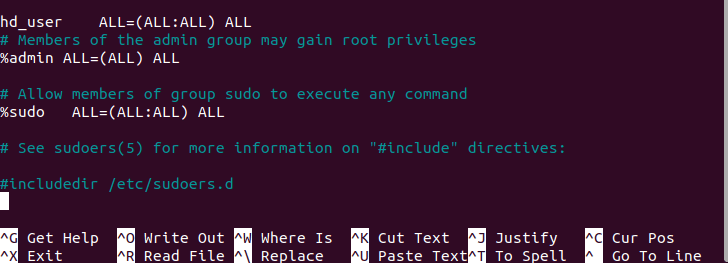
Save the file using ‘Ctrl+O’, press ‘Enter’, and exit the editor with ‘Ctrl+X’.
7. Configure Environment Variables
Configuring environment variables is an essential step to ensure Hadoop and its dependencies are correctly set up and can be accessed system-wide. This involves modifying configuration files to set paths and options for Hadoop and Java.
a. Modify ~/.bashrc:
The ~/.bashrc file is a script that runs whenever a new terminal session is started. Adding Hadoop environment variables here ensures that they are automatically set whenever you open a terminal.
sudo nano ~/.bashrc
Add the following lines to the end of the ~/.bashrc file:
export JAVA_HOME=/usr/lib/jvm/java-11-openjdk-amd64
export HADOOP_HOME=/usr/local/hadoop
export HADOOP_INSTALL=$HADOOP_HOME
export HADOOP_MAPRED_HOME=$HADOOP_HOME
export HADOOP_COMMON_HOME=$HADOOP_HOME
export HADOOP_HDFS_HOME=$HADOOP_HOME
export YARN_HOME=$HADOOP_HOME
export HADOOP_COMMON_LIB_NATIVE_DIR=$HADOOP_HOME/lib/native
export PATH=$PATH:$HADOOP_HOME/sbin:$HADOOP_HOME/bin
export HADOOP_OPTS="-Djava.library.path=$HADOOP_HOME/lib/native"
JAVA_HOME: Points to the Java installation directory.
HADOOP_HOME: Specifies the root directory of the Hadoop installation.
HADOOP_INSTALL: Another reference to the Hadoop installation directory.
HADOOP_MAPRED_HOME, HADOOP_COMMON_HOME, HADOOP_HDFS_HOME, YARN_HOME: Point to various Hadoop components.
HADOOP_COMMON_LIB_NATIVE_DIR: Points to the directory containing native Hadoop libraries.
PATH: Adds Hadoop’s binary directories to the system path.
HADOOP_OPTS: Sets additional Hadoop options, like the Java library path.
Make sure that you have added correct path for each. Change the Java version according to the version installed on your PC.

Save and exit the file. Press Ctrl + X, then Y, and hit Enter to save the changes and exit.
To apply the changes made to ~/.bashrc immediately without restarting the terminal, use the following command:
source ~/.bashrc
This will reload the ~/.bashrc file, applying the changes.
b. Modify hadoop-env.sh:
The hadoop-env.sh file is used to configure the environment for Hadoop daemons. Setting the JAVA_HOME variable here ensures that Hadoop uses the correct Java version.
sudo nano /usr/local/hadoop/etc/hadoop/hadoop-env.sh
Once the file is open, add or modify the following line:
export JAVA_HOME=/usr/lib/jvm/java-11-openjdk-amd64
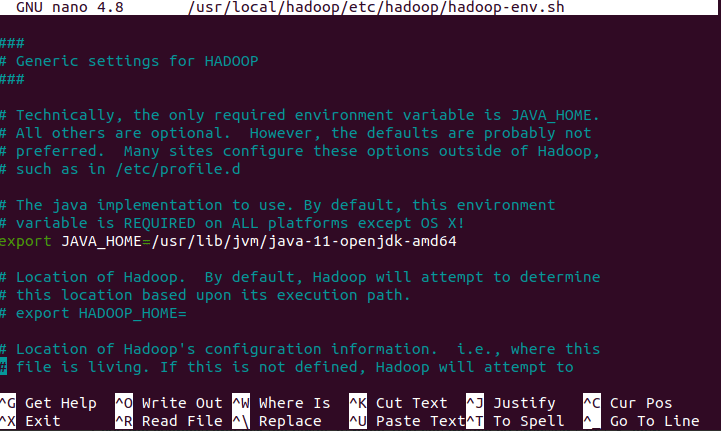
Press Ctrl + X, then Y, and hit Enter for saving the changes.
c. Modify core-site.xml:
Configures the core settings, such as the default filesystem.
sudo nano /usr/local/hadoop/etc/hadoop/core-site.xml
Once the file is open, Insert the following configuration inside the <configuration> tags:
<configuration>
 <property>
             <name>fs.defaultFS</name>
             <value>hdfs://localhost:9000</value>
 </property>
</configuration>
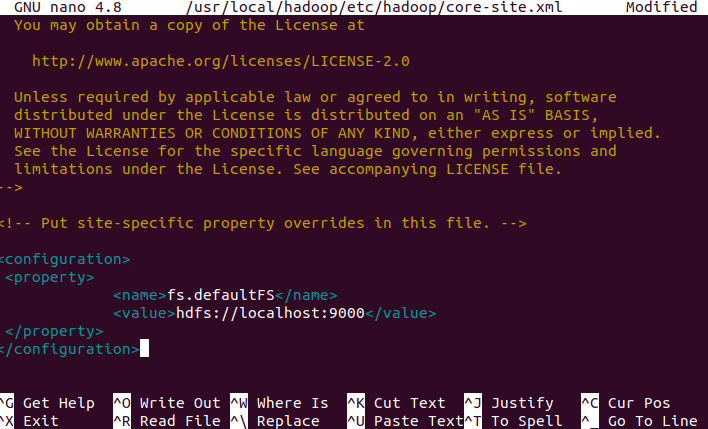
Save the changes and exit the editor. Press Ctrl + X, then Y, and hit Enter. This configuration sets the default filesystem to HDFS running on localhost with the port 9000.
d. Modify mapred-site.xml:
Configures MapReduce settings. If the file does not exist, create it from the template.
sudo cp /usr/local/hadoop/etc/hadoop/mapred-queues.xml.template /usr/local/hadoop/etc/hadoop/mapred-site.xml
sudo nano /usr/local/hadoop/etc/hadoop/mapred-site.xml
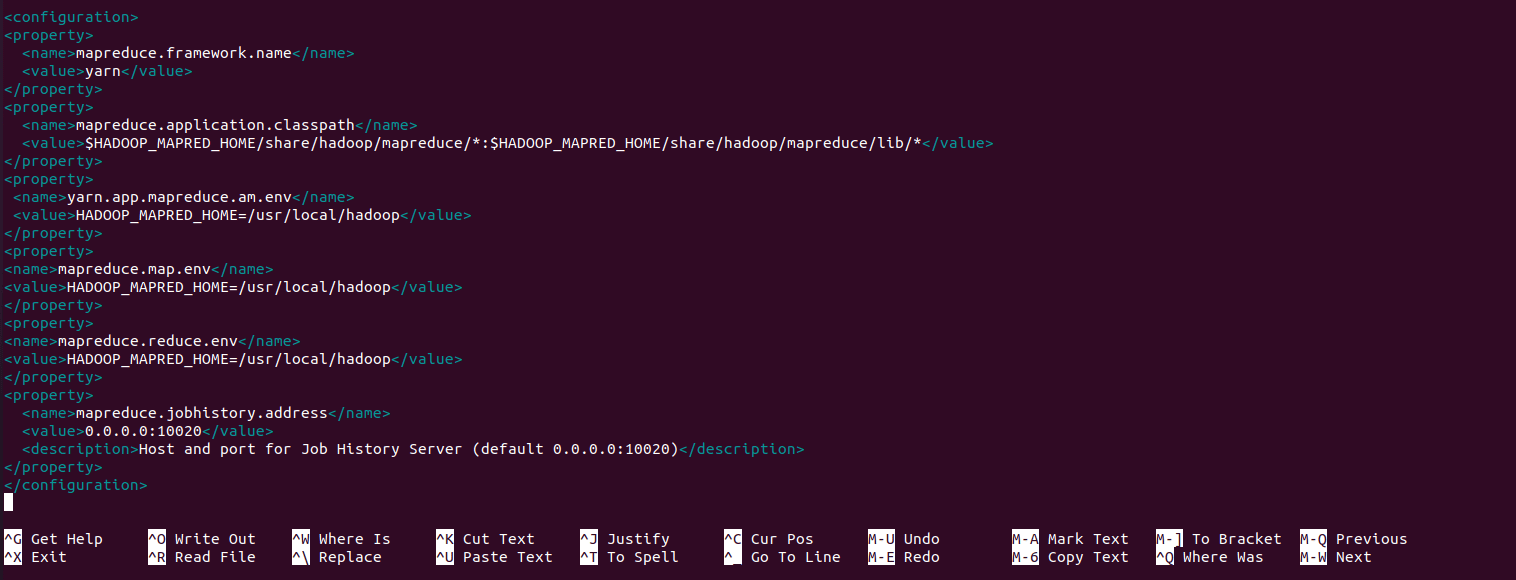
Insert the following configuration inside the <configuration> tags:
<configuration>
	<property>
    	<name>mapreduce.framework.name</name>
    	<value>yarn</value>
	</property>
	<property>
    	<name>mapreduce.application.classpath</name>
    	<value>$HADOOP_MAPRED_HOME/share/hadoop/mapreduce/*:$HADOOP_MAPRED_HOME/share/hadoop/mapreduce/lib/*</value>
	</property>
	<property>
    	<name>yarn.app.mapreduce.am.env</name>
    	<value>HADOOP_MAPRED_HOME=/usr/local/hadoop</value>
	</property>
	<property>
    	<name>mapreduce.map.env</name>
    	<value>HADOOP_MAPRED_HOME=/usr/local/hadoop</value>
	</property>
	<property>
    	<name>mapreduce.reduce.env</name>
    	<value>HADOOP_MAPRED_HOME=/usr/local/hadoop</value>
	</property>
	<property>
    	<name>mapreduce.jobhistory.address</name>
    	<value>0.0.0.0:10020</value>
    	<description>Address and port for Job History Server (default 0.0.0.0:10020)</description>
	</property>
</configuration>
mapreduce.framework.name: Specifies that YARN is the resource management framework.
mapreduce.application.classpath: Sets the classpath for MapReduce applications.
yarn.app.mapreduce.am.env, mapreduce.map.env, mapreduce.reduce.env: Set the environment variables for the MapReduce Application Master and tasks.
mapreduce.jobhistory.address: Configures the address and port for the Job History Server.
Press Ctrl + X, then Y, and hit Enter.
e. Modify hdfs-site.xml:
Configures HDFS-specific settings such as the NameNode and DataNode directories and replication factor.
sudo nano /usr/local/hadoop/etc/hadoop/hdfs-site.xml
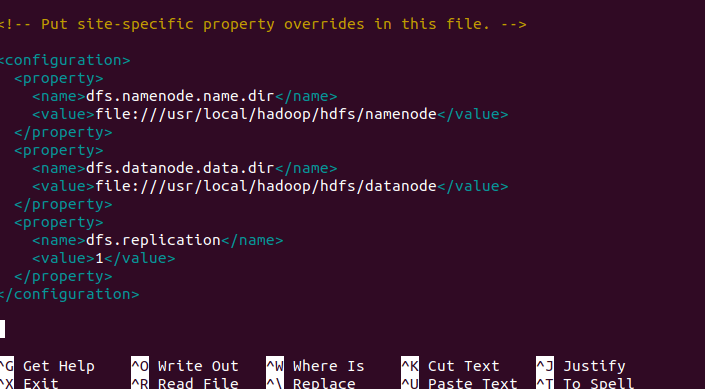
Insert the following configuration inside the <configuration> tags:
<configuration>
  <property>
    <name>dfs.namenode.name.dir</name>
    <value>file:///usr/local/hadoop/hdfs/namenode</value>
  </property>
  <property>
    <name>dfs.datanode.data.dir</name>
    <value>file:///usr/local/hadoop/hdfs/datanode</value>
  </property>
  <property>
    <name>dfs.replication</name>
    <value>1</value>
  </property>
</configuration>
dfs.namenode.name.dir: Directory for storing NameNode data.
dfs.datanode.data.dir: Directory for storing DataNode data.
dfs.replication: Sets the default replication factor for HDFS.
Press Ctrl + X, then Y, and hit Enter.
f. Modify yarn-site.xml:
Configures YARN-specific settings.
sudo nano /usr/local/hadoop/etc/hadoop/yarn-site.xml
Insert the following configuration inside the <configuration> tags:
<configuration>
    <property>
        <name>yarn.nodemanager.aux-services</name>
        <value>mapreduce_shuffle</value>
    </property>
</configuration>
yarn.nodemanager.aux-services: Enables the auxiliary service for MapReduce shuffle.
Press Ctrl + X, then Y, and hit Enter.
7. Initialize Hadoop Distributed File System (HDFS):
Create necessary directories and set permissions:
sudo mkdir -p /usr/local/hadoop/hdfs/namenode
sudo mkdir -p /usr/local/hadoop/hdfs/datanode
sudo chown -R hd_user:hadoop_test /usr/local/hadoop/hdfs
sudo chmod -R 700 /usr/local/hadoop/hdfs
Formatting the NameNode initializes the metadata for the Hadoop file system. This step should be performed only once, typically during the initial setup, as reformatting will erase the existing metadata and file system contents.
hadoop namenode -format
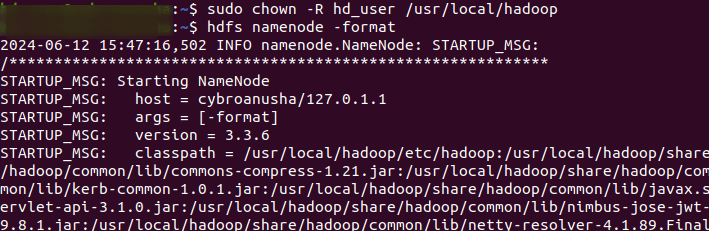
Be aware that formatting the NameNode will erase all existing data in HDFS, so use this command with caution, particularly in production environments. Once the NameNode is formatted, you can start the Hadoop services to utilize HDFS and run MapReduce jobs.
8. Starting Hadoop Services:
After formatting the NameNode, you need to start the HDFS daemons, which include the NameNode and DataNode. Starting Hadoop services is the process of initiating the necessary daemons and components within the Hadoop ecosystem to make the cluster operational. These services include both Hadoop Distributed File System (HDFS) and Yet Another Resource Negotiator (YARN), which are essential for storing data and managing resources respectively.
start-dfs.sh
start-yarn.sh
start-dfs.sh: This script starts the Hadoop Distributed File System (HDFS) daemons, including the NameNode and DataNode.
NameNode: Manages the file system namespace and regulates access to files by clients.
DataNode: Stores actual data in the HDFS by managing the storage attached to the nodes.
Starting HDFS allows it to begin functioning, enabling it to store and provide access to data across the cluster. This is essential for applications that require reliable, distributed file storage.

start-yarn.sh: This script starts the Yet Another Resource Negotiator (YARN) daemons, including the ResourceManager and NodeManagers.
ResourceManager: Manages the allocation of resources across the cluster, coordinating the execution of applications.
NodeManager: Manages resources on a single node, executing tasks requested by the ResourceManager.
YARN is responsible for resource management and job scheduling in Hadoop. Starting YARN enables it to manage resources efficiently across the cluster and run various types of applications, including those using MapReduce.

In older versions of Hadoop, ‘start-all.sh’ was used to start all Hadoop daemons, including both HDFS and YARN. However, in newer versions, it's recommended to start HDFS and YARN separately for better control and management.
Command to start all daemons (if available):
start-all.sh
However, start-all.sh has been deprecated in newer Hadoop versions. It's now better to use separate scripts like start-dfs.sh and start-yarn.sh for more precise control over Hadoop's components. This approach ensures better management of Hadoop services.
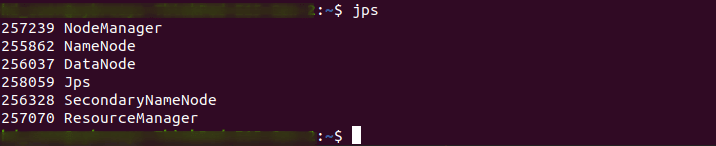
9. Verifying Hadoop Daemon Status:
Verifying Hadoop daemon status involves using the ‘jps’ command, which lists Java processes to check if Hadoop daemons such as NameNode, DataNode, SecondaryNameNode, ResourceManager, and NodeManagers are running. Each daemon corresponds to a Java process, confirming its operational status within the Hadoop cluster. This step ensures that all necessary components are active and ready to handle data storage, processing, and resource management tasks effectively.
jps
10. Accessing Hadoop NameNode Web UI:
Upon accessing http://localhost:9870/, you will see the Hadoop NameNode Web UI. This interface provides various tabs and sections that allow you to monitor the health, status, and configuration of the Hadoop NameNode.
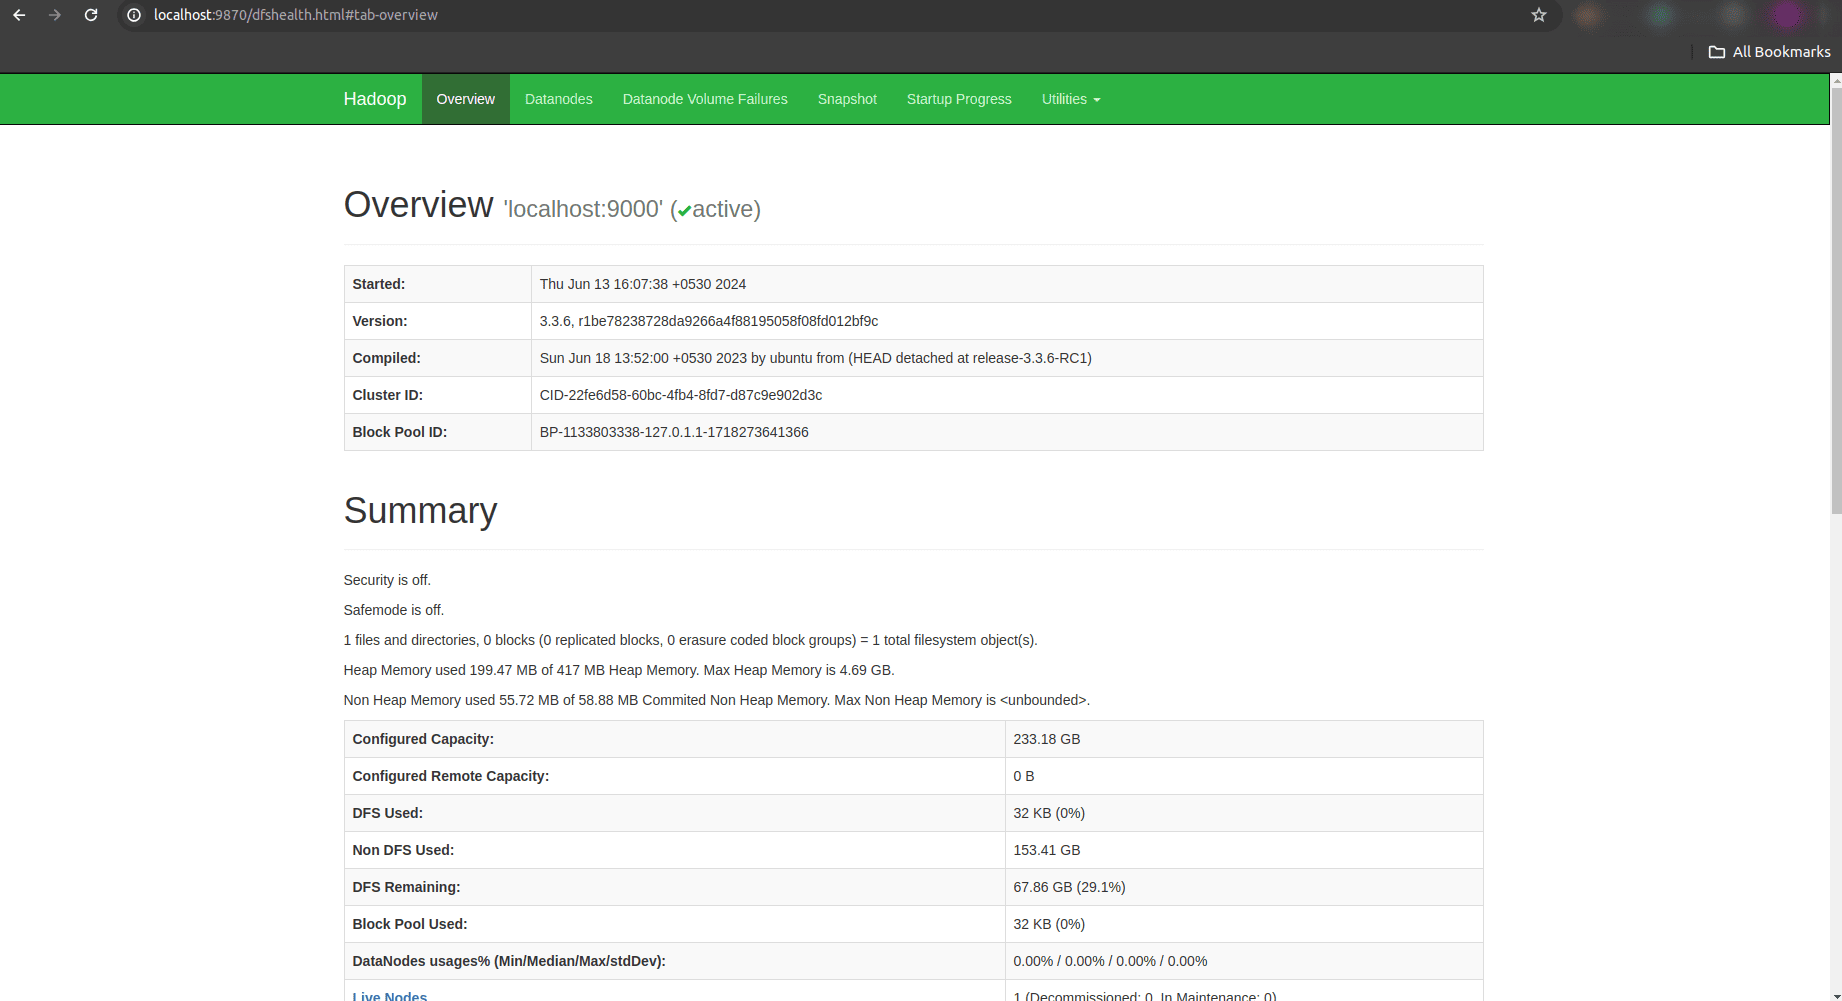
The NameNode UI typically displays essential information such as cluster summary, data nodes, HDFS capacity, file system usage, and more. It provides insights into the overall state of the HDFS, allowing administrators and users to troubleshoot issues, manage files, and ensure optimal performance of the Hadoop cluster.
11. Accessing Hadoop ResourceManager Web UI:
Upon accessing http://localhost:8088/, you will be directed to the Hadoop ResourceManager Web UI. This interface presents various tabs and sections that provide comprehensive information about resource management and application execution within the Hadoop cluster.
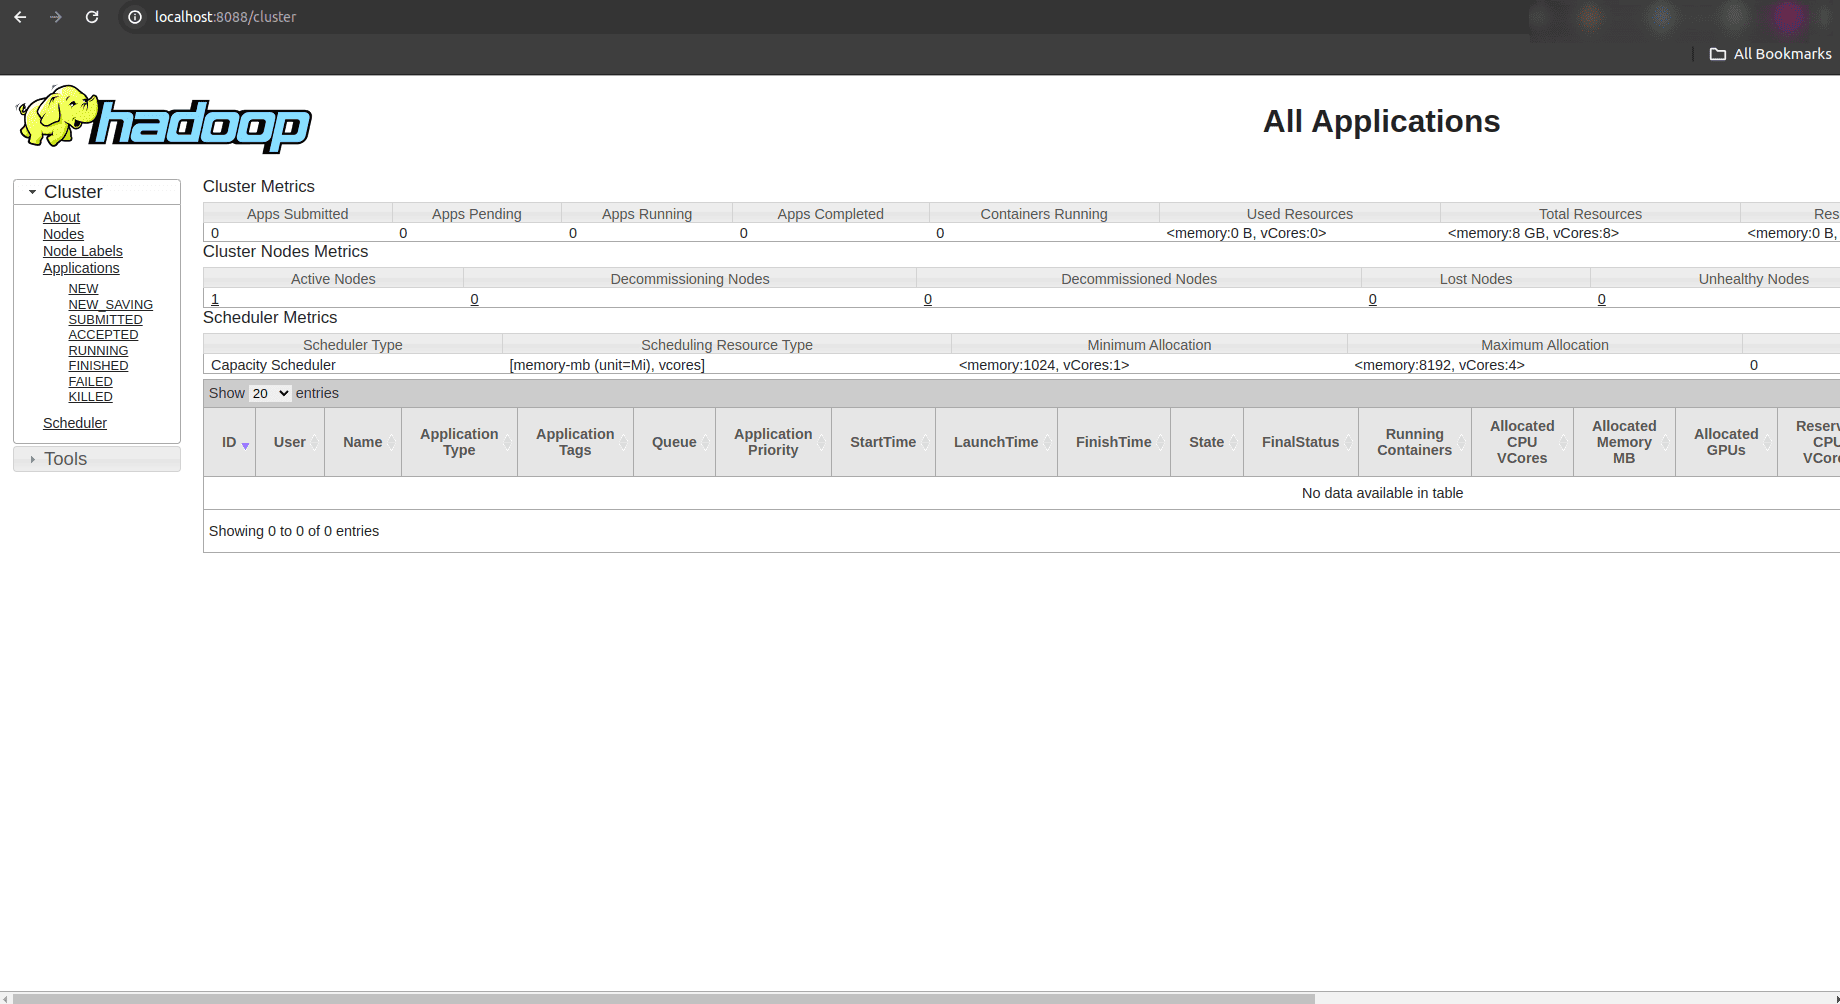
The ResourceManager UI typically displays a dashboard that includes summary information about active and completed applications, cluster utilization metrics, node managers, queues, and more. This allows administrators and users to monitor the current state of resource allocation and utilization.
12. Stopping Hadoop Services:
Stopping Hadoop services is necessary for maintenance tasks, system shutdowns, or when scaling down resources. To stop the Hadoop Distributed File System (HDFS) services, including the NameNode and DataNodes, use the following command:
stop-dfs.sh
This script gracefully shuts down the HDFS services. It ensures that all data is safely written to disk and that the services stop cleanly without data loss or corruption.
To stop the Yet Another Resource Negotiator (YARN) services, which include the ResourceManager and NodeManagers, use the following command:
stop-yarn.sh
This script initiates the shutdown process for YARN, allowing all running applications to complete their tasks and release resources before shutting down.
In older Hadoop versions, you might find a deprecated script called stop-all.sh, which attempts to stop all Hadoop services in one command. However, it’s recommended to use stop-dfs.sh and stop-yarn.sh separately for more control and to avoid potential issues.
stop-all.sh
After executing these commands, it’s crucial to verify that the Hadoop daemons have indeed stopped. You can use the jps command to check for running Java processes associated with Hadoop.
jps
In conclusion, setting up Hadoop on Ubuntu involves configuring Java, creating dedicated users, and configuring essential environment variables and configuration files. Accessing the Hadoop NameNode and ResourceManager Web UIs provides visibility into cluster health and job status, while starting and stopping services ensures efficient cluster management. Mastering these basics equips users to leverage Hadoop for scalable data storage and processing, making it a powerful tool in the realm of big data analytics.
To read more about How to Install Odoo 17 on Ubuntu 20.04 LTS Server, refer to our blog How to Install Odoo 17 on Ubuntu 20.04 LTS Server .