Odoo 17 is a powerful and versatile ERP system that allows businesses to streamline their operations across various modules, including accounting, HR, inventory, and sales. One of the standout features of Odoo is its robust reporting capabilities, which enable users to generate detailed reports tailored to their specific needs. Customizing existing reports in Odoo 17 can help you get more out of your data and present it in a way that best suits your business requirements.
In this blog, we will guide you through the process of customizing reports in Odoo 17.
1. Understanding the Basics of Odoo Reports
Odoo reports are typically built using a combination of QWeb (Odoo's XML-based templating engine), Python, and the Odoo framework. These reports can be found in various modules and are essential for extracting valuable insights from your data. Before diving into customization, it's crucial to understand the structure of these reports:
Models: Define the data structure and business logic.
Views: Determine how data is presented to the user.
QWeb Templates: Control the layout and styling of the reports.
2. Locating Existing Reports
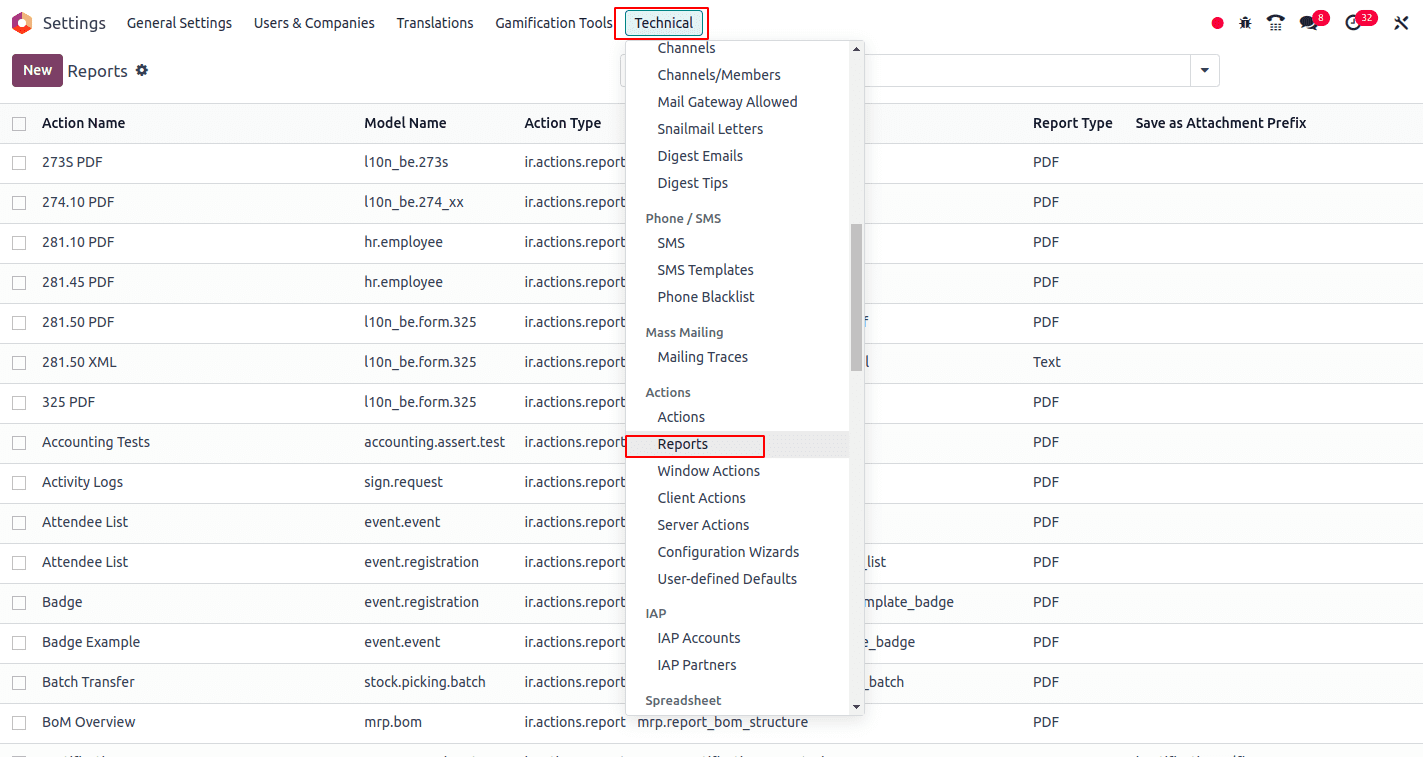
To customize a report, you first need to locate it within Odoo. You can find all reports and their details in the Technical section in Odoo settings. Here, you can get the template name and code.

The above screenshot shows the report menu. Clicking on it will display a list view of all report templates in Odoo.
3. Inheriting and Modifying Existing Reports
To customize an existing report, you need to inherit it in your custom module. Here's an example of how to do this:
* Create a new XML file in your custom module's views directory.
* Use the <template> tag to inherit the existing report template and make your modifications.
For example, add a new field for customer code in the res.partner model and include this field in the invoice template.
class ResPartner(models.Model):
   """Inheriting res partner for adding customer code for all customers"""
   _inherit = 'res.partner'


   customer_code = fields.Char(string='Customer ID',
                   help='Unique Identification number for partners')
Now include this field in all invoice PDF reports. To do that, inherit the invoice PDF report template.
<?xml version="1.0" encoding="utf-8"?>
<odoo>
<!--    Inheriting invoice pdf reports for adding customer code along with the address of customer -->
    <template id="report_invoice_document" inherit_id="account.report_invoice_document">
        <xpath expr="//div[@name='address_same_as_shipping']//t[@t-set='address']" position="inside">
            <div t-if="o.partner_id.customer_code">
                Customer ID: <span t-out="o.partner_id.customer_code"/>
            </div>
        </xpath>
        <xpath expr="//div[@name='address_not_same_as_shipping']//t[@t-set='address']" position="inside">
            <div t-if="o.partner_id.customer_code">
                Customer ID: <span t-out="o.partner_id.customer_code"/>
            </div>
        </xpath>
        <xpath expr="//div[@name='no_shipping']//t[@t-set='address']" position="inside">
            <div t-if="o.partner_id.customer_code">
                Customer ID: <span t-out="o.partner_id.customer_code"/>
            </div>
        </xpath>
    </template>
</odoo>
In this example, the Odoo invoice PDF template is customized to include a customer code in the address section. By using XPath expressions and template inheritance, it ensures that the customer code is displayed correctly regardless of the address configuration.
Customizing existing reports in Odoo 17 allows you to tailor the system to meet your unique business needs. By following the steps outlined in this blog, you can create a custom module, inherit and modify existing reports, and implement dynamic changes using Python. With careful planning and testing, you can enhance your Odoo reports and gain deeper insights into your business operations.
To read more about How To Customize Existing Dynamic Reports In Odoo 16, refer to our blog How To Customize Existing Dynamic Reports In Odoo 16.