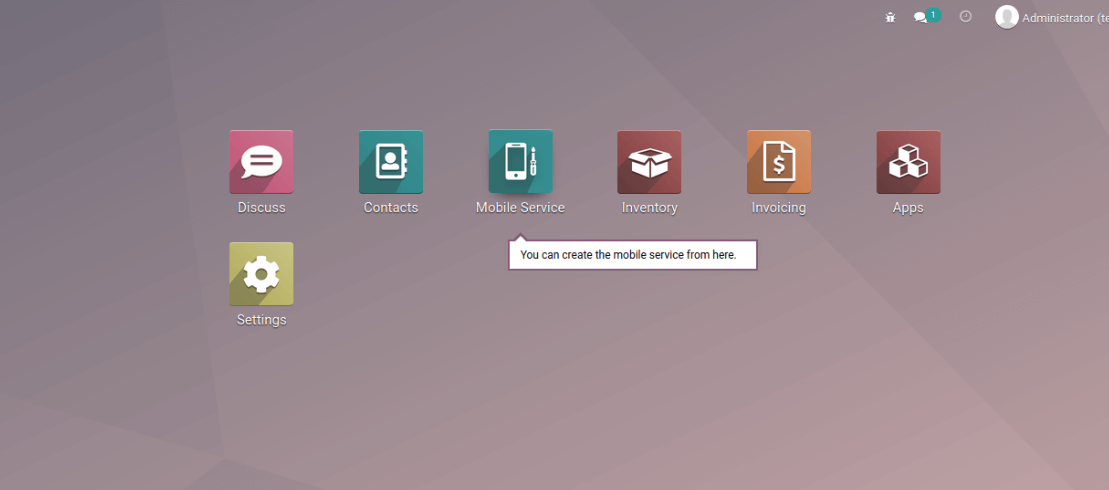
Tour is a guideline of a module which gives the functional details about the module by giving live scenarios step by step. In this blog, we will discuss the creation of tour in a custom module.
Steps to Creating a tour
For creating a tour we have to specify the details in the javascript file in /static/src/js/tour.js
Example:
odoo.define(mobile_service_shop.example_tour', function(require) {
    "use strict";
    // Minimal requirements needed to create a tour
    var core = require('web.core');
    var tour = require('web_tour.tour');
    // Allows you to translate tour steps
    var _t = core._t;
    tour.register('mobile_tour', {
        url: "/web",
    }, [tour.STEPS.SHOW_APPS_MENU_ITEM, {
        trigger: '.o_app[data-menu-xmlid="mobile_service_shop.mobile_service_main_menu"]',
        content: _t('For managing mobile service? click here.'),
        position: 'bottom',
    }]);
});
Options:
Options (second argument of tour.register):
Mobile_tour - technical name of the tour.
url - page the tour should be starting.
skip_enabled - adds skip button for tips.
wait_for - wait for deferred object before running the script.
test - only for tests.
edition - set enterprise if it is enterprise otherwise odoo will consider as community.
Attributes:
content - is the text that we want to display on the tour.
trigger - will trigger the tour, in this mobile_service_shop is the module name and mobile_service_main_menu is the main menu of the module.
Position - is the position that we want to display the text and icon.
timeout - maximum waiting time to conditions.
width - width that set to the text specified in content, the default will 270.
extra_trigger - is the option to make sure that your step is in the correct screen, for example, ‘trigger’:’.o_form_editable’ can be seen in other screens with this class. But if you write an option ‘extra_trigger’:’.o_mobile_service’ in the step then it will show in the correct screen.
Predefined steps:
SHOW_APPS_MENU_ITEM - build-in function to start from the home screen for blinking icon on the app.
TOGGLE_HOME_MENU - to switch between the app and main screen of odoo.
WEBSITE_NEW_PAGE - it is used in frontend to create a new page on the website.
Trigger in tour:
'.o_app[data-menu-xmlid="odoo_app_name.xml_id"]:
{
    trigger:      '.o_app[data-menu-xmlid="mobile_service_shop.mobile_service_main_menu"]',
    content: _t('Want to manage your details? It starts here.'),
    position: 'bottom',
}
Input:
{    trigger: 'input[placeholder="Name"]',
    content: _t('Fill in the name of the record first.'),
    position: 'bottom',
}
.o-kanban-button-new:
{
    trigger: '.o-kanban-button-new',
    content: _t('Let\'s create your first record.'),
    position: 'bottom',
}
.o_form_button_edit:
{
    trigger: '.o_form_button_edit',
    content: _t('Let\'s modify our record.'),
    position: 'bottom',
}
.o_form_button_save:
{
    trigger: '.o_form_button_save',
    content: _t('Click on save to save your new record in the database.'),
    position: 'bottom',
}
Breadcrumb-item:
{
    trigger: '.breadcrumb-item:not(.active):last',
    content: _t('Use the breadcrumbs to go back.'),
    position: 'bottom',
}
Including javascript file:
<odoo>
   <template id="assets_backend" name="tour_demo assets" inherit_id="web.assets_backend">
       <xpath expr="." position="inside">
           <script type="text/javascript"
src="/mobile_service_shop/static/src/js/mobile_tour.js"></script>
       </xpath>
   </template>
</odoo>
Including manifest file:
"depends": [
    "web_tour",
],
# ...
"demo": [
    "views/mobile_tour.xml",
],
