In Odoo 18, sequence numbers are crucial for providing unique identifiers to records across various models. These identifiers can follow a customizable pattern, such as a prefix or padding, making it easier to track records in an organized manner. Sequence numbers are widely used in Odoo applications for invoices, orders, products, and more.
In this guide, we’ll walk through two approaches to creating custom sequence numbers: one by defining them through code for a specific model and another using Odoo’s built-in settings interface. To demonstrate, we’ll create a new Library Management module, where each book in the library is assigned a unique reference number.
Why use Sequence Numbers?
Using sequence numbers ensures that each record has a unique identifier, which is crucial for maintaining clarity, consistency, and traceability in business processes. By assigning sequence numbers to invoices, orders, or products, organizations can streamline record management, reduce duplication, and enhance control over transactions. This practice supports accurate tracking and retrieval of information, improves reporting precision, and enables seamless integration with other systems, ensuring data integrity across platforms. Sequence numbers also help in compliance by providing a clear audit trail, preventing errors, and making it easier to detect discrepancies or fraudulent activities.
Benefits of Using Sequence Numbers
1. Uniqueness: Ensures that every record can be identified distinctly.
2. Traceability: Facilitates easy tracking of records throughout their lifecycle.
3. Customization: Allows businesses to define formats that align with their branding and operational needs.
Method 1: Creating a Sequence in Code
Step 1: Define the Model
First, create the model where you want to apply the sequence. Here, we’ll create a model for library.book, representing books in a library, and configuring a sequence to generate unique reference numbers.
from odoo import api, fields, models, _
class LibraryBook(models.Model):
   _name = 'library.book'
   _description = 'Library Book'
   name = fields.Char(string="Book", required=True, help="Book Title")
   author = fields.Char(string="Author", required=True, help='Author of the Book')
   isbn = fields.Char(string="ISBN", required=True, help="ISBN of Book")
   reference_number = fields.Char(string="Reference Number", default=lambda self: _('New'), readonly=True, copy=False, help="Reference Number of the book")
   @api.model_create_multi
   def create(self, vals):
       """Automatically generate a reference number for new books."""
       if vals.get('reference_number', _('New')) == _('New'):
           vals['reference_number'] = self.env['ir.sequence'].next_by_code('library.book')
       return super(LibraryBook, self).create(vals)
Explanation of Code:
* reference_number: A character field with a default value of 'New.' This field will store the unique identifier for each book record.
* create: Overrides the create method to assign a sequence-generated identifier to reference_number each time a new record is created.
Step 2: Define the Sequence in XML
Now that we have our model set up, we need to define a sequence for the library.book model. This will be done in an XML file within the data directory of your module.
Create an XML file named ir_sequence_data.xml with the following content:
<?xml version="1.0" encoding="UTF-8" ?>
<odoo>
   <data noupdate="1">
       <record id="ir_sequence_library_book" model="ir.sequence">
           <field name="name">Library Book Reference Numbers</field>
           <field name="code">library.book</field>
           <field name="prefix">LIB</field>
           <field name="padding">5</field>
           <field name="number_next">1</field>
           <field name="number_increment">1</field>
           <field name="company_id" eval="False"/>
       </record>
   </data>
</odoo>
Explanation of XML Fields
* id: Unique identifier for the sequence record.
* name: Descriptive name for the sequence (e.g., Library Book Reference Numbers).
* code: This associates the sequence with our library.book model.
* prefix: A prefix for the reference number (e.g., LIB for Library).
* padding: Defines the number of digits in the sequence.
* number_next: The starting number for the sequence.
* number_increment: The increment step for the sequence.
Step 3: Test the Sequence Generation
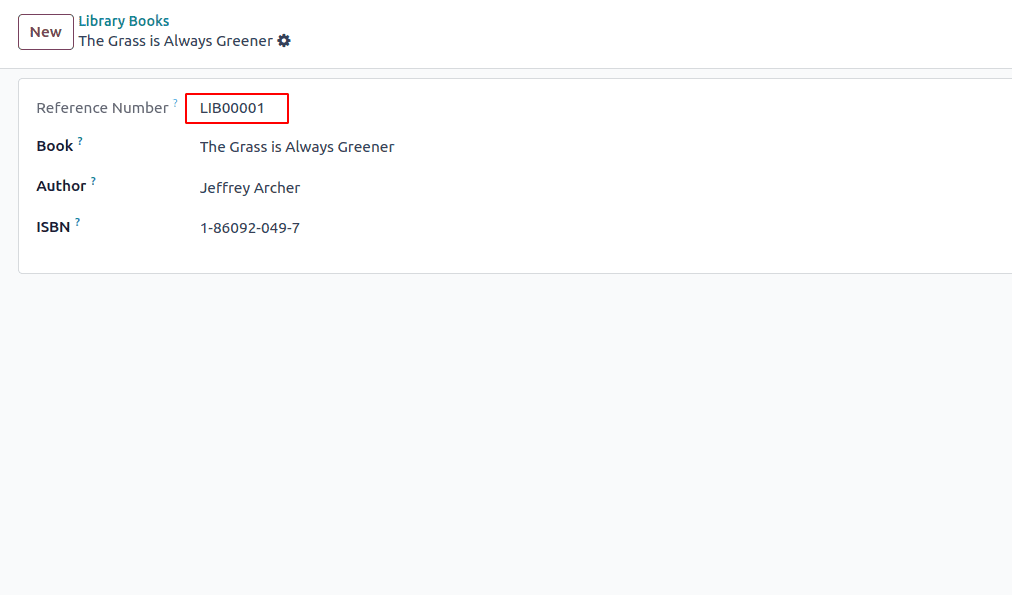
After defining your model and sequence, navigate to the Library Book model (you may need to create a menu item for it in your module). Create a new book record by filling in the title, author, and ISBN fields. You should see the Reference Number field populated automatically with a unique identifier formatted as LIB00001, LIB00002, and so on.

Method 2: Creating a Sequence through the Odoo Settings Menu
If you prefer not to work directly with code, you can create sequences through the Odoo interface. This approach is ideal for non-technical users who need to manage or create sequences for different models.
Step 1: Access the Sequences Menu
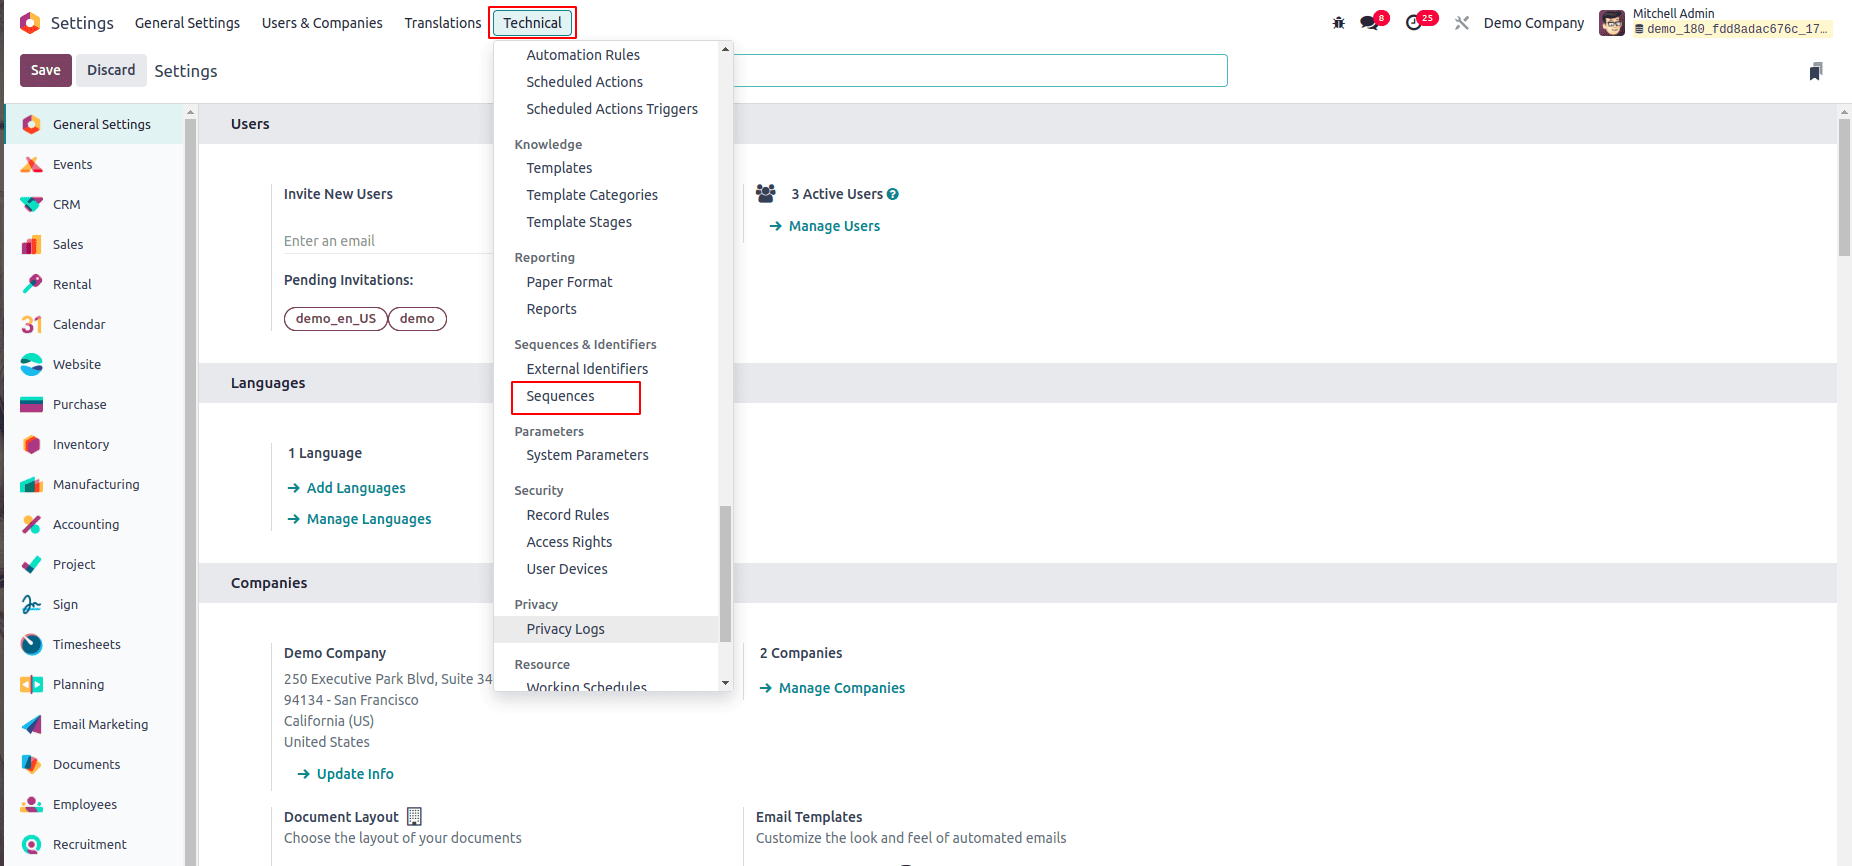
1. Go to Settings in the Odoo backend. Under Technical, find Sequences & Identifiers and select Sequences

Step 2: Create a New Sequence
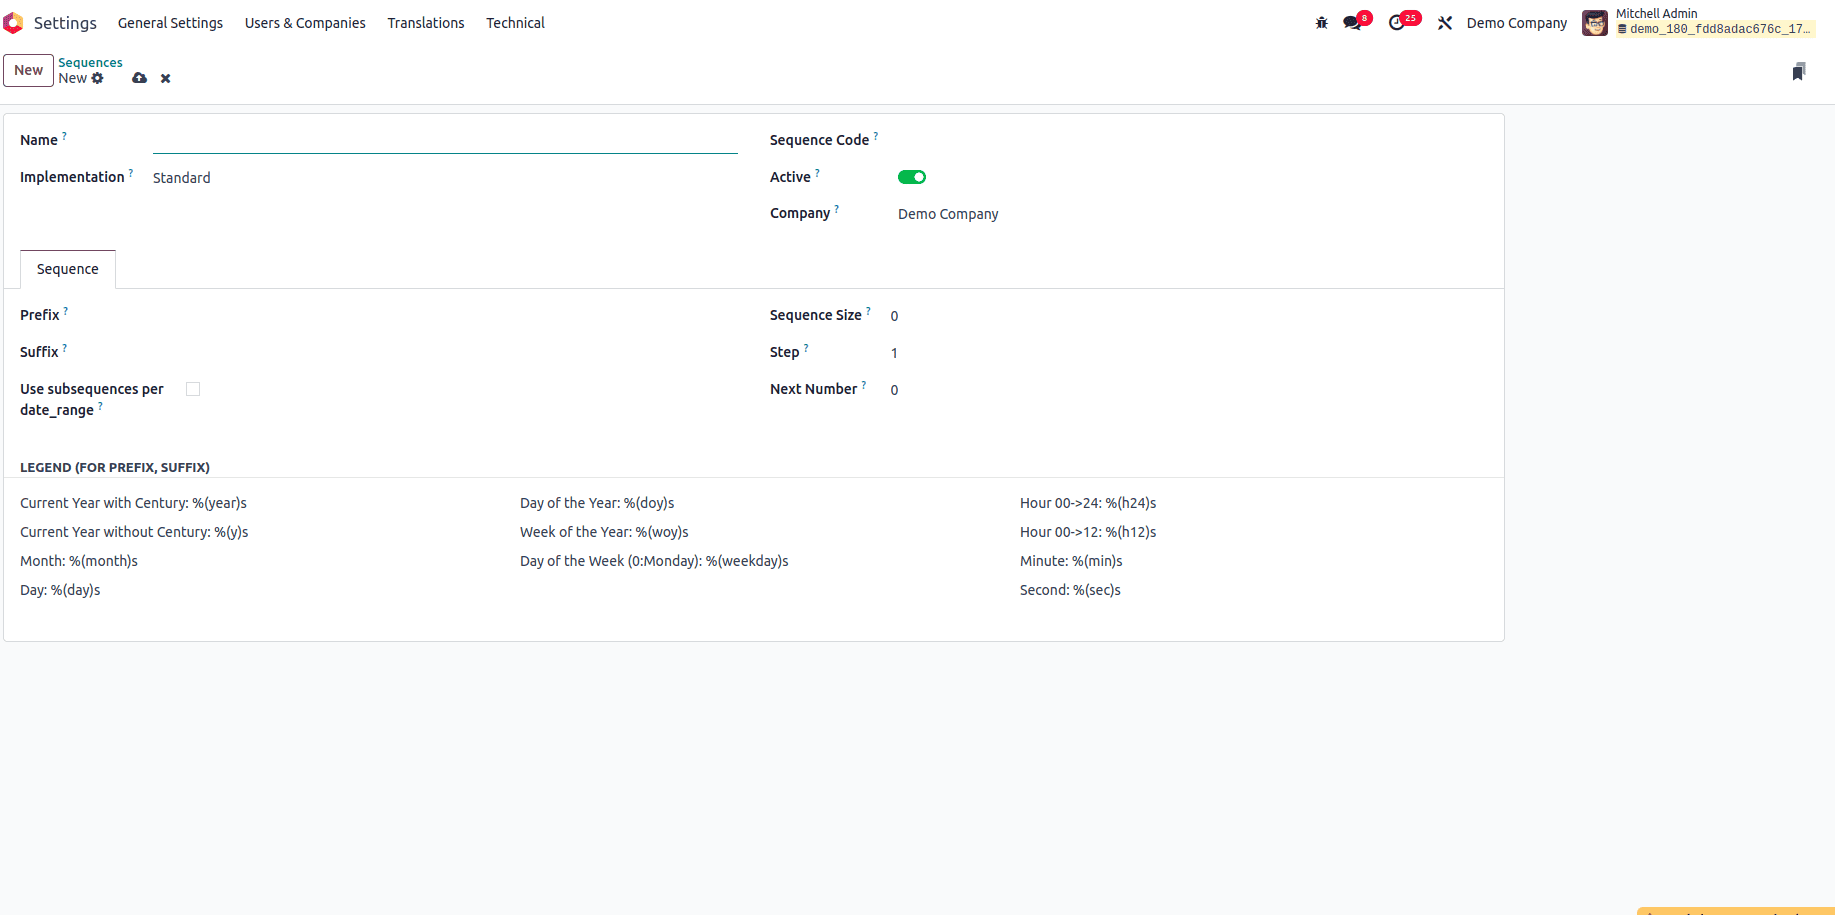
1. Click Create to open a new sequence form.
2. Fill out the following fields:
* Name: A descriptive name for the sequence, such as "Library Book Reference Number."
* Code: Set to match your model’s code, e.g., library.book.
* Prefix: Add a prefix like "LIB" for the library.
* Padding: Enter the number of digits, such as 5.
* Number Next: Set the starting number.
* Number Increment: Define the step for the sequence, typically 1.

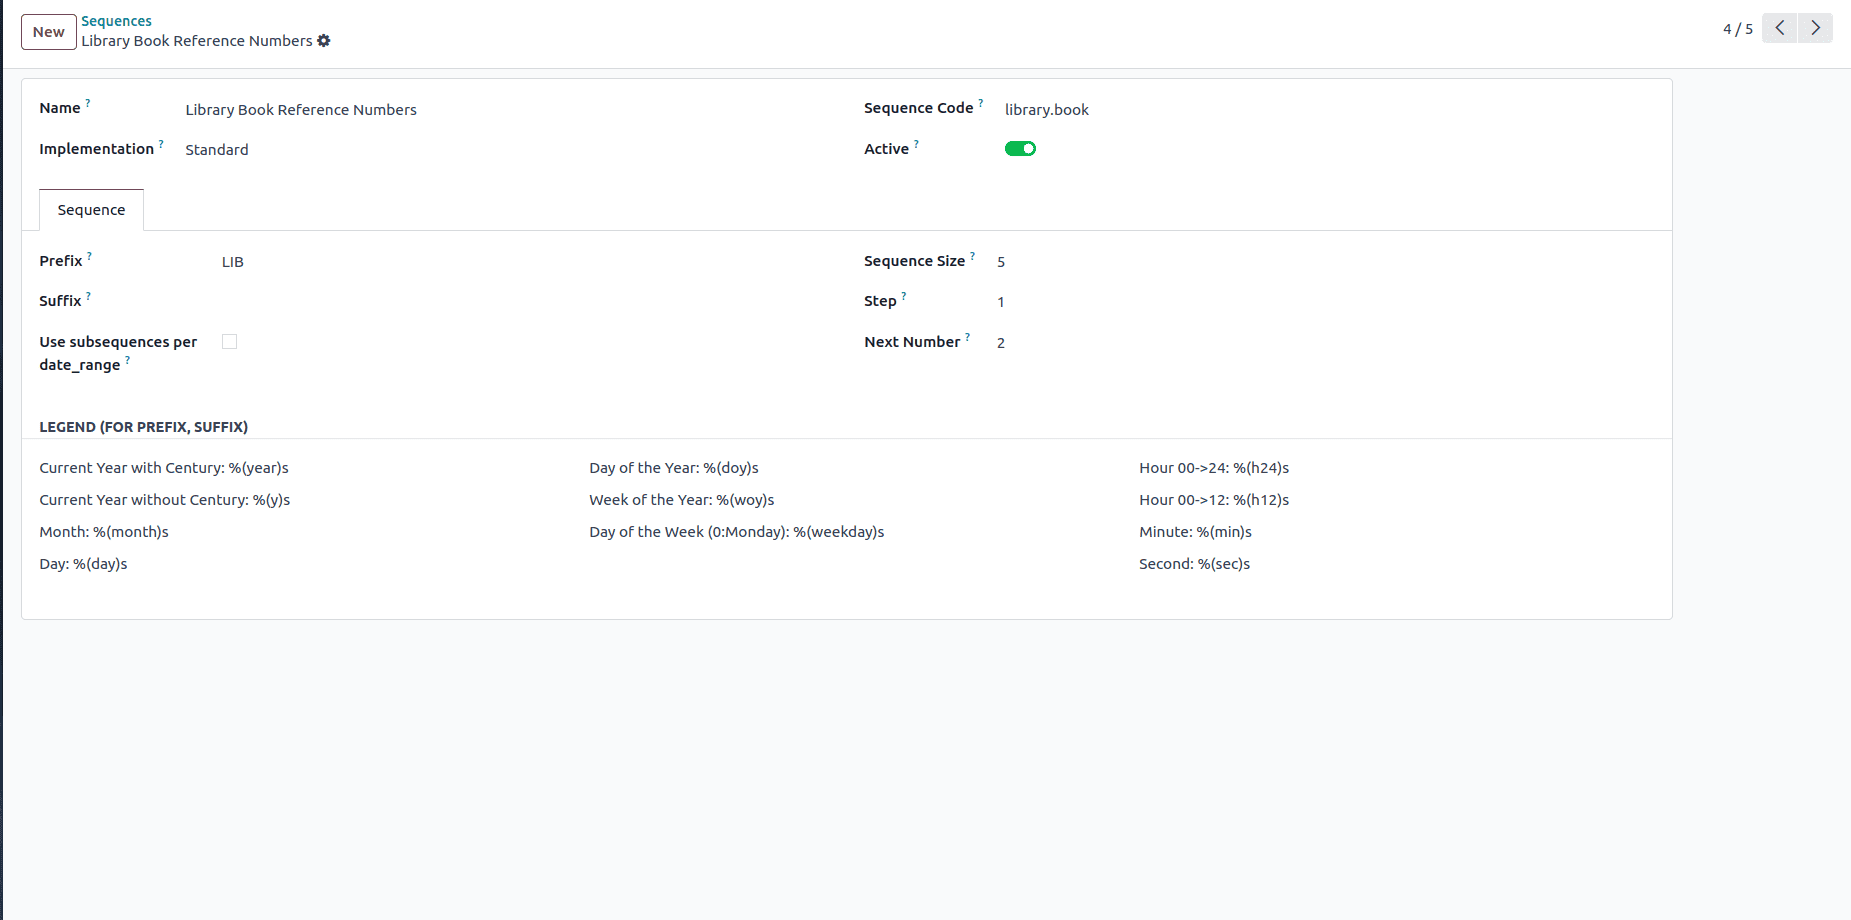
Step 3: Save and Apply
After filling in the required fields, save the sequence. Now, whenever you create a new record in the library.book model, Odoo will automatically apply the sequence to generate a unique identifier.

Additional Sequence Customization Options
Odoo sequences offer several options for further customization. Below are a few ways you can adapt sequences to your specific needs:
1. Adding Date Ranges to Sequences
Sequences can be configured with specific date ranges, which means they reset at the end of each period (e.g., annually or monthly). This feature is especially helpful for models that require periodic record tracking, like invoices or contracts.
To configure date ranges, simply check the Use subsequences per date range option in the sequence form. Set the Date Range field to the desired frequency (e.g., monthly or yearly).
2. Standard vs. No Gap Implementation
Odoo allows sequences to use either Standard or No Gap implementations. In the Standard method, if a sequence number is skipped or a record is deleted, the numbering will continue to the next available number, leaving a gap. In No Gap mode, the sequence fills in any missing numbers.
* Standard: Typically used in accounting where every number represents a unique document.
* No Gap: Ensures a continuous sequence, often for operational tracking where missing identifiers might cause confusion
In Odoo 18, creating custom sequence numbers enhances record management across different modules. Whether you’re a developer who prefers defining sequences in code or an administrator who needs quick setups through the settings, Odoo provides flexible solutions. By following this guide, you’ll be able to set up sequences for any model, ensuring organized, traceable records with minimal effort.
To read more about How to Create Sequence Numbers in Odoo 17, refer to our blog How to Create Sequence Numbers in Odoo 17.