In Odoo, the one2many field is employed to establish a one-to-many relationship between two models. This field enables the creation of multiple related records in the target model from a source model. To define a one2many field in Odoo, you must specify both the target model and the name of the field on the target model that defines the relationship.
Here’s an example:
from odoo import models, fields
class ParentModel(models.Model):
   _name = 'parent.model'
   child_ids = fields.One2many(comodel_name='child.model',
                               inverse_name='parent_id',string='Children')
class ChildModel(models.Model):
   _name = 'child.model'
   parent_id = fields.Many2one(comodel_name='parent.model',string='Parent')
In this example, we have two models: ParentModel and ChildModel. The ParentModel includes a one2many field named `child_ids`, which links to the ChildModel through the `parent_id` field on the ChildModel.
This configuration allows multiple child records to be associated with a single parent record via the child_ids field. In the parent form view, the `child_ids field will be presented as a list of related child records.
One2Many Field on a Website
Allowing users to create records within a one2many field directly from a website can be very convenient. This functionality enables users to populate the table through an online form.
Here’s a practical example:
First, define two models that are related via a one2many relationship and create the corresponding views for these models.
Now, we need to create a website menu.
<?xml version="1.0" encoding="UTF-8" ?>
<odoo>
   <record id="material_request_website_menu" model="website.menu">
       <field name="name">Material Request</field>
       <field name="url">/material_request</field>
       <field name="parent_id" ref="website.main_menu"/>
       <field name="sequence" type="int">90</field>
   </record>
</odoo>
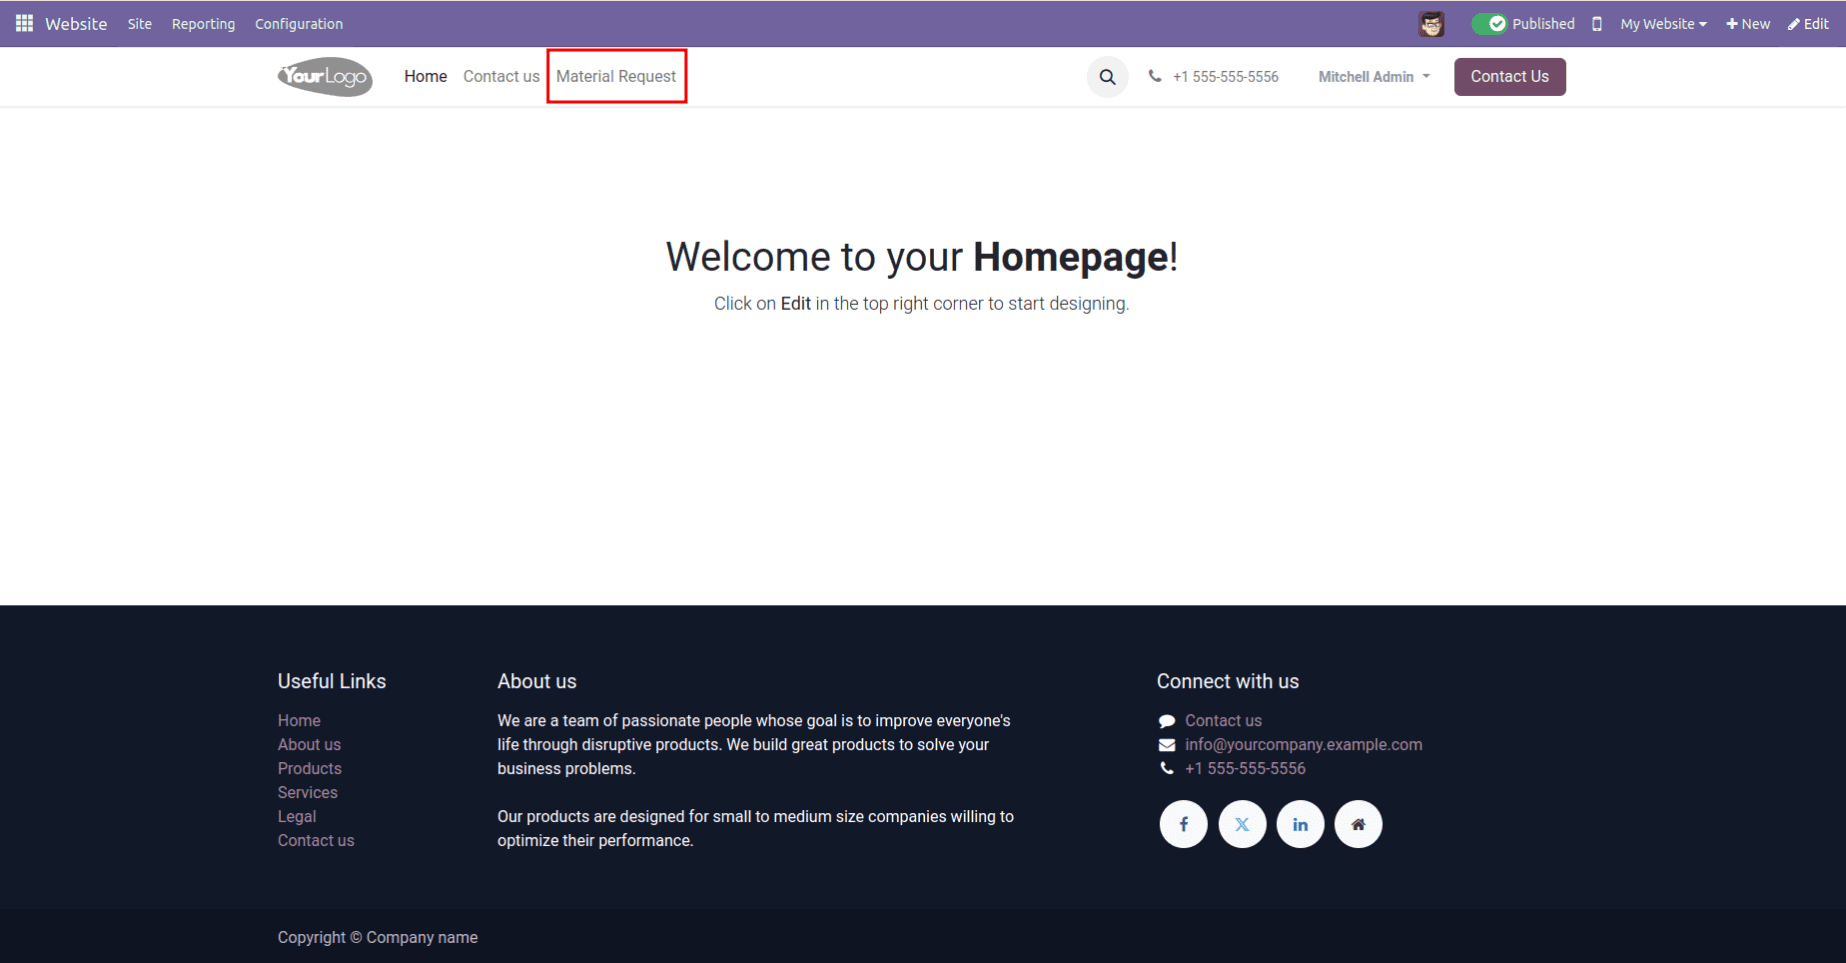
This will add a new menu option to the website.

Then create a template for the page.
<?xml version="1.0" encoding="UTF-8" ?>
<odoo>
<template id="web_machine_request_template">
<t t-call="website.layout">
<div id="wrap" class="oe_structure oe_empty">
<div class="container">
<div class="header">
<h3>Online Material Request</h3>
</div>
<form enctype="multipart/form-data"
class="o_mark_required">
<input type="hidden" name="csrf_token"
t-att-value="request.csrf_token()"/>
<div class="s_website_form_rows row s_col_no_bgcolor">
<div class="row s_col_no_resize s_col_no_bgcolor">
<label class="col-form-label col-sm-auto
s_website_form_label"
style="width: 200px" for="studio1">
<span class="s_website_form_label_content">
Name
</span>
<span class="s_website_form_mark">*</span>
</label>
<div class="col-sm">
<select id="customer" name="customer"
class="form-control s_website_form_input"
required="1">
<option></option>
<option t-foreach="customer"
t-as="cust"
t-att-value="cust['id']"
t-out="cust['name']"/>
</select>
</div>
<div class="row s_col_no_resize
s_col_no_bgcolor">
<label class="col-form-label
col-sm-auto s_website_form_label"
style="width: 200px" for="studio1">
<span class="s_website_form_label_content">
Date
</span>
<span class="s_website_form_mark">*</span>
</label>
<div class="col-sm">
<input id="date" type="date"
class="form-control s_website_form_input"
name="date" required="1"/>
</div>
</div>
<div class="form-group">
<div class='row ml-1' style="width:99%;">
<div class="form-group col-12 show_total_project">
<div class="row s_col_no_resize s_col_no_bgcolor">
<table class="table table-bordered mt-3
total_project_costs"
id="material_table">
<thead>
<tr>
<td>
<strong>
Material *
</strong>
</td>
<td>
<strong>Quantity *
</strong>
</td>
<td>
<strong>Operation
Type *
</strong>
</td>
<td>
<strong>Source
location*
</strong>
</td>
<td>
<strong>Destination
location*
</strong>
</td>
<td width="5%"/>
</tr>
</thead>
<div class="collapse">
<tbody>
<tr class="material_order_line">
<td>
<select id="product"
name="product"
class="form-control
s_website_form_input">
<option></option>
</select>
</td>
<td>
<div class="d-flex">
<span class="mt-2"
style="margin-right: 0.5rem !important;"/>
<input placeholder="quantity"
type="number"
class="form-control total_cost"
name="quantity"
id="quantity"
value="1"/>
</div>
</td>
<td>
<div class="d-flex">
<span class="mt-2"
style="margin-right: 0.5rem !important;"/>
<select id="operation_type"
name="operation"
class="form-control
s_website_form_input operation">
<option></option>
</select>
</div>
</td>
<td>
<button class="btn fa fa-trash-o remove_line"
style="color: red;
padding: 0px;
margin-left: -6px;
margin-top: 6px;
margin-bottom:15px;"
name="delete"
aria-label="Delete row 1"/>
</td>
</tr>
<tr class="add_extra_project d-none">
<td>
<select id="product"
name="product"
class="form-control">
<option></option>
</select>
</td>
<td>
<div class="d-flex">
<span class="mt-2"
style="margin-right: 0.5rem !important;"/>
<input placeholder="quantity"
type="number"
class="form-control total_cost"
name="quantity"
id="quantity"/>
</div>
</td>
<td>
<div class="d-flex">
<span class="mt-2"
style="margin-right: 0.5rem !important;"/>
<select id="operation_type"
name="operation"
class="form-control operation">
<option></option>
</select>
</div>
</td>
<td>
<button type="button"
class="btn fa fa-trash-o remove_line"
style="color: red;
padding: 0px;
margin-left: -6px;
margin-top: 6px;
margin-bottom:15px;"
name="delete"
aria-label="Delete row 1"/>
</td>
<td>
<div class="d-flex">
<span class="mt-2"
style="margin-right: 0.5rem !important;"/>
<select id="src_location"
name="source"
class="form-control
s_website_form_input fields">
<option></option>
</select>
</div>
</td>
<td>
<div class="d-flex">
<span class="mt-2"
style="margin-right: 0.5rem !important;"/>
<select id="dest_location"
name="destination"
class="form-control
s_website_form_input fields">
<option></option>
</select>
</div>
</td>
</tr>
</tbody>
</div>
</table>
</div>
<div>
<button type="button"
class="btn btn-info
add_total_project button-color"
style="float: right;
margin-right: -15px;">
<i class="fa fa-plus"/>
</button>
</div>
</div>
</div>
</div>
<div class="clearfix oe_login_buttons">
<button type="button"
class="custom_create btn btn-primary btn-block">
Create Request
</button>
</div>
</div>
</div>
</form>
</div>
</div>
</t>
</template>
</odoo>
After creating the template, we need to connect the template and the menu using the controller.
from odoo import Command
from odoo.http import request, Controller, route

class WebFormController(Controller):
   @route('/material_request', auth='public', website=True)
   def material_request(self):
       products = request.env['product.product'].sudo().search([])
       customer = request.env['res.users'].sudo().search([])
       location = request.env['stock.location'].sudo().search([])
       datas = {
           'products': products,
           'customer': customer,
           'location': location,
       }
       return request.render(
                          'material_request.web_machine_request_template',datas)
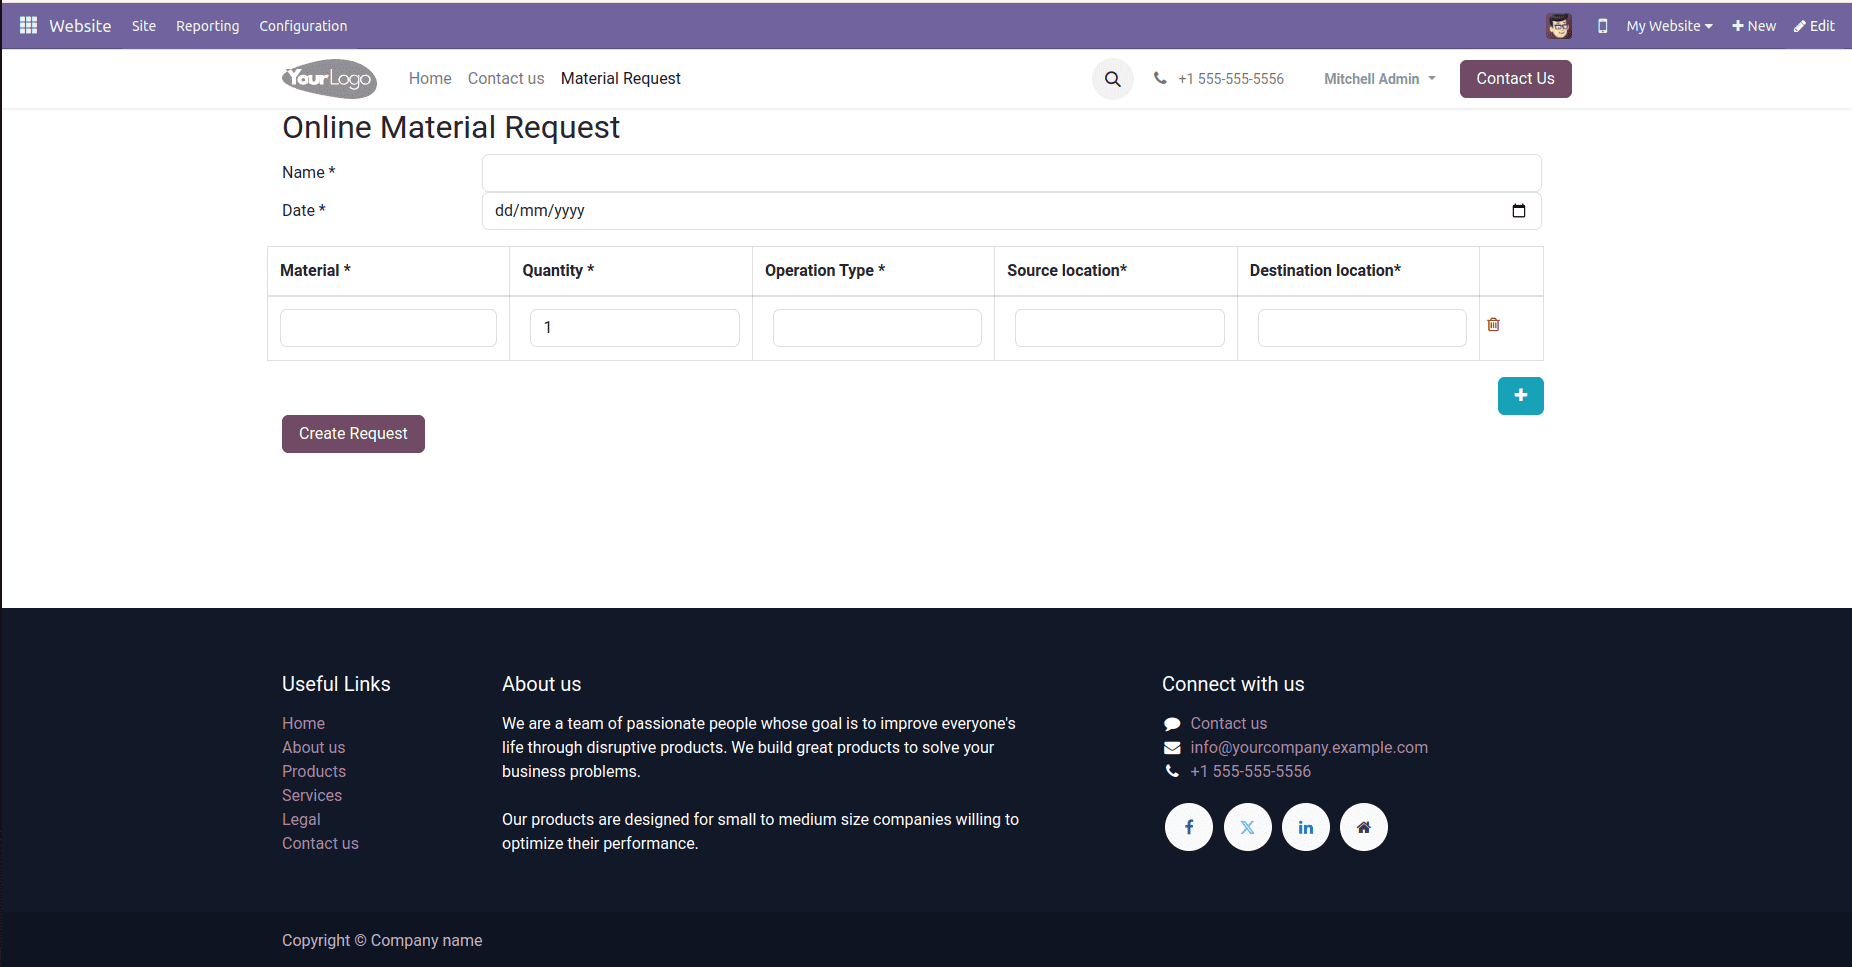
This will display the template when the web form menu is clicked.Here’s an example of the vie

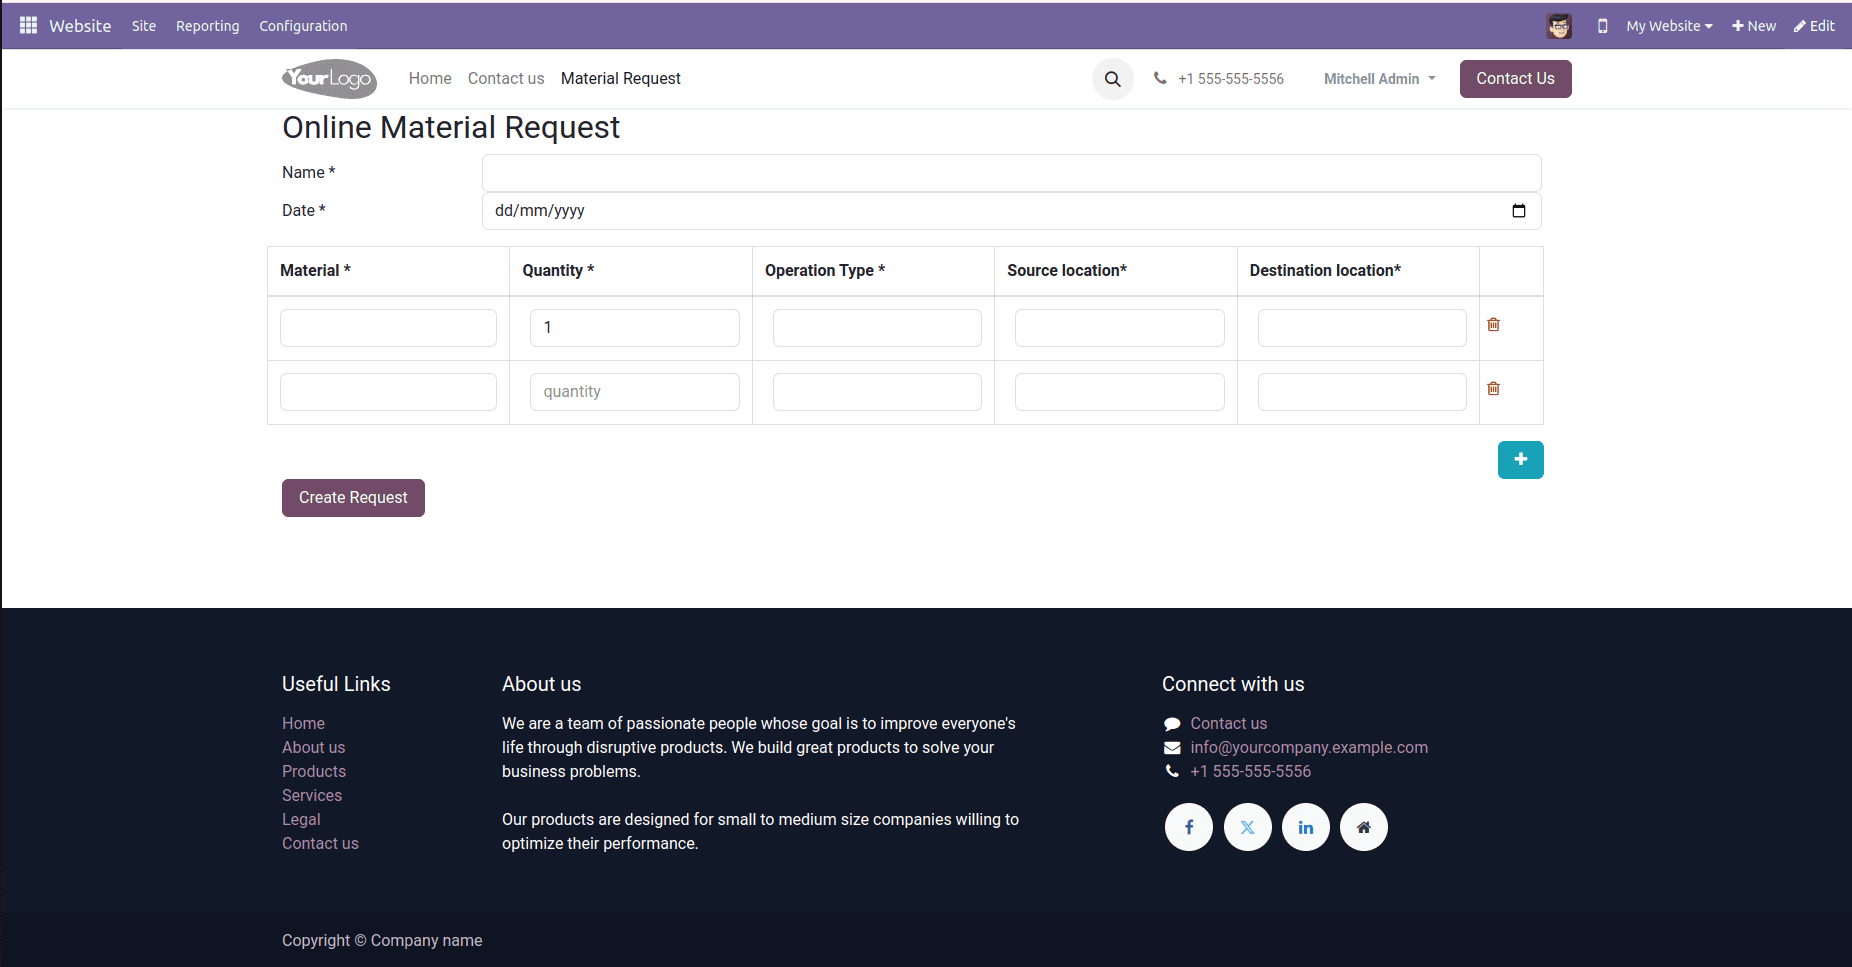
You can enter the name, add multiple codes and cost simply by clicking the plus icon in the bottom. To handle operations such as adding or Removing lines and submitting the form,we’ll need to implement some Javascript for website functionality.
Custom.js file
/** @odoo-module **/
import { jsonrpc } from "@web/core/network/rpc_service";
import publicWidget from "@web/legacy/js/public/public_widget";
publicWidget.registry.MaterialRequest = publicWidget.Widget.extend({
   selector: "#wrap",
   events: {
       'change #operation_type': '_onChangeType',
       'click .add_total_project': '_onClickAdd_total_project',
       'click .remove_line': '_onClickRemove_line',
       'click .custom_create': '_onClickSubmit',
   },
   _onClickSubmit: async function(ev){
     var self = this;
           var partner = $('#customer').val()
           var date = $('#date').val()
           var material_data = [];
           var rows = $(
               '.total_project_costs > tbody > tr.material_order_line');
           for(var i=0;i<rows.length;i++){
           var values=rows[i]
               let product = $(values).find('select[name="product"]').val();
               let quantity = $(values).find('input[name="quantity"]').val();
               let operation = $(values).find('
                                          select[name="operation"]').val();
               material_data.push({
                       'material':product,
                       'quantity':quantity,
                       'operation':operation,
               });
           }`
          })
        },
   _onClickAdd_total_project: function(ev){
               var $new_row = $('.add_extra_project').clone(true);
               $new_row.removeClass('d-none');
               $new_row.removeClass('add_extra_project');
               $new_row.addClass('material_order_line');
               $new_row.insertBefore($('.add_extra_project'));
   },
   _onChangeType: function(ev){

  if ($(ev.target).closest('tr').find
                    ('.operation').val()=="purchase order"){
           $(ev.target).closest('tr').find('.fields').attr('disabled',true);
       } else{

        $(ev.target).closest('tr').find('.fields').attr('disabled',false);
       }
   },

_onClickRemove_line: function(ev){
       $(ev.target).parent().parent().remove();
   },
Here _onClickSubmit function is to pass the cost and code to the controller. _onClickRemove_line function is to remove the line or for the delete button.
And the _onClickAdd_total_project is to add an extra line.

Then, we need to create a controller for the form submission.
@route('/material/submit', type='json', auth='public', website=True, )
def request_submit(self, **post):
   order = []
   for recs in post['data']:
       if recs['operation'] == 'purchase order':
           dicts = {'product_id': int(recs.get('material')),
                    'material_qty': int(recs.get('quantity')),
                    'operation_type': recs.get('operation')}
       else:
           dicts = {
               'product_id': int(recs.get('material')),
               'material_qty': int(recs.get('quantity')),
               'operation_type': recs.get('operation'),
               'src_location_id': int(recs.get('source')),
               'dest_location_id': int(recs.get('destination'))
           }
       order.append(dicts)
   record = request.env['material.request'].sudo().create({
       'employee_id': int(post.get('partner')),
       'date': post.get('date'),
       'material_order_ids': [Command.create(rec) for rec in order],
   })
   record.state = 'submitted'
   user = request.env['res.users'].sudo().browse(int(post.get('partner')))
   if user.email:
       template = request.env.ref(
           'material_request.material_mail_template')
       template.send_mail(record.id, force_send=True)
   return record.reference_no
This will create a record inside the model. With this approach, we can efficiently create records in the backend and include one2many relationships using templates, allowing us to submit data in the desired format and generate records according to our requirements.
To read more about How to Create One2many Field in the Odoo 16 Website, refer to our blog How to Create One2many Field in the Odoo 16 Website.