Integrating a WYSIWYG editor into your Odoo portal forms can greatly enhance the user experience by allowing users to format their text easily. In this blog, we'll walk you through the process of adding a WYSIWYG editor to a text area in an Odoo portal form. We'll cover how to add the necessary dependencies, update your HTML template, and extend the public widget to initialize the editor.
Step 1: Add web_editor to Your Module Dependencies
The first step is to ensure that the web_editor module is included in your module's dependencies. The web_editor module provides the necessary tools to implement a WYSIWYG editor.
To do this, open your module’s manifest file (__manifest__.py) and add web_editor to the depends list, as shown below:
{
    'name': 'Your Custom Module',
    'depends': ['web_editor'],
    ...
}
By adding web_editor to the dependencies, you're making sure that all the functionalities required for the WYSIWYG editor are available in your module.
Step 2: Update the HTML Template
Next, you need to update your HTML template to designate the text area where the WYSIWYG editor will be applied. To do this, you’ll use the o_wysiwyg_loader class on the <textarea> element.
Here’s how you can set up your text area:
<textarea t-attf-class="o_wysiwyg_loader tot_description
    tot_form_field
    form-control"
    id="description"
    placeholder="Explain your Service Details"
    rows="4"
    name="description"/>
The o_wysiwyg_loader class is a key element that signals Odoo to load the WYSIWYG editor for this specific text area.
Step 3: Extend the Public Widget to Initialize the Editor
With the web_editor dependency in place and your HTML updated, the final step is to extend a public widget in Odoo to initialize the WYSIWYG editor. This involves adding a JavaScript file to your module.
Create a JavaScript file in your module and add the following code:
/* @odoo-module */
import publicWidget from "@web/legacy/js/public/public_widget";
import { loadWysiwygFromTextarea } from "@web_editor/js/frontend/loadWysiwygFromTextarea";
publicWidget.registry.Project = publicWidget.Widget.extend({
    selector: '.offer_head',
    start: function () {
        var self = this;
        // Initialize the WYSIWYG editor on all text areas with the o_wysiwyg_loader class
        $('textarea.o_wysiwyg_loader').toArray().forEach((textarea) => {
            var $textarea = $(textarea);
            var $form = $textarea.closest('form');
            var options = {
                toolbarTemplate: 'website_test.web_editor_toolbar',
                toolbarOptions: {
                    showColors: false,
                    showFontSize: false,
                    showHistory: true,
                    showHeading1: false,
                    showHeading2: false,
                    showHeading3: false,
                },
                resizable: true,
                userGeneratedContent: true,
                height: 100,
            };
            loadWysiwygFromTextarea(self, $textarea[0], options).then(wysiwyg => {
                $form.find('.note-editable').find('img.float-start').removeClass('float-start');
            });
        });
        return this._super.apply(this, arguments);
    },
});
Customization options:
toolbarTemplate: 'website_test.web_editor_toolbar':
* Specifies a custom toolbar template for the WYSIWYG editor. This allows you to define the appearance and available tools in the editor's toolbar.
* website_test.web_editor_toolbar is an example template ID, which should be defined elsewhere in your module.
toolbarOptions: :
* showColors: false: Disables the color picker tool in the toolbar.
* showFontSize: false: Disables the font size selection tool in the toolbar.
* showHistory: true: Enables the history tool, which allows users to undo/redo changes.
* showHeading1: false, showHeading2: false, showHeading3: false: Disables the heading options in the toolbar, restricting users from adding specific heading styles.
resizable: true:
* Allows the editor to be resized by the user. This makes it more flexible for different screen sizes or user preferences.
userGeneratedContent: true:
* Marks the content as user-generated, which can influence how the content is handled by Odoo’s security and styling mechanisms. This is often used to manage content entered by users in a controlled way.
height: 100:
* Sets the initial height of the WYSIWYG editor in pixels. This can be adjusted based on your design requirements.
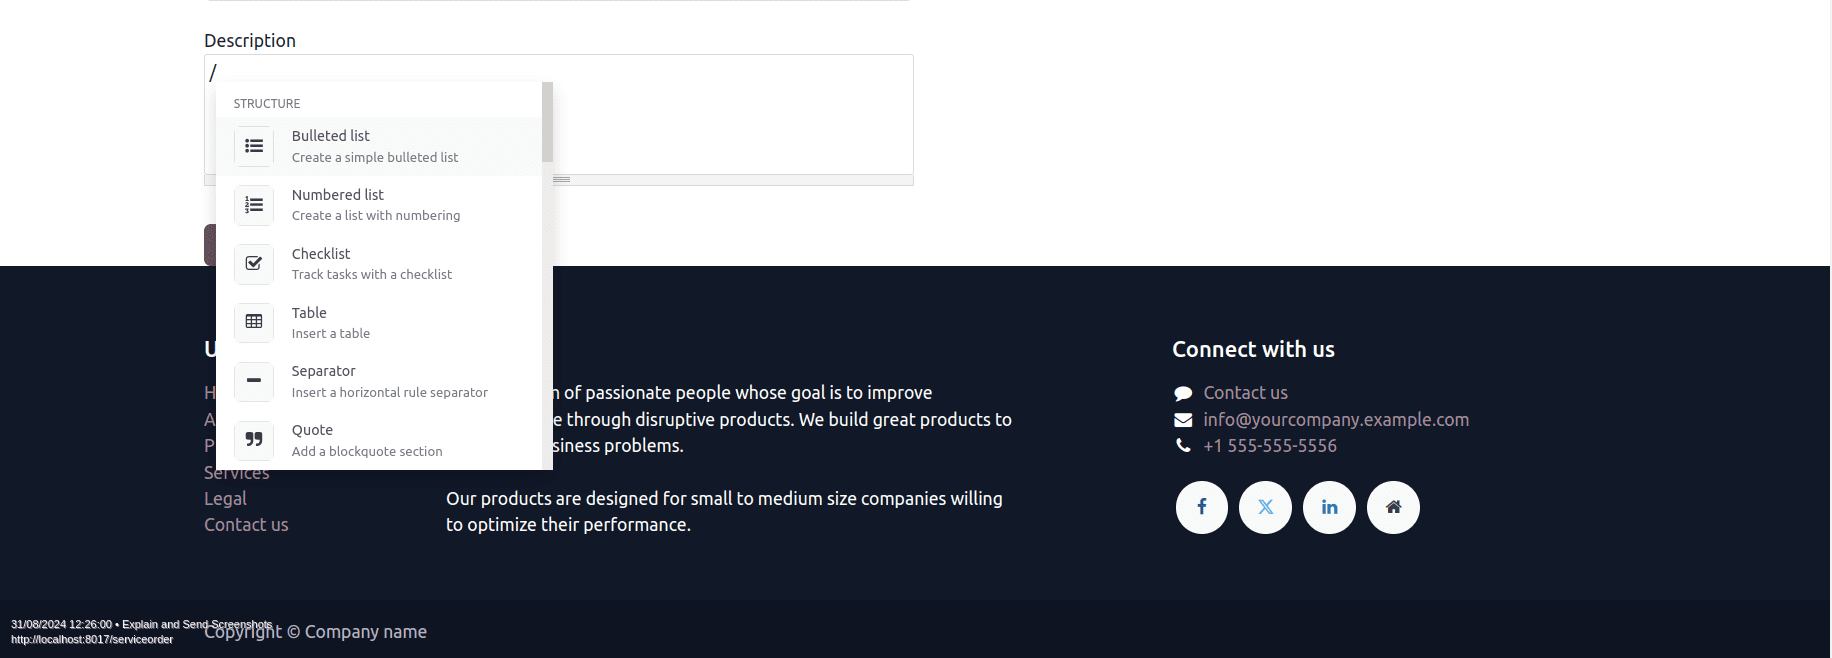
Features available in WYSIWYG editor
STRUCTURE
* Bulleted list:
Create a simple list with bullet points to organize content. Each item in the list appears with a preceding bullet symbol, making it visually clear that they are part of a group.
* Numbered list:
Create a list with sequential numbering. Useful for ordered steps, processes, or rankings where the order of items is significant.
* Checklist:
Track tasks with a checklist where each item can be marked as complete. This feature is great for to-do lists, task management, or any list where progress tracking is needed.
* Table:
Insert a table to organize data in rows and columns. Tables are useful for presenting structured information like schedules, comparisons, or any data that benefits from grid formatting.
* Separator:
Insert a horizontal rule to visually separate sections of content. This helps to create clear divisions between different parts of the text, improving readability.
* Quote:
Add a blockquote section to highlight a quotation or a notable excerpt from another source. Blockquotes are typically indented and styled differently to distinguish them from regular text.
* Code:
Add a code section to display programming code or preformatted text. This section is usually displayed in a monospaced font and preserves whitespace and indentation, making it ideal for sharing code snippets.
* 2 columns:
Convert a section into 2 columns, allowing content to be split into two side-by-side sections. This layout is useful for comparing information or creating a more dynamic page structure.
* 3 columns:
Convert a section into 3 columns. This is great for dividing content into three equal parts, providing a balanced and visually appealing layout.
* 4 columns:
Convert a section into 4 columns. This is useful for displaying content that can be broken down into four parts, creating a compact and organized presentation.
BANNERS
* Banner Info:
Insert an information banner to highlight important or informational content. Typically styled in a way that draws attention without being too intrusive.
* Banner Success:
Insert a success banner to communicate positive messages, such as completed tasks or successful operations. Often styled in green or another color associated with success.
* Banner Warning:
Insert a warning banner to alert users to potential issues or important notices that require attention. Usually styled in a cautionary color like yellow or orange.
* Banner Danger:
Insert a danger banner to indicate errors, critical warnings, or urgent messages. Typically styled in red to emphasize the severity of the content.
FORMAT
* Heading 1:
Big section heading, used for the most important or top-level headings in the content. It usually stands out the most, often used for titles or major sections.
* Heading 2:
Medium section heading, used for sub-sections under Heading 1 . It's less prominent than Heading 1 but still noticeable.
* Heading 3:
Small section heading, used for sub-sections under Heading 2 . It provides further division within content without overpowering the main headings.
* Switch direction:
Switch the text's direction, which is particularly useful for languages that are read from right to left (e.g., Arabic, Hebrew).
* Text:
Paragraph block, used for regular text content. It forms the basic unit of writing in the editor, where you enter most of your content.
MEDIA
* Image:
Insert an image into the content. This feature allows you to add visual elements to your text, enhancing engagement and illustrating points.
* Video:
Insert a video, enabling multimedia content within the text. Videos can be used for tutorials, demonstrations, or any content that benefits from moving images and sound.
NAVIGATION
* Link:
Add a hyperlink to text, allowing users to navigate to another webpage, document, or section within the same page. Links are essential for creating interactive and connected content.
* Button:
Add a button to the content, which can be linked to a specific action or page. Buttons are more visually prominent than text links and are often used for calls to action (e.g., "Sign Up," "Learn More").
WIDGETS
* Emoji:
Add an emoji to the text to convey emotion or add a playful element to the content. Emojis are widely recognized and can make content more relatable.
* 3 Stars:
Insert a rating widget with 3 stars, useful for feedback, reviews, or any content where you want to allow users to give a rating.
* 5 Stars:
Insert a rating widget with 5 stars, providing a more detailed rating option compared to the 3-star version. Commonly used in product reviews, feedback forms, and similar contexts.
AI TOOLS
* ChatGPT:
Generate or transform content with AI. This tool can assist in writing, summarizing, or generating ideas based on the input provided.
BASIC BLOCKS
* Signature:
Insert your signature, often used at the end of emails, documents, or forms to provide a personal touch or authenticate the content.
Conclusion
This script customizes and initializes a WYSIWYG editor for text areas within a form on an Odoo portal page. The options provided allow fine control over the toolbar's appearance, the editor's behavior, and the user experience. By understanding each part of this code, you can further customize and extend the WYSIWYG editor to suit your specific needs.
To read more about How to Design a Website With Odoo 17 Website App, refer to our blog How to Design a Website With Odoo 17 Website App.