The purchase management module of Odoo ERP is another important platform module. Although this module resembles the sales module, it serves entirely different purposes. The user-friendly interface of the purchase management system is specifically created for users.
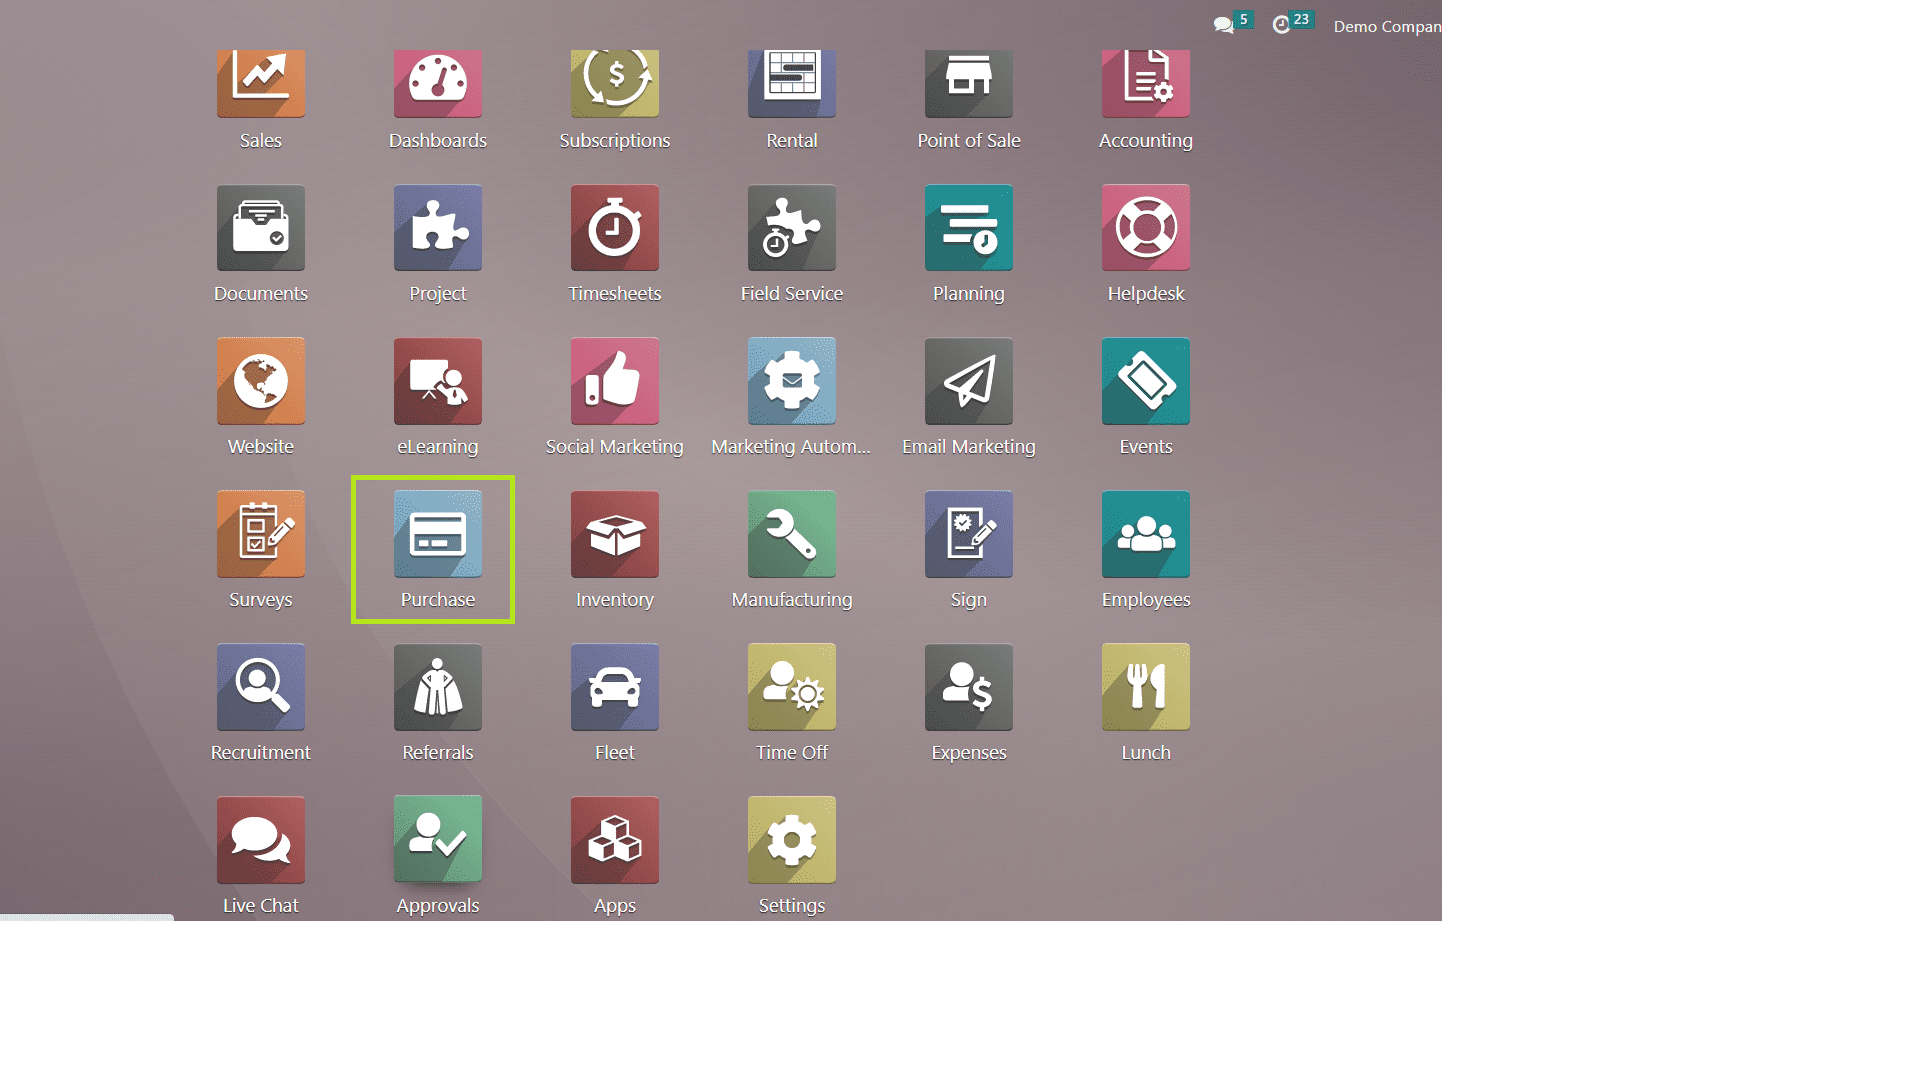
This module allows you to keep track of all supplier information, purchase details, inventory management, supplier details, and so on. This purchase management offers compact and at-full-length solutions to purchase with RFQ( Requests for Quotation). This module helps you make quick decisions because of the existing details in the ERP platform, such as supplier details, previous order details, searched item lists, etc.
Keeping track of purchases is an unavoidable requirement for most businesses that buy products and services regularly. Purchases are one of the most important modules in any ERP software. This purchase management module can assist you in keeping track of even the most minor details of your purchases. There are also numerous features for this module, such as,
1. It is compatible with other related modules.
2. The module is linked to inventory and updated as products enter the warehouse.
3. It includes an RFQ (request for quotations) function that allows you to request a quote from your suppliers. Such as sending requests through mail or posts, getting offers for items, customizing your messages, etc.
4. We can manage the orders by monitoring RFQs and orders, managing incoming products, and automating orders.
5. Invoice Management.
6. Automatic Corporate Reconciliation
7. Product Handling
8. Analysis & forecasting
How to Create New Purchase Orders
Installing the purchase module is the first step in creating new purchase orders. When we open the module, it will open a configuration, as shown in the below screenshot.
On this page, we can see various purchase orders, RFQs, and related data in a listview, giving the user a quick view of their purchase orders, revenue generated, average order value, purchase revenue in the last seven days, and so on.
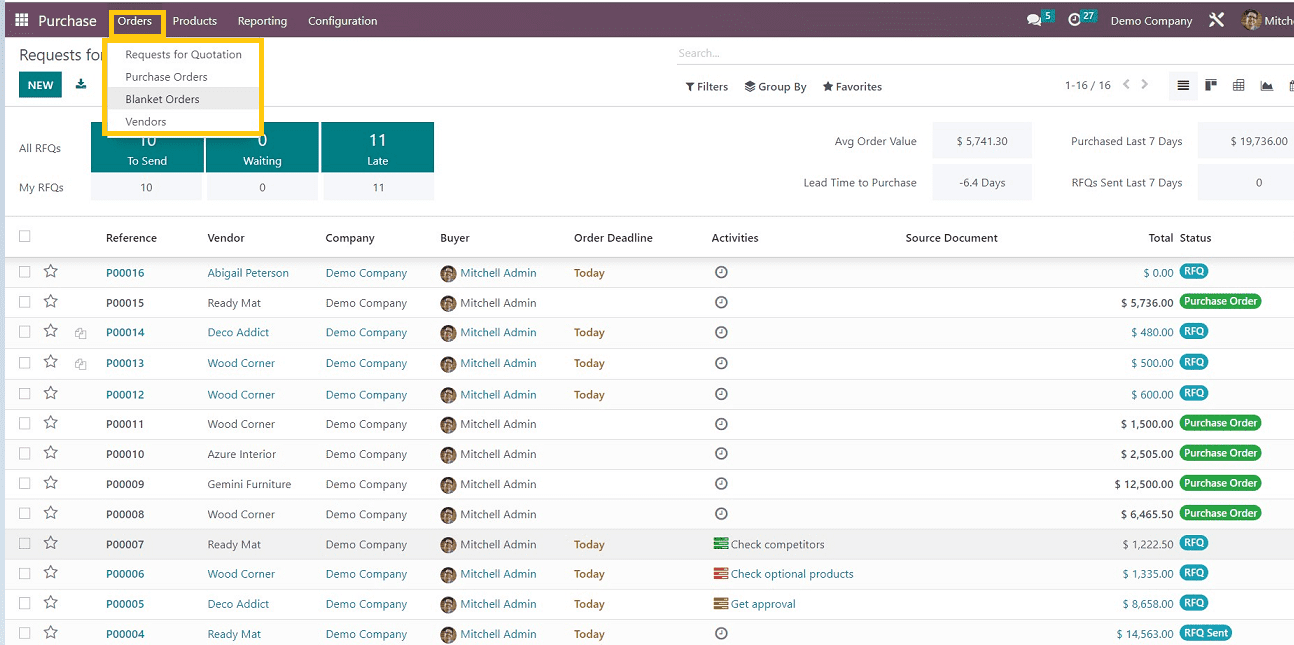
To create a new purchase order, we have to select "Purchase Order" from the "Order" menu, which will open a form view as shown below.
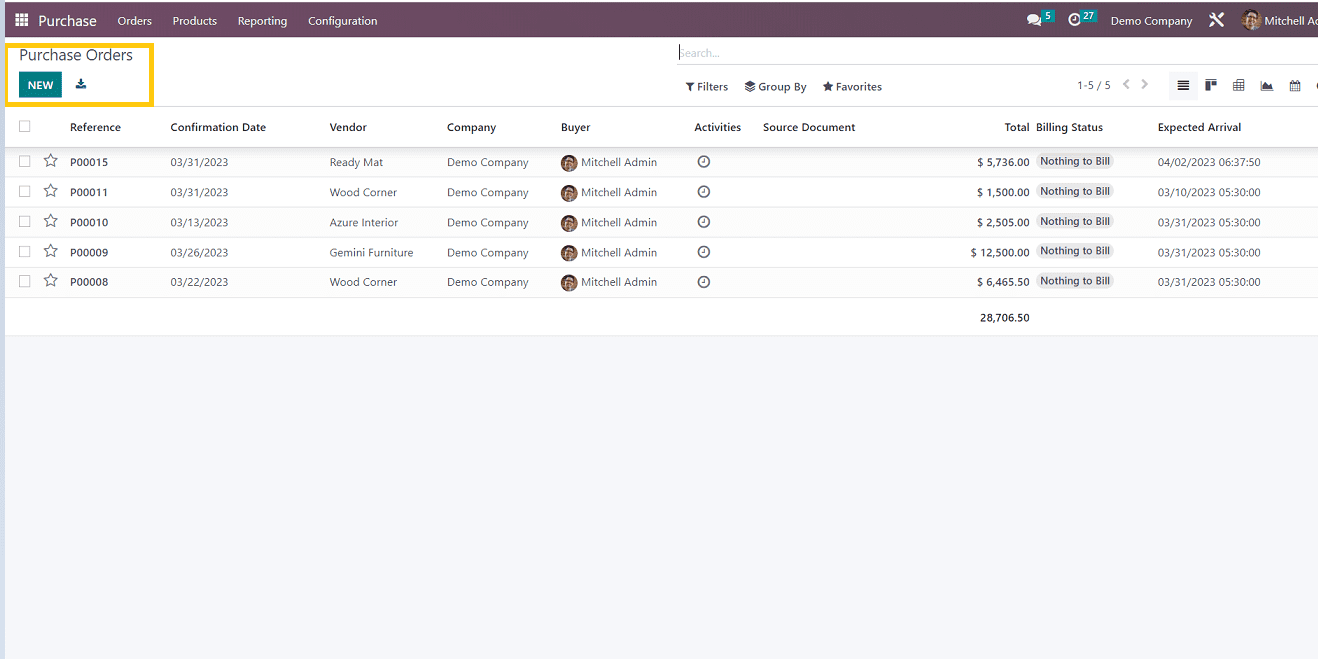
Here you can see the already-existing purchase order list.
To create our new purchase order, click on the option, and it will lead to a page to create a new order as per our current requirements.
We have to fill in the “vendor name” that can be filled out or selected from the existing customer dropdown included in the vendor section.
“Vendor reference,” “Order deadline,” and “Expected arrival date” as per the order requirements.
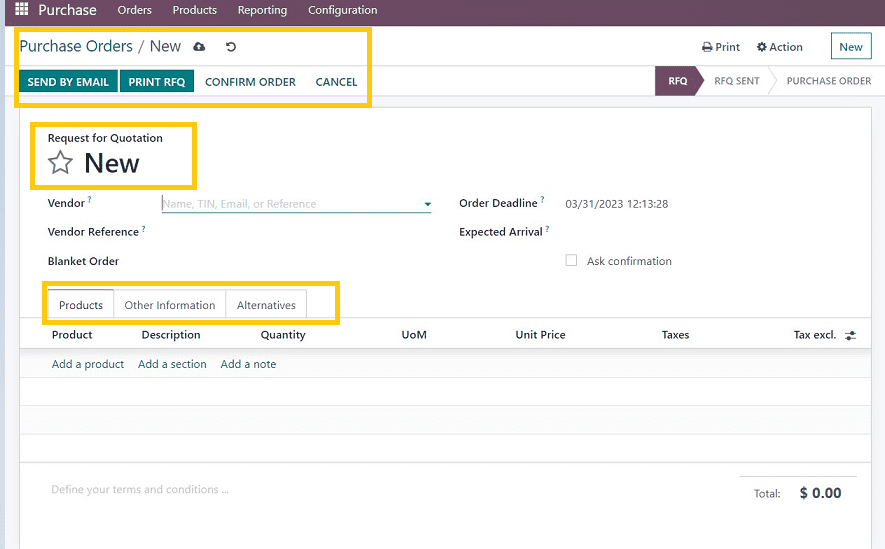
Here you can see three sections to fill out in our purchase order as follows.
1. Products
2. Other Information
3. Alternatives
Products section
We can manage every detail related to purchase management. So moving into the Products section, we have to add the particular item we will purchase in this order, or you can select from the pre-existing section by choosing from the dropdown menu.
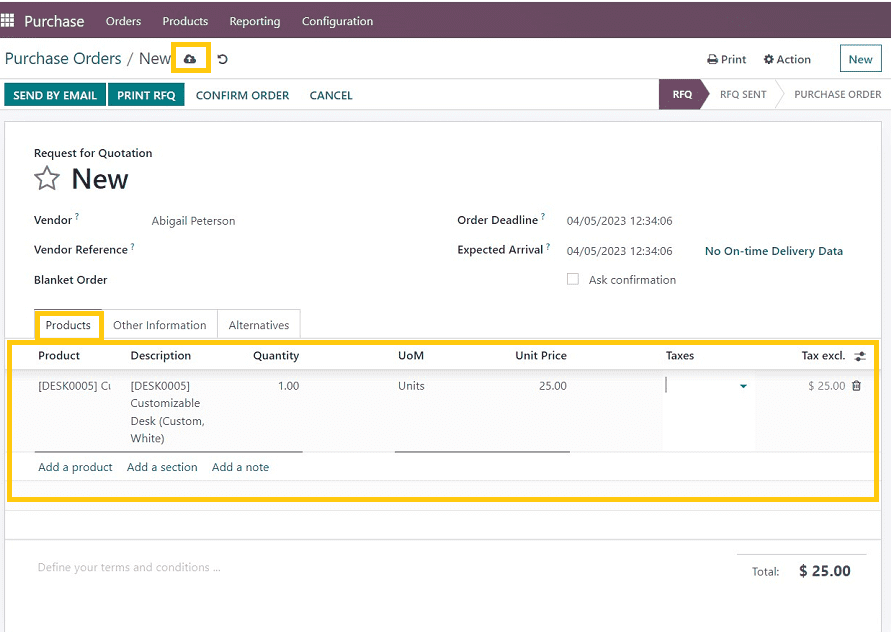
I have selected a “Customizable white desk” from the product dropdown menu in this scenario. We can add more items to the purchase order form by clicking “Add a product” from the products dropdown section. Then add quantity, a unit of measure, unit price, etc.
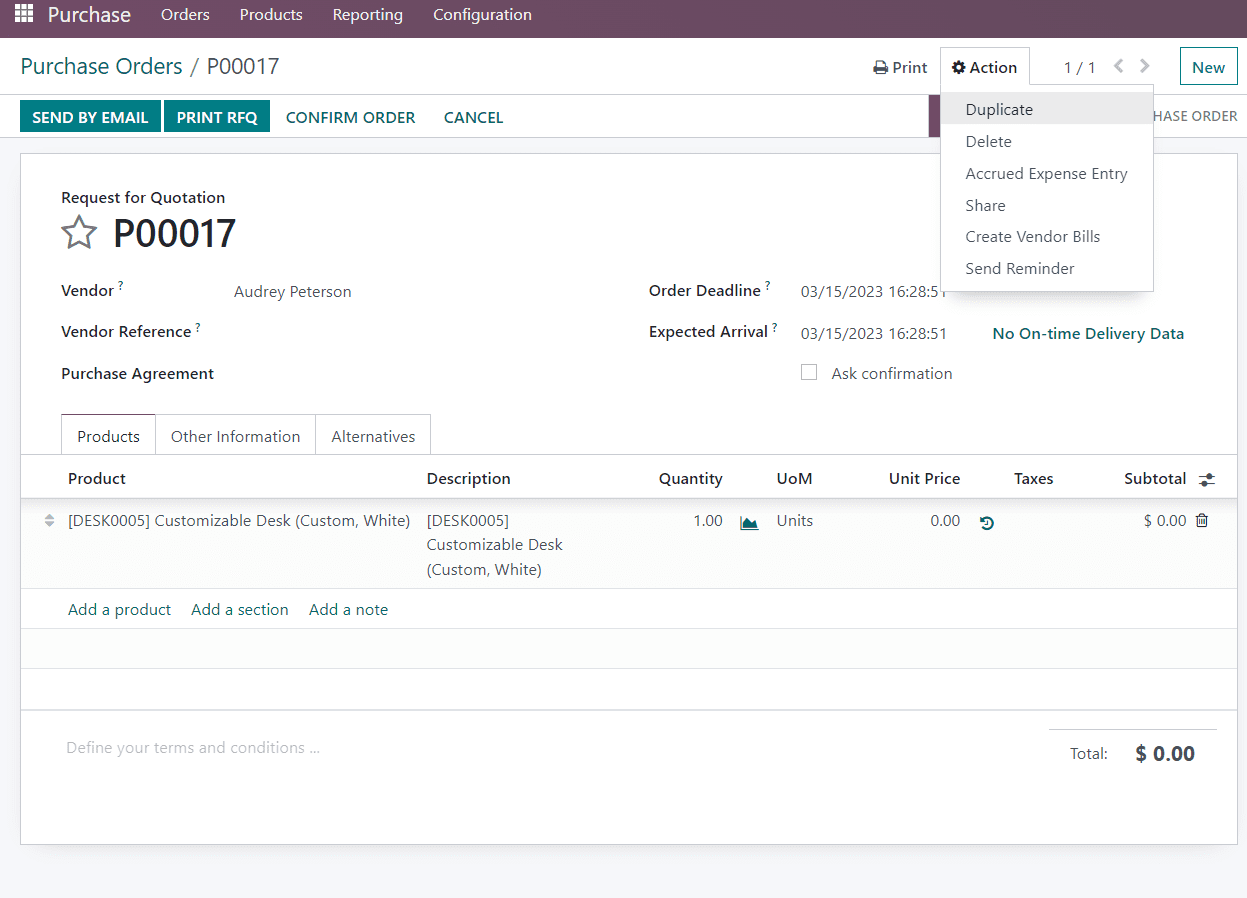
After selecting the required item, we can change the quantity, price per unit as per the item. To do that, go to the ‘Action’ section in the upper right corner of the page and select ‘duplicate’ from the dropdown menu, so we can edit the quantity and price of the item.
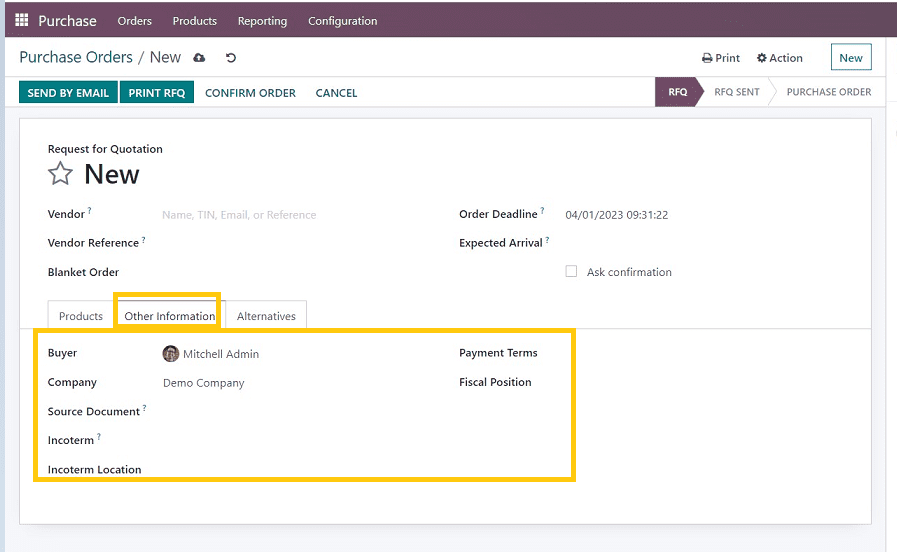
Other information section
In this section, we must fill in the Buyer's name, Company name, Source document, Incoterm, payment terms, and fiscal position.
Alternatives Section
Users can add alternative requests for quotes from different vendors in the "alternatives" section to create a call for tenders. Choose the ideal lead time, OTD, and total amount combination before choosing. By contrasting the product offerings of various vendors, you can decide which items to order from one seller and which from another.
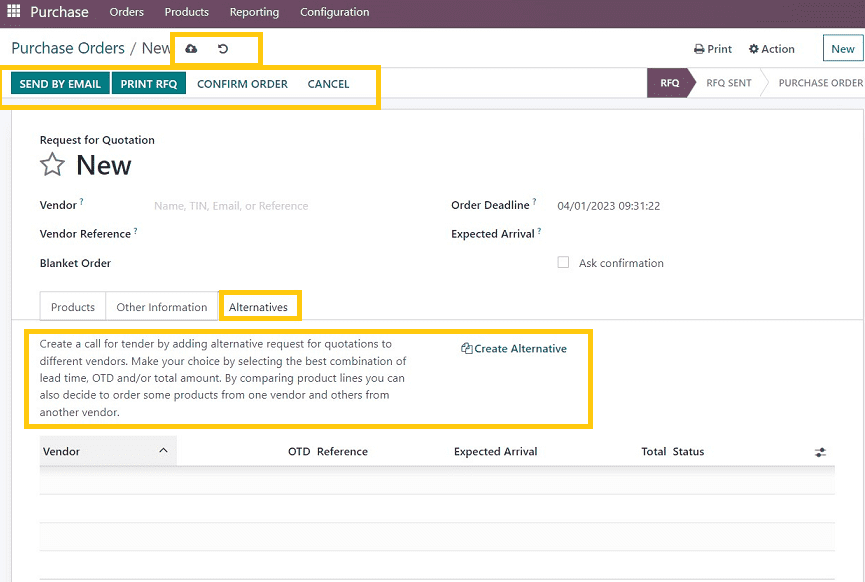
Once the ordering process is complete, save the details. We can also send an email regarding the purchase order to the vendors by clicking on the “SEND BY EMAIL" option, which will open a popup to edit the email draft, as shown in the below screenshot.
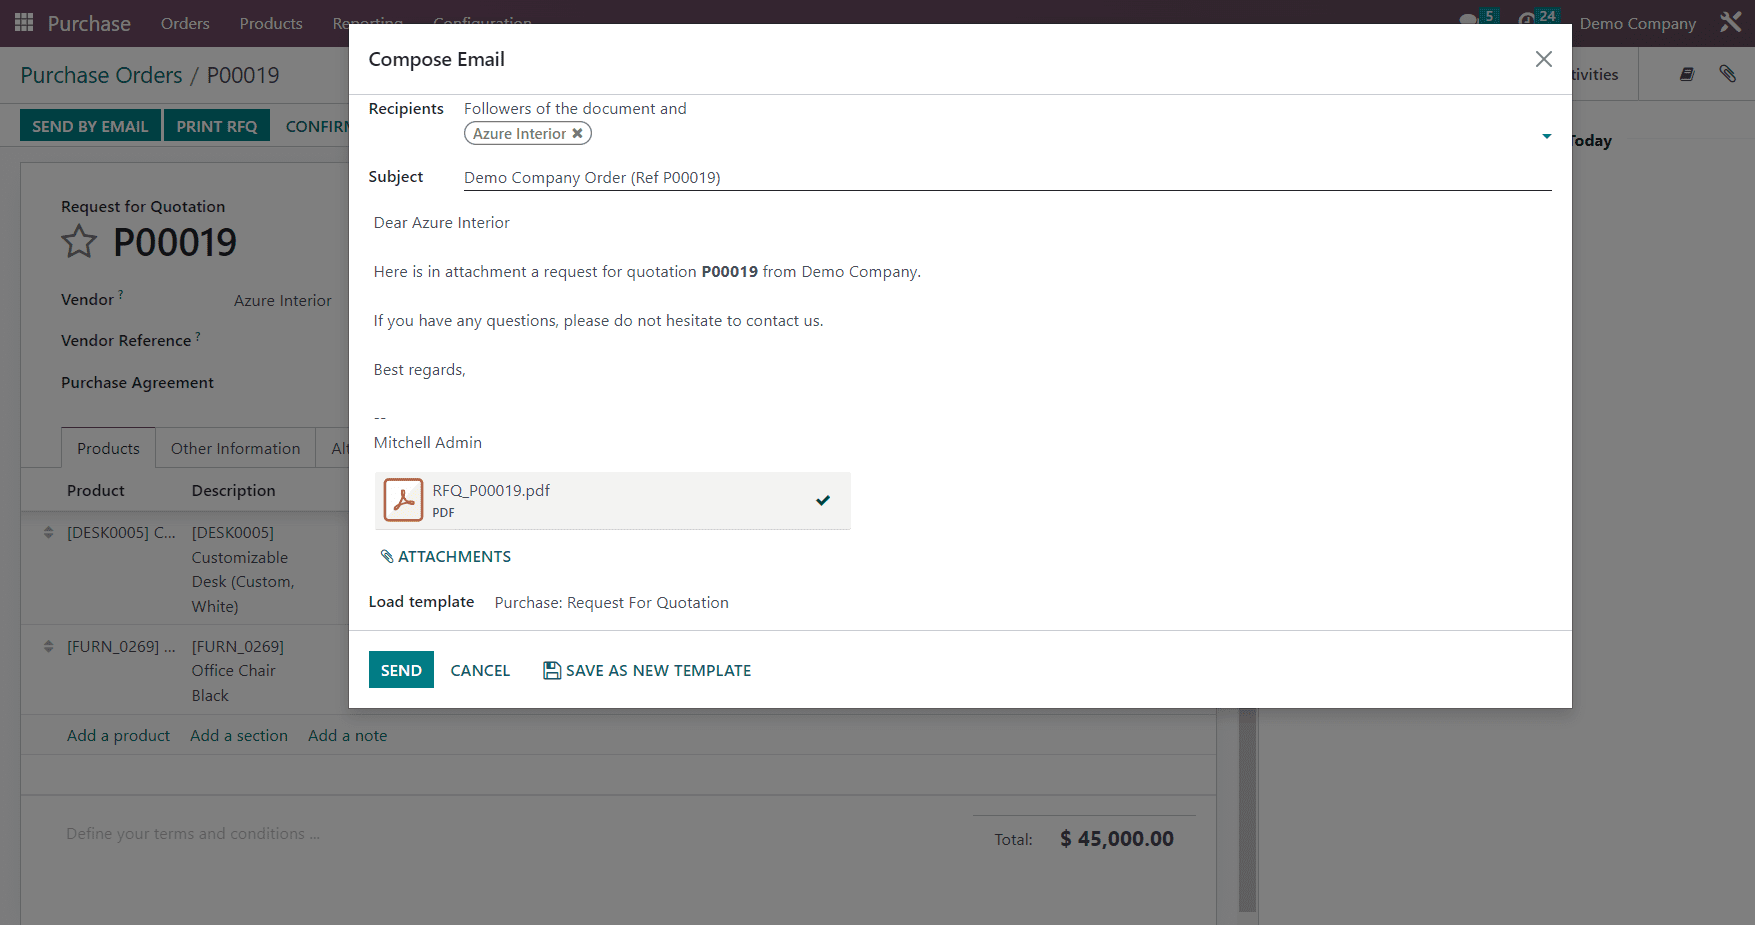
After sending the mail, we can confirm the order to validate the ordering process by clicking the "Confirm Order" button in the top left corner.
So, in the upper right corner of the screen, we can see that our order status has changed to "RFQSENT."
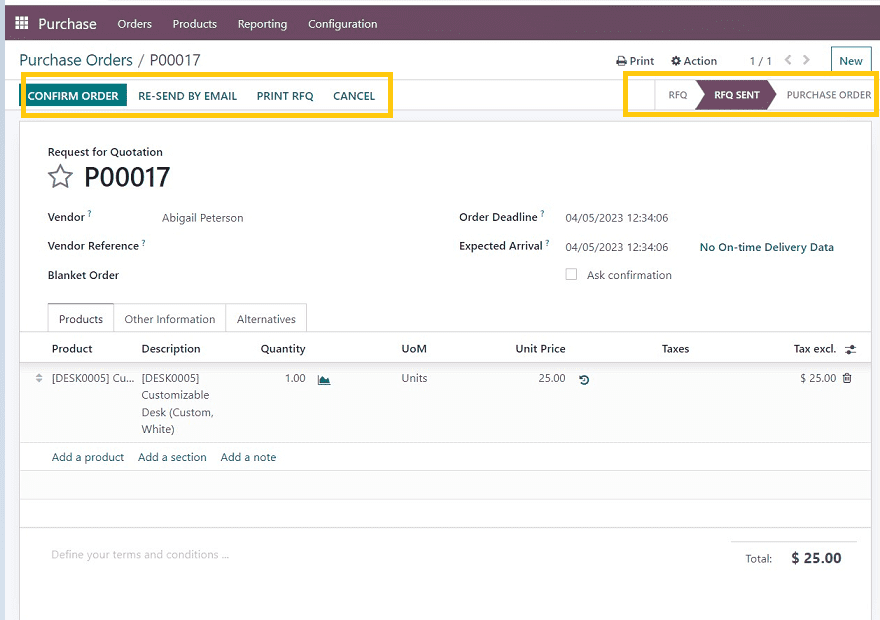
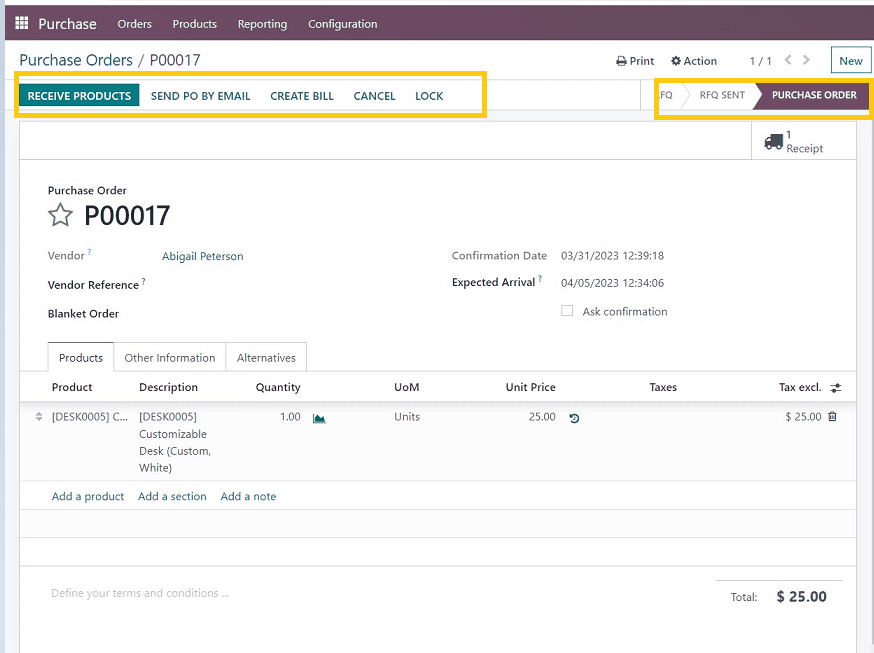
The software will let us know when the order will be delivered. After getting the delivery, Click the "Receive Product" button from the upper left corner of the form menu. After completing the delivery, you can see the "Purchase Order" status in the upper right corner.
We can validate the order after it has been purchased by clicking the "Validate" button. Also, check or set up new quantities, print the order, print labels, etc., from the form menu, as shown in the below screenshot.
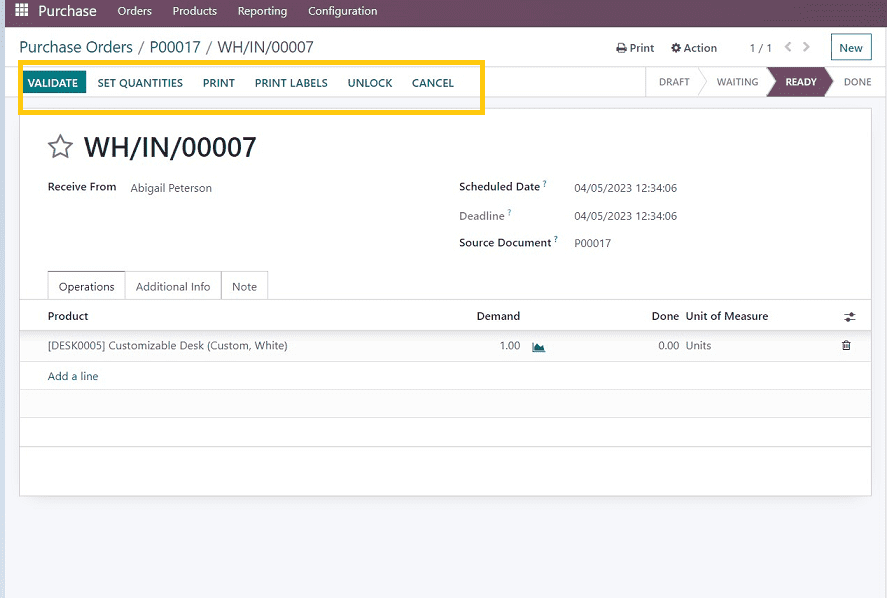
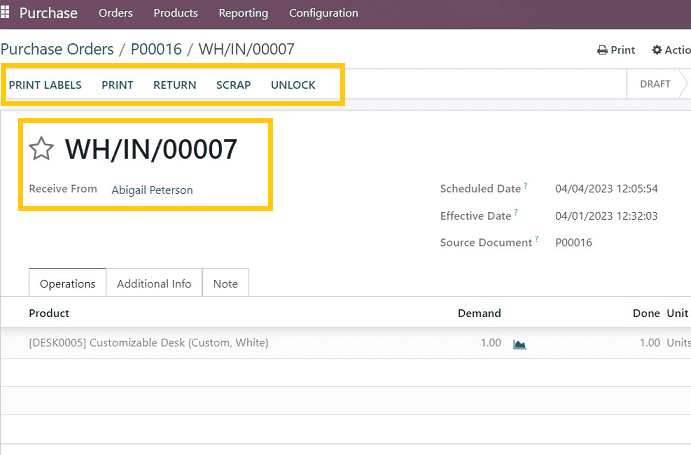
When the product is received, we can use the form menu to return it or mark it as scrap, as seen in the above screenshot.
Once the processes are completed, users can view the status of their order from the purchase order main menu, as shown below.
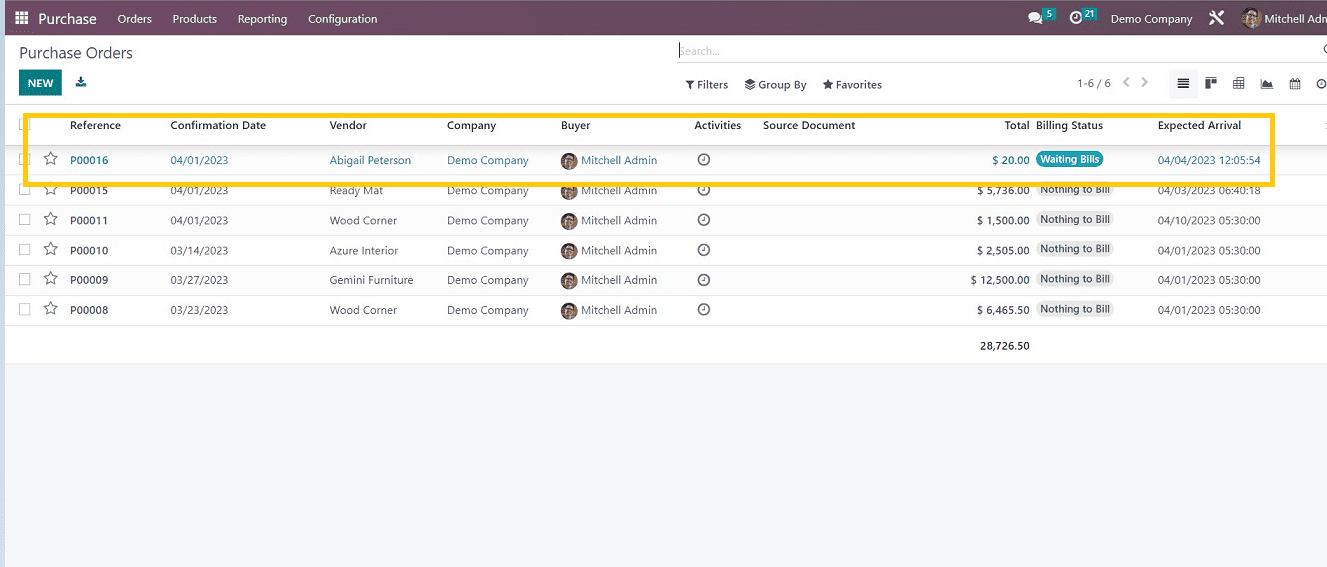
From this screenshot, we can easily understand that the order status is “waiting for bills.”
We can do the billing process by clicking on the purchase order list view, and it will direct us to a form view in which we can create a bill, as shown in the screenshot below.
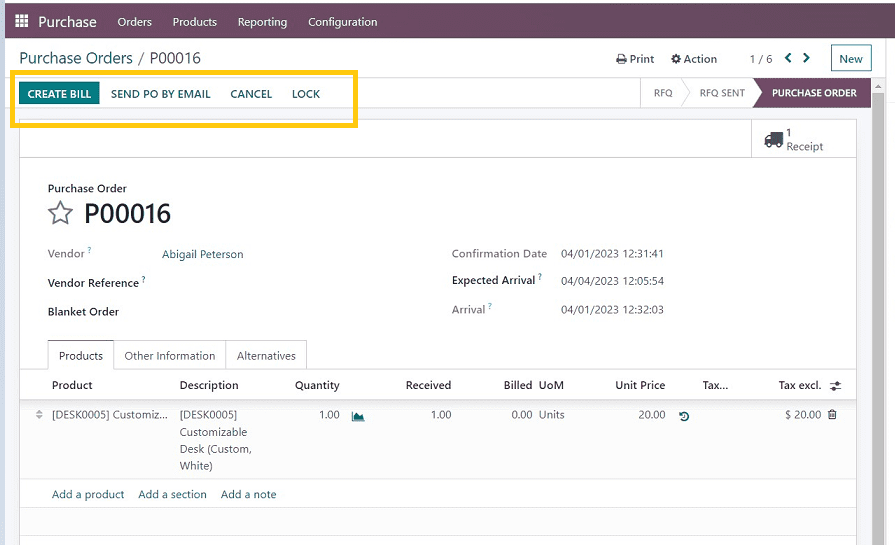
Users can create bills by clicking the "Create bill" button in the form menu bar and the “Confirm” button to confirm the billing process in the screenshot below.
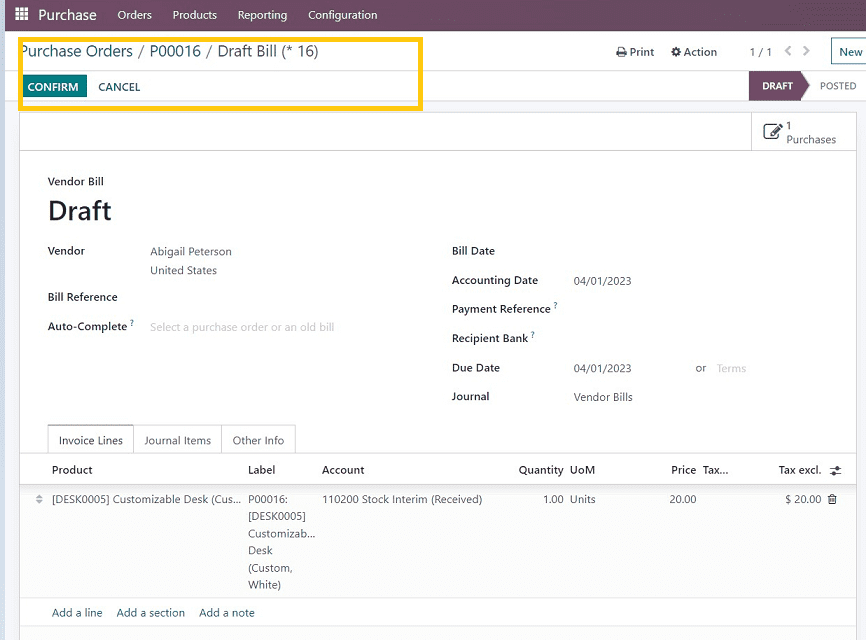
These are the fundamental steps for creating a new purchase order in the Odoo 16 purchase module. This platform is easy to use and provides various functions and features required to create and manage every aspects of a Purchase Order effectively.