Digital learning is increasing faster than in previous times, and the pandemic period is an era of online learning. The online courses attract individuals due to the time-consuming factor and exciting facts. We can see the changes in every industry with internet accessibility and growth. People can access digital resources from any place with flexible time and the internet.
Odoo 15 eLearning module assists in creating a new course, contents, managing visitors, Forums, and Certifications.
This blog helps you generate Courses and Content in the Odoo 15 eLearning module.
Odoo 15 eLearning
To access the eLearning module, you can download it from the Odoo Apps. The eLearning dashboard contains several tabs such as Courses, Configuration, Forum, and Reporting. We can manage the Attendees, Posts, Quizzes, Contents, and Reviews through the eLearning module.
Courses
An analysis of created courses is visible in the eLearning Overview. Select the Courses menu from the Courses dashboard to get an overview of each course. Here, you can see the Duration, number of Attendees, Views, Content, and Reviews in the Kanban view. The course's website view is displayed to you by clicking on the View Course icon. In addition, the three-dot button near the Course title assists to Delete, Contact Attendees, Lessons and Edit your course.
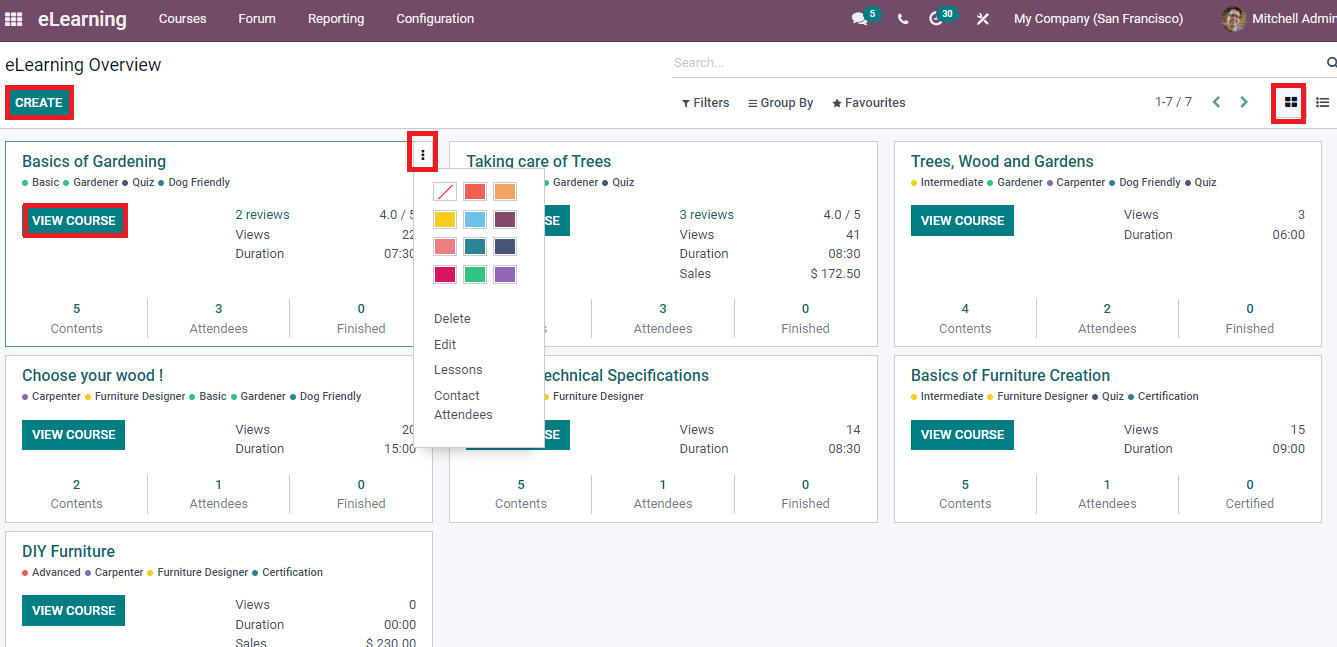
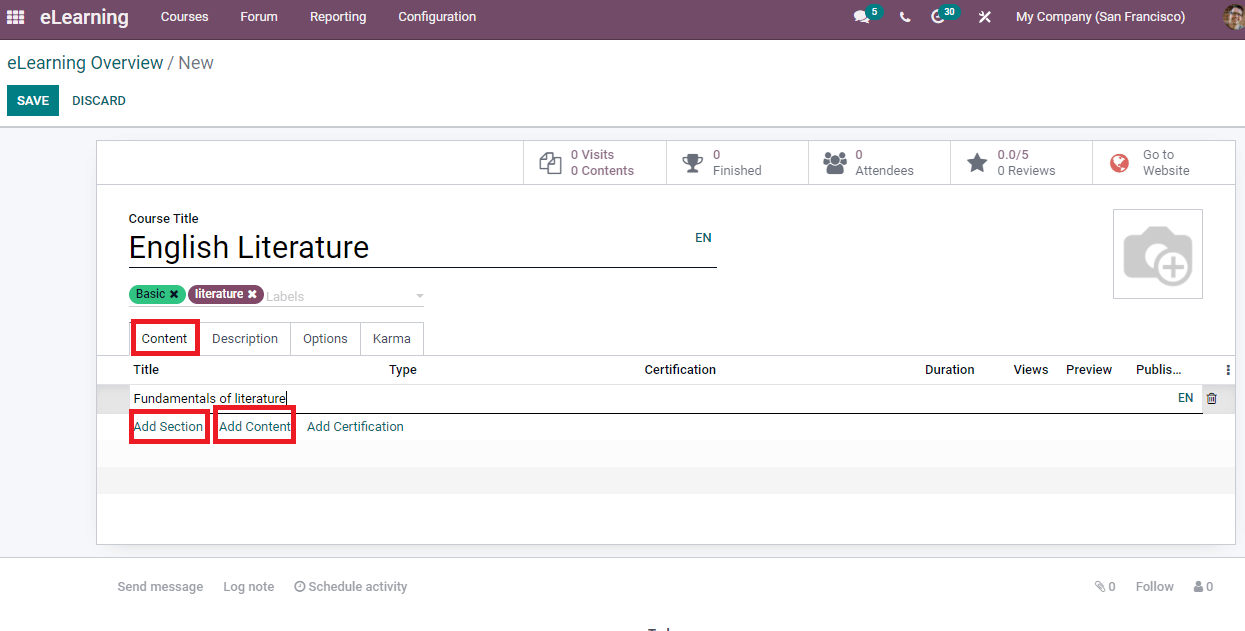
We can generate a new course by clicking on the Create button. Enter the Course title and add basic, advanced, quiz, certification, etc. You can create more tags according to your course and the tags used to categorize the courses. In the end, you can view several tabs such as Content, Options, Descriptions, and Karma. We can create content for a course using the Content Tab. Click on the Add Section button, and a new space opens before you. Here, you can add the section for your course.
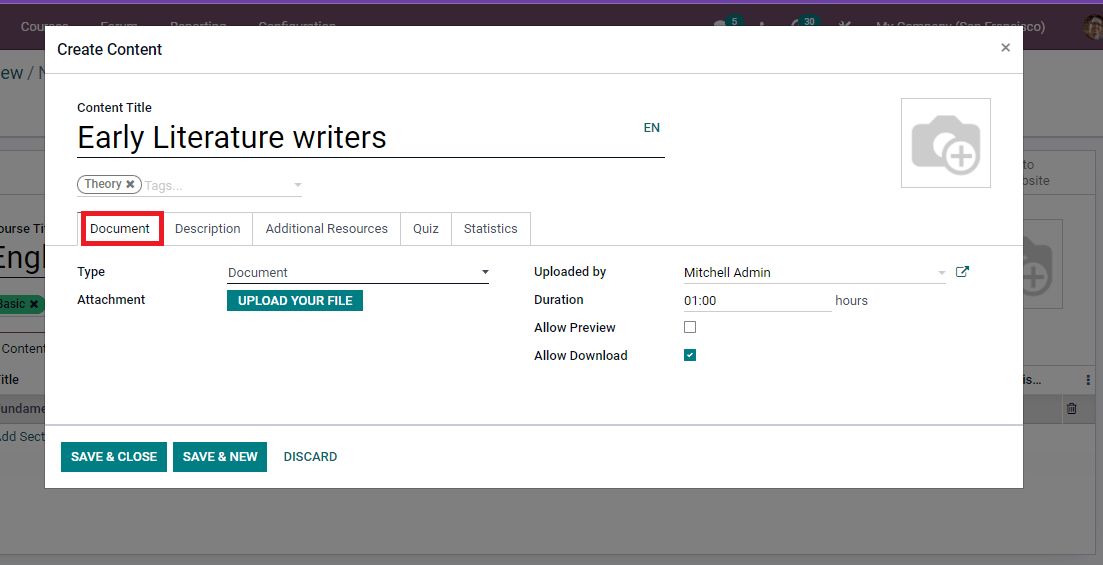
If you click on the Add Content option, you will direct to a new window. In the Create Content window, enter Content Title and Tags. Inside the Document tab, you can apply the Type as Document, Presentation, Video, and more aspects. Based on the properties of a document, the Type will generate automatically. You can add the Youtube or Google document URL and name of the Responsible Person in the Uploaded by option. The estimated completion time for a slide is added in the Duration option. By activating the Allow Preview option, anyone can access your course. The user did not want to join the channel to access the course content. Moreover, it is possible to attach the course content by clicking the Upload Your File option near the Attachment option. Users can download the slide content by enabling the Allow Download option.
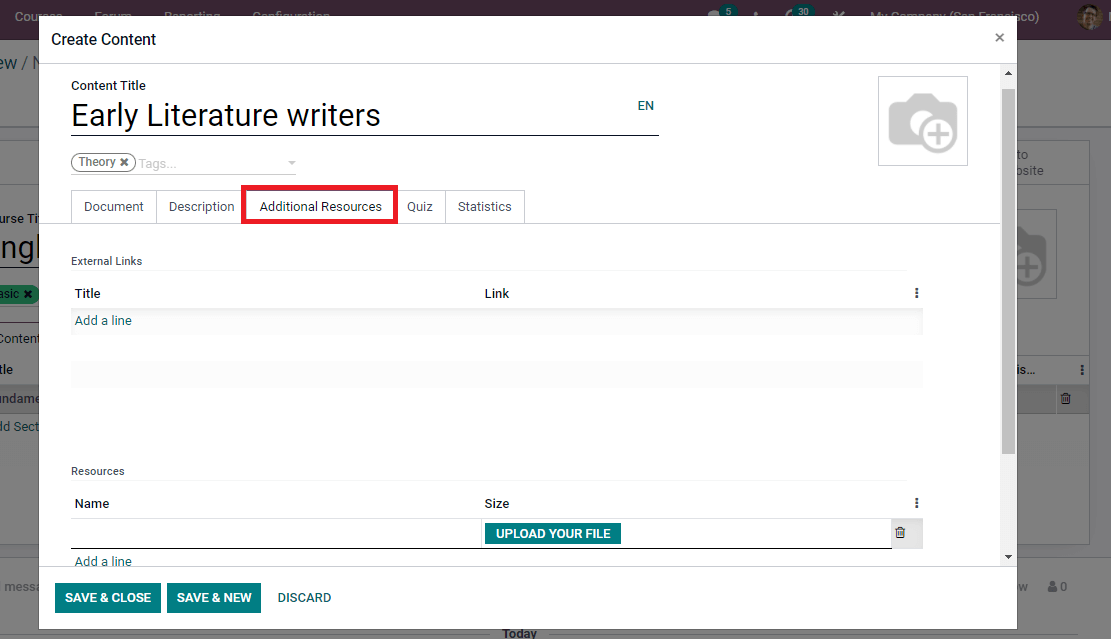
You can add a description inside the Description tab. In the Additional Resources tab, enter the link and title below the External Links by clicking on Add a line button. After that, add the course Name and upload your file inside the Resources heading using Add a line icon.
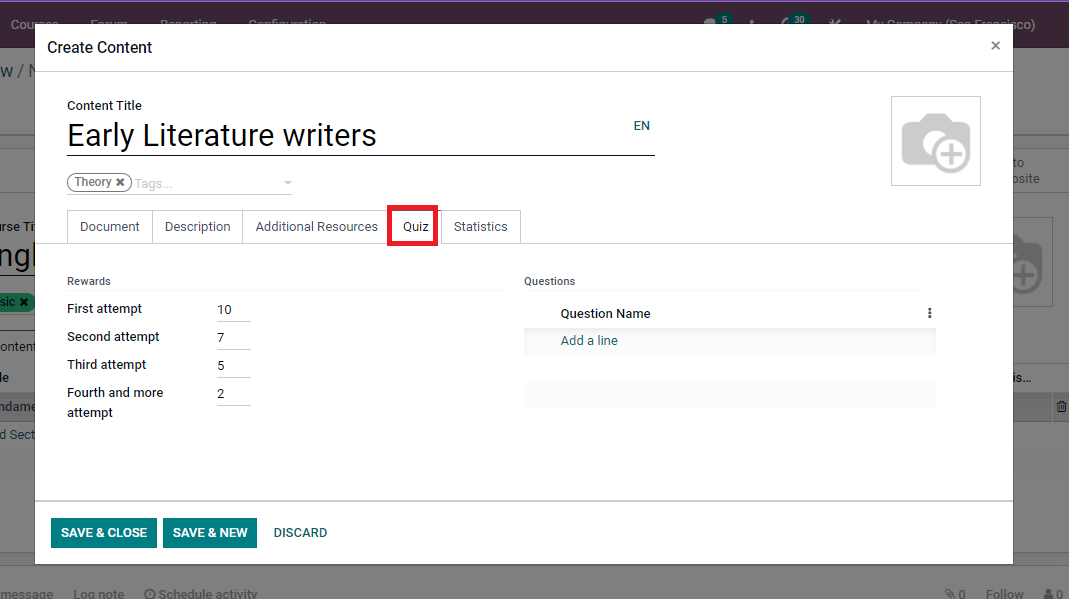
In the Quiz tab, you can add questions for the audience using the Add a line button and set Rewards for the number of attempts.
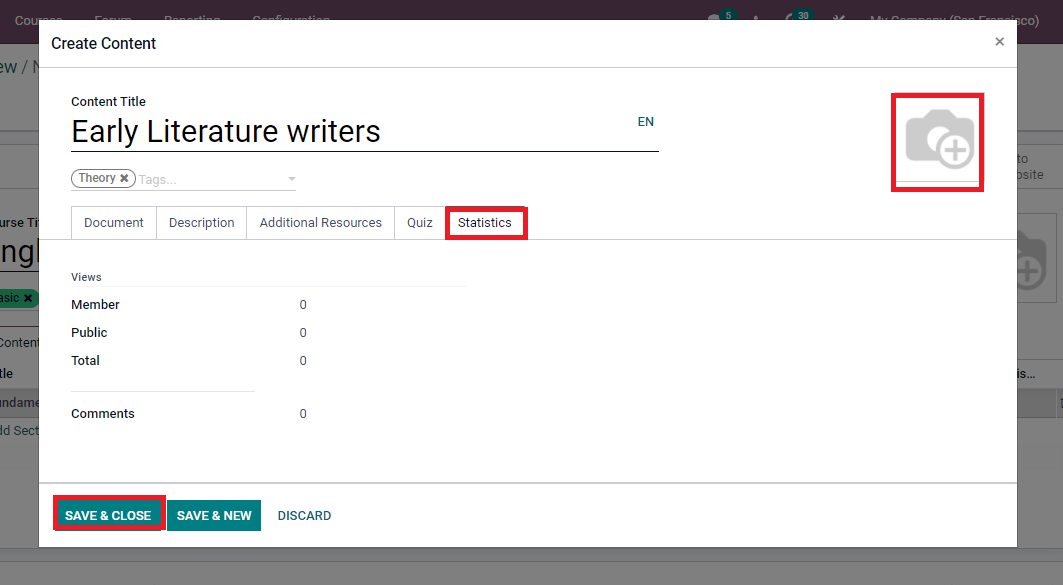
You can see the number of views from the public, members, and comments in the Statistics tab and press the Save & Close icon. The camera button at the right end helps you add images relating to your Content Title.
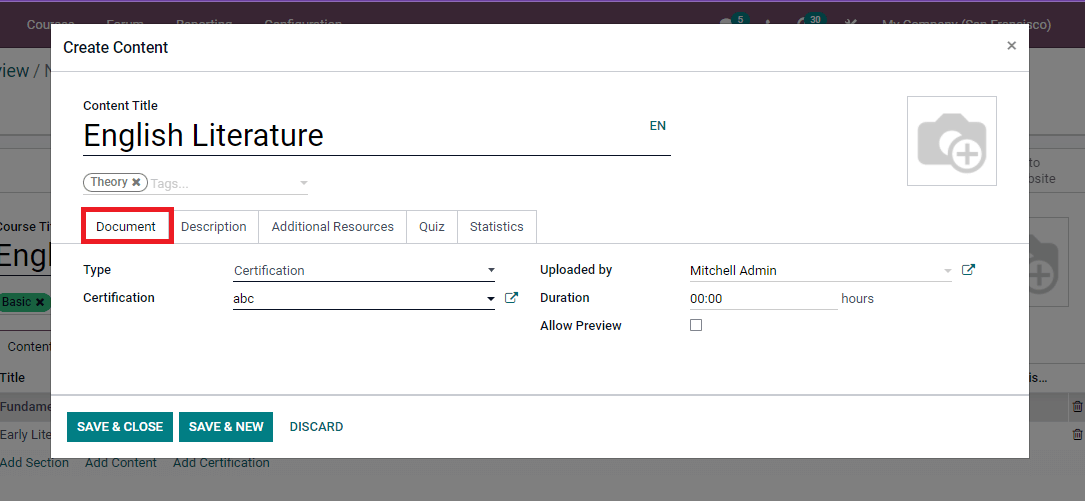
A certification can apply using the Add Certification button inside the Content tab of the new Course window. After clicking this button, enter the Content Title/Tags in a new page that opens before the user. In the Document tab, you can see a Certification option and choose the Company from the list. Put your Course type as certification and click on the Save icon. All other options are the same as we discussed before in the new content creation window.
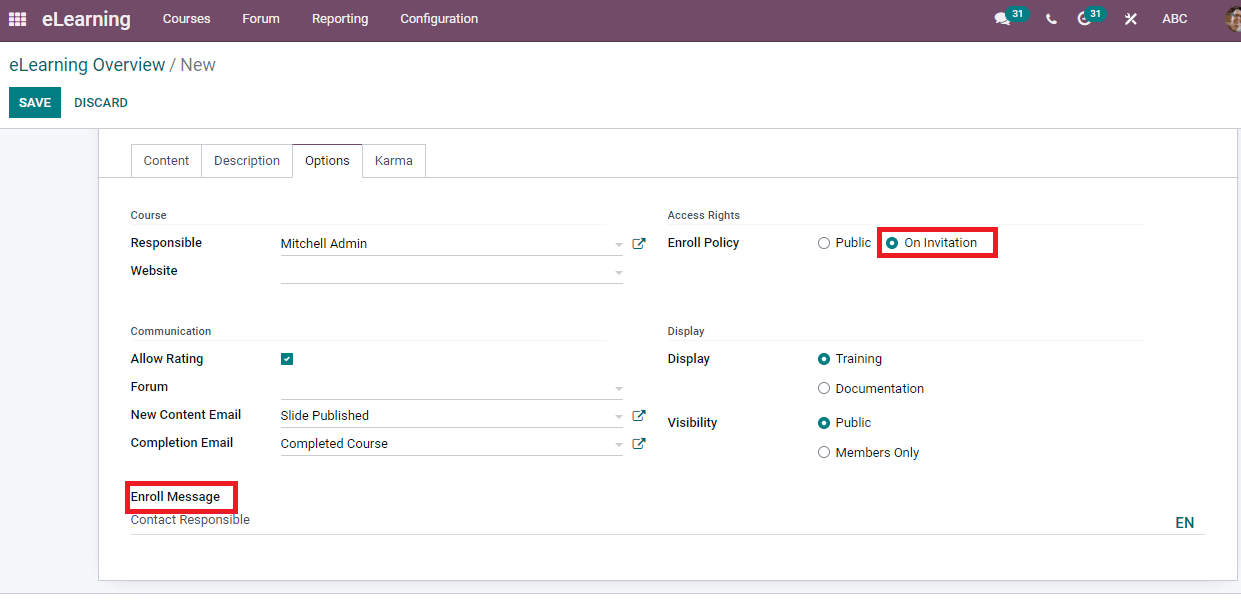
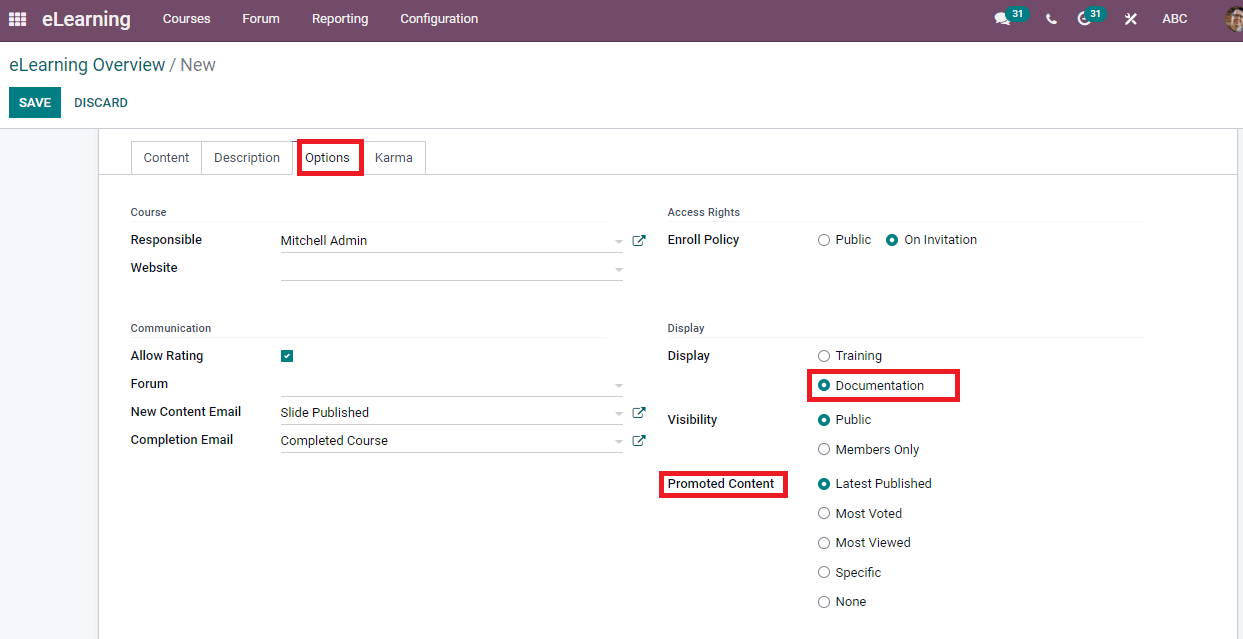
Add the information about the course inside the Description tab of the new Course window. In the Options tab, you can add details regarding the course, Display, Access Rights, and Communication. Select the Responsible person and website from the course option. Later, Enroll policy is a condition to enroll everyone put as Public or On Invitation inside the Access Rights. After selecting On Invitation, a new option of Enroll Message is visible at the end to assist the message about enrollment processing for responsible contacts.
Allow Rating option enabling users to review courses, like content, and post comments. Select the Forum and choose the New Content Email for Email attendees once new content is published. Once the course is completed, attendees receive a Completion Email, and you can select it from the dropdown menu. All these options are visible inside the Communication Tab. Select the Display as Training/Documentation and Visibility as Public/Members only below the Display option. After selecting the Documentation from the Display option, Promoted content is visible before you. A slide will appear at the top page based on the promotion strategy of Promoted Content. Some of the options under Promoted Content are Last Published, Most Viewed, None, Most Voted, and Specific. The last created slide is the Latest Published, and the most voted slides come under the Most Voted section. Moreover, the slide viewed by prominent people is depicted in the Most viewed section. None means the absence of a slide, and Specific chooses the slide to appear.
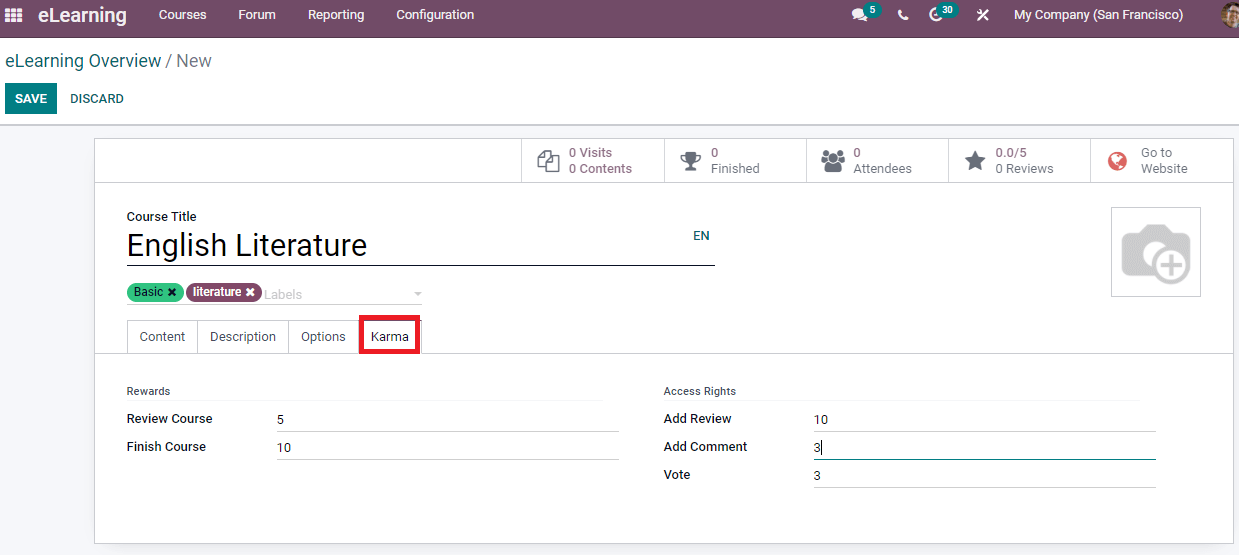
You can add the Rewards for Review or Finish the course. Enter the Access Rights such as Add Comment, Vote, and Add Review in the Karma tab. Karma needed to add a Review for the course using Add Review and comment on the course slide using the Add Comment option. After applying all details, click on the Save icon in the Course window.
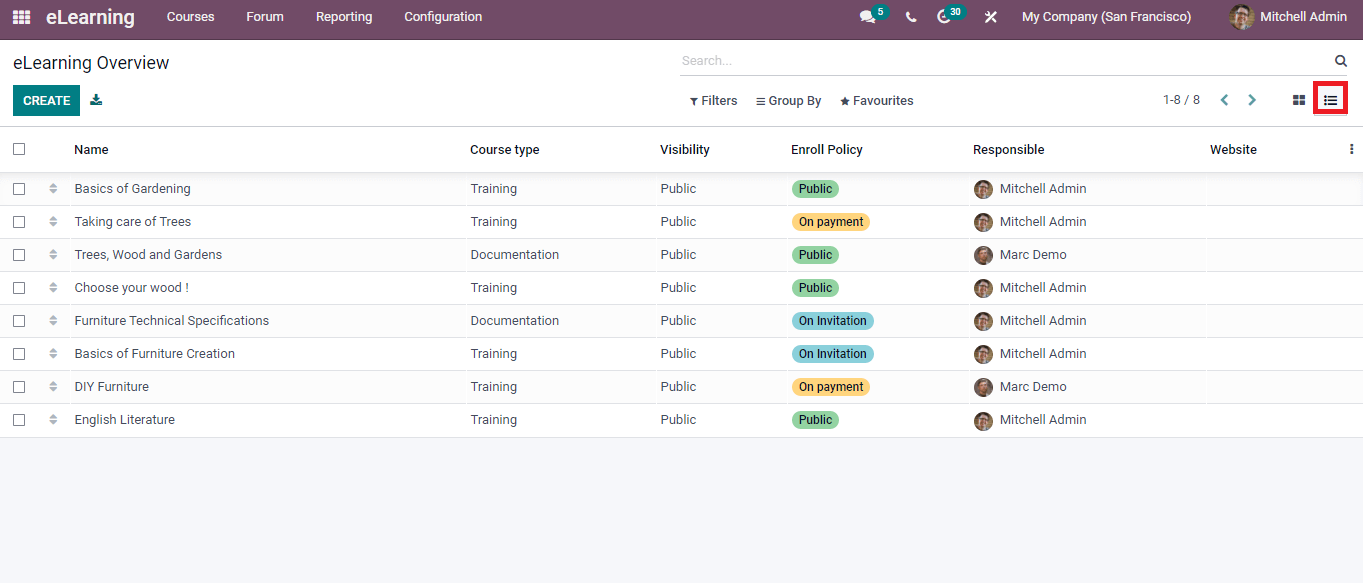
The created course is visible in the eLearning Overview dashboard. The eLearning window is visible in the List view consisting of details such as Website, Name, Visibility, Course Type, and Responsible person.
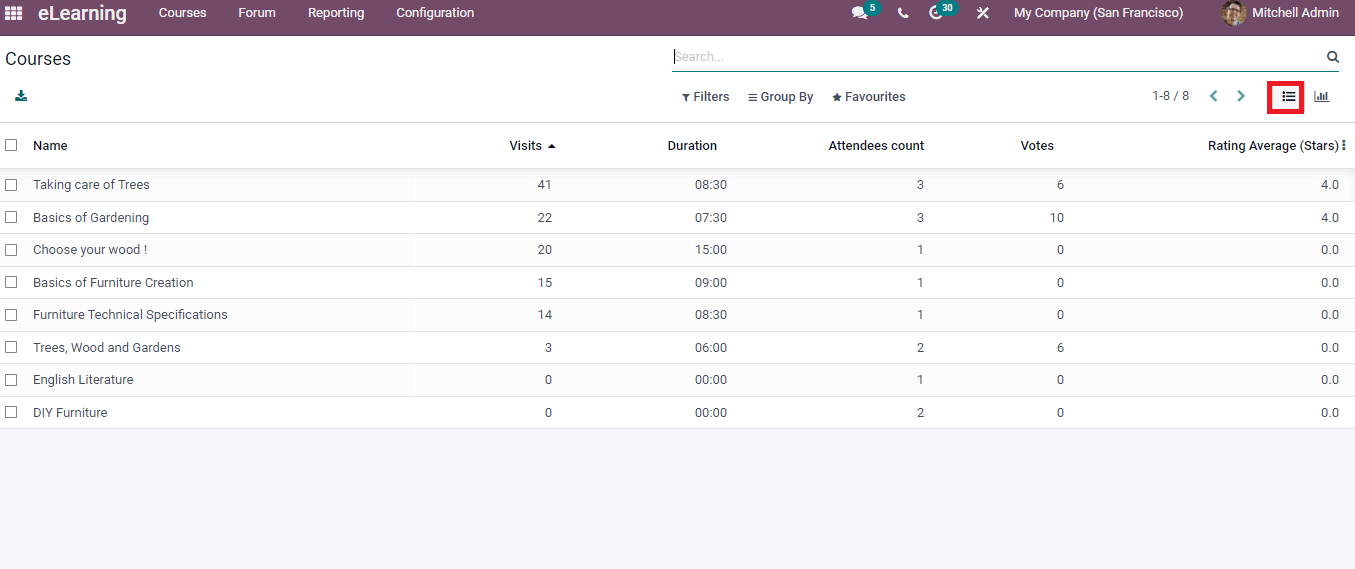
The reports of courses are viewable from the Reporting tab. In the List view of Courses window, we can see the Name, Duration, Votes, Visits, Rating Average, and Attendees Count of each course.
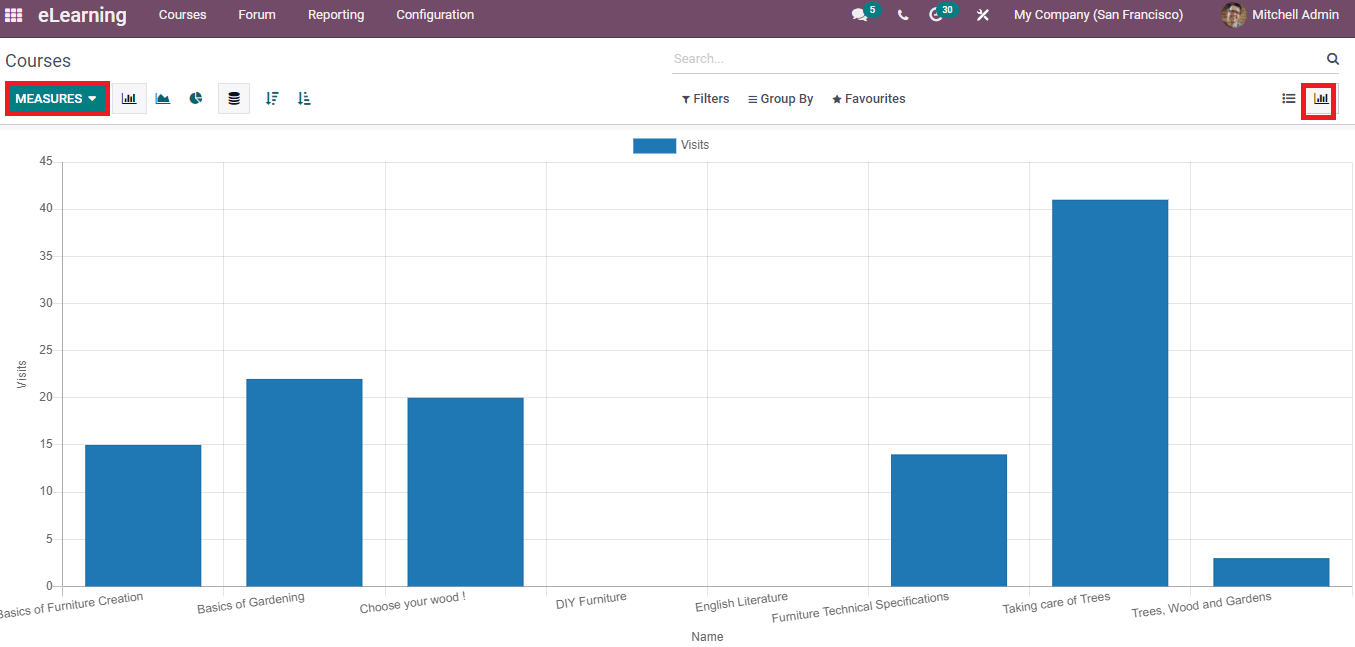
The Graph view of Courses contains Course details on the X-axis and the number of Visits on the Y-axis. By clicking on the Measure icon, you can apply Count relating to Content, Comment, Review, Duration, Sequence and more on graphical representation.
Contents
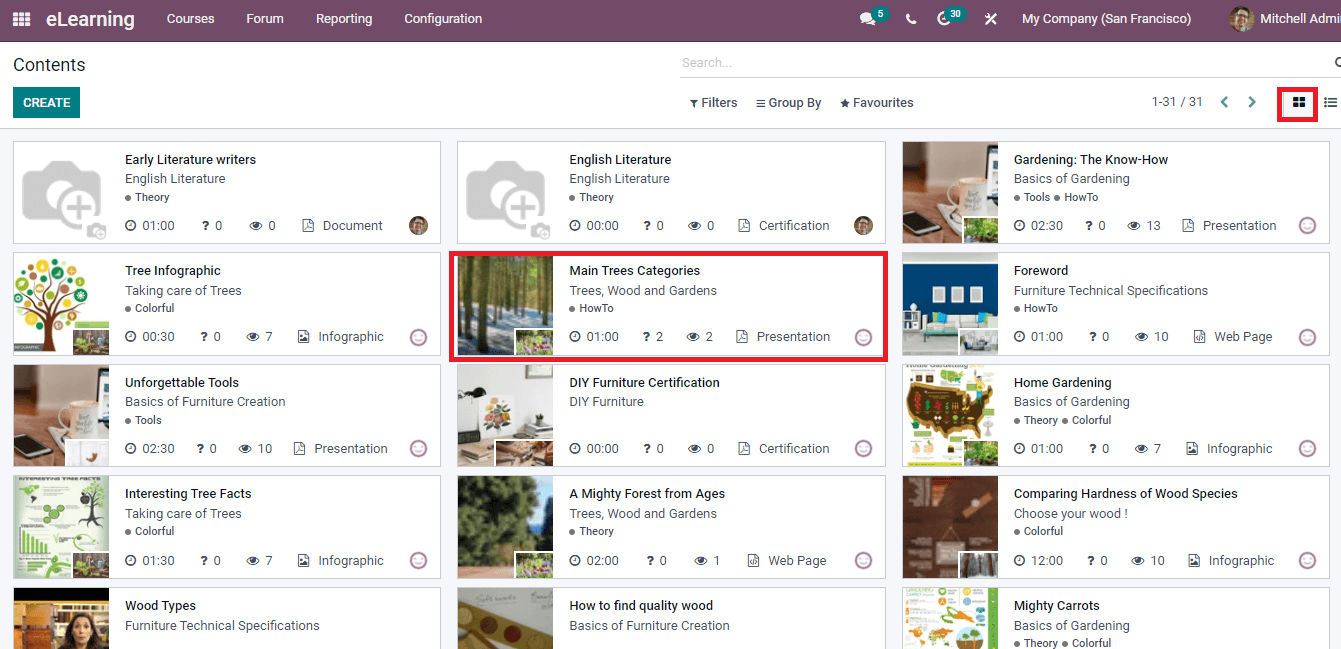
Select the Contents menu from the Courses tab to see the details of specific contents of each course. You can see the Type, Title, Duration, and Views of each content with a particular image in the Kanban view of the Contents window. The vast information of content is visible by clicking on a title.
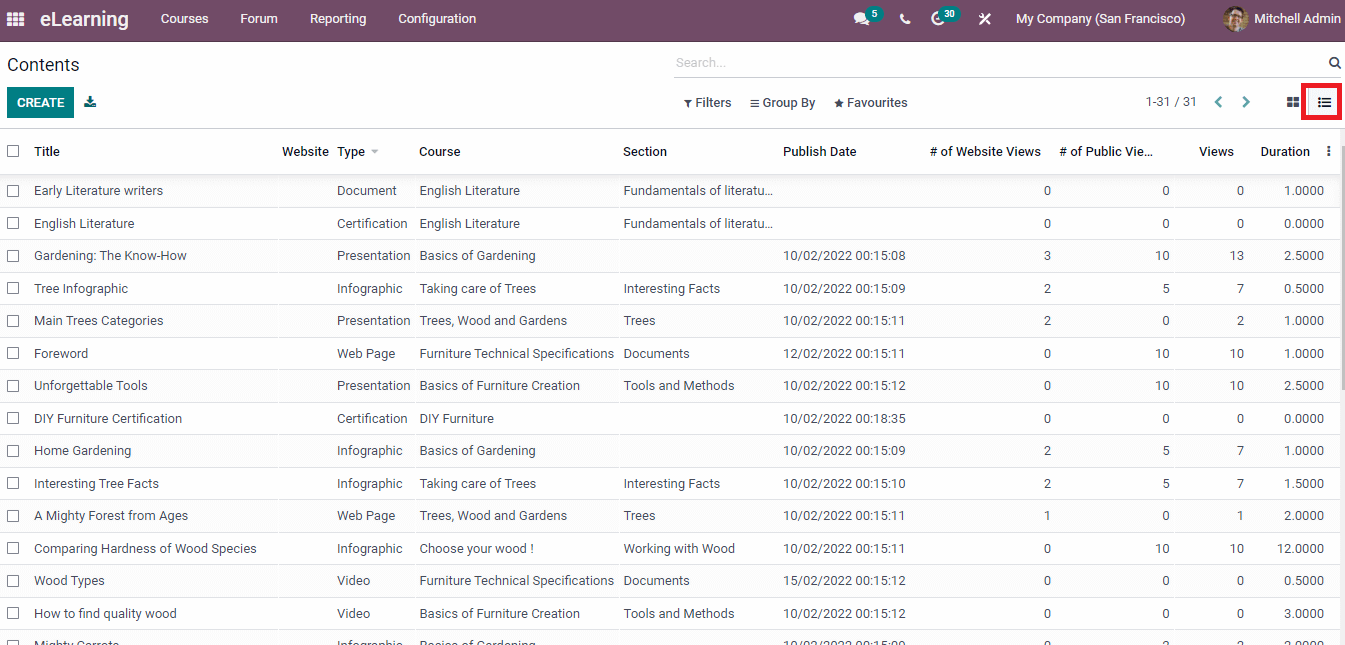
In the List format of Contents window, we can see the Course, Date, Type, View, Section, and Duration of each content.
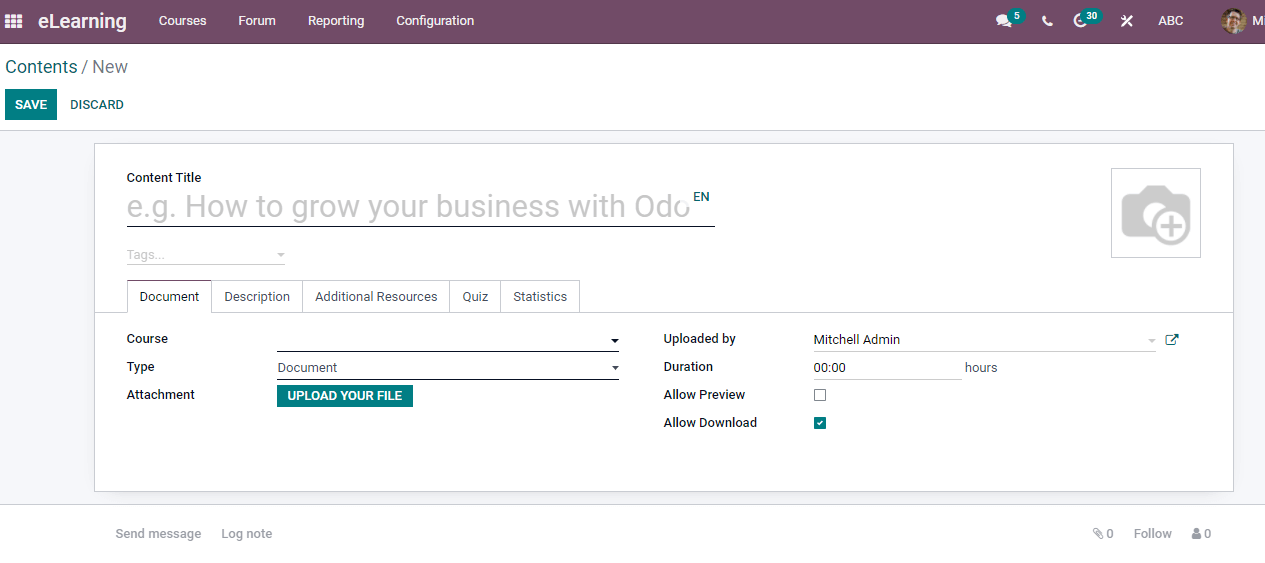
To create new Content
The Create icon in the Contents window assists in developing new content for your course. In the new Contents window, enter the Tags and Content Title. Other tabs such as Document, Quiz, Description, Statistics and Additional Resources process steps we said before at the beginning of course creation.
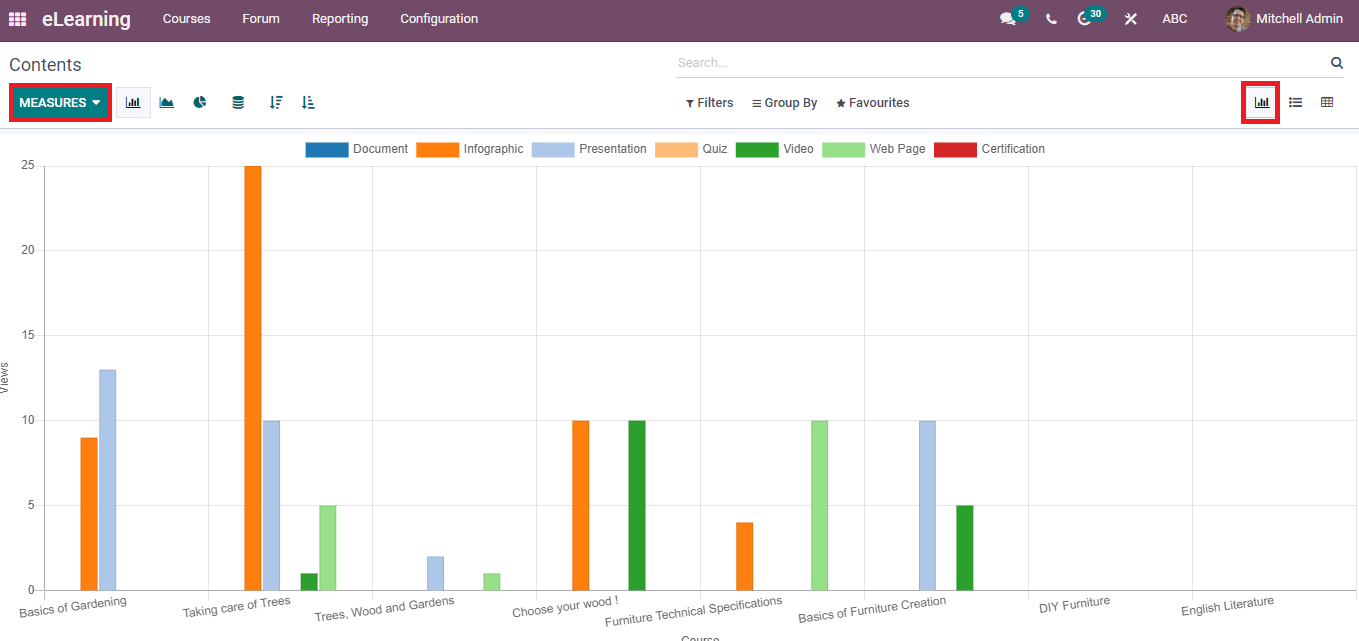
The analysis of created contents is depicted in the Contents menu in the Reporting tab. In the Graph view of Contents window, you can see Course information on X-axis and Views on Y-axis. It is possible to apply Counts such as likes, number of certifications, videos, website, slides and more using the Measure button.
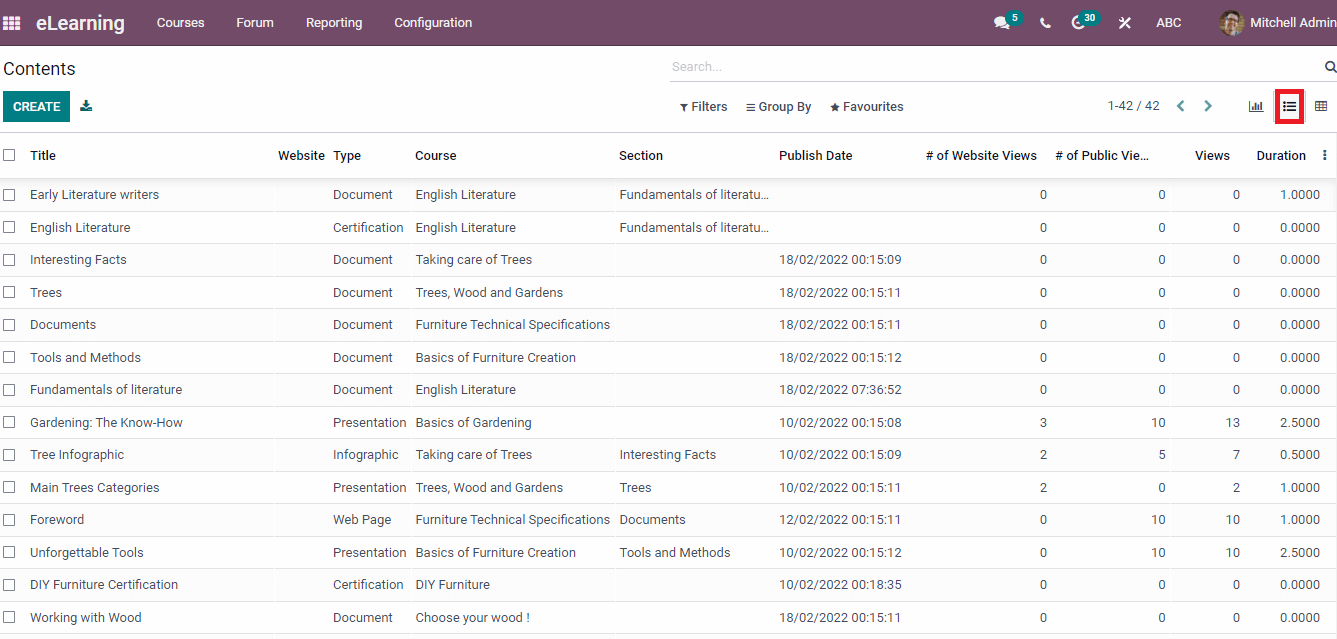
The List view of Contents window consists of details such as Title, Course, Publish Date, Duration, Course, Views, and Website. We can view the detailed information by clicking on a specific content title.
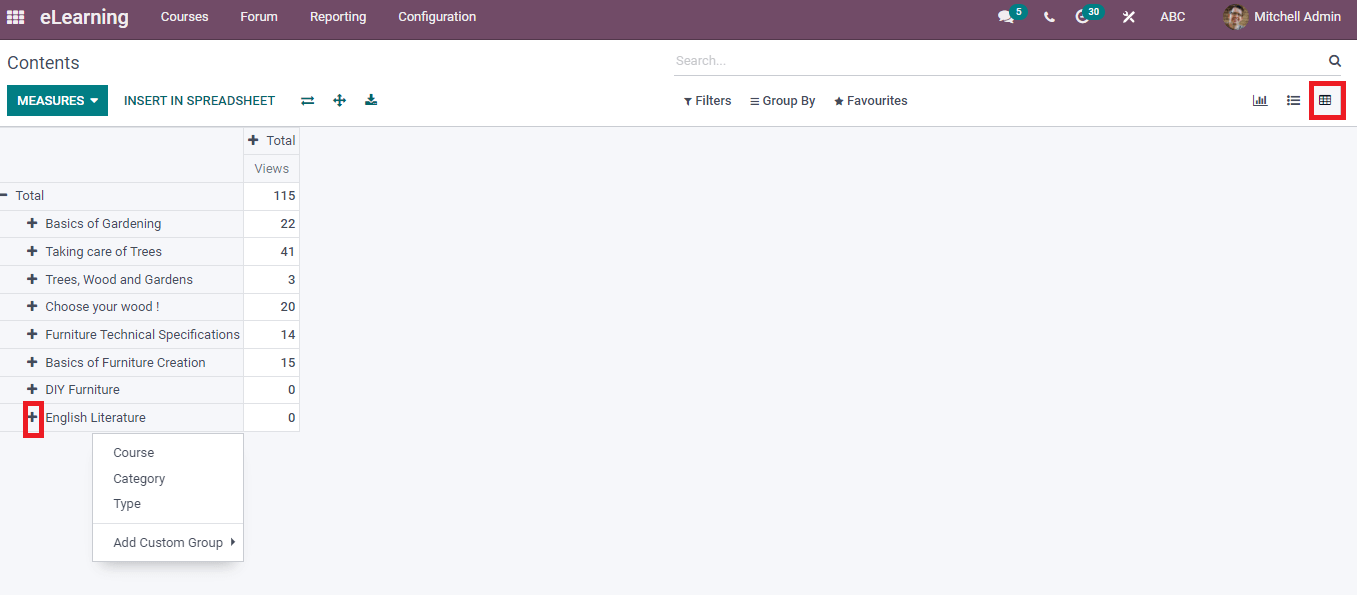
In the Pivot view of Contents window, you can see the Total views per course. We can add a Custom Group for each course as per the Category, Course, and Type.
 Odoo 15 eLearning module helps to implement various courses with definite tools. Users can enroll and complete the courses within less time from any location. It is possible to add multiple lessons inside each course and set Karma points as per rules. We can evaluate students' progress through Question pools, attempt limits, and quizzes. Odoo eLearning module enables to engage with the community with comments, forums, and Emails.