Odoo is an open-source ERP platform that offers robust multi-language support. However, custom modules need to be translated manually, while the default Odoo modules can support multiple languages at the same time. This means that users of the same database can access the system in their preferred language simultaneously.
We'll begin with a brief overview of the language update process in Odoo 17. Then, we'll dive into the details of translating custom modules. Finally, we'll walk you through the steps to add a new language to your Odoo 17 instance.
How to Add & Change User Language?
To add a new language, go to the General Settings section. Only users with the appropriate permissions can access and modify the default languages.
Settings > General Settings > Languages
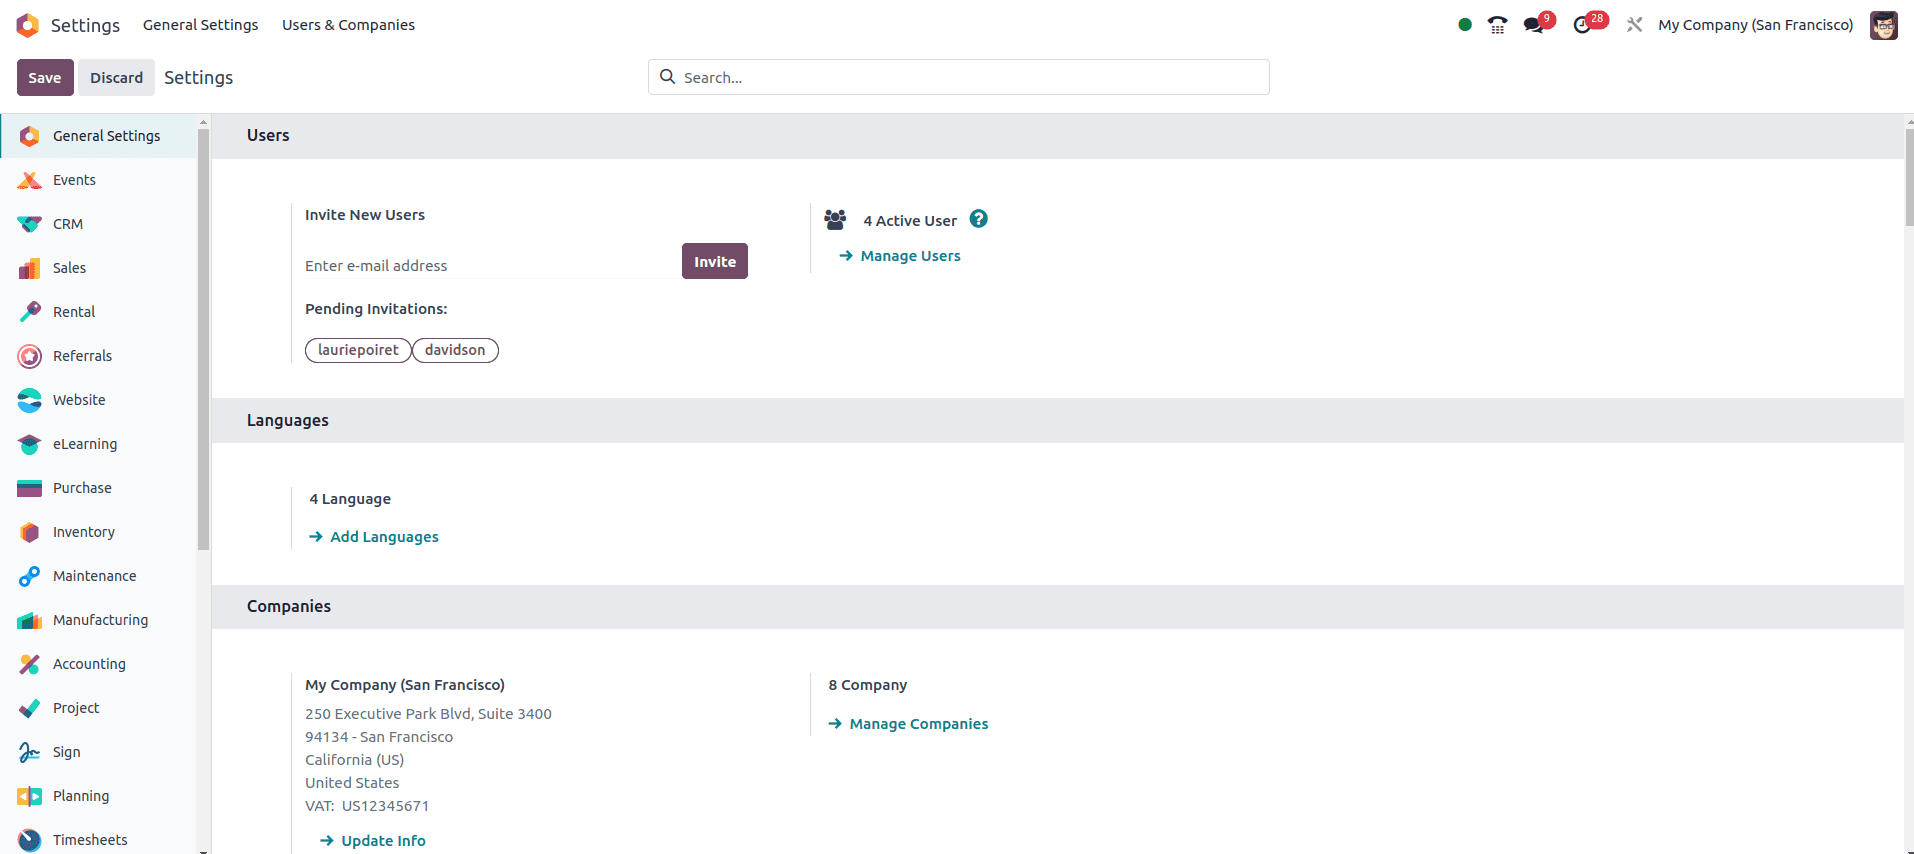
As you can see in the image above, there is a button labeled Add Languages. Click this button to add more languages to your Odoo instance. However, you will only see the languages Odoo has pre-added at this stage. We will discuss how to add completely new languages later in this blog.
Currently, we can see that four languages are already pre-selected. This allows each user to choose their preferred language from these available options.
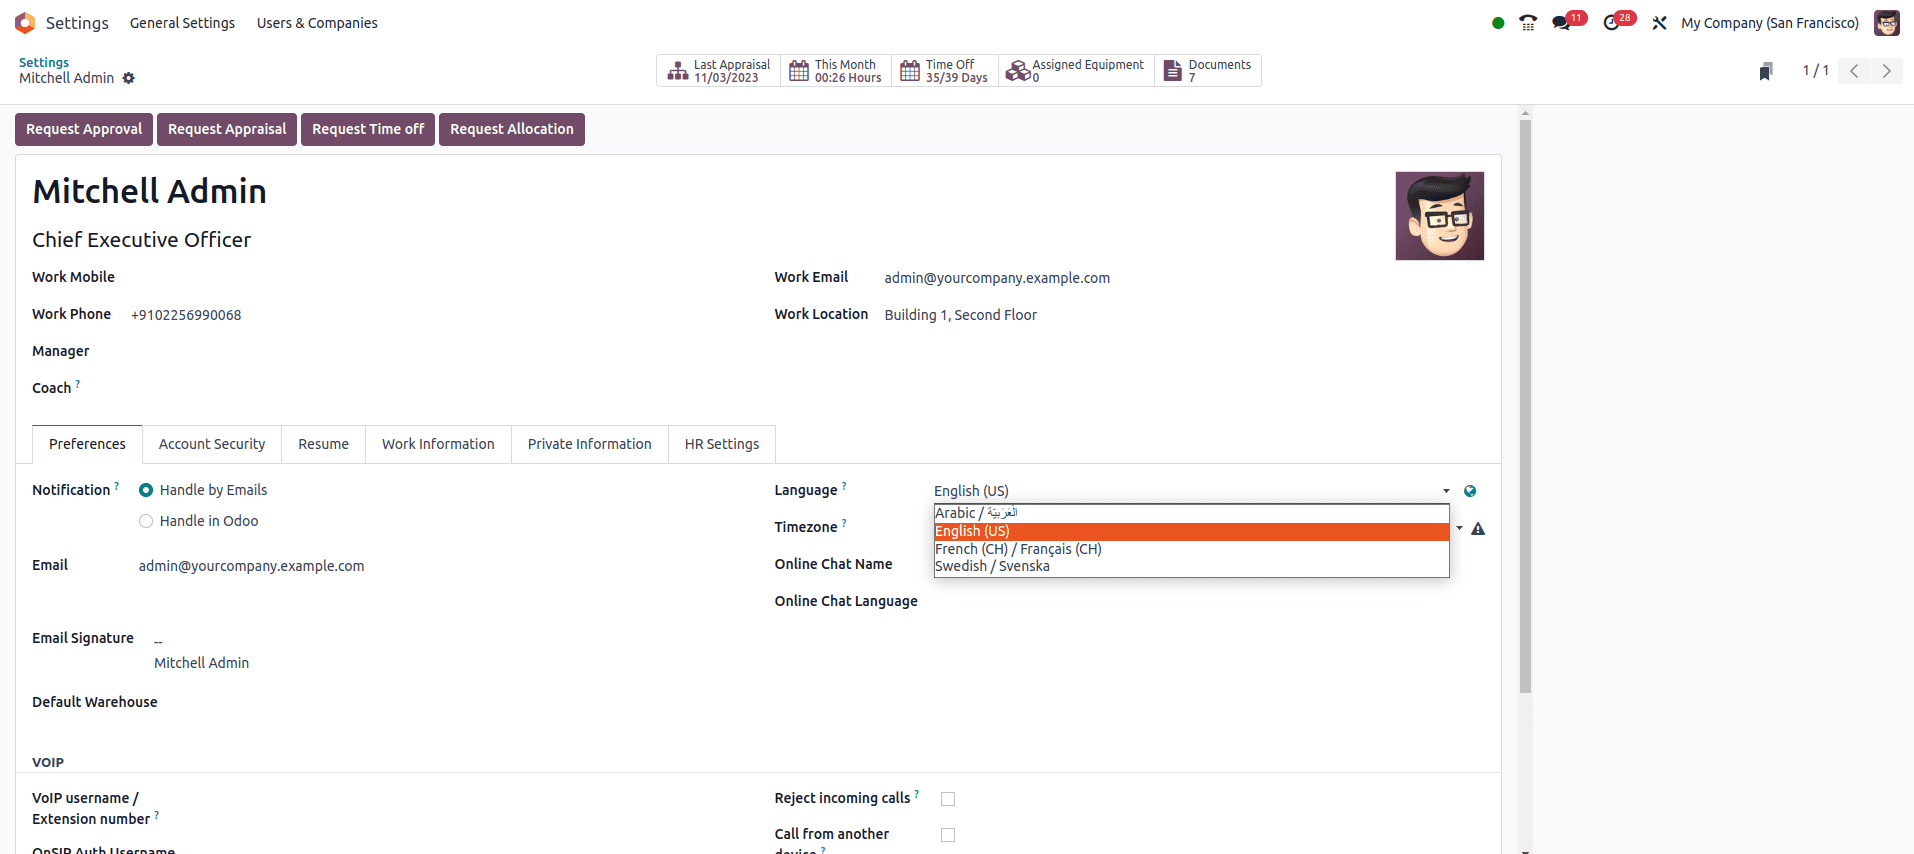
Referring to the image above, users can choose from the four pre-defined languages. To change the language, they need to select their target language, save the form, and Odoo will then reload in the newly selected language. This straightforward method makes changing the user's language preferences a seamless experience.
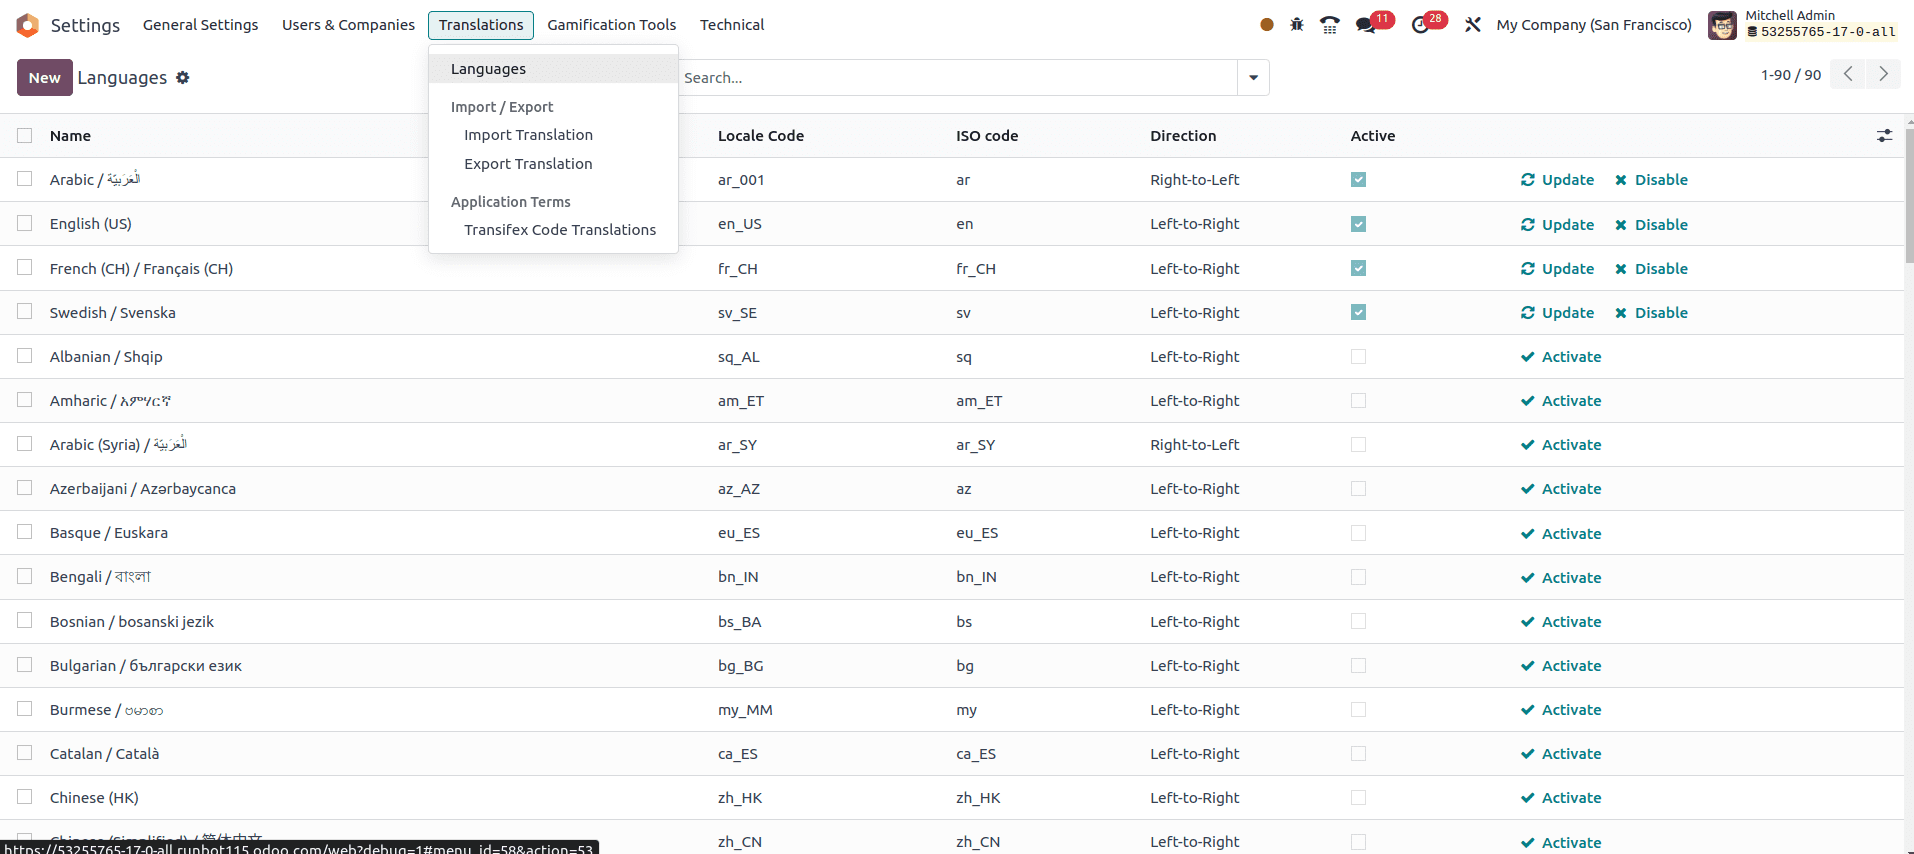
Adding new languages can also be accomplished through the 'Language' section, accessible from the Translation menu. By clicking the 'Activate' button, you can seamlessly incorporate a new language into your Odoo instance.
Settings>Translation>Languages
How to Define Translation to Custom Module?
Now, let's proceed to the next aspect. As previously noted, the majority of default modules come pre-equipped with translations. However, when dealing with a custom module, the responsibility of adding translations falls upon us.
In this blog, I am going to show you how to add Arabic translation for my Vehicle rental module.
Before proceeding, let's take a look at the screenshots. In the first image, I've updated the user language. However, in the second image, there are no changes in my Vehicle Rental module. This lack of change is because we haven't added any translations for our custom module.
Now, let's explore how to add translations. To do so, we must access the configuration settings. Within the configuration settings, you'll find a menu item labeled 'Translations,' which plays a pivotal role in customizing language preferences at the module level.
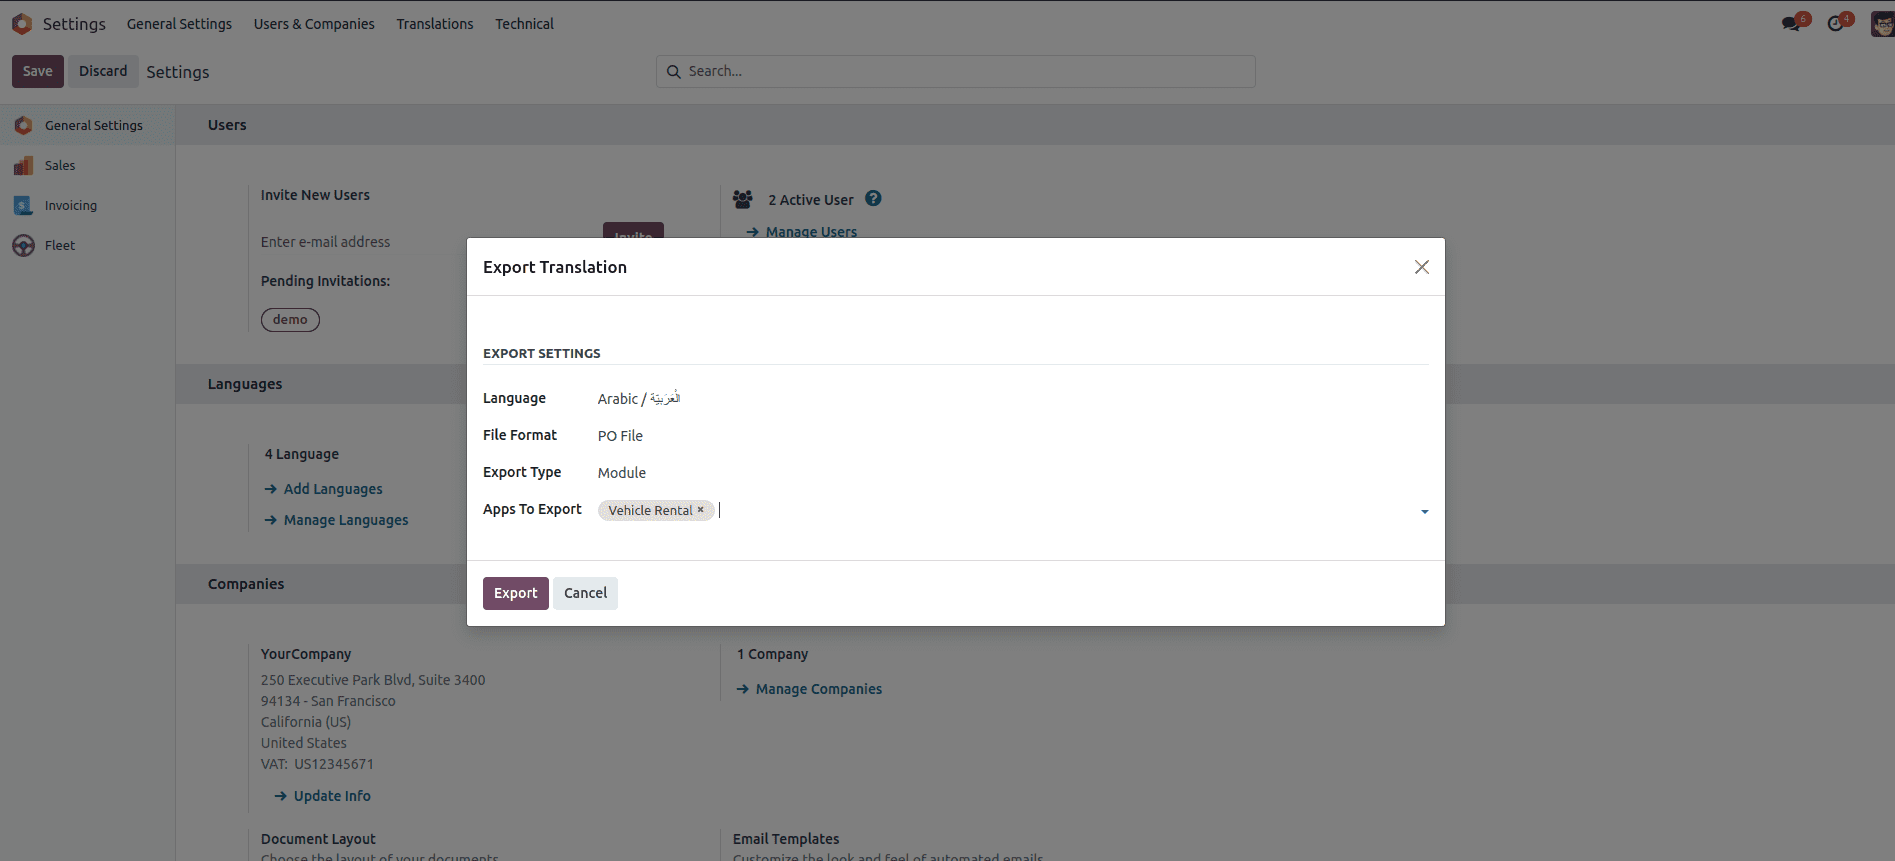
To initiate the translation process, our first step is to export the translations of our custom module into the desired target language. In my case, the target language is Arabic. Simply click on the 'Export Translation' menu, and it will open a pop-up window that resembles the one below:
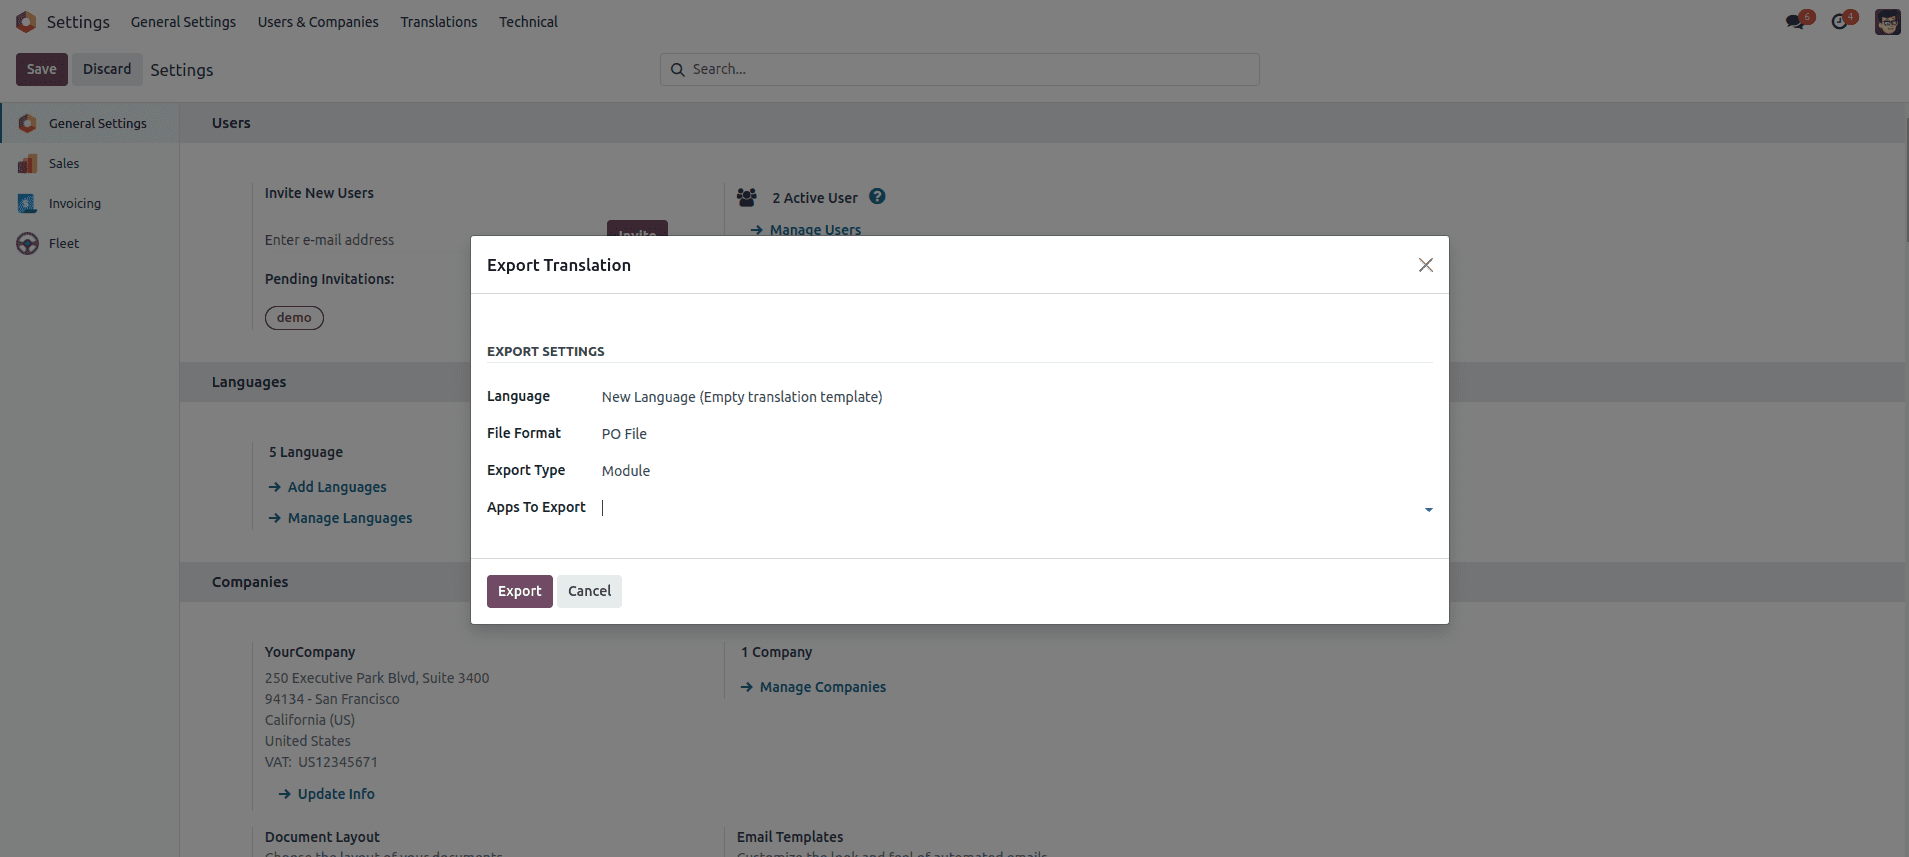
Let's explore the fields within the export translation pop-up:
1. Language: This field allows us to specify the target language. In this case, we'll select 'Arabic' as the language for export.
2. File Format: Choose the file format in which you wish to export the translations. Options include CSV, PO, and TGZ archives. For this example, I'll select the 'PO' file format.
3. Export Type: In this field, you can specify whether you want to update translations for the entire module or for a specific model. In this blog, we're adding translations for the entire Vehicle Rental module. However, if you have a specific model in mind, you can select it here.
4. Apps To Export: In this section, you can select the modules for which you want to add or update translations. Multiple modules can be chosen.
While this blog is primarily focused on custom module translation, if you've selected the 'model' in the Export type, you'll encounter two additional fields:
1. Model to Export: Here, you can select the specific model for which you want to add translations.
2. Model Domain: This field allows you to filter records based on specific conditions. Using this filter, you can export the exact records for translation that you need.
It's time to export the translation file. To select the custom module for which you want to add translations, simply click on the 'Apps To Export' field. You'll see a list of all Odoo modules, including our custom modules. Once you've made your selection, click on the 'Export' button.
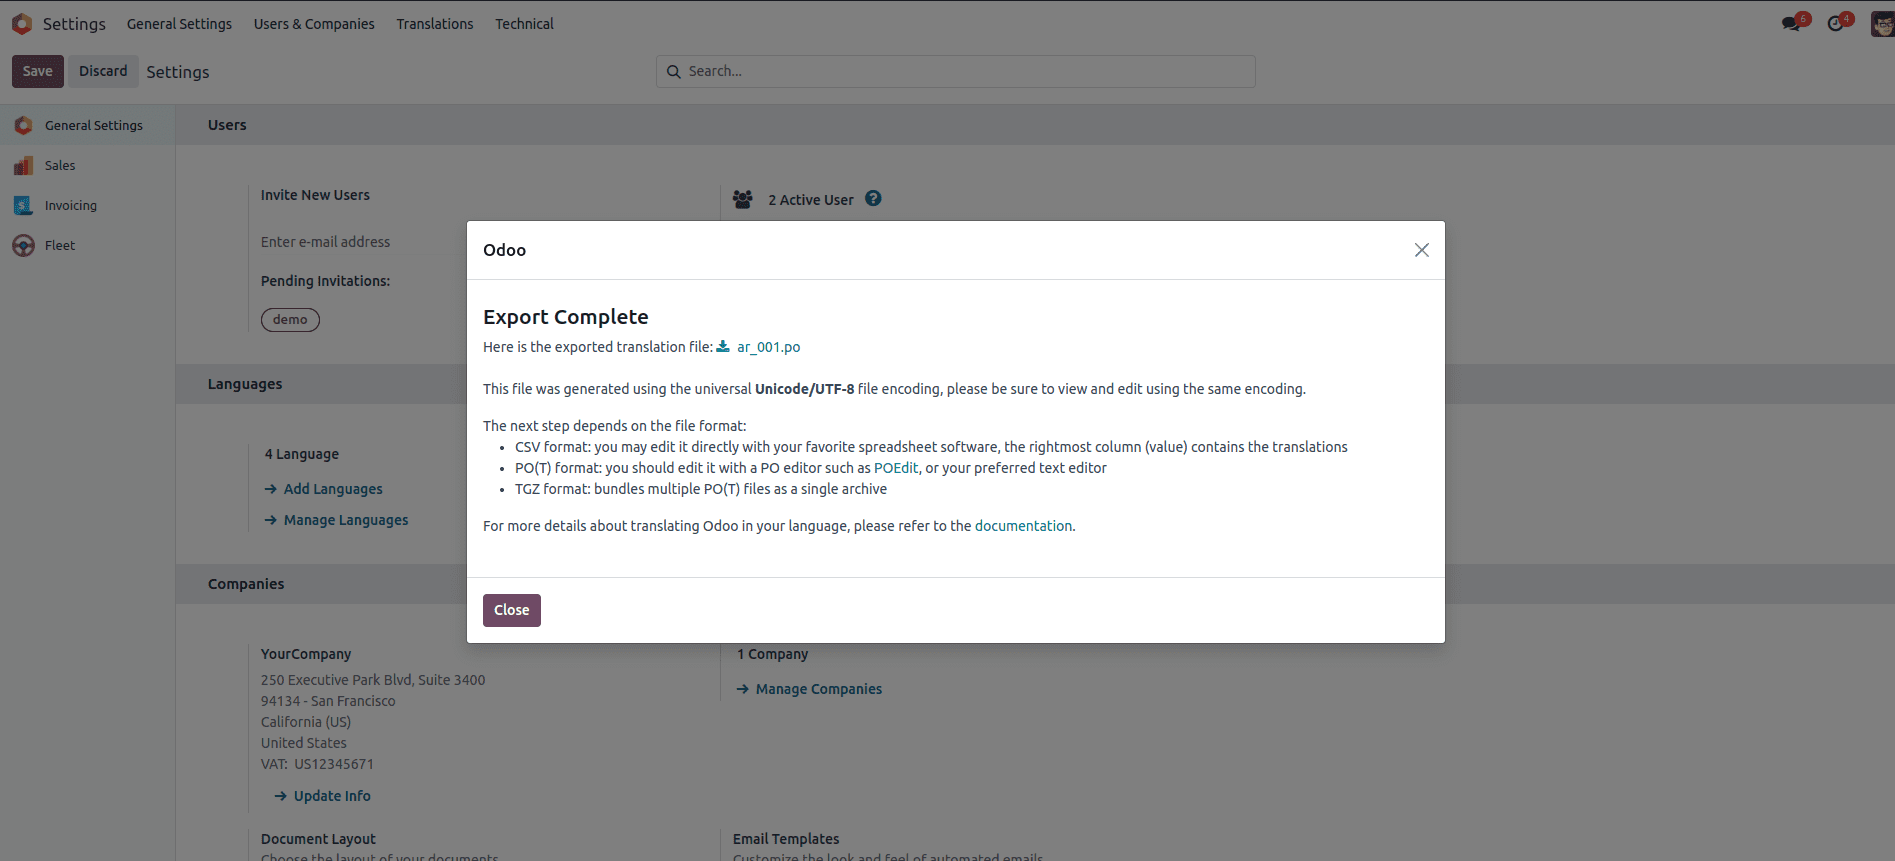
When you click the 'Export' button, Odoo will generate the translation file in the specified target language. To retrieve the file, simply click on the download icon.
Once the file is downloaded, you can open it in any text editor if it's a PO file. If you opted for the CSV format, you can edit it using your preferred spreadsheet software.
msgid "Action Needed"
msgstr ""
#. module: vehicle_rental
#: model:ir.model.fields,field_description:vehicle_rental.field_vehicle_rent_charges__amount
#: model_terms:ir.ui.view,arch_db:vehicle_rental.view_rent_charge_form
msgid "Amount"
msgstr ""
#. module: vehicle_rental
#: model:ir.model.fields,field_description:vehicle_rental.field_vehicle_rent_request__message_attachment_count
msgid "Attachment Count"
msgstr ""
#. module: vehicle_rental
#: model:ir.model.fields.selection,name:vehicle_rental.selection__vehicle_rental__state__available
#: model_terms:ir.ui.view,arch_db:vehicle_rental.view_vehicle_search
msgid "Available"
msgstr ""
After opening the file, it will display various details, including information about your version, database, and the exported module name. However, there's no need to modify this information; you can proceed directly to add translations.
Within the file, you will encounter keys named 'msgid,' which are automatically filled with the default language. Alongside 'msgid,' you'll find another key labeled 'msgstr.' To add translations, you simply need to provide the translation value for each 'msgid' key
#. module: vehicle_rental
#: model:ir.model.fields,field_description:vehicle_rental.field_vehicle_rent_request__message_needaction
msgid "Action Needed"
msgstr "????????? ???????"
#. module: vehicle_rental
#: model:ir.model.fields,field_description:vehicle_rental.field_vehicle_rent_charges__amount
#: model_terms:ir.ui.view,arch_db:vehicle_rental.view_rent_charge_form
msgid "Amount"
msgstr "????"
#. module: vehicle_rental
#: model:ir.model.fields,field_description:vehicle_rental.field_vehicle_rent_request__message_attachment_count
msgid "Attachment Count"
msgstr "??? ????????"
Just as shown in the example above, proceed to add the necessary translations. After you've updated or added the translations, you should place the file in your module directory. It's crucial to ensure that the file name remains unchanged. Here's an image to provide you with a visual representation of the folder structure:
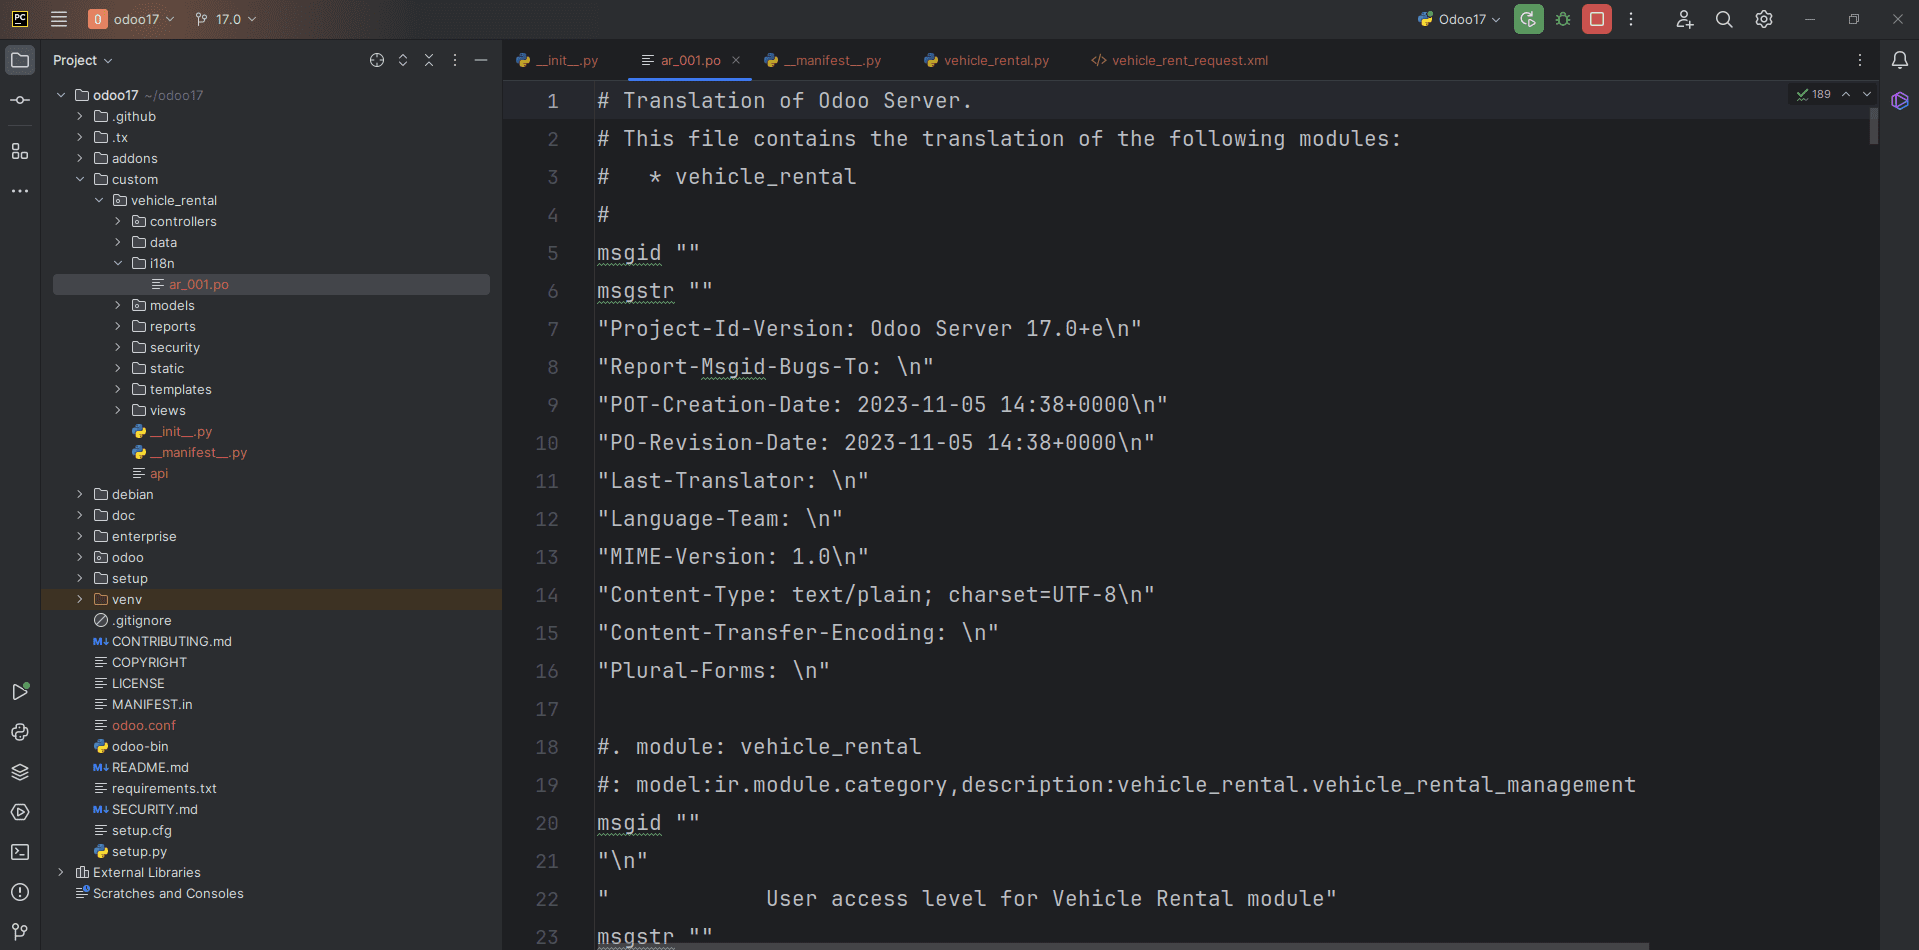
In the screenshot provided, you can observe that I've added the updated PO file within a folder named 'i18n.' It's important to maintain this specific folder structure.
With these steps completed, it's time to update the module on your server and proceed to upgrade the module. It's worth noting that there's no requirement to mention the translation file in the __manifest__.py file. Odoo automatically detects this file. After upgrading your module, you can verify the translation functionality by changing the language as needed.
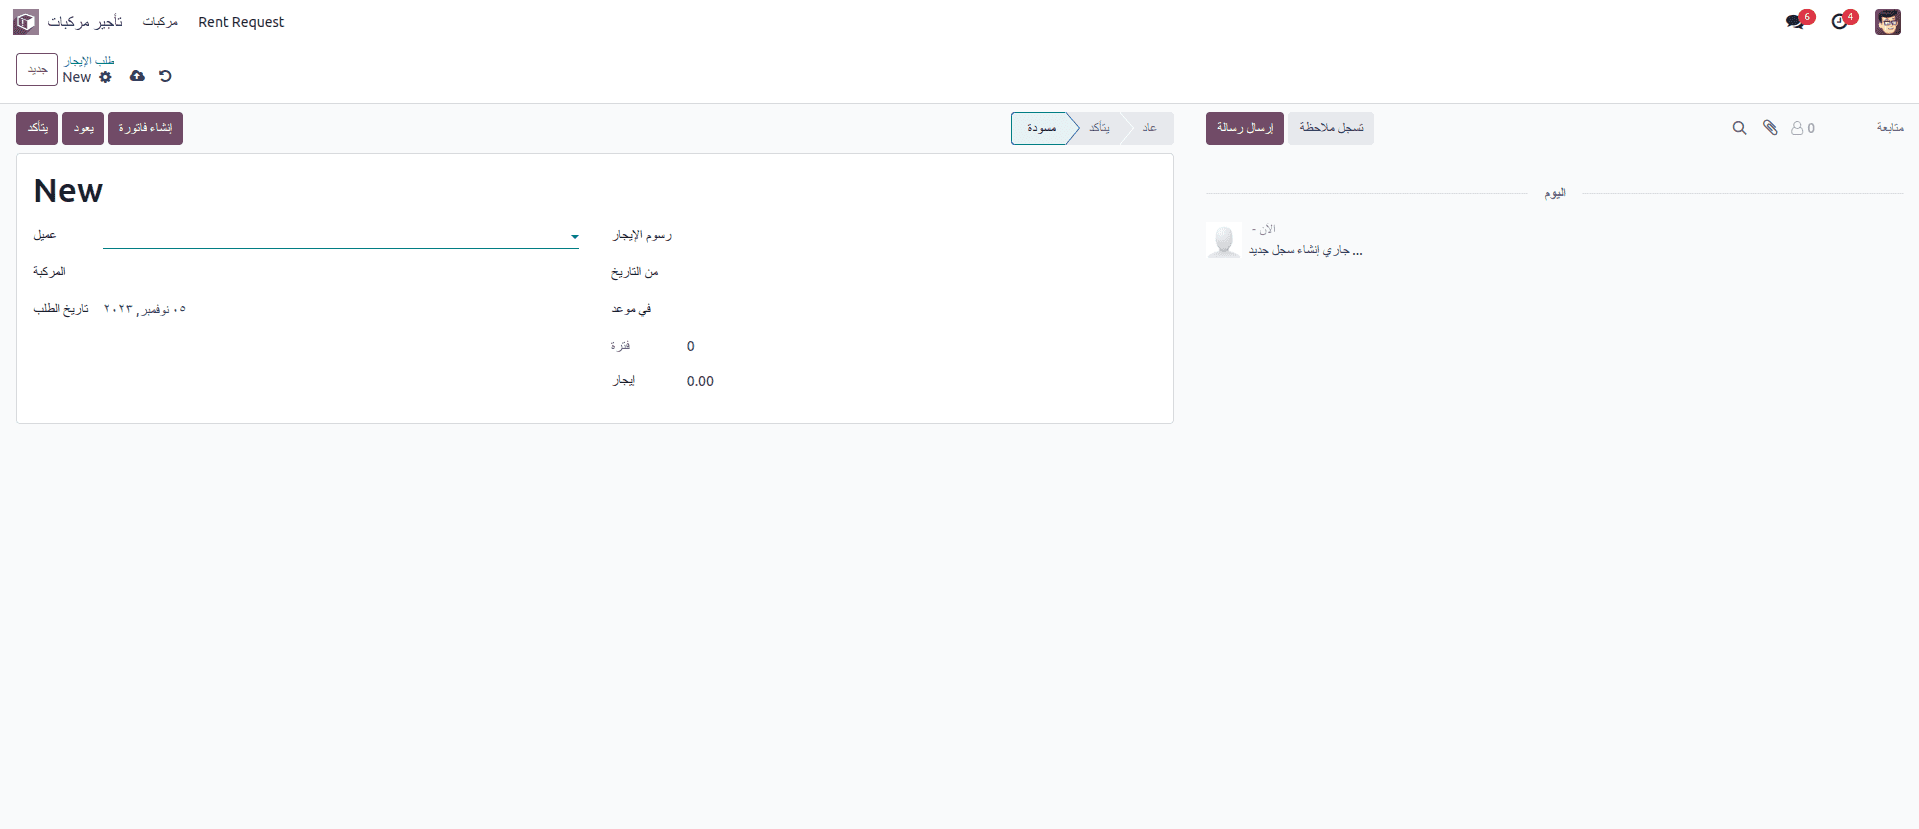
In the screenshot provided, you can see that the module is now entirely in the Arabic language, demonstrating how we can successfully add or update translations in custom modules. This approach ensures that your Odoo application is more accessible and user-friendly for a wider range of language preferences
How to Add a New Language?
To add a new language to Odoo, you can follow a straightforward process. Simply create a CSV file in your module and name it 'res.lang.csv.' Then, include the file path in your module's manifest file under the 'data' key."
"id","name","code","iso_code","direction","grouping","decimal_point","thousands_sep","date_format","time_format","week_start"
"base.lang_isk","Icelandic / íslenska","is","is","Left-to-Right","[]",",",,"%d-%m-%Y","%H:%M:%S","7"
This serves as an example of facilitating the addition of a new language. You can specify various language details, including the language name, ISO code, decimal points, date format, and more.
Upon installing this module, you will notice a new record added to the language table, making the language ready for use within your Odoo instance.
In this blog post, we've explored the process of updating language settings and adding translations for custom modules in Odoo 17. We learned how to change a user's language preference, export translations, and add new languages. For custom modules, we examined the essential steps for creating and updating translations, including exporting translation files and placing them in the module directory. Additionally, we discussed how to add new languages to Odoo by creating a 'res.lang.csv' file. By following these guidelines, you can make your Odoo application more user-friendly and accessible to a global audience, fostering a smoother user experience across multiple languages.
To read more about configuring translation to a custom module & adding a new language in Odoo 16, refer to our blog Configure Translation to Custom Module & Add New Language in Odoo 16