Odoo, one of the best suitable platforms for managing all your business activities and also seriously examines the importance of having an exclusive module for satisfying customer queries. So the platform included a well-defined Helpdesk module for managing all the helpdesk-related activities. This module is available in Odoo enterprise editions. This module can be easily integrated with the CRM module and can also be coordinated with Odoo Live Chat and Website modules. The Odoo 14 Helpdesk module provides you various configuration options under its Configuration tab.
In this blog, let us examine the configuration aspects of Helpdesk Teams available in the Odoo 14 Helpdesk module.

The configuration options available in the Helpdesk module are highlighted in the above image. There you can view various options such as
Let us discuss the Configuration steps of the Helpdesk Teams option available. In the Odoo Helpdesk module, the Helpdesk Teams are the useful feature that is designed from the thought of having an excellent strategy for creating, responding and managing queries or requests of customers using software support. By creating an efficient helpdesk team, you can save valuable time, bring more profits, and also can remove communication barriers. In Odoo, the Helpdesk team is a set of employees working for answering the queries or requests raised from the side of customers. This facility is essential for an organization to manage its customers in a proper way. This will bring you customer satisfaction. Through this doubt clearing system, the customers can clear all their doubts and confusion before signing the deal. Moreover, the customers can report their complaints and issues regarding the product or service after receiving the product or service. An efficient Helpdesk Team powered with excellent software can only manage all these activities properly. The efficient Odoo Helpdesk module can help you for managing all related activities. This module can assist you in configuring efficient Helpdesk Teams. Let us discuss the back-end configuration of Odoo Helpdesk Teams.
Helpdesk Teams
The Helpdesk Teams page in Odoo can be accessed from the configuration tab of the Odoo Helpdesk module. So you can go to Helpdesk -> Configuration -> Helpdesk Teams. Now you will find the Helpdesk window as portrayed in the below screenshot.
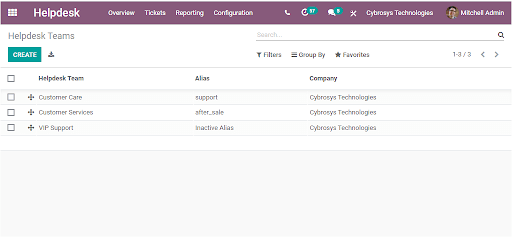
Here in the Helpdesk Teams window, you can find the Helpdesk Teams that are already configured in the platform. Each of the created Helpdesk Teams is displayed in a list format along with the details such as Helpdesk Team, Alias, and the associated Company. The platform allows you to filter the contents using the default and customizable options available. Additionally, you have the Group By and Favourite search options to perform default as well as custom groups. These options can be accessed from the top right side of the window. The Create button available in the window will let you open the Helpdesk Teams creation window. The image of the Helpdesk Team creation window is given below.
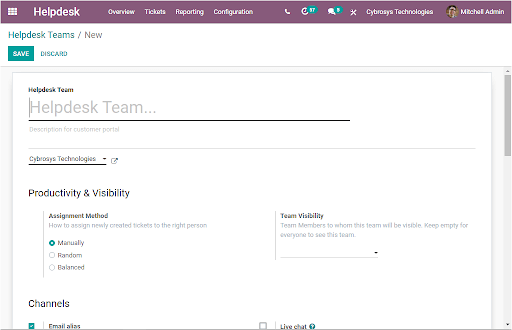
In this Helpdesk creation window, under the Helpdesk Team option, you can provide the name of the Helpdesk Team along with the description of the customer portal. Then the Company details can be allocated. If you have already given your company details on the platform, it will be auto allocated. If you have multiple companies, you can choose the company from the dropdown menu available. Under the Productivity and Visibility option, you have the options such as Assignment method and Team Visibility. The Assignment method option will help you for assigning newly created tickets to the right person. Odoo allows you to manage ticket assignments in three manners. Which is
By enabling the Manually option, the person who generates the ticket will be responsible for assigning tickets to a helpdesk team member. With the Random assignation, every user gets the same number of tickets. If it is done with Balanced assignation, tickets are assigned to the user with the least amount of open tickets. The Team Visibility option will be available with the assignation of Random and Balanced options. This option can be used to mention the team members to whom this team will be visible. You can keep the field empty for everyone to see this team. If you need to limit the use, you can specify the name of the members in the field.
The next field that you can view in the Helpdesk creation window is Channels. Under the Channels menu, you have various options. The first option is an Email alias. If you enable this option, all the incoming emails will automatically create tickets. All the incoming emails of your company will be automatically converted to the helpdesk id as tickets.
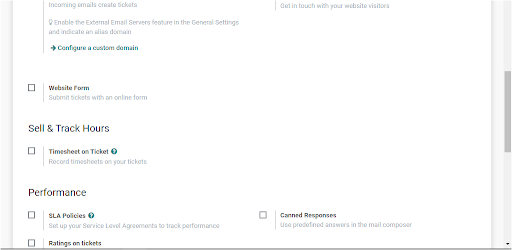
Once you activate the Email alias option, it will automatically activate the external email server features in the General settings. Now the Website Form option allows you to submit tickets with an online form. The activation of this option will help the customers to submit tickets with the use of an online platform. For conducting this, you can prepare a form on the website. Using this form, customers can fill in the details and also can submit it.
The Live Chat option can be activated by checking the box near the option. By doing this action will help the customers who visit the website to present their doubts through the Live Chat tool. Later, these doubts and queries will be generated as tickets. The helpdesk team that handles the Live Chat can resolve the tickets.
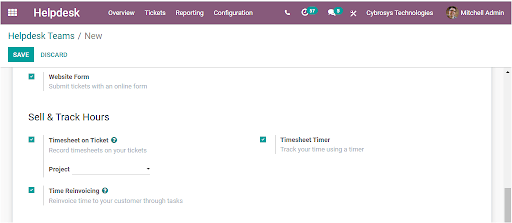
In the Sells & Track Hours menu, you have the option named Timesheet on Tickets. Once you activate this option, you will be depicted with associated options such as Time Reinvoicing and Timesheet Timer. For taking the advantage of these options you should install the Odoo Project module. The Timesheet on Ticket option will allow you to record timesheets on your tickets. The Time Reinvoicing option allows you to re invoice the time spent on the ticket through tasks. On the other hand, the Timesheet Timer option allows you to track your time using a timer.
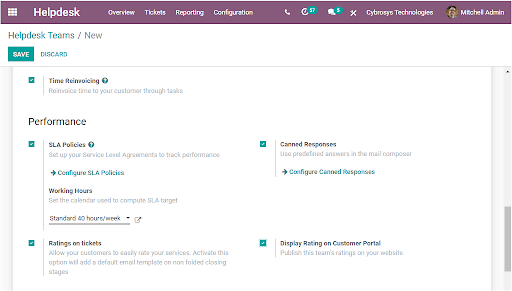
Now let us move on to the next tab. Under the Performance tab, you have various options. The SLA Policies option allows you to set up your service level agreements to track performance. You have the provision to configure SLA Policies here itself. Moreover, the Working Hours of a team can be set under the Working Hours option available. Then the Ratings on tickets option can be selected for allowing your customers to easily rate your services. Activating this option will add a default email template on non folded closing stages. Similarly, the Canned Responses option can be activated for using predefined answers in the mail composer. You can configure canned responses from here by selecting the Configure Canned Responses option available. Finally, you can enable the option Display Rating on Customer Portal to publish this team’s ratings on your website.
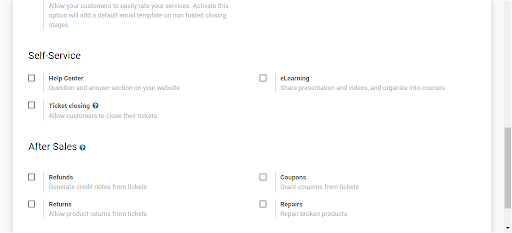
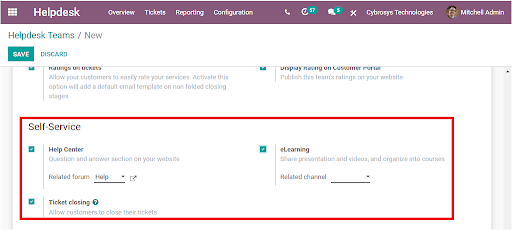
Now in the Self-Service tab, you can activate the Help Center option for enabling a question and answer section on your website. The related forum can be allocated using the dropdown menu available. Now the Ticket closing option will allow customers to close their tickets after solving their tickets. In addition, the eLearning option allows you to share presentations and videos and organize into courses.
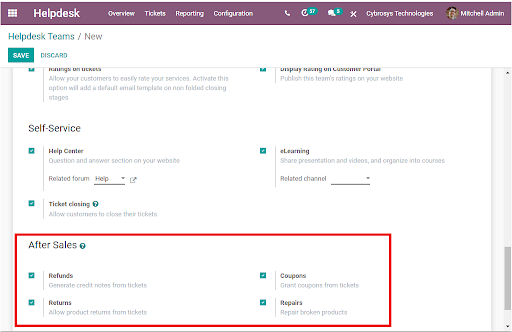
Now the last tab is available under the Odoo Helpdesk Teams creation window, After Sales will include the options Refund, Returns, Coupons, and Repairs. You can activate the Refunds option to generate credits notes from tickets. The Coupons option allows you to grant coupons from tickets and the Returns option allows product returns from tickets. The last one, the Repairs option can be used for repair management.
This is how we can configure Helpdesk Teams in the Odoo 14 Helpdesk module. You can learn more about the Odoo Helpdesk module from Cybrosys blogs.