Odoo Expenses streamlines the expense management process for businesses by allowing employees to submit expenses, which are reviewed by management and accounting teams to ensure compliance with company policies. After approval, payments are processed and disbursed for reimbursement, enhancing transparency and accountability. To use the app, users need to set up expense categories tailored to their specific needs.
Configuring Expense Categories
The Odoo 17 Expense module's "Expense Categories" submenu under the "Configuration" menu provides a streamlined approach to managing various expenditure types, facilitating efficient payment administration and reimbursements.
Users can access a comprehensive dashboard listing predefined expenditure categories by Name, Internal Reference, Internal Note, Sales Price, Cost, Vendor Taxes, and Reinvoice Expenses from this dashboard, as shown below.

The "Filter" and "Group By" options inside the advanced search bar facilitate easy data organization and navigation, while the "Favorites" feature allows users to quickly mark frequently accessed records.
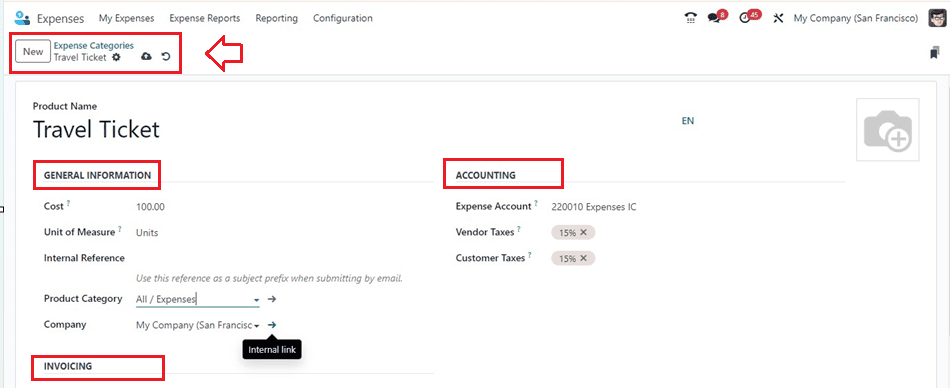
The 'New' button facilitates creating a new Expense Category. The displayed product form contains some form sections like GENERAL INFORMATION, ACCOUNTING, and INVOICING.


Fill in the Product Name area and select the Unit of Measure option from the drop-down.
The Cost field should be set to a specific amount for reimbursement or leave it at 0.00. If necessary, provide an Internal Reference about the product to use as a subject prefix when submitting via email. Then, choose the relevant Product Category or set it to ‘All.’ Finally, choose the Company.
If using the Odoo Accounting app, select the correct accounting entails inside the ACCOUNTING section, including Expense Account, as it affects reports. If applicable, set a tax on each product in the Vendor Taxes and Customer Taxes fields. These taxes will be automatically configured if this is set.
The INVOICING area can be used in Odoo's "Reinvoice Expenses" field allows businesses to indicate whether expenses should be reinvoiced to customers, making it useful for service-based businesses. Choosing an appropriate option will help you to re-invoice the invoices or vendor bills at their Cost or Sales price. Finally, save the form data to generate a new Expense Category.
Generating and Submitting Expenses
The Odoo 17 ERP Expenses module simplifies business expense management by allowing employees to report expenses, enabling managers to assess and approve them quickly. The ability to record and go forward with payments for upcoming transactions is another advantage for accountants.
My Expenses
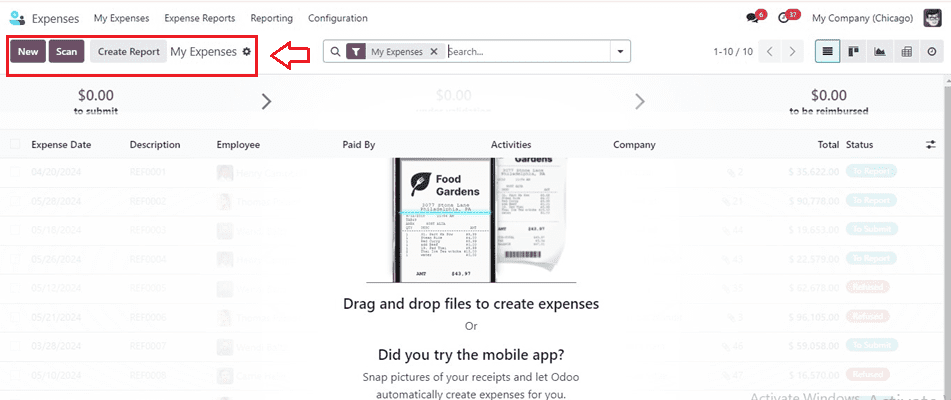
Users may access their expenditure history, including information about the Expense Date, Description, Employee, Company, Paid By, Status, etc on the My Expenses page. At the top of the display, users may also examine reimbursement amounts, validation fees, and report expenses. This gives a clear picture of the present status of the costs.

With the Scan icon, you may add a new expense by choosing the New icon in the My Expenses box, start a new report by clicking the Create Report button, or upload an expense report straight from your system. This will open a new Expense configuration form as shown below.

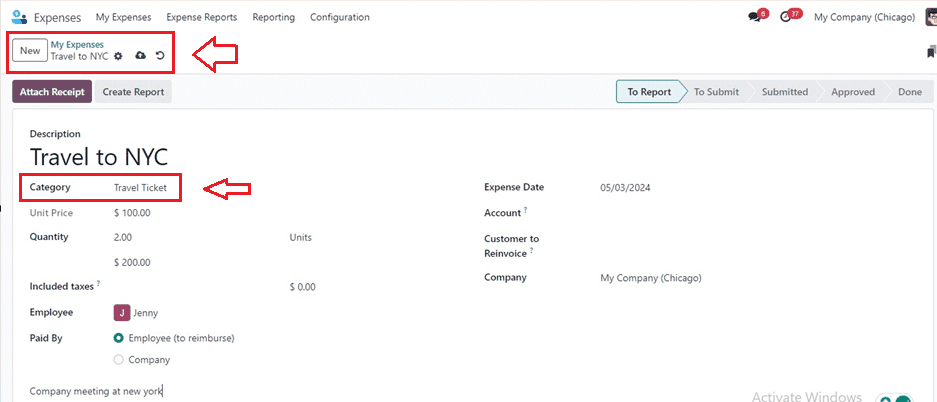
After providing details about your expenditures in the Description part of the new window, choose the relevant Category. Here, I am choosing the preconfigured category named ‘Travel Ticket.’
*The Categories field allows us to choose from a variety of predefined expenditure categories. We can also input the entire amount of an expense in the Total column.. In the Employee option, you can select a specific employee's name.
*In the Paid By area, you may also choose the payer for the expenditure. Paying the employee and the firm jointly is an alternative. If the worker receives compensation, the company will reimburse the worker for any additional costs later on.
*We can also provide the Expense Date and Bill Reference, which indicates the date your purchase was billed.
*You may choose the expected expense account from the Account menu. We may also decide on the business name and the category that clients will be invoiced under.
After editing the relevant fields about the expense, save your data and the Odoo 17 automatically saves every item of data. Furthermore, as the screenshot below shows, you may mark the expenditure as To Report, To Submit, Approved, Refused, Submitted, and Done.

Attaching Receipts and Creating Reports
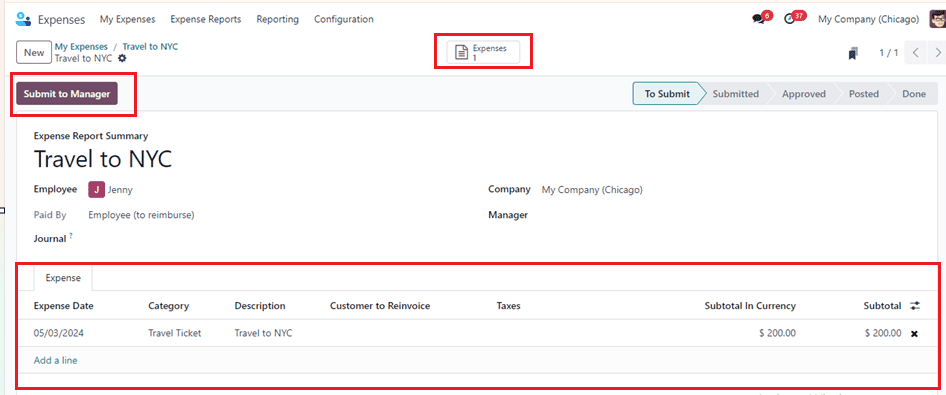
To provide proof of the expenditure request, click the Attach Receipt icon and upload any cost receipts from your device's storage. Selecting the Create Report icon on the My Expenses page may quickly define an expense report and we can see a new button named Submit to Manager with the details of this particular expense in an Expense Report Summary view, as depicted below.

Utilize the Expenses smart button to view the Expense configuration form and edit the changes. We can also mention the Journal and the responsible Manager's name in the respective fields provided inside the form view.
Submitting the Request
Clicking on the Submit to Manager button will send the expense request to the respective manager and we can see an Approve, Refuse, Reset To Draft button.

After receiving the request, the manager or respective person can approve, reject, or draft the request as per the conditions.
Odoo 17 simplifies financial transaction management for organizations by setting expense categories tailored to specific needs. This allows for better financial visibility and decision-making, optimizing financial management practices, leading to increased control, transparency, and improved financial health. To read more refer to How to Submit Expenses Through Incoming Email in Odoo 16 Expense App