In today's digital world, protecting user data and ensuring application security is paramount. Node.js, a popular framework for building web applications, requires robust authentication and authorization mechanisms to safeguard sensitive information and control access to specific resources.
This blog post will guide you through implementing a basic yet effective authentication and authorization system for your Node.js application using Express, bcryptjs, and JSON Web Tokens (JWT).
Understanding the Fundamentals:
* Authentication: Verifies the user's identity, typically through username and password or other credentials.
* Authorization: Identifies the actions a user is authorized to perform according to their role or assigned permissions.
* JWT: A compact, self-contained token containing user information used for secure authentication between parties.
Step-by-Step Implementation:
1. Project Setup:
a. Create a new project directory and initialize it with npm init -y.
b. Install required dependencies: express bcryptjs jsonwebtoken.
2. User Model:
a. Define a User model to represent user data (username, password, role).
b. Implement a comparePassword method to verify user credentials using bcryptjs.
User.js
const bcryptjs = require('bcryptjs');
const users = [];
const User = function(username, password, role) {
   this.username = username;
   this.password = password;
   this.role = role;
};
User.prototype.comparePassword = function(password) {
   return bcryptjs.compareSync(password, this.password);
};
module.exports = User;
3. Authentication Routes:
a. Create Express routes for user registration and login.
b. During registration, hash the password before storing it securely using bcryptjs.
c. Implement login logic to validate user credentials and generate a JWT token upon successful login.
app.js
const express = require('express');
const User = require('./User');
const bcryptjs = require('bcryptjs');
const jwt = require('jsonwebtoken');
const app = express();
app.use(express.json());
// Secret key for JWT
const secret = 'your_secret_key';
const users = [];
// Register a new user
app.post('/register', async (req, res) => {
   const { username, password, role } = req.body;
   // Hash password before storing
   const hashedPassword = await bcryptjs.hash(password, 10);
   const newUser = new User(username, hashedPassword, role);
   users.push(newUser);
   res.json({ message: 'User registered successfully' });
});
// Login and generate JWT
app.post('/login', async (req, res) => {
   const { username, password } = req.body;
   const user = users.find(u => u.username === username);
   if (!user) {
       return res.status(401).json({ message: 'Invalid username or password' });
   }
   const isPasswordValid = user.comparePassword(password);
   if (!isPasswordValid) {
       return res.status(401).json({ message: 'Invalid username or password' });
   }
   // Generate JWT token
   const token = jwt.sign({ userId: user.username, role: user.role }, secret, { expiresIn: '1h' });
   res.json({ token });
});
module.exports = app;
4. Authorization Middleware:
a. Create a middleware function to verify the JWT token included in the authorization header.
b. Extract user information from the decoded token and make it accessible in subsequent requests.
verifyJWT.js
const jwt = require('jsonwebtoken');
const verifyJWT = (req, res, next) => {
   const authHeader = req.headers.authorization;
   if (!authHeader || !authHeader.startsWith('Bearer ')) {
       return res.status(401).json({ message: 'Unauthorized' });
   }
   const token = authHeader.split(' ')[1];
   try {
       const decoded = jwt.verify(token, 'your_secret_key');
       req.user = decoded;
       next();
   } catch (error) {
       res.status(401).json({ message: 'Invalid token' });
   }
};
module.exports = verifyJWT;
5. Protected Route:
a. Define a protected route that requires authorization.
b. Use the authorization middleware to verify the JWT token before granting access.
c. Implement role-based authorization checks to control access based on the user's role.
server.js
const app = require('./app');
const verifyJWT = require('./verifyJWT');
app.get('/protected', verifyJWT, (req, res) => {
    // Access user information from req.user
    if (req.user.role === 'admin') {
        // Allow access only to admins
        res.json({ message: 'Welcome admin!' });
    } else {
        res.status(403).json({ message: 'Forbidden' });
    }
});
app.listen(3000, () => {
    console.log('Server listening on port 3000');
});
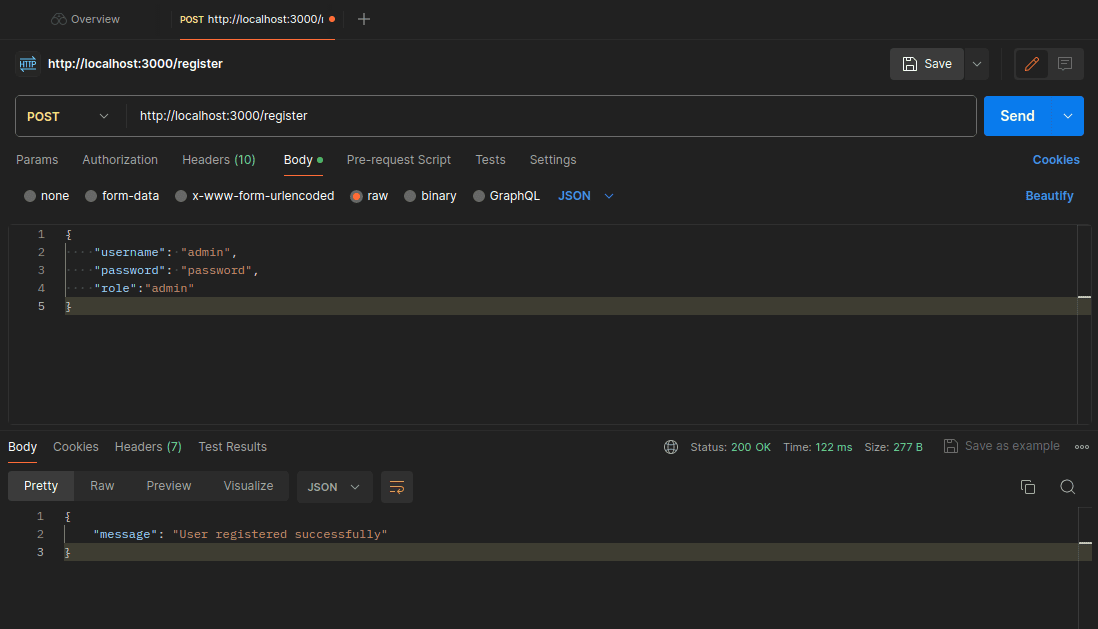
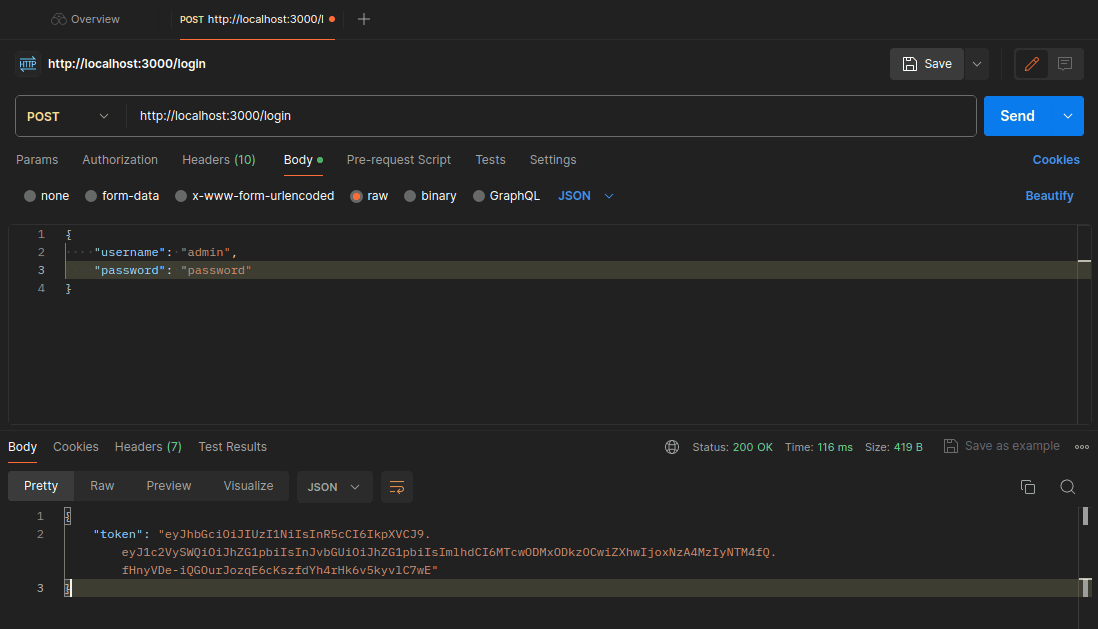
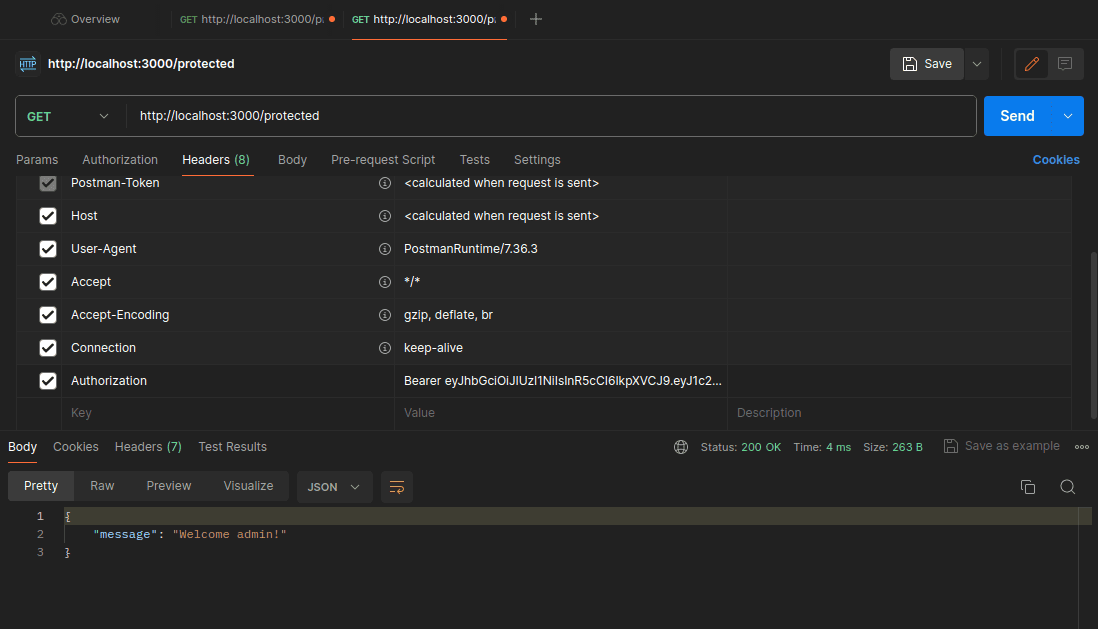
Testing with postman
1. Register a new user: Send a POST request to the /register endpoint with user details.

2. Login: Send a POST request to the /login endpoint with username and password.

3. Access protected resources: Send a GET request to the protected route, including the JWT token in the authorization header.

Remember:
* Replace your_secret_key with a strong, unique secret key for JWT generation.
* Consider using a database like MongoDB for secure user data storage in production environments.
* Implement additional security measures like input validation and secure password storage practices.
This example provides a basic foundation for securing your Node.js application with authentication and authorization. By following these steps and adapting them to your specific needs, you can build robust and secure web applications that protect user data and enforce access control effectively.
To read more about How to Install Node.js on Windows & Linux, refer to our blog How to Install Node.js on Windows & Linux.