The handling of events is a risky task for the organization at some stages, and the management team faces several issues to formulate an event. A planner's job covers through the Odoo Events module, and you can manage the promotion of an event using the features of the Odoo platform. Odoo 15 Events module contains several advantages, such as managing speakers, organizing calendars, automating the payment process, and adding tickets for your event. We can handle the sponsors for the event and sell the packages to participants. Attendees are the crucial part of an event, and user can track their registration/number using the Odoo Events platform. Users can set Emails and send SMS to participants in a program through the Odoo Events dashboard.
This blog assists you in getting an overview of the Registration Desk and Attendees in the Odoo 15 Events module.
Registration Desk
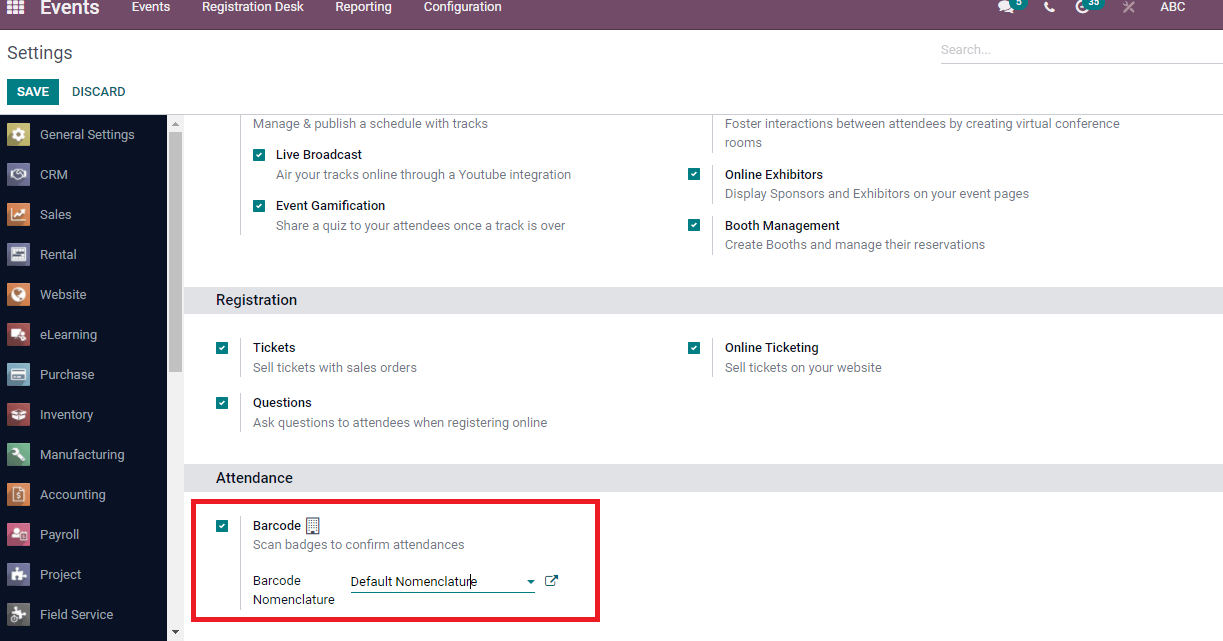
You can access the events and manage attendees using the Registration Desk. It helps scan the barcodes at the entry to an event and select the attendees. Go back to the Settings menu in the Configuration tab, and it includes several options regarding Events, Attendance and Registration. Activate the Barcode option inside the Attendance tab to scan badges for the attendance confirmation. Choose the Barcode Nomenclature from the drop-down menu according to your need.
Press on the Registration Desk tab in the Odoo Events dashboard. You can see two options in the new window as Scan a Badge and Select Attendee.
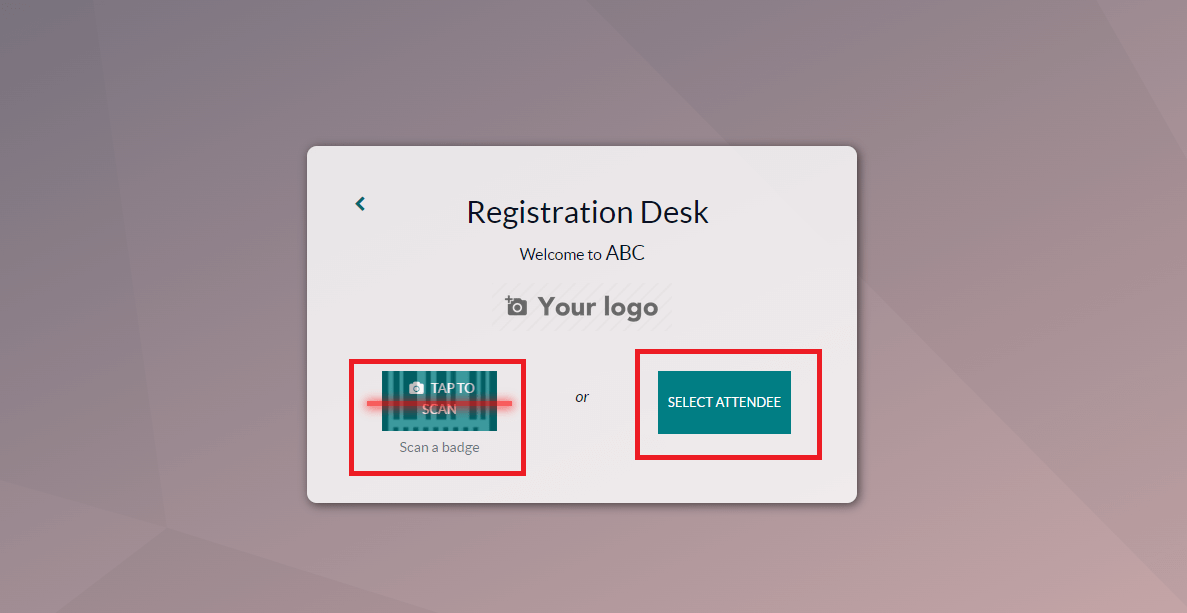
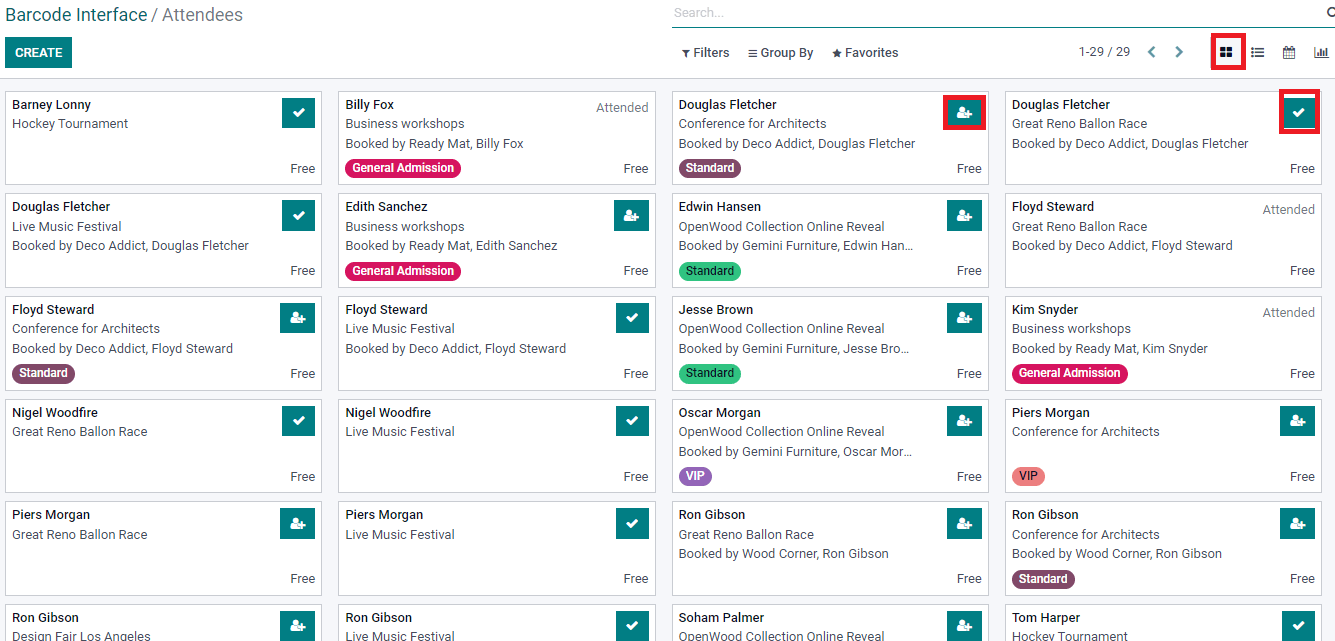
You can allow the camera to Scan a badge at the Registration Desk. Another method is to click on the Select Attendee icon. A new Barcode Interface/Attendee window appears before the user. We can view the name of attendees, ticket type, the status of each event in the Kanban view. You can confirm the attendance by clicking on + icon at the right end of each attendee name, and the confirmation depicts a tick mark
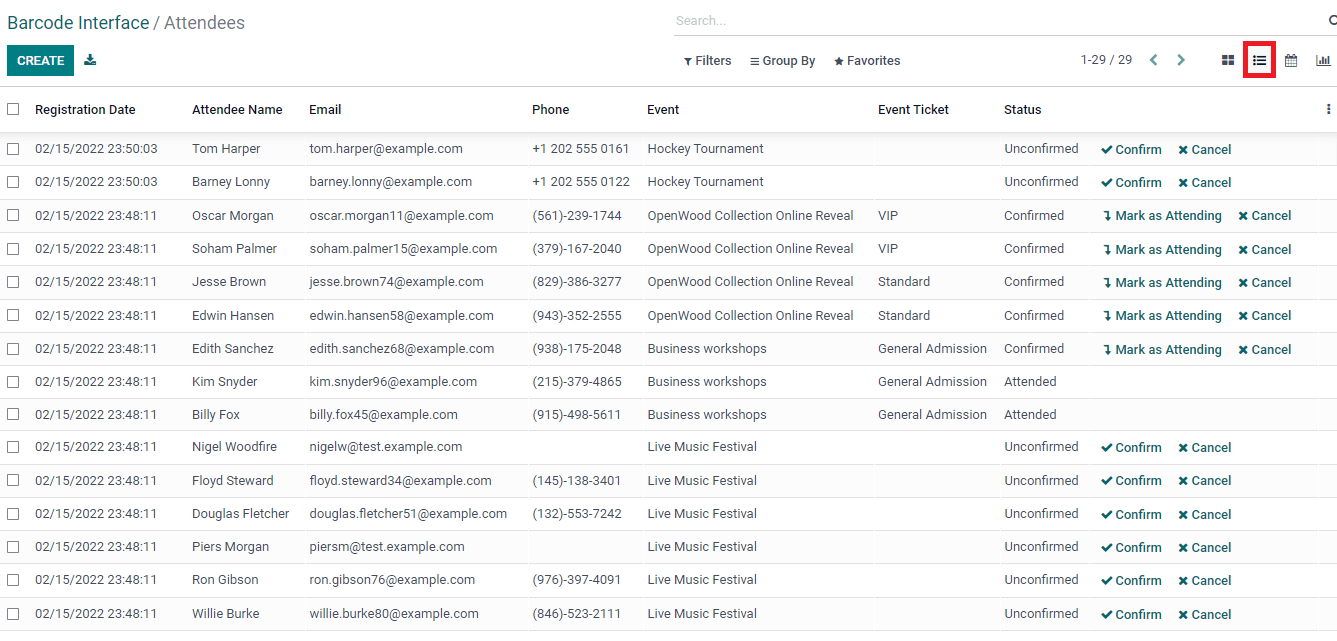
The details such as Email, Registration Date, Status, Event, Attendee Name, Phone and Status are available in the List view window. We can apply the cancellation, confirmation or mark as attending an event.
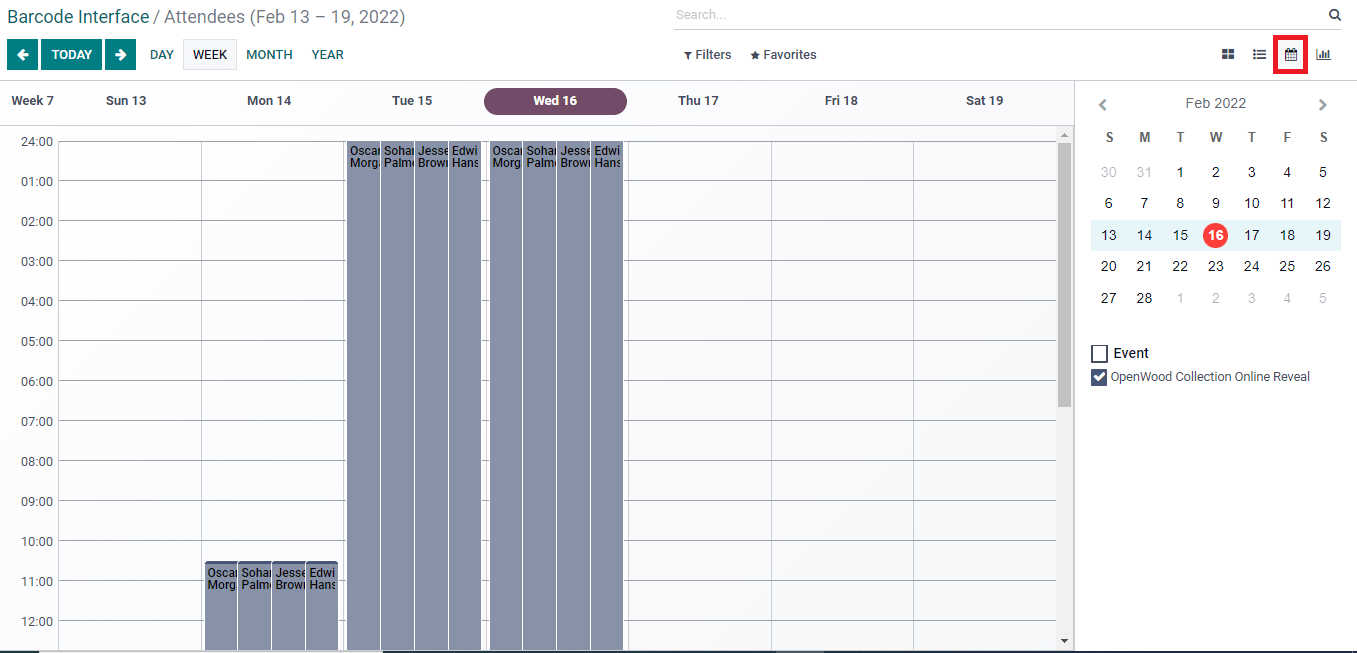
In the Calendar view of the Barcode Interface, details of upcoming events specify with date and time. Users can create a new program by pressing on the date, and we can see the events based on month, day,/year
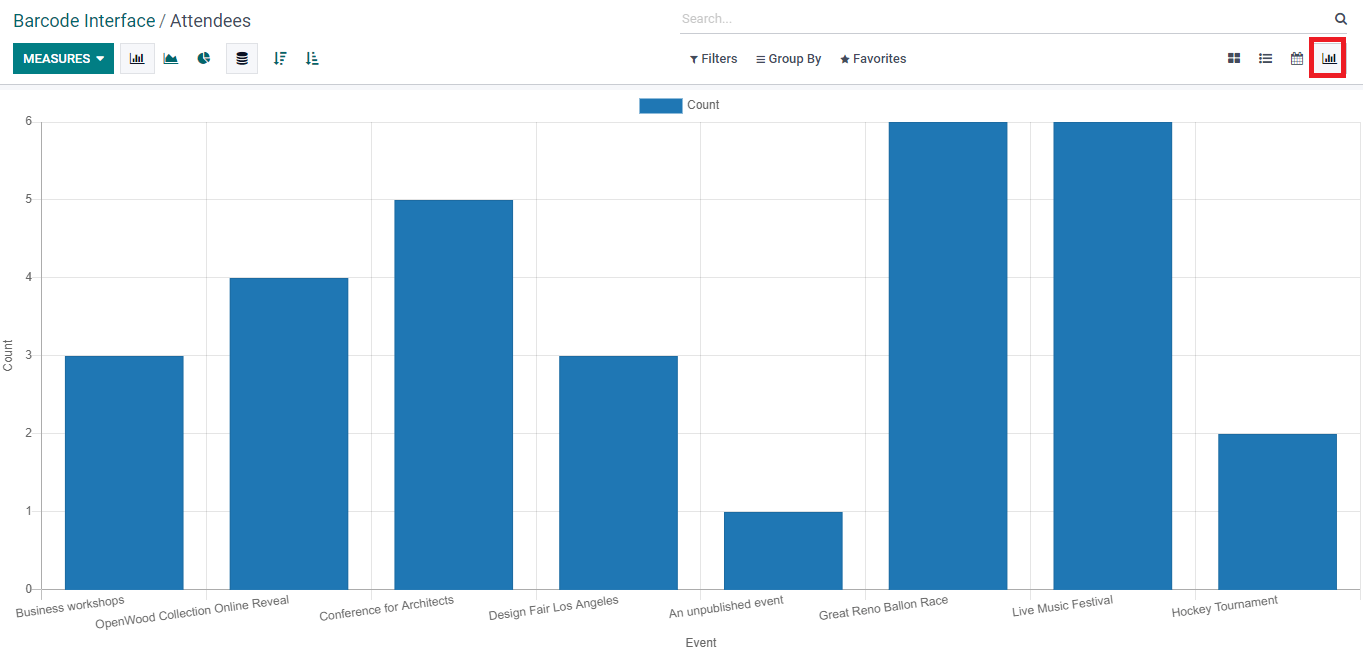
The Graph format of the Barcode Interface window shows the Event on X-axis and Count on the Y-axis. You can see the Count of each event separately by clicking on the chart bar.
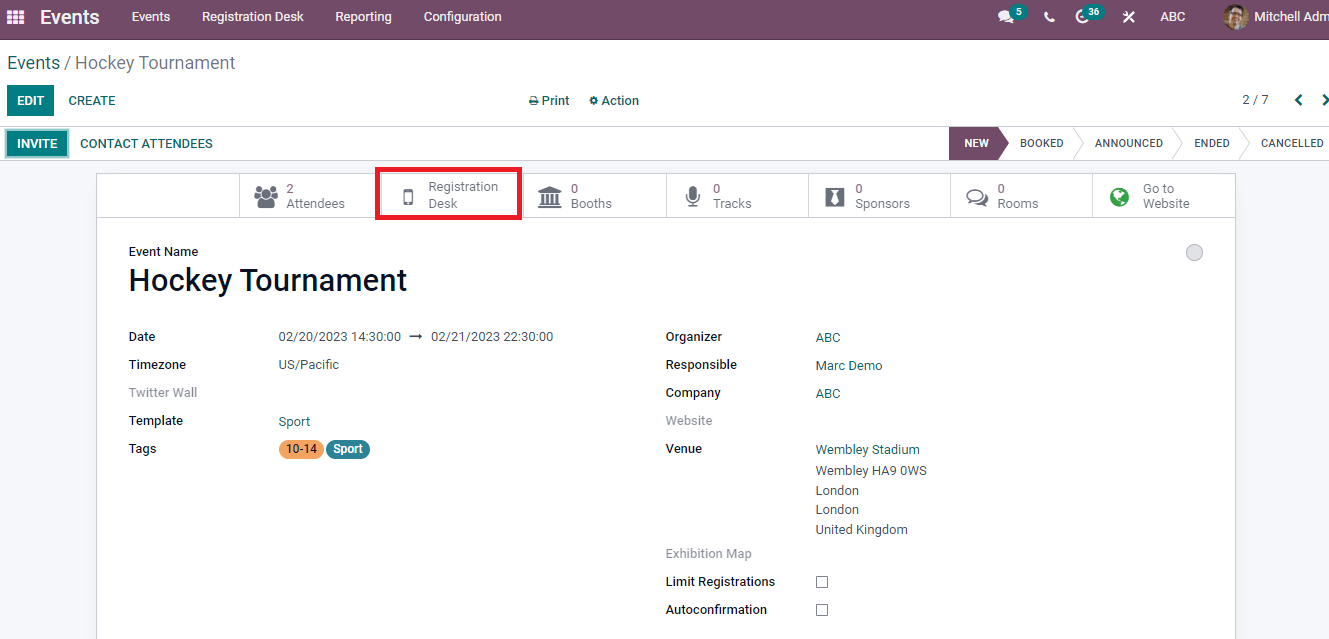
We can configure the Registration Desk using another method. Choose your event from the Events tab, and you can see the Registration Desk option in the Events window. After clicking the option, It will direct you to the Registration Desk home page.
After clicking on the Select Attendee option on the Registration Desk page, you can see the attendees list. The Create icon assists in generating a new attendee inside the Barcode Interface window. Enter the Attendee's details, press the Save icon and Confirm your booking. The confirmation of booking is visible on your event in the Events window.
Attendees
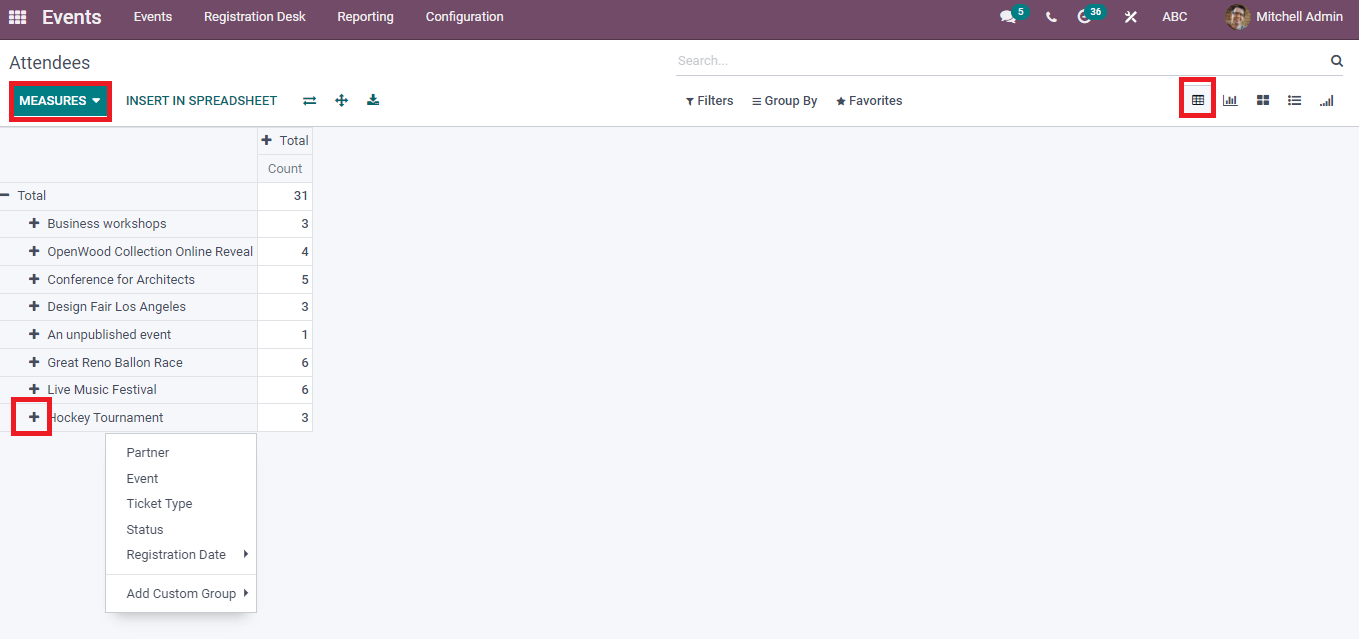
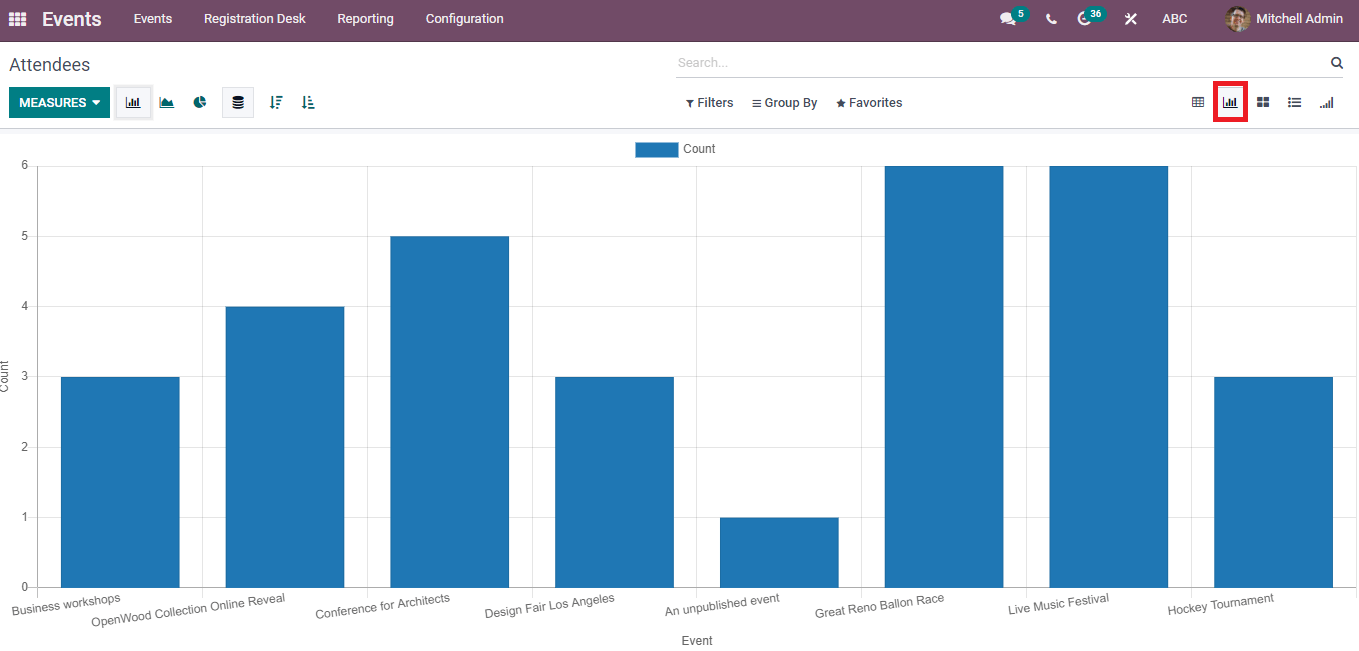
One of the unavoidable tasks of a firm is to report making relates to every activity. The Reporting tab of the Events module consists of two menus such as Events and Attendees. Select the Attendees menu in the Reporting tab to manage your attendees. The Pivot view of the Attendees window displays the total Count of participants in each event. You can add Custom Group by clicking on + icon next to each event, and the Measure icon shows the Count.
In the graphical representation, you can see the Event information on the X-axis and the Count of attendees in each event on Y-axis.
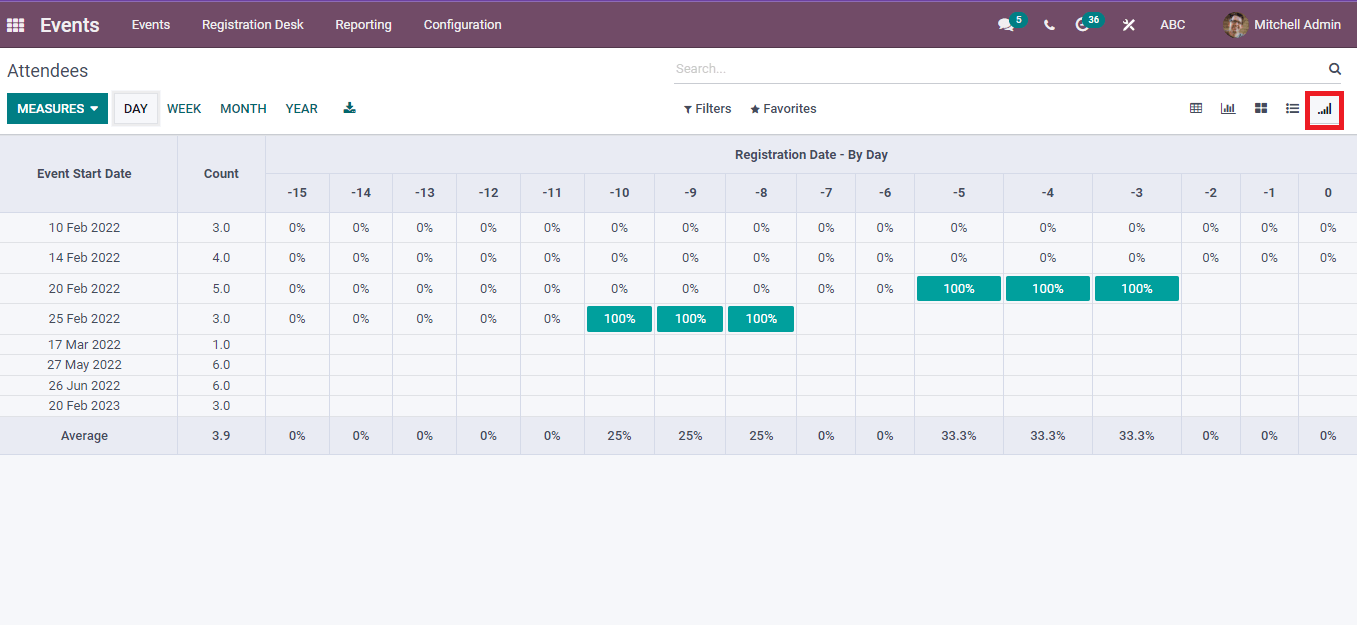
The Cohort view of the Attendees window depicts the average of Count, Registration Date by day and Event start date. We can view the average Count of attendees per day, month, week and year
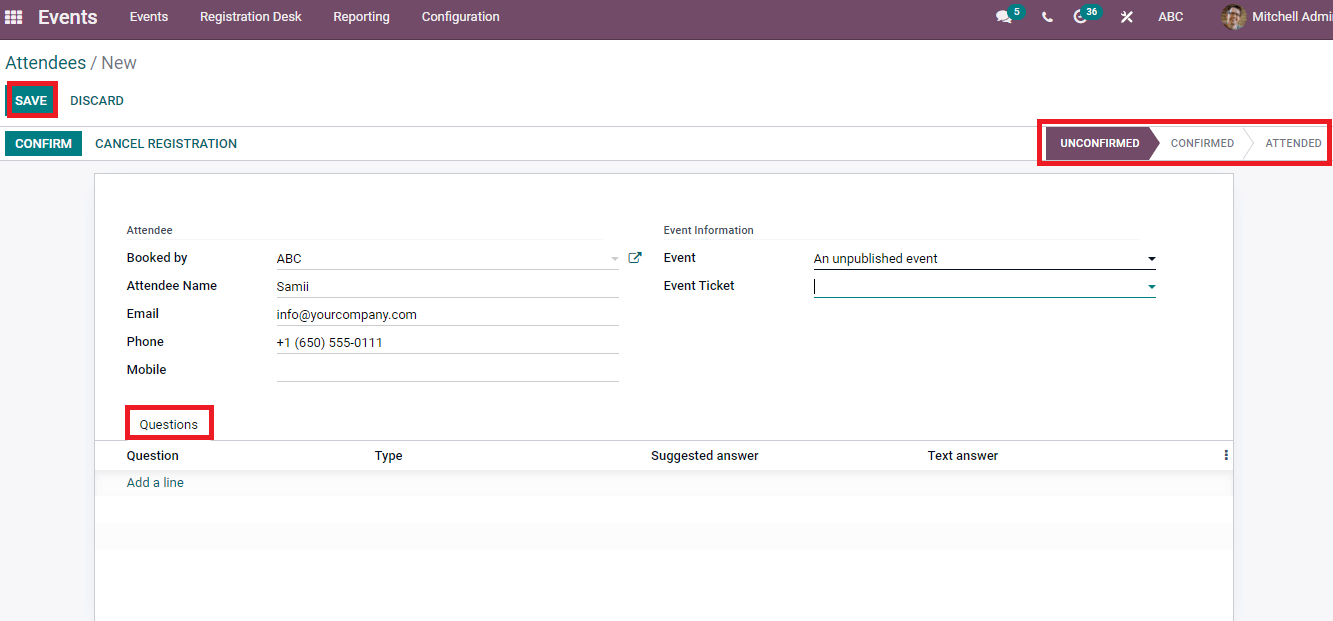
Attendees window is also visible in Kanban and List forms. You can develop a new Attendee by pressing on Create icon. Add the Name, Phone, and Email under the Attendee option in the new Attendee window. Select the event inside the Event information and questions for attendees in the Question tab. It is essential to save the information and put it in the stages such as Attended, Unconfirmed/Confirmed.
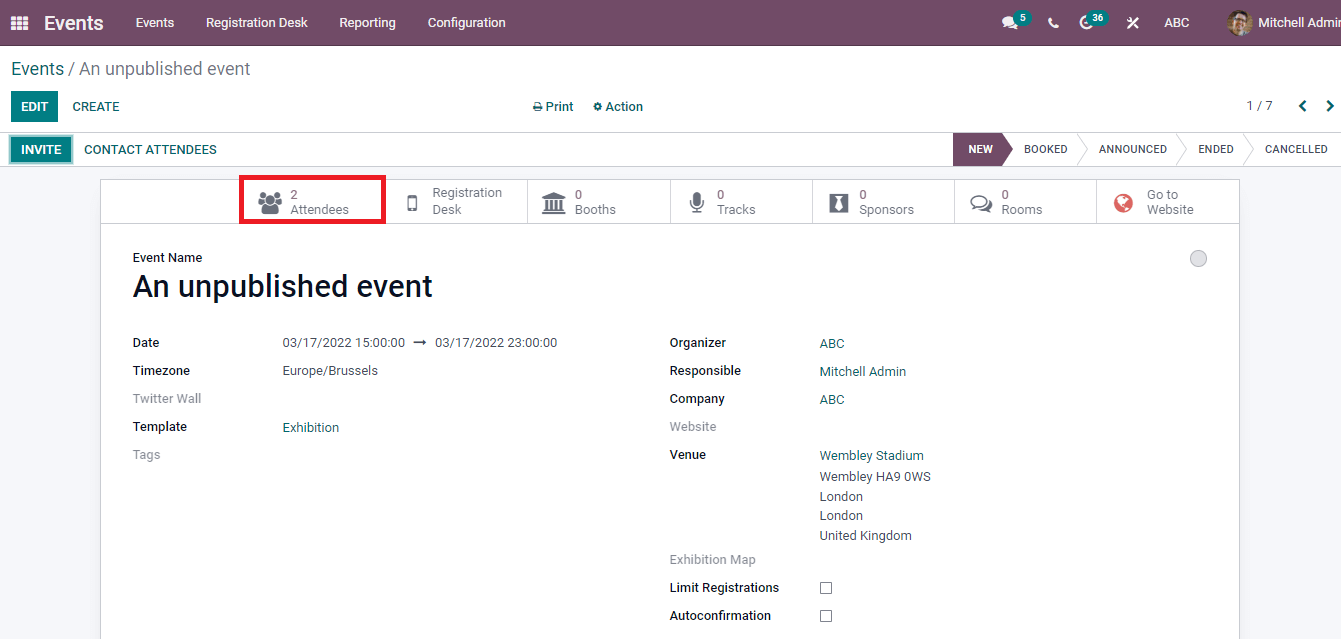
We can view the number of attendees from the Events window and an overview of the Attendees participating in your event visible after clicking on the Attendees icon.
Events Analysis
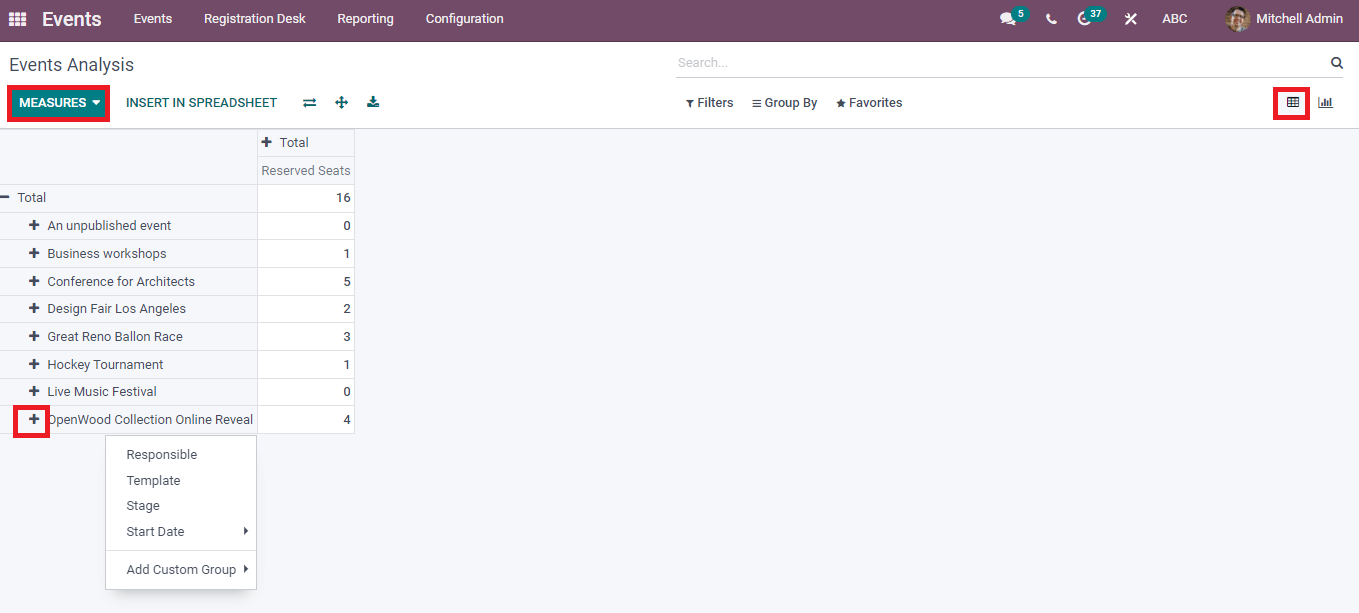
You can analyze the events by pressing on the Events menu from Reporting tab. The Pivot view of the Events Analysis window depicts each event's total reserved seats. We can apply Count based on Unconfirmed/Available Seats, Number of Participants and Attendees by clicking the Measure button. You can add Custom Group for your event by pressing on + icon.
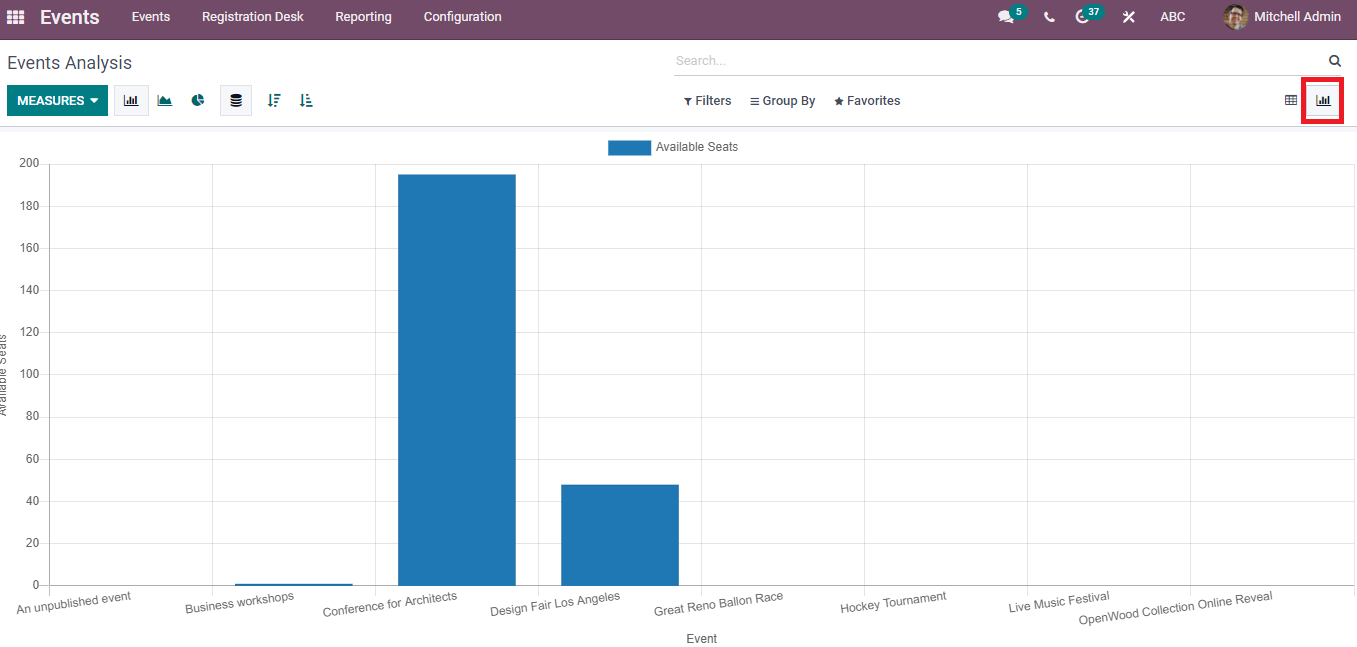
The Graph view of the Event Analysis window depicts the event's details on the X-axis and Available Seats on the Y-axis. We can visible the graphical representation in Pie, Bar and Line forms
The massive responsibility of an organization is to conduct a successful event. All your events manage efficiently through the Odoo ERP platform. Individuals can create and publish an event using the Odoo 15 events module. Moreover, participants can book their tickets and view each program's timings and location separately. You can develop annual or monthly reports of events through the Reporting feature of the Events module. Apart from these, we can configure event templates, stages, Booth categories and Lead Generation in the Events window of the Odoo platform. The Odoo 15 version is rich with new strategies and plans that assist in boosting your development of an event.