E-commerce websites give businesses the ability to expand into new markets and build resilience through sales in the event that their physical stores have to close. Before you even open a physical store, an e-commerce site can give you a global market and brand recognition if you're just starting a business.
You can control every aspect of the customer experience, such as branding, shipping, and customer support, by building a specialized e-commerce website. Whether you decide to build it yourself or hire a developer, having knowledge of the procedure can help you make wise decisions that will result in a website that is well-suited for selling your goods.
The process of building a website is quite challenging and includes planning, gathering the necessary data, designing, assembling, coding, testing, and maintenance, all of which require time, effort, and financial resources. An appealing and well-designed website increases engagement, enhances user experience, and makes a favorable first impression on visitors. The way users interact with the content on a website is determined by its design, which makes an important first impression. If the user interface is well-designed, customers will continue to be interested in the experience and think it is easy. Businesses can ensure that their customers will have a positive experience and advance in the sales process by implementing design principles like clear visuals, crisp copy, and logical navigation.
Odoo 16 Website Module and Website Shopping
Odoo Website Module, a complete ERP platform, offers a top-to-bottom approach to building websites with e-commerce integration capabilities. Users can plan, design, and build their own websites without using any coding techniques. You can create appealing websites using built-in templates, building blocks, various editing tools, and ready-to-use themes.
The Odoo Website Module is integrated with the e-commerce application. It provides the same attributes and abilities as a result. You can manage your website and payments, sell your products, publish your products on the website you built, and perform all other related tasks.Users can sell their products easily without needing extra plugins using the odoo platform.
Features of Odoo Website E-commerce Section
Sell your Products: Odoo is appropriate for all business types. There are many ready-to-use features in it, so there is no need to buy extra plugins.
Set-up Attributes and Variants: Set different prices for various product configurations, such as size and color options.
Multi Websites & B2B Store: Make the store only accessible to authorized users, and display different prices using price lists.
Automated Tax Rates: Based on the type and location of your customers, your sales taxes are automatically applied.
Real-Time Dashboard: Track the most interesting visitors in real-time and connect with them with just one click using push notifications, live chat, SMS, etc.
Customer Portals: Customers Visitors to the portal have immediate access to their documents, including support tickets, invoices, projects, tasks, and more.
Browse Bar: Utilize the built-in search bar to quickly find products.
Wishlist: Customers can add their desired products to the wishlist.
Simple Checkout Procedure: The checkout procedure is simple. Add more unique steps if necessary.
Payment Acquirers: Offer PayPal, Ingenico, Adyen, and SIPS Worldline as payment options, or develop your own.
Calculate the Cost of shipping: Utilize the embedded delivery method configurator in Odoo to have delivery costs calculated automatically.
Shipping Partners: Utilize shipping connectors for DHL, UPS, USPS, FedEx, and La Poste to expedite your shipping process and track your orders from Odoo.
Shopping Through the Odoo 16 Website
Odoo provides a simple and catchy user interface, so shopping through the Odoo website Module can be done very smoothly without any hassles.
Let’s check the process of shopping through an odoo 16 website.
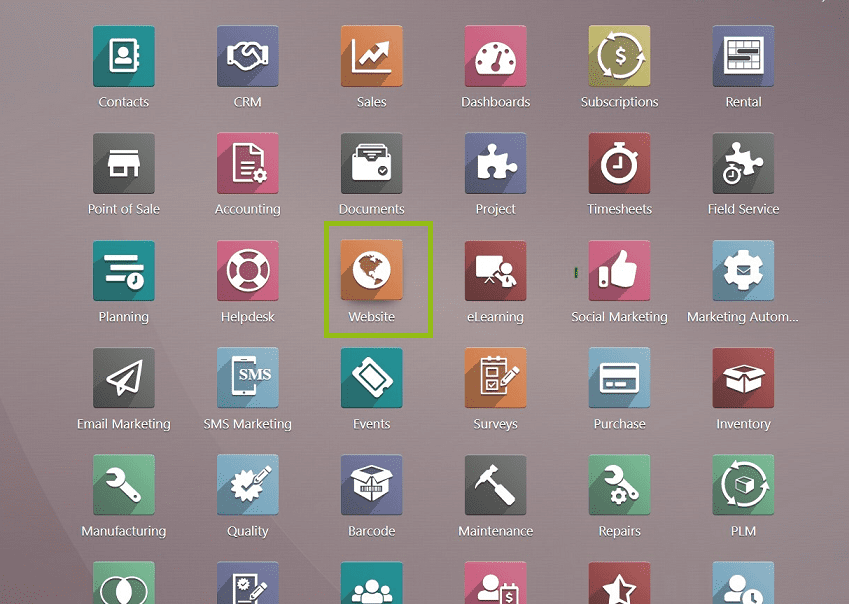
Install your website module from the Odoo platform, which will appear in your Odoo platform as shown in the screenshot below.
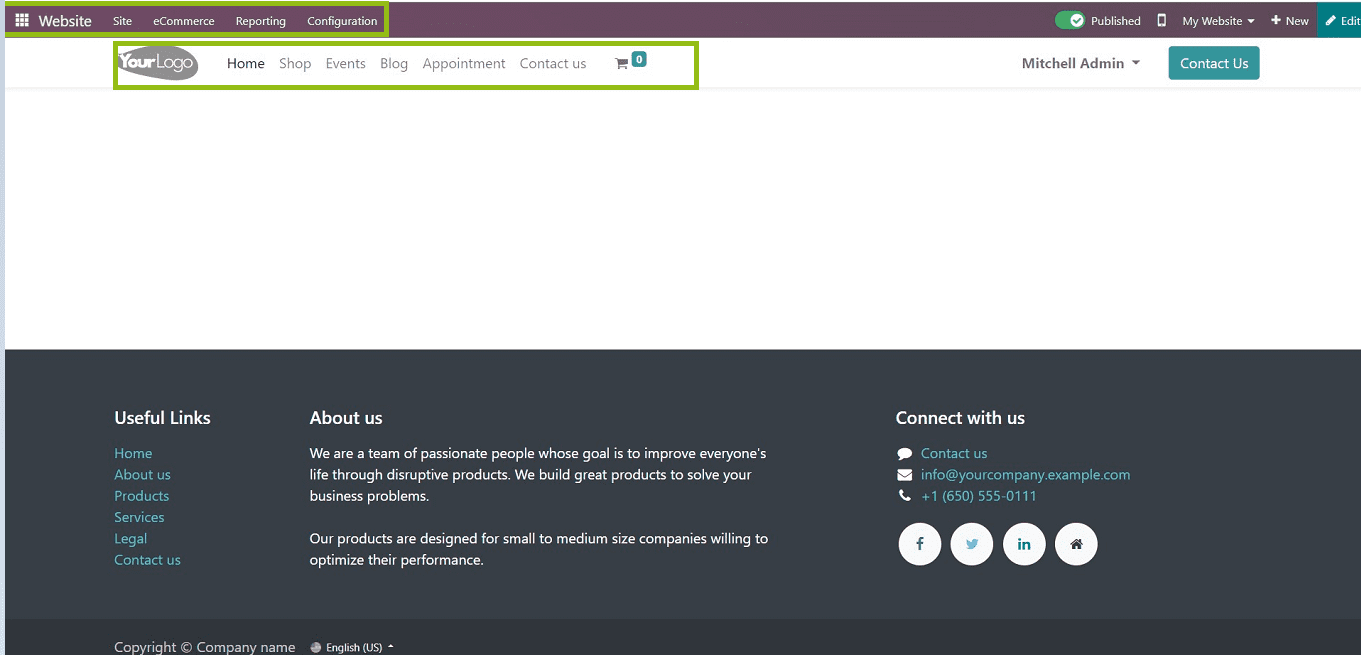
You can see the website module homepage as a web page template that contains various menu items and module menus such as Website, Site, E-commerce, Reporting, and Configuration, as illustrated in the screenshot below.
After setting up the entire website, we can start shopping right from the home page. In this blog, we can discuss the procedure in detail.
Users can check their website requirements, e-commerce, and shopping site configuration before performing the shopping procedures using the Configuration menu from the Website platform.
Activating Payment Providers
A business that offers payment services to companies that accept online payment options is known as a payment service provider. Numerous methods, such as bank transfers, credit cards, debit cards, e-wallets, cash cards, and others, could be used to complete these transactions. Amazon Pay, PayPal, Stripe, AsiaPay, and Mollie are a few examples of payment providers that are frequently referred to as merchant service providers or third-party payment processing companies. These payment processors also guarantee the speed and security of your transactions.
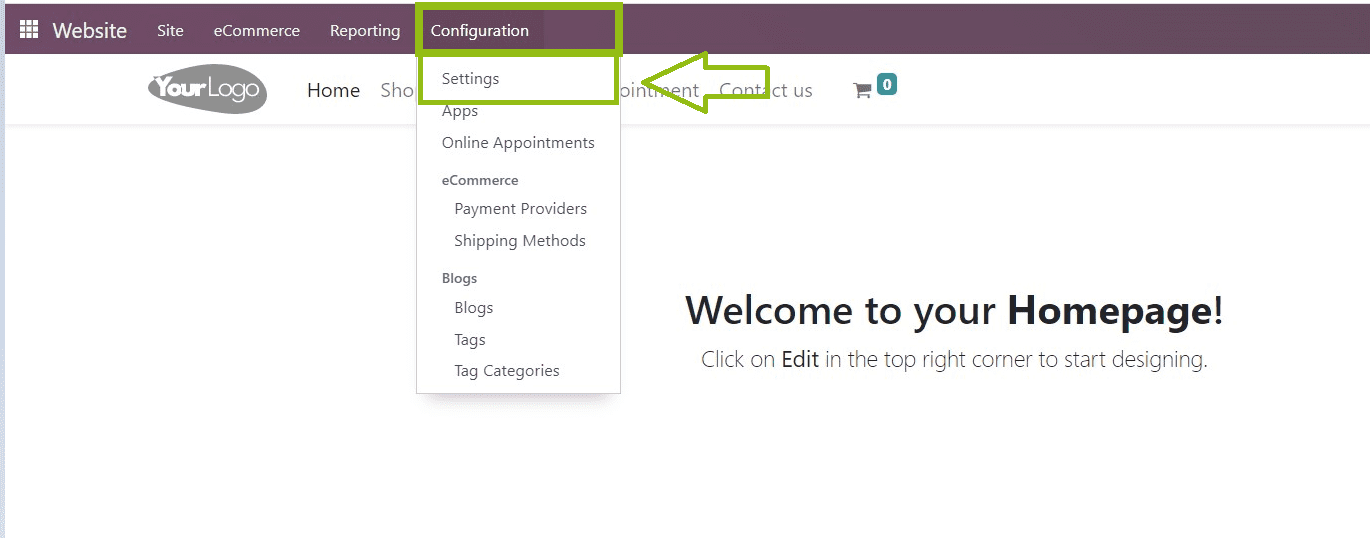
Users can activate their payment providers from the configuration settings menu, as depicted in the below screenshot.
We can see the configuration form as shown in the screenshot below.
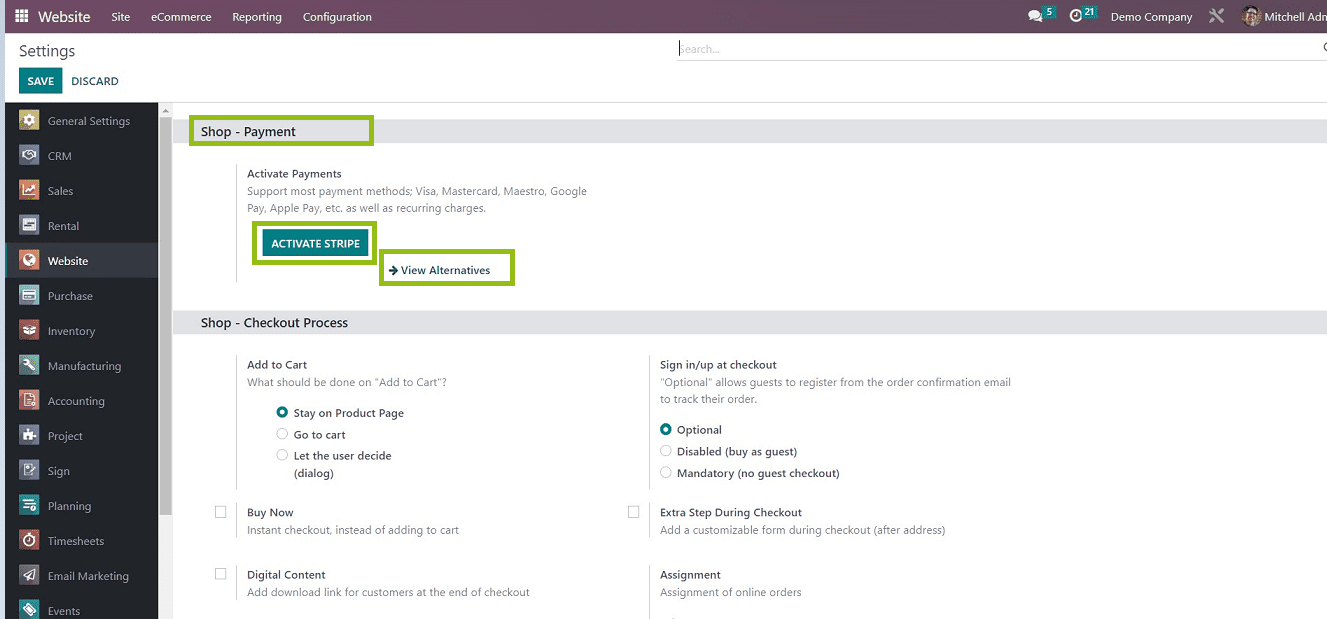
You can activate the Stripe service by clicking on the “ACTIVATE STRIPE” button or add other payment providers by clicking on the “View Alternatives.”
We will reach a page that contains a list of various payment providers like Paypal, Demo, Adyen, Buckaroo, Amazon Direct Payments, etc. Users can select and click on the "install" button corresponding to the payment provider.
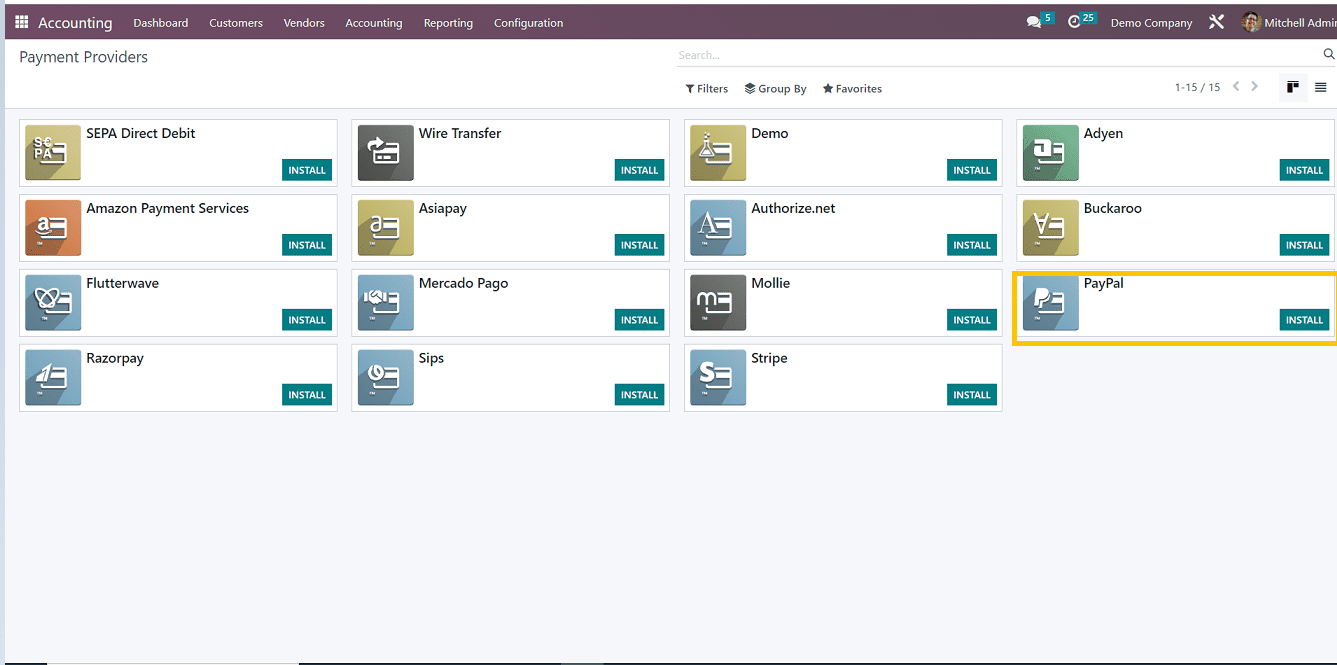
You can choose any payment service and install it. So the package will be installed, and it will show the "Activate" button instead of the "Install" button. Click on the ‘Activate’ Button. Users can begin purchasing after establishing their payment providers. However, you must first set up your shopping interface's settings using the configuration menu offered by the Odoo ERP platform. One of the settings categories accessible in the Odoo Website Module, the Shop & Checkout process settings, enables you to change the features or functionalities of your online shopping interface.
Shop-Checkout Process
Users can configure their shopping cart and checkout procedures using the Shop-Checkout settings options, as depicted in the screenshot below.
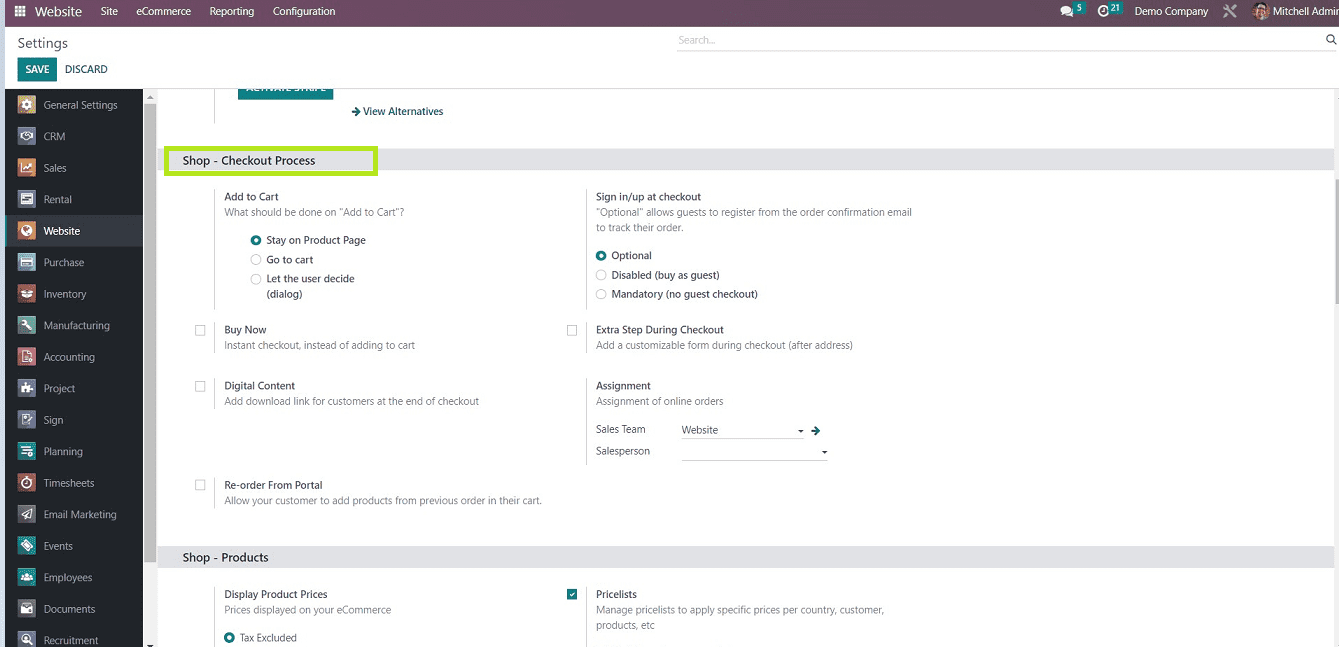
In this Shop- checkout settings category, we can see the settings such as
Add to Cart - Users can choose from three scenarios that must be completed as customers click the add to cart button.
Buy-New - If the customer clicks on this button, then it will immediately add the product to the cart and direct to the checkout page for payment processes
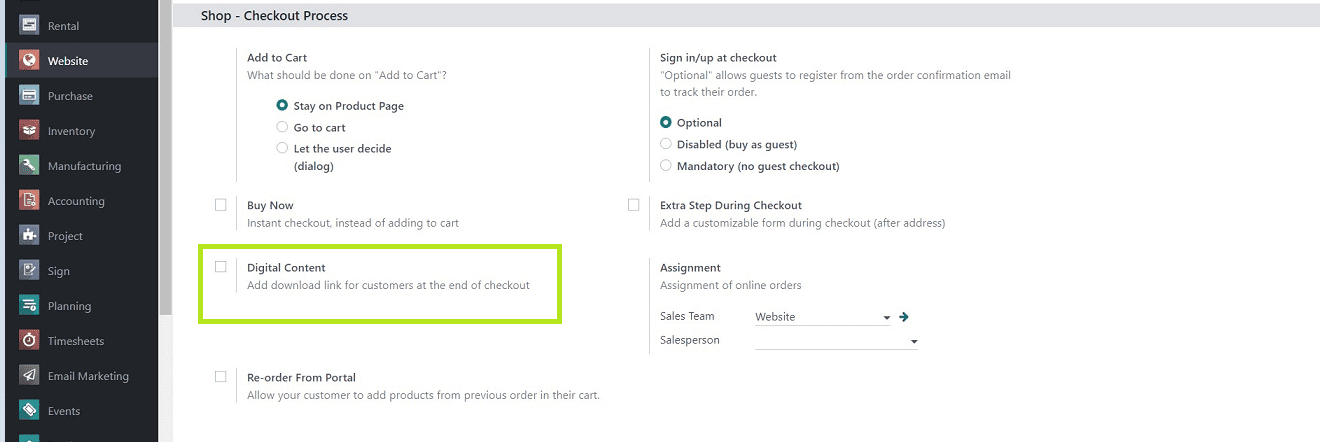
Digital Content - Users can add download links after the checkout process.
Re-order from Portal - On the customer portal, customers can place new orders for items from previous sales orders.
Sign in/ up at Checkout - One option for a checkout policy is to allow customers to check out as guests or as signed-in users only. Customers can check out as a guest as well and, if enabled, sign up later to track their orders.
Extra Step during Checkout - Add a customizable form during checkout, excluding the address details.
Assignment - You can mention the assigned online team and website for the particular order.
Add To Cart
Let’s Check the functions of each and every shop-checkout process mentioned above.
Users can select What should be done in the "Add to Cart" section. We can choose from three options: Stay On the Product Page, Go To the Cart, and Let the User Decide.
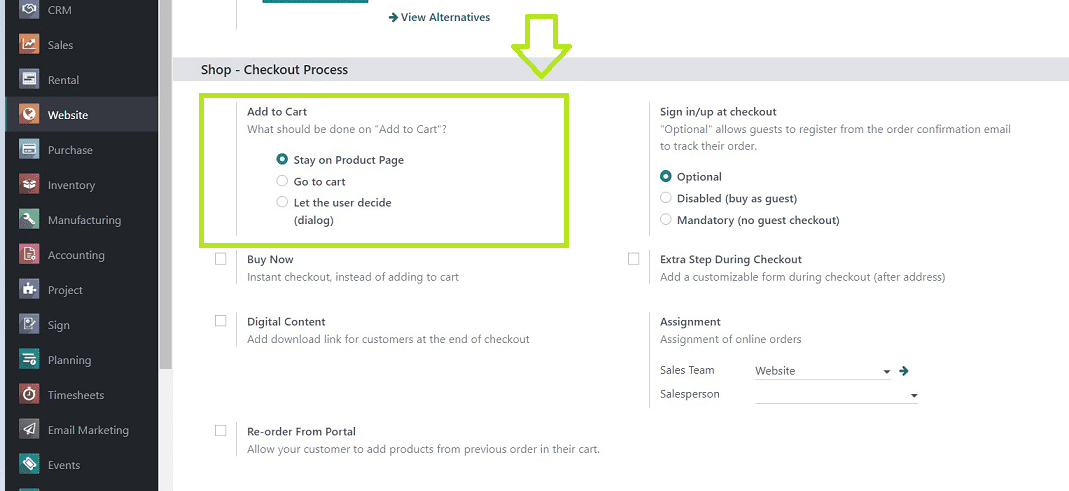
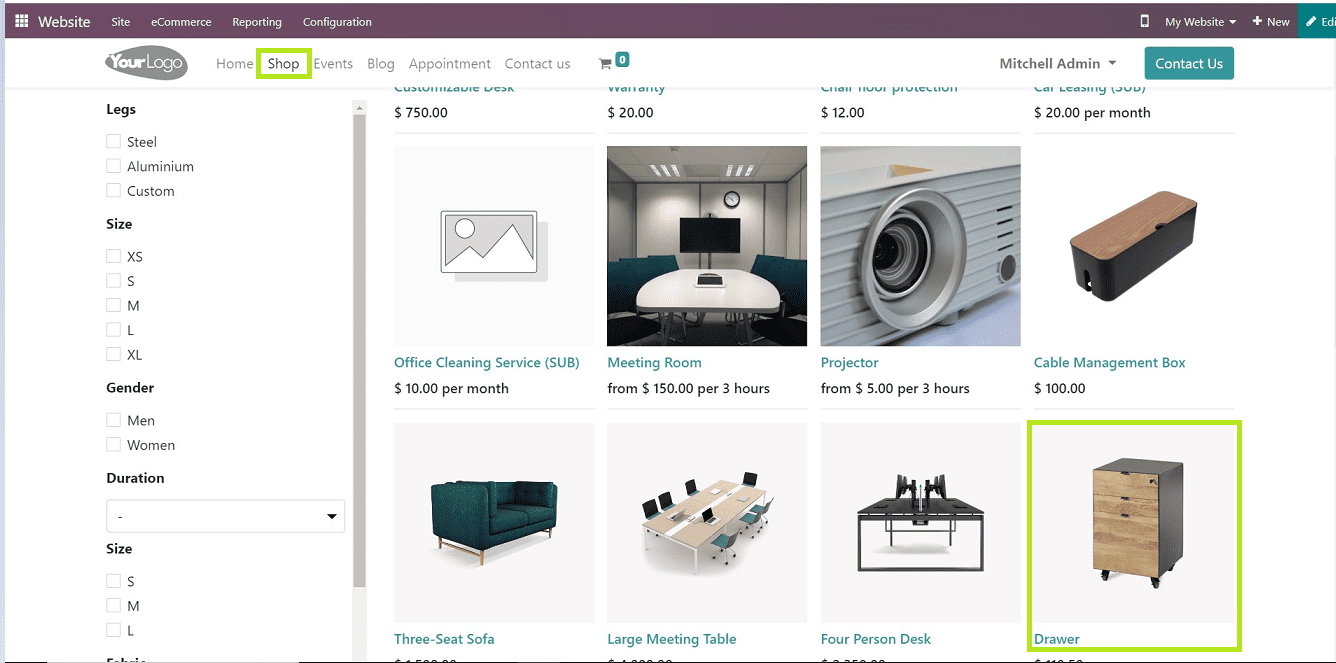
We can check these three scenarios by shopping for a product. First of all, select a product from the website homepage using the “Shop” menu.
In this scenario, We can purchase a "Drawer " product for demonstration purposes.
So click on the particular product, which will lead you to the shopping cart, as shown in the screenshot below.
Stay on the product page.
Let's assume the customer selects this option when making a purchase online. After pressing the "Add to Cart" button, you will remain on the product page, but the item will be added to your shopping cart, as shown in the screenshot below.
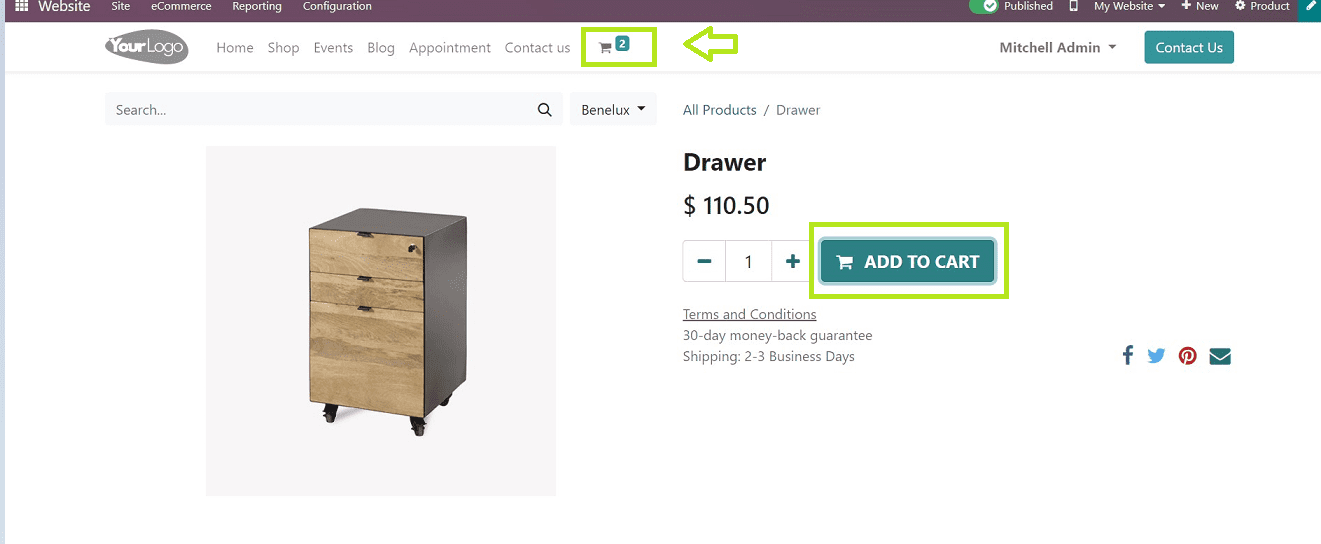
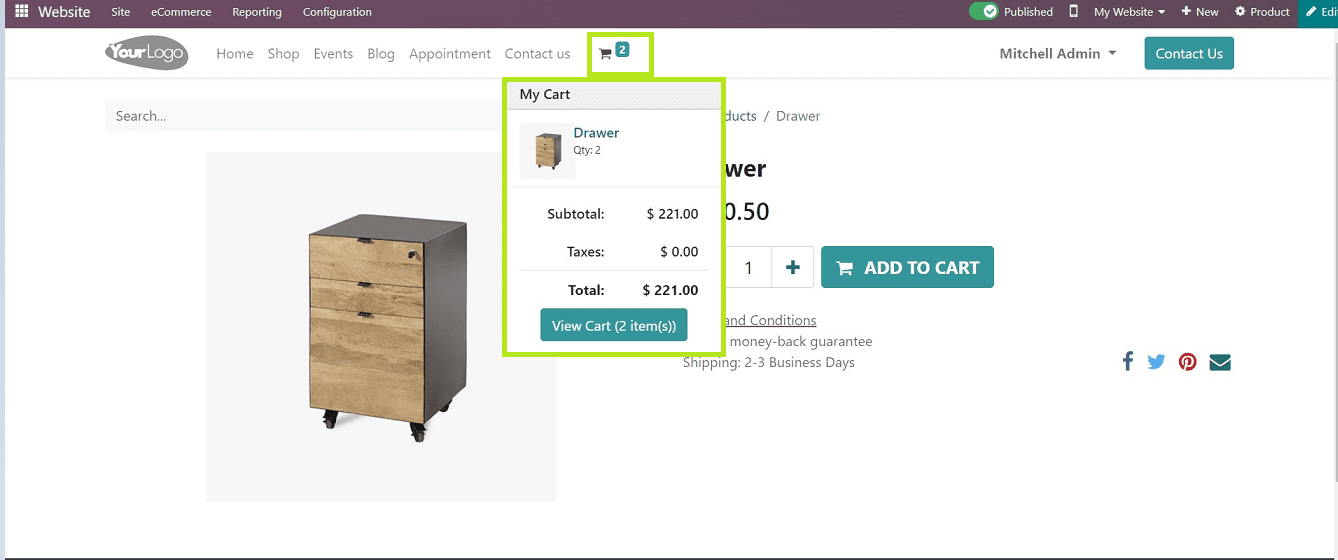
With each click, the "Add to Cart" button will add more than one item to the shopping cart, and we can see the cart details from a flash window from the cart icon illustrated in the screenshot below.
Go To Cart
If the user has selected this option from the settings menu, then while shopping procedure, the “Add to Cart” button will instantly direct to the cart page depicted in the screenshot below.
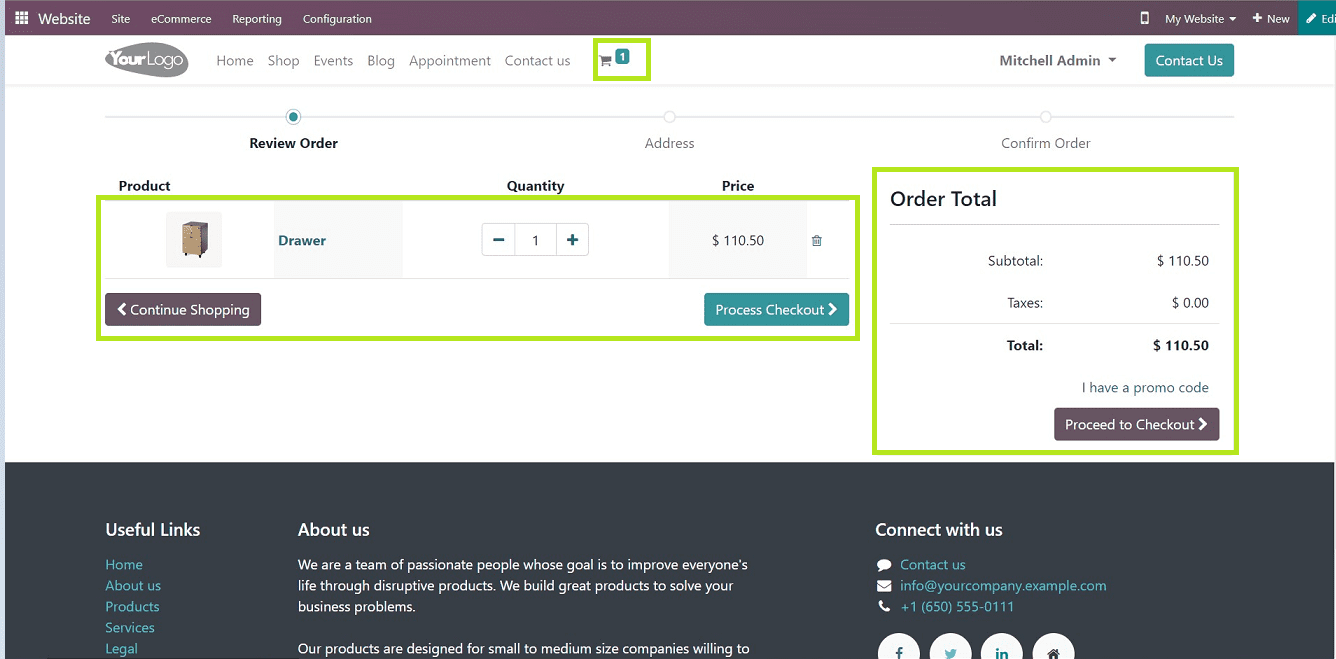
You can quickly proceed to Checkout from the cart menu.
Let The User Decide
Activating this option will open a dialogue box after clicking the “Add to Cart” button. Users can decide whether to go back to the shopping page or continue the payment process by clicking on the required button illustrated in the screenshot below.
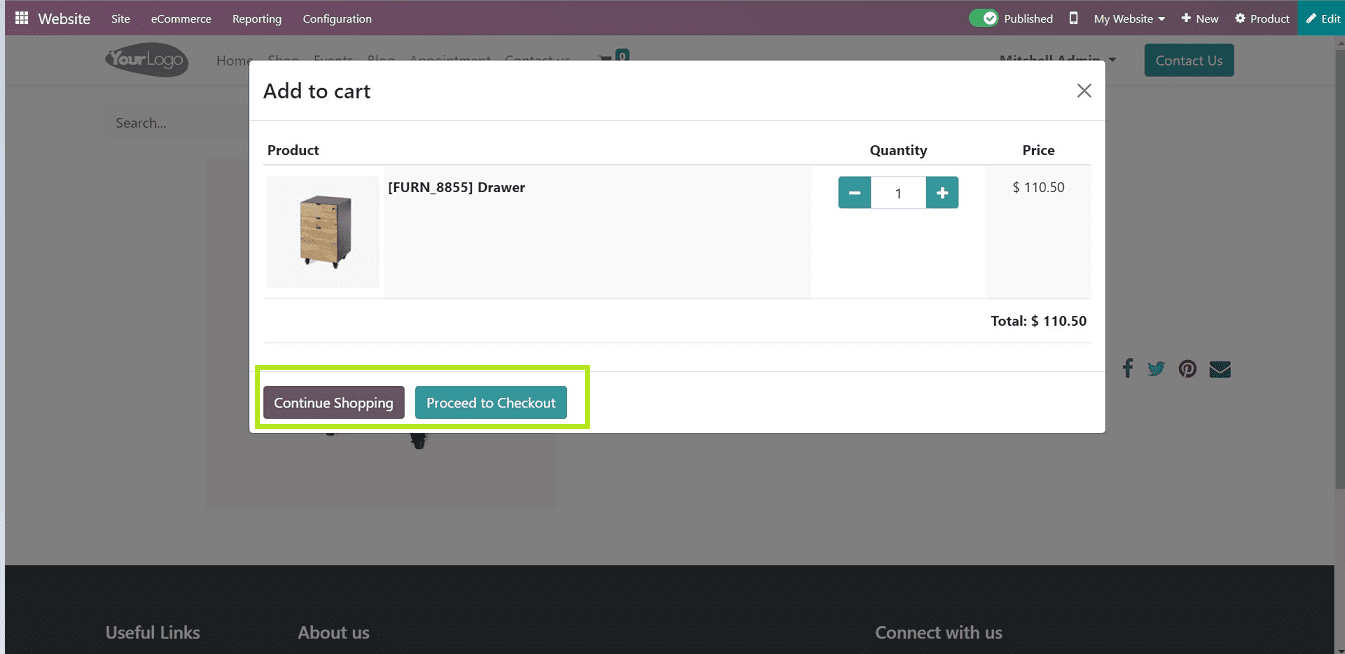
We have discussed the “Add To Cart” section from the Shop-Checkout process settings available in the Odoo 16 Website Module.
Now Let’s discuss the Sign in/sign-up at the checkout section.
“Sign in/up at checkout” Section
Users can configure the Sign in or Sign up function at the checkout process of their order. It is possible to select from the three options such as Optional, Disabled, and Mandatory.
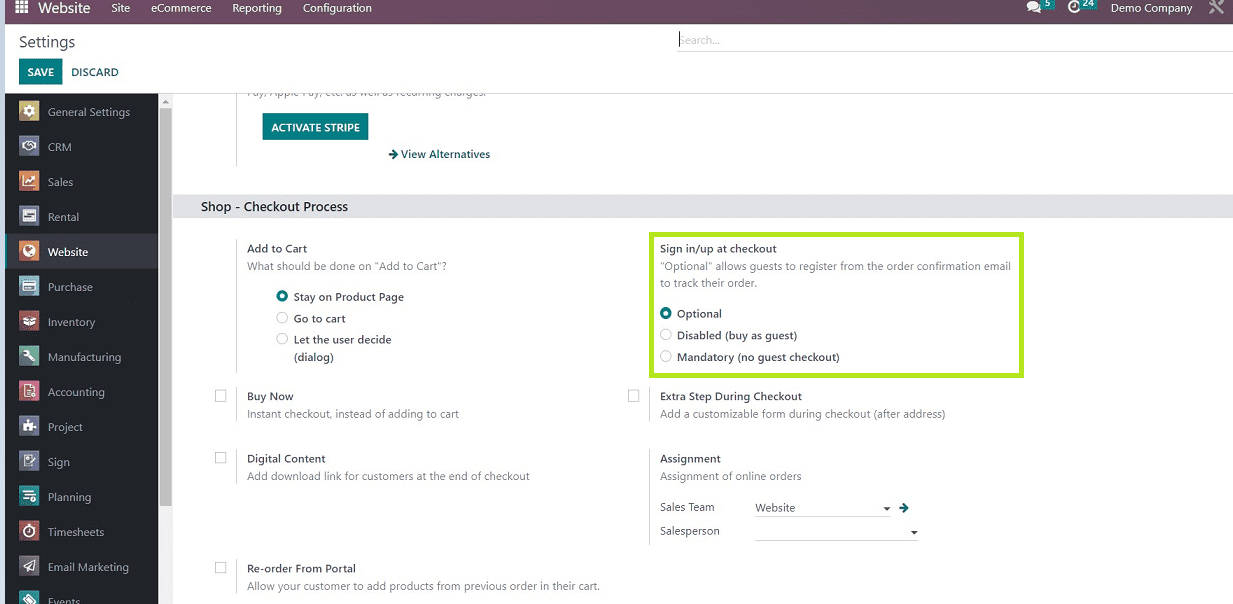
Optional
Enabling this option will allow customers to register from the order confirmation email to track their order.
Disabled
Users who select this option can make purchases without creating an account on the website. Anyone can make an incidental purchase of the item.
Mandatory
If the user admin selects this option, online users must verify their information by logging in with their credentials to place any orders.
These are the three options available in the Sign in/up checkout process settings.
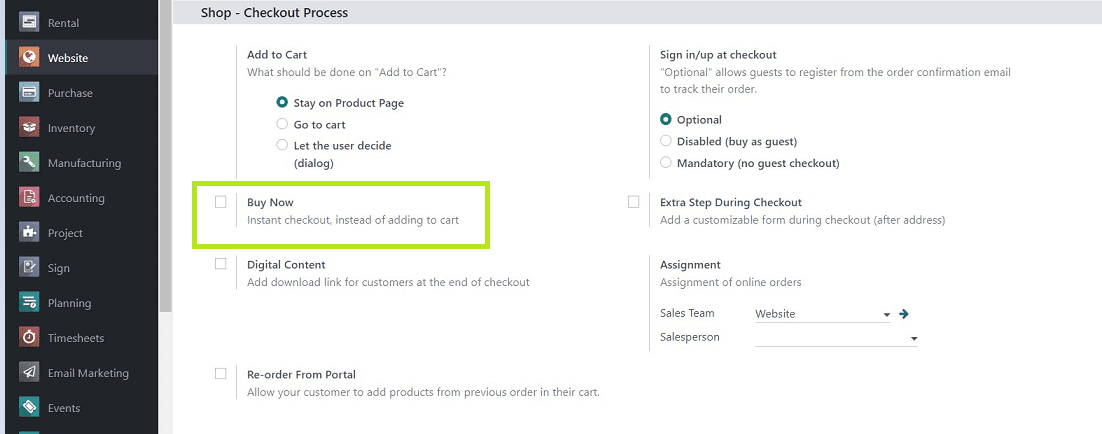
Buy Now
Enabling the “Buy Now” option will direct users quickly to the checkout page instead of adding items to the cart.
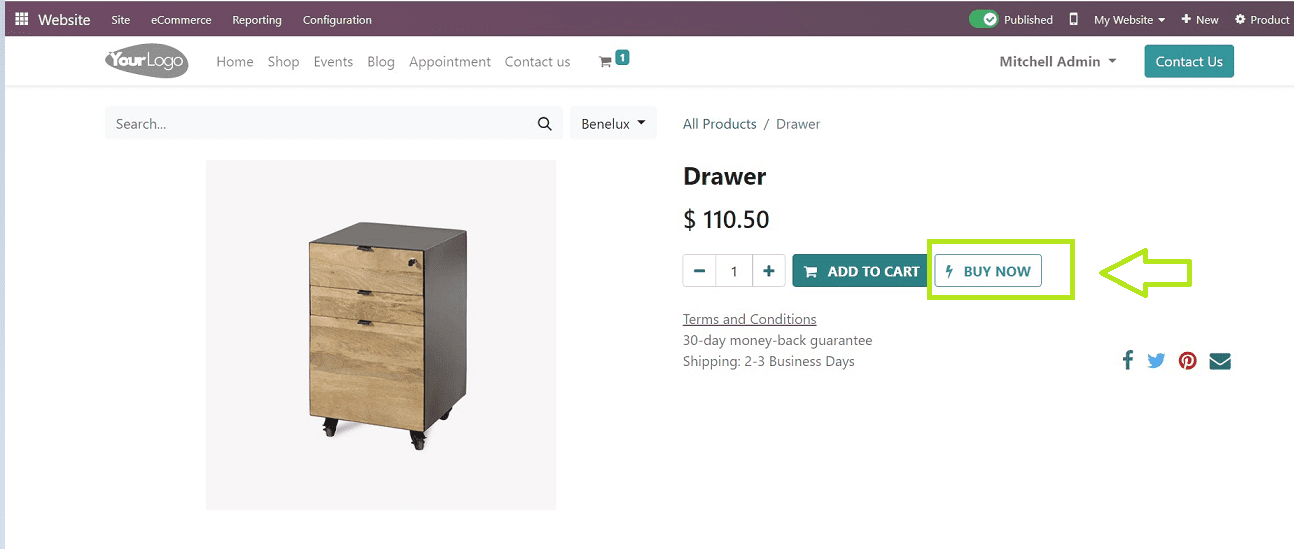
Selecting the “Buy Now” option will create a new button in the Checkout section while shopping for a product, as shown in the screenshot below.
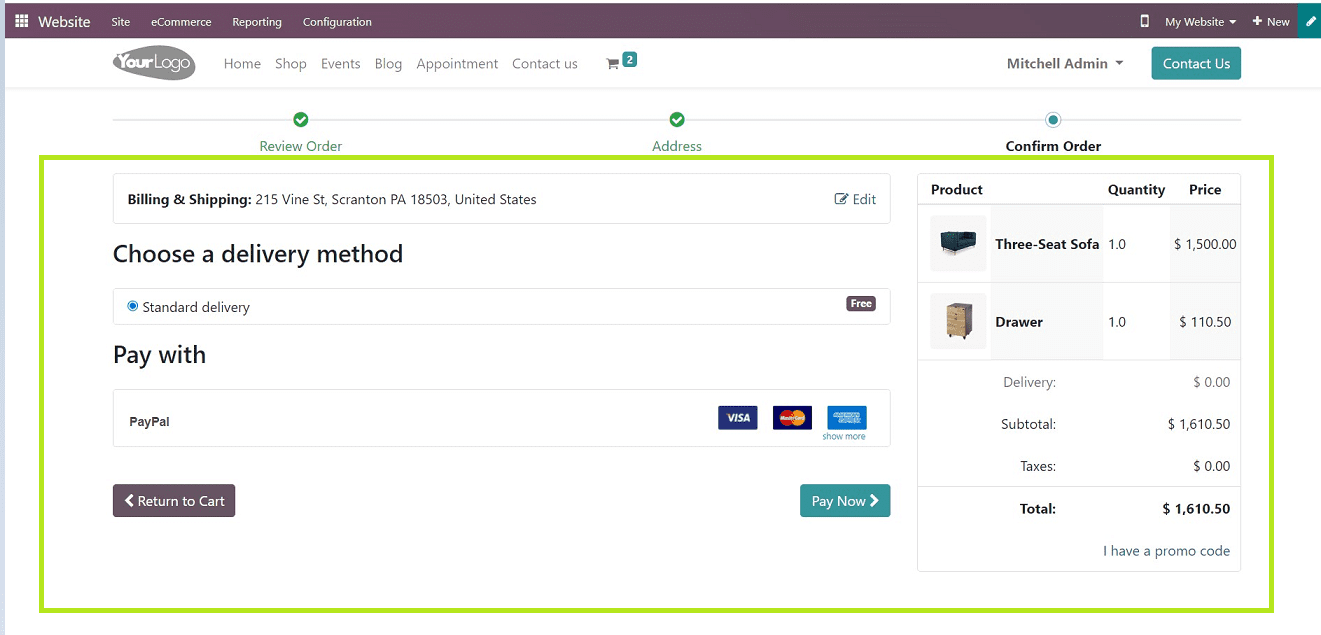
Clicking on the “Buy Now” button will lead you to the checkout page illustrated in the screenshot below.
Digital Content
Any form of media that is shared through online delivery systems and used by a company to interact with clients, customers, or users of its website or applications is referred to as digital content. For Example Digital Books, E-Magazines, Pdf Books, etc.
Enabling the “Digital Content” option will include a download link for customers after the conclusion of checkout.
Re-order From Portal
This Option enables users to quickly and simply create new sales orders based on old ones. Transferring all relevant info from the prior order, including the product specifics and customer details, saves time and effort while still allowing for any necessary adjustments. This option will allow customers to add items from previous orders to their shopping carts.

Extra Step During Checkout
During checkout, users can add a customizable form after the address section.
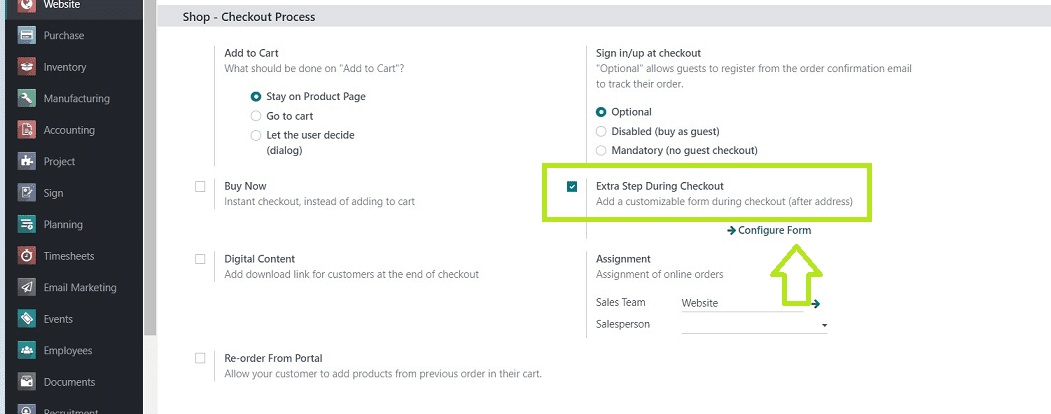
Enabling this option will add a “Configure Form” button, as you can see from the above screenshot.
The Configure Form button will lead you to a page where you can add extra details rather than addresses, like Alternative Delivery Addresses, Location details, References, etc.
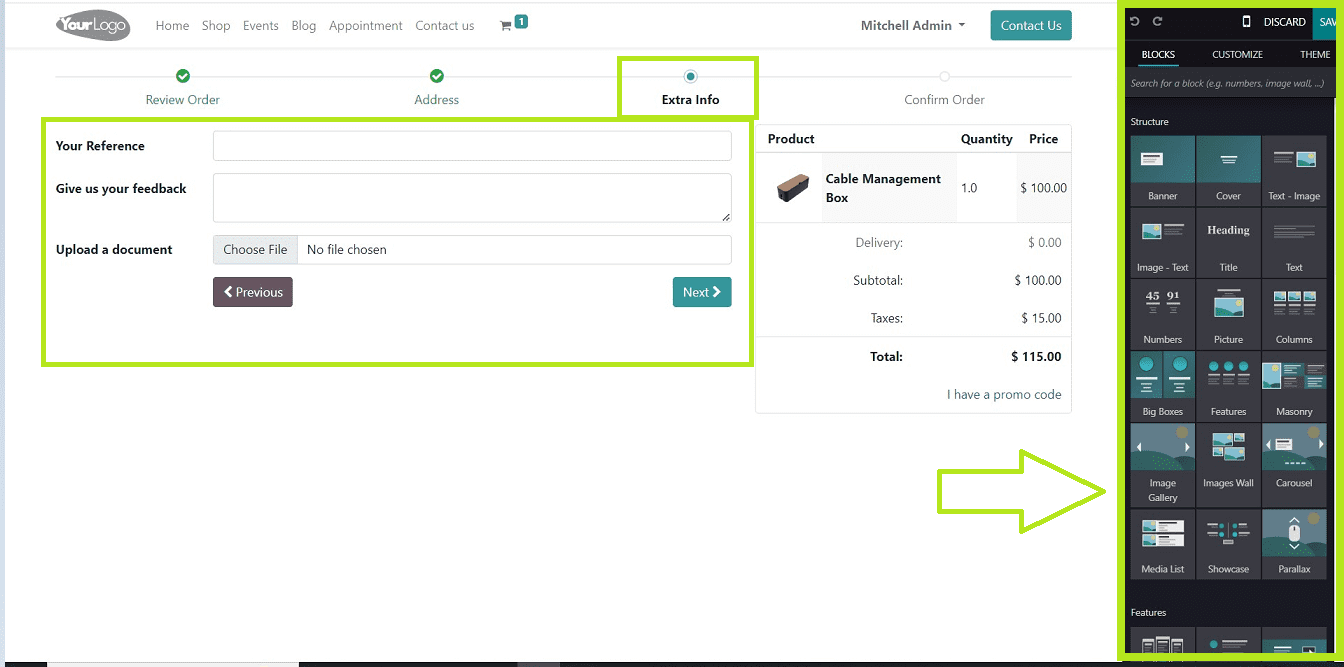
You can customize the Extra information section as per your specific requirements. Additionally, customize the section as needed by utilizing the huge array of editing tools and functionalities provided by the Odoo 16 platform, as illustrated in the above screenshot.
Assignment
Admin users can assign the Sales team and Salesperson who is responsible for the Online Orders using this option.
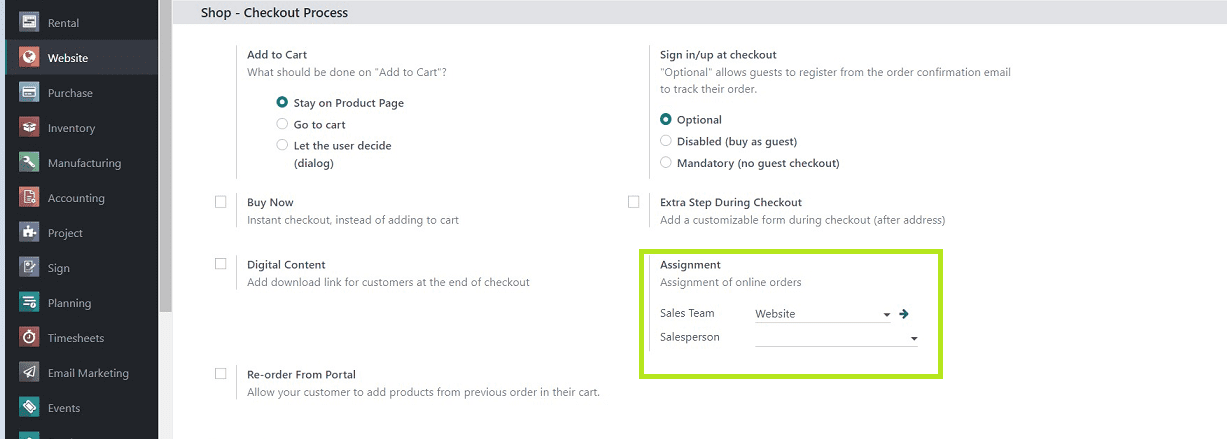
As indicated in the screenshot above, you can select the suitable option from the dropdown list provided in the respective field provided under each option.
All of the settings options available in the Shop & Checkout process section of the Odoo 16 website configuration settings menu have been discussed. As we have explained throughout this blog, users can quickly configure their online shopping website characteristics using these settings options.