Recruitment is the process of locating and attracting qualified candidates to fill unfilled positions within an organization. The majority of people believe that making an offer is a simple process. However, this is not always the case. Making an offer is crucial to the hiring and selection process since the time after a candidate accepts it is hard and difficult. At this stage, the HR department is in charge of the procedure that follows an offer which includes finding people that have the right skill set and mindset needed to help an organization accomplish its goals. Finding open positions, examining job criteria, assessing applications, screening, shortlisting, and choosing the best applicant are all steps in the recruitment process.
Odoo Recruitment Module is an Open source ERP platform that helps to manage recruitment processes in any business firm. Users can manage the recruitment processes very smoothly within this compact platform.
Features and functions available in the Recruitment Module
Some of the Odoo 16 Recruitment module features include,
* Connect job offers from different employment websites to your module and keep track of all of your offers.
* Maintain an applicant pool for your available openings and get more organized with clever activity management.
* From the app, manage everything from application emails to automated responses.
* Create an easily accessible repository with all the resumes of your applicants.
* You may immediately schedule interviews using Odoo, invite people to meetings, and integrate your Google Calendar with Odoo.
* Create links to offers for the chosen applicants. Allow them to read the offer, input their personal data, and sign it.
* Allow your staff to create their own benefits package, including a gross wage, vacation time, food vouchers, etc.
* Integration with Odoo HR and Employees Module gives additional features to turn an applicant into an Employee and manage their profiles, Appraisals, Leaves, etc.
Now we can check the menu items and their functions in detail.
You can avail of the Recruitment Management facilities by installing the module's most recent version from the Odoo 16 ERP package.
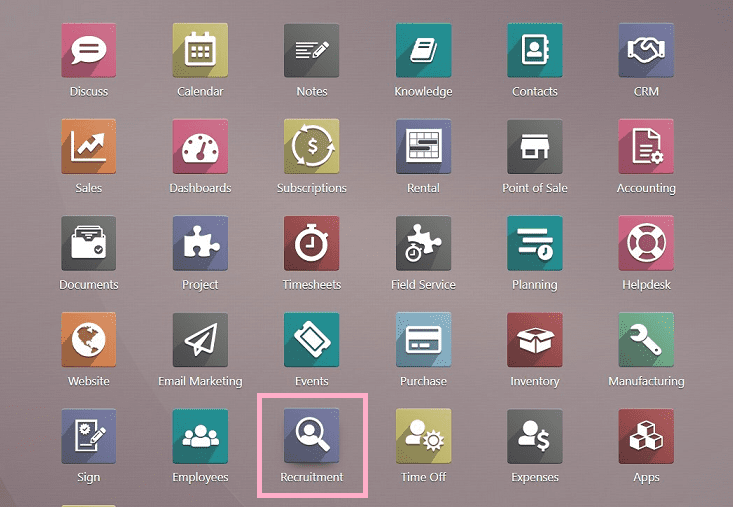
You can see the module’s homepage, which contains four menu items such as “Recruitment,” “Applications,” “Reporting,” and “Configuration,” as shown in the screenshot below.
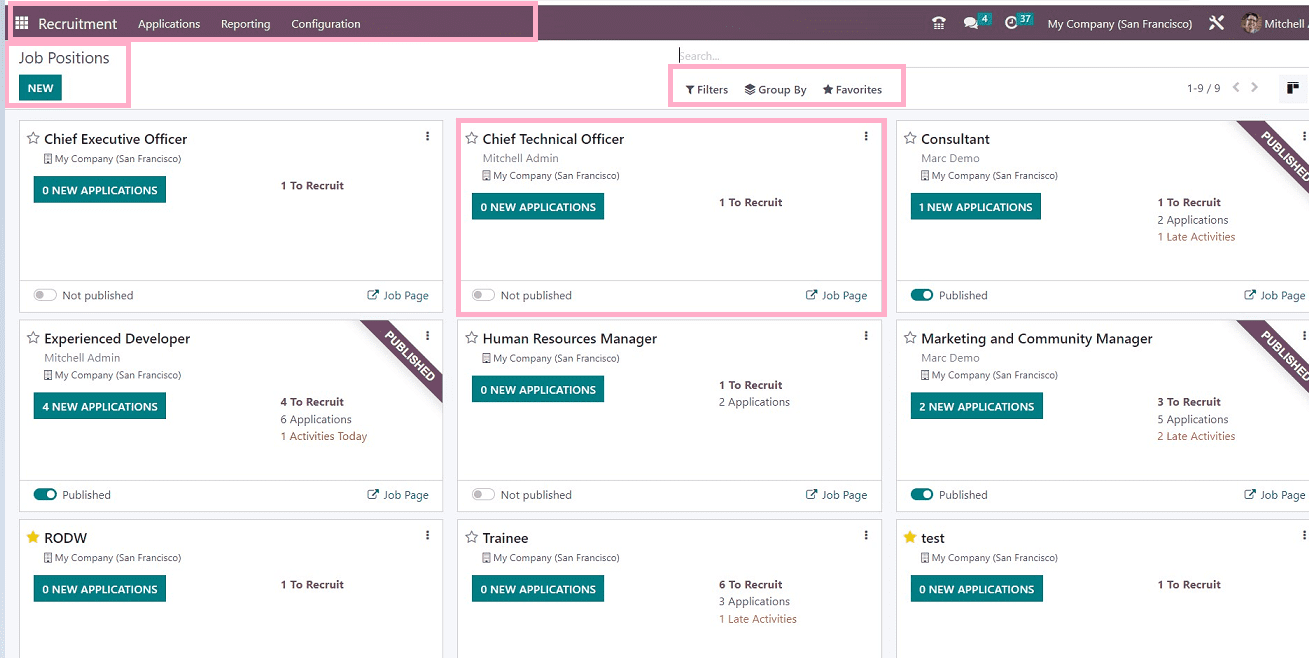
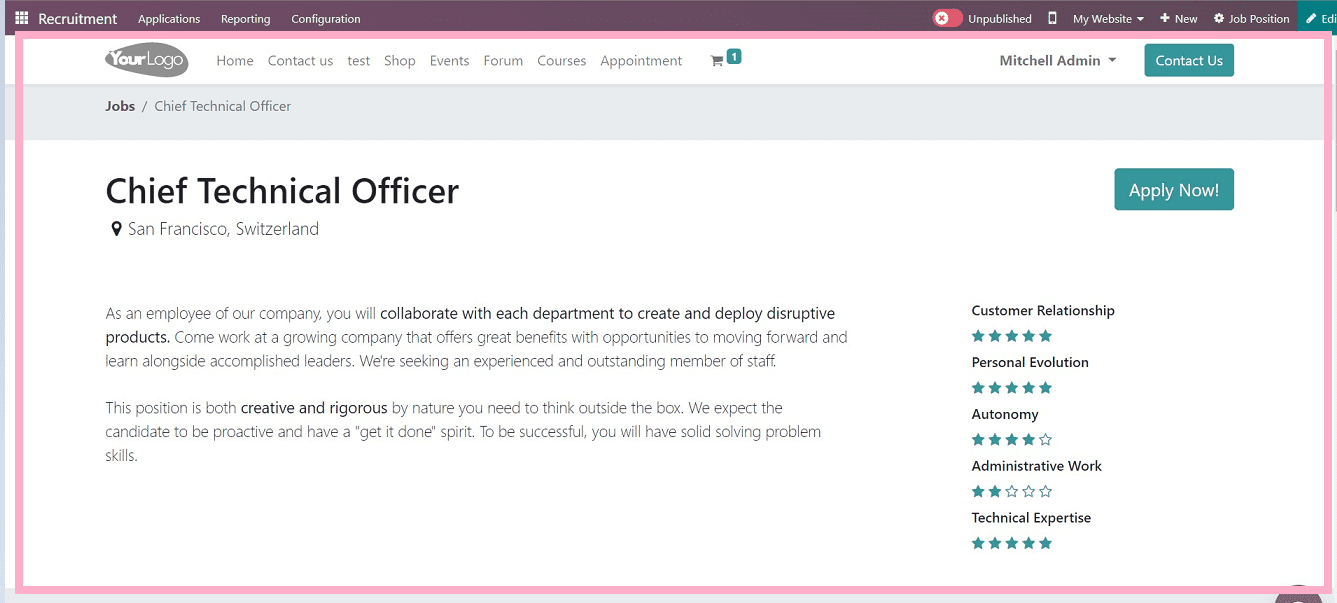
You can see the dashboard pane for the Odoo 16 Recruitment module after selecting it. An overview of all available open positions in the Job Positions pane. The user can examine the specifics of each job post in the Kanban view, including the Job Post, Department, Company Details, whether it has been published or not, Number of applicants, Number of Vacancies, any late activity, and other information. By selecting the "Job Page" option, which will lead you directly to the webpage preview, you can also check out the job application webpage.
Coming back to the job application Kanban cards, Using the three-doted menu at the bottom of the right end, you can view Applications, Interviews, Trackers, Activities, and review Reports. And also you can configure the Job Post by clicking on the “Configuration” option. The “Archive” option helps you to save the job post in the archived section. Odoo provides various color tags to denote the importance of job posts or the urgency of the job vacancy. You can color the Kanban card by choosing a color.

Additionally, a number of sorting options are shown under “Filters,” “Group By,” and “Favorites.” Job openings may be filtered based on favorites, published messages, archived communications, unread messages, and custom filters.

You can add customized filter options using the “Add Custom Filter” option provided in the filter options, as depicted in the above screenshot.
Application Menu
The “Application” is a form with candidate information submitted for a position inside an organization. Following the publication of a job vacancy on a website or any other platform, every firm receives a number of resumes. You can view each job applicant's information independently using the “By Job Position” menu item present in the “Application” menu, as shown below.

“Application By Job Positions” menu and Creating a New Job Position
You can create a new job application based on the job position by clicking on the “NEW” button available on the “By Job Position” homepage. it will open a pop-up window, as shown in the screenshot below.

You can create a new job position in the “Create a new job position” window in the “Job Position” field and save your job position using the “CREATE” button. so the new job position will be added to the dashboard view, as illustrated below, so that you can click on the Kanban card of the newly created job position.
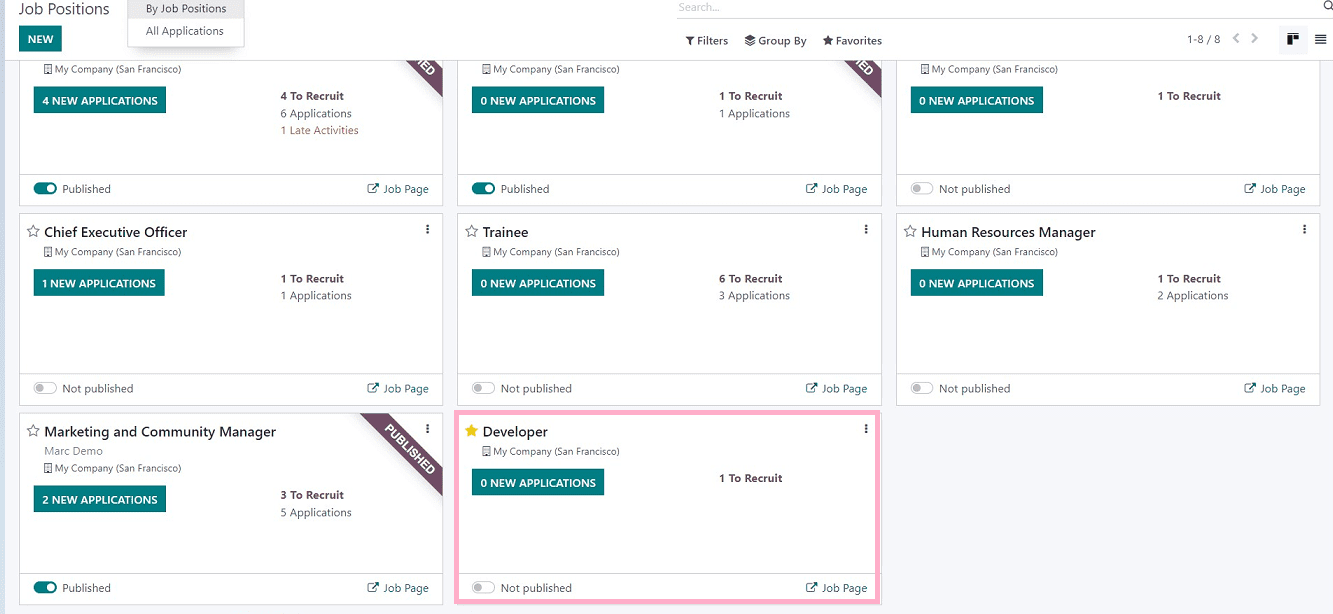
After clicking on the job Kanban Card, you will be transmitted to the "Job Positions" portal, where you may edit the information on that specific job application. The "Initial Qualification," "First Interview," "Second Interview," and "Contract Proposal" of the prior applications I received for this position are all available for your review. This is a new job posting right now. Therefore, utilizing the "NEW" button that is present in the page's top left corner, we can establish the job position specifications from the beginning.
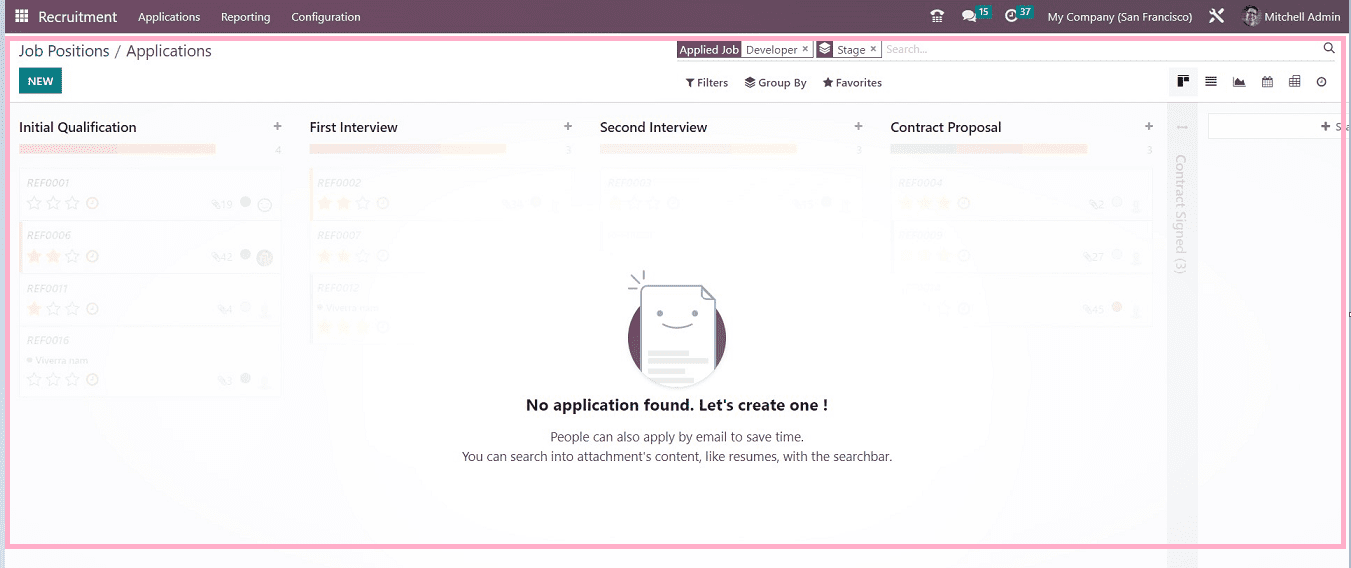
The “NEW” button will open the new job application configuration form, as shown in the screenshot below.
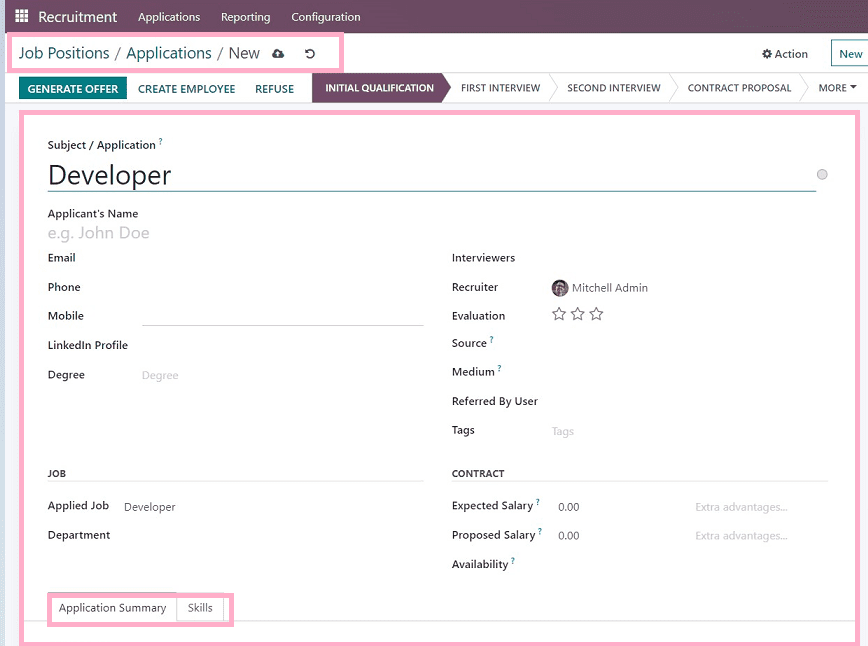
The application name will be auto-filled in the “Subject/ Application” field then you can give the name of the applicant in the “Applicant’s Name” area. Mention your “Email,” “Phone,” or “Mobile” in the appropriate fields, and you can provide the official link of your LinkedIn profile in the “LinkedIn Profile” field. Mention your highest qualification in the “Degree” area by selecting from the dropdown list. Also, you can provide the names of the job interviewers in the “Interviewers” area and the “Recruiter” name. It is possible to mention the application evaluation by rating it with stars in the “Evaluation” area. It is possible to identify the search engine that provided the link's source in the “Source” field. The sources are categorized as Twitter, Monster, Glassdoor, etc. Next, select the “Medium” option and then the application distribution mechanism. Users have access to a variety of media, including email, SMS, Linkedin, phone, and more. You can mention the “Referred By User” and also select appropriate tags from the “Tags” section.
Set the position as a Developer in the “Applied Job” area underneath the “JOB” section. Users have the option of selecting from various department options present in the dropdown section of the “Department” field associated with the open position.
The user can enter the applicant's desired pay in the “Expected Salary” area of the “CONTRACT” section. Include the employee's pay that was offered by the employer in the “Proposed Salary” field. After that, you can select the applicant's anticipated joining date in the “Availability” column.
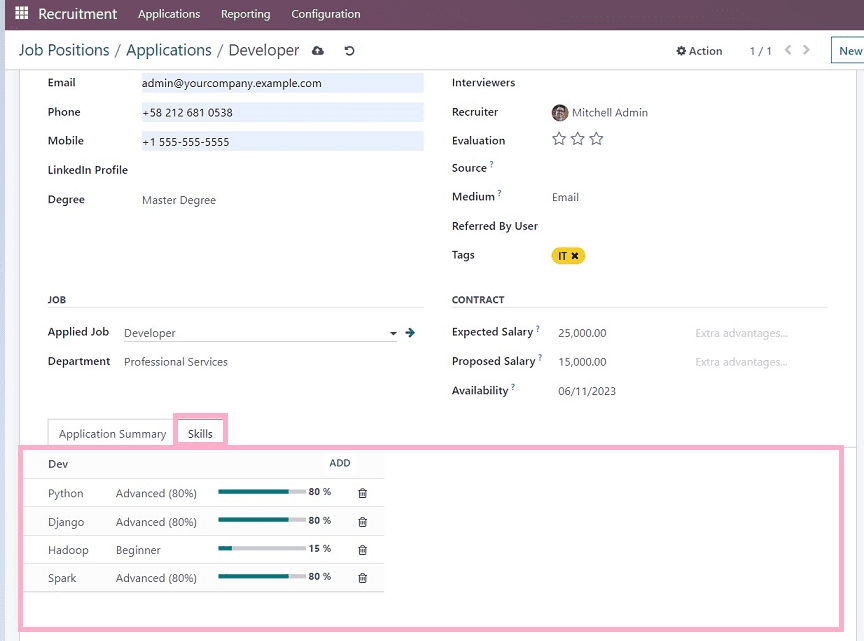
As you can see from the screenshot below, the configuration form contains two tab sections such as “Application Summary” and “Skills,” so let’s discuss them in detail.
Application Summary Tab: In this tab section, users can edit any description or details about the Job Application.
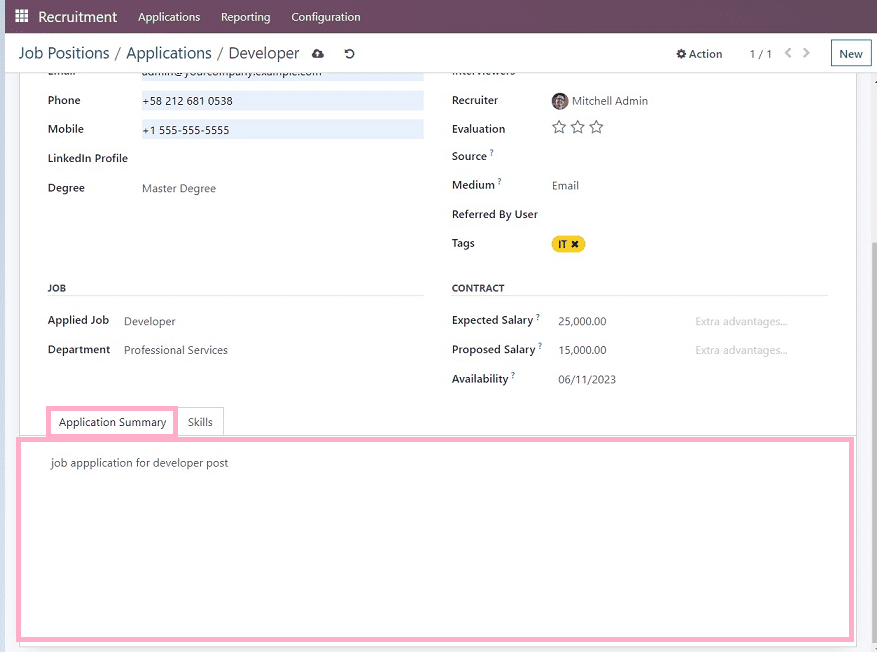
Skills tab:
The "CREATE A NEW ENTRY" icon is located under the "Skills" page, and it can be used to apply an applicant's talents.

the "CREATE A NEW ENTRY" button will immediately open a popup window depicted below.
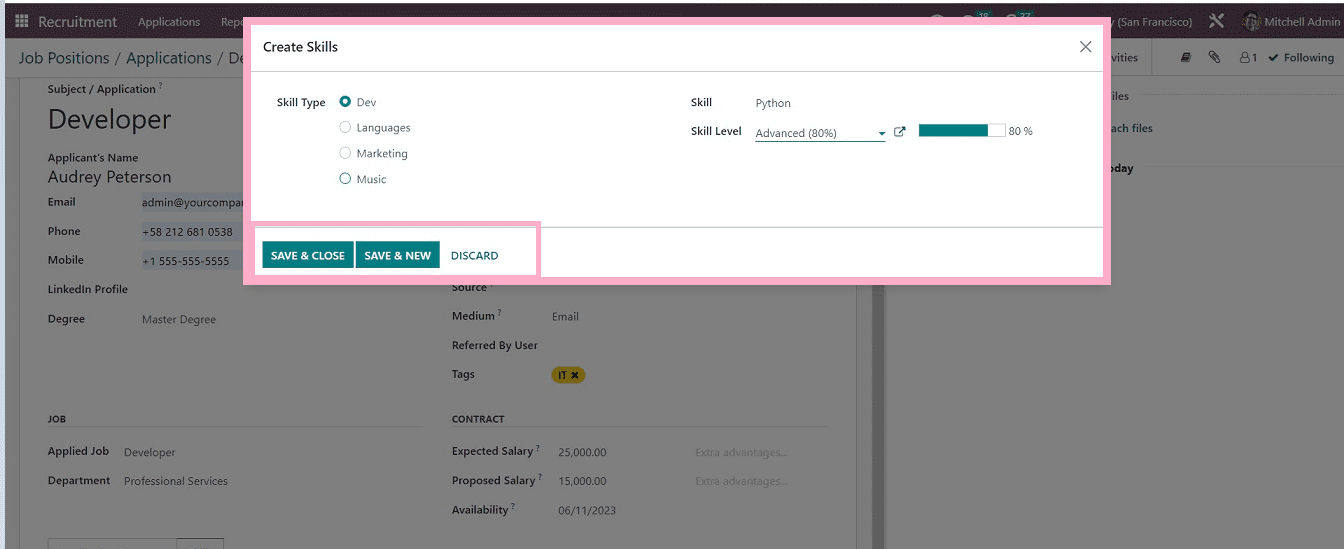
Now you can choose a “Skill Type” from the options given on the “Crete Skills” window. Then select a skill from the dropdown list options available in the “Skill” data field, and also you can mention the skill proficiency in the “Skill Level” area like Beginner level, Intermediate level, Advanced level, etc. In a single skill creation window, only one skill is allowed to be created. save the skill using the “SAVE & CLOSE” button, or you can save and add a new skill quickly by using the “SAVE & NEW” button. After that, save your Job applications using the save icon provided at the top of the Configuration form.
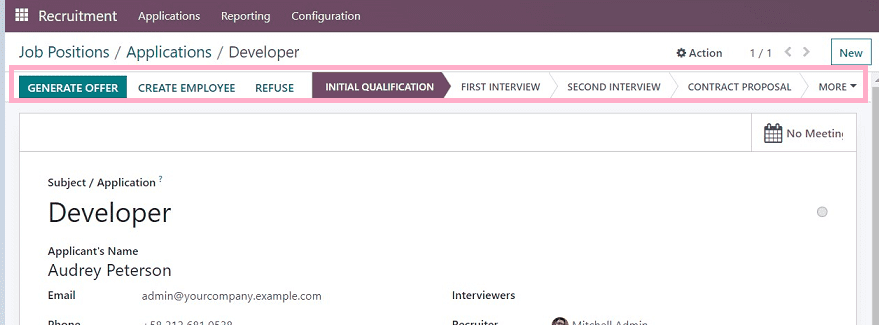
After completing all phases of a job application, users can make an offer to candidates. We may rapidly extend the employment offer to a candidate by selecting the "Generate Offer" icon.
In Odoo 16, every application detail is manually preserved. The step is now shown in the Applications box as "INITIAL QUALIFICATION." You have the option to change the stage to "FIRST INTERVIEW," "CONTRACT PROPOSAL," "SECOND INTERVIEW," and more following each round of screening.
“All Applications” menu item and create a new Application
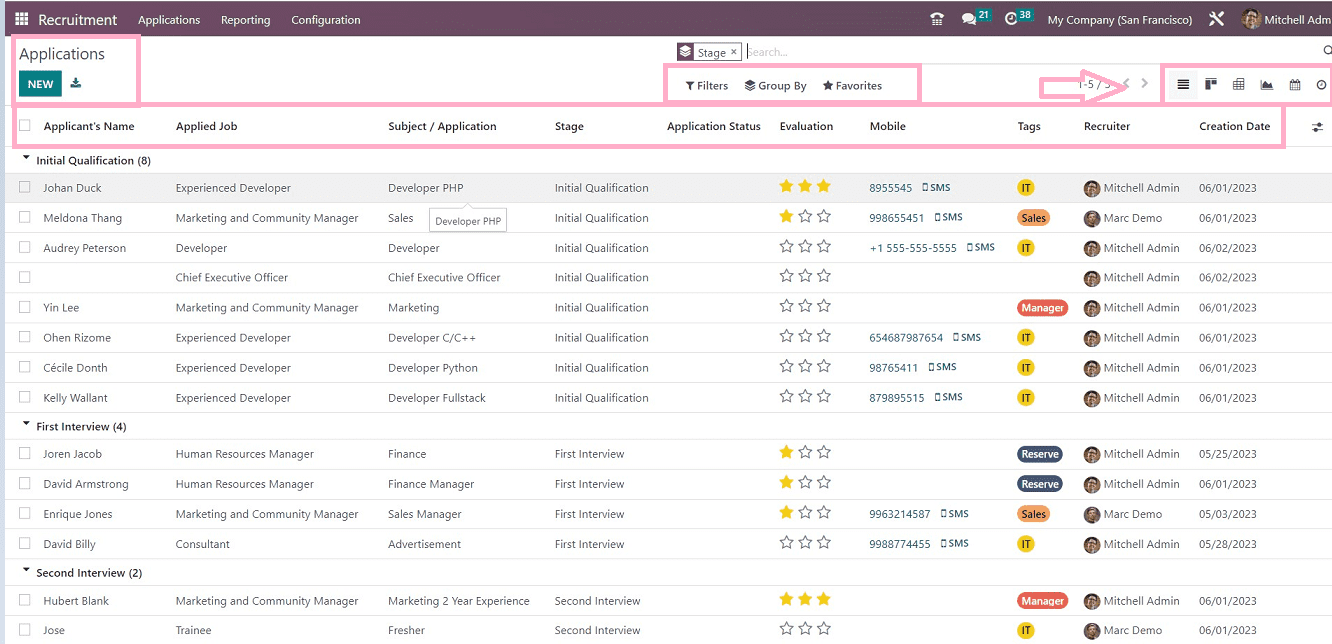
When you select the All Programs menu item from the Applications tab, a list of all programs will appear. A general concept of each application's information, such as the “Applicant's name,” “Applied Job,” “Subject/Application,” “Stage,” “Application Status,” “Evaluation,” etc., is provided via the List view of the applications window. Odoo provides various “Filter,” “Group By,” and “Favorites” options. You can change the list view into Kanban, Pivot, Graphical, and Calendar views by clicking on the respective icons provided in the upper right corner of the page, as labeled in the screenshot below.
If a new application has to be made, then select the” NEW” button. You will be directed to a fresh new Job Application configuration, as shown below.
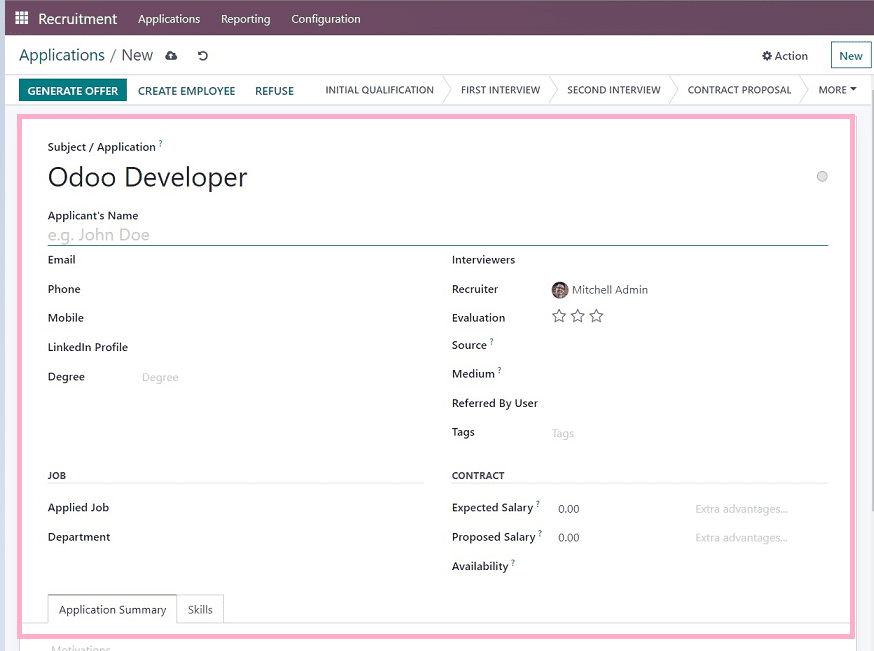
The hired and in-progress details of the recruiter are visible in The process of creating a new Application in the “All Application” menu is also the same as the procedure that we have discussed in the previous section. Add the email subject, title, and personal number of the candidate in the “Applicant's Name” and “Email” fields. Select the education qualification, mention “LinkedIn Profile,” “Tag,” and the name of “Interviewers,” and add the “Recruiter” name when applying for a job. Mark the appreciated level of a candidate as good, very good, or excellent by selecting the star icon in the Appreciation field. The “JOB section allows the user to select an “Applied Job” and “Department,” and the “CONTRACT” section allows the user to enter the “Expected Salary” and “Proposed Salary.” Users can specify the description of an application and add necessary skills by pressing the” CREATE A NEW ENTRY” icon. Hence, it is easy to define new applications for your company in the Odoo 16.
Reporting Menu
A corporation may quickly create marketing goals and comprehend business results and trends. The greatest report management system helps the business develop swiftly. We can handle “Recruitment Analysis,” ”Source Analysis,” “Time in Stage Analysis,” and “Team Performance” within the Reporting area of Odoo Recruitment. Let's examine each reporting option in detail.

Recruitment Analysis
By selecting the Recruitment Analysis option from the Reporting page, you can evaluate the hiring of candidates in a company. The recruitment analysis graph shows source data and applicant count. In a firm recruiting report, you can analyze the recruited and in-progress data independently.
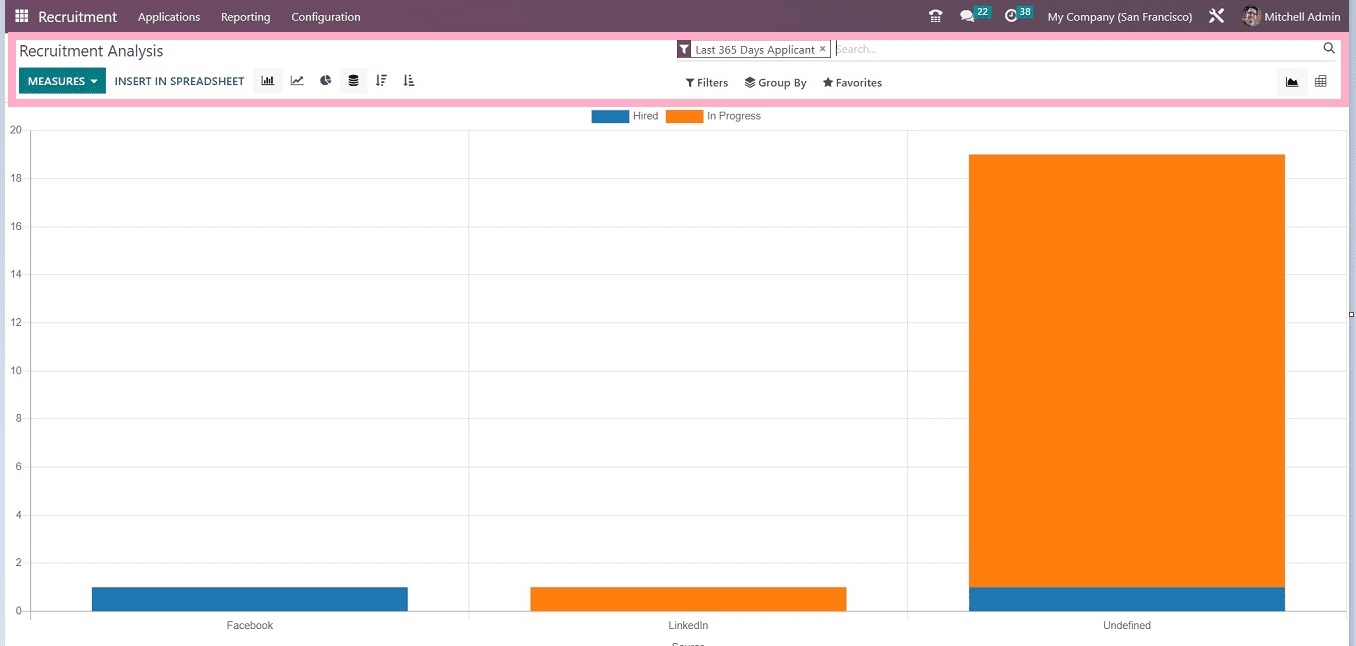
We can add several values to the graph, such as “Applicant,” “Meetings,” “Hired Ratio,” “Process Duration,”and more, by selecting the “MEASURES” icon.

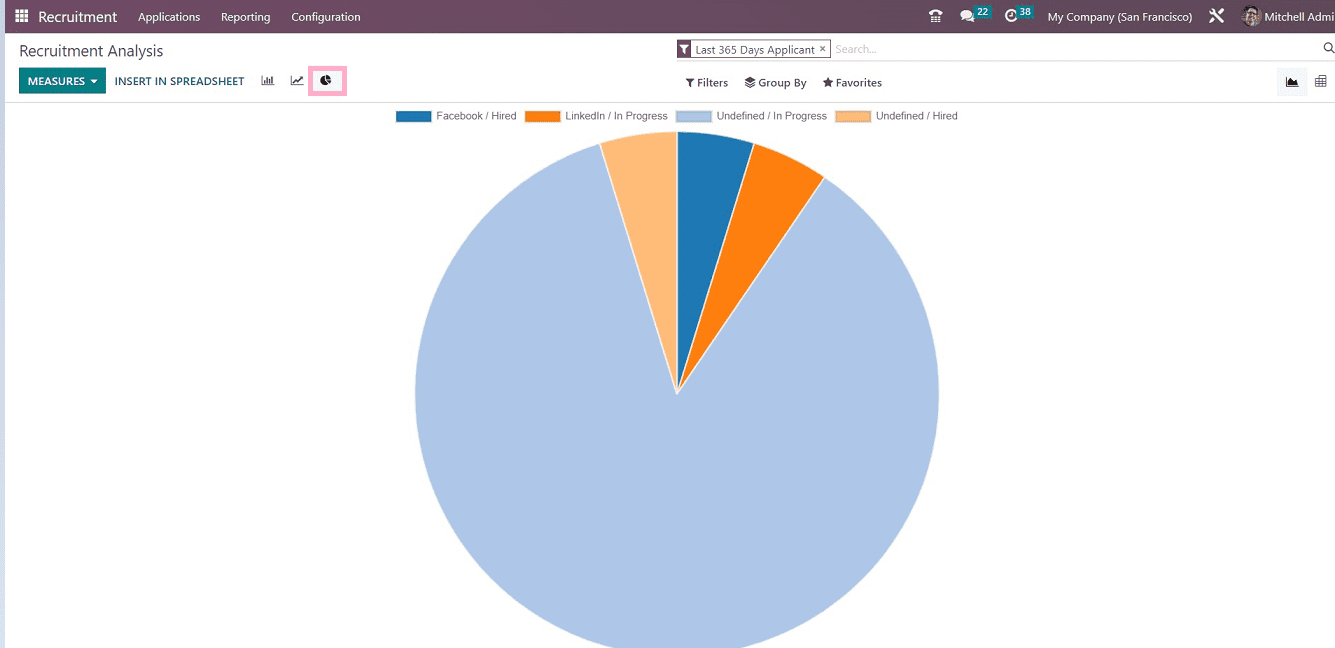
The data may also be sorted and filtered based on the options given in the “Filter,” “Group By,” and “Favorites” options. Also, you can change the Bar Chart view into different visualization modes by clicking on the various icons provided in the upper part of the page, such as Line Chart, Pie Chart, Stacked View, Descending View, Ascending View, and more. For an example, check out the report’s Pie Chart view shown below.
Source Analysis
Through a reporting function, users may examine the origins of each hiring procedure inside the organization. When the user selects the Source Analysis option from the Reporting tab, a graphical depiction appears. The viewers can observe the application count and source information on this graphical view.
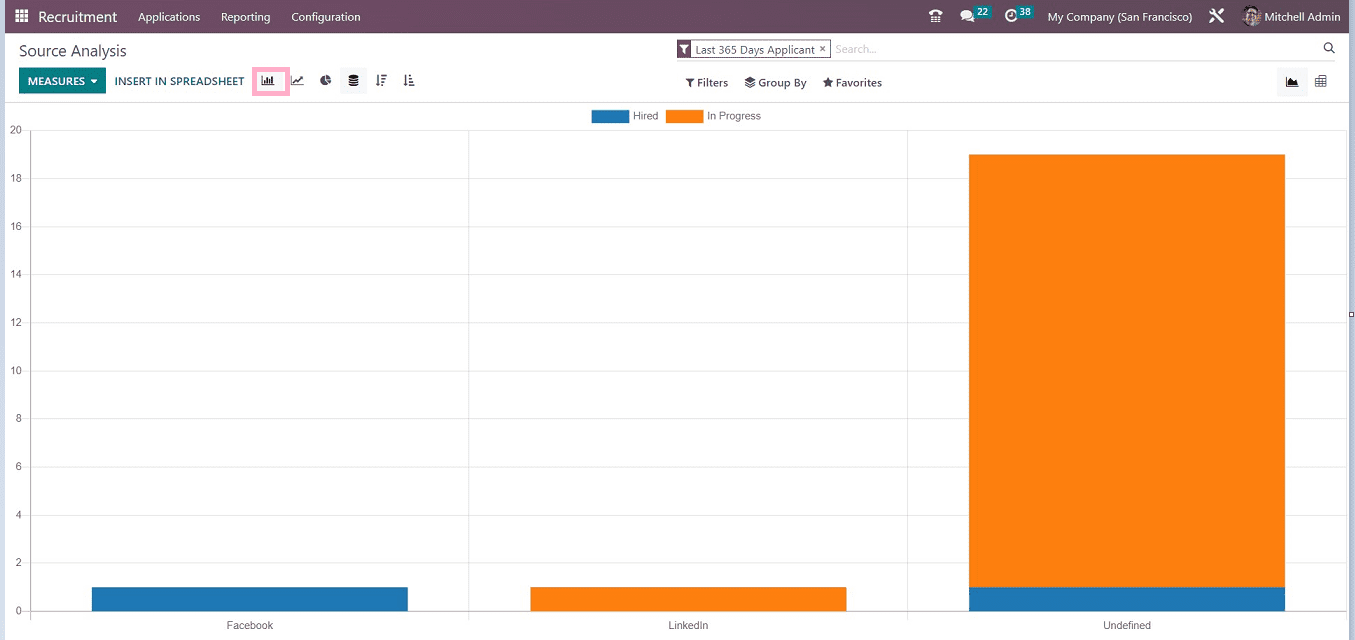
The Bar Chart view can be changed into different visualization modes by clicking on the icons in the page's upper left corner and also changing the graphical parameters as per the requirement by selecting from the “MEASURES” dropdown options.
Time in Stage Analysis
Users can assess the phases of each candidate recruiting process using the “Time in Stage Analysis” option in “Reporting.” The overall count of each stage based on each job position is displayed in the Stage Analysis window's Pivot view. The Pivot table gives users access to the total days spent on each step of the “Initial Qualification,” “First Interview,” “Second Interview,” and “Contract Proposal.”
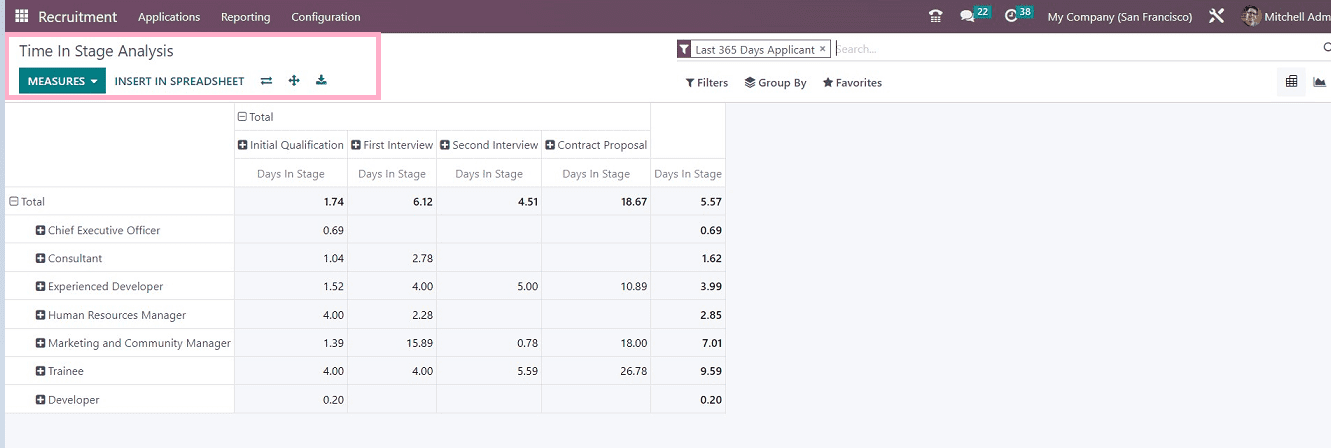
You can use the “MEASURES” button to change the parameters of the report. Users can insert spreadsheets using the “INSERT IN SPREADSHEET” button and change the report view axis using the “Flip Axis” icon. Expand the view using the “Expand” button and also download the xl file using the download icon.
Team Performance
Analyzing each team's performance in an organization can be done using Odoo 16's Reporting function. In the graph view, the Recruiter data is displayed on the X-axis, and the Count is displayed on the Y-axis. The “MEASURES” option can be used to group the team's performance according to the “Number of Applicants,” “Meetings,” “Hired People,” “Length of the Process,” and other factors.
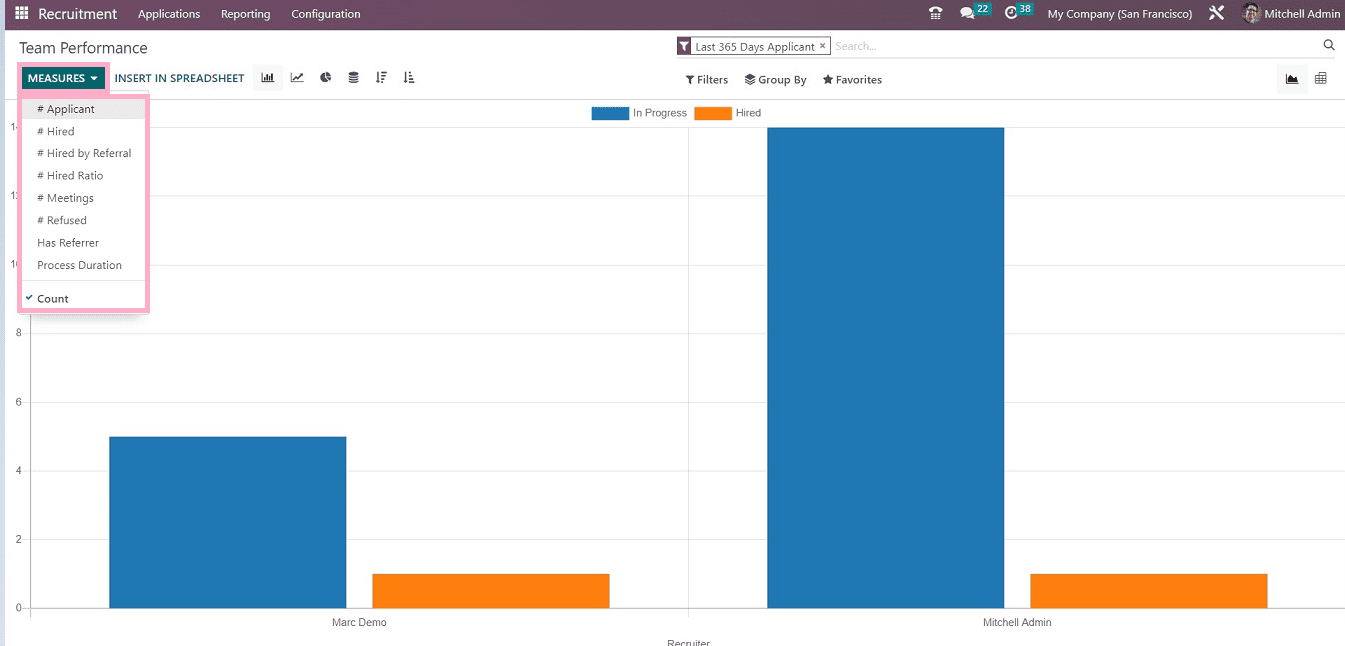
Configurations
The odoo 16 platform's configuration settings assist in configuring a number of settings choices, including "Settings," "Job Positions," "Applications," "Employees," and "Activities." Let's discuss them.

Settings
The Settings section of the website allows users to control the “Recruiting Process” and “Job Posting” preferences. They can publish open positions on the website by turning on the ”Online Posting” option, “Sending Interview Survey” to candidates, and displaying resumes on the application form. Users can check the “CV Display” option to display their resumes on the application form. The “Send SMS” option helps to send SMS texts to your contacts about the job application. Additionally, you can Digitize your cv using the “CV Digitization(OCR)” option.
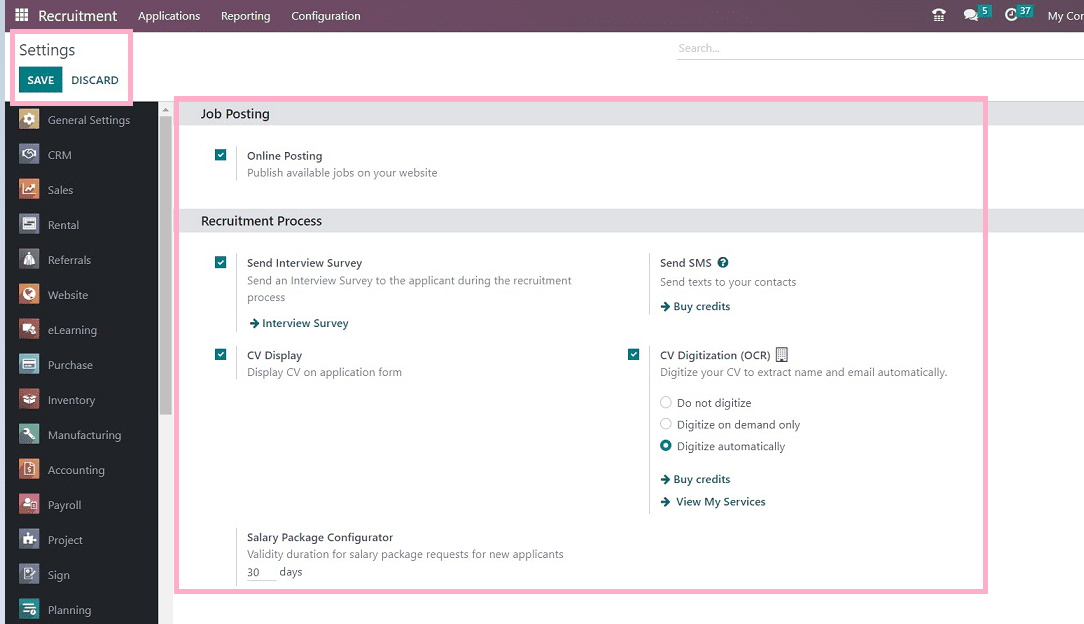
Job Positions
The Job Positions section of Configuration allows users to customize “Employment Types” such as full-time, temporary, and part-time. All job categories' names, including Replacement, Interim, and Permanent, are visible to users. To create a new job type, users can select the “NEW” button, as illustrated in the screenshot below.

Applications
Within the Applications part of the “Configuration” page, you can access the “Refuse Reasons” menu. The open window allows users to see the specifics of each refusal reason, including the Email Template and Description. Selecting the” NEW” button will allow you to create a new refusal reason.

Employees
For specific services, most businesses have several departments. There are several departments for job management depending on the size of the organization. The “Departments” option can be found under the” Employees” section of the “Configuration” tab. Each department list, such as Display Name, Employees, Company, and others, is available to the user in the open window. We can describe a new department in your firm by clicking the” NEW” button.

Activities
Activity types refer to the many categories of tasks carried out inside an organization. A list of all generated activities is available after you select the “Activity Types” option in “Configuration.” The user can read information about each activity, including Name, Type, Default Summary, and more, in the| “Activities” pane. By choosing the” NEW” icon on the Activity Types page, you can create brand-new activities, as depicted in the screenshot below.

These are the configuration settings available in the “Configuration” menu of the Odoo 16 Recruitment Module.
We have discussed an overview of the Recruitment Module Platform and each of its menu items and functions in this blog. Within this compact interface, users can manage the recruiting procedures with ease.