Businesses may effectively control the flow of items within their warehouses with the help of transfers in Odoo Inventory and guaranteeing precise inventory management and optimized operations.
In this blog, we are going to discuss batch transfer, wave transfer, and cluster picking in the Odoo 17 inventory application.
Batch transfer in Odoo 17
In an online business platform, there are many sale orders, and the company wants to deliver the sale order items to the customers. From that huge number of sales orders, the delivery location for the 10 sales orders is to the same location. Then, the company makes these 10 sales orders into a single batch and transfers them together.
The batch transfer is a way of grouping multiple transfers and processing them into a single unit or the act of moving or transferring items in a single operation or batch between several locations within a warehouse. This is frequently carried out to maximize warehouse operations and improve the flow of goods. Internal transfer is the movement of stock from one location to another location within the same warehouse. So if a warehouse processes with a number of customers daily, to optimize the picking of the products, they just group the items that are similar in nature, which helps the pickers to reduce the traveling time and they can pick the similar items together. It also increases the picking efficiency and can make batch transfers using wave transfers.
First, move to the inventory application in Odoo 17 and choose the configuration settings. In configuration settings, under the operations section, there is an option to enable batch transfer.
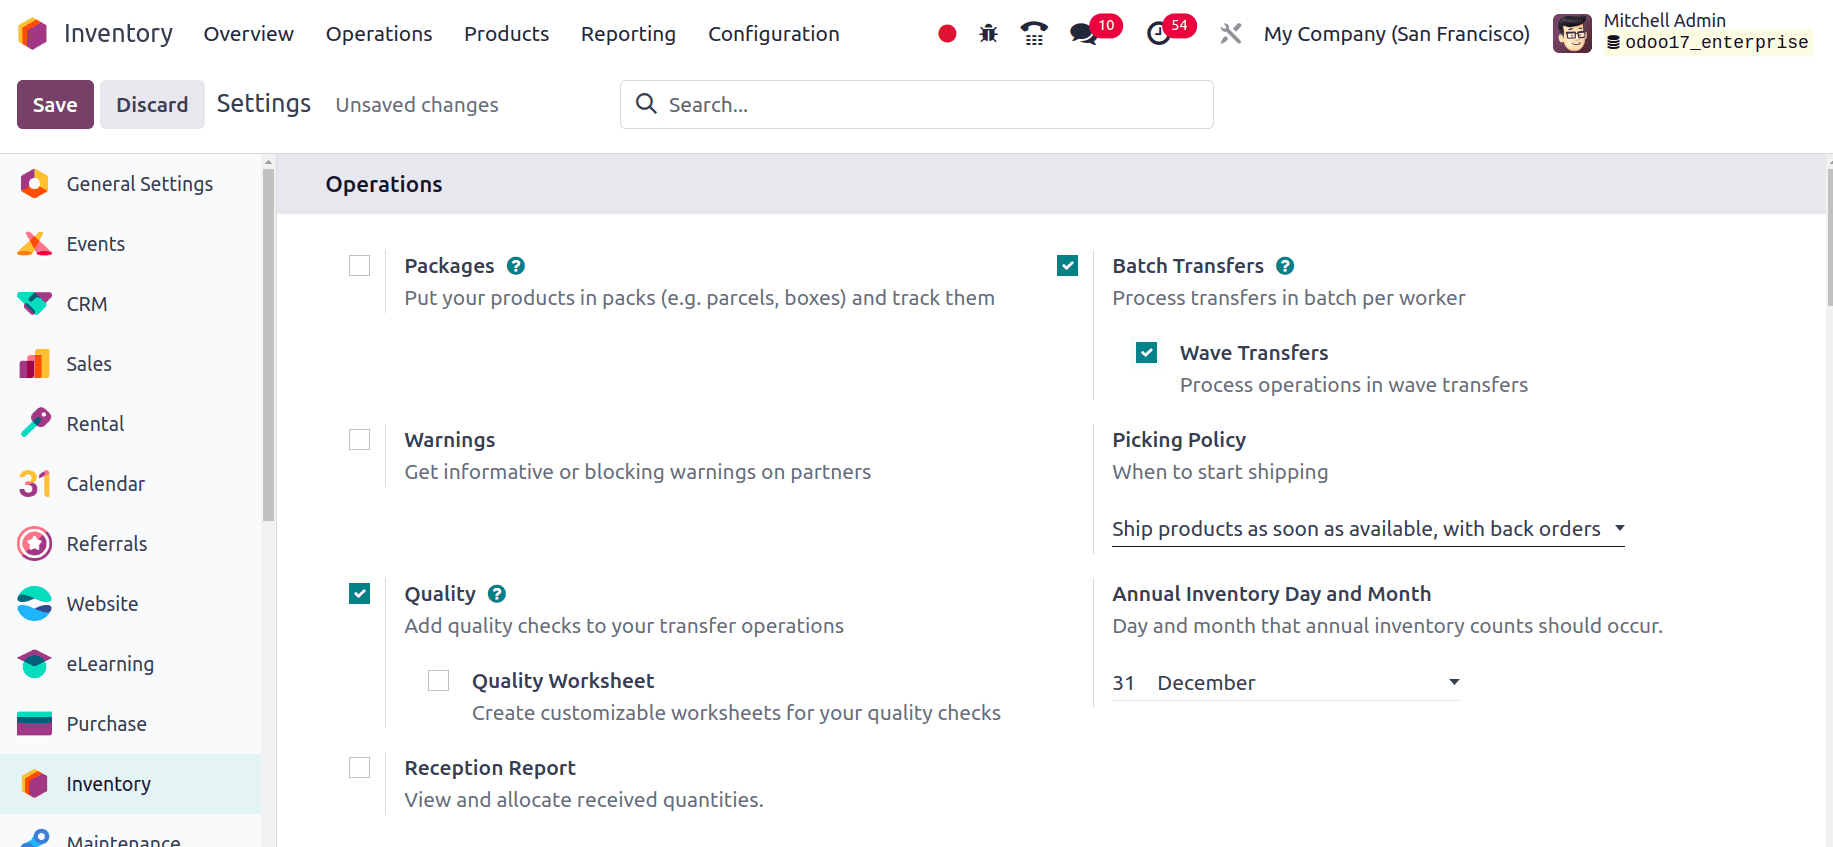
When we enable the batch transfer there appears an extra option wave transfer. After enabling the batch transfer feature, save it. We can manually create batch transfers by moving to the inventory application and going to the operations menu. Click the batch transfer submenu.
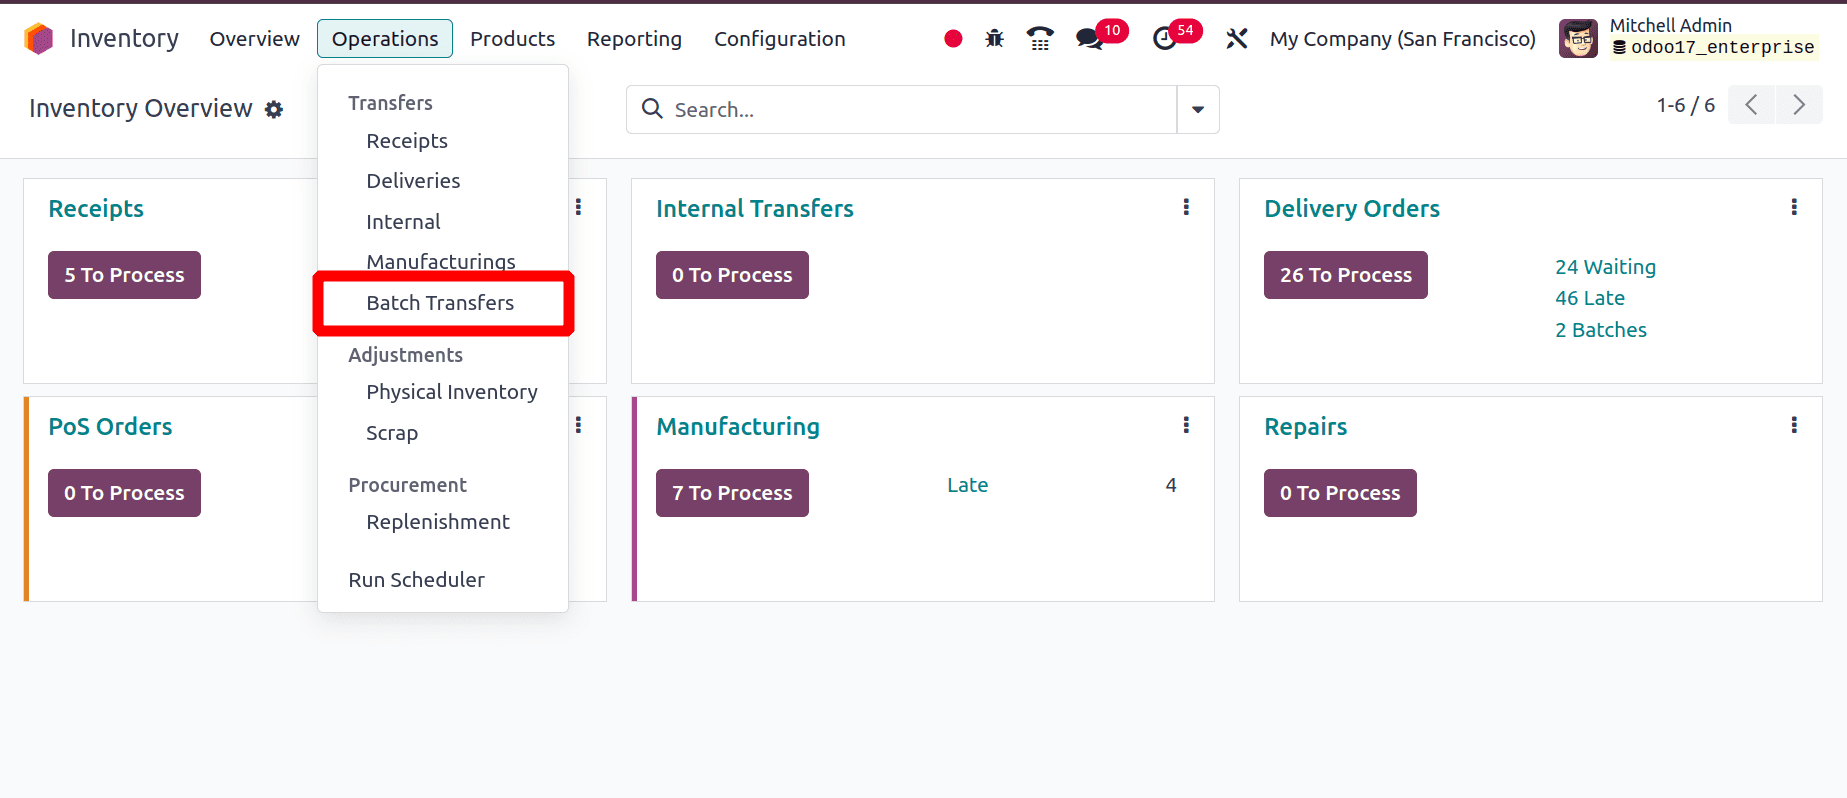
On clicking the batch transfer, we will be directed to a new page. There we can create new batches. To create new batches, click the New button.

There appears the batch transfer form. In that form, there are different fields to fill.
* Responsible: which is the employee responsible for the picking? Leave blank if there is no specific employee assigned.
* Operation type: select the Operation for which these batch transfers are categorized.
* Scheduled date: Scheduled date for processing the transfers. Leave blank if there is no need to set a specific date.
Under the transfer tab, there is an option to add operations to batches. Click the add a line option and there appears a popup window with a list of operations. Select the operations that we want to add to the batch.
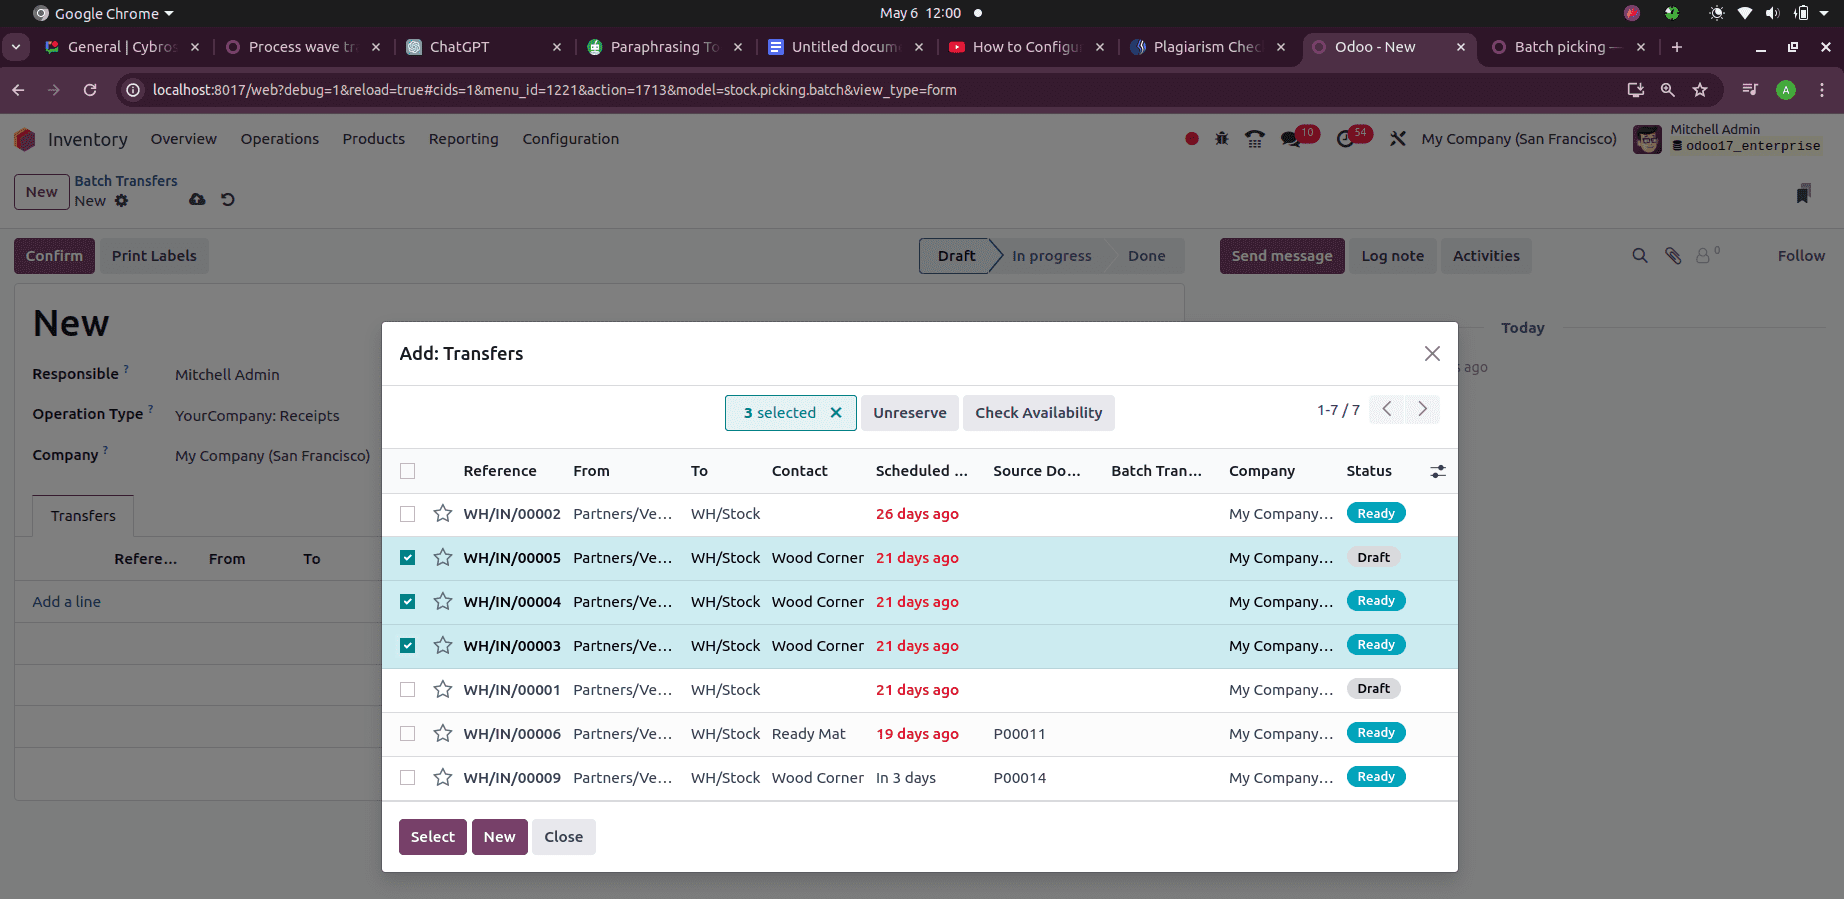
After the operations have been selected click the select button and then the selected data will be in the batch transfer’s form.
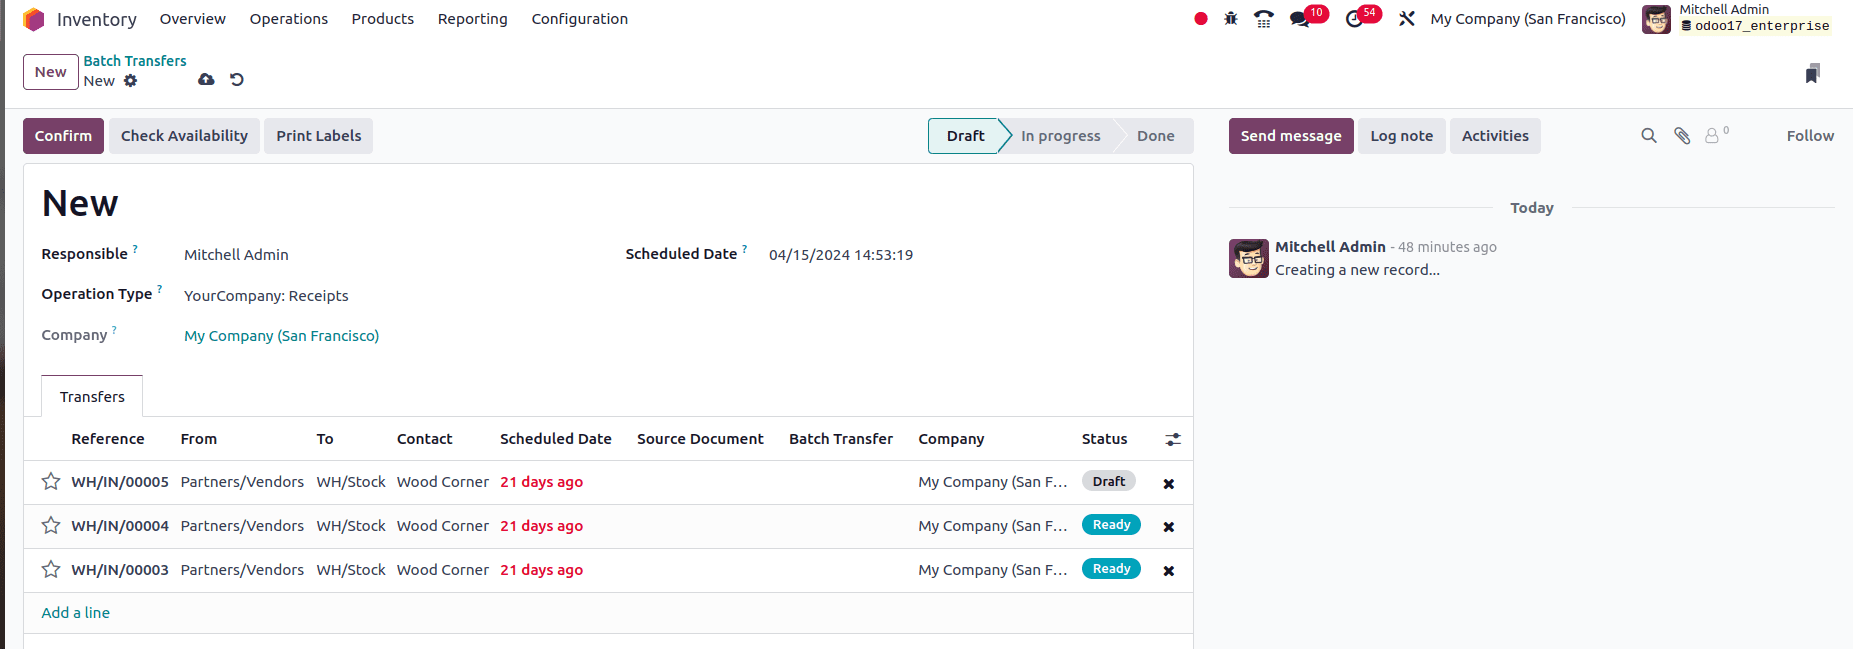
Then we can click the Check Availability button and if all the items are available those operations in the draft state also will be converted to the ready state.
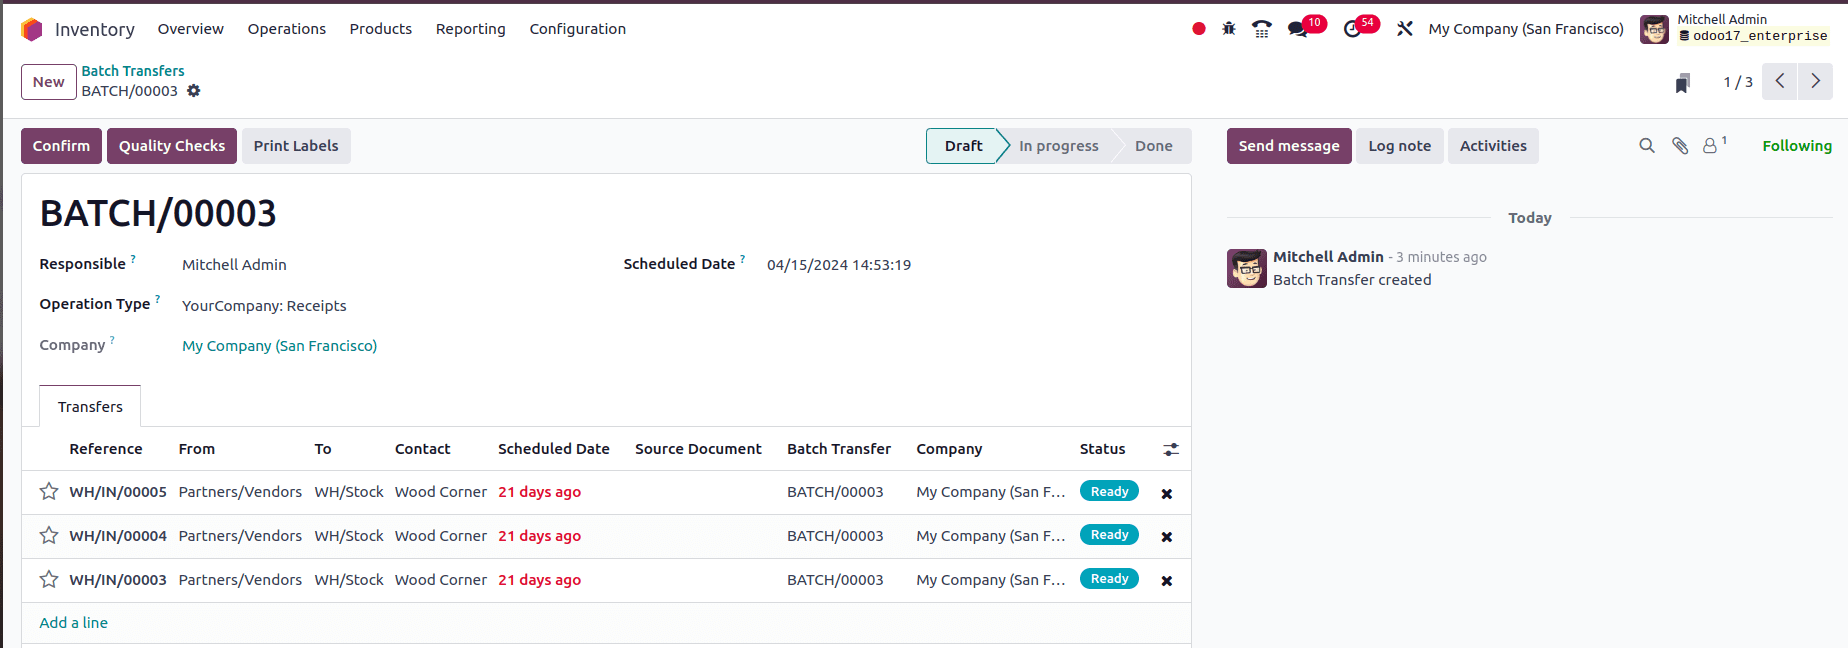
Next, we have the option for quality checks. If we want to check the quality of items in the batch click the Quality check button and make the quality check. Then click the confirm button to confirm the batch transfer and the state of the batch will be “in progress”. Click the validate button to validate the batch transfer and the state of the transfer will be in the done state.
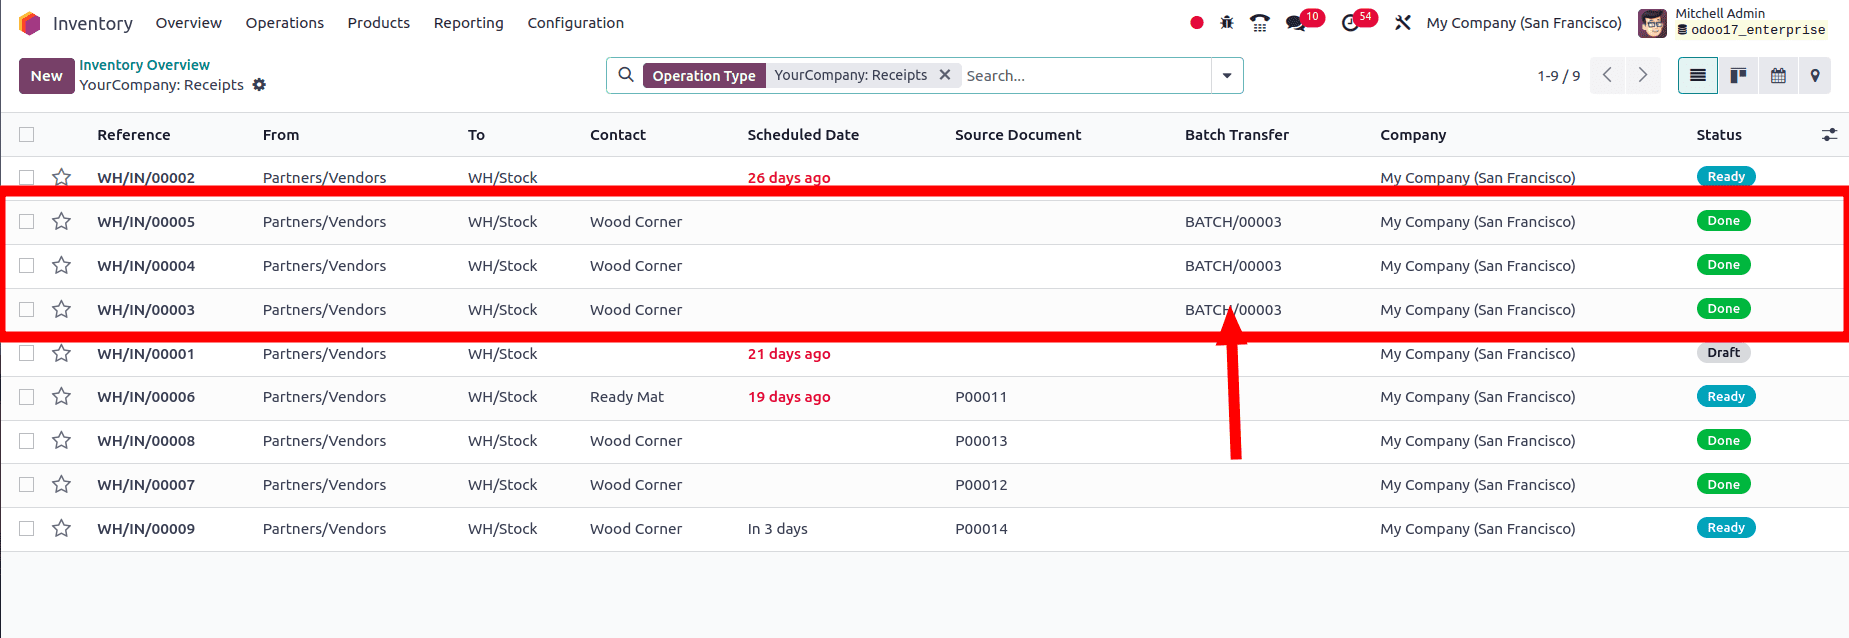
In the above screenshot, when we go to the list view of the operations, all the operations that we have batched are now in a done state and we can see, which batch these operations belonged to under the batch transfer column.
We can also conduct wave transfer operations by selecting the operations from the list of operations. Go to the dashboard of the inventory module and choose any of the operations and we get a list view of the chosen operations. Here we chose receipt operation and selected some of the receipts in different stages from the list and clicked the Action button. There is an option “Add to batch”, click on the add to batch option.
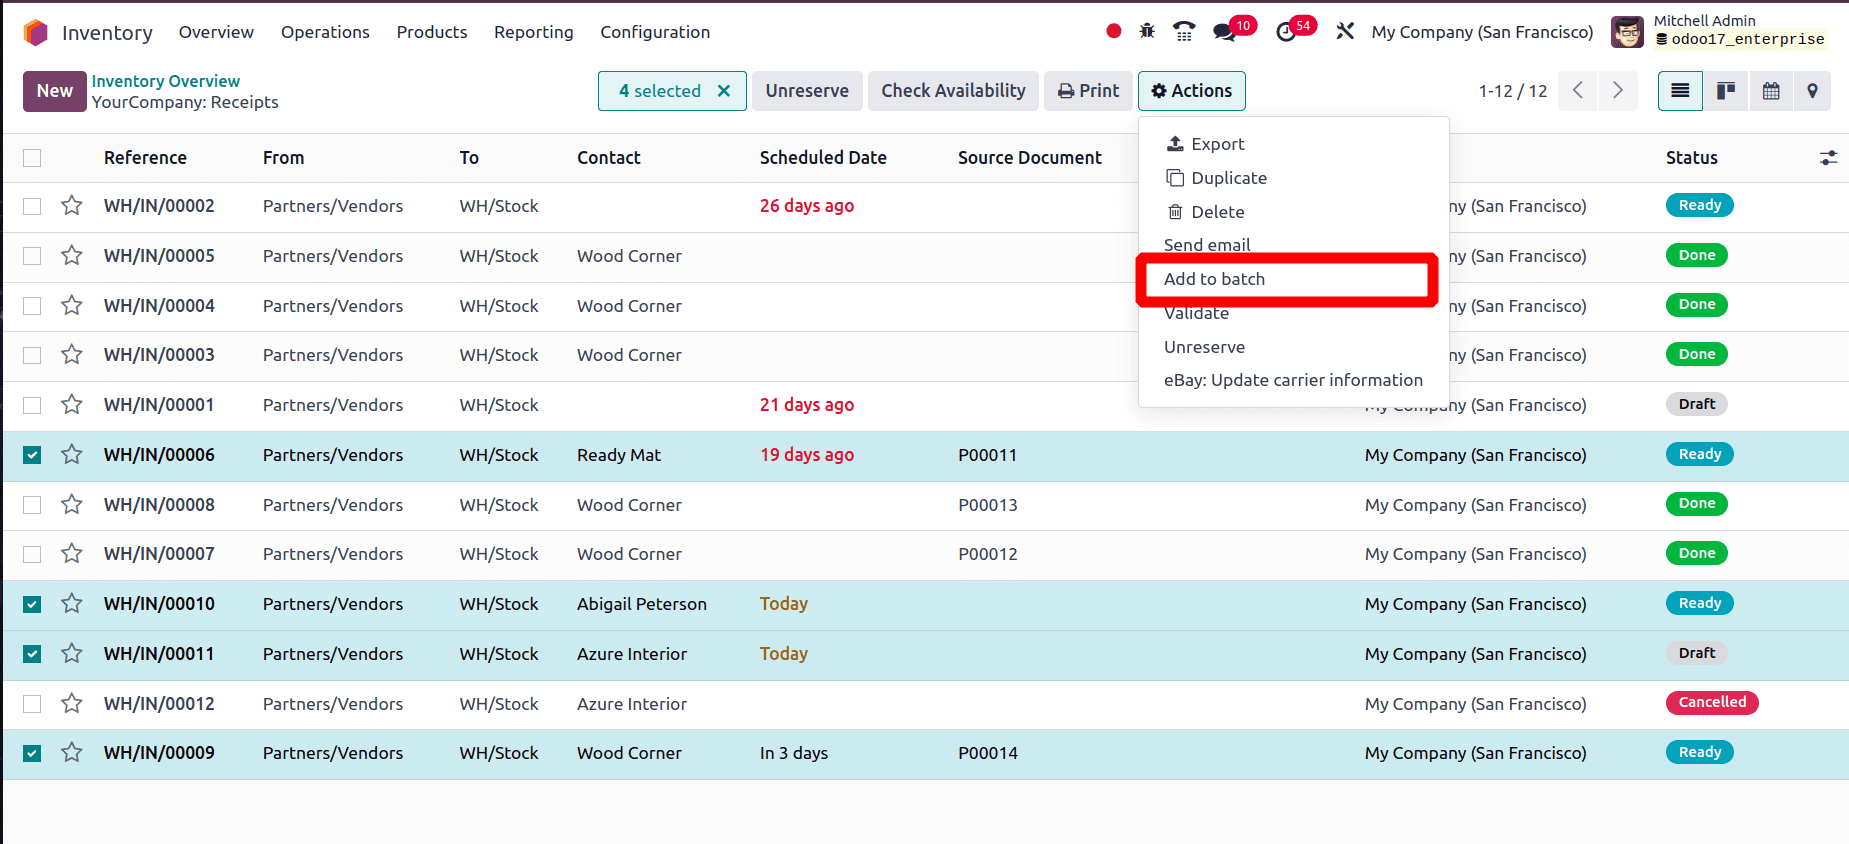
At that time, a popup window appears in which we have the option to add these selected receipts to an existing batch or we can also create a batch transfer. Choose the add a new batch option and provide a responsible person. If we want to create this batch in draft status, enable the draft option.

Click the confirm button in the popup window, and thus the new batch has been created. To see the newly created batch, go to the operation menu of the inventory tab. Then click the batch transfer sub-menu. There we can see the new batch.

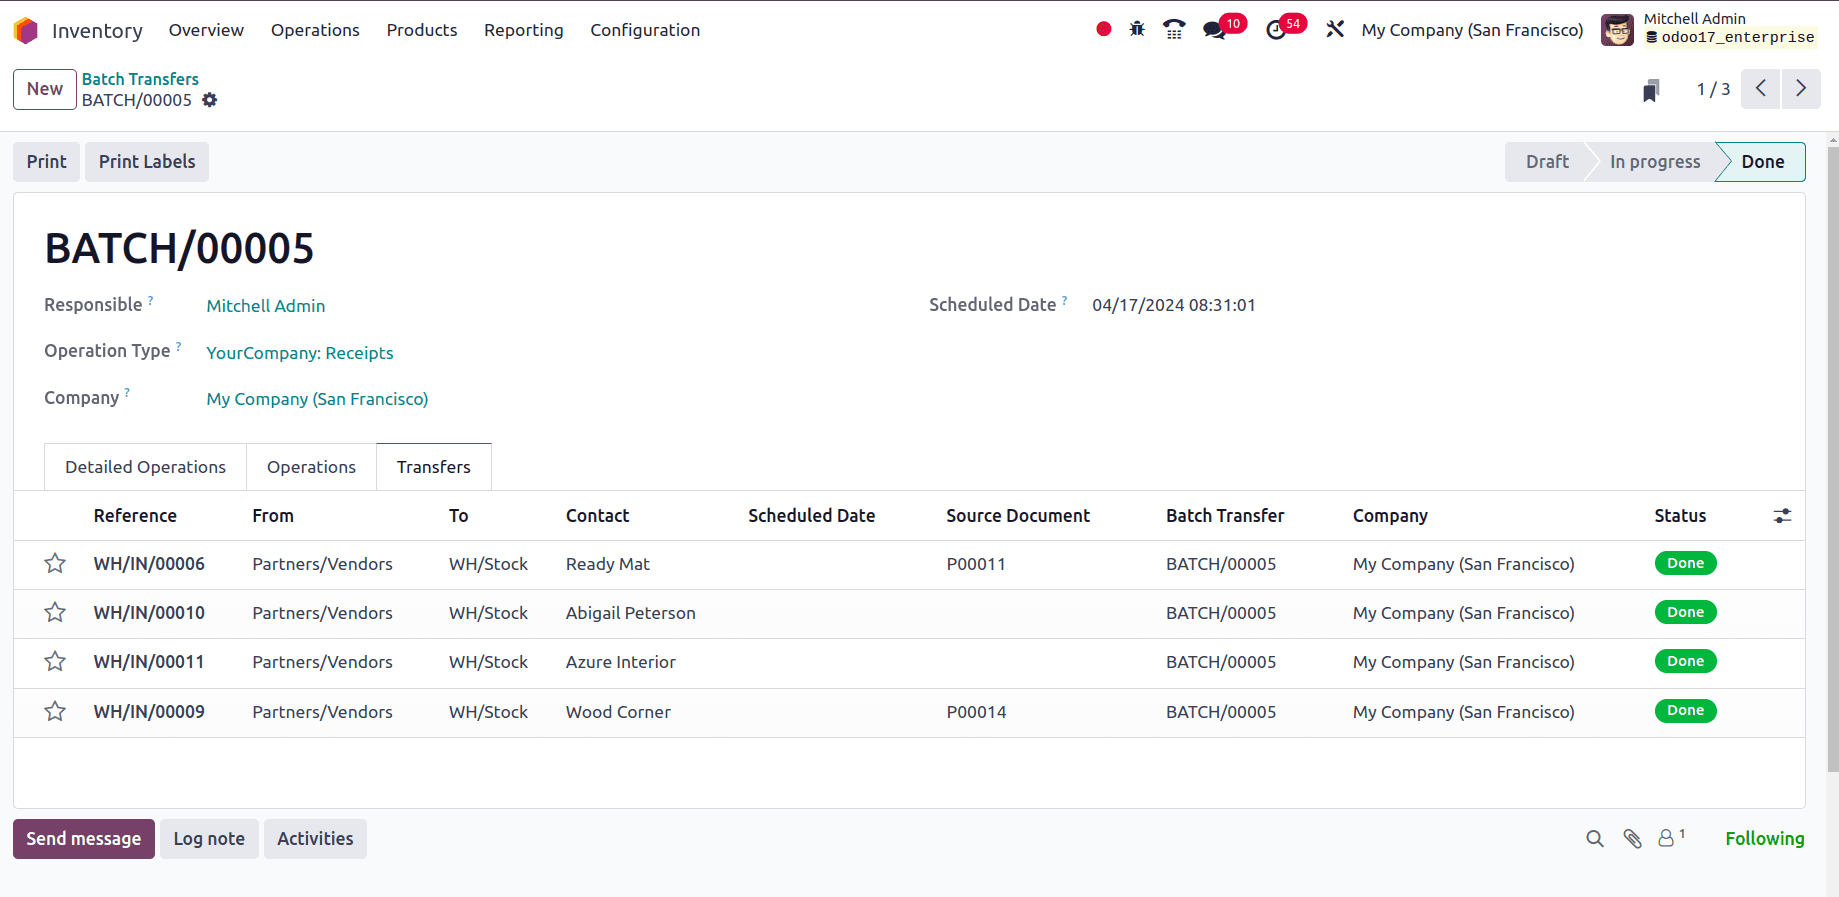
When we enter that new batch under the transfer tab we can see that the status of all the receipts is in the ‘Ready’ state. Then click the validate button to validate the batch and then the batch is in the done state.
Wave transfer in Odoo 17
Imagine that you are working in the warehouse of a textile manufacturing company. Today you have a surge of online orders, and you can see this list of multiple transfer requests like moving stock between different warehouse locations or the shipment of the item to the customer in the Odoo Inventory module. By considering factors like product location, delivery time, order priority, etc we can group those transfers and add them to wave and perform a wave transfer so that you can complete similar transfers simultaneously.
Wave transfer allows to picking of the available items from the transfers and the grouping of multiple transfers together processes them into a single unit. Multiple wave transfer can also be converted to a batch transfer. Here we are going to create a wave transfer with delivery orders.
For creating the wave transfers, go to the dashboard of the inventory module and from the dashboard choose any one operation. Here we are choosing delivery orders. When we click on the delivery orders, we get the list view of all delivery orders. Select the delivery orders that we want to include in the wave transfer.
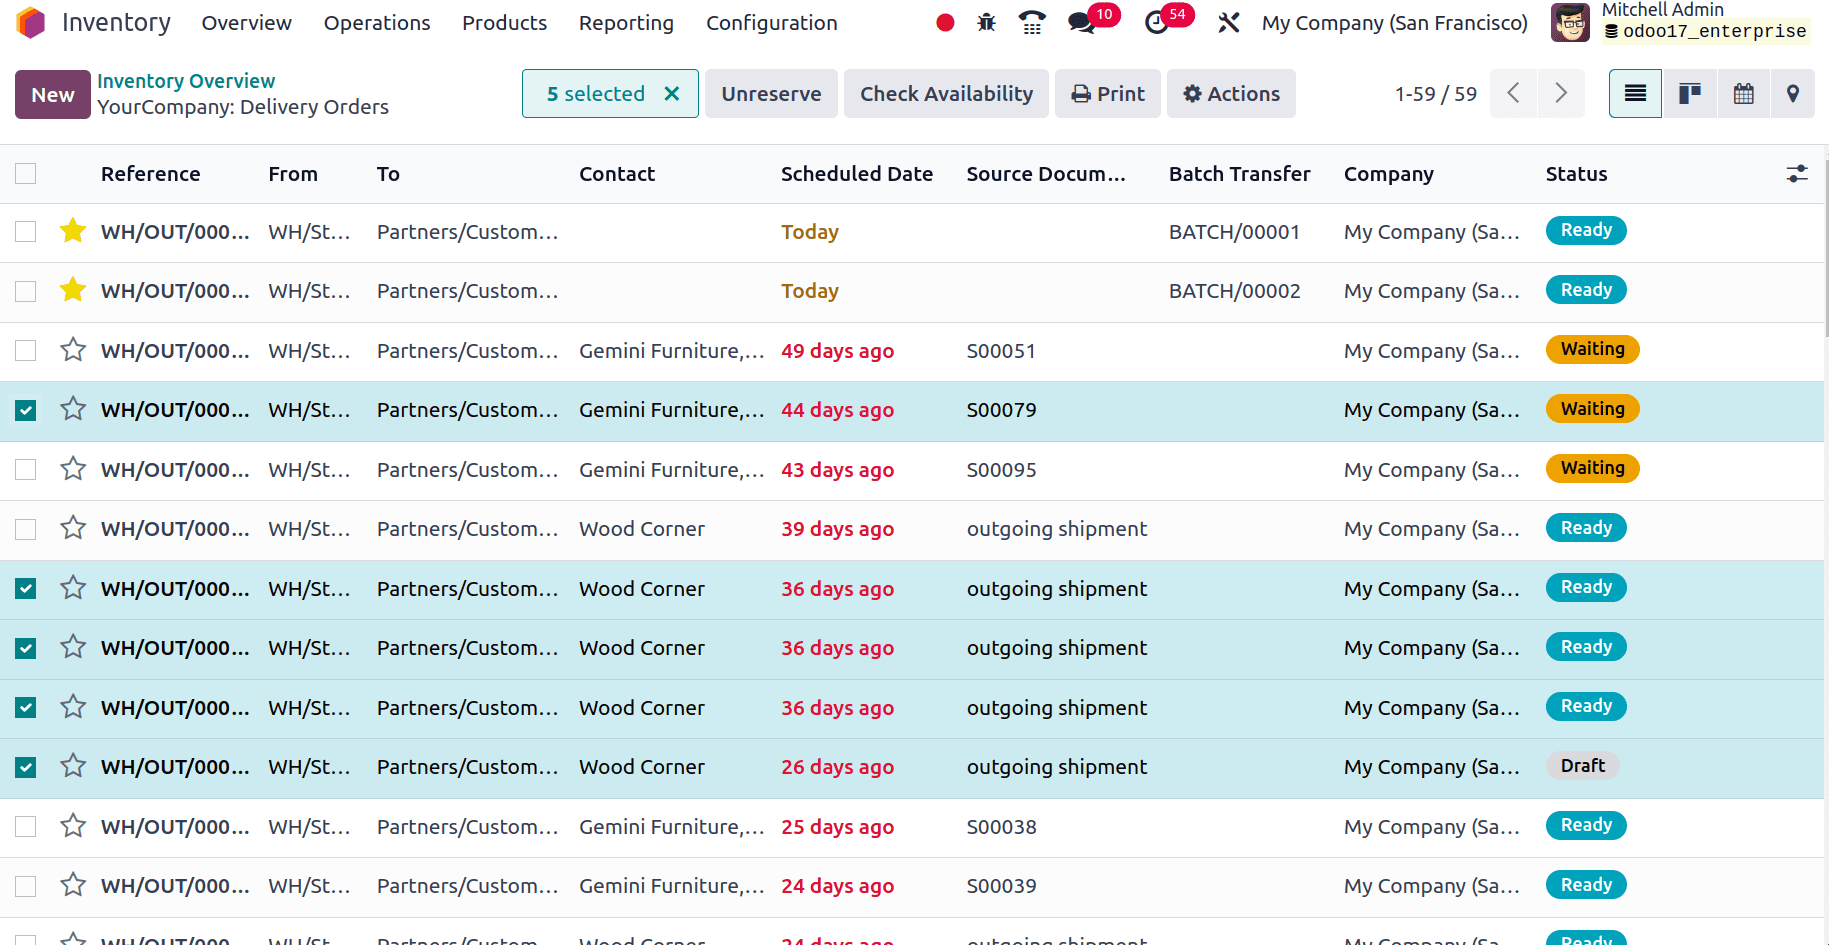
From the screenshot, we can see that we have selected five deliveries in which one of them is in draft state and another is in waiting state. But in wave transfer only the operations in the ’Ready’ state can be included in the wave, all others are neglected. So when the deliveries are selected click the action button and find the option “Add to wave”. Click add to wave option
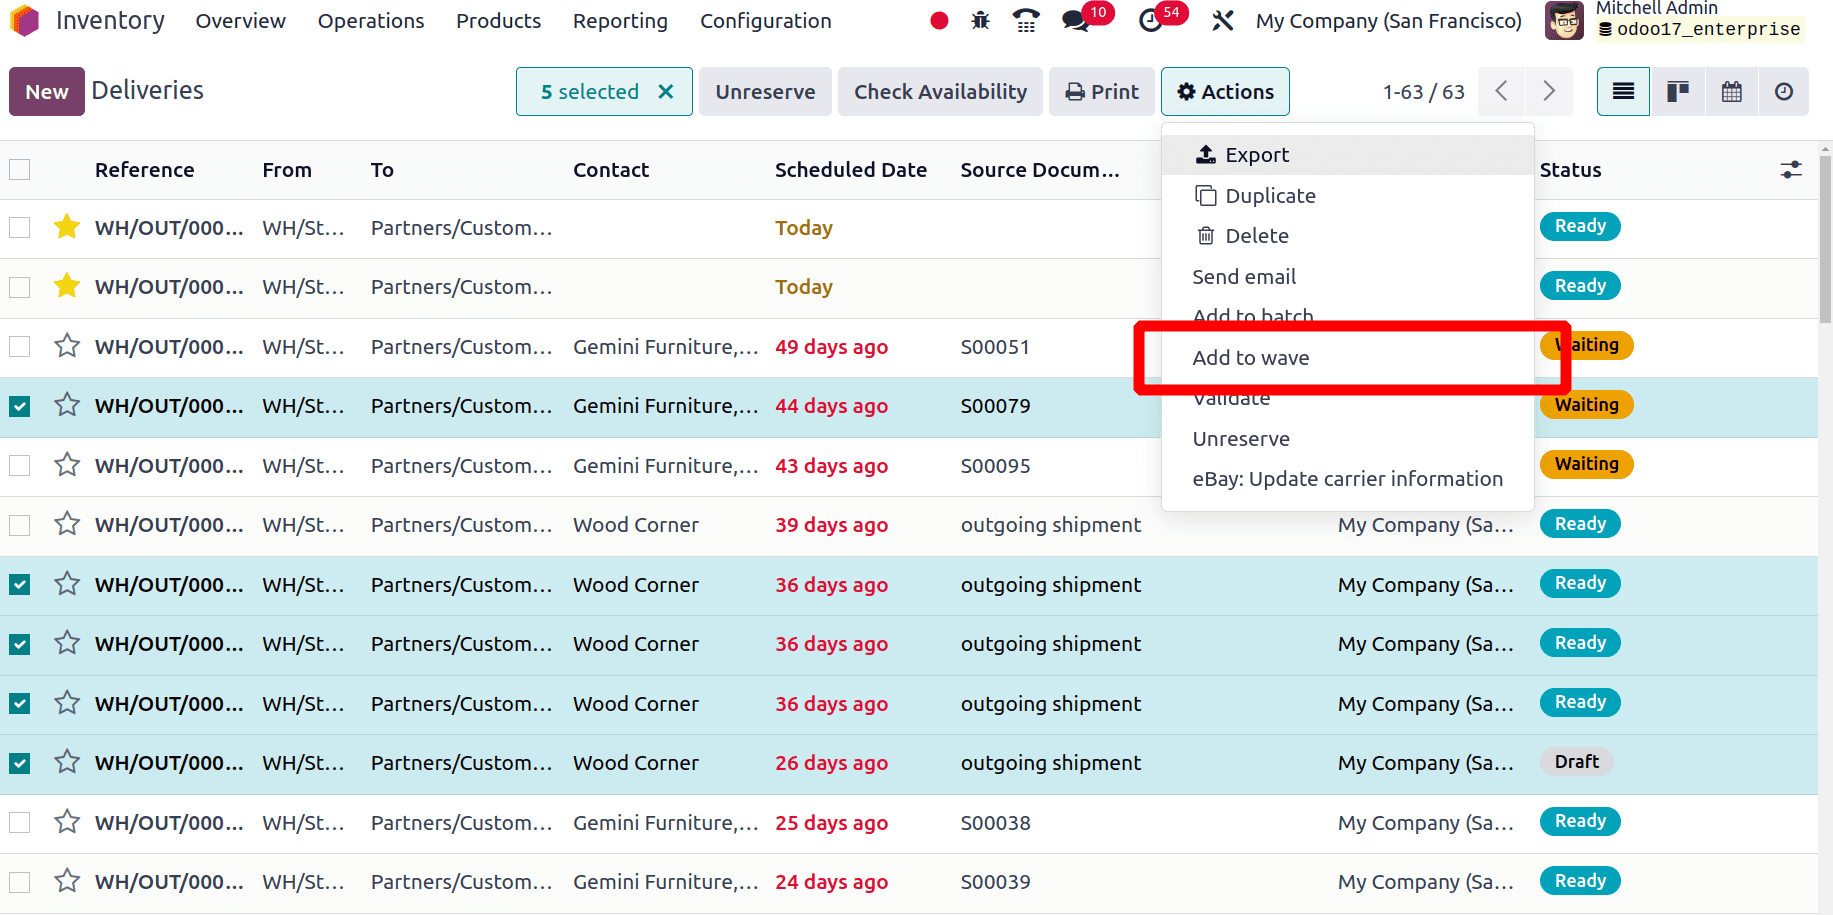
When we click on the add to wave option, a popup window occurs and in that popup, we can add these selected deliveries to an existing wave transfer or to a new wave. We can also provide a responsible person for this wave transfer.

Click the Confirm button in the popup window, at that time a new popup appears in which we can see the delivery orders which we are allowed to include in the wave transfer. That is as we already said, the delivery orders which are under draft state and waiting for state will be neglected.

From the list of deliveries in the popup if we want to exclude any delivery it also can be done in this popup window. Select the transfers and click the Add to Wave button. Thus the new wave transfer has been created, and we can see this wave transfer by clicking the operations tab of the inventory module. There we can find an option, “wave transfer”.
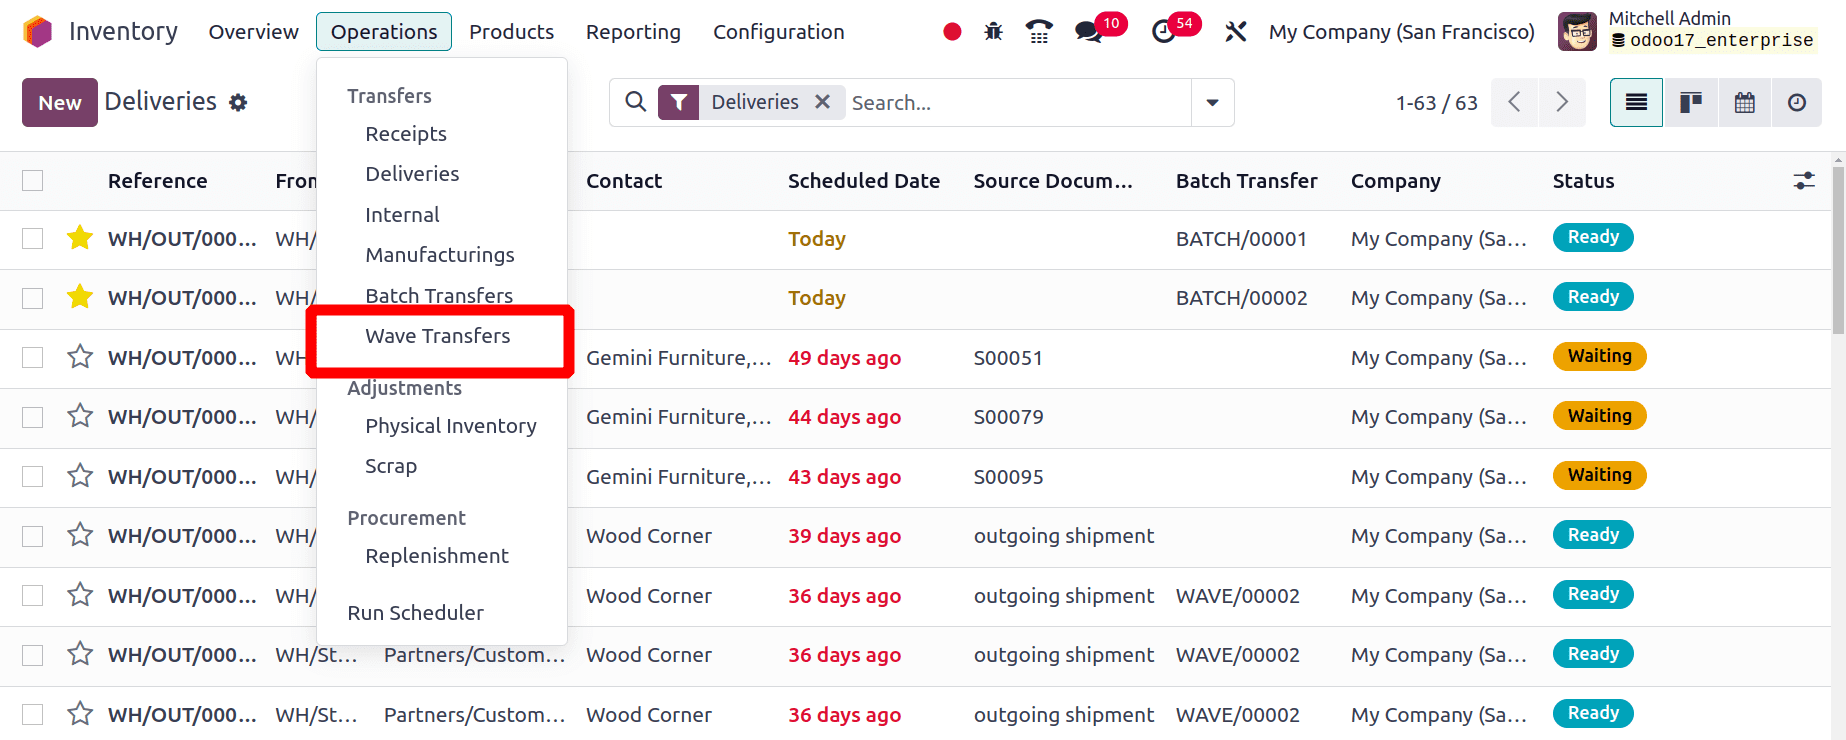
Click the wave transfer and then we can see all the wave transfers that are already configured.

Choose the transfer and click the validate button in the form to validate the wave transfer.
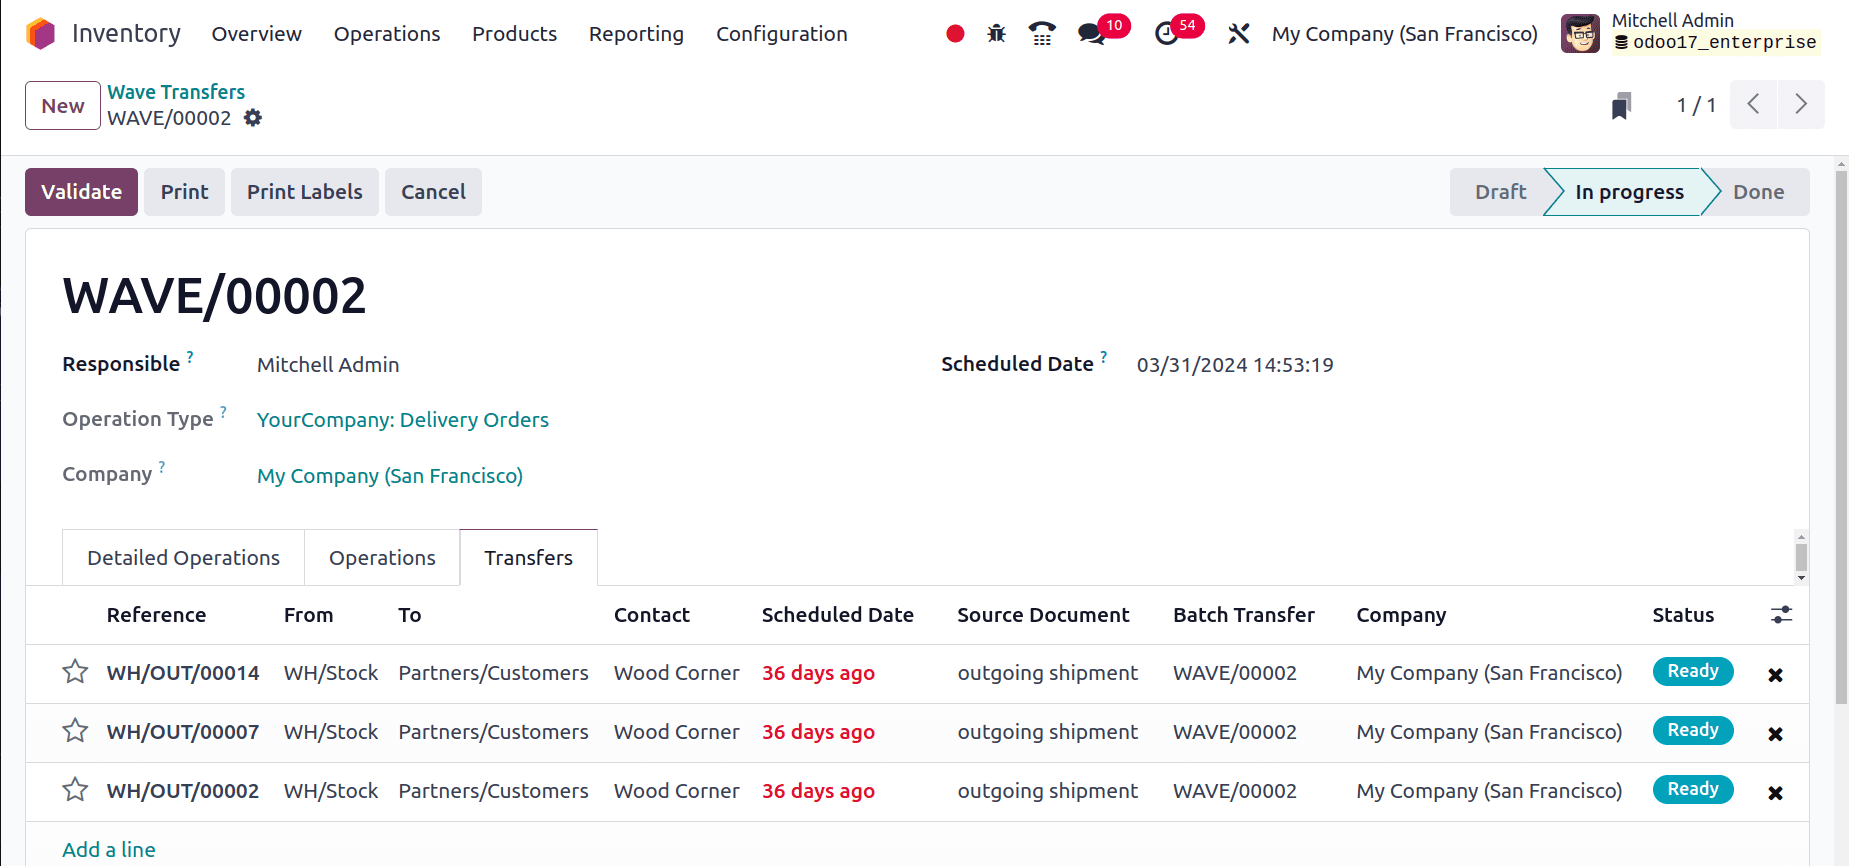
When the transfer has been validated the status of all the transfers will get changed to the done state.
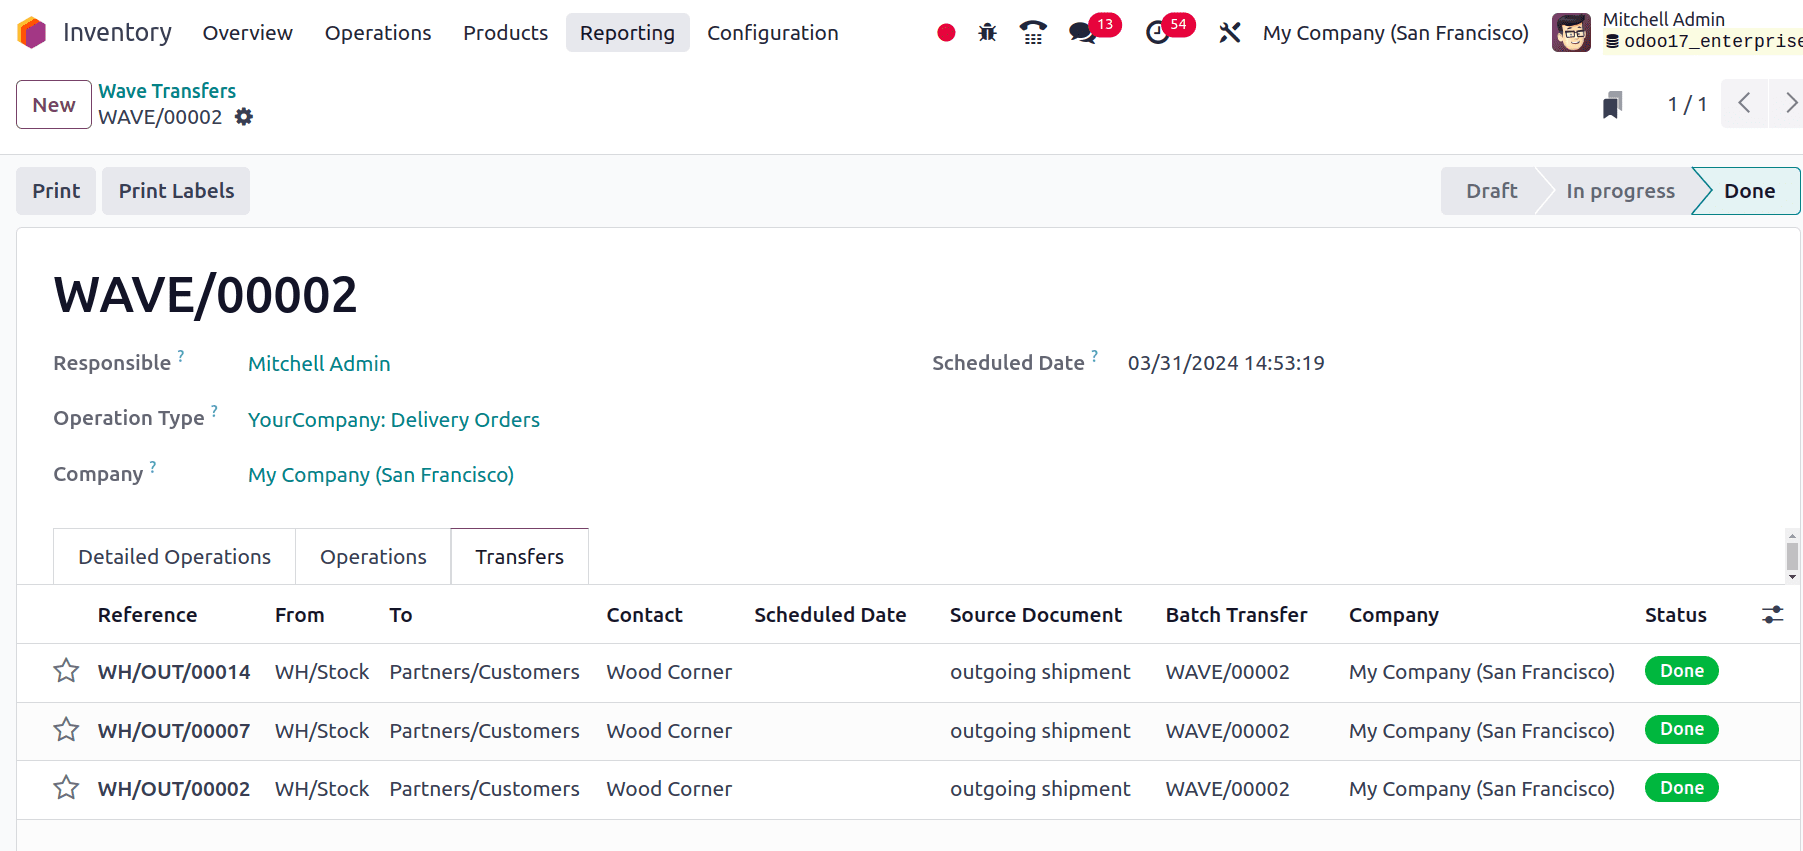
Here, we have successfully configured a wave transfer for delivery orders.
Cluster picking in Odoo 17
Cluster picking is one of the advanced order fulfillment approaches which is derived from batch picking. Here pickers use this tactic to load a cart with several products, in which everyone is assigned to a certain sales order. Then the picker visits every storage location and promptly packs the products into the corresponding order package.
Given that it removes the requirement for product sorting into packages for consumers after selection, this strategy works best for medium-sized businesses with high order volumes and few unique products.
Cluster picking does, however, come with several drawbacks. For example, it is not possible to prioritize urgent orders, and batches must be manually optimized before proceeding. Bottlenecks may arise from the selection procedure as a result.
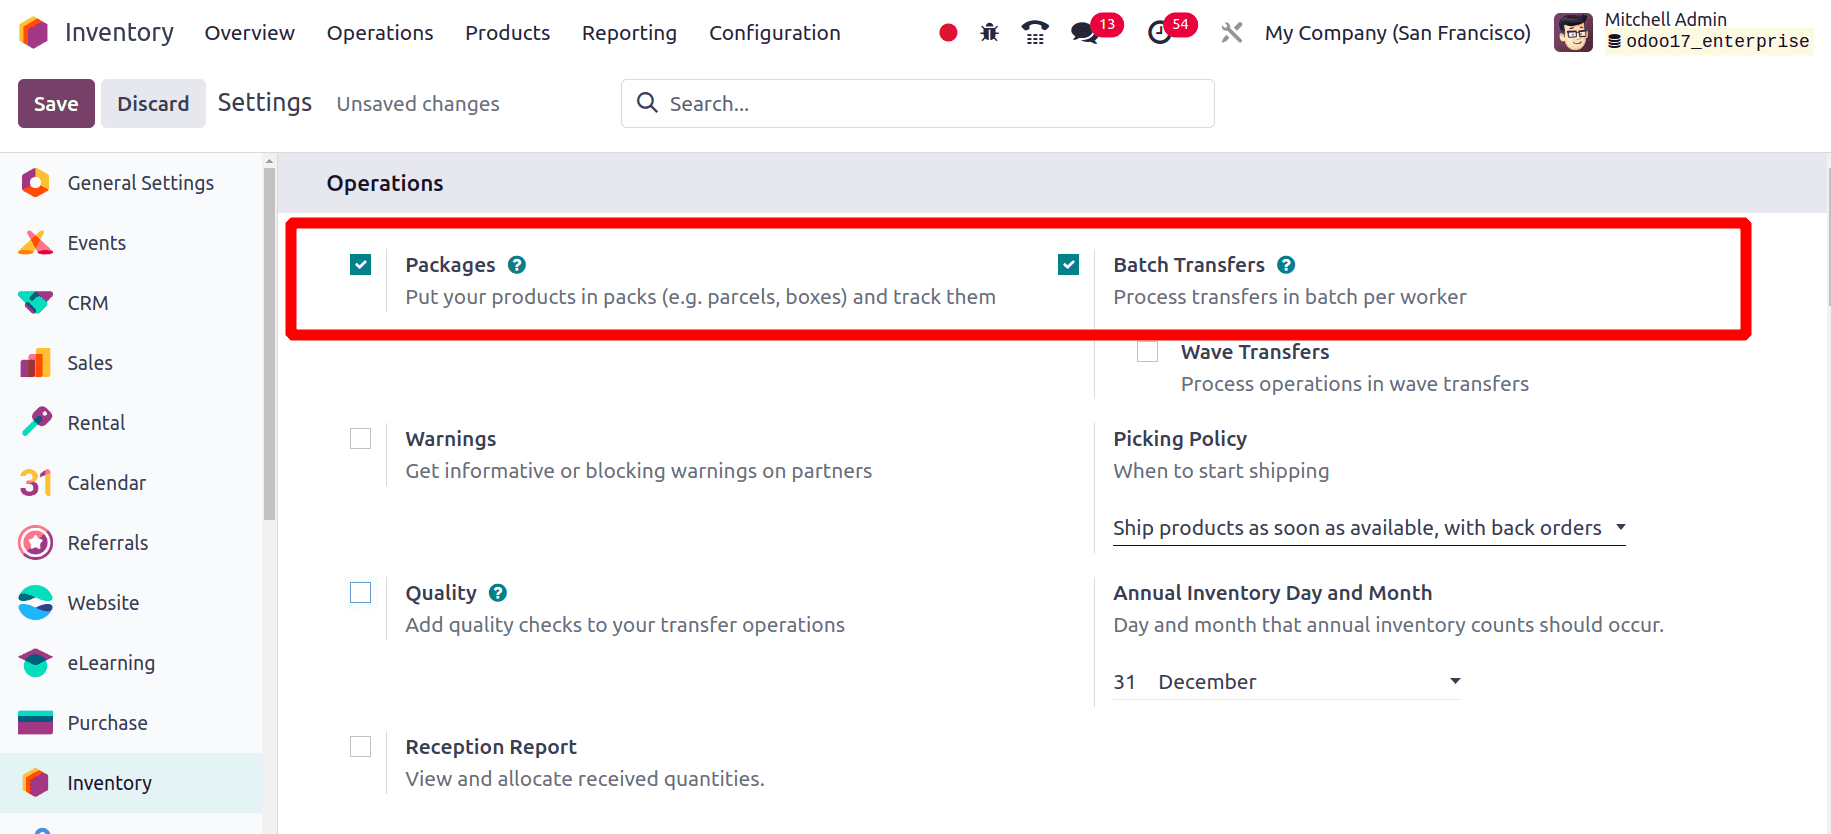
To activate cluster picking, go to the inventory module and click on the configuration settings. Under the operations section, enable packages and batch transfer options. Packages let us manage our cluster and cluster picking is derived from batch picking, so we have enabled batch transfer.
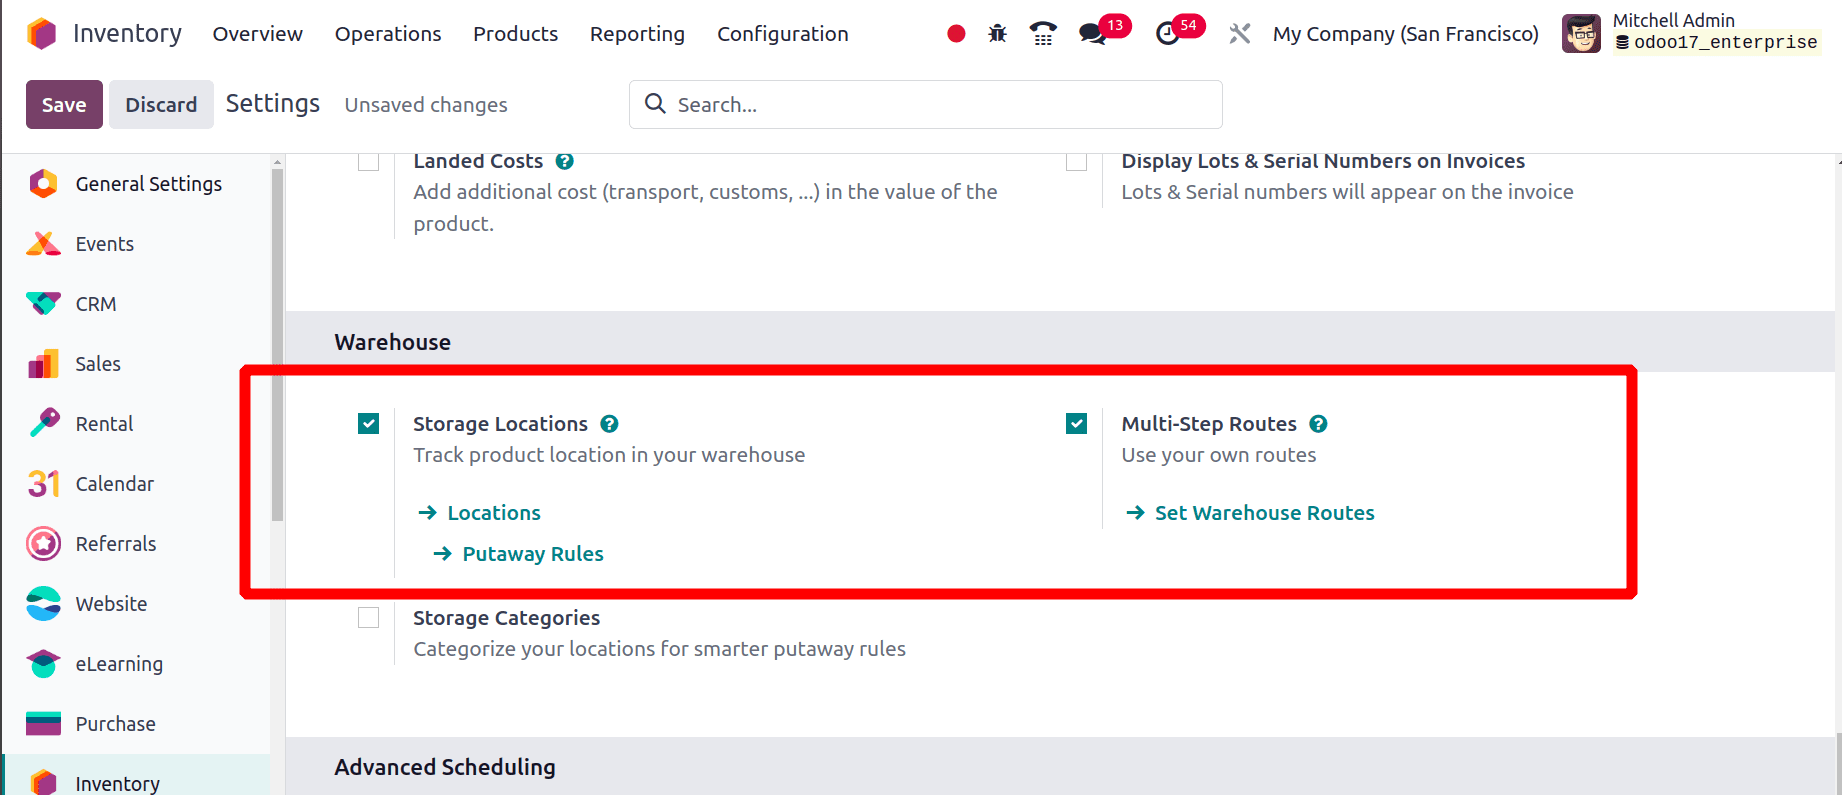
Then the next step is to enable the multi-step route and the storage location so that the picking operation is optimized. For that go to the operation section in the configuration settings. Under the warehouse option enable ‘Storage Locations’ and ‘Multi-step Routes’. Storage location lets us manage different locations for different products and multi-step routes manage with routes while shipping the products to the customer.
We want to store different products in different locations, so we want to create different locations for that. Go to the ‘Configuration’ menu and click the ‘Locations’ sub-menu. From there by clicking the new button, we can configure new locations.
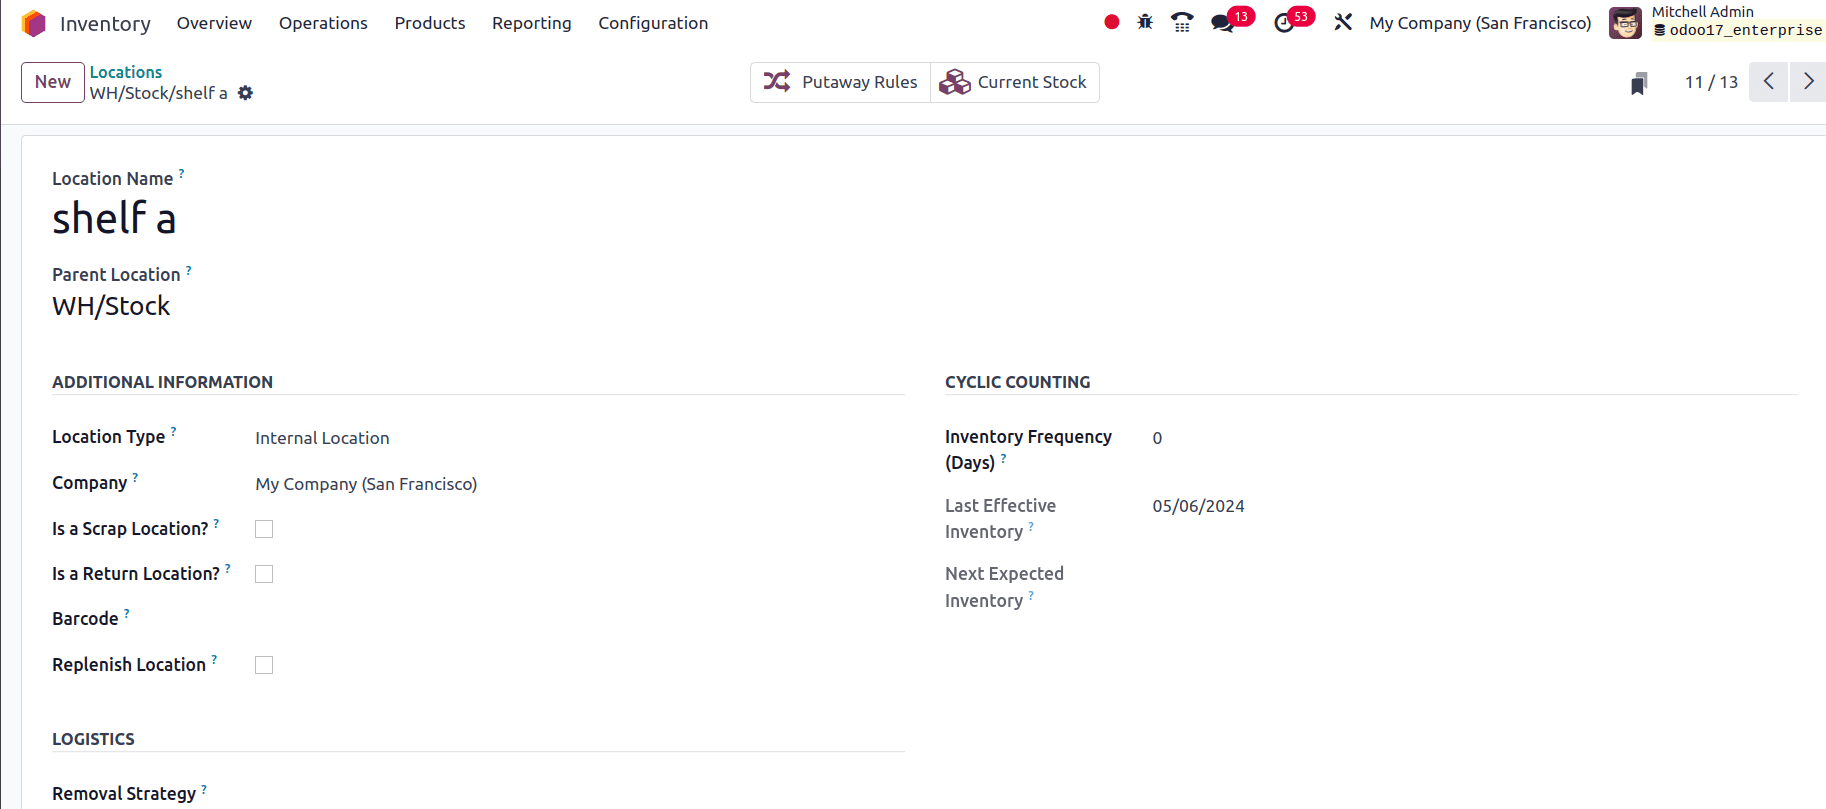
Similarly, here we have created locations ‘shelf a’, ‘shelf b’, and ‘shelf c’. Then we can consider some products to process the cluster picking. First, click the ‘Products’ menu and then the ‘Products’ sub-menu from the inventory application and configure three different products there.
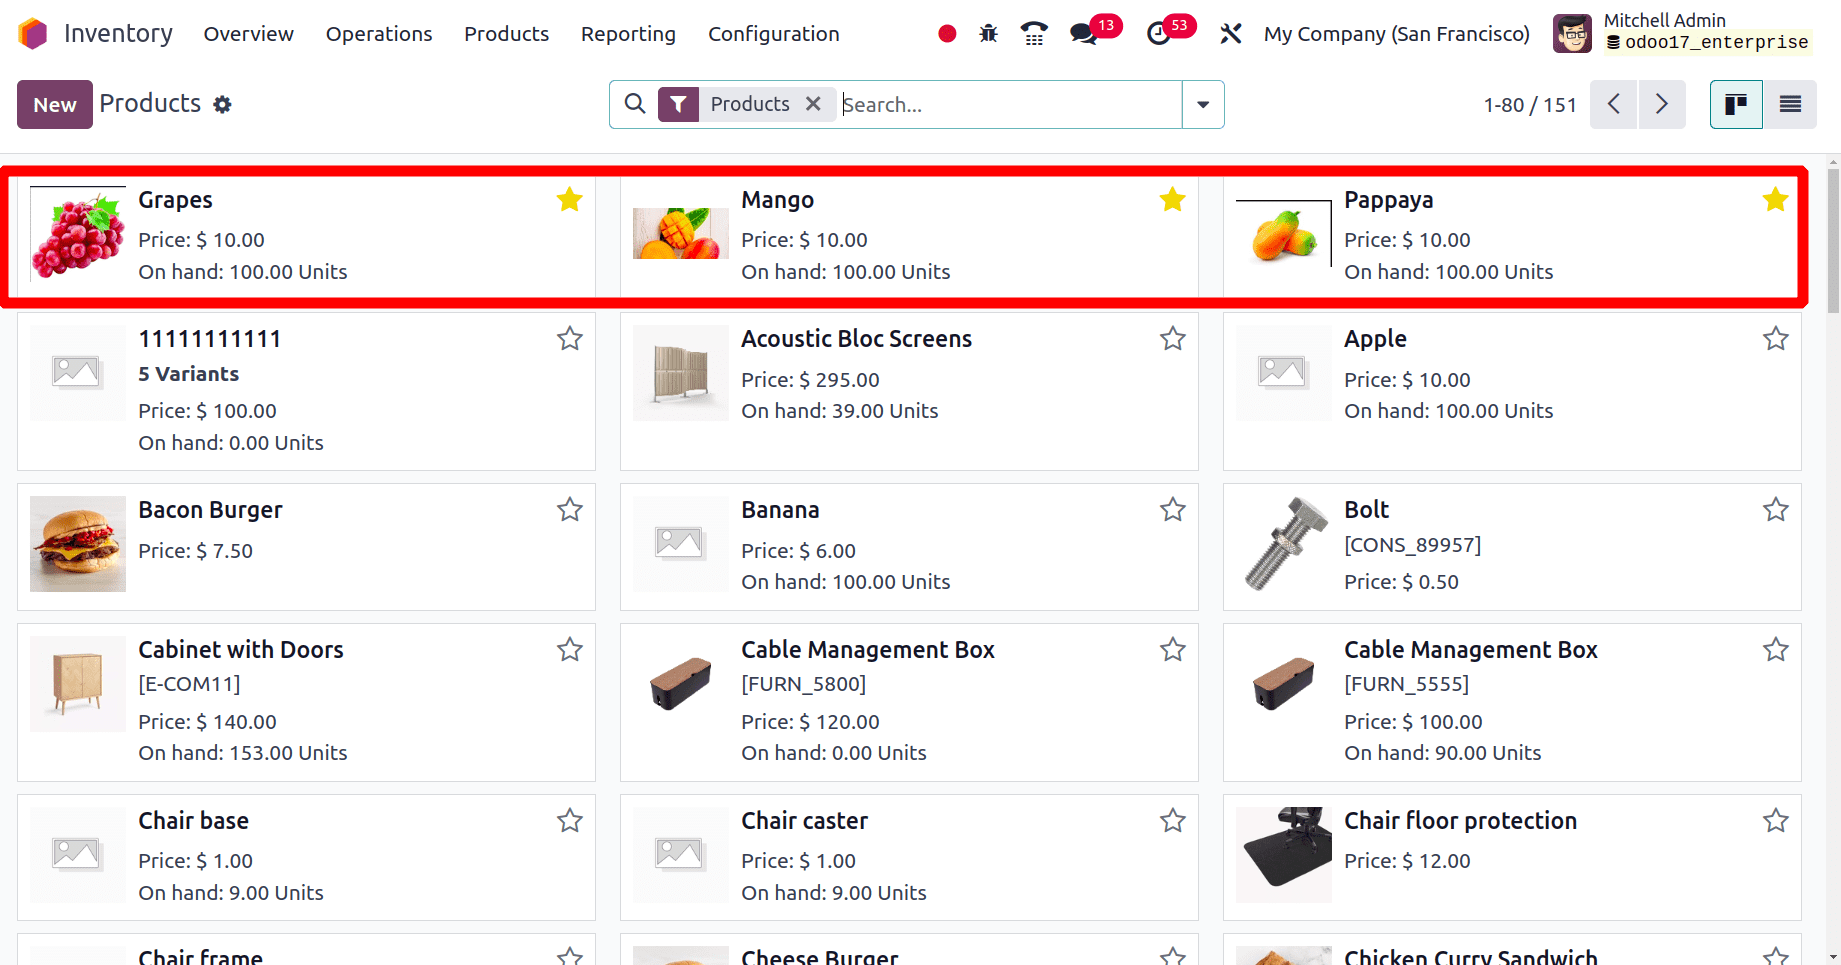
Here we have configured three different products and stored these three products in three different warehouses. Similarly to the screenshot below the other two products are stored on ‘shelf b’ and ‘shelf c’.

Then to perform the cluster picking, we can just move to the ‘Product’ menu, click the packages sub-menu, configure three packages as shown below, and set package use as a ‘reusable box’.
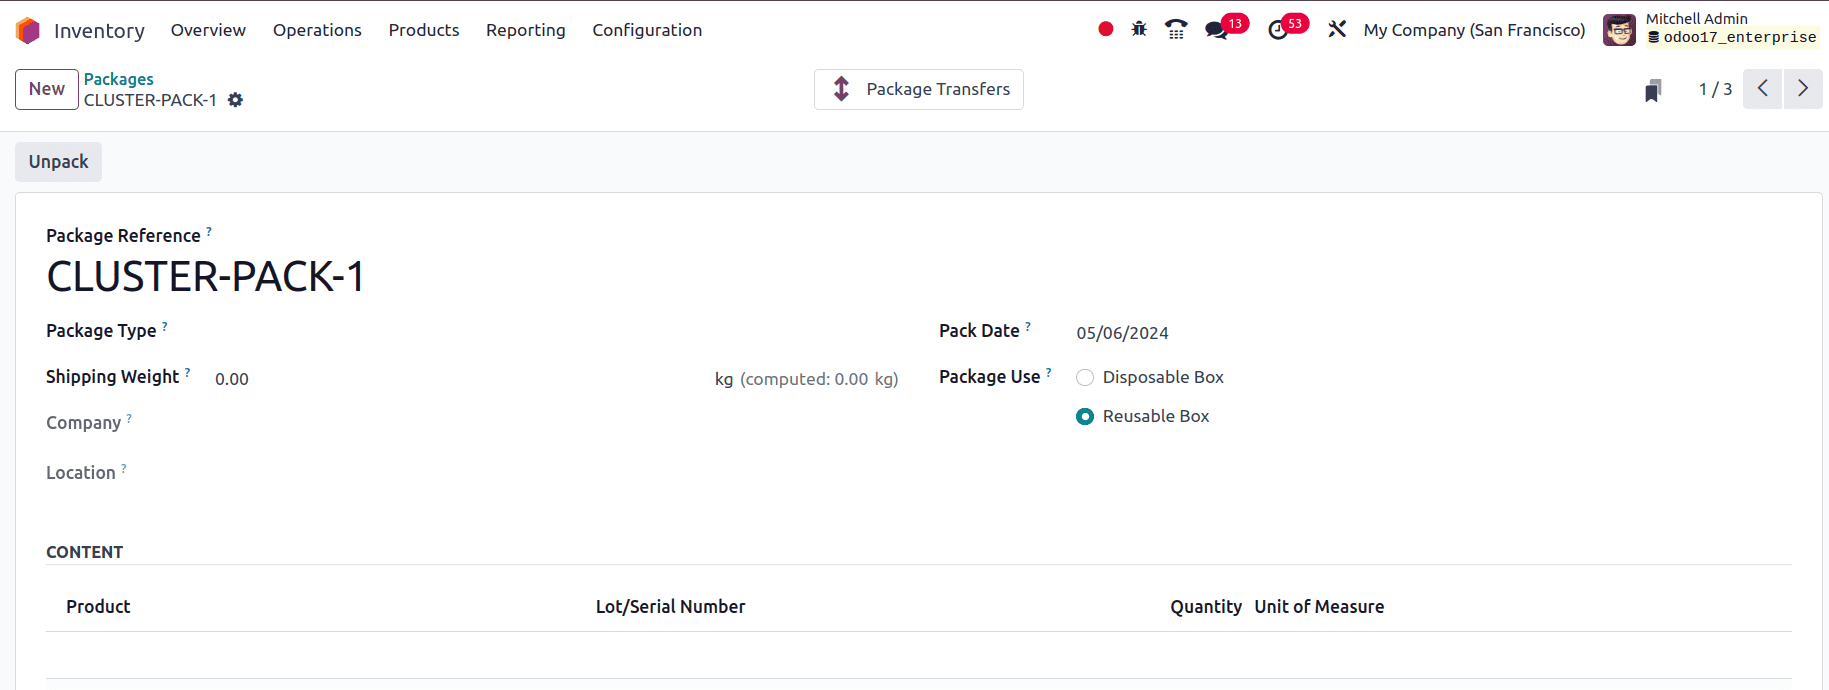
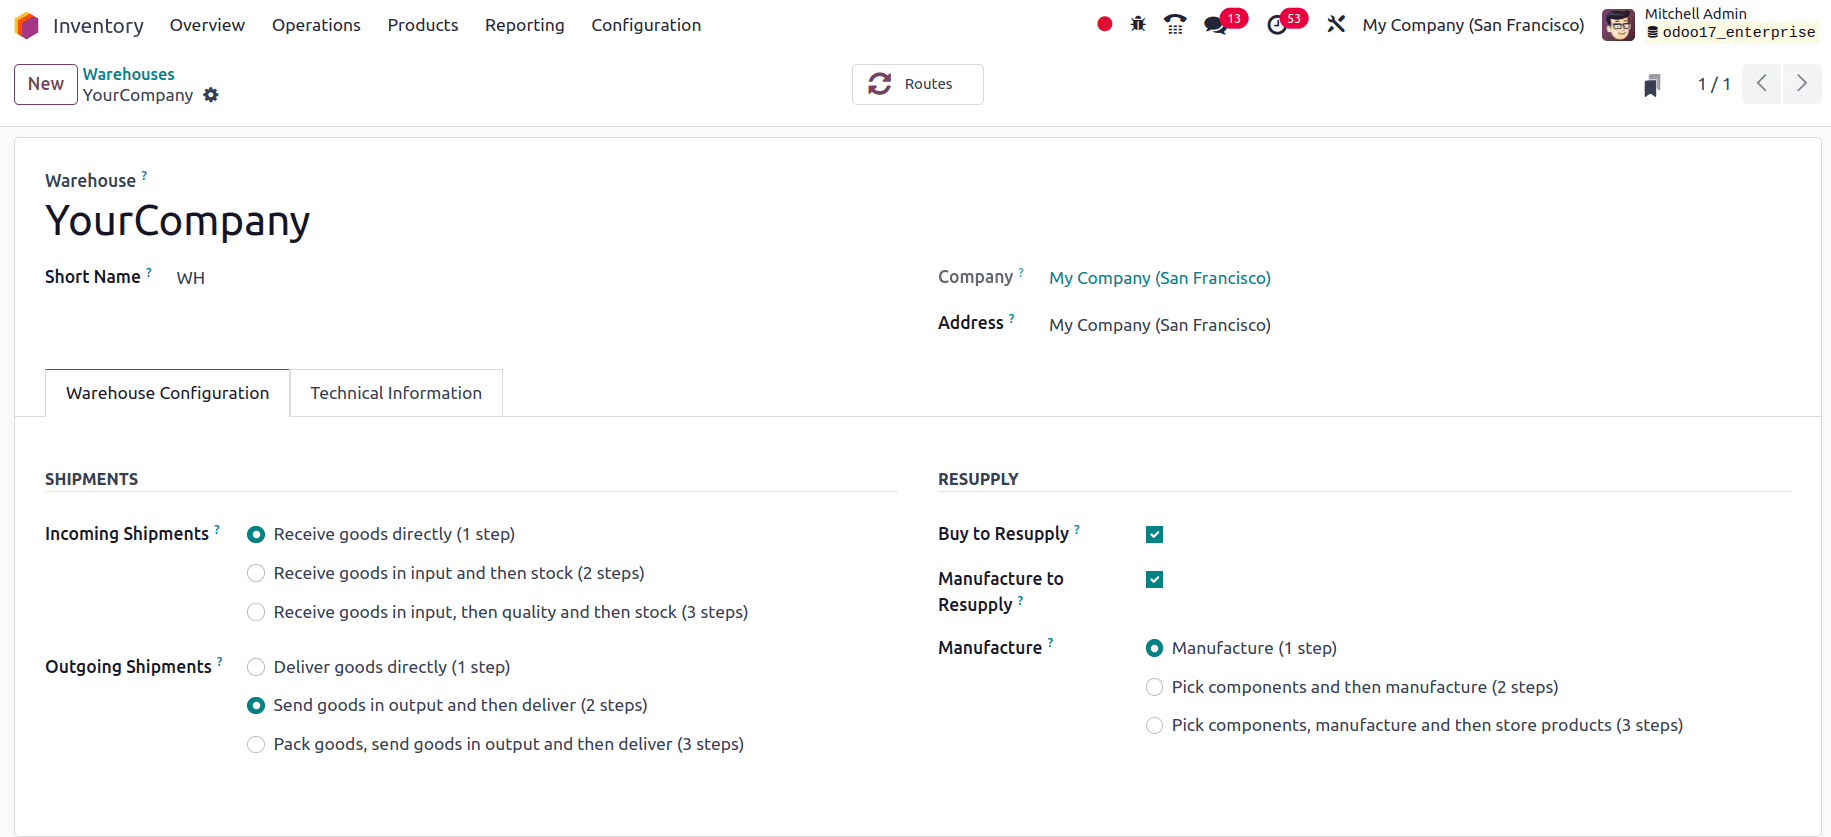
Similar to the above screenshot, we can configure ‘cluster pack 2’. Then we want to consider the warehouse. Here, we want to manage the routes. So in the outgoing shipment process, the shipper will move to different locations and pick up the items in the cart and once the picking is done it will be delivered to the customer. For that, we can choose the outgoing shipment in two steps. To set up the shipment, go to the ’Configuration’ menu, click the ‘Warehouse’, and select ‘Outgoing Shipments’ in 2 steps.
Now, we can see how cluster picking is performed in Odoo. We can move to the sales application in Odoo. Create a sale order for any of the two products that we have newly configured. Then, confirm the sale order.
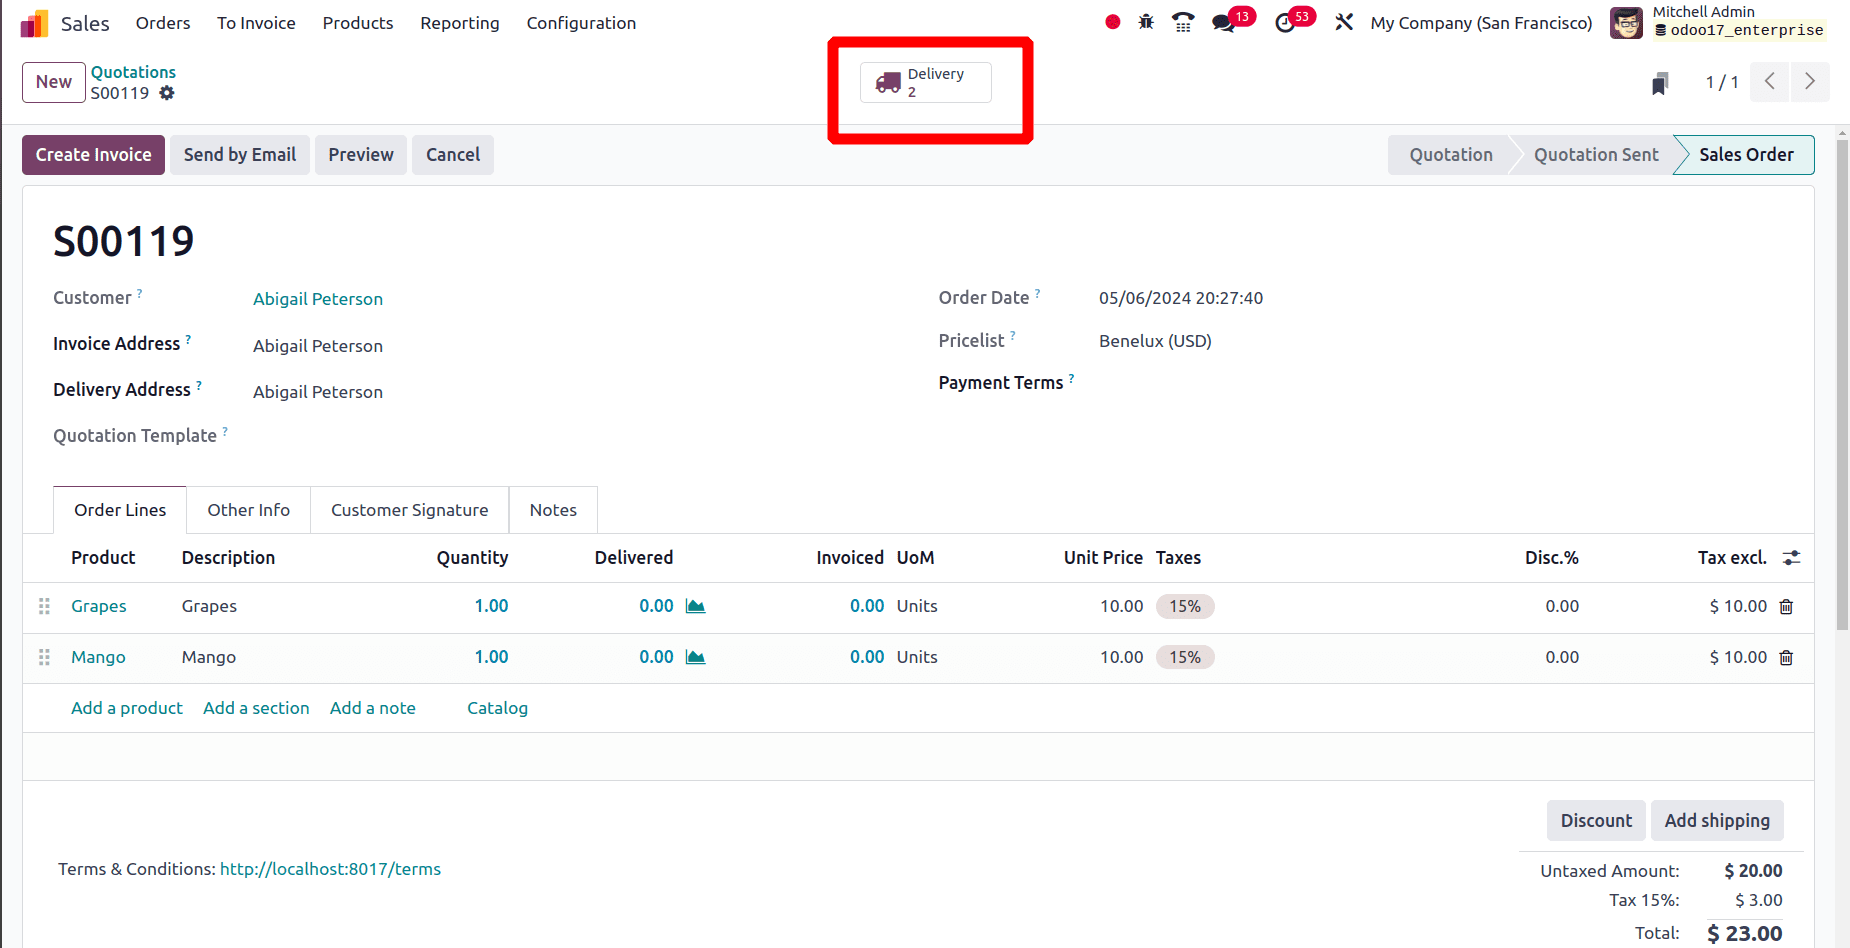
In this first sales order, the customer has made an order for grapes and mangos. Grapes are stored on ‘shelf a’ and mango is stored on ‘shelf b’. So when a customer makes this order the picker wants to pick these different products from different shelves, ‘shelf a’ and ‘shelf b’.
Here we can see that the delivery will be done in two steps. Then create one more sale order for a different customer.
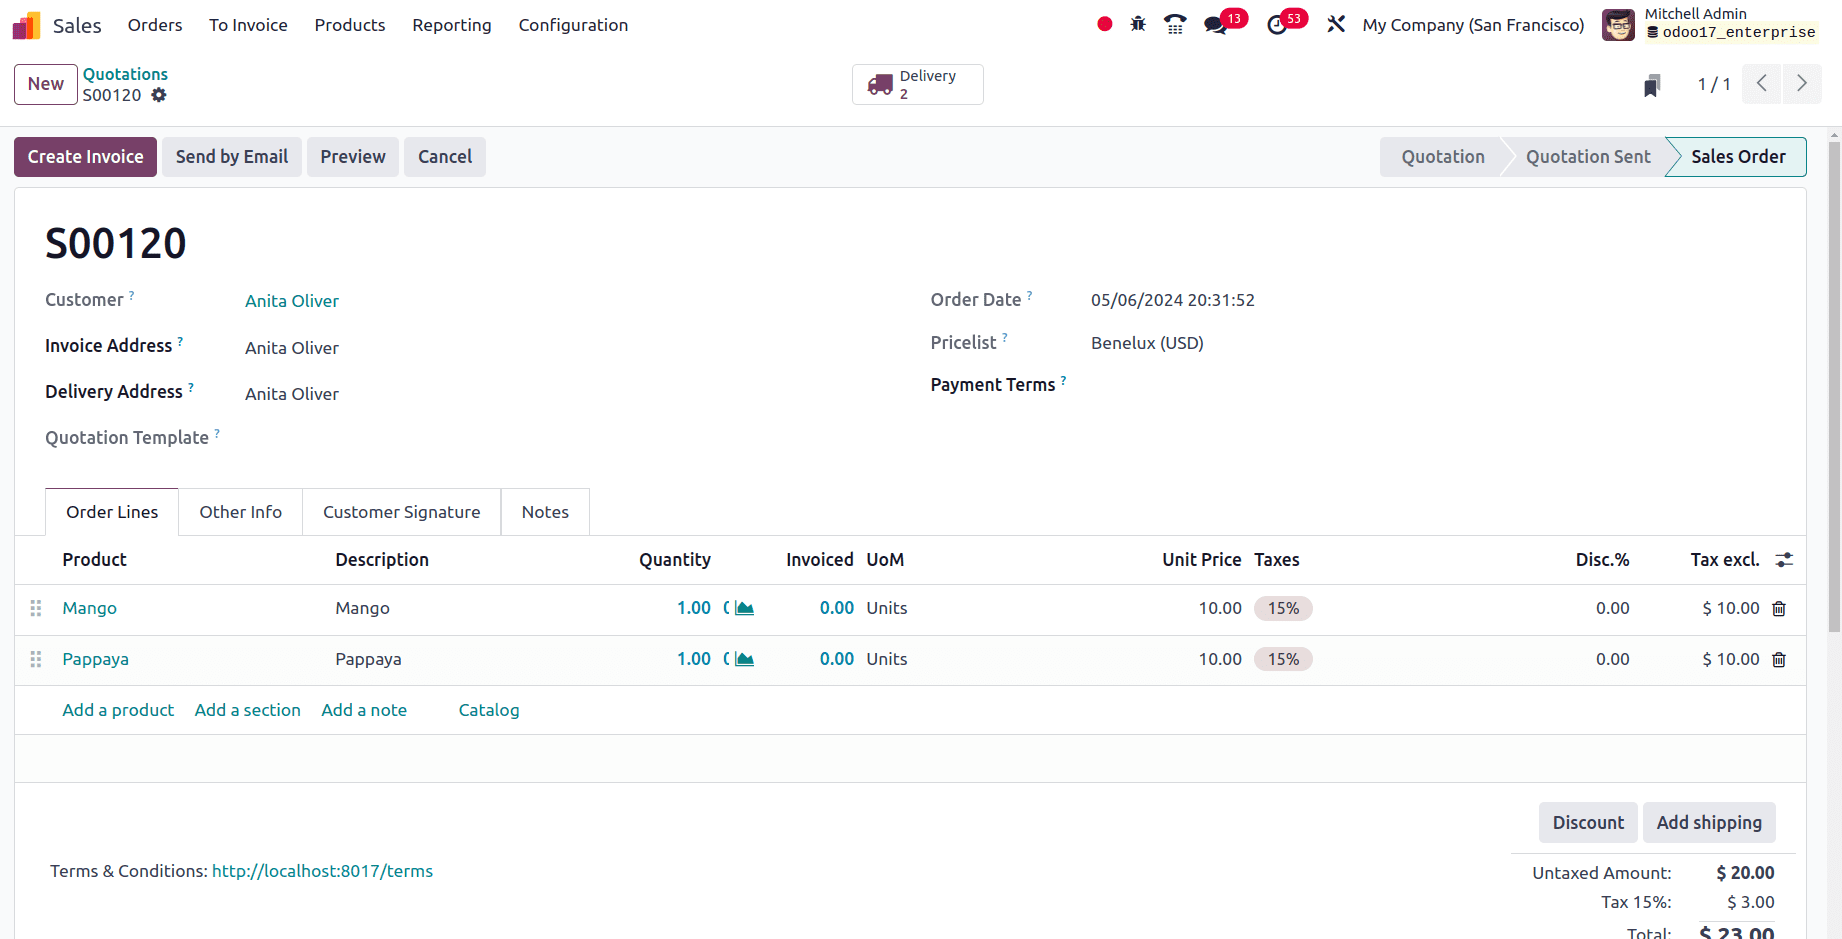
Here in the second sales order, the customer ordered mango and papaya. The product mango is on ‘shelf b’ and papaya is on ‘shelf c’. So the picker wants to pick the product from ‘shelf b’ and ‘shelf c’ to fulfill the order. Here too the delivery is done in two steps. Then we can move to the inventory module and in the dashboard itself we can see two processes to pick from.

Open the two picking operations and select them, add these two to a single batch, and confirm the batch.
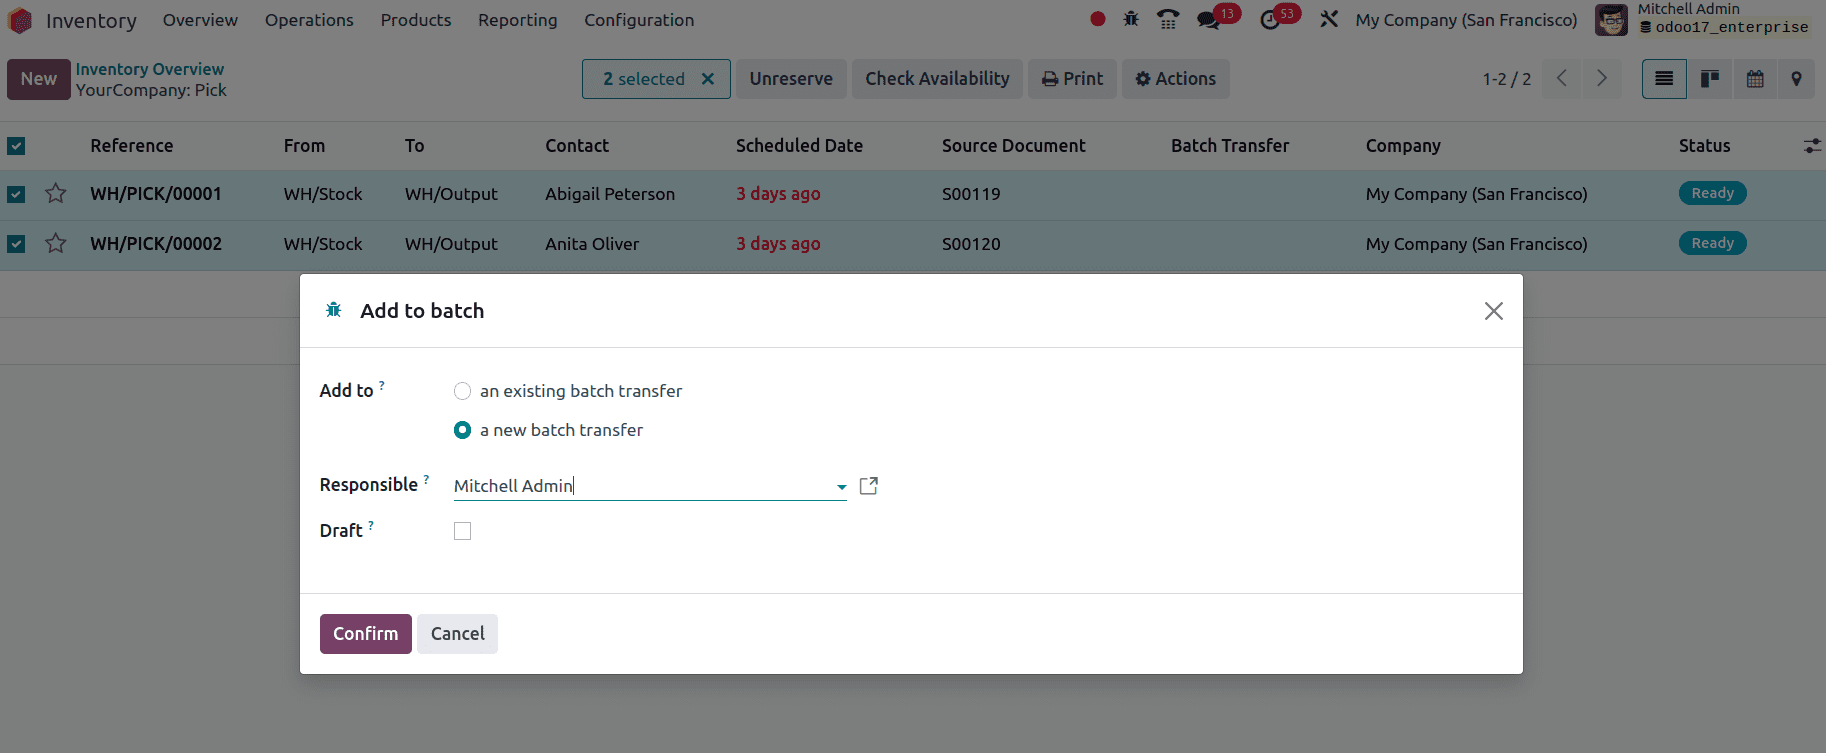
Then go to the batch transfers list from the operation menu and validate the batch transfer.

By clicking the validate button, the batch transfer has been validated
In this blog, we have discussed batch transfer, wave transfer, and cluster picking in detail.
So by using these features, transfers take less time and effort when we move several products between locations in one transaction, and handle several transfer requests at once to increase productivity and cut down on processing time, particularly when working with large quantities.
To read more about An Overview of Batch Transfer and Wave Transfer in Odoo 16 ERP, refer to our blog An Overview of Batch Transfer and Wave Transfer in Odoo 16 ERP.