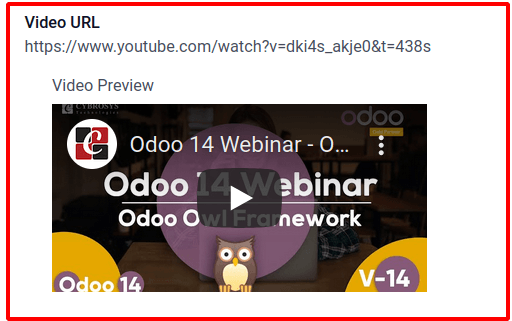
The video preview is a widget used for previewing videos. It is mainly used to view the preview whenever we upload the video. There are many cases where we want to upload images and videos. In such cases, uploading images and viewing the preview is easier, but uploading videos and viewing the preview of the video is complicated. One such solution preview videos are to use the video_preview widget.
This blog explains in detail the video preview widget in Odoo.
1. What is a Video preview?
2. Video preview widget
3. How to use the video preview?
Video previews let you view a short preview of a video before watching it. Whenever you might hover over a video's thumbnail or scroll past a video during a mobile search, you'll see a 3-second preview. After the short video preview ends, it will go back to its normal state, and you will see the video’s thumbnail instead.
In Odoo, videos can be uploaded, and the corresponding previews can be viewed as a thumbnail. It will help you to get a short description of the video.
The videos can be uploaded, and it will give us a short preview of the video. For that purpose, use the video preview widget.
Video preview widget
Before using the video preview widget, the widget should be defined. The widget is defined in Odoo. Hence we have to use the video preview widget. After that, we have to upload the URL of the video. Then we can view the preview of the video.
Here, briefly explain how to define a video preview widget.
var AbstractField = require('web.AbstractField');
var core = require('web.core');
const {Markup} = require('web.utils');
var fieldRegistry = require('web.field_registry');
var QWeb = core.qweb;
After defining the abstract field, core, field registry, and qweb, extend the abstract field. After extending, we have to render the function. Inside the function, render the template.
var FieldVideoPreview = AbstractField.extend({
   className: 'd-block o_field_video_preview',
   _render: function () {
       this.$el.html(QWeb.render('productVideo', {
           embedCode: Markup(this.value),
       }));
   },
});
fieldRegistry.add('video_preview', FieldVideoPreview);
return FieldVideoPreview;
});
This is how the widget is defined. After adding in this code, you can use the widget video_preview.
In XML file productVideo shown below:
<?xml version="1.0" encoding="UTF-8"?>
<templates xml:space="preserve">
   <t t-name="productVideo">
       <div class="embed-responsive embed-responsive-16by9 mt-2" t-if="embedCode">
           <t t-out="embedCode"/>
       </div>
   </t>
</templates>
How to use the video preview widget?
We have discussed how to define a widget and video preview definition. In this section, we will discuss how we can use the video preview widget. First, we have to define a character field to store the URL of our video. Also, we have to specify another field to preview the view of the video. It should be defined as an HTML field. In short, we need two fields, one to store the corresponding video URL that should be uploaded and the other to store the video preview.
The HTML field should be a computing field. Hence we have to specify the corresponding compute function for the field. The compute function should be defined as follows:
@api.depends('video_url')
def _compute_embed_code(self):
   for image in self:
       image.embed_code = get_video_embed_code(image.video_url)
The function get_video_embed_code is already defined function in Odoo.In this compute function we have to assign like:image.embed_code = get_video_embed_code(image.video_url).
Also, we have to specify constrain for checking whether the given URL is valid or not. If the video URL is not valid, then it will raise an error message. The function must be defined as shown below
@api.constrains('video_url')
def _check_valid_video_url(self):
   for image in self:
       if image.video_url and not image.embed_code:
           raise ValidationError(
               ("Provided video URL for '%s' is not valid. Please enter a valid video URL.", image.name))
Also we have to import the get_video_embed_code from website tools
from addons.website.tools import get_video_embed_code
After defining these two functions and two fields, we have to define the XML file. In the XML file, we have to specify these fields.
<label for="video_url" string="Video URL"/><br/>
<field name="video_url"/>
<div class="col" attrs="{'invisible': [('video_url', 'in', ['', False])]}">
   <div class="o_video_container p-2">
       <span>Video Preview</span>
       <field name="embed_code" class="mt-2" widget="video_preview"/>
       <h4 class="o_invalid_warning text-muted text-center"
           attrs="{'invisible': [('embed_code', '!=', False)]}">
           Please enter a valid Video URL.
       </h4>
   </div>
</div>
This is how we define our XML file. In the XML, file we have to specify a label for the video URL. Also, we have to use widget video preview. Similarly, we have to define XML and py files.
Output:
Initially, we will have to specify the URL of the video that should be uploaded.

Whenever upload the URL over here then the embed code field will be displayed with a video preview. Then the output should be shown as below:

This is how the video preview widget should be added. It is very helpful to get a brief idea about that video.