Gspread is a Python API designed for Google Sheets, offering a range of convenient features. With Gspread, you can easily open a spreadsheet using its title, key, or URL. It allows for reading, writing, and formatting cell ranges. Additionally, Gspread supports sharing and access control, as well as batching updates, making it a versatile tool for managing Google Sheets within your Python projects.
In this blog, we will learn how to use gspread API.
Steps
1. Installation
You can install gspread using the command below.
pip install gspread
After installing gspread, we need to import gspread to use it in our code. Gspread can be imported as follows:
Import gspread
2. Authentication
To access spreadsheets through Google Sheets API, we need to authenticate and authorize our application.
* Use Service Account If you are planning to access the spreadsheets on behalf of a bot account.
* Use OAuth Client ID If you wish to access spreadsheets on behalf of end users.
2.1. Enabling API access for a project.
Go to the Google Developers Console and create a new project (or select a project you already have).
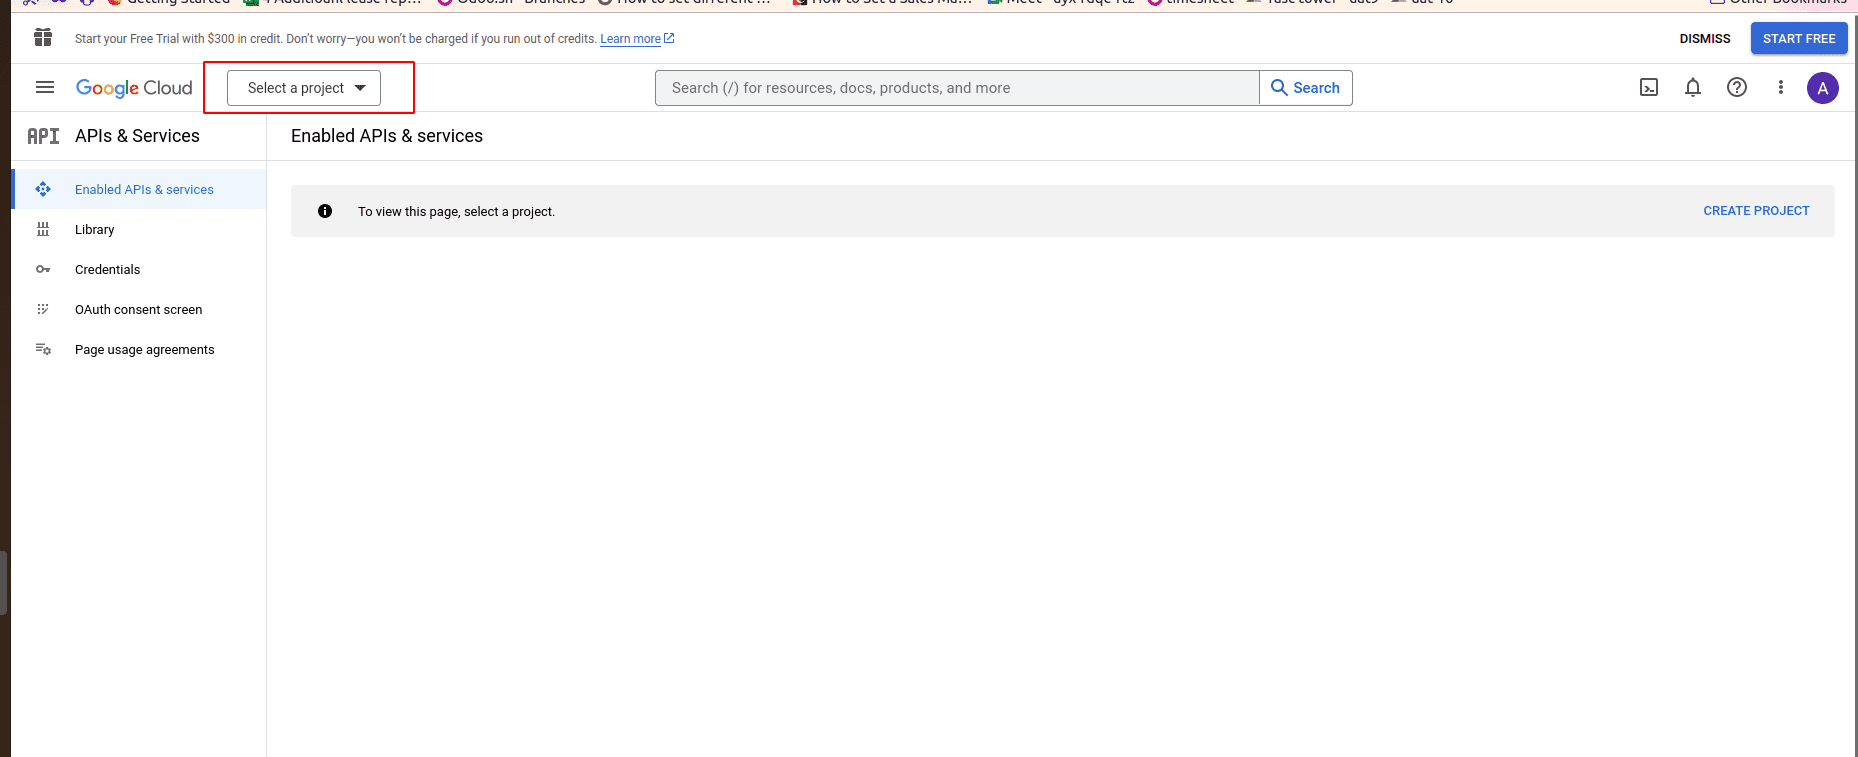
* From Search APIs and Services, find Google Drive API and enable it.
* Search for Google Sheets API from Search for APIs and Services and enable it.
2.2. Service Account
Service account - This is a special type of Google Account created to represent bots (a non-human user) and that must need to be authenticated and authorized to access data in the Google APIs.
By default, the service account does not have access to any spreadsheet, and it will only get access after we share access with this account.
Here are the steps to create a service account:
1. Turn on API access for your project (if you haven’t already).
2. Go to APIs and Services > Credentials and select Create credentials > Service account key. After that, fill out the service account form.
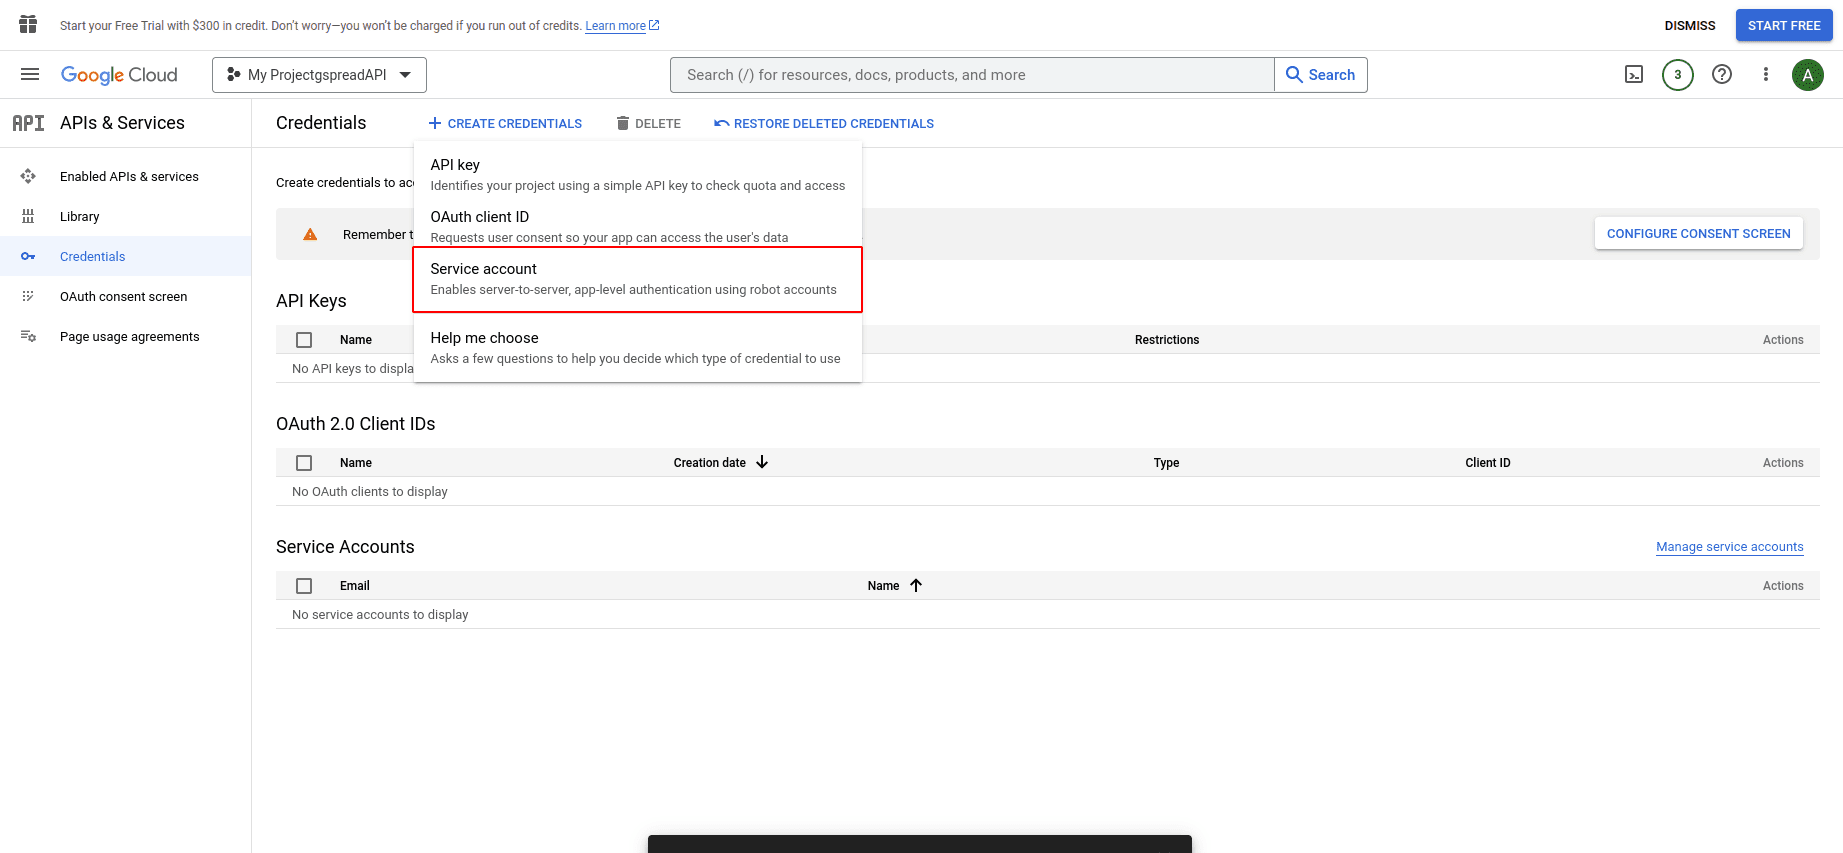
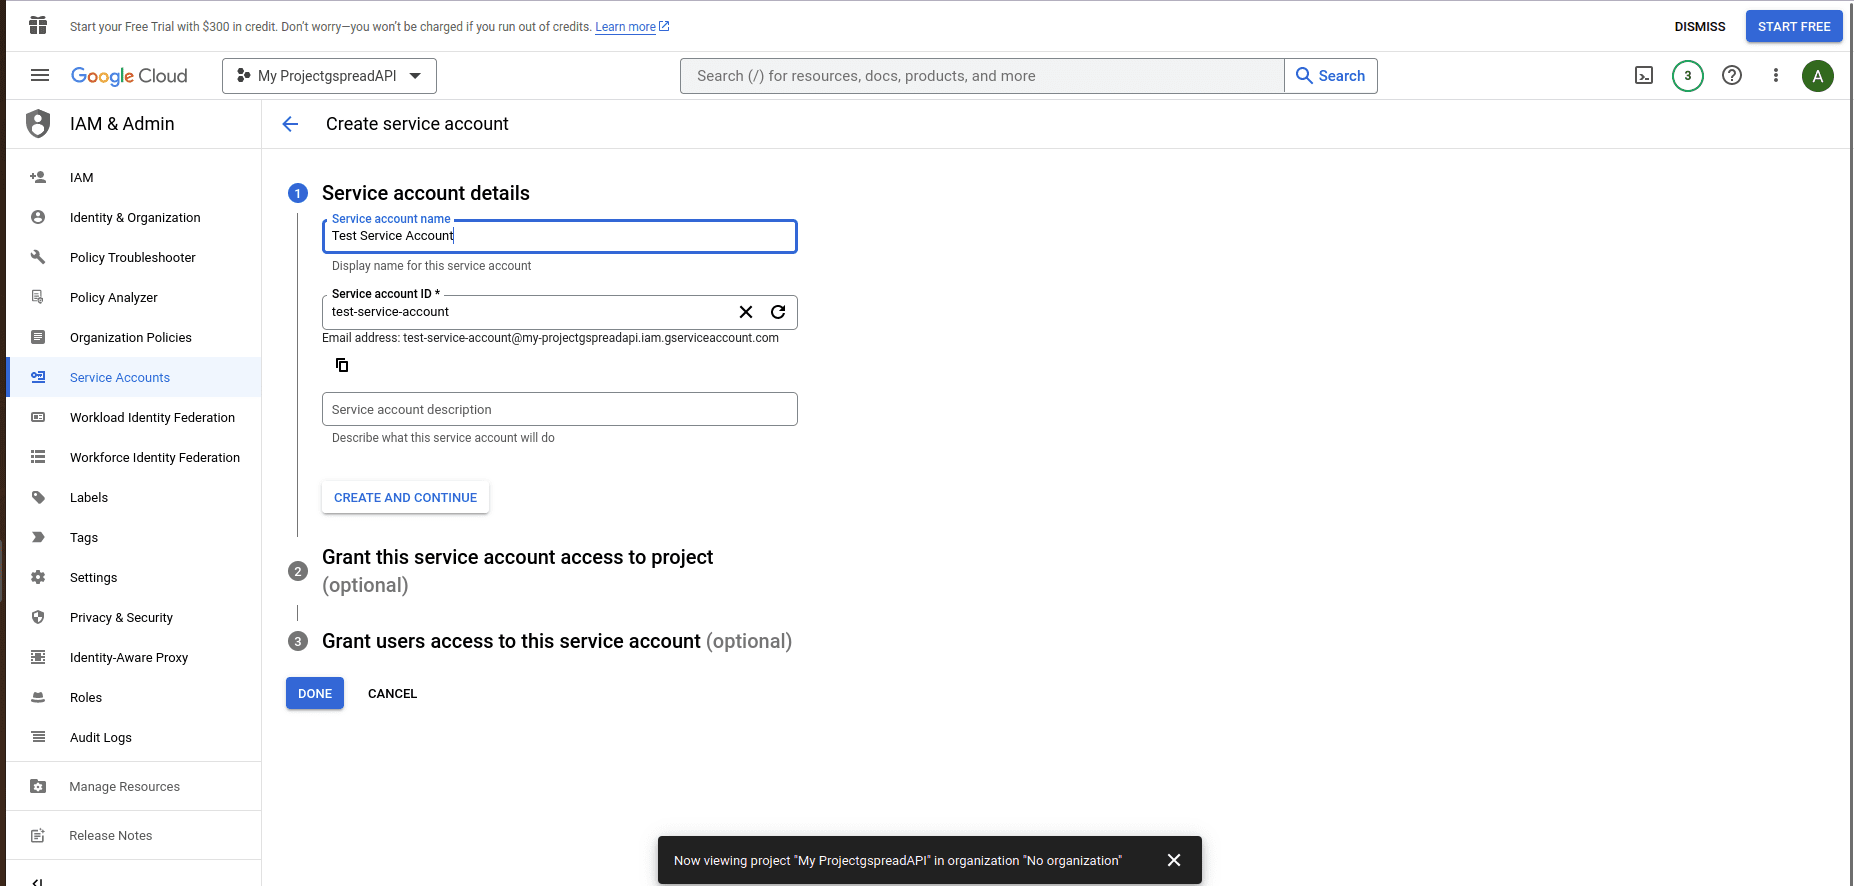
3. Click on “Manage service accounts” above Service Accounts.
4. Click on a recently created service account and then select “Manage keys.” Then, click on ADD KEY options under the Keys tab and create a new key.
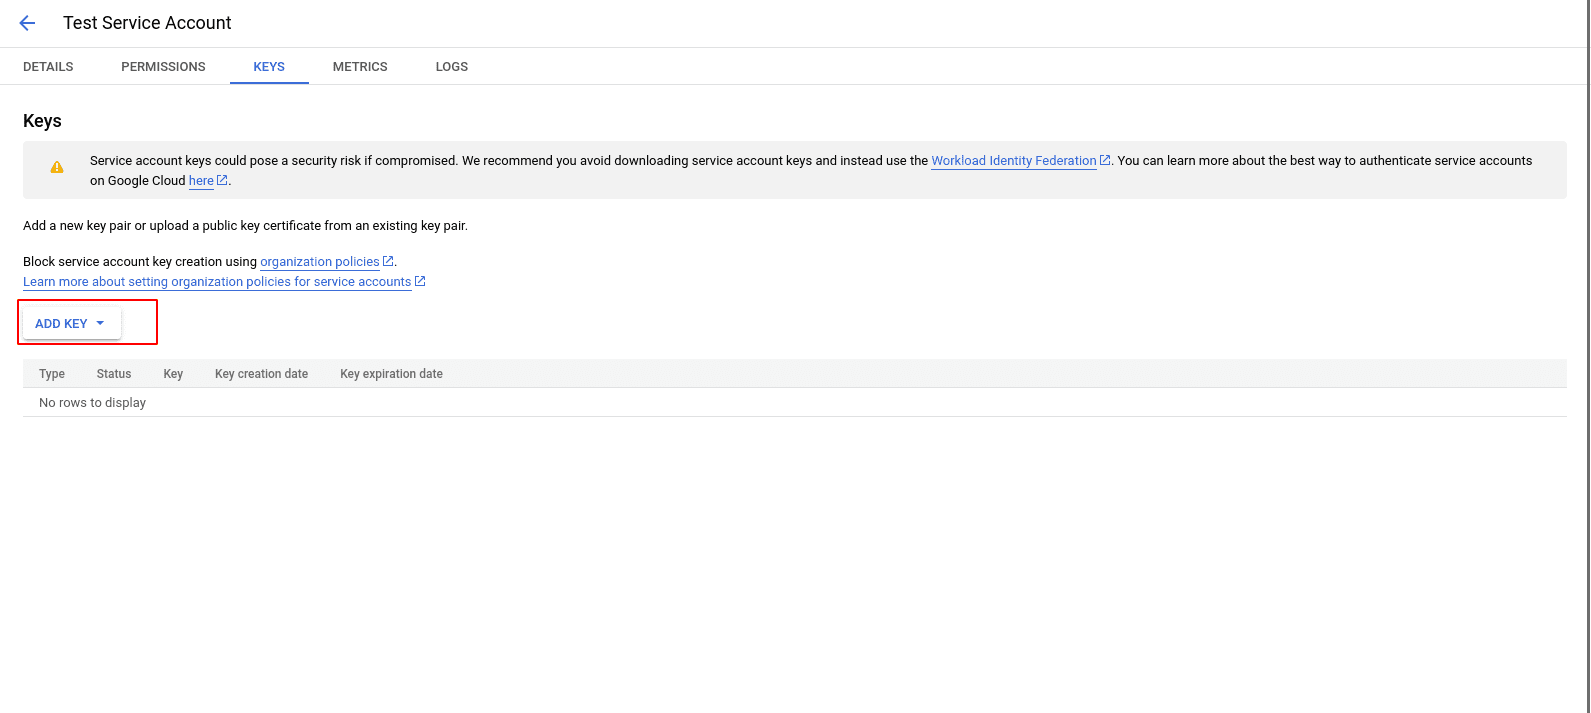
5. Select the JSON key type and then press “Create”.
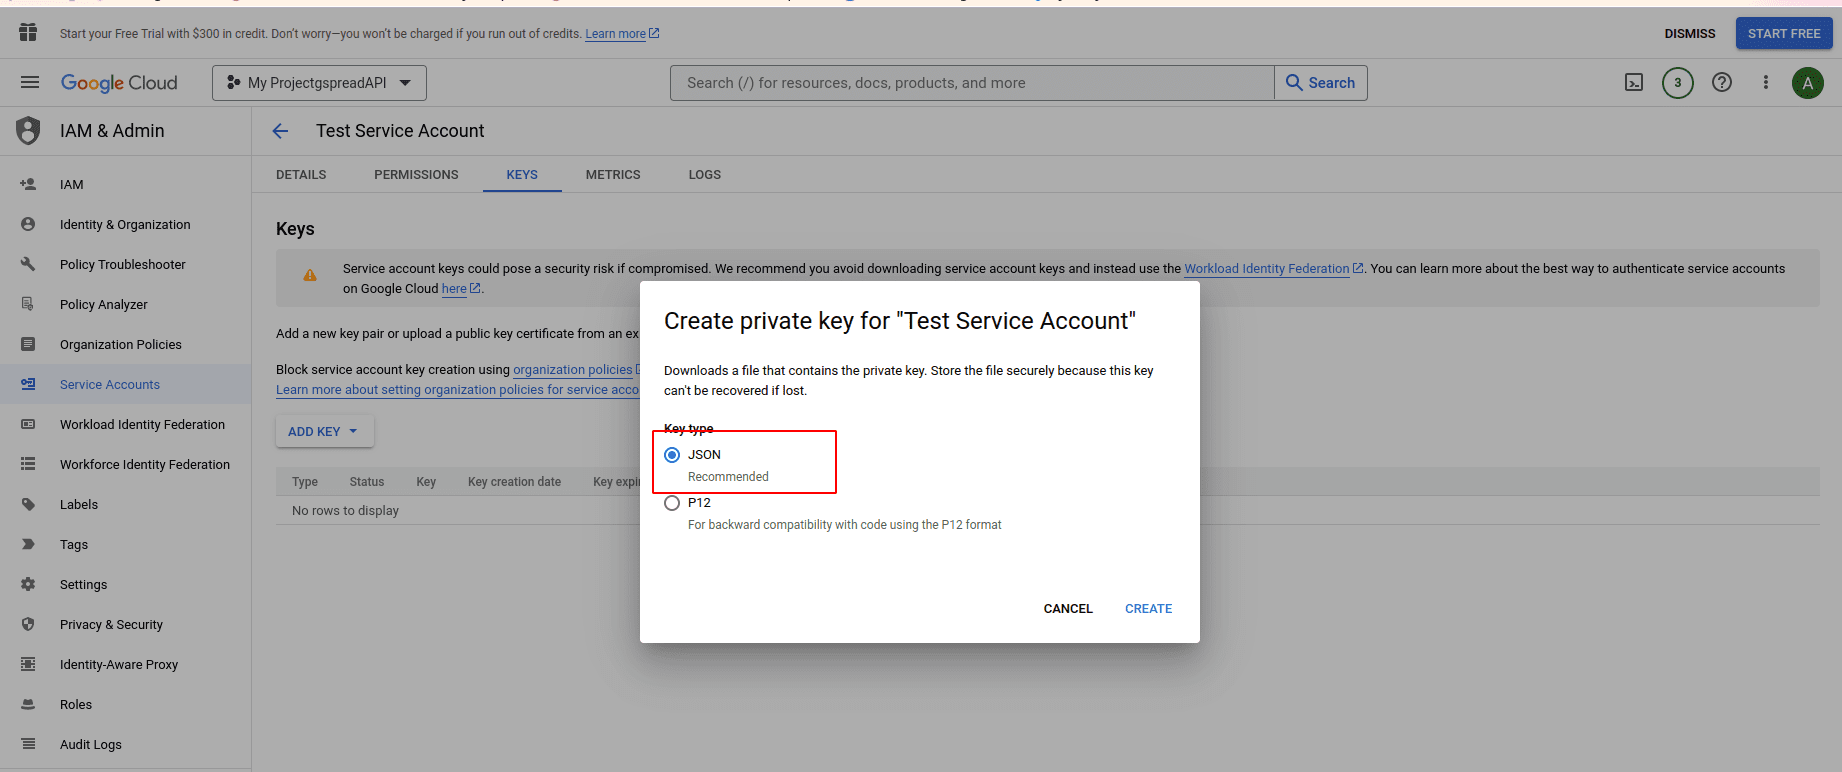
Then, you will get a downloaded JSON file with credentials. It will look like this:
{
  "type": "service_account",
  "project_id": "my-projectgspreadapi",
  "private_key_id": "84........50",
  "private_key": "-----BEGIN PRIVATE KEY-----\nM ......... S5bS\n-----END PRIVATE KEY-----\n",
  "client_email": "test-service-account@my-projectgspreadapi.iam.gserviceaccount.com",
  "client_id": "10..........831",
  ...
}
Keep in mind the location of the credentials file you downloaded.
6. Navigate to your spreadsheet and share it, as you would with any other Google account, with the client_email from the previous step. Otherwise, you’ll get a gspread.exceptions.SpreadsheetNotFound exception when trying to access this spreadsheet from your application or a script if you don’t do this step.
7. Move the downloaded file to ~/.config/gspread/service_account.json. Windows users should put this file to %APPDATA%\gspread\service_account.json.
8. Now create a new Python file with this code
import gspread
gc = gspread.service_account()
sh = gc.open("Sheet")
print(sh.sheet1.get('A1'))
9. You can also store the credentials file in another location. For that, you just need to specify its path in service_account() as follows.
gc = gspread.service_account(filename='path/to/the/downloaded/file.json')
Otherwise, you have another option to pass the credentials as a dictionary:
import gspread
credentials = {
  "type": "service_account",
  "project_id": "my-projectgspreadapi",
  "private_key_id": "84........50",
  "private_key": "-----BEGIN PRIVATE KEY-----\nM ......... S5bS\n-----END PRIVATE KEY-----\n",
  "client_email": "test-service-account@my-projectgspreadapi.iam.gserviceaccount.com",
  "client_id": "10..........831",
  ...
}
gc = gspread.service_account_from_dict(credentials)
sh = gc.open("Sheet")
print(sh.sheet1.get('A1'))
2.3. Oauth Client ID
In Oauth Client ID, the application or a script is accessing spreadsheets on behalf of an end user. While using this method, the application or script will ask the end user to grant access to the user’s data.
1. If you haven't yet enabled API access for your project, enable it.
2. Go to API & Services -> OAuth Consent Screen And then click on the button for Configure Consent Screen.
a. On the 1 OAuth consent screen tab, give the app a name and then fill in the User support email and the Developer contact information. Click SAVE AND CONTINUE.
b. You don't need to fill anything in "2 Scope". Just click SAVE AND CONTINUE.
c. In the "3 Test Users" tab, add the end user's Google account email (usually your own Google email ). Click “SAVE AND CONTINUE”.
d. Double check the “4 Summary” displayed and click Back to Dashboard.
3. Go to “APIs & Services > Credentials”
4. Click “+ Create credentials” at the top, then select “OAuth client ID”.
5. Select “Desktop app,” name the credentials, and click “Create.” Click “Ok” in the “OAuth client created” popup.
6. Download the credentials by clicking the Download JSON button in “OAuth 2.0 Client IDs” section.
7. Move the downloaded file to ~/.config/gspread/credentials.json. Windows users should put this file to %APPDATA%\gspread\credentials.json.
Create a new Python file with this code:
import gspread
gc = gspread.oauth()
sh = gc.open("Sheet")
print(sh.sheet1.get('A1'))
Once you run the above code, the browser will launch asking you for the authentication. Observe the guidelines provided on the webpage.
After finishing, the gspread saves the authorized credentials next to credentials in a configuration directory.JSON. You only need to authorize it once in your browser and on the following runs it will reuse the stored credentials.
If you want to store credentials elsewhere, specify the path to the credentials.json and authorized_user.json in oauth():
gc = gspread.oauth(
credentials_filename='path/to/the/credentials.json',
authorized_user_filename='path/to/the/authorized_user.json'
)
There is also an option to pass your credentials directly as a python dictionary. This way, you don't need to save them as a file, or you can save them in your favorite password manager.
import gspread
credentials = {
"installed": {
"client_id": "12345678901234567890abcdefghijklmn.apps.googleusercontent.com",
"project_id": "my-project1234",
"auth_uri": "https://accounts.google.com/o/oauth2/auth",
"token_uri": "https://oauth2.googleapis.com/token",
...
}
}
gc, authorized_user = gspread.oauth_from_dict(credentials)
sh = gc.open("Sheet")
print(sh.sheet1.get('A1'))
After authentication, you must store the returned JSON string containing the user credentials. To authenticate directly and skip the process, provide details as a python dictionary as the second argument in the next oauth request.
import gspread
credentials = {
"installed": {
"client_id": "12345678901234567890abcdefghijklmn.apps.googleusercontent.com",
"project_id": "my-project1234",
"auth_uri": "https://accounts.google.com/o/oauth2/auth",
"token_uri": "https://oauth2.googleapis.com/token",
...
}
}
authorized_user = {
"refresh_token": "8//ThisALONGTOkEn....",
"token_uri": "https://oauth2.googleapis.com/token",
"client_id": "12345678901234567890abcdefghijklmn.apps.googleusercontent.com",
"client_secret": "MySecRet....",
"scopes": [
"https://www.googleapis.com/auth/spreadsheets",
"https://www.googleapis.com/auth/drive"
],
"expiry": "1070-01-01T00:00:00.000001Z"
}
gc, authorized_user = gspread.oauth_from_dict(credentials, authorized_user)
sh = gc.open("Sheet")
print(sh.sheet1.get('A1'))
Gspread methods
1. Open Spreadsheet
You can open a spreadsheet by its title as it appears in Google Docs:
sh = gc.open('Sheet')If you have multiple Google Spreadsheets with the same name, this method will open the latest sheet without errors. It is recommended that you open the worksheet using its unique ID. If you want to be more specific use the key (which can be extracted from the page's URL):
sht1 = gc.open_by_key('0BmgG6nO_6dprdS1MN3d3MkdPa142WFRrdnRRUWl1UFE')Or, if you're too lazy to extract the key, just paste the URL of the spreadsheet.
sht2 = gc.open_by_url('https://docs.google.com/spreadsheet/ccc?key=0Bm...FE&hl')2. Create Spreadsheet
Use the method create() to create a new blank spreadsheet:
sh = gc.create('A new spreadsheet')If you wish to use a service account, the new spreadsheets will only be visible to this account. And to access the spreadsheet that is newly created from Google Sheets with your Google account you must need to share it with your Gmail first. From the section below, we can understand how to share a spreadsheet.
3. Share Spreadsheet
If your email is ab@gmail.com, then you can share the newly created spreadsheet with yourself as follows:
sh.share(ab@gmail.com', perm_type='user', role='writer')
4. Select Worksheet
We can select a worksheet by its index. Worksheet indexes start from zero:
worksheet = sh.get_worksheet(0)
Also, we can select a worksheet by its title as follows.
worksheet = sh.worksheet("March")The most common case to select a worksheet Sheet1 as follows:
worksheet = sh.sheet1
If you want to get a list of all worksheets you can use the code below.
worksheet_list = sh.worksheets()
5. Create Worksheet
worksheet = sh.add_worksheet(title="Worksheet1", rows=100, cols=20)
6. Delete Worksheet
sh.del_worksheet(worksheet)
7. Get Cell Value
We can get a cell value by using A1 notation or by using row and column coordinates.
val = worksheet.acell('B1').value
val = worksheet.cell(1, 2).value
If you want to get a cell formula:
cell = worksheet.acell('B1', value_render_option='FORMULA').value
# or
cell = worksheet.cell(1, 2, value_render_option='FORMULA').value
8. To get all values from row or column
To get all values from the first row, you can use the code below.
values_list = worksheet.row_values(1)
To get all values from the first column, you can use the code below.:\
values_list = worksheet.col_values(1)
Note: Up till now, we have only retrieved a small quantity of information from a sheet. This is excellent until you need to iterate over multiple rows or columns or retrieve values from hundreds of cells.
Gspread is powered by Google Sheets API v4. When you use a gspread method to update or fetch a sheet, it typically results in one HTTP API request from the program.
There are performance costs associated with HTTP calls. Therefore, you can enhance the efficiency of your app by requesting data all at once if you find that it is looping through rows or columns or fetching information one at a time.
Moreover, Usage Limits were implemented with Sheets API v4 (as of this writing, 300 requests every 60 seconds per project, and 60 requests per user). Your application will display an APIError 429 RE-SOURCE_EXHAUSTED when it reaches that limit.
The following techniques could assist you in lowering API calls:
* The function get_all_values() retrieves values from every cell in the sheet.
* All values from a range of cells are retrieved using get().
* With a single API request, batch_get() can retrieve values from several cell ranges.
* A range of cells can be updated with a list of lists using the update() function.
* With just one API request, you can update several cell ranges with batch_update().
9. Obtaining Every Value as a List of Lists from a Worksheet
list_of_lists = worksheet.get_all_values()
10. Obtaining All Values as a List of Dictionaries from a Worksheet
list_of_dicts = worksheet.get_all_records()
11. Locating/Finding a Cell
Locate a cell where a string matches:
cell = worksheet.find("Dough")
print("Found something at R%sC%s" % (cell.row, cell.col))
Locate a cell that matching or contains the regular expression
amount_re = re.compile(r'(Big|Enormous) dough')
cell = worksheet.find(amount_re)
The result returns None if the value is not Found
12. Locating Every Matched Cell
Locate every cell that matches a string:
cell_list = worksheet.findall("Rug store")Locate every cell that fits a regexp:
criteria_re = re.compile(r'(Small|Room-tiering) rug')
cell_list = worksheet.findall(criteria_re)
13. Clear A Worksheet
At the same time, clear one or more cell ranges:
worksheet.batch_clear(["A1:B1", "C2:E2", "my_named_range"])
Clear the entire worksheet:
worksheet.clear()
14.Cell Object
Every cell has coordinates properties and value:
value = cell.value
row_number = cell.row
column_number = cell.col
15. Updating Cells
We can update the cells using A1 notation:
worksheet.update('B1', 'Bingo!')Or by using row and column coordinates:
worksheet.update_cell(1, 2, 'Bingo!')
Update a range
worksheet.update('A1:B2', [[1, 2], [3, 4]])16. Formatting
This is an example of simple formatting.
Set A1:B1 text format to bold:
worksheet.format('A1:B1', {'textFormat': {'bold': True}})Change the text color and font size, and horizontal alignment, and color the background of the A2:B2 cell range black.
worksheet.format("A2:B2", {
"backgroundColor": {
"red": 0.0,
"green": 0.0,
"blue": 0.0
},
"horizontalAlignment": "CENTER",
"textFormat": {
"foregroundColor": {
"red": 1.0,
"green": 1.0,
"blue": 1.0
},
"fontSize": 12,
"bold": True
}
})
A dictionary with the fields that need to be updated is the second argument passed to format(). The complete list of format options can be found at CellFormat in the Sheet API Reference.
Recommendation: gspread-formatting provides rich features to assist you in going beyond the basics.
17. Using pandas and gspread
A well-liked library for data analysis is pandas. Get_all_records() is the most straightforward method for obtaining data from a sheet into a pandas DataFrame:
import pandas as pd
dataframe = pd.DataFrame(worksheet.get_all_records())
This is a simple illustration of how to write a dataframe to a sheet. Using update(), we insert a dataframe's header and values into the first row of a sheet:
import pandas as pd
worksheet.update([dataframe.columns.values.tolist()] + dataframe.values.tolist())
Check out these libraries for advanced use cases with pandas:
• gspread-pandas
• gspread-dataframe
18. Using gspread with NumPy
A Python library called NumPy is used for scientific computing. It offers resources for handling multidimensional arrays with excellent performance.
To read the contents of a sheet into a NumPy array:
import numpy as np
array = np.array(worksheet.get_all_values())
The code above is predicated on the assumption that your data begins with the sheet's first row. You must replace the worksheet if the first row contains a header row.utilize the worksheet and get_all_values().[1:] get_all_values().
Write a NumPy array to a sheet:
import numpy as np
array = np.array([[1, 2, 3], [4, 5, 6]])
# Write the array to worksheet starting from the A2 cell
worksheet.update('A2', array.tolist())
In summary, the Python gspread API emerges as a versatile and user-friendly tool for seamlessly integrating Google Sheets into Python workflows. With its straightforward implementation, robust functionality, and wide-ranging applications, gspread proves to be a valuable asset for developers and data enthusiasts alike. Whether you're automating tasks, conducting data analysis, or collaborating on projects, the simplicity and power of gspread make it a go-to solution for harnessing the potential of Google Sheets within your Python projects. So this is all about Python gspread API, hope you all got the information about gspread API.