An order tracking system is necessary for a business to improve customer satisfaction. With a tracking system, tracking a product with a current and delivery location is easy. Several production stages undergo inside the inventory operations of a company. Employers and officers quickly track product movement in case of raw materials and finished goods. With the assistance of an ERP, users can quickly adopt a tracking system for business. Odoo 15 Inventory module is an important way to secure product tracking of a manufacturing company. The tracking ability of Odoo ERP is entirely based on Lot/Serial numbers.
This blog points out how to track products using the Odoo 15 Inventory.
We can make clear information of tracking using Lot/Serial numbers in Odoo ERP. Users can modify the serial numbers as per the business requirements. Hence, tracking is performed effectively for your products in a firm. Now, let's view a detailed analysis of product tracking using the Odoo 15 Inventory module.
To Activate the Traceability feature from Odoo 15
Users need to activate the traceability feature from Odoo 15 Inventory module. Choose the Settings menu below the Configuration tab of the Odoo 15 Inventory module. Activate the Lots & Serial Numbers option below the Traceability section in the Settings window, as displayed in the screenshot below.
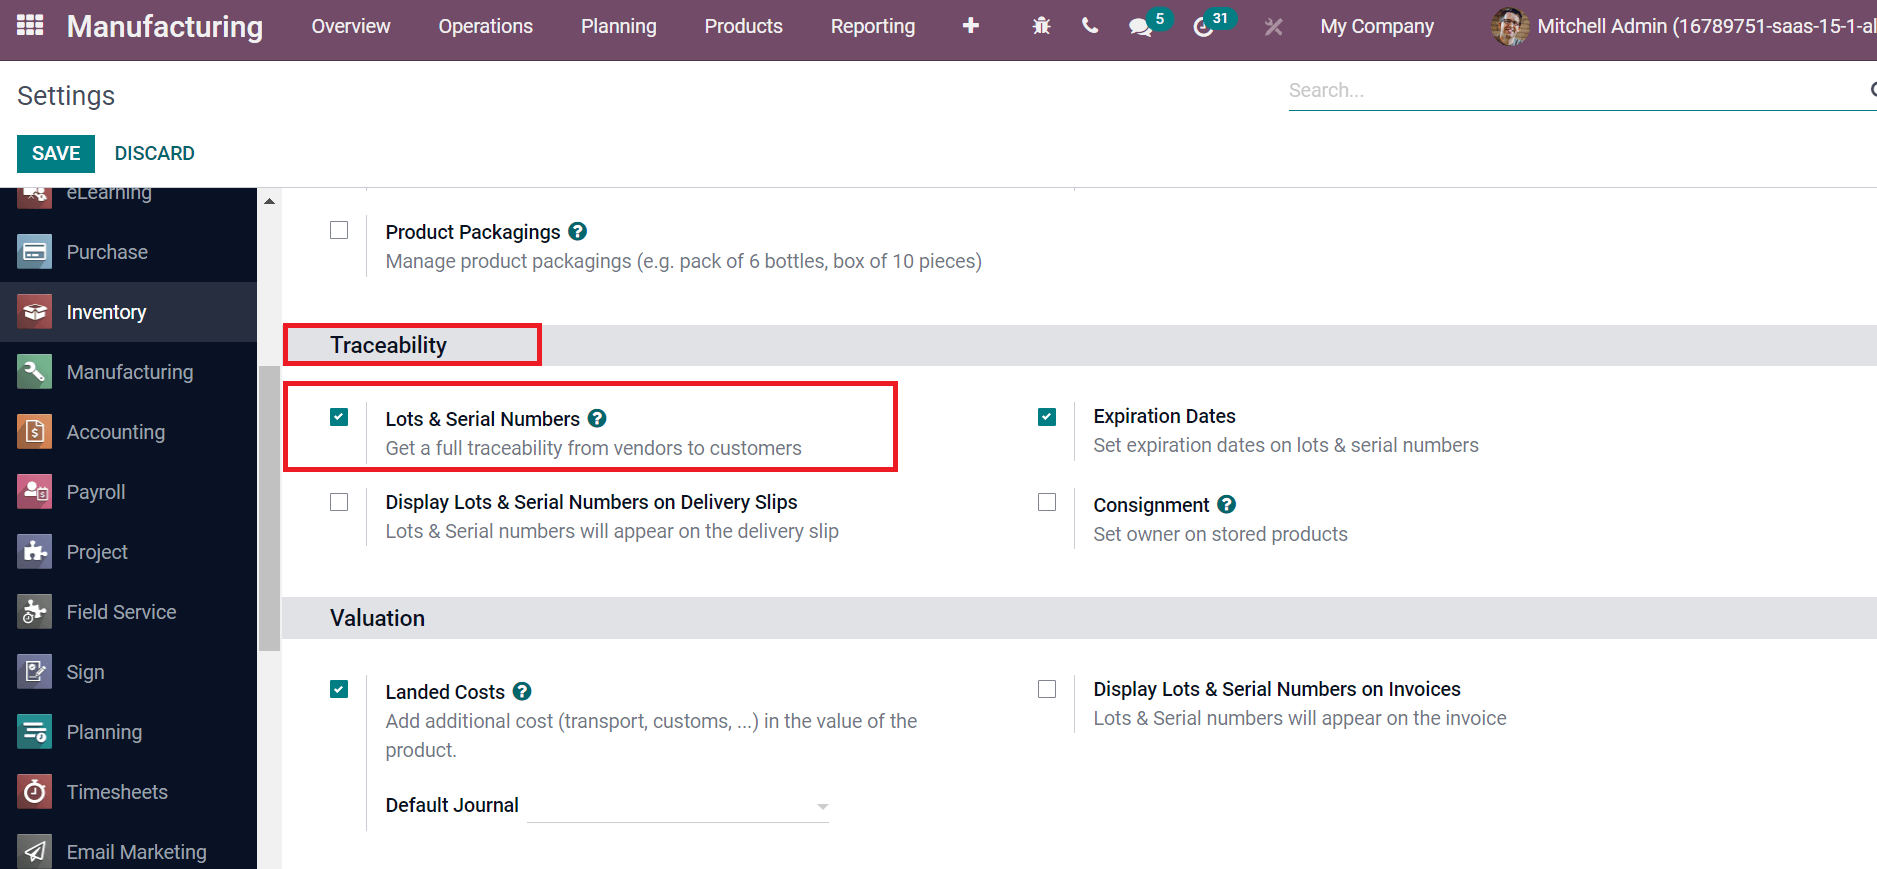
We get full traceability from vendors to customers by enabling the Lots & Serial Numbers option. Each serial number denotes separate products and is unique. We use serial numbers for individual product traceability in your business. Next, we can activate the serial number for a product. Let's formulate a new product using Odoo 15 Inventory module. Click on the Products menu in Odoo 15 Inventory module, and you can see the created products here, as denoted in the image below.
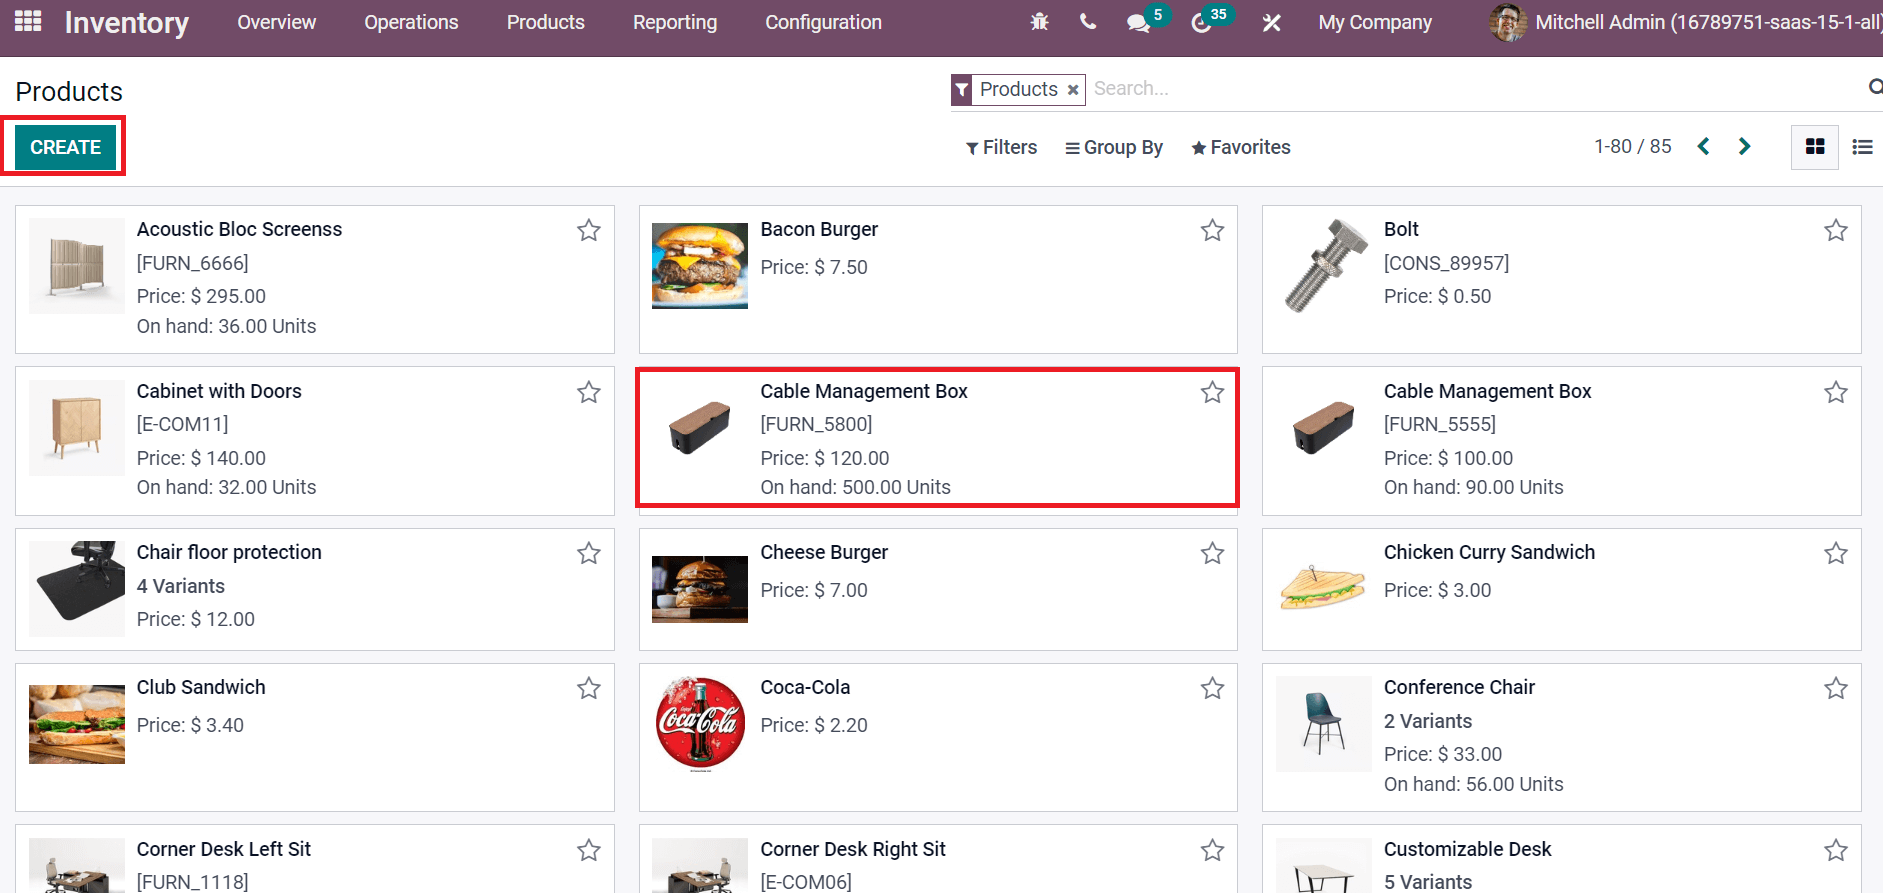
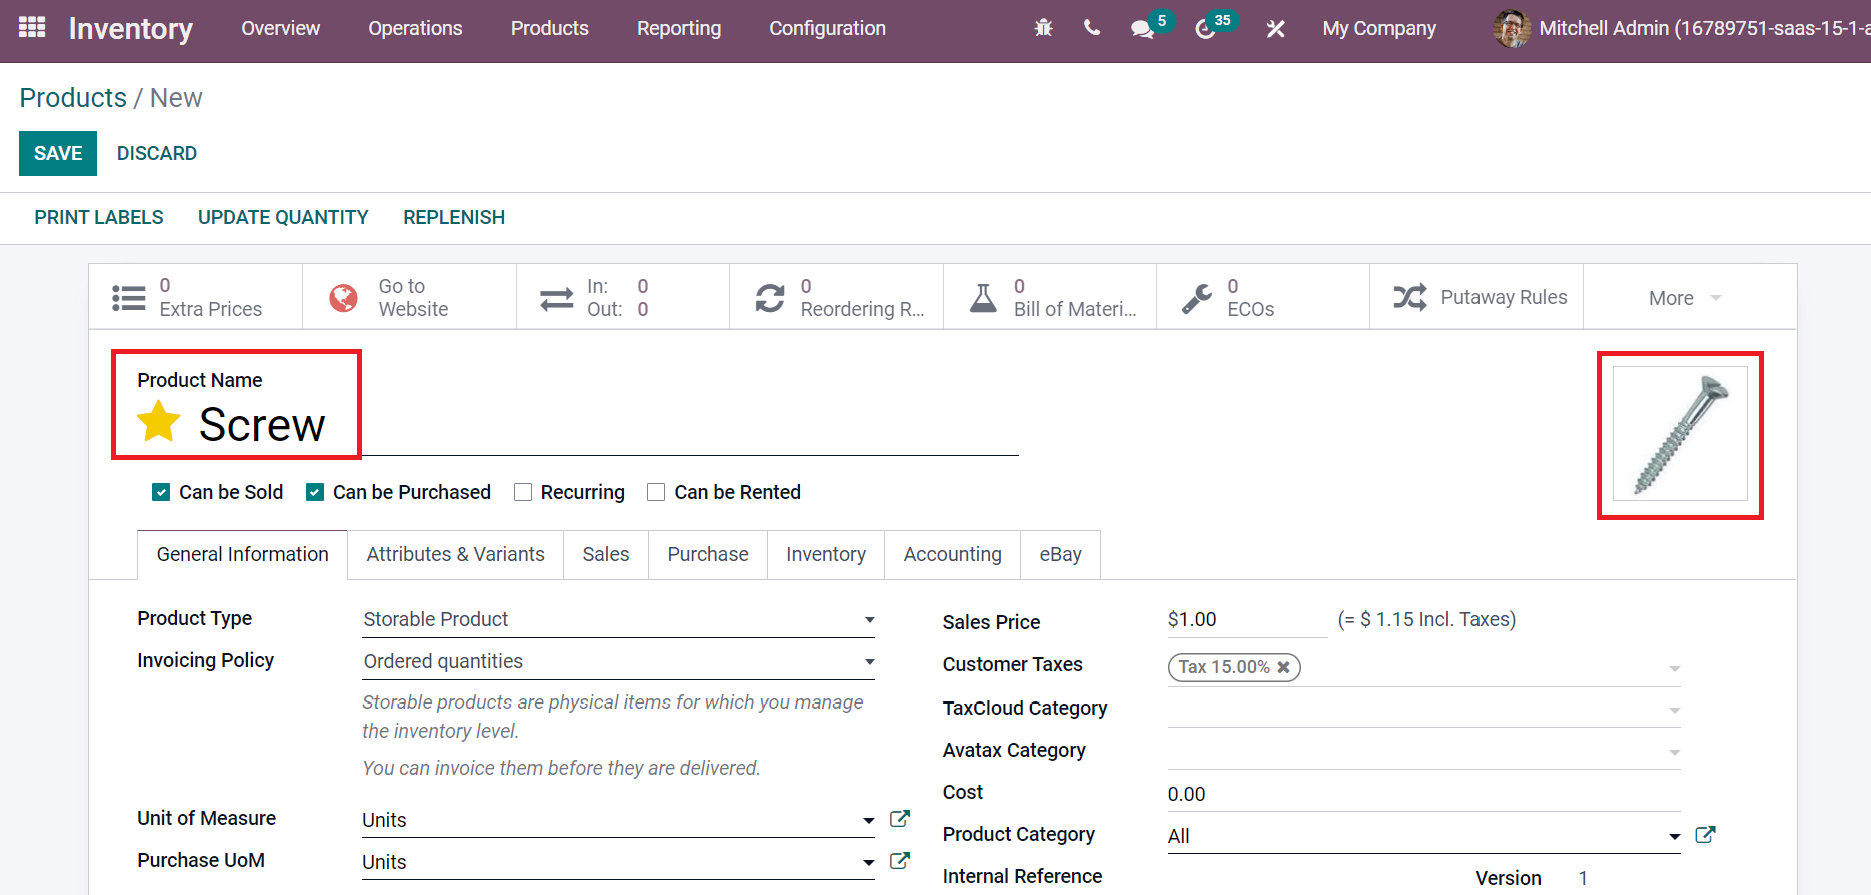
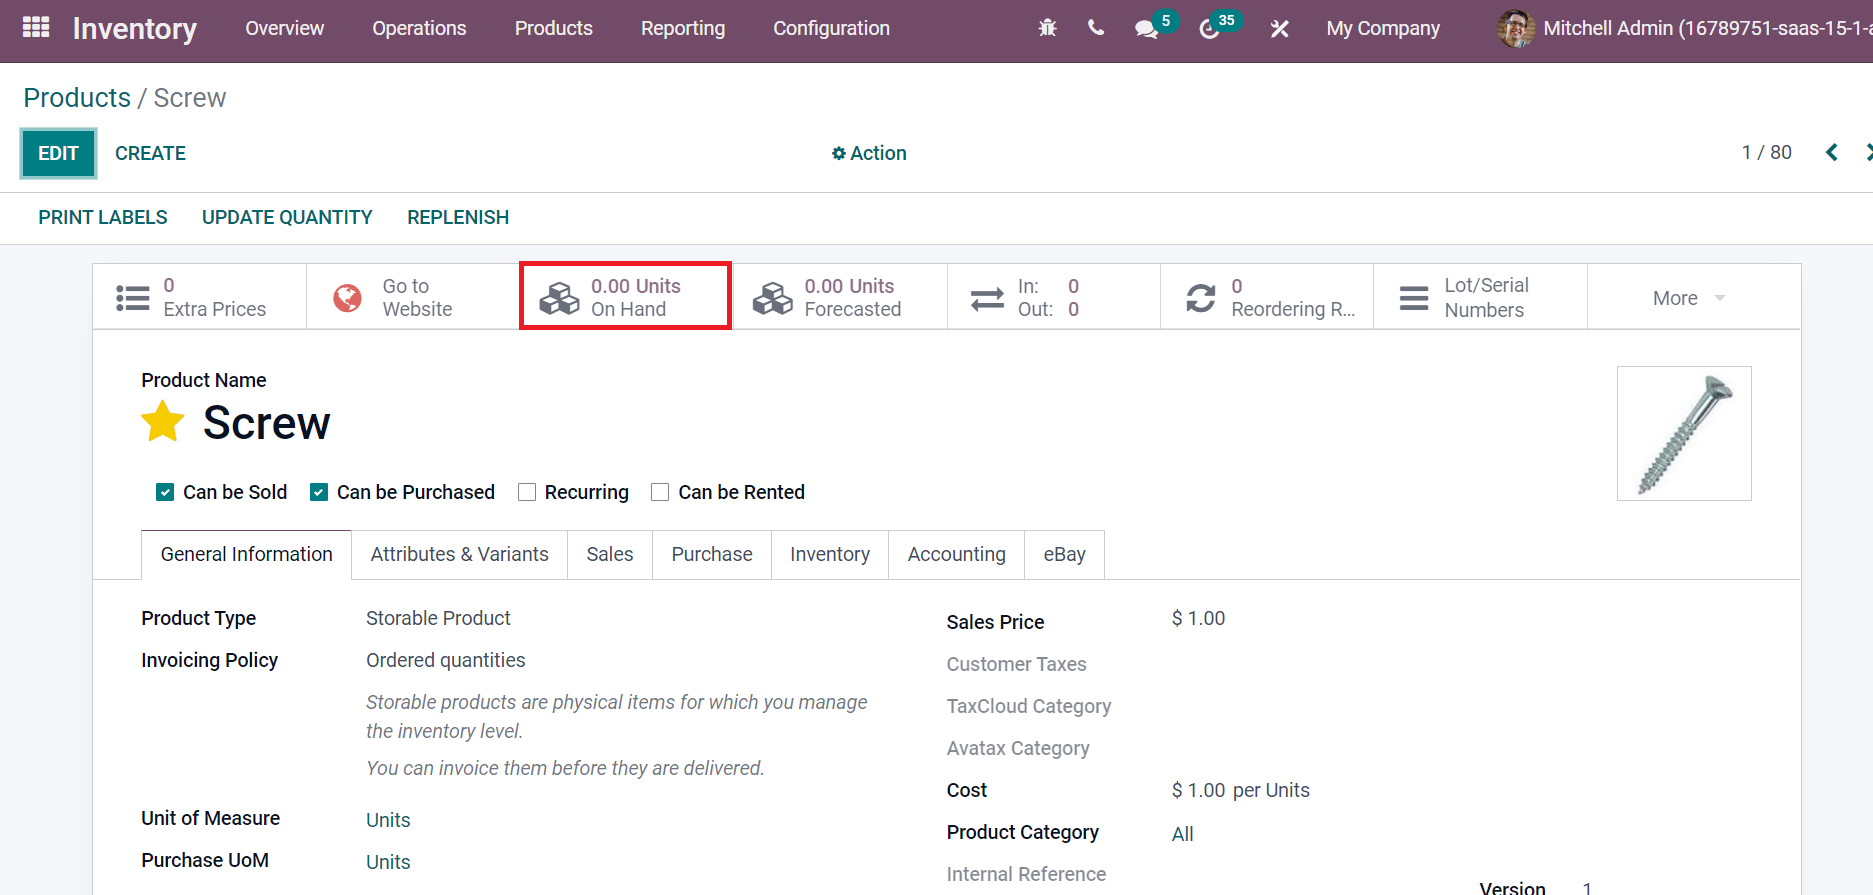
You can access the details of each product separately, giving information such as product name, price, on-hand units, or more, as shown in the screenshot above. Select the CREATE icon to formulate a new product for tracking with a serial number. In the Products window, add Screw on the Product Name field and attach an image as displayed in the screenshot below.
Now, we can enable the serial number option from the Inventory tab. Choose the Inventory tab, and you can view a Traceability section. Users can ensure the traceability of storable commodities in a warehouse using the tracking option. Tracking is divided into three types: No Tracking, By Unique Serial Number, and By Lots, as specified in the screenshot below.
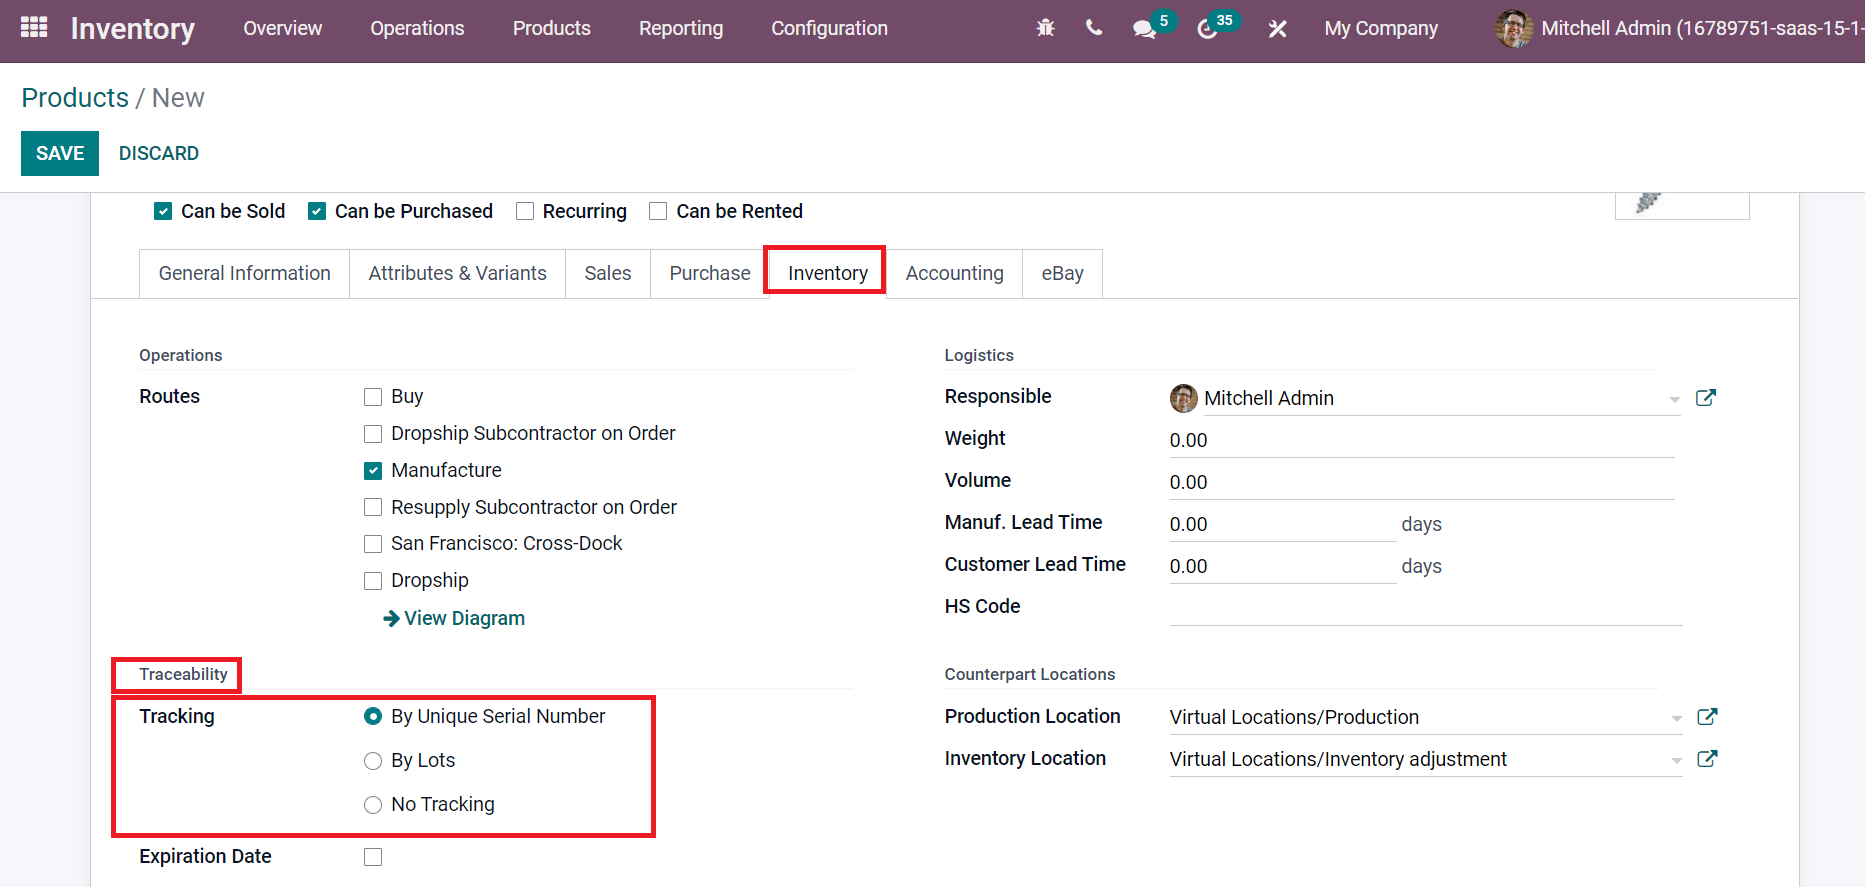
Here, we selected the By Unique Serial Number option below the Traceability section. After saving the details, we can add quantities for your product Screw. Select the On Hand smart button in the Products window to apply more quantities, as denoted in the screenshot below.
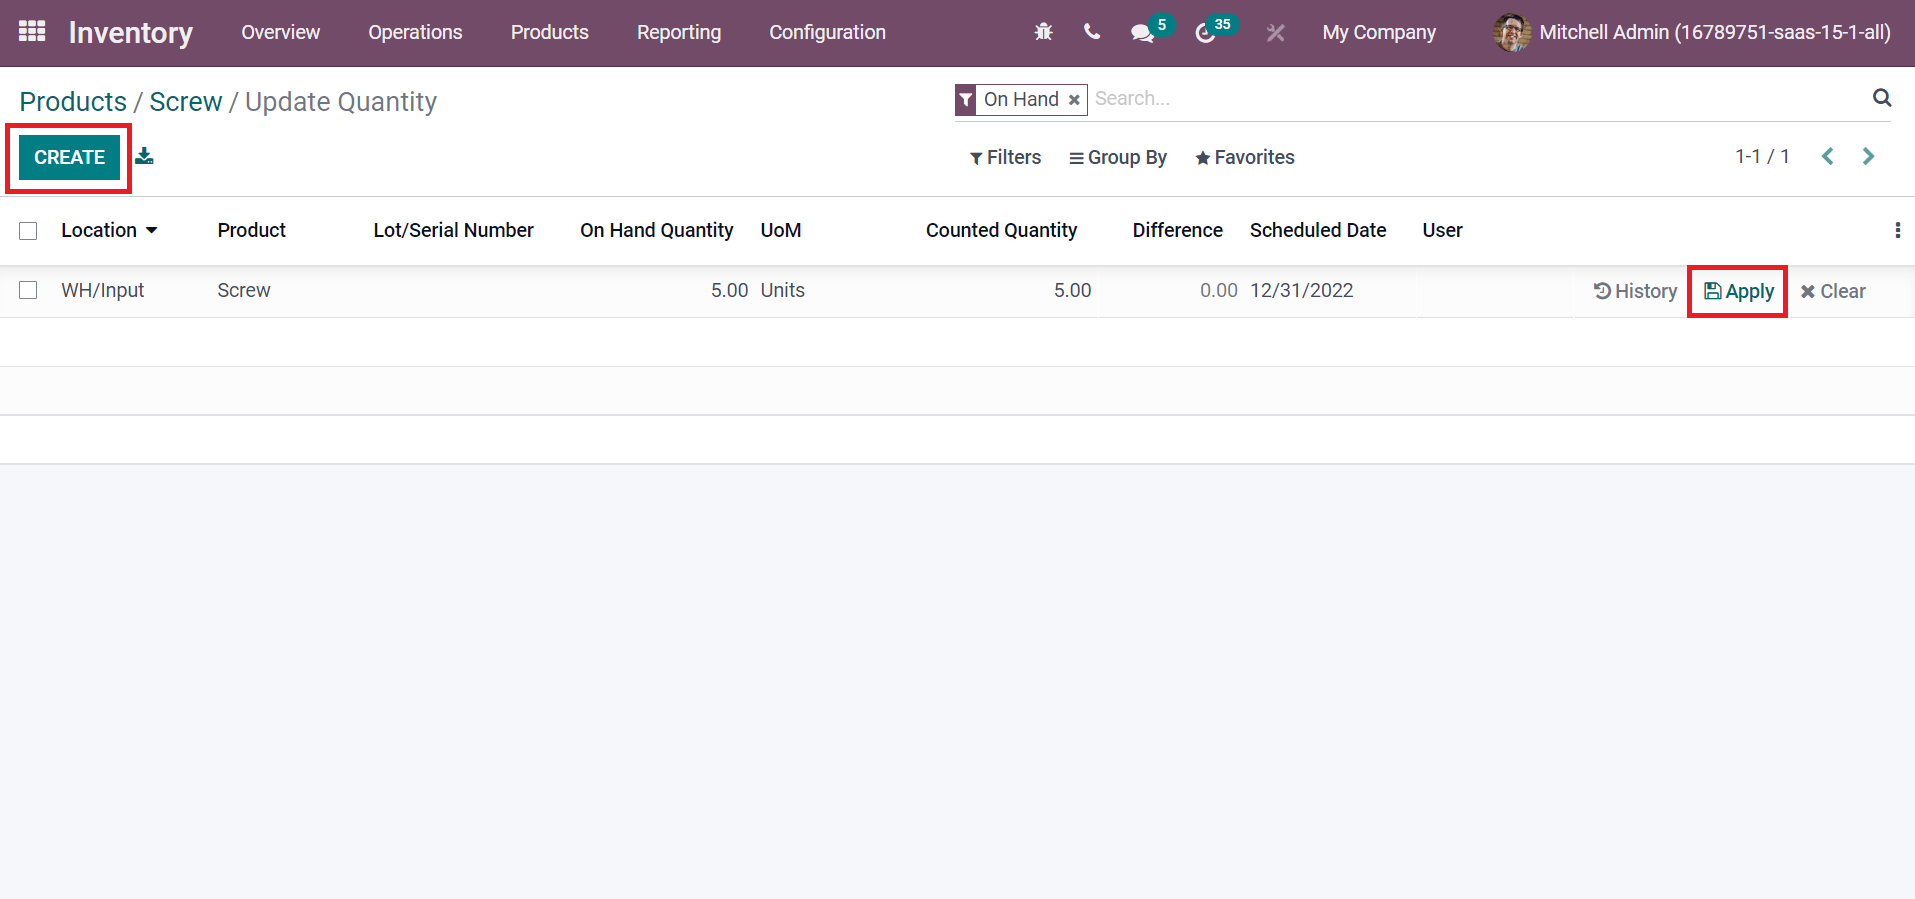
In the new window, you can enter quantities by clicking on CREATE icon. After adding quantity, click on Apply icon to generate the count for the Screw as portrayed in the screenshot below.
Next, let's track a product by the serial number after generating a quotation.
How to Track a Product using a Serial Number?
A serial number is a unique identity to track product location in a warehouse. Users can describe the tracking option of a purchased product using Odoo ERP. We can develop a purchase order for product screws to track quickly. So, let's create a purchase quotation from the Odoo 15 Purchase module. Click the Requests for Quotation menu in the Orders tab, and all created quotations are clear before the user. You can see the information related to each quotation, such as Company, Reference, Vendor, Source Document, and Status, as mentioned in the screenshot below.
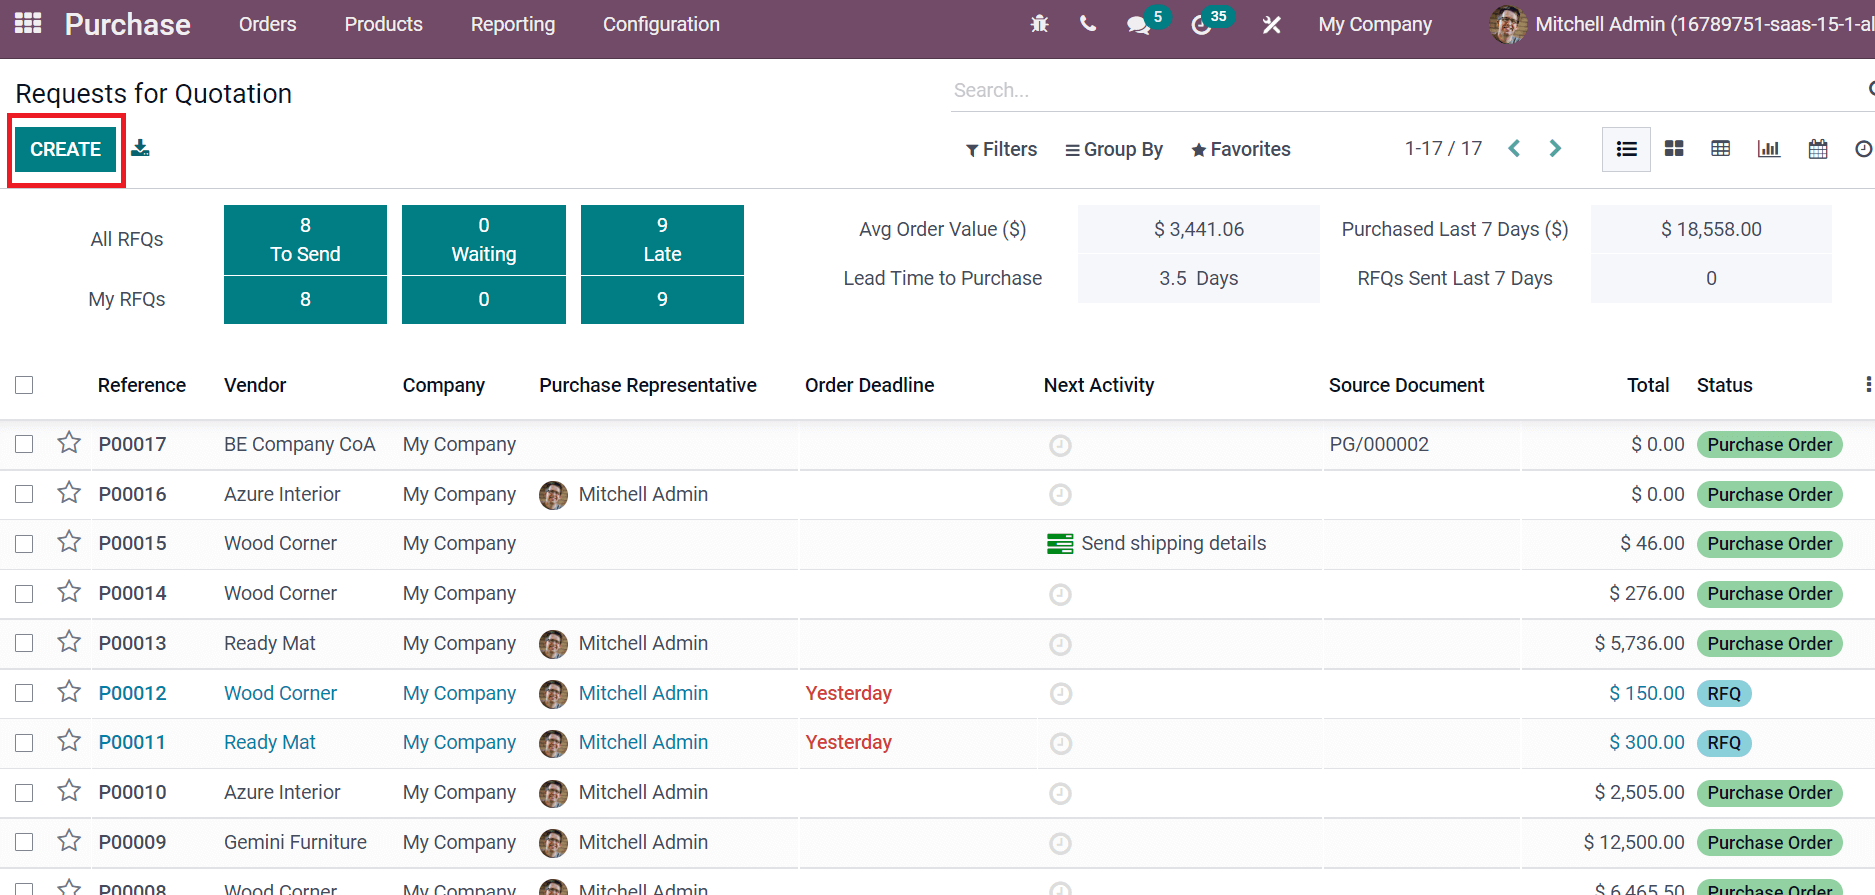
Choose the CREATE icon to process a new request for quotation. Add Vendor, Vendor Reference, and Currency in the Requests for Quotation window, as displayed in the screenshot below.
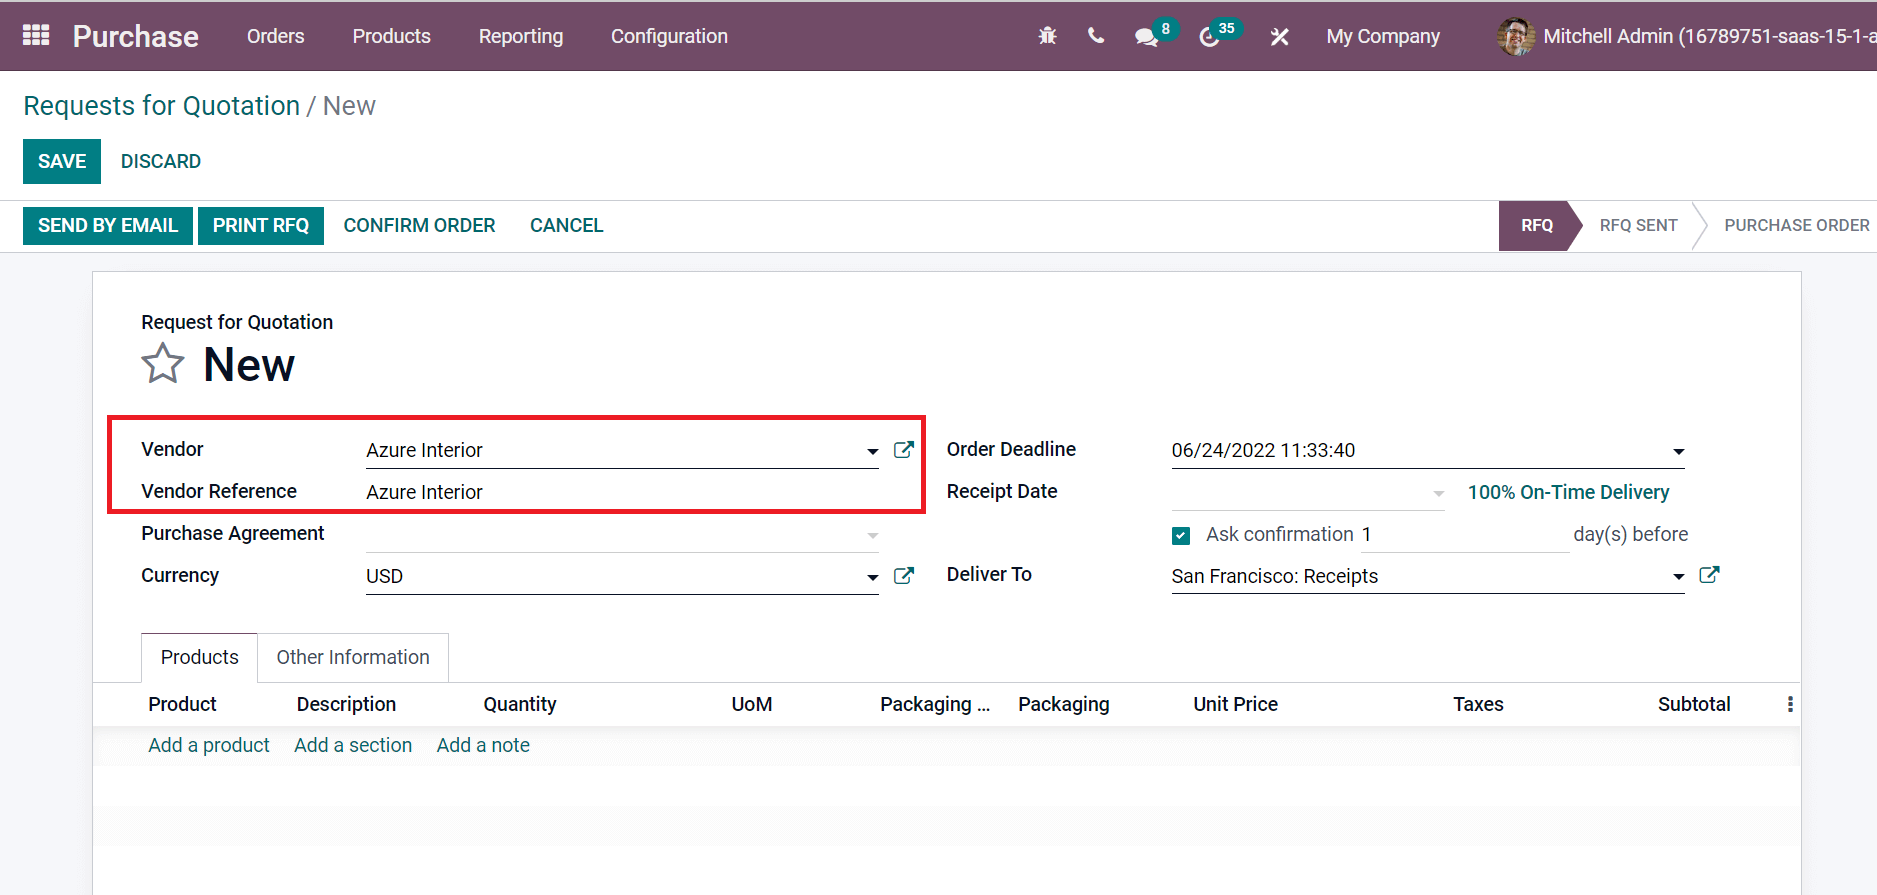
You can enter the confirmed quotation date in the Order Deadline field and promised date by a vendor in the Receipt Date field, as in the screenshot below.
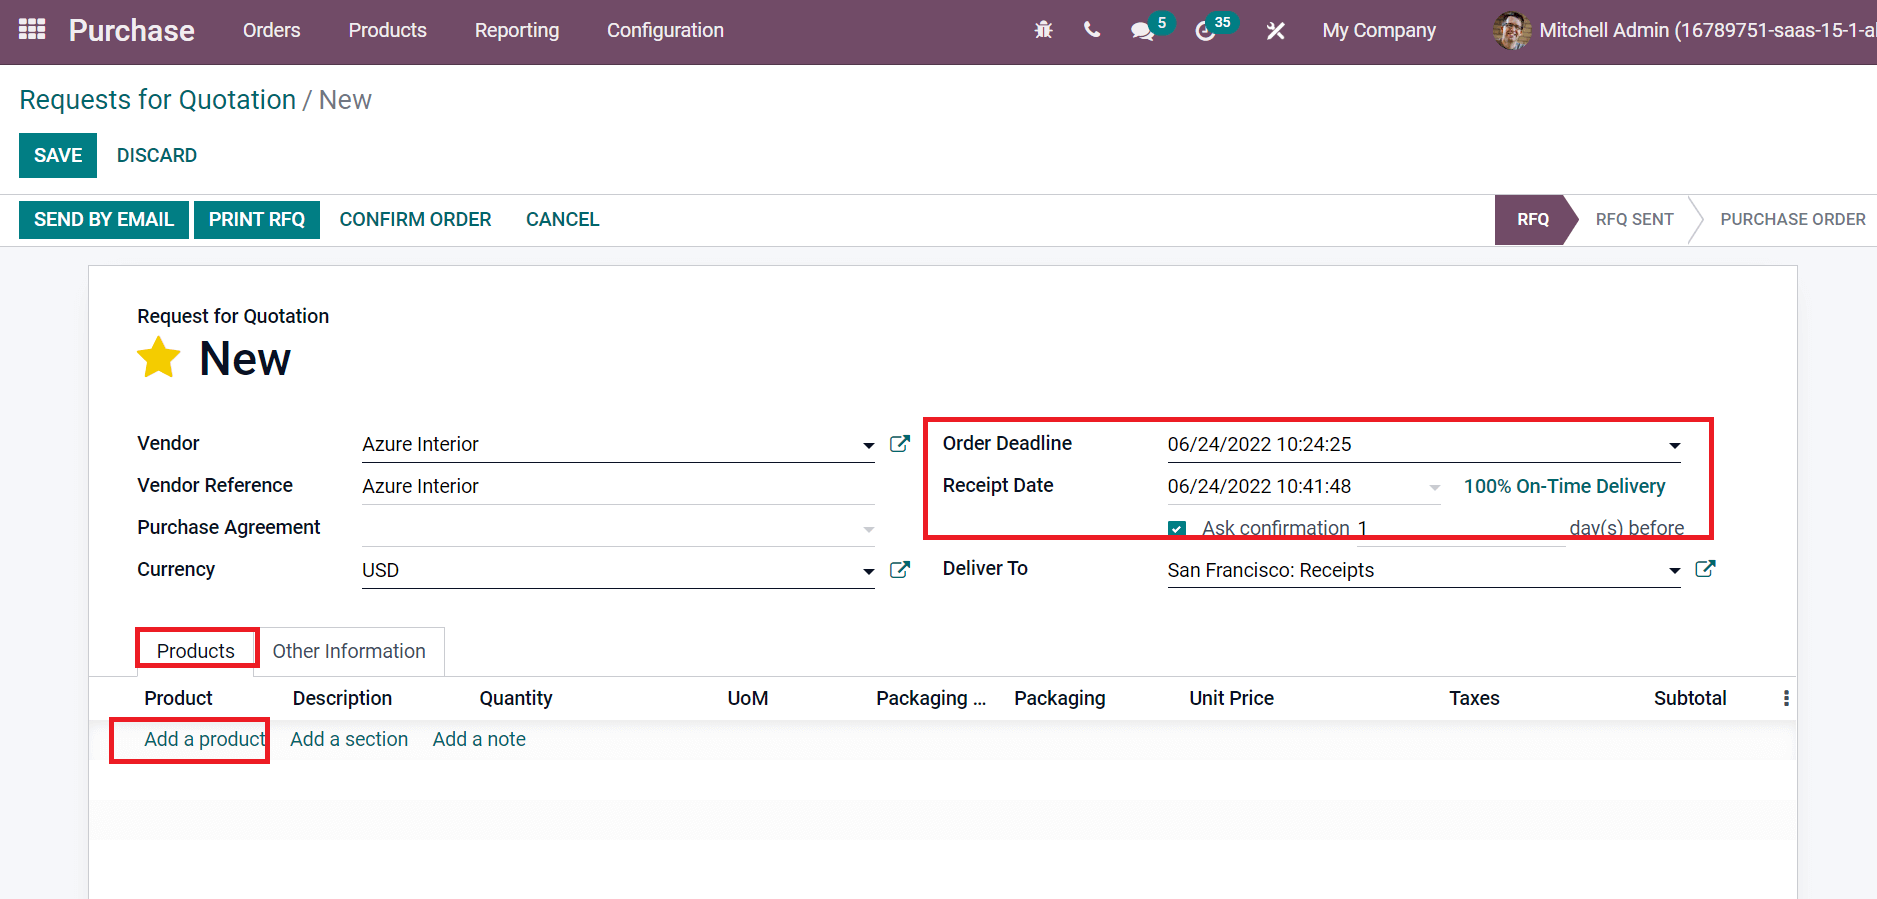
Choose your product screw by selecting the Add a product option below the Products tab. Selected product data is visible below the Product tab and choose the SAVE icon as illustrated in the screenshot below.
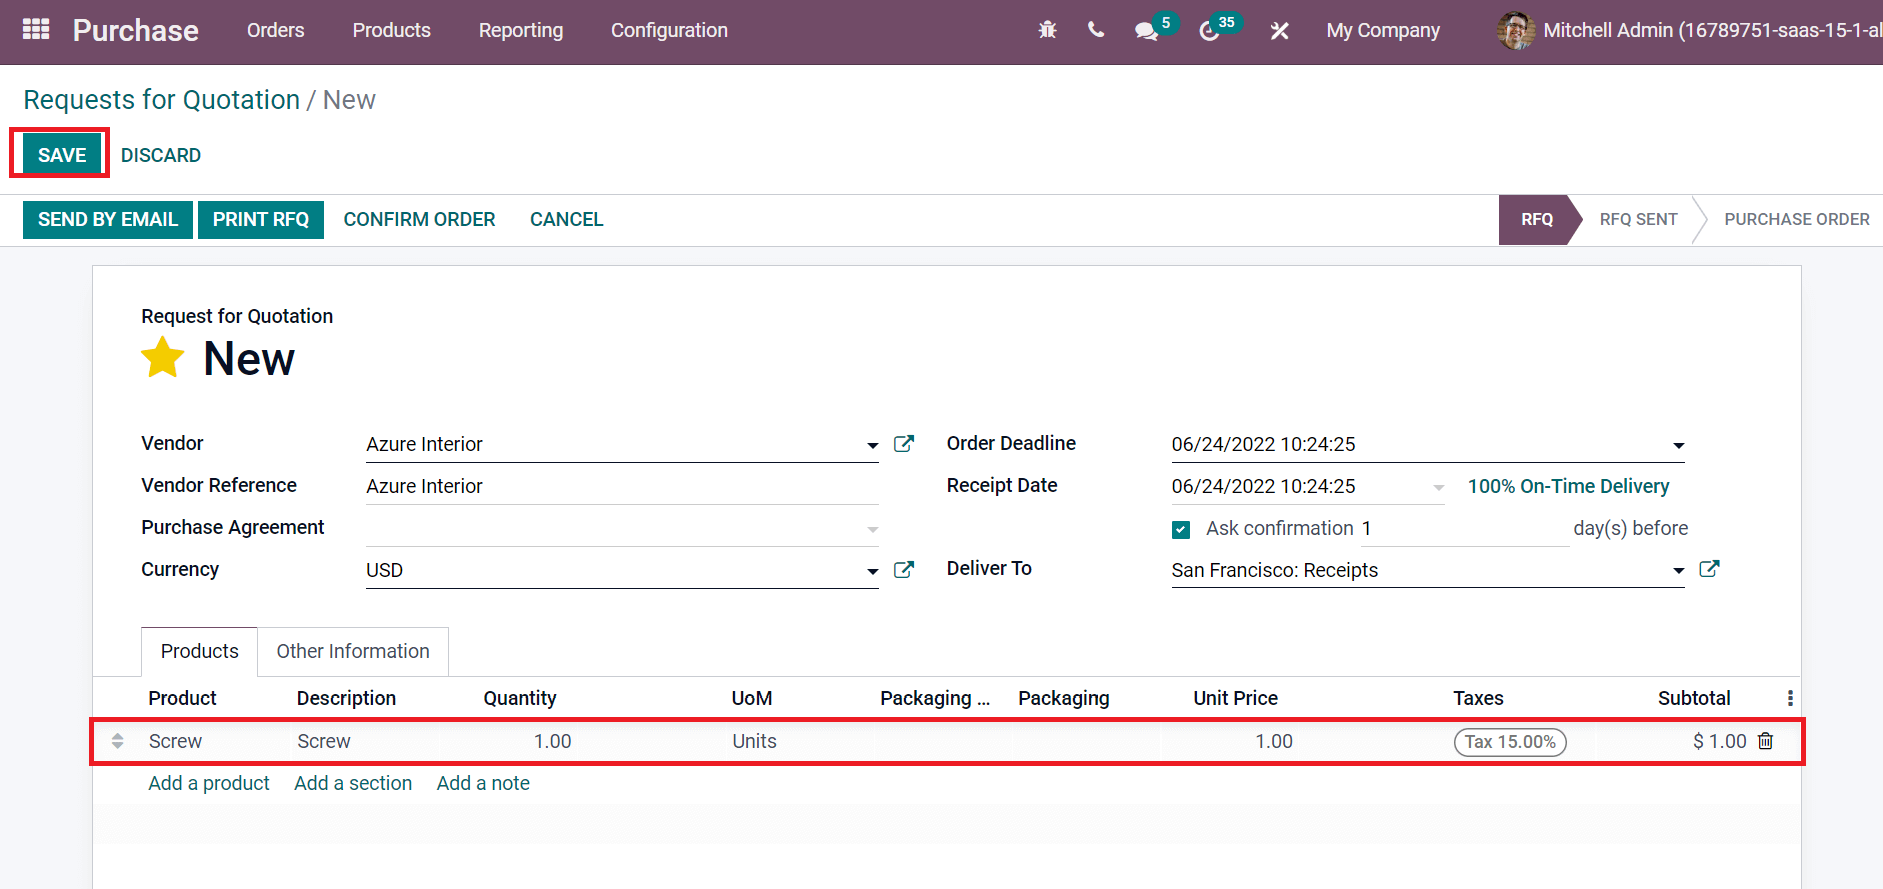
Click on the CONFIRM ORDER icon after saving your information, as implied in the screenshot below.
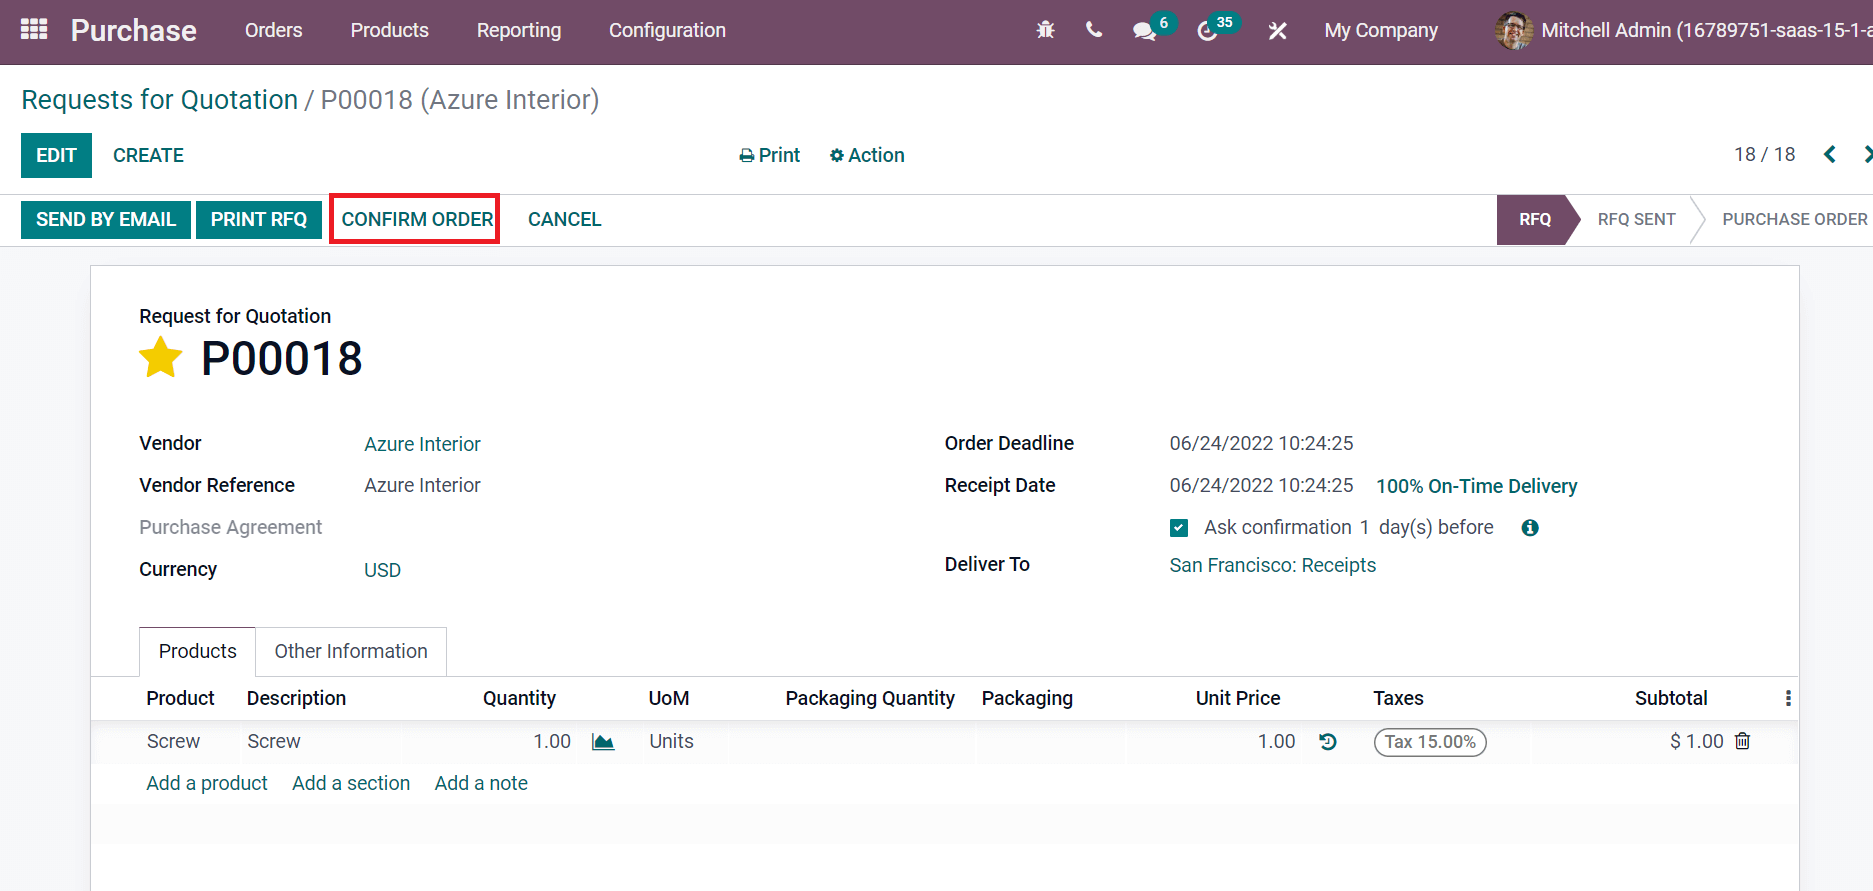
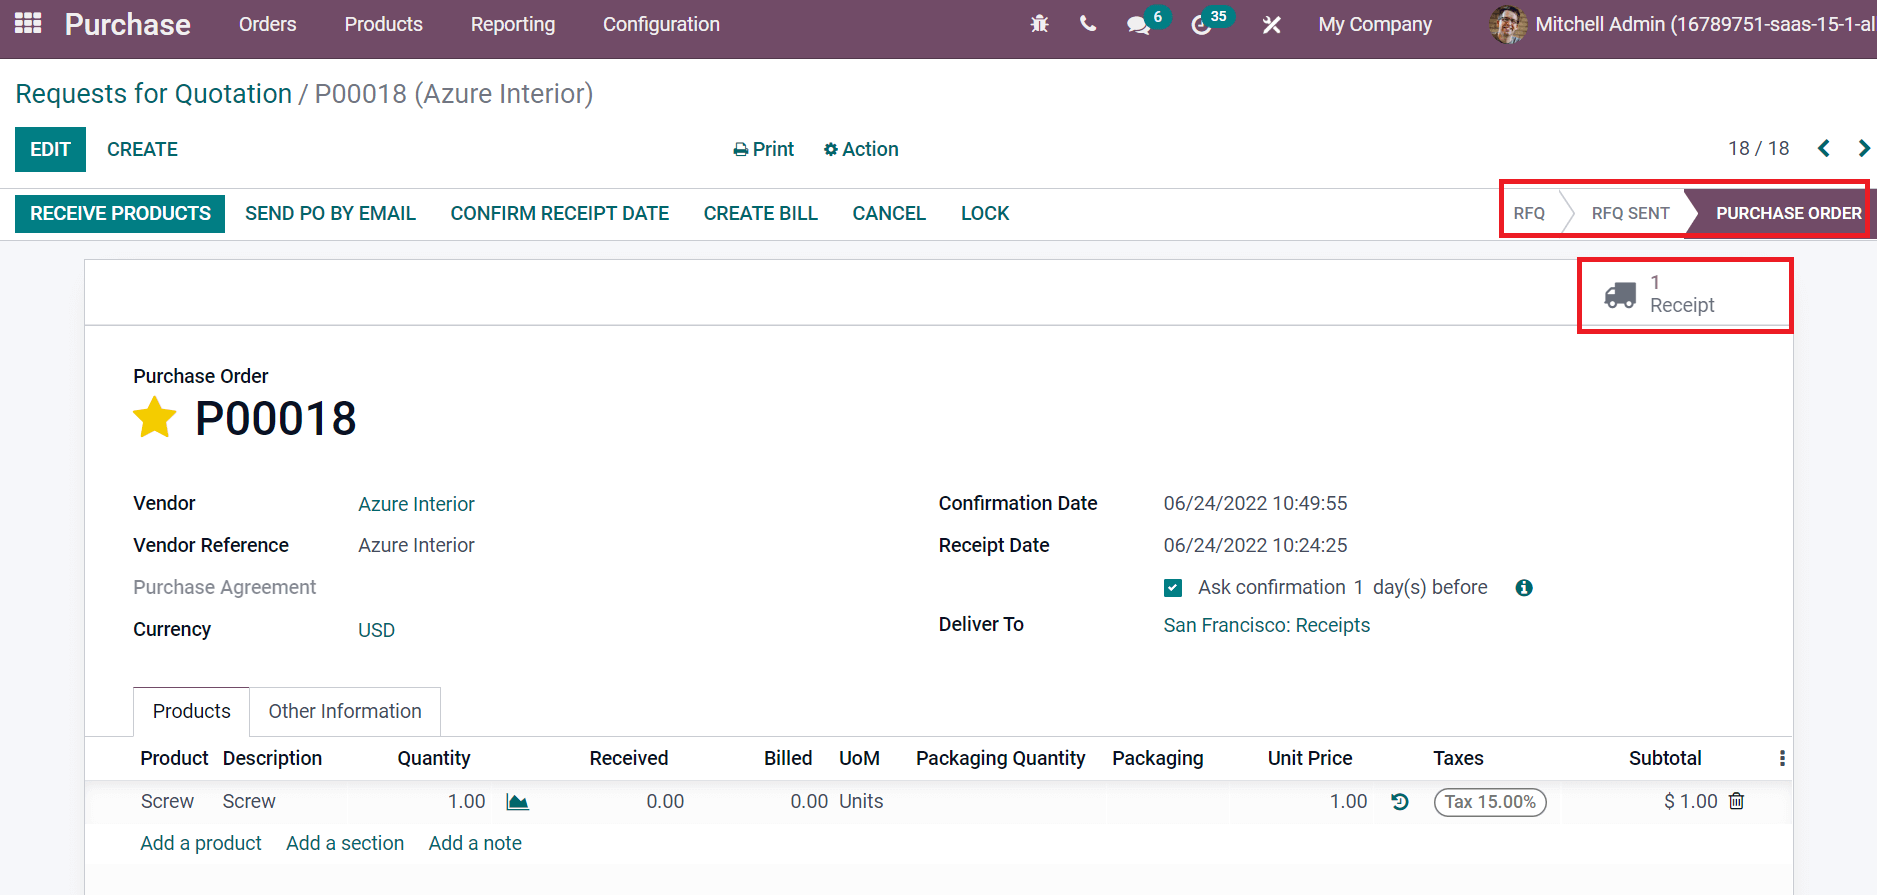
After confirming the order, the stage changes from RFQ to PURCHASE ORDER. Choose the Receipt smart button to validate your incoming shipments as specified in the screenshot below.
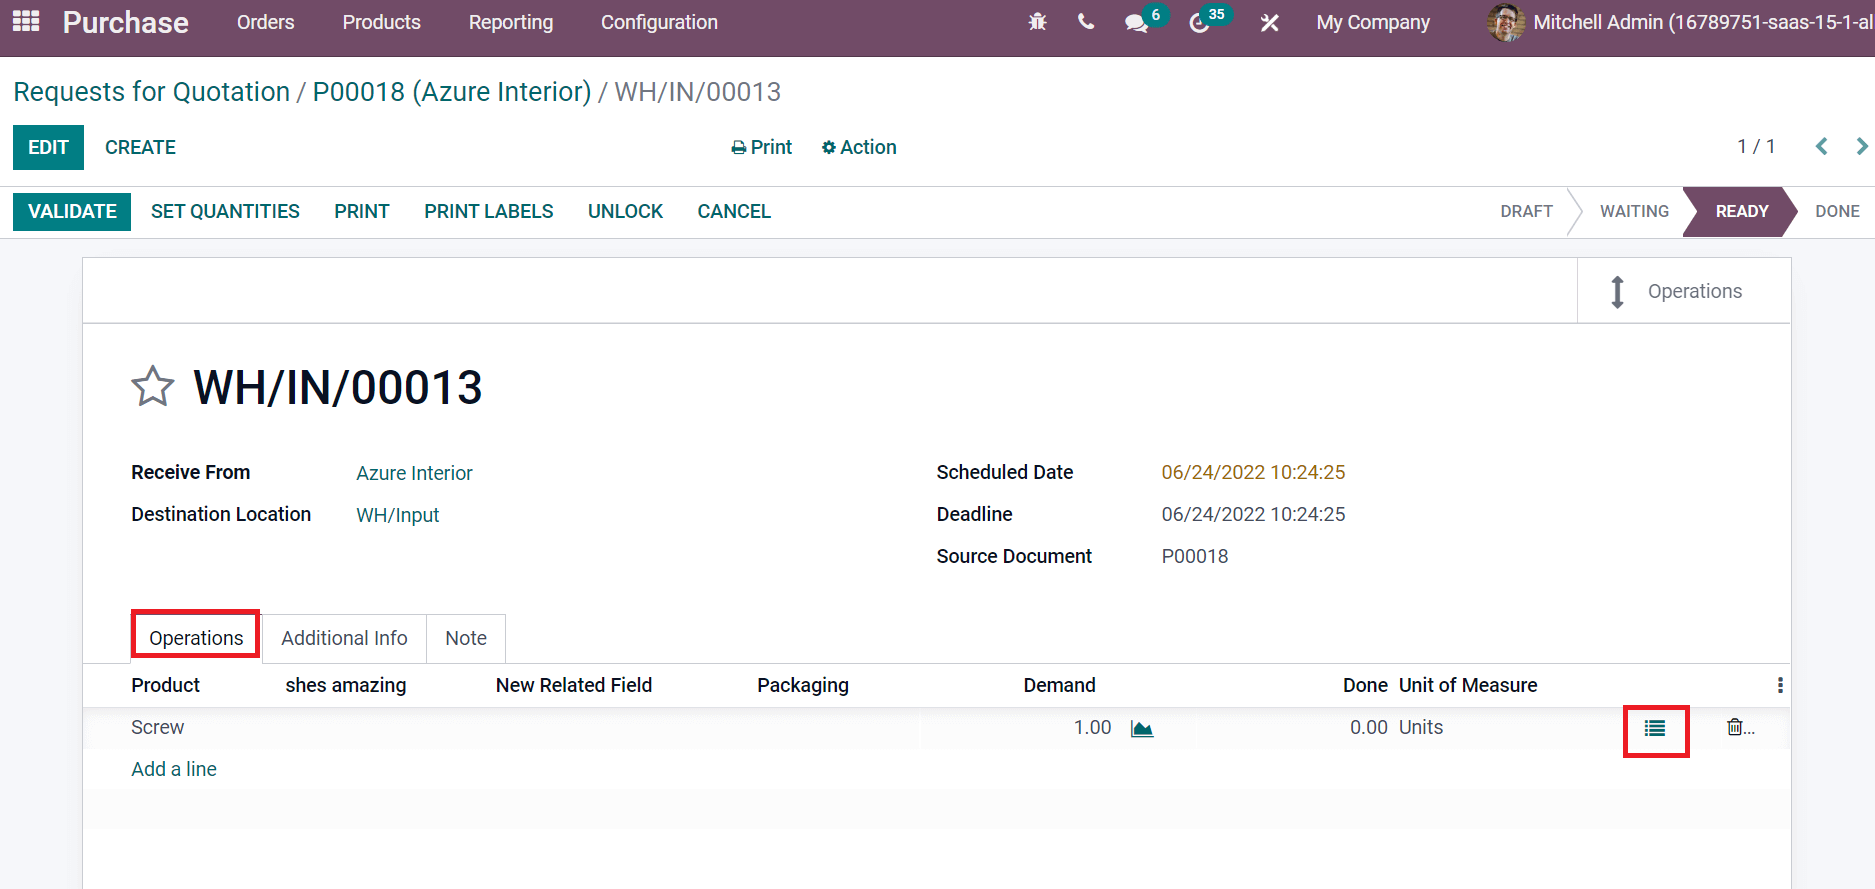
In the new window, select the three-bar icon near to Unit of Measure option below the Operations tab, as indicated in the screenshot below.
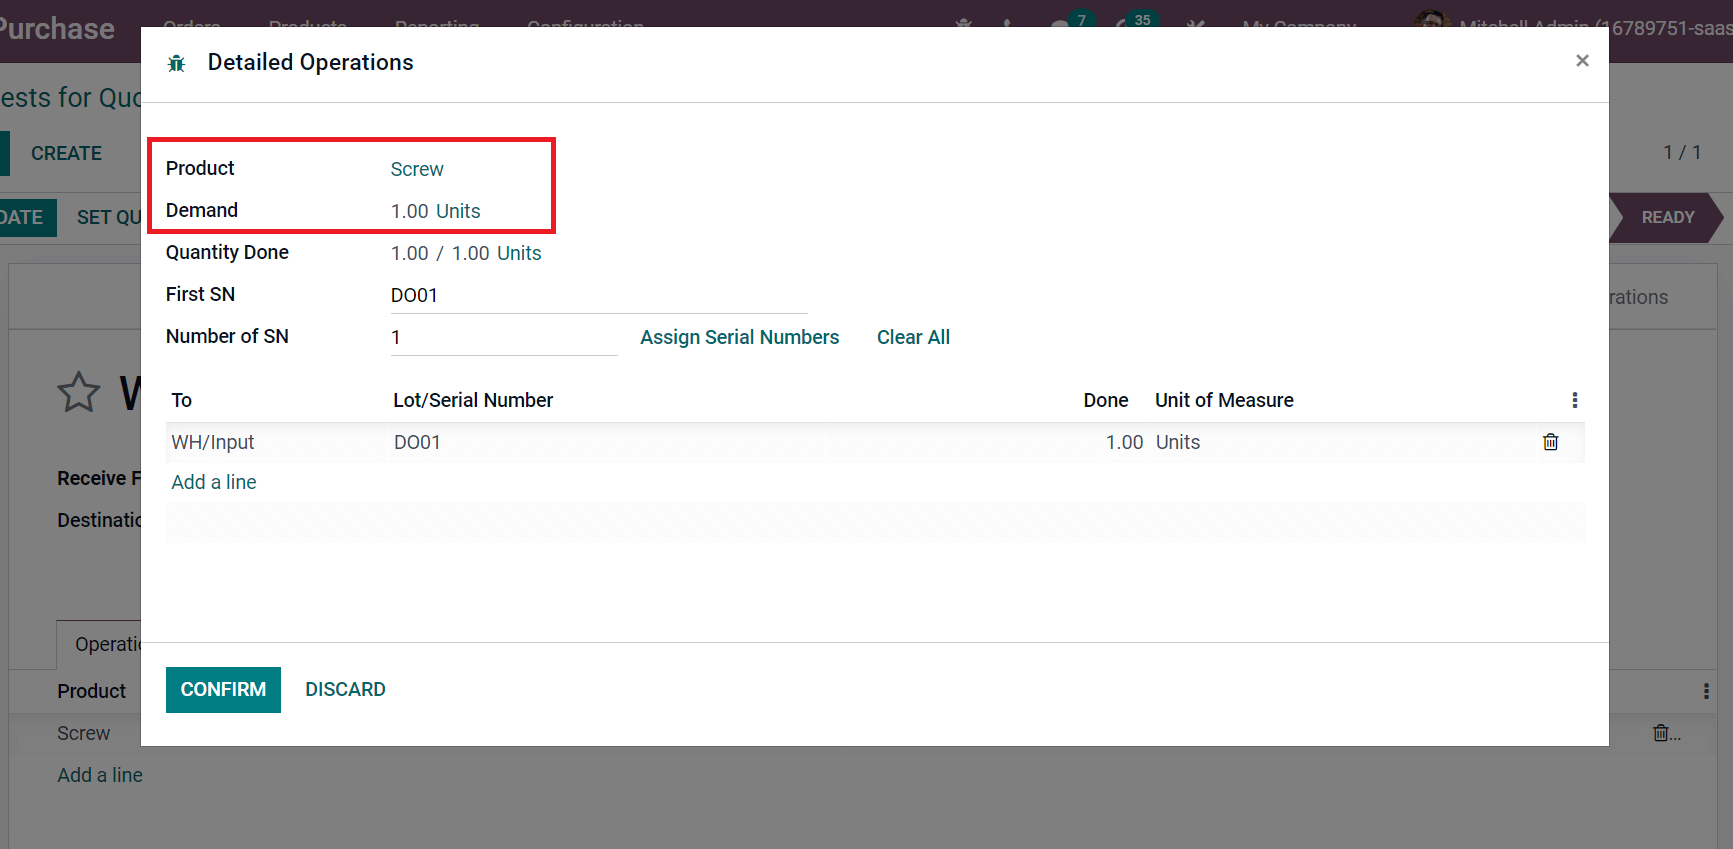
A Detailed Operations window opens before you show the product and count of products from an inventory point of view in the Demand field, as marked in the screenshot below.
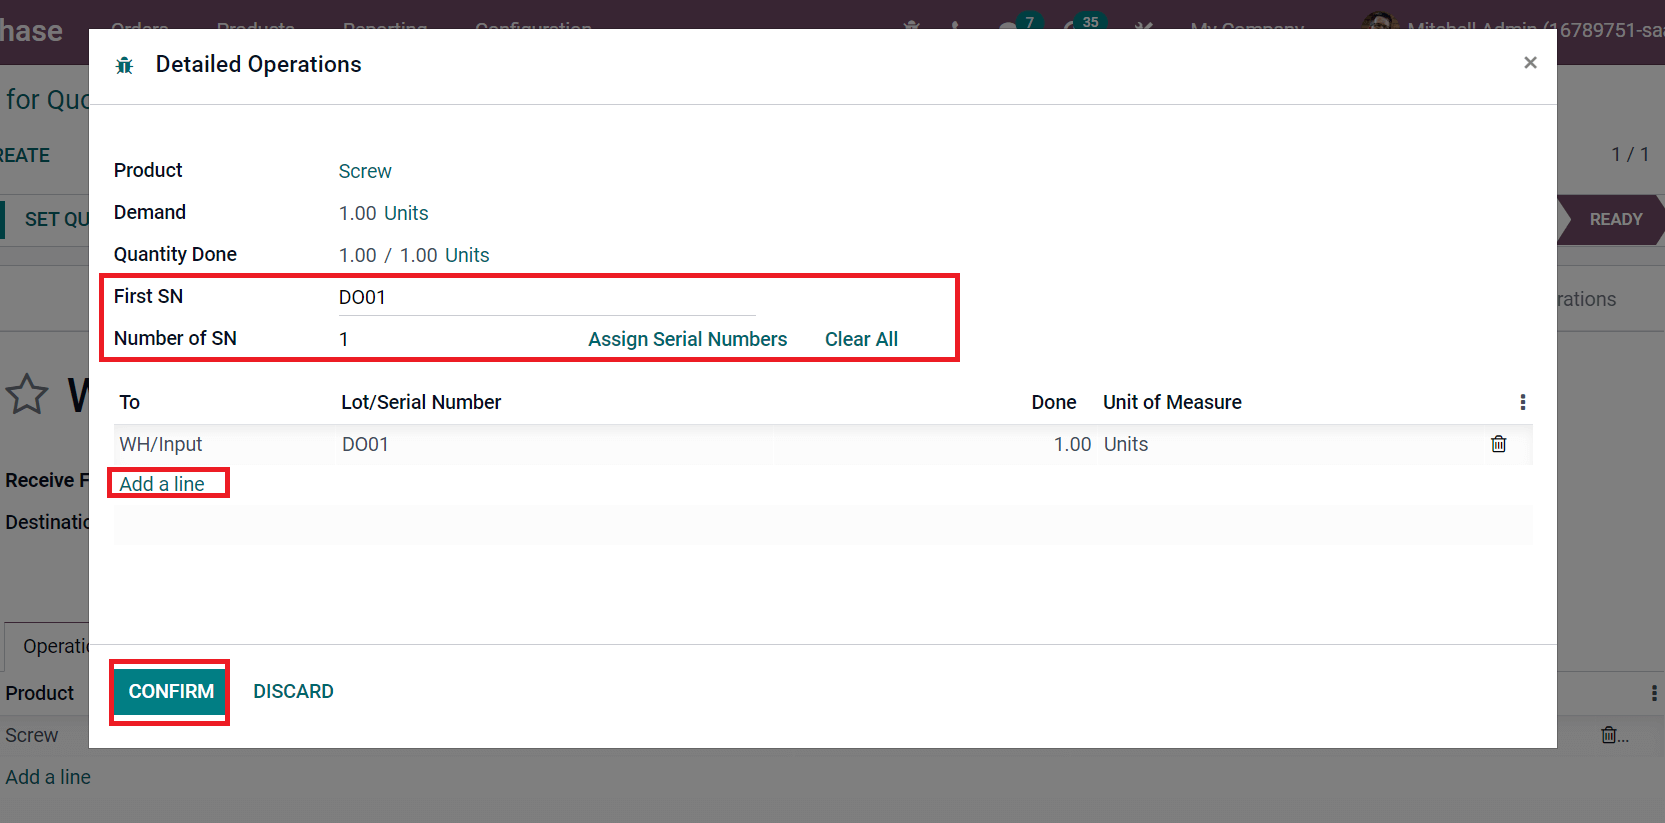
Later, enter your first serial number in the First SN field and apply a total number of serial numbers for your product in the Number of SN field. Click on Add a line option to enter your serial number with a unit of measure and select the CONFIRM icon as represented in the screenshot below.
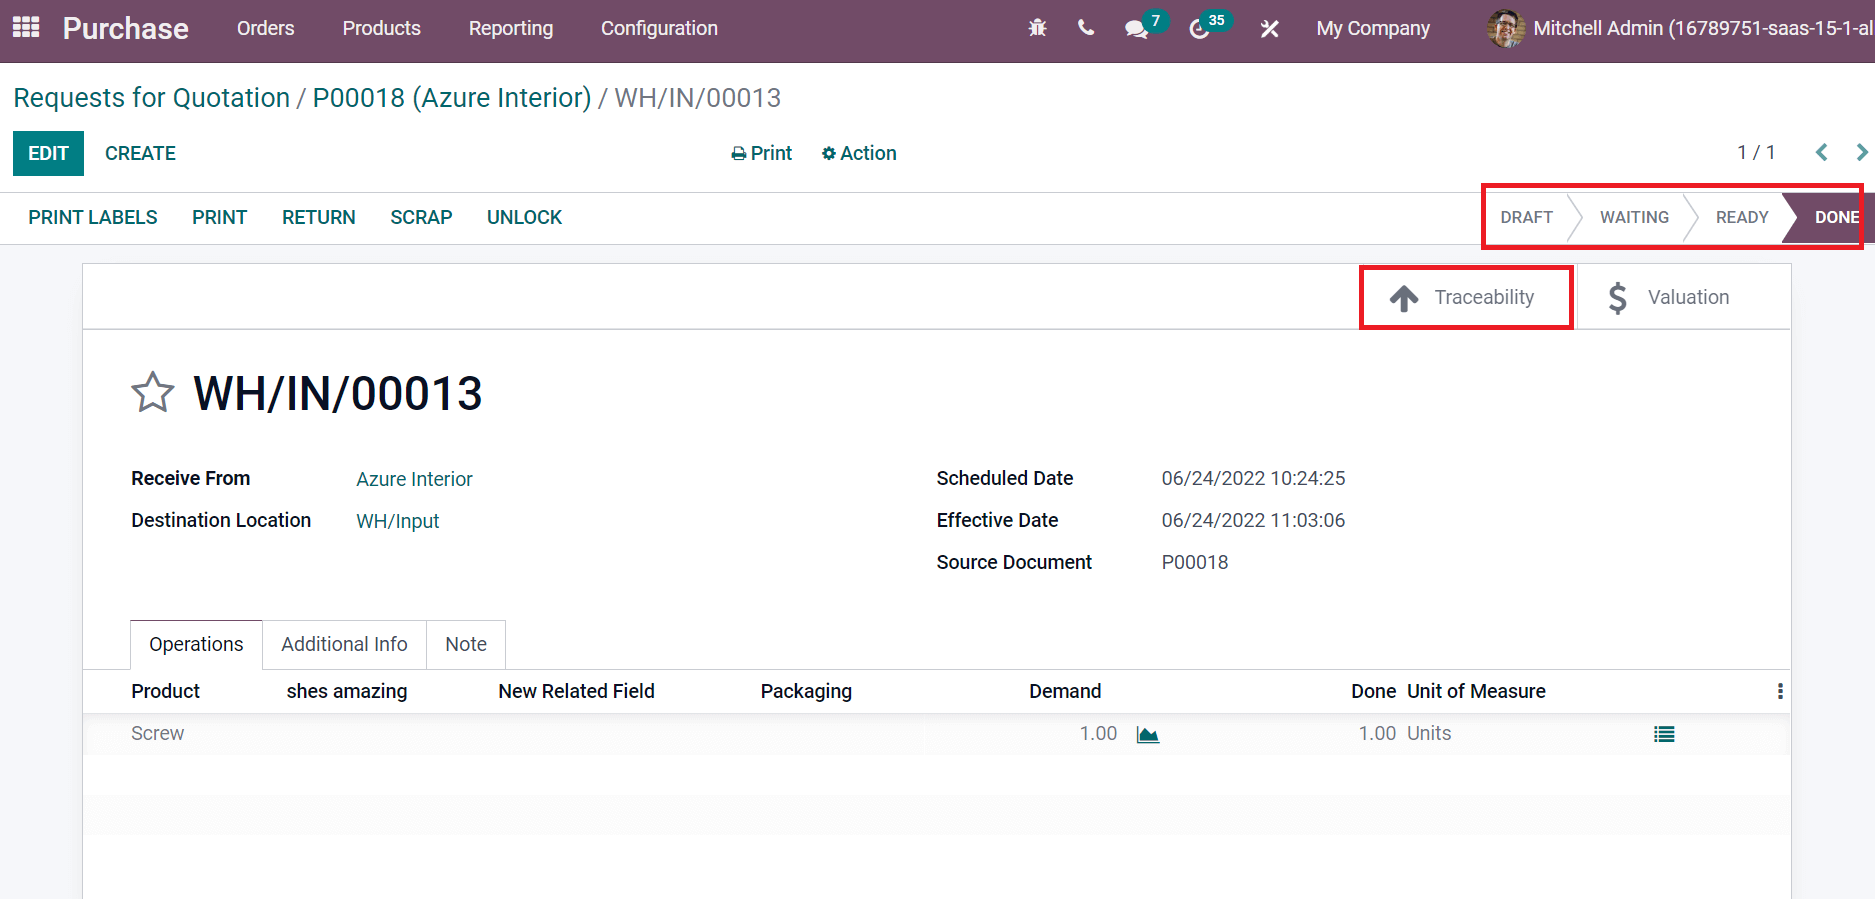
You can validate the Receipt after adding the serial number for the product. After the validation, the stage changes from READY to DONE, and you can see a Traceability smart button, as demonstrated in the screenshot below.
We can access the traceability report of the product screw in the next window. It shows details such as Date, Reference, Quantity, Lot/Serial, From, and To location, as in the screenshot below.
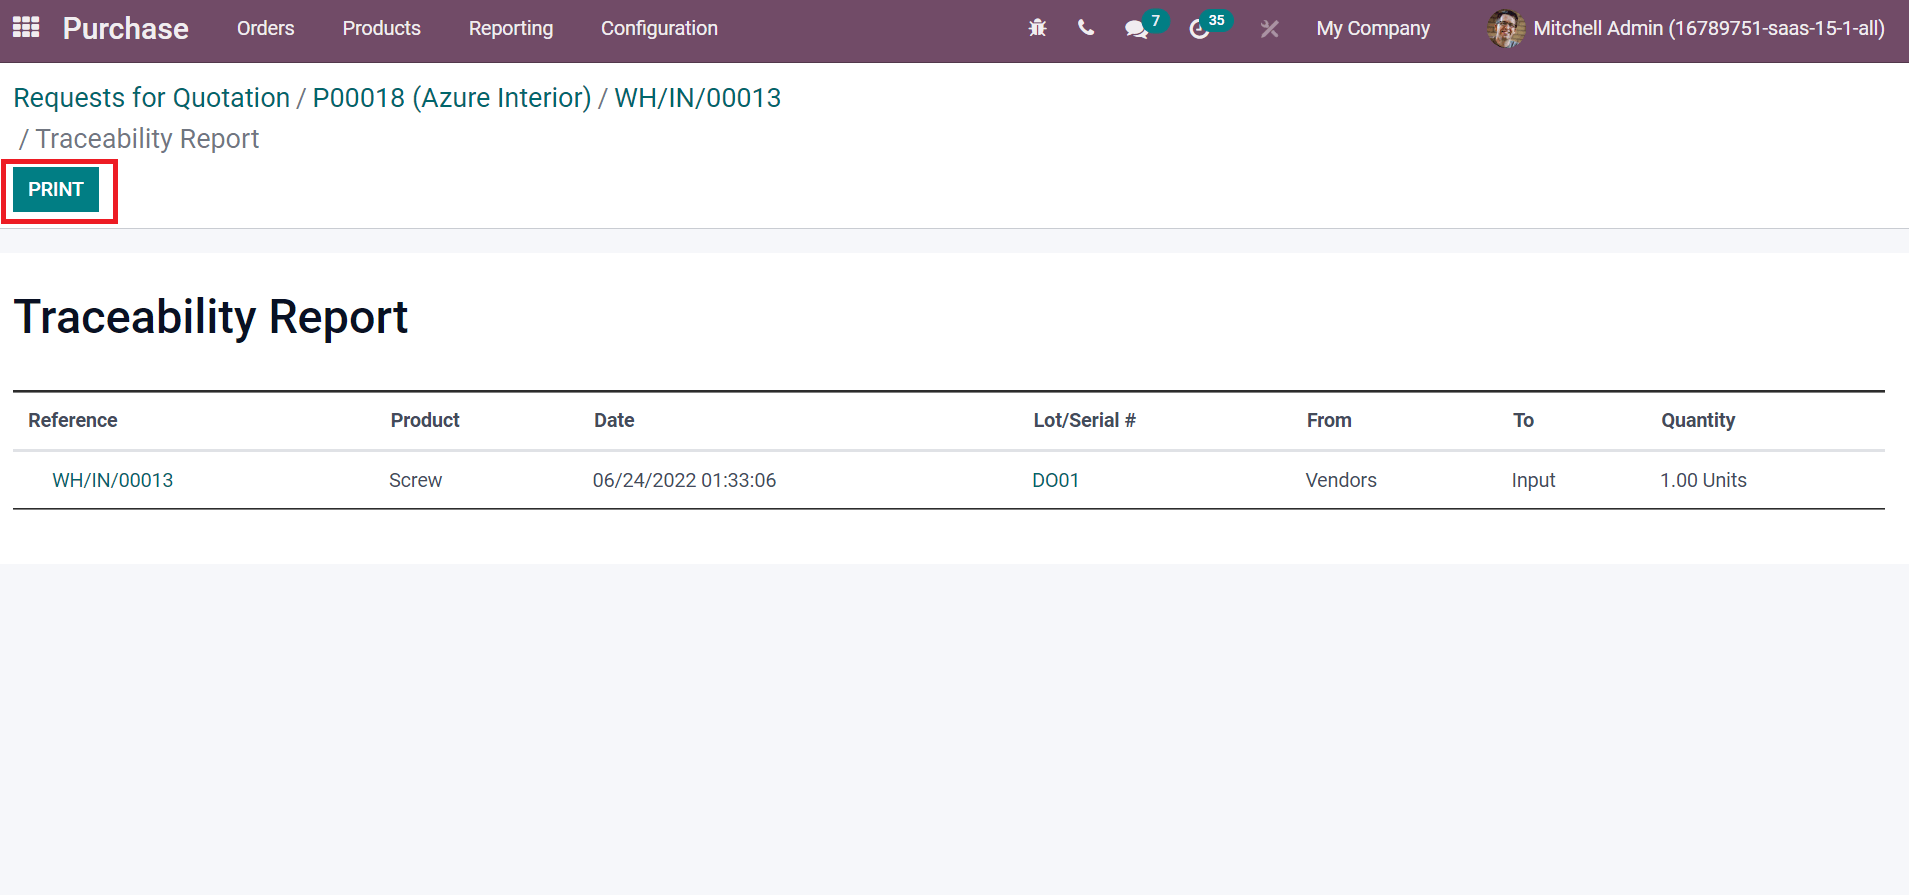
Users can download the traceability report by clicking on the PRINT icon, as shown in the screenshot above.
Odoo ERP ensures tracking product traceability using the Serial Numbers. We can quickly add a serial number when purchasing a commodity and track its location. A product's availability verifies quickly with a serial number. Refer to the given below link to know more about Product Traceability in Odoo 15 Inventory.