Ensuring a seamless and secure user authentication process in mobile app development is crucial. Firebase Authentication (Firebase Auth) is a powerful and flexible solution that simplifies this task. Whether you're building a simple login system or a more complex one with multiple authentication methods, Firebase Auth provides an efficient way to manage users with minimal effort.
In Flutter, Firebase Auth integrates smoothly, allowing developers to quickly implement authentication features such as email/password login, social logins (Google, Facebook), and even anonymous authentication. This blog will guide you through setting up Firebase Authentication in your Flutter app, showcasing best practices and tips for building secure, user-friendly apps.
Before diving into Firebase Authentication, the first step is to create a new Flutter project and connect it to Firebase. Here's a quick guide to get you started:
1. Create a Flutter Project: Open your terminal or IDE (like Android Studio or Visual Studio Code) and run the following command to create a new Flutter project:
flutter create your_project_name

2. Set Up a Firebase Project: Head over to the Firebase Console and create a new project:
a. Click on "Add Project" and follow the setup instructions.
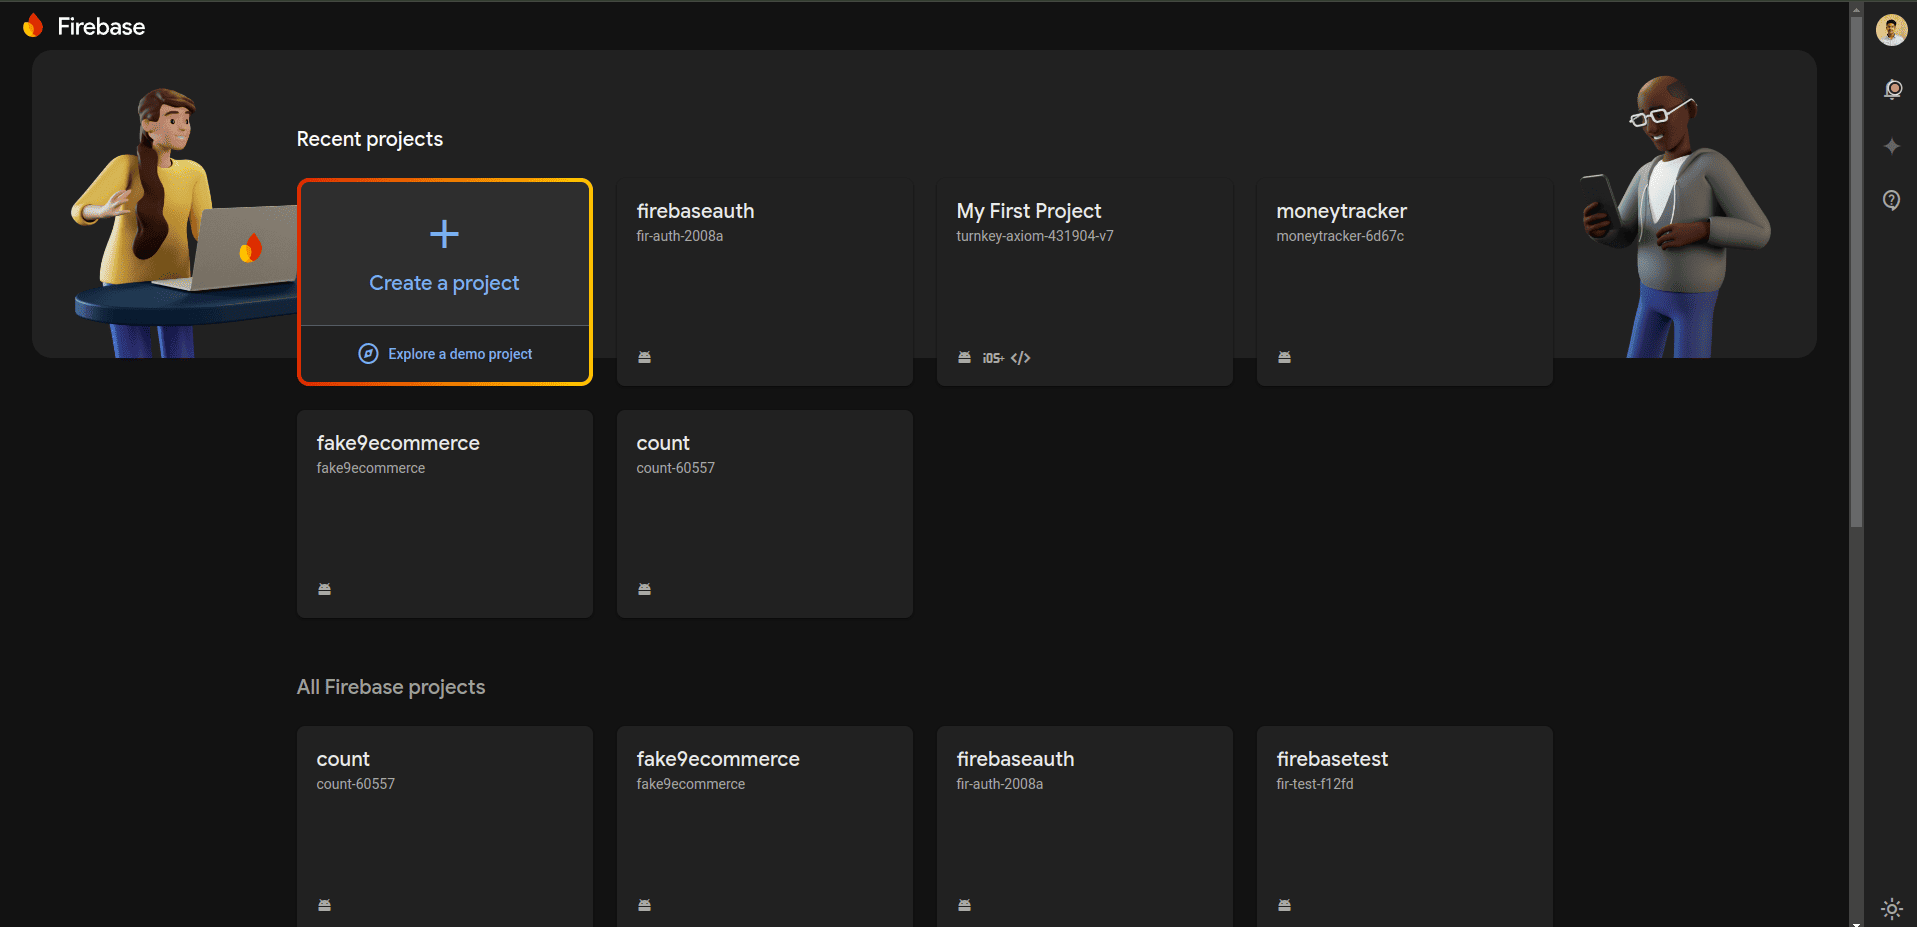
b. Once your Firebase project is ready, you'll need to register your Flutter app (both for Android and iOS, if needed).
3. Register Your Flutter App with Firebase
Now, you need to register your Flutter app with Firebase for both Android and iOS (if you plan to support both platforms).
For Android:
* In the Firebase Console, click on the Android icon to register your app.
* Enter your Android package name. You can find it in your Flutter project at android/app/src/main/AndroidManifest.xml under the package attribute.
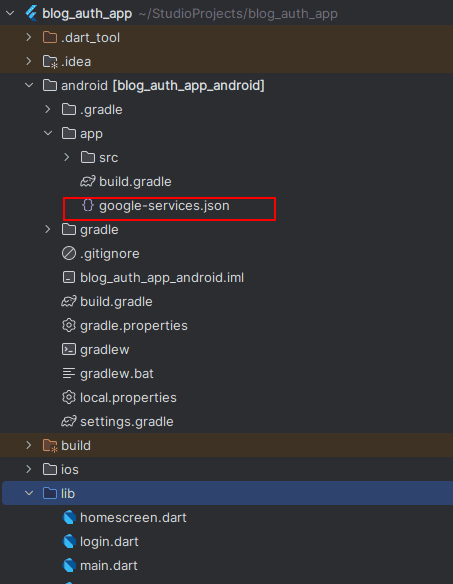
* Download the google-services.json file and place it in your Flutter project’s android/app directory.
For iOS:
* Click on the iOS icon in the Firebase Console.
* Enter your Android package name. You can find it in your Flutter project at android/app/src/main/AndroidManifest.xml under the package attribute.
* Download the GoogleService-Info.plist file and place it in your Flutter project’s ios/Runner directory. Don’t forget to open the ios/Runner.xcworkspace file in Xcode and ensure the GoogleService-Info.plist is included in your app's build.
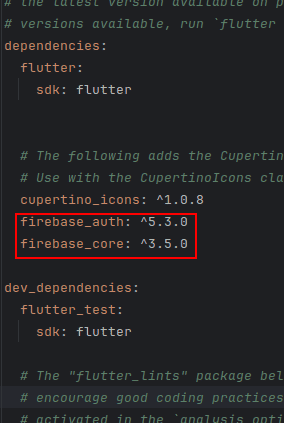
4. Install Firebase Packages: Add the necessary Firebase packages to your pubspec.yaml file, including firebase_core and firebase_auth, then run flutter pub get:
dependencies:
firebase_core: latest_version
firebase_auth: latest_version
5. Initialize Firebase in Flutter: Initialize Firebase within your app. Add the following code in your main.dart file:
void main() async {
WidgetsFlutterBinding.ensureInitialized();
await Firebase.initializeApp();
runApp(const MyApp());
}
* WidgetsFlutterBinding.ensureInitialized() prepares Flutter to handle asynchronous code at startup.
* Firebase.initializeApp() connects our app to Firebase, allowing us to use services like Authentication.
* Finally, runApp(MyApp()) starts the app once Firebase is ready.
Here is the full code for the main page:
import 'package:firebase_core/firebase_core.dart';
import 'package:flutter/material.dart';
import 'login.dart';

void main() async {
  WidgetsFlutterBinding.ensureInitialized();
  await Firebase.initializeApp();
  runApp(const MyApp());
}
class MyApp extends StatelessWidget {
  const MyApp({super.key});
  // This widget is the root of your application.
  @override
  Widget build(BuildContext context) {
    return MaterialApp(
      title: 'Flutter Demo',
      theme: ThemeData(
        colorScheme: ColorScheme.fromSeed(seedColor: Colors.deepPurple),
        useMaterial3: true,
      ),
      home:  LoginScreen(),
    );
  }
}
6. Structuring Your Flutter App: Login, Signup, and Home Screens:
Now that your Flutter project is connected to Firebase, the next step is to set up the structure of your app. For a basic authentication flow, you'll need to create the following key screens:
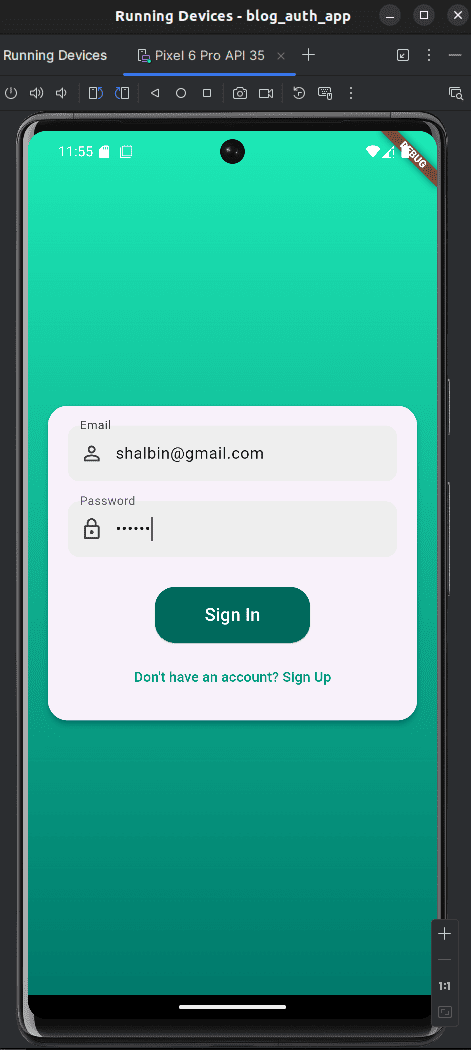
1. Login Screen: A screen where users can log in using their email and password.
* Import Firebase Authentication:
import 'package:firebase_auth/firebase_auth.dart';
* Initialize FirebaseAuth
final FirebaseAuth _auth = FirebaseAuth.instance;
* Authenticates a user in a Flutter app using Firebase by checking the provided email and password asynchronously, returning a UserCredential object upon successful login, which contains the user's authentication details.
final credentials = await _auth.signInWithEmailAndPassword(email: email, password: password);
Here is the full code for the Login page:
import 'package:blog_auth_app/signup.dart';
import 'package:firebase_auth/firebase_auth.dart';
import 'package:flutter/material.dart';
import 'homescreen.dart';
import 'dart:developer';

class LoginScreen extends StatefulWidget {
  const LoginScreen({Key? key}) : super(key: key);
  @override
  State<LoginScreen> createState() => _LoginScreenState();
}
class _LoginScreenState extends State<LoginScreen> {
  final _formKey = GlobalKey<FormState>();
  final TextEditingController _emailController = TextEditingController();
  final TextEditingController _passwordController = TextEditingController();
  final _auth = FirebaseAuth.instance;
  @override
  void dispose() {
    _emailController.dispose();
    _passwordController.dispose();
    super.dispose();
  }
  String? _validateEmail(String? value) {
    if (value == null || value.isEmpty) {
      return 'Please enter your email';
    }
    String pattern = r'^[^@]+@[^@]+\.[^@]+';
    RegExp regex = RegExp(pattern);
    if (!regex.hasMatch(value)) {
      return 'Enter a valid email';
    }
    return null;
  }
  String? _validatePassword(String? value) {
    if (value == null || value.isEmpty) {
      return 'Please enter your password';
    } else if (value.length < 6) {
      return 'Password must be at least 6 characters long';
    }
    return null;
  }
  @override
  Widget build(BuildContext context) {
    return Scaffold(
      body: SingleChildScrollView(
        child: Container(
          height: MediaQuery.of(context).size.height,
          width: MediaQuery.of(context).size.width,
          decoration: BoxDecoration(
            gradient: LinearGradient(
              colors: [Colors.tealAccent.shade400, Colors.teal.shade700],
              begin: Alignment.topCenter,
              end: Alignment.bottomCenter,
            ),
          ),
          child: Center(
            child: Padding(
              padding: const EdgeInsets.all(16.0),
              child: Form(
                key: _formKey,
                child: Column(
                  mainAxisAlignment: MainAxisAlignment.center,
                  children: [
                    Card(
                      elevation: 5,
                      shape: RoundedRectangleBorder(
                        borderRadius: BorderRadius.circular(20),
                      ),
                      child: Padding(
                        padding: const EdgeInsets.all(20.0),
                        child: Column(
                          children: [
                            TextFormField(
                              controller: _emailController,
                              decoration: InputDecoration(
                                filled: true,
                                fillColor: Colors.grey[200],
                                prefixIcon: const Icon(Icons.person_outline),
                                hintText: 'Enter your email',
                                labelText: 'Email',
                                border: OutlineInputBorder(
                                  borderRadius: BorderRadius.circular(12.0),
                                  borderSide: BorderSide.none,
                                ),
                              ),
                              validator: _validateEmail,
                            ),
                            const SizedBox(height: 20),
                            TextFormField(
                              controller: _passwordController,
                              obscureText: true,
                              decoration: InputDecoration(
                                filled: true,
                                fillColor: Colors.grey[200],
                                prefixIcon: const Icon(Icons.lock_outline),
                                hintText: 'Enter your password',
                                labelText: 'Password',
                                border: OutlineInputBorder(
                                  borderRadius: BorderRadius.circular(12.0),
                                  borderSide: BorderSide.none,
                                ),
                              ),
                              validator: _validatePassword,
                            ),
                            const SizedBox(height: 30),
                            ElevatedButton(
                              style: ElevatedButton.styleFrom(
                                padding: const EdgeInsets.symmetric(
                                    horizontal: 50, vertical: 15),
                                shape: RoundedRectangleBorder(
                                  borderRadius: BorderRadius.circular(20),
                                ),
                                backgroundColor: Colors.teal.shade800,
                              ),
                              onPressed: () async {
                                if (_formKey.currentState?.validate() ?? false) {
                                  final user = loginUserWithEmailAndPassword(
                                    _emailController.text.trim(),
                                    _passwordController.text.trim(),
                                  );
                                  if (user != null) {
                                    print('user  :  $user');
                                    Navigator.pushReplacement(
                                      context,
                                      MaterialPageRoute(builder: (context) => Homescreen()),
                                    );
                                  } else {
                                    ScaffoldMessenger.of(context).showSnackBar(
                                      SnackBar(content: Text('Login failed. Please check your credentials.')),
                                    );
                                  }
                                }
                              },
                              child: const Text(
                                'Sign In',
                                style: TextStyle(fontSize: 18, color: Colors.white),
                              ),
                            ),
                            const SizedBox(height: 10),
                            TextButton(
                              onPressed: () {
                                Navigator.push(
                                  context,
                                  MaterialPageRoute(builder: (context) => SignupScreen()),
                                );
                              },
                              child: const Text(
                                'Don\'t have an account? Sign Up',
                                style: TextStyle(color: Colors.teal),
                              ),
                            ),
                          ],
                        ),
                      ),
                    ),
                  ],
                ),
              ),
            ),
          ),
        ),
      ),
    );
  }
  Future<User?> loginUserWithEmailAndPassword(
      String email, String password) async {
    try {
      final credentials = await _auth.signInWithEmailAndPassword(
          email: email, password: password);
      return credentials.user;
    } catch (e) {
      log('something went wrong');
    }
    return null;
  }
}
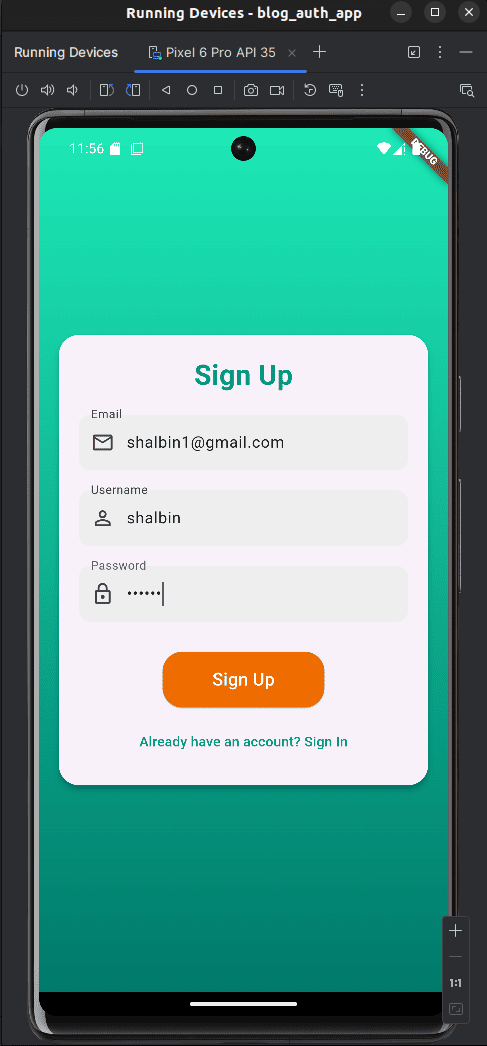
2. Signup Screen: A screen where new users can create an account by signing up with their email and password.
* Create a New User: Use the following line to register a new user with an email and password retrieved from text controllers:
Future<User?> createUserWithEmailAndPassword(
String email, String password) async {
try {
final credentials = await _auth.createUserWithEmailAndPassword(
email: email, password: password);
return credentials.user;
} catch (e) {
log('something went wrong');
}
return null;
}
Here is the full code for the SignUp page:
import 'dart:developer';
import 'package:firebase_auth/firebase_auth.dart';
import 'package:flutter/material.dart';
import 'homescreen.dart';
class SignupScreen extends StatefulWidget {
  const SignupScreen({super.key});
  @override
  State<SignupScreen> createState() => _SignupScreenState();
}
class _SignupScreenState extends State<SignupScreen> {
  final _formKey = GlobalKey<FormState>();
  final TextEditingController _usernameController = TextEditingController();
  final TextEditingController _passwordController = TextEditingController();
  final TextEditingController _emailController = TextEditingController();
  final _auth = FirebaseAuth.instance;
  @override
  Widget build(BuildContext context) {
    return Scaffold(
      body: SingleChildScrollView(
        child: Container(
          height: MediaQuery.of(context).size.height,
          width: MediaQuery.of(context).size.width,
          decoration: BoxDecoration(
            gradient: LinearGradient(
              colors: [Colors.tealAccent.shade400, Colors.teal.shade700],
              begin: Alignment.topCenter,
              end: Alignment.bottomCenter,
            ),
          ),
          child: Center(
            child: Padding(
              padding: const EdgeInsets.all(16.0),
              child: Column(
                mainAxisAlignment: MainAxisAlignment.center,
                children: [
                  Card(
                    elevation: 5,
                    shape: RoundedRectangleBorder(
                      borderRadius: BorderRadius.circular(20),
                    ),
                    child: Padding(
                      padding: const EdgeInsets.all(20.0),
                      child: Form(
                        key: _formKey,
                        child: Column(
                          children: [
                            const Text(
                              'Sign Up',
                              style: TextStyle(
                                  fontSize: 28,
                                  fontWeight: FontWeight.bold,
                                  color: Colors.teal),
                            ),
                            const SizedBox(height: 20),
                            TextFormField(
                              controller: _emailController,
                              decoration: InputDecoration(
                                filled: true,
                                fillColor: Colors.grey[200],
                                prefixIcon: const Icon(Icons.email_outlined),
                                hintText: 'Enter your email',
                                labelText: 'Email',
                                border: OutlineInputBorder(
                                  borderRadius: BorderRadius.circular(12.0),
                                  borderSide: BorderSide.none,
                                ),
                              ),
                              validator: (value) {
                                if (value == null || value.isEmpty) {
                                  return 'Please enter an email';
                                }
                                if (!RegExp(r'^[^@]+@[^@]+\.[^@]+')
                                    .hasMatch(value)) {
                                  return 'Please enter a valid email';
                                }
                                return null;
                              },
                            ),
                            const SizedBox(height: 20),
                            TextFormField(
                              controller: _usernameController,
                              decoration: InputDecoration(
                                filled: true,
                                fillColor: Colors.grey[200],
                                prefixIcon: const Icon(Icons.person_outline),
                                hintText: 'Enter your username',
                                labelText: 'Username',
                                border: OutlineInputBorder(
                                  borderRadius: BorderRadius.circular(12.0),
                                  borderSide: BorderSide.none,
                                ),
                              ),
                              validator: (value) {
                                if (value == null || value.isEmpty) {
                                  return 'Please enter a username';
                                }
                                if (value.length < 4) {
                                  return 'Username must be at least 4 characters';
                                }
                                return null;
                              },
                            ),
                            const SizedBox(height: 20),
                            TextFormField(
                              controller: _passwordController,
                              obscureText: true,
                              decoration: InputDecoration(
                                filled: true,
                                fillColor: Colors.grey[200],
                                prefixIcon: const Icon(Icons.lock_outline),
                                hintText: 'Enter your password',
                                labelText: 'Password',
                                border: OutlineInputBorder(
                                  borderRadius: BorderRadius.circular(12.0),
                                  borderSide: BorderSide.none,
                                ),
                              ),
                              validator: (value) {
                                if (value == null || value.isEmpty) {
                                  return 'Please enter a password';
                                }
                                if (value.length < 6) {
                                  return 'Password must be at least 6 characters';
                                }
                                return null;
                              },
                            ),
                            const SizedBox(height: 30),
                            ElevatedButton(
                              style: ElevatedButton.styleFrom(
                                padding: const EdgeInsets.symmetric(
                                    horizontal: 50, vertical: 15),
                                shape: RoundedRectangleBorder(
                                  borderRadius: BorderRadius.circular(20),
                                ),
                                backgroundColor: Colors.orange.shade800,
                              ),
                              onPressed: () async {
                                if (_formKey.currentState!.validate()) {
                                  final user = createUserWithEmailAndPassword(
                                      _emailController.text,
                                      _passwordController.text);
                                  if (user != null) {
                                    log('User Created Successfully');
                                    Navigator.push(
                                        context,
                                        MaterialPageRoute(
                                            builder: (context) => Homescreen()));
                                  }
                                }
                              },
                              child: const Text(
                                'Sign Up',
                                style: TextStyle(
                                    fontSize: 18, color: Colors.white),
                              ),
                            ),
                            const SizedBox(height: 10),
                            TextButton(
                              onPressed: () {
                                Navigator.pop(context); // Go back to login
                              },
                              child: const Text(
                                'Already have an account? Sign In',
                                style: TextStyle(color: Colors.teal),
                              ),
                            ),
                          ],
                        ),
                      ),
                    ),
                  ),
                ],
              ),
            ),
          ),
        ),
      ),
    );
  }
  Future<User?> createUserWithEmailAndPassword(
      String email, String password) async {
    try {
      final credentials = await _auth.createUserWithEmailAndPassword(
          email: email, password: password);
      return credentials.user;
    } catch (e) {
      log('something went wrong');
    }
    return null;
  }
}
3. Home Screen: The main screen that users see after successfully logging in.
import 'dart:developer';
import 'package:flutter/material.dart';
import 'package:firebase_auth/firebase_auth.dart';
import 'login.dart';
class Homescreen extends StatefulWidget {
  const Homescreen({Key? key}) : super(key: key);
  @override
  State<Homescreen> createState() => _HomescreenState();
}
class _HomescreenState extends State<Homescreen> {
  final FirebaseAuth _auth = FirebaseAuth.instance;
  @override
  Widget build(BuildContext context) {
    return Scaffold(
      appBar: AppBar(
        automaticallyImplyLeading: true,
        title: const Text('Home'),
        backgroundColor: Colors.teal,
      ),
      body: StreamBuilder<User?>(
        stream: _auth.authStateChanges(),
        builder: (context, snapshot) {
          if (snapshot.connectionState == ConnectionState.waiting) {
            return const Center(child: CircularProgressIndicator());
          }
          User? currentUser = snapshot.data;
          print('user  : $currentUser');
          return Center(
            child: Column(
              mainAxisAlignment: MainAxisAlignment.center,
              children: [
                const Text(
                  'Welcome!',
                  style: TextStyle(fontSize: 24, fontWeight: FontWeight.bold),
                ),
                const SizedBox(height: 20),
                Text(
                  'User ID: ${currentUser?.uid ?? 'Not available'}',
                  style: const TextStyle(fontSize: 18),
                ),
                const SizedBox(height: 10),
                Text(
                  'Email: ${currentUser?.email ?? 'Not available'}',
                  style: const TextStyle(fontSize: 18),
                ),
                const SizedBox(height: 30),
                ElevatedButton(
                  onPressed: () async {
                    await signout();
                    Navigator.pushReplacement(
                        context, MaterialPageRoute(builder: (context) => LoginScreen()));
                  },
                  style: ElevatedButton.styleFrom(
                    padding: const EdgeInsets.symmetric(horizontal: 50, vertical: 15),
                  ),
                  child: const Text('Logout'),
                ),
              ],
            ),
          );
        },
      ),
    );
  }
  Future<void> signout() async {
    try {
      await _auth.signOut();
    } catch (e) {
      log('Something went wrong: $e');
    }
  }
}
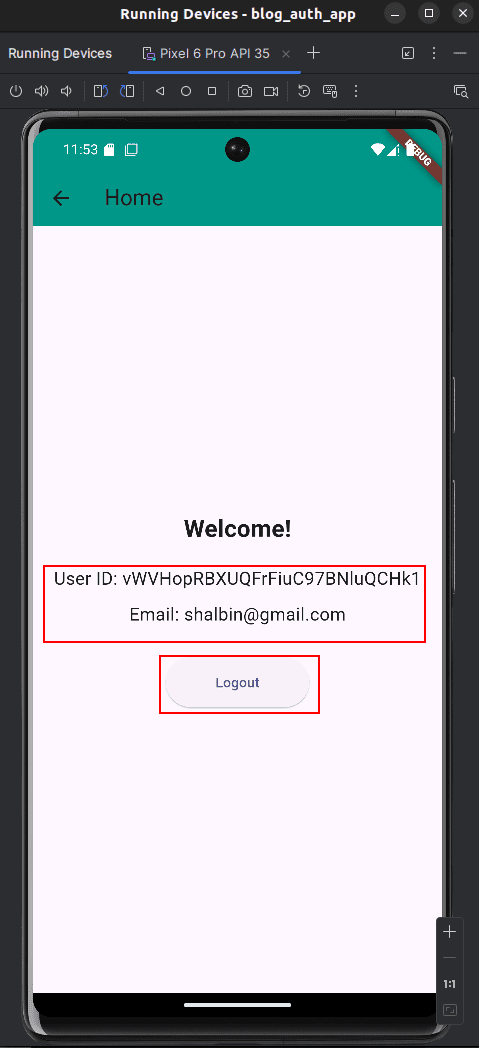
Each of these screens will work together to provide a smooth user experience. Let's walk through creating each of these screens and wiring them up to Firebase Authentication.
Firebase Authentication provides an efficient and streamlined way to implement user authentication in Flutter applications. With just a few lines of code, we can set up both sign-in and sign-up flows that integrate seamlessly into our app.
For example, to sign in an existing user, we simply call:
final credentials = await _auth.signInWithEmailAndPassword(
    email: email,
    password: password,
);
And to register a new user, we use:
final credentials = await _auth.createUserWithEmailAndPassword(
    email: email,
    password: password,
);
Firebase handles the heavy lifting, from managing sessions to securing authentication tokens, allowing us to focus more on creating a great user experience. Additionally, Firebase Authentication integrates easily with other Firebase services, such as Firestore and Cloud Functions, giving us a powerful suite of tools for building scalable and secure applications.
In short, Firebase Authentication not only simplifies the process of adding authentication to Flutter apps but also provides a reliable, scalable solution that can grow with your application’s needs. This powerful tool is ideal for developers looking to build secure, user-friendly applications with minimal setup.
To read more about How to Connect Cloud Firestore Plugin With Flutter, refer to our blog How to Connect Cloud Firestore Plugin With Flutter.