The manufacturer defines an expiration date as the last day that a consumable product, such as food or medicine, will be at its best. Food expiration dates ensure the product's flavor and texture until that date, but federal law mandates makers of prescription and over-the-counter medications to disclose expiration dates. Dates like "sell by," "use by," "best by," or "do not use after" are printed on the package or container as a warning not to throw away the product due to potential safety or effectiveness issues. Instructions on when to remove products off the shelf by the expiration date are also provided to store staff.
Odoo 18 uses expiration dates to manage the lifecycles of perishable products in order to reduce loss and prevent customers from purchasing out-of-date things. By giving things lots and serial numbers, it helps companies, such as food manufacturers, to determine their expiration information and set precise expiration dates. The Odoo 18 Inventory Application is where you can accomplish this.
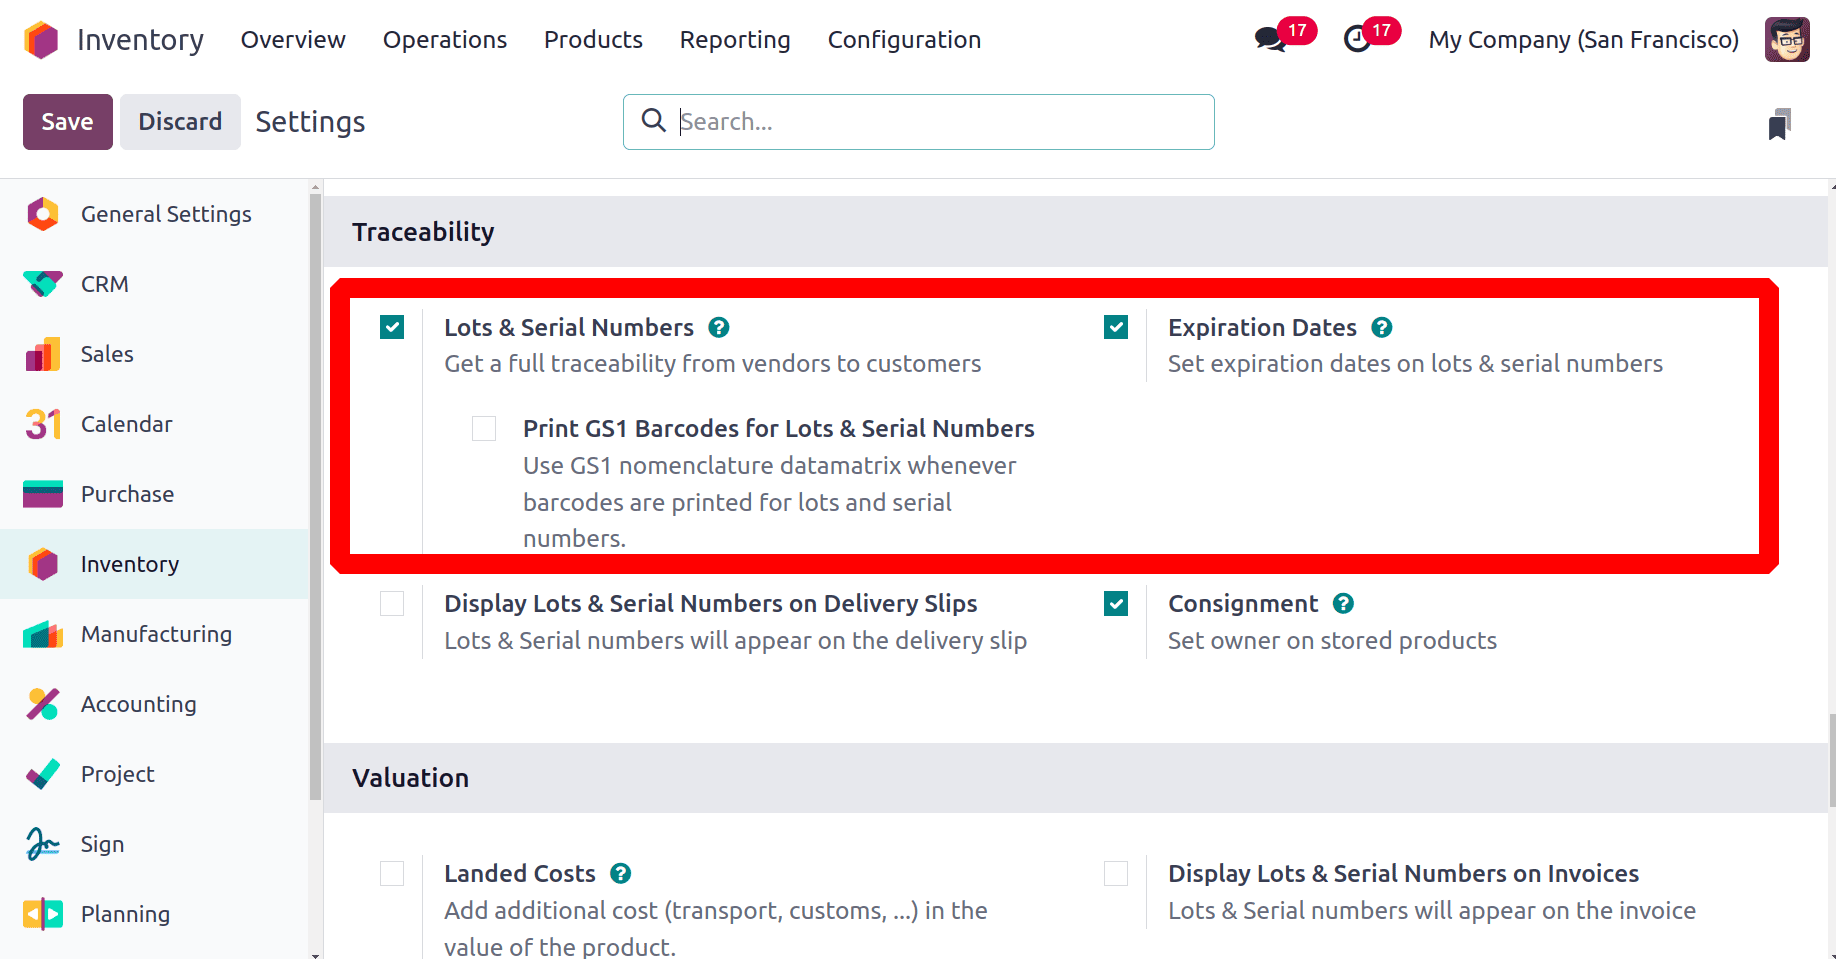
Users must first set up the options for Lot/Serial Number before assigning expiration dates to the inventory goods. Thus, select the "Settings" window from the "Configuration" menu. To activate expiration dates in the Inventory app, select the "Lots & Serial Numbers" option by checking the box in the "Traceability" section of the "Settings" window. Odoo will add an additional field called "Expiration Dates" if you enable this functionality.
: Configuration > Settings > Lots & Serial Numbers & Expiration Dates > Save
After saving the changes, you can either create a new product by choosing the "Products" part of the "Product" menu or navigate to a product configuration form. There is a list of products displayed. Click the New button to add a new one.
Inside each of the form tab sections, customers can easily create a new product called "Chocolate" and provide some basic product information. Utilise the Inventory Tracker by Lot or by Unique Serial Number.
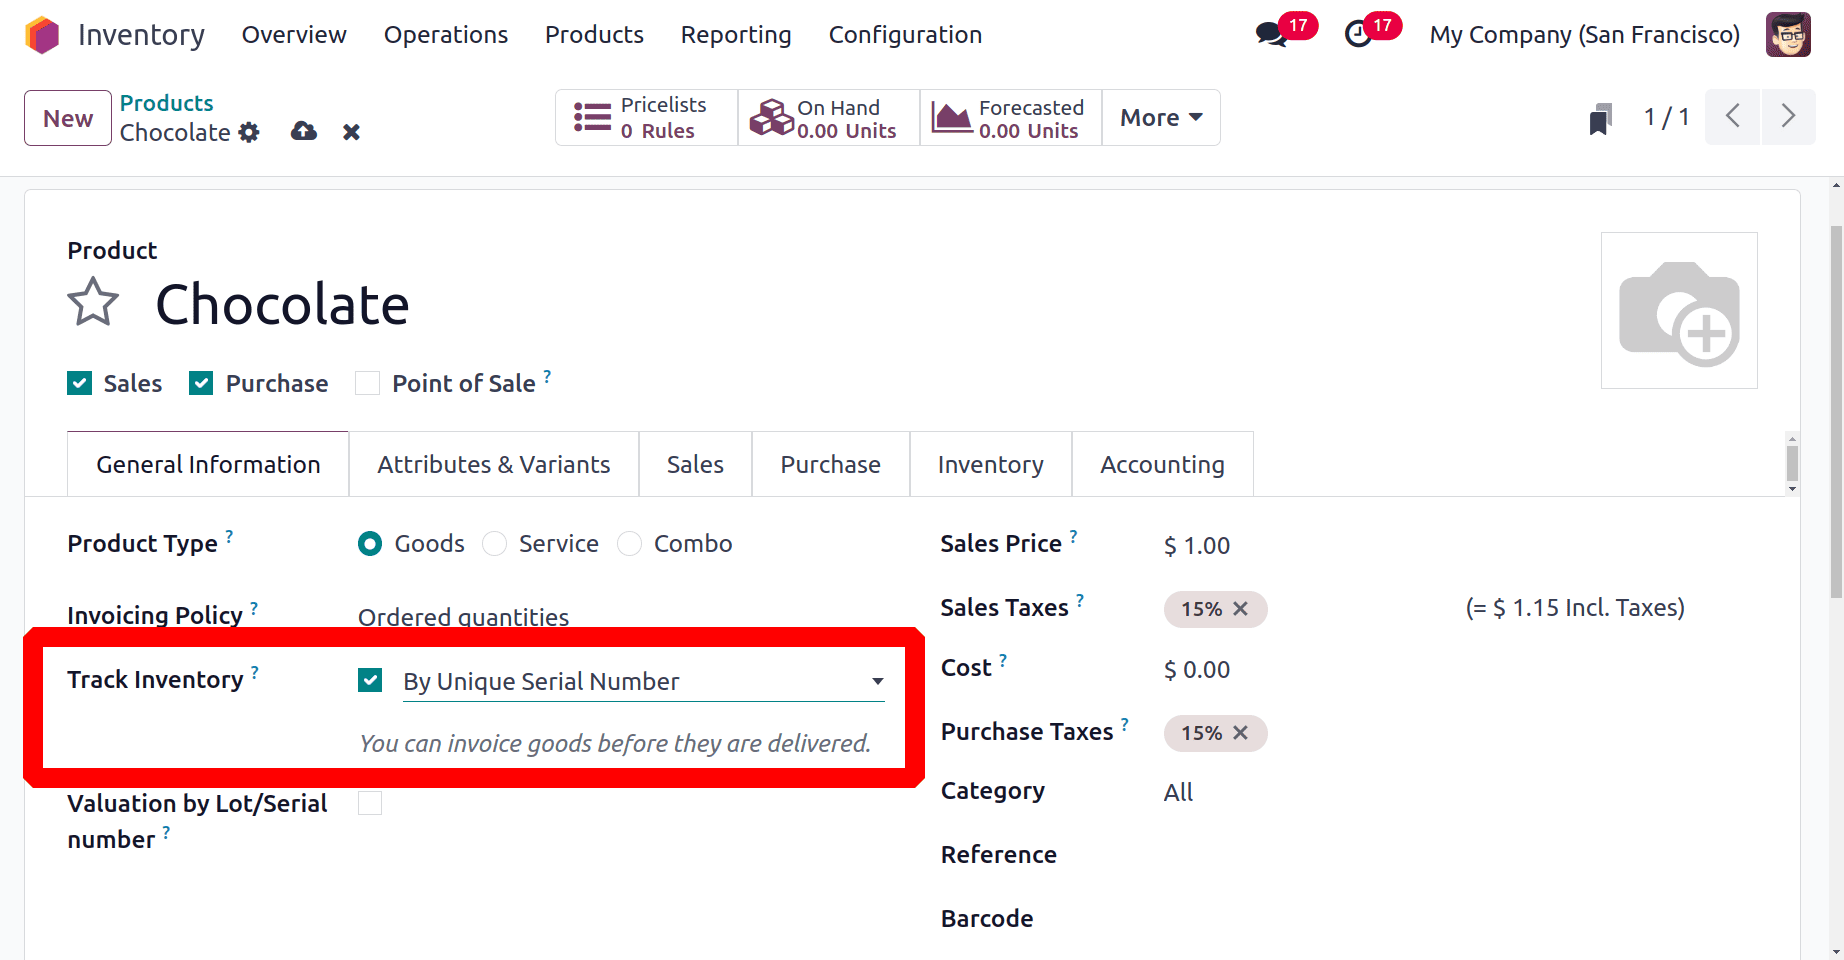
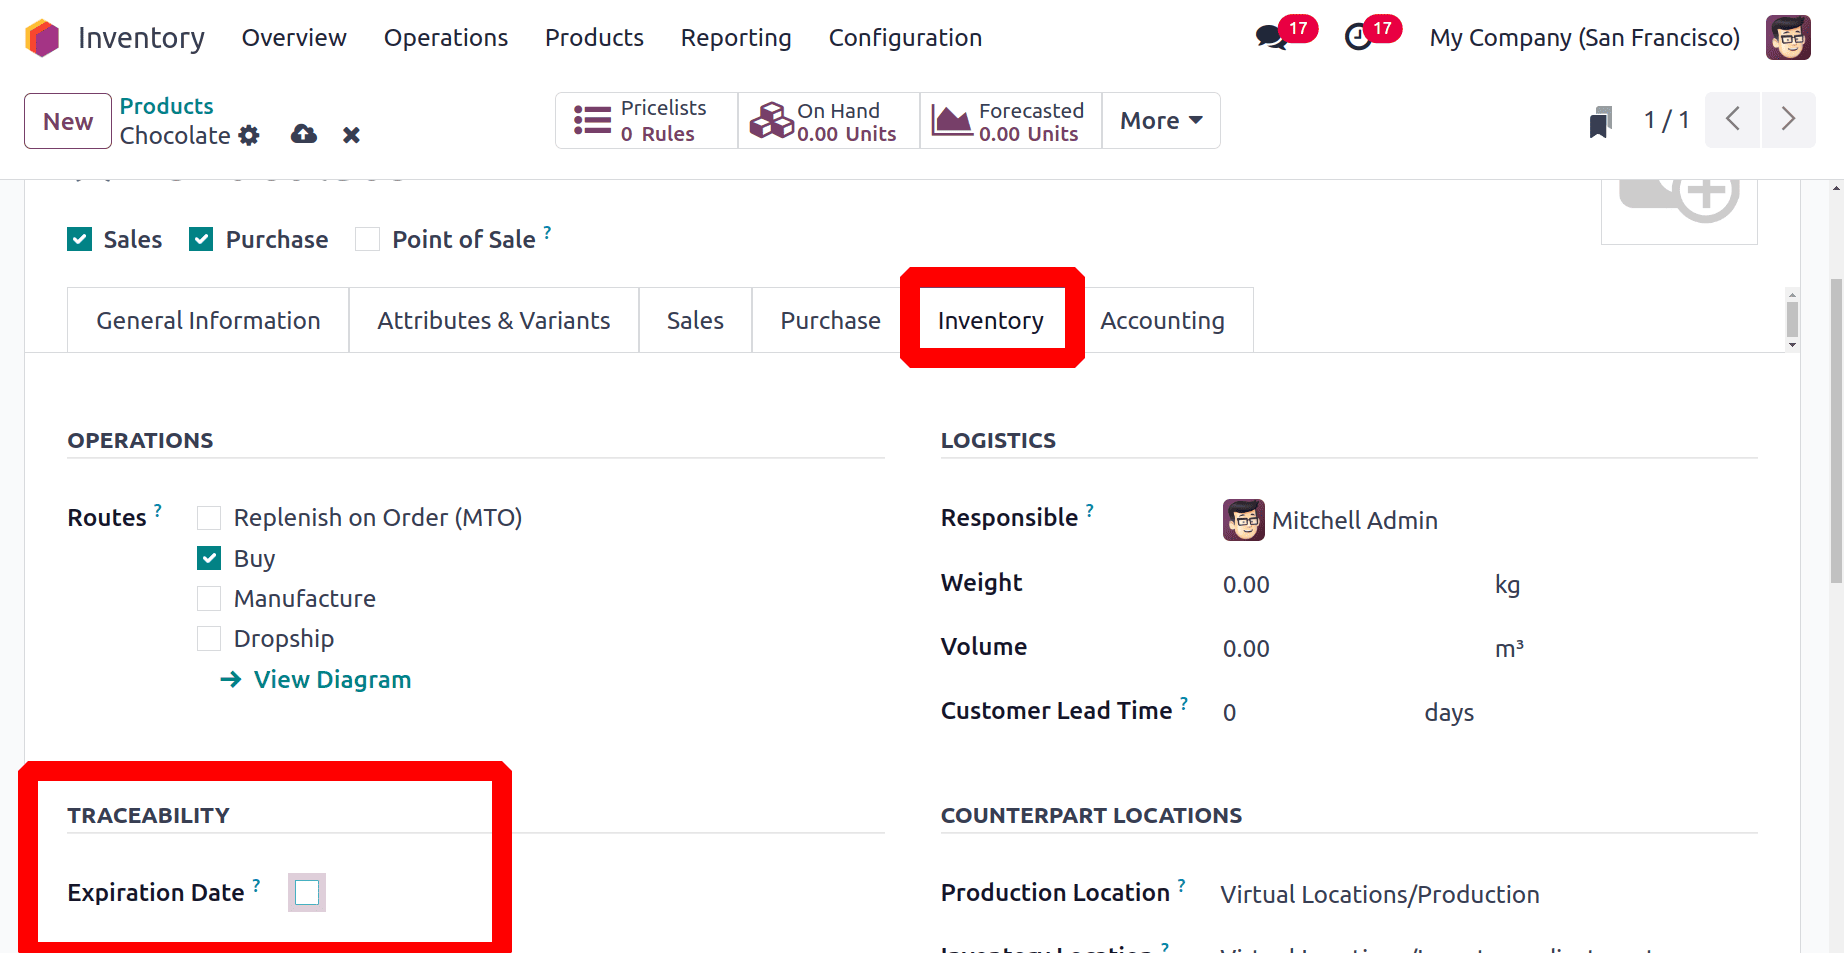
Go to the "Inventory" tab of the product's setup form and choose "By Unique Serial Number" or "By Lots" as the "Traceability" option to define the product expiration dates. This will bring up a second field called "Expiration." To enable traceability, activate the option. In the "DATES" section, you will see fields to enter various expiration dates, such as "Expiration Date," "Best Before Date," "Removal Date," and "Alert Date."
* Expiration Dates: Expiration dates show how long it takes for an item to become unsafe or undesirable once it is made or received from a seller.
* Best Before Date: The phrase "Best Before Date" refers to the period of time before the product's expiration date when it begins to deteriorate, even if there isn't a major risk.
* Removal Dates: The removal date shows the number of days until the products are removed from stock.
* Alert Date: A specific number of days before the expiration date, an alert should be sent out about products in a particular lot or serial number.

The above screenshot shows the dates that the user added for the product Chocolate. We can rapidly construct a new Receipt transfer for this product once the dates have been provided and the data has been saved. Thus, from the Inventory "Operations" menu's "Receipts" area. To add a new receipt, click on the New button.
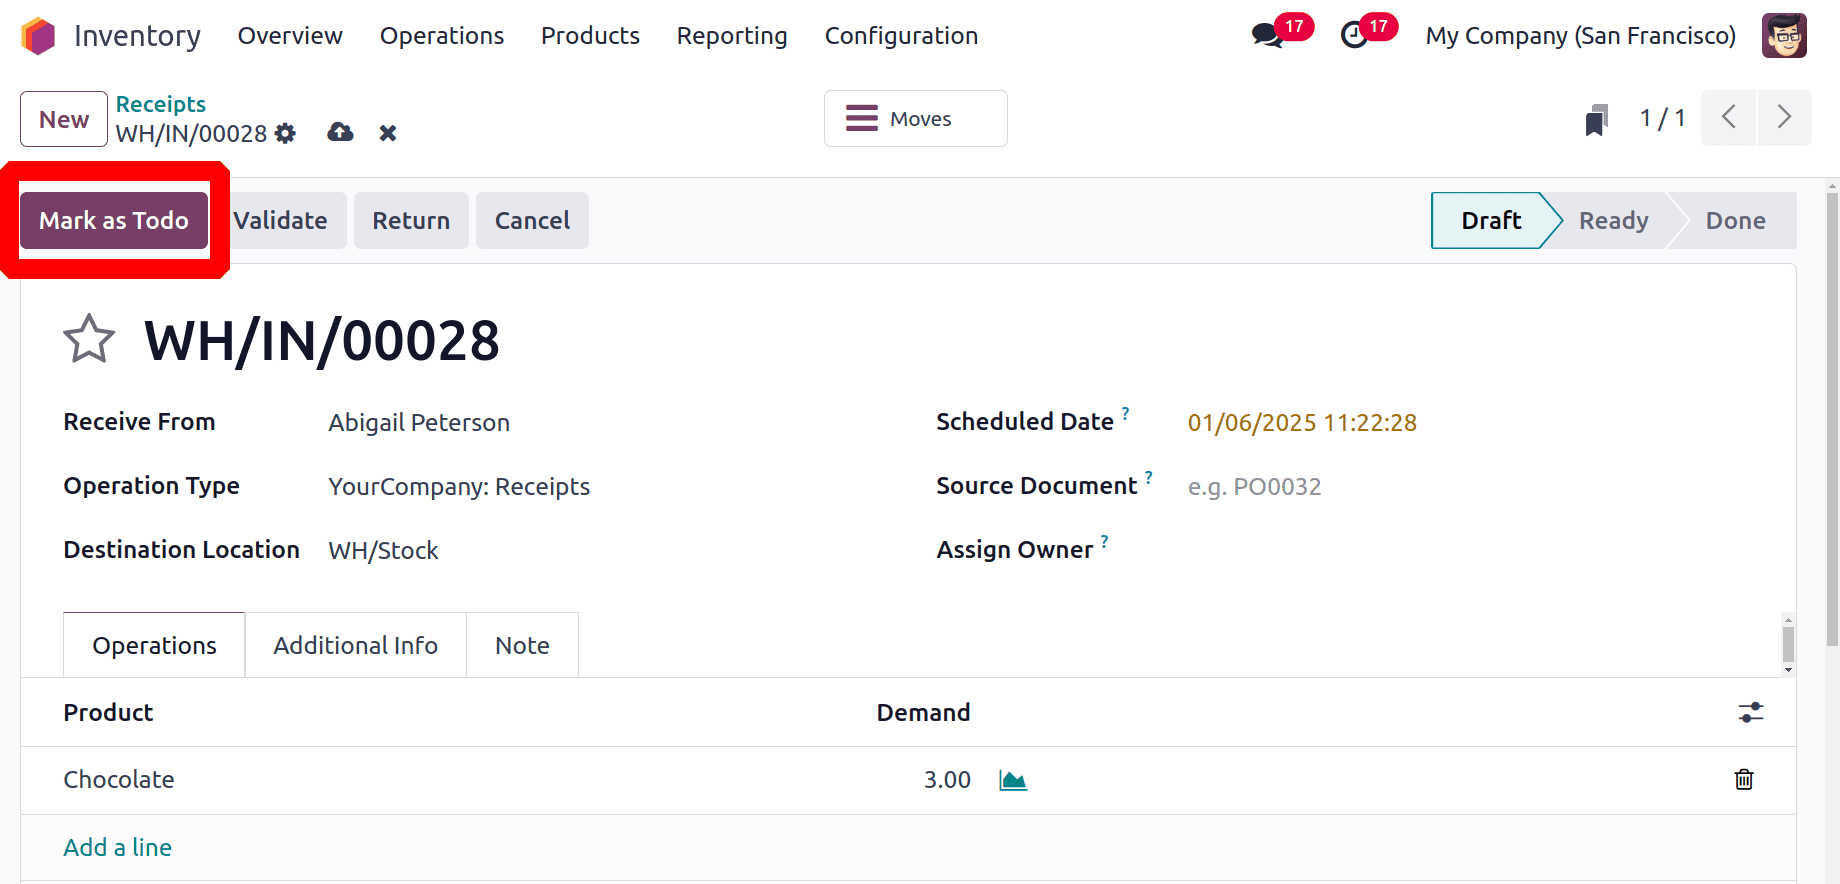
In the form view that is displayed, the user must add a vendor name. And add the product Chocolate inside the Operation tab. Here the user added 3 quantities of Chocolate, saved, and clicked on the Mark as Todo button.
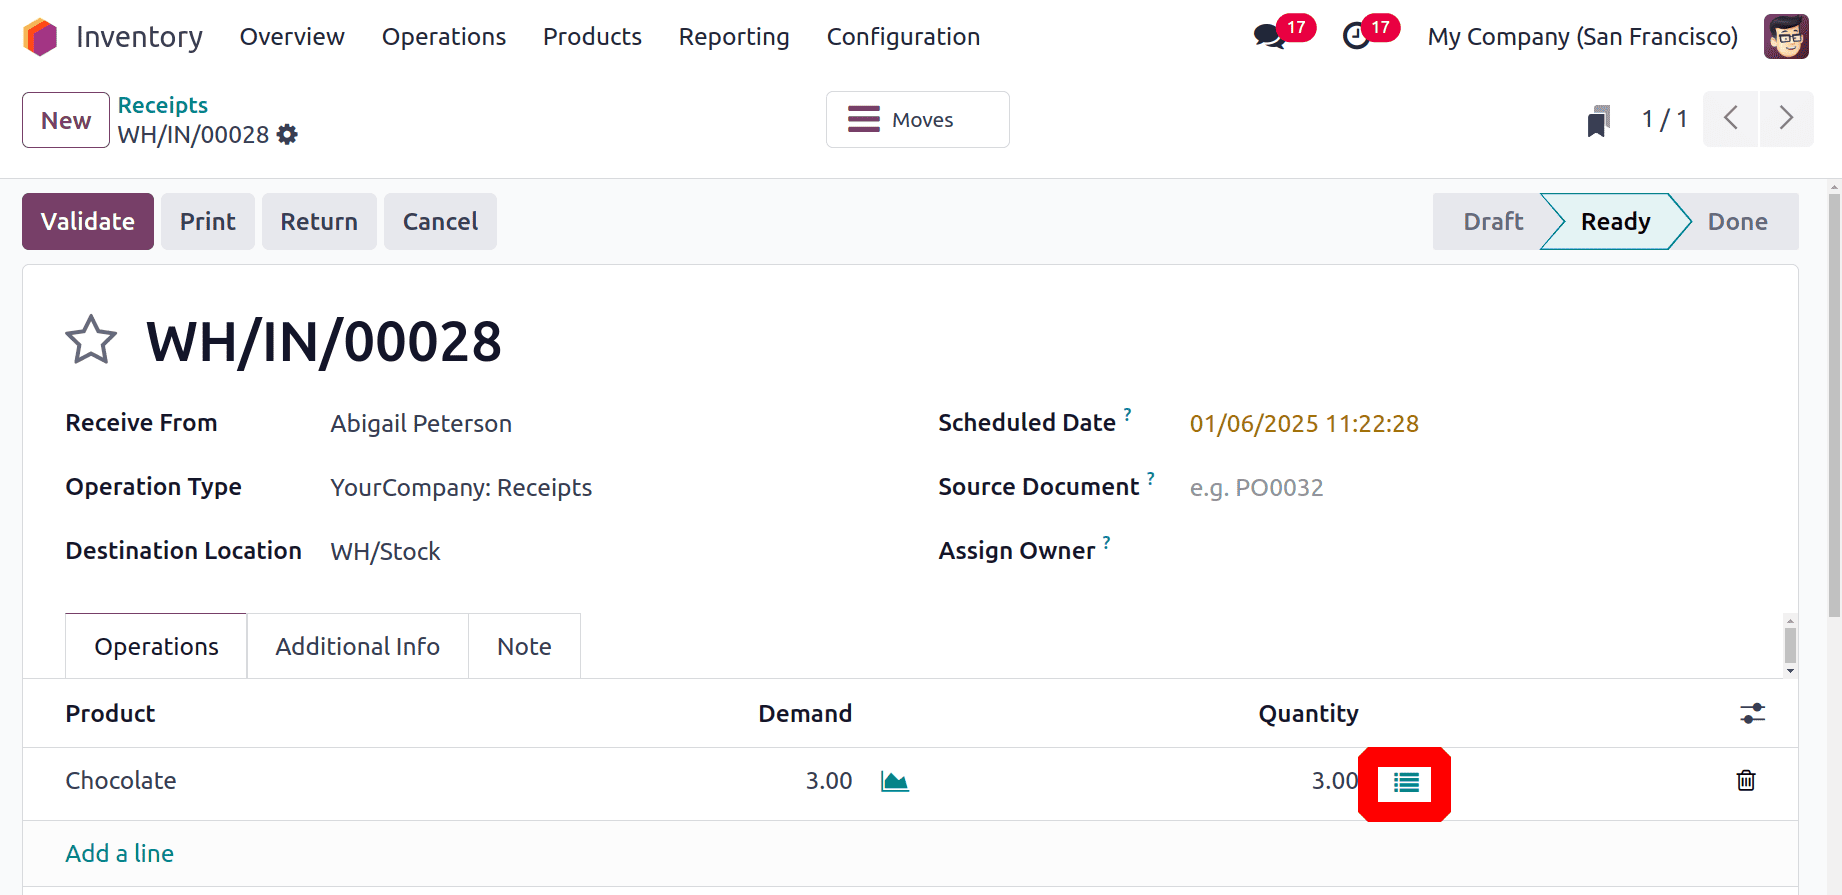
The user needs to add serial numbers for each quantity received. On the "Operation" tab, click the menu that appears inside the product column.
After that, a dashboard with fields for Lot/Serial Numbers, Expiration Date, To, Destination Package, Quantity, and Unit of Measure will open in a new popup window. Additionally, as seen in the screenshot below, you can use the "Generate Serials" and "Import Lots" buttons to configure new product serial or lot numbers.
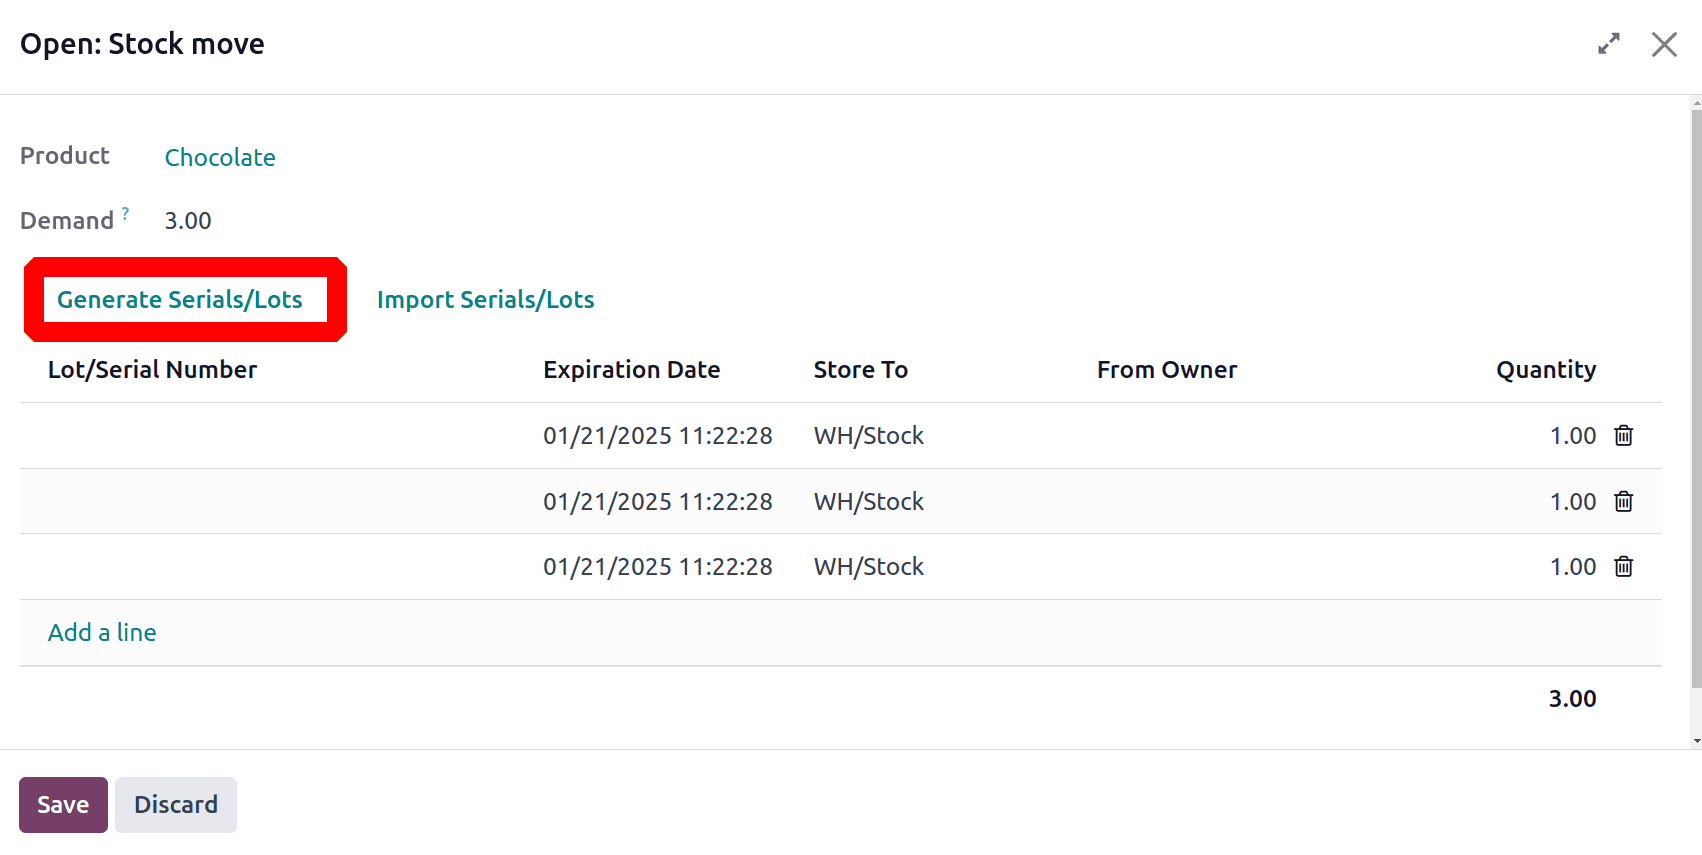
The "Generate Serials/Lots" button allows users to personalize serial numbers, while the "Number of SN" section allows users to specify the total amount of serial numbers needed. Before selecting the "Generate" option to get the required serial numbers, we can also alter the product's First Serial Number (SN).
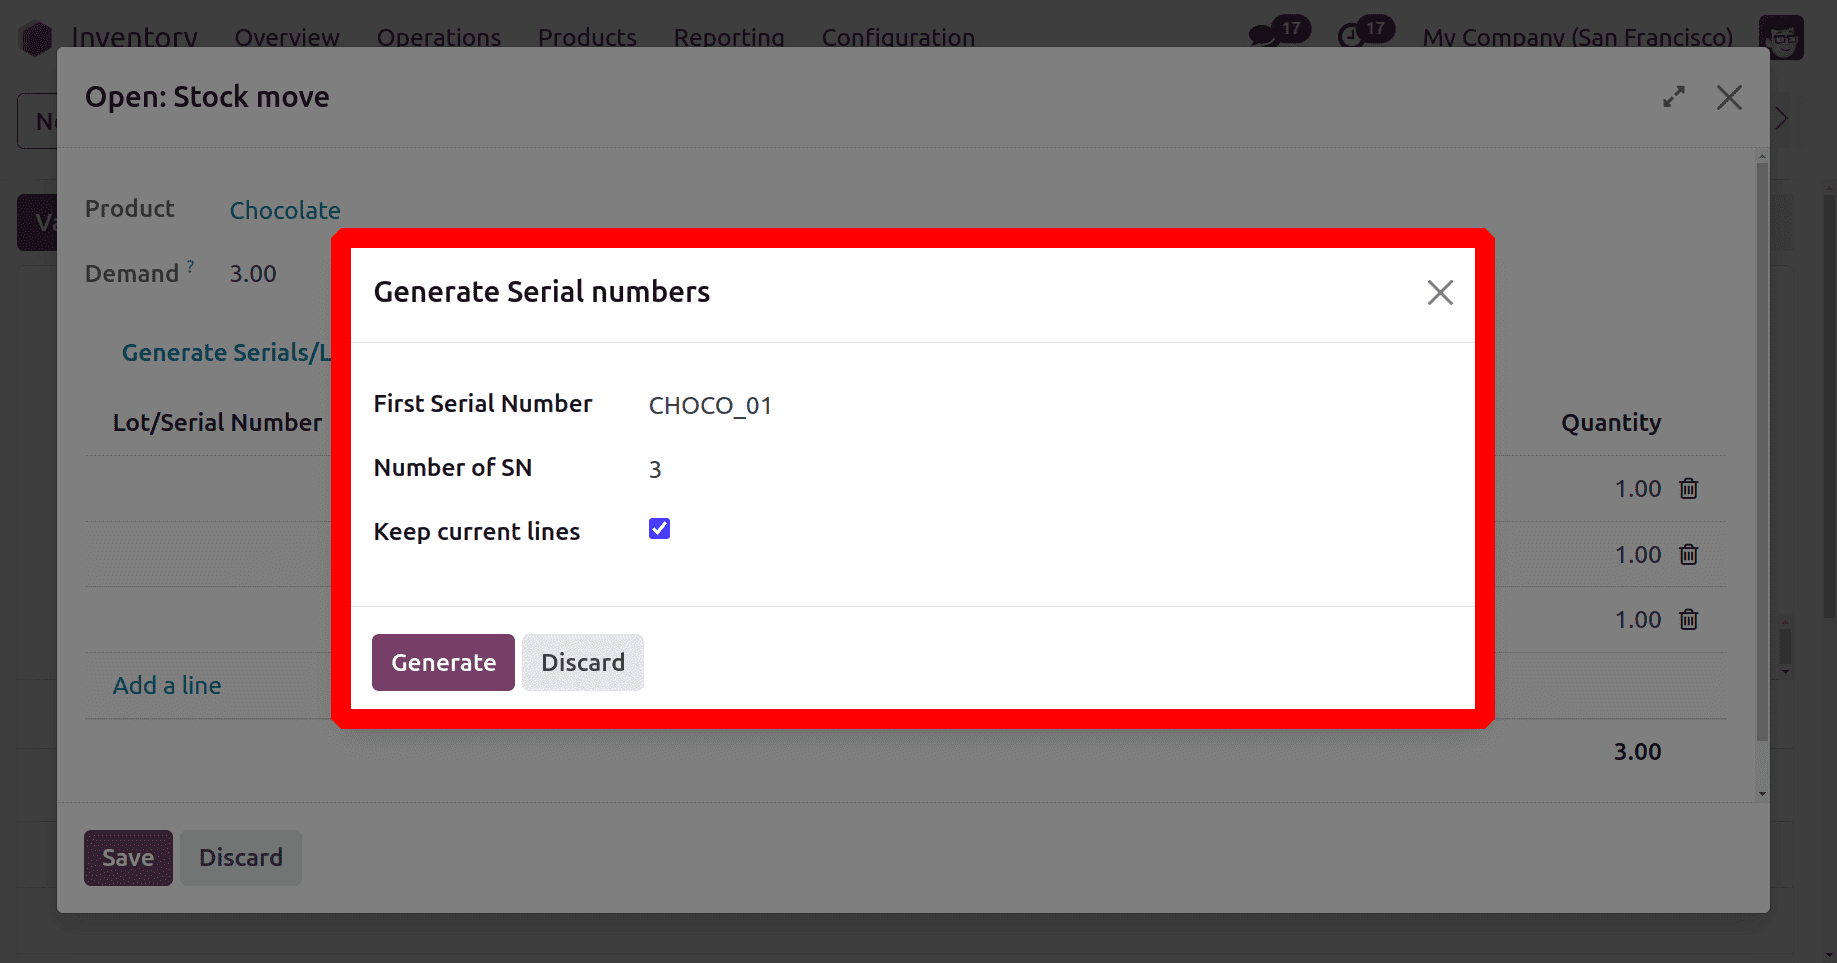
The "Generate" button is used to generate the serial numbers once the user enters a sample serial number, such as "CHOCO_01," in the "First Serial Number" area. The number of SN is 3. Enable the Keep Current lines, so the serial number will generate in the order of the first value.
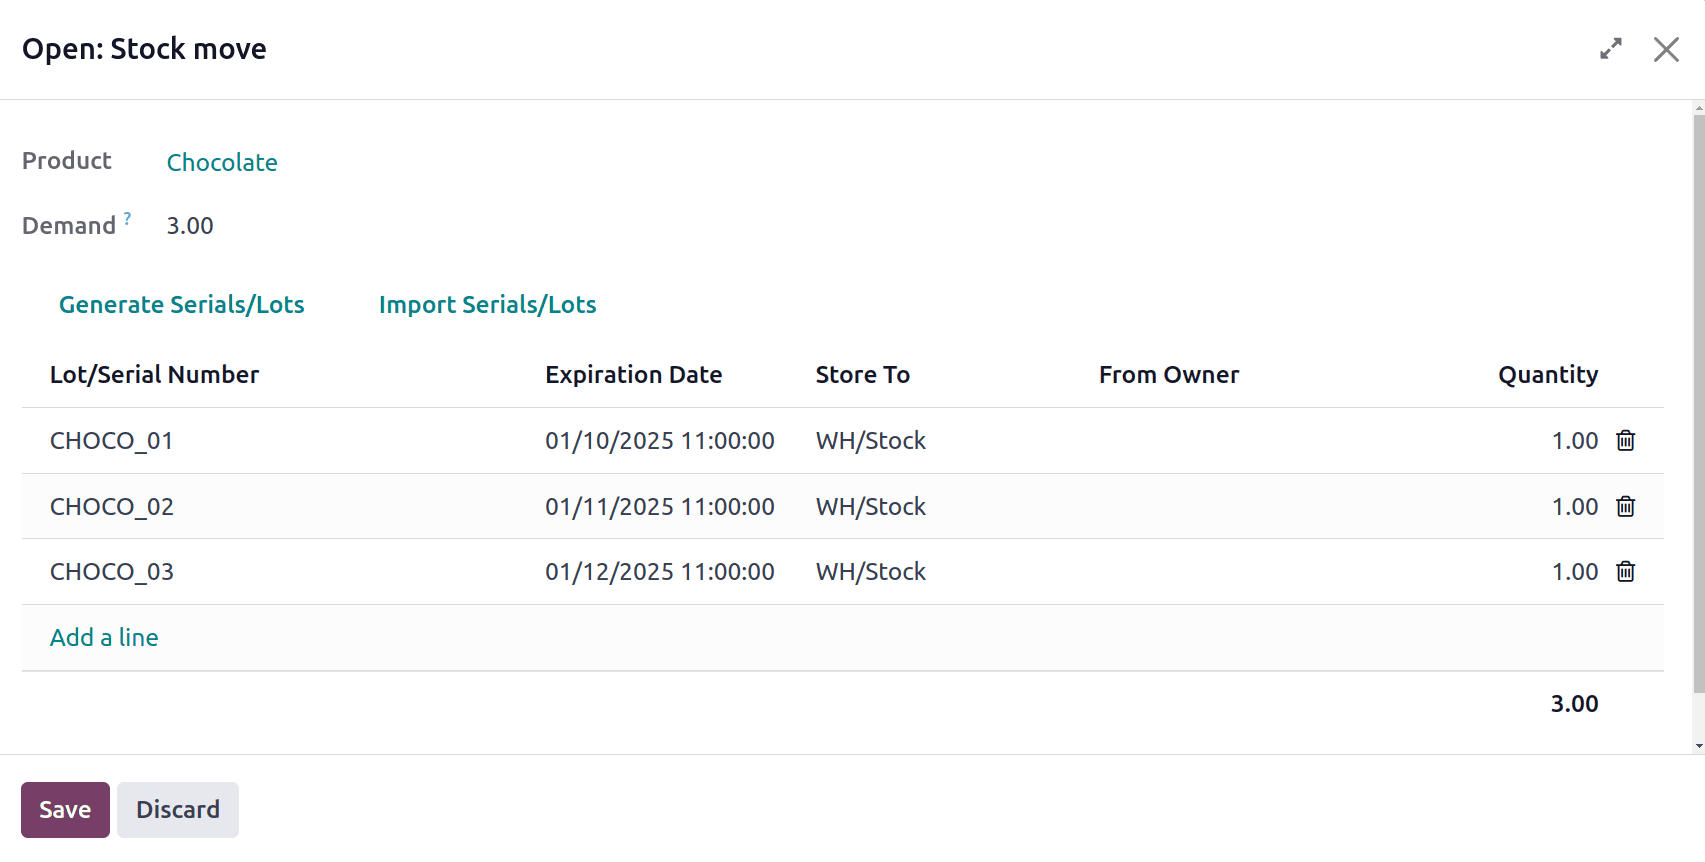
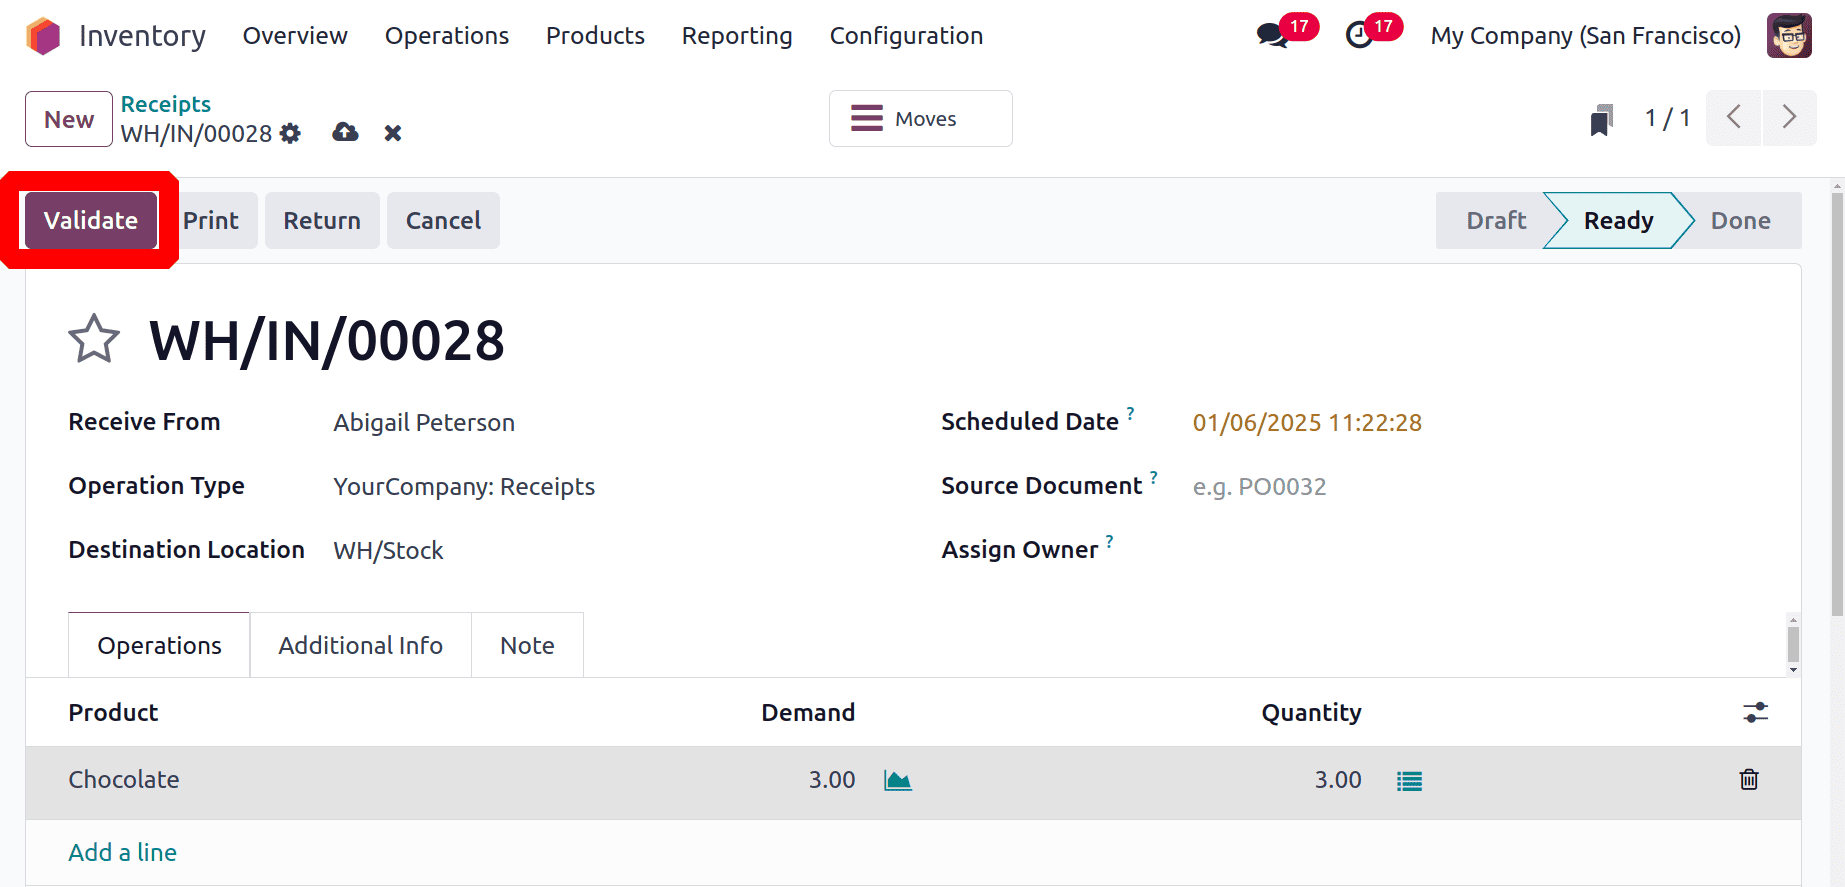
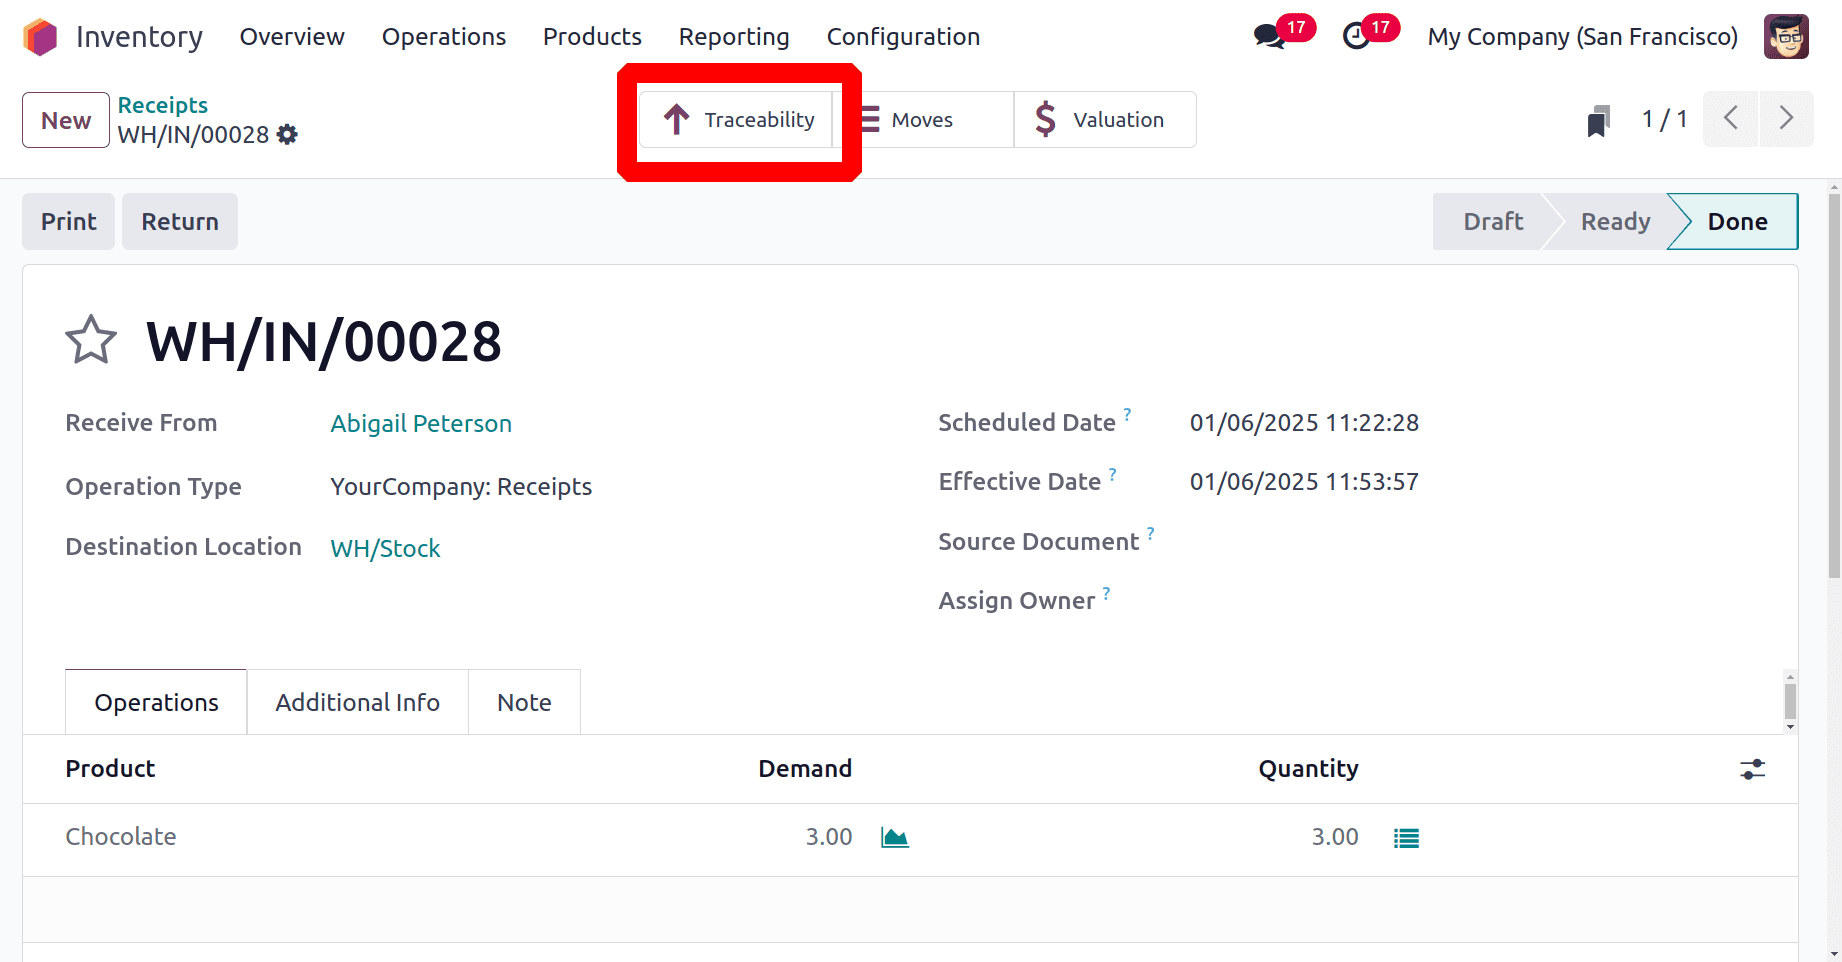
The newly produced serial numbers for our product are seen in the screenshot above. Near the added serial number shows the Expiration Dates. Users can simply edit the expiration dates from there. Then don't forget to return to the Receipt order configuration page after saving the numbers. Validate the receipt to get the products to company stock.
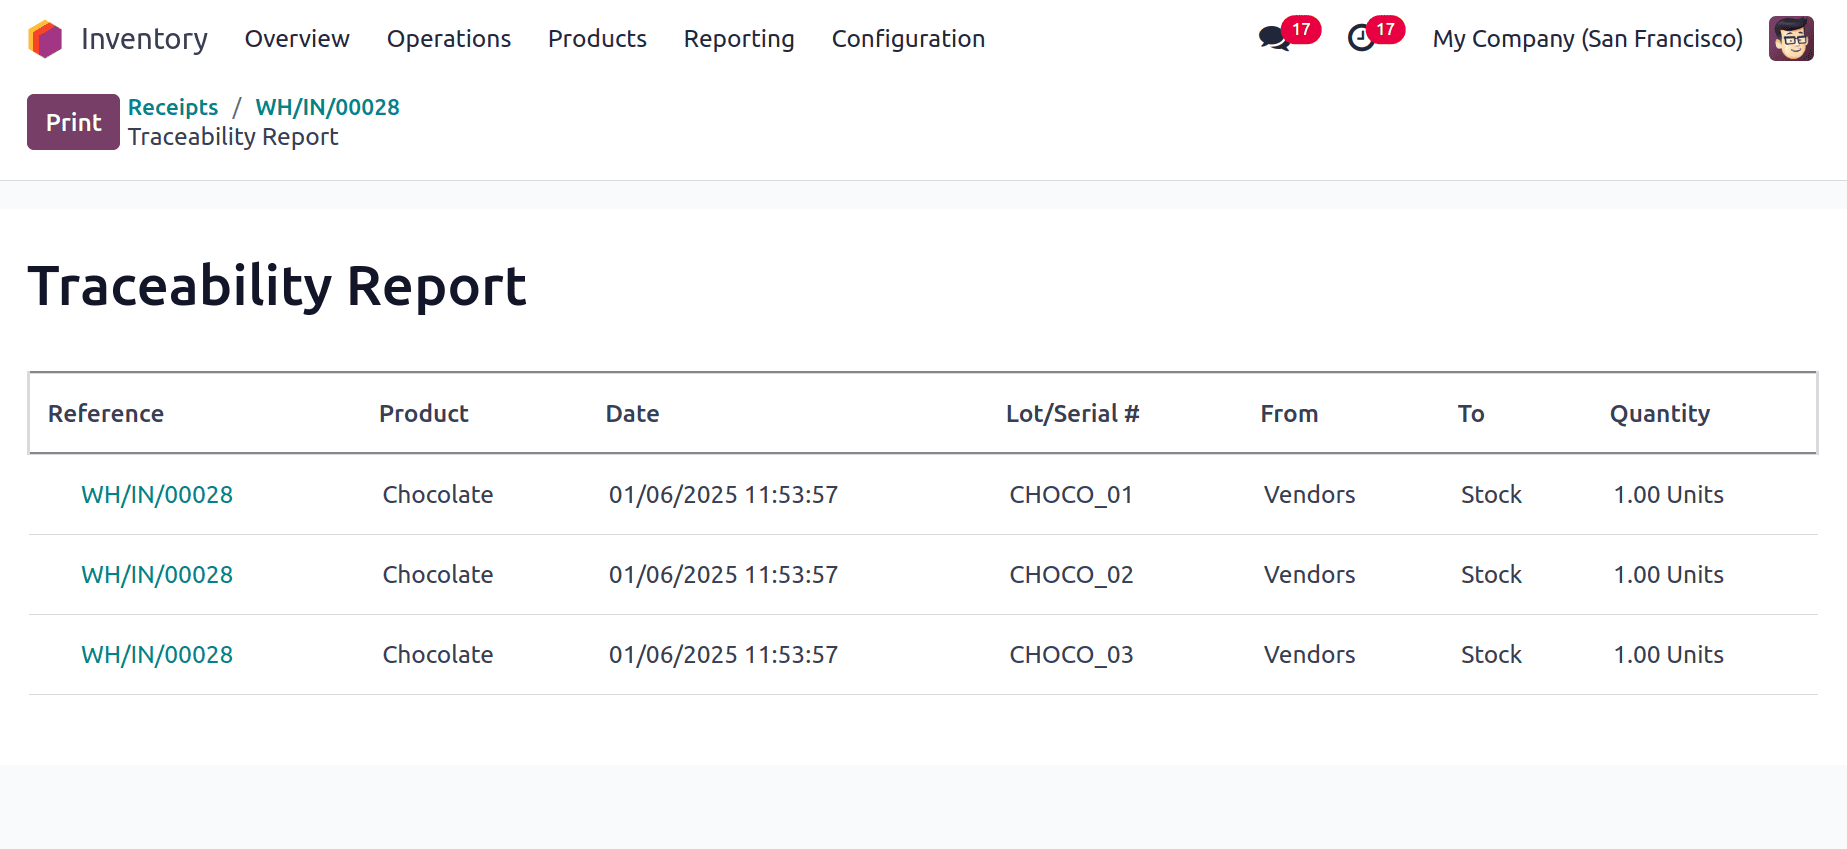
A report of Received items with lot/serial numbers and expiration dates can be viewed from the smart tab named Traceability.
The "Expiration Date" column also shows the added expiration dates. In this case, we have given the identical expiration dates for each quantity of product.
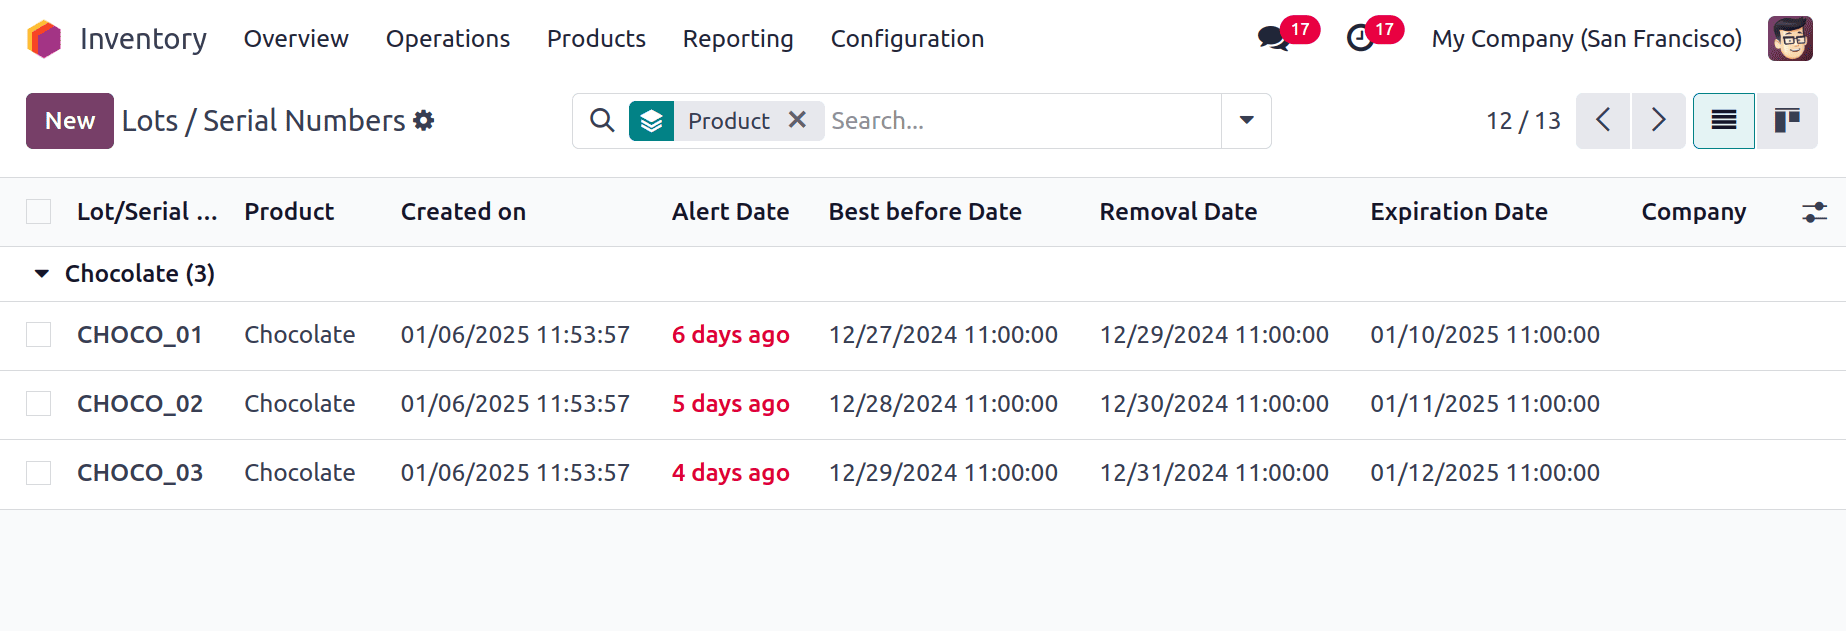
Then just choose the Lots/Serial Numbers, from the products menu. From there, uses get clear details of the added lot/serial numbers and expiration dates.
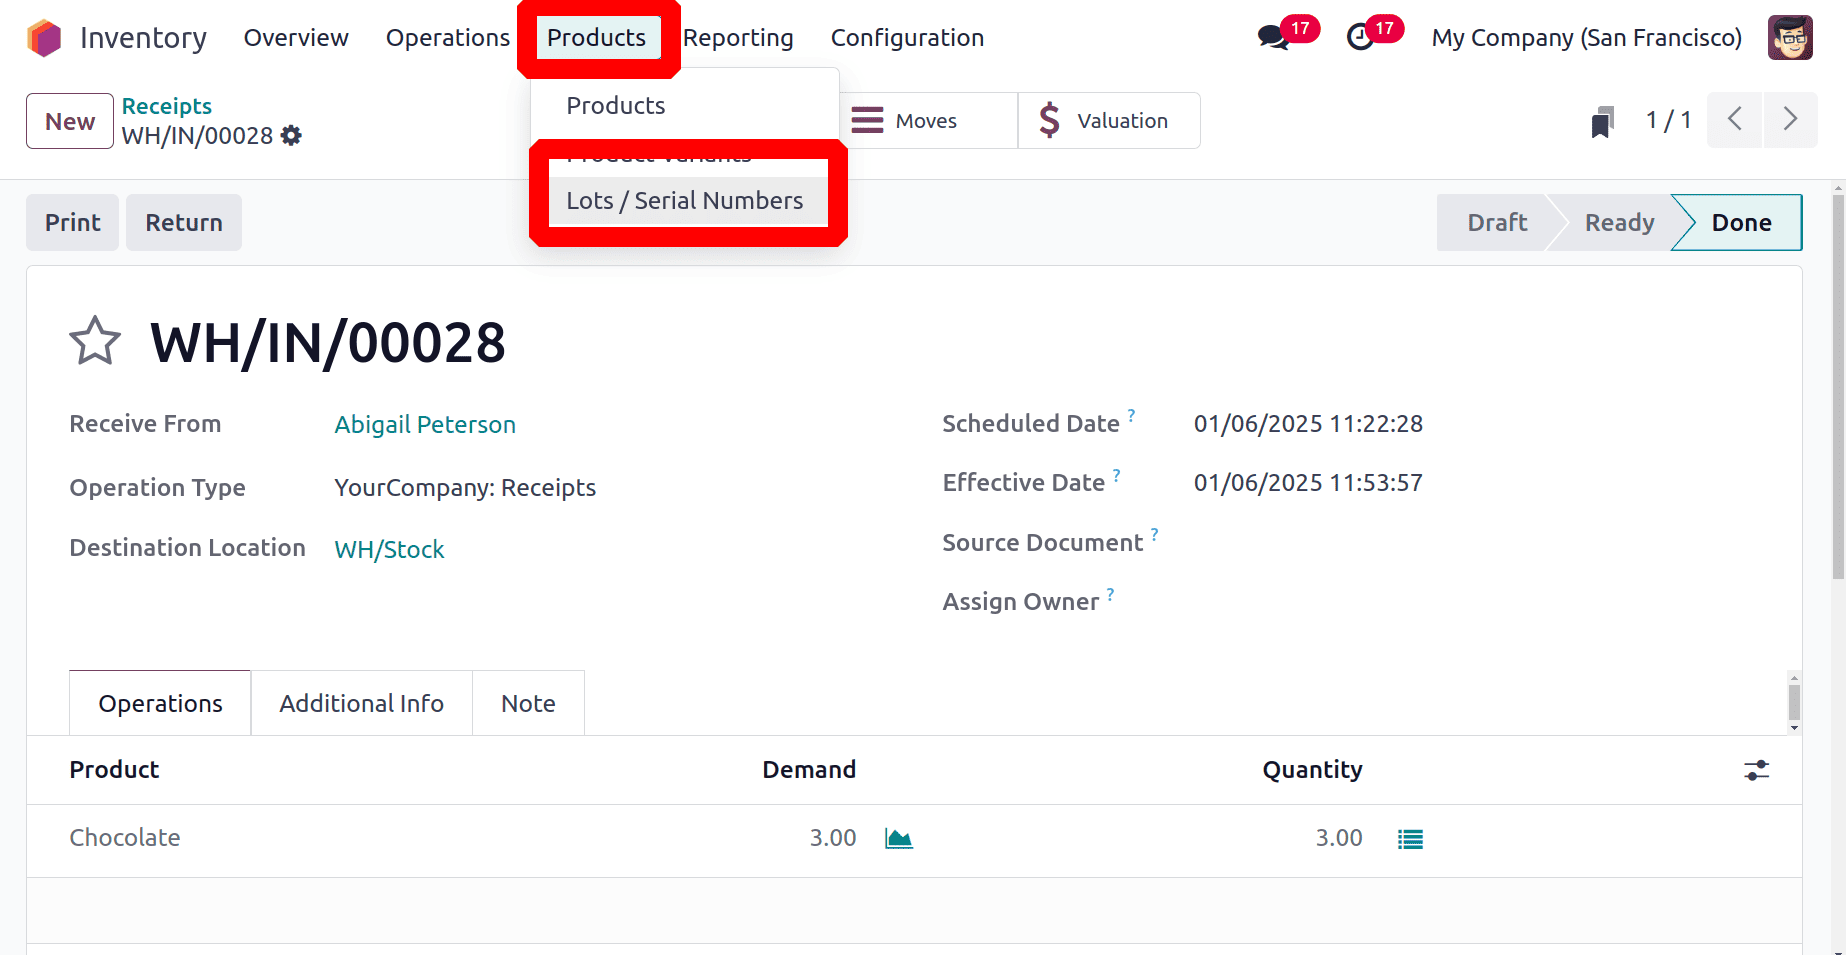
So it shows a list of traceable products with Lot/Serial Numbers, Product Name, Created On, Alert Date, Best before Date, Removal Date, Expiration Date and Company.
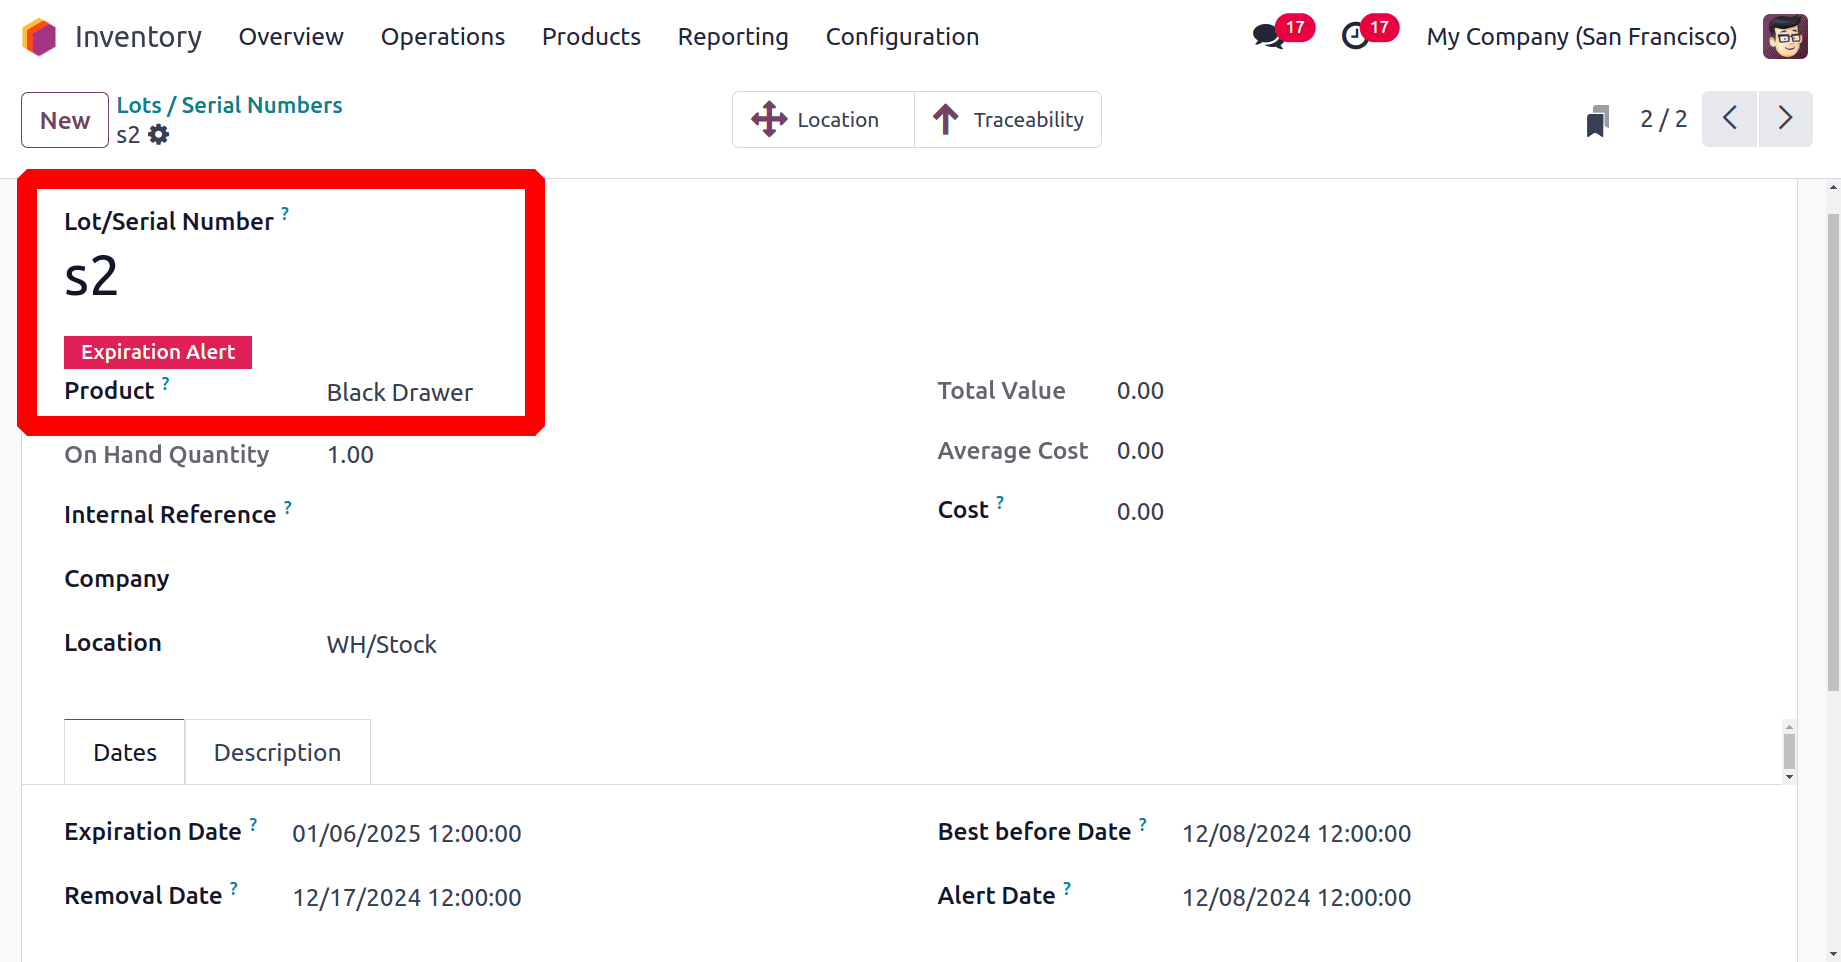
It's also possible to add a new one using the New Button. To open an existing one, click on it. Here the product with Serial number CHOCO_1 is opened. The Dates tab in it shows the Expiration Date, Removal Date, Best before Date, Alert Date.
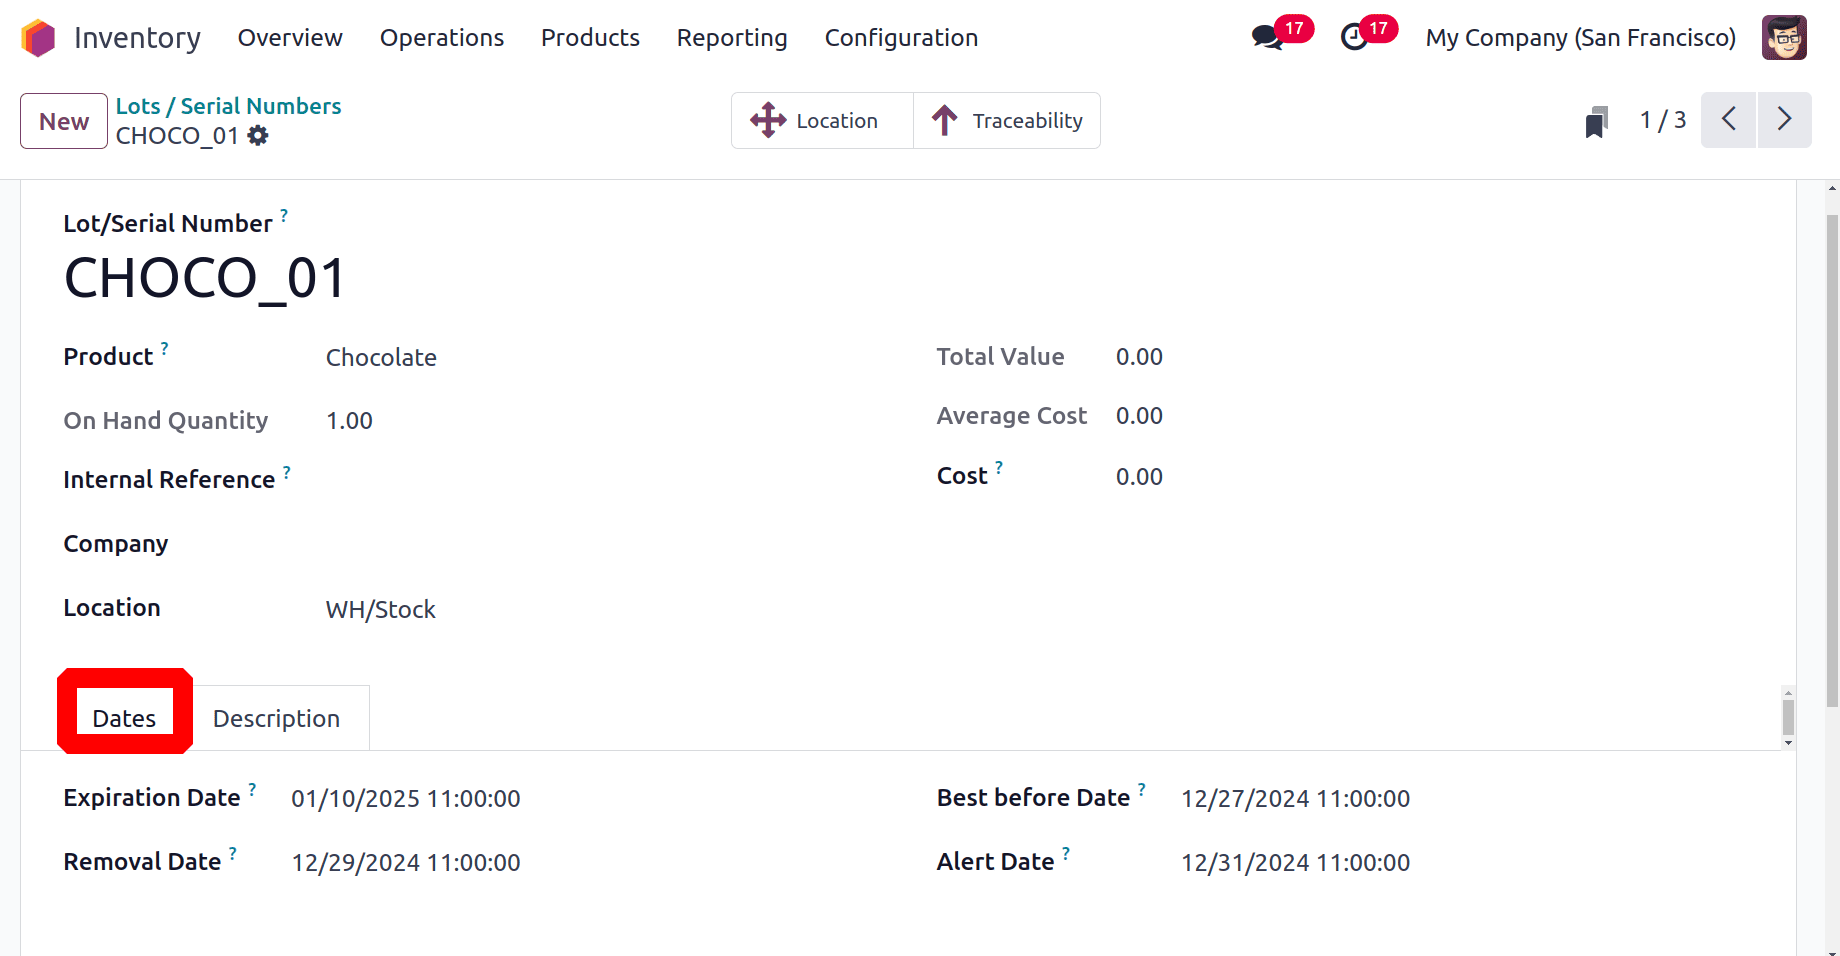
On the basis of the Alert Date is the date an expiration alert will generate as shown in the below screenshot
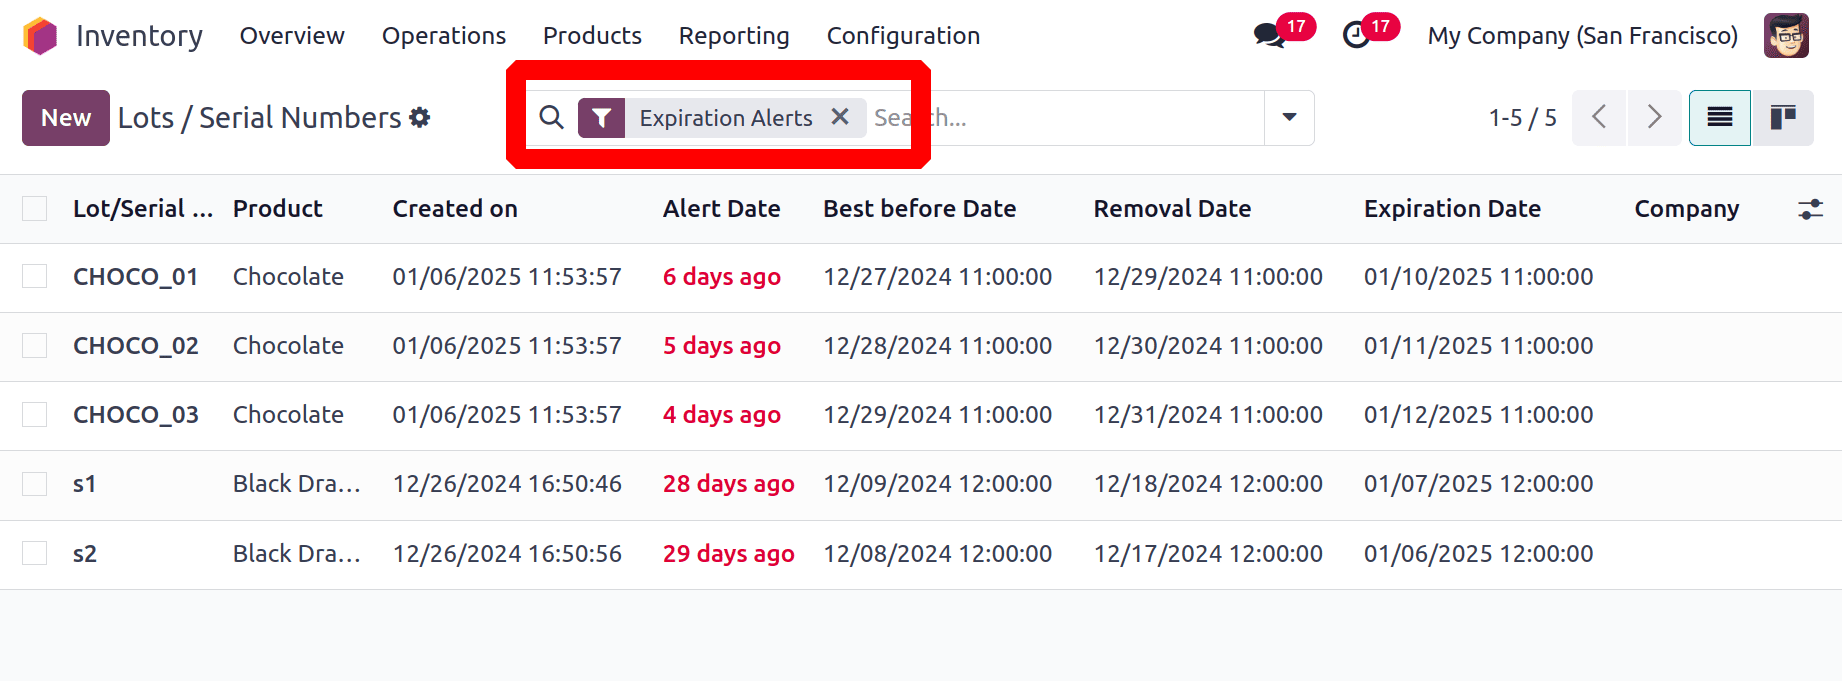
Users have the option to filter the entire selection based on the Expiration Alert, which will filter all products that are about to expire.
Managing product expiration dates in Odoo 18 well guarantees efficient operations, lowers waste, and upholds industry standards. Businesses can stay proactive and reduce risks by leveraging Odoo's robust capabilities, which include lot monitoring, inventory optimization, and automated notifications. Adopting these tools promotes customer and stakeholder happiness and trust in addition to increasing efficiency.
To read more about How to Set Up Expiration Dates for Your Product with Odoo 17 Inventory, refer to our blog How to Set Up Expiration Dates for Your Product with Odoo 17 Inventory.