In this blog, we will go through how to create a custom header and footer in the Odoo 16 website module. Odoo generates many header layouts that you may utilize by default. We can just inherit the default theme because we will be creating a new header.
When naming the theme module, we must make sure that the name starts with “theme_” after the underscore you can type in your theme name. There are two basic files required to run your Odoo theme. Create two files inside the "theme_custom" folder: __init__.py and __manifest__.py.
Manifest
Since we don't yet have any Python code to import, make the init file empty. Copy the following code into the manifest file. You can rename the name and description according to your needs.
{
   'name': 'Custom Theme',
   'description': 'Custom website theme',
   'category': 'Theme',
   'sequence': 10,
   'version': '16.1.0.0',
   'depends': ['website'],
   'data': [
       'views/header.xml',
       'views/footer.xml',
   ],
   'images': [
   ],
   'application': False,
   'auto_install': False,
   'license': 'LGPL-3',
}
Custom Header
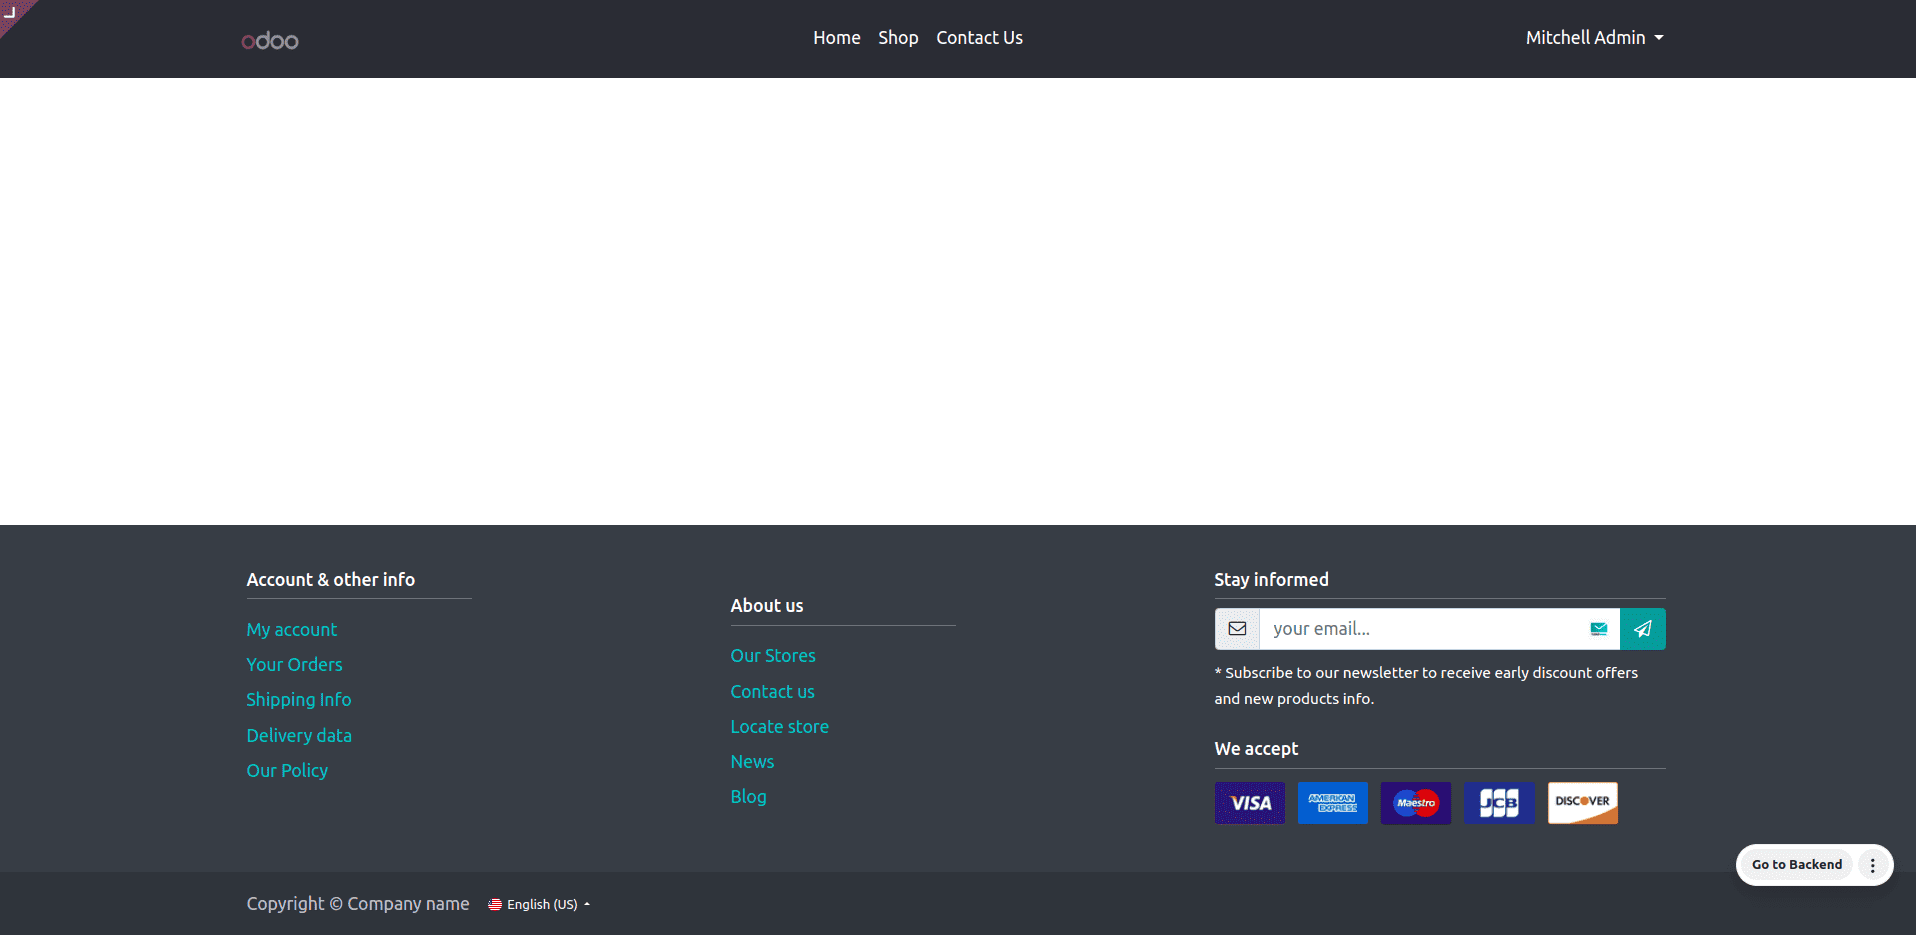
To begin, we may search header templates to see all of the current headers. You'll note that "website.layout" is inherited by all headers. We may create a new XML file in our custom module's views folder and call it header.xml. The code below will replace the whole header, thus, we must use expr="//header."
<?xml version="1.0" encoding="UTF-8" ?>
<odoo>
   <template id="custom_theme_header" inherit_id="website.layout"
             name="Custom Theme Header">
       <xpath expr="//header" position="replace">
           <header style="z-index: 9999">
               <nav class="navbar navbar-expand-lg navbar-light py-3"
                    style="background-color: #2a2d34;">
                   <div class="container ps-2 pe-2">
                       <a class="navbar-brand" href="#">
                           <img src="/web/static/img/logo.png"
                                alt="Logo"
                                style="height: 25px; max-height: 25px;"/>
                           <!--  Add your website name here instead of image if necessary  -->
                       </a>
                       <button class="navbar-toggler" type="button"
                               data-toggle="collapse"
                               data-target="#navbarSupportedContent"
                               aria-controls="navbarSupportedContent"
                               aria-expanded="false"
                               aria-label="Toggle navigation">
                           <span class="fa fa-bars"/>
                           <span/>
                       </button>
                       <div class="collapse navbar-collapse"
                            id="navbarSupportedContent">
                           <ul class="navbar-nav mx-auto">
                               <li class="nav-item">
                                   <a class="nav-link text-white"
                                      href="#">
                                       Home</a>
                               </li>
                               <li class="nav-item">
                                   <a class="nav-link text-white"
                                      href="#">Shop</a>
                               </li>
                               <li class="nav-item">
                                   <a class="nav-link text-white"
                                      href="#">Contact Us</a>
                               </li>
                           </ul>
                           <div class="nav navbar-nav ml-auto">
                               <!--  Sign In  -->
                               <t t-call="portal.placeholder_user_sign_in">
                                   <t t-set="_item_class"
                                      t-value="'nav-item ml-lg-3'"/>
                                   <t t-set="_link_class"
                                      t-value="'nav-link'"/>
                               </t>
                               <!--  User Dropdown  -->
                               <t t-call="portal.user_dropdown">
                                   <t t-set="_user_name" t-value="True"/>
                                   <t t-set="_item_class"
                                      t-value="'nav-item dropdown ml-lg-3'"/>
                                   <t t-set="_link_class"
                                      t-value="'nav-link font-weight-bold'"/>
                               </t>
                           </div>
                       </div>
                   </div>
               </nav>
           </header>
       </xpath>
   </template>
</odoo>
Custom Footer
We did the same thing with the header. Create a new file, footer.xml, within the views folder, and replace the footer with this code or your own custom code.
<?xml version="1.0" encoding="UTF-8" ?>
<odoo>
<template id="custom_footer" inherit_id="website.layout">
<xpath expr="//div[@id='footer']" position="replace">
<div id="footer" class="oe_structure oe_structure_solo" t-ignore="true" t-if="not no_footer">
<section class="s_text_block pt40 pb24" data-snippet="s_text_block" data-name="Text">
<div class="container">
<div class="row">
<!-- Shop departments -->
<div class="col-12 col-sm-6 col-md-4">
<h6>Account & other info</h6>
<div class="s_hr pb8" data-name="Separator">
<hr class="w-50 me-auto" style="border-top-width: 1px; border-color: var(--600);" />
</div>
<ul class="list-unstyled tp-list-arrow">
<t t-foreach="[
'My account', 'Your Orders', 'Shipping Info',
'Delivery data', 'Our Policy']" t-as="info">
<li class="my-2">
<a href="#"><t t-esc="info" /></a>
</li>
</t>
</ul>
</div>
<!-- Account & Other Info -->
<div class="col-12 col-sm-6 col-md-4">
<h6 class="mt-4">About us</h6>
<div class="s_hr pb8">
<hr class="w-50 me-auto" style="border-top-width: 1px; border-color: var(--600);" />
</div>
<ul class="list-unstyled tp-list-arrow">
<t t-foreach="['Our Stores', 'Contact us', 'Locate store', 'News', 'Blog']" t-as="about">
<li class="my-2">
<a href="#"><t t-esc="about" /></a>
</li>
</t>
</ul>
</div>
<!-- Newsletter & Payment -->
<div class="col-12 col-md-4">
<h6>Stay informed</h6>
<div class="s_hr pb8">
<hr class="w-100 me-auto" style="border-top-width: 1px; border-color: var(--600);" />
</div>
<div class="s_newsletter_list">
<div class="input-group">
<span class="input-group-text">
<i class="fa fa-envelope-o" />
</span>
<input type="email" name="email" class="form-control" placeholder="your email..." />
<a role="button" href="#" class="btn btn-primary">
<i class="fa fa-send-o" />
</a>
</div>
<div class="mt-2">
<small>* Subscribe to our newsletter to receive early discount offers and new products info.</small>
</div>
</div>
<h6 class="mt-4">We accept</h6>
<div class="s_hr pb8">
<hr class="w-100 me-auto" style="border-top-width: 1px; border-color: var(--600);" />
</div>
<ul class="list-inline tp-payment-icons">
<li class="list-inline-item my-1">
<img src="/theme_custom/static/src/img/payment/visa.png" alt="Visa"/>
</li>
<li class="list-inline-item my-1">
<img src="/theme_custom/static/src/img/payment/american_express.png" alt="American Express"/>
</li>
<li class="list-inline-item my-1">
<img src="/theme_custom/static/src/img/payment/maestro.png" alt="Maestro"/>
</li>
<li class="list-inline-item my-1">
<img src="/theme_custom/static/src/img/payment/jcb.png" alt="JCB"/>
</li>
<li class="list-inline-item my-1">
<img src="/theme_custom/static/src/img/payment/discover.png" alt="Discover"/>
</li>
</ul>
</div>
</div>
</div>
</section>
</div>
</xpath>
</template>
</odoo>
After updating these XMLs, we need to install and select the theme. This will be our final output.

To put it briefly, one of the most effective methods to improve your website's identity and user experience is to customize the header and footer. The main sections may be altered to give you a comprehensive, expert design that strengthens site navigation and protects the brand identity. Because Odoo's capabilities are versatile, creating a visual presence that appeals to your target audience is simple. Following the guidelines will offer your website a distinctive yet useful design that will enhance the user experience and make it more interesting.
To read more about How to Modify Existing Web Pages in Odoo 17, refer to our blog How to Modify Existing Web Pages in Odoo 17.