Odoo 18 is a powerful, flexible platform for managing and customizing all kinds of business applications. It’s designed to let developers easily create solutions that fit specific needs, whether that’s automating tasks, managing data, or creating custom workflows. One of the standout features of Odoo 18 is its web controller framework, which lets developers build custom front-end views and handle HTTP requests. These web controllers are essential for connecting Odoo’s backend with external apps or custom web pages, allowing for real-time data integration and management. By using web controllers, businesses can create interactive, responsive experiences for customers, suppliers, and partners, extending Odoo’s capabilities beyond the usual ERP setup.
In Odoo, controllers are used to manage and configure front-end modules on the website, creating a bridge between the website and the back-end modules. With controllers, you can set up specific URLs that connect your web pages to backend functions, making it easier to design a seamless, interactive website experience.
To get started with controllers, you’ll first need to create a controllers folder in your custom module. Inside this folder, you'll include the necessary Python files along with an __init__.py file.
from . import controllers
Once added, this new controllers folder will appear in the module structure, providing a dedicated space for setting up custom routes and extending Odoo's website functionalities.
Create a Controller File:
Creating a controller in Odoo lets you fetch backend data and display it on the front end, giving you flexibility to set up custom web routes. In the controller file, import the necessary modules and define your controller class. In this example, we'll create a controller to display all purchase order data.
from odoo import http
from odoo.http import request
class PurchaseOrderController(http.Controller):
    @http.route(['/purchaseorders'], type="http", auth="public", website=True)
    def display_purchase_orders(self, **kwargs):
        # Fetch purchase order records
        purchase_orders = request.env['purchase.order'].sudo().search([])
        # Prepare data for the template
        values = {
            'records': purchase_orders
        }
        # Render the template with data
        return request.render("customer_portal_custom.purchase_order_template", values)
The @http.route decorator is crucial for defining a URL route within Odoo. It designates where a specific controller function can be accessed. Here’s a detailed breakdown of the syntax:
@http.route(['/purchaseorders'], type="http", auth="public", website=True)
Each component serves a specific purpose:
* '/purchaseorders': This segment specifies the URL path. When a user navigates to this URL (e.g., <your_domain>/purchaseorders'), Odoo executes the corresponding function below this decorator to generate and display the appropriate webpage.
* type='http': This parameter indicates that the route is intended for HTTP requests. This means the route is designed for browser access. Alternatively, a type of json is used for API endpoints that return data in JSON format.
* auth='public': This parameter sets the level of authentication required to access the route. The main options include:
1. 'public': The page is accessible to anyone, including users who are not logged in.
2. 'user': Only authenticated users (logged-in users) can access the page.
3. 'bearer': The Bearer uses a token for access, Basic authentication sends credentials, verifies users with an API token.
4. 'none': No authentication is required, allowing for complete open access to the route.
* website: This parameter indicates whether the controller is connected to the website, with a value of True for linked pages and False for non-website functionality.
* methods: You can specify which HTTP methods are allowed; if not specified, all methods are permitted. The main methods include:
1. ['GET']: Used for retrieving data without making any changes.
2. ['POST']: Used for submitting data or making changes.
* sitemap: This parameter enables the creation of sitemap links that showcase website navigation, serving as a directory for accessible pages.
* cors: Cross-Origin Resource Sharing (CORS) facilitates secure requests and data exchange between browsers and servers.
* multilang: This feature allows the addition of multiple languages to the website, enabling frontend translations.
* csrf: Cross-Site Request Forgery (CSRF) protection is used to secure user sessions by generating a unique token.
Currently, we have all the purchase order details stored in the purchase_orders variable. While in models, we typically use self.env for database interactions, in controllers, we utilize request.env to access the Odoo environment.
To address any potential access rights issues when working with records, we apply the sudo() method before performing any operations like search or create. This ensures that we can retrieve or manipulate records without running into permission errors.
Now, we can render a webpage to display the purchase order details with the following code:
return request.render("customer_portal_custom.purchase_order_template", values)If we need to redirect the user to a different URL instead of rendering a page, we can use the request.redirect method. For example, if we want to send the user to /shop, we would write this instead:
return request.redirect(‘/shop’)
Creating the View:
Now we can create the XML template named purchase_order_template in the views folder of our module. This is necessary because we have already referenced this view in our controller.
<?xml version="1.0" encoding="utf-8"?>
<odoo>
    <template id="purchase_order_template" name="Purchase Orders List">
        <t t-call="website.layout">
            <div class="oe_structure">
                <div class="container">
                    <h3>Purchase Orders</h3>
                    <table class="table table-bordered table-striped">
                        <thead>
                            <tr>
                                <th>Order Reference</th>
                                <th>Date</th>
                                <th>Supplier</th>
                                <th>Status</th>
                                <th>Subtotal</th>
                                <th>Taxes</th>
                                <th>Total Amount</th>
                            </tr>
                        </thead>
                        <tbody>
                            <t t-foreach="records" t-as="order">
                                <tr>
                                    <td>
                                        <t t-esc="order.name"/>
                                    </td>
                                    <td>
                                        <t t-esc="order.date_order"/>
                                    </td>
                                    <td>
                                        <t t-esc="order.partner_id.name"/>
                                    </td>
                                    <td>
                                        <t t-esc="order.state"/>
                                    </td>
                                    <td>
                                        <t t-esc="order.amount_untaxed"/>
                                    </td>
                                    <td>
                                        <t t-esc="order.amount_tax"/>
                                    </td>
                                    <td>
                                        <t t-esc="order.amount_total"/>
                                    </td>
                                </tr>
                            </t>
                        </tbody>
                    </table>
                </div>
            </div>
        </t>
    </template>
</odoo>
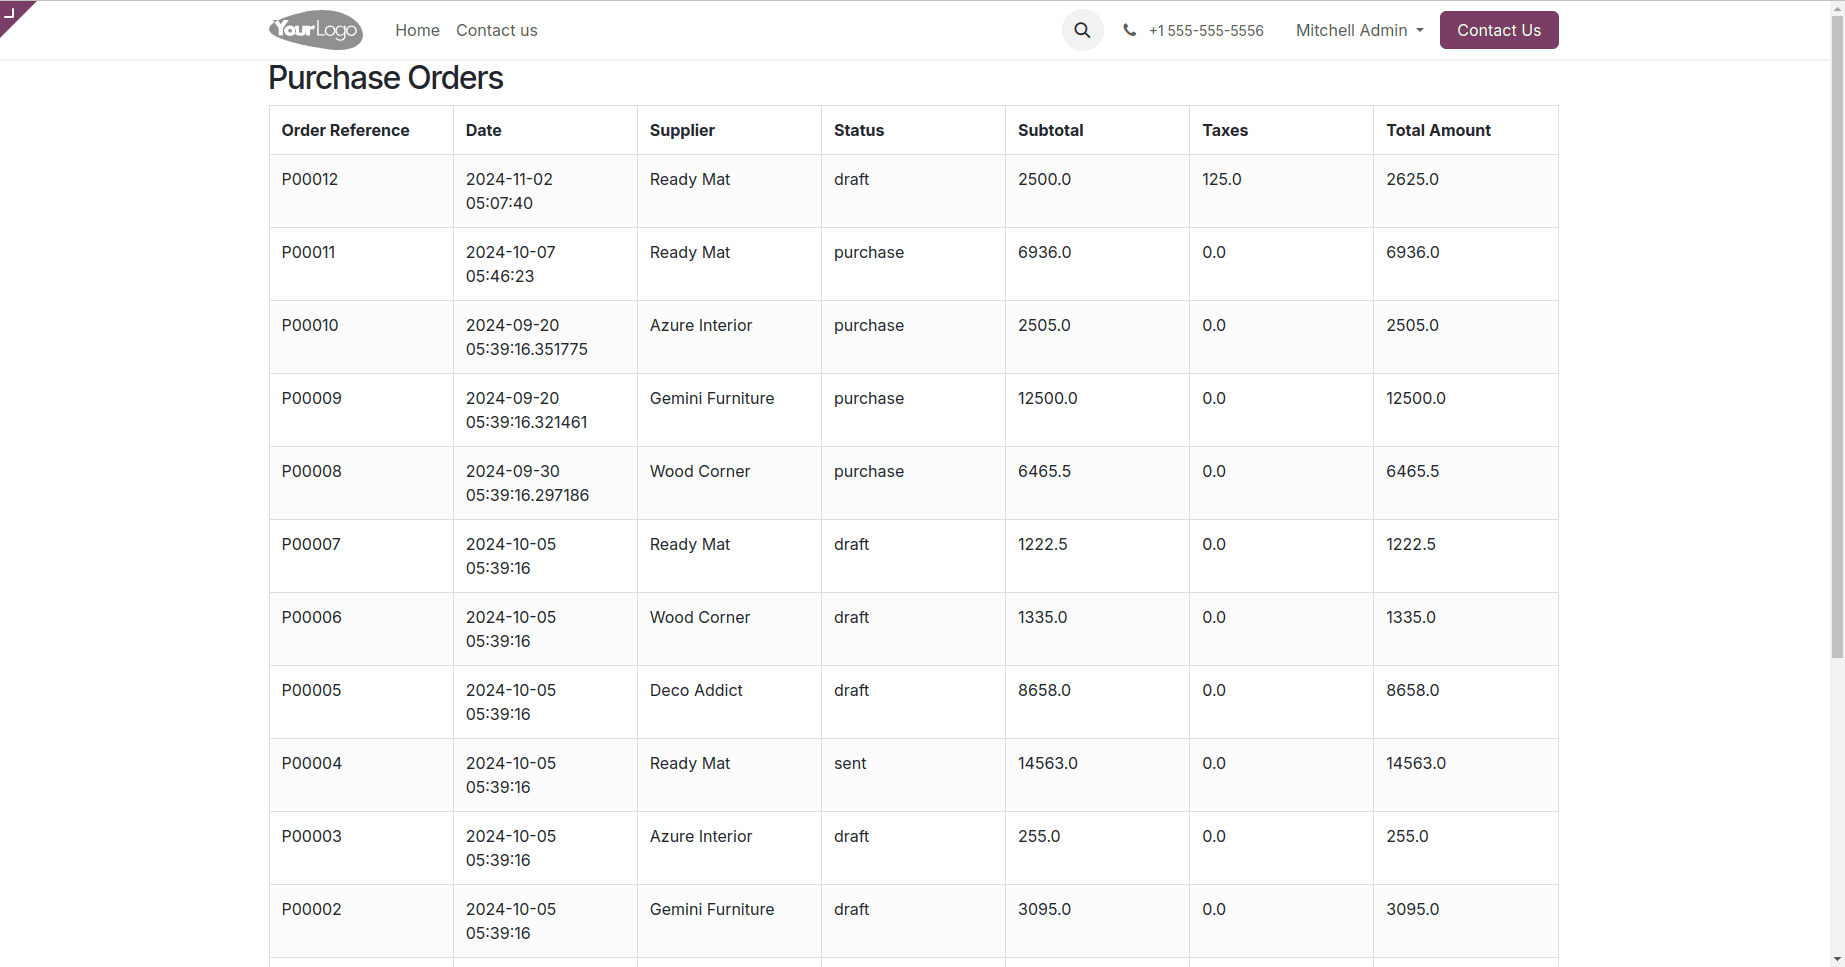
Now, the page named /purchaseorders will show all the purchase orders as shown in the picture below.

In summary, web controllers in Odoo allow you to customize web interactions by defining routes, implementing business logic, and controlling responses. They are versatile tools for building custom web experiences in Odoo 18.
To read more about How to Create a Generic Controller in Odoo 17 Website, refer to our blog How to Create a Generic Controller in Odoo 17 Website.