The Odoo 16 Rental module covers nearly all of the needs and information of the rental business. The module makes it simple for users to understand the rental products, availability, etc. The Odoo Rental module is an all-inclusive solution for your rental management company's needs.
What is new in Odoo Rental?
The rental market has grown in popularity. As a result, Odoo introduced additional clever features to the rental module for smooth operation without lowering customer satisfaction.
Let's check out the new features of Odoo’s Rental Module.
1. Rental period - (Users can set the rental durations and utilize it for online rentals)
2. Price-Based & Time-Based Renting Periods- (Under the rental module's product setup section, the Time-Based Pricing can be configured. The website for the rental product will show this cost.)
3. Internet rentals- (rentals plus e-commerce) (Users can view the configured rental product according to the time-based pricing by going to the eCommerce website after the product has been configured in the rental module.)
4. Upselling & Cross-Selling of Rental Goods- (Users could increase revenue by upselling and cross-selling. Create a new product that can be sold in order to do this.)
5. Utilizing Rental Search to market rental products with engaging blog content
6. Setting Up the Unavailability Dates
How to create a new rental product in Odoo 16?
Enter the rental module to create a new rental product.
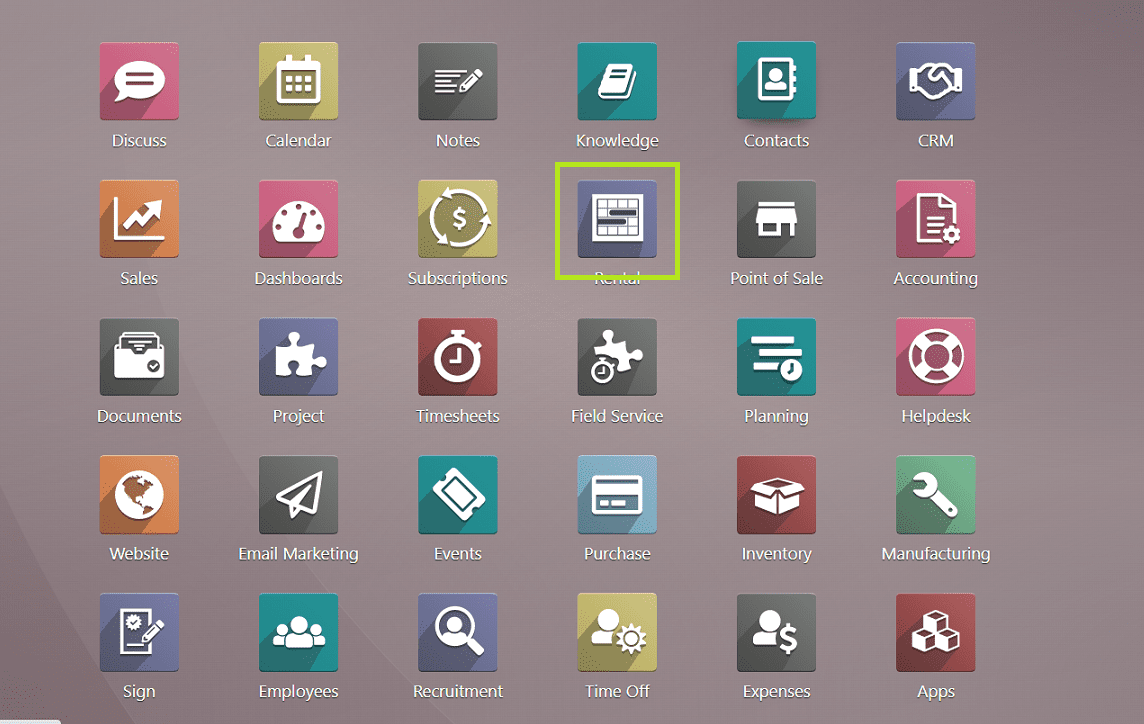
After entering the rental module, you will see the interface as shown below.
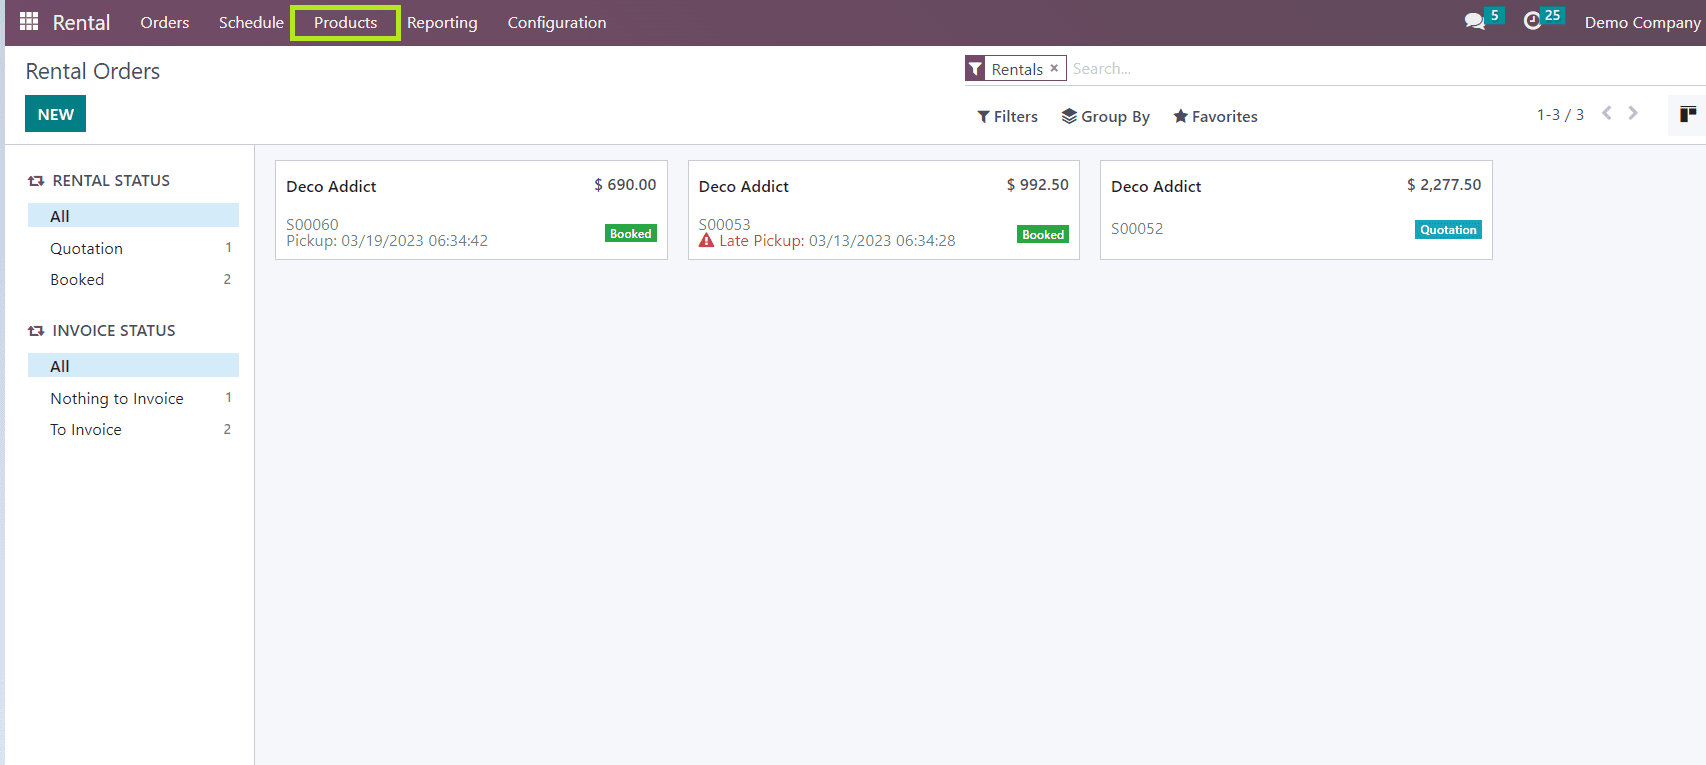
Here you can see existing rental orders, rental statuses, invoice statuses, etc. So let's come to the point of creating a new rental product.
Step 1: Go to the "Products" menu on the menu bar, and it will open a page where all the rental products will be displayed. If you click on the product, then it will open the description and details related to the particular product.
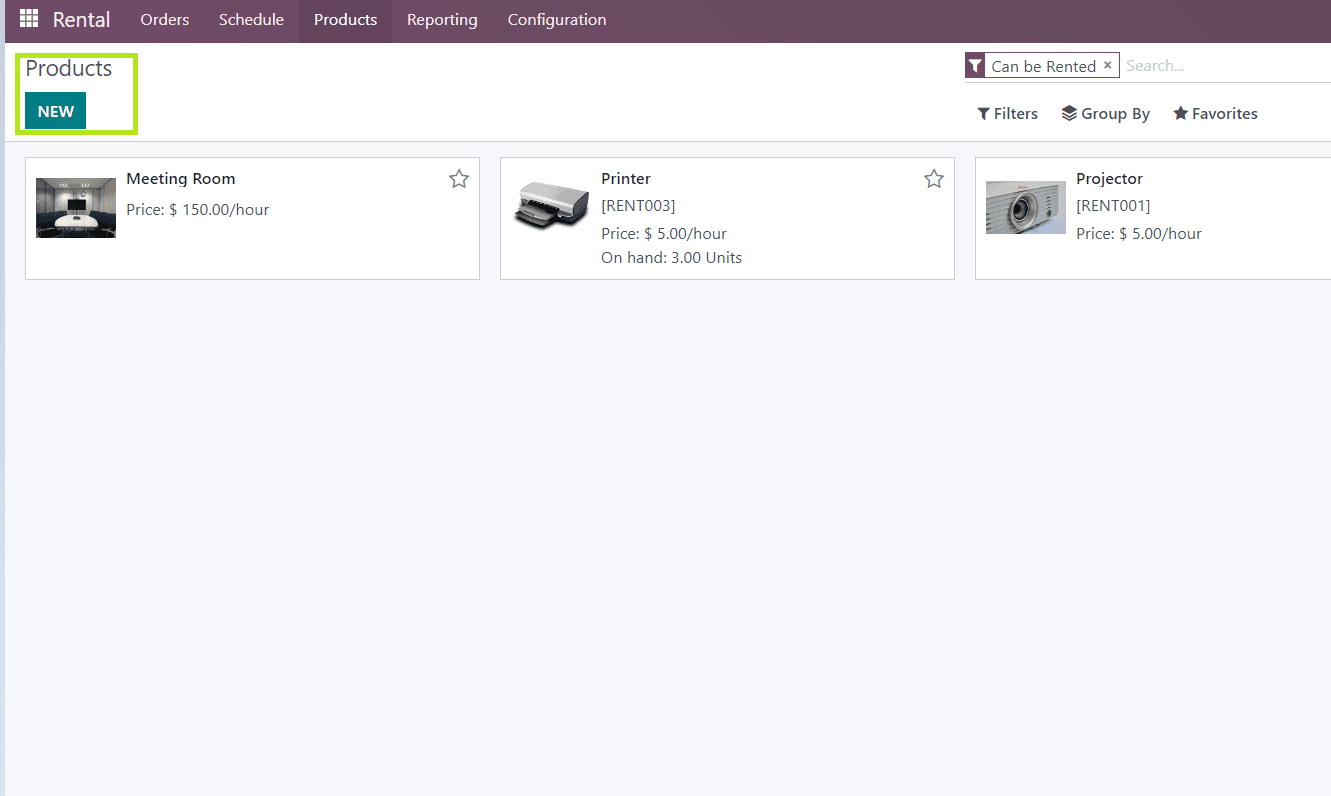
Here we can see that only three rental products are available. If we want to rent the existing product, then we can choose from the list. So now we are going to create a new product for rental purposes.
Step 2: Under the Products section, click the "New" button.
Step 3: Create the product details.
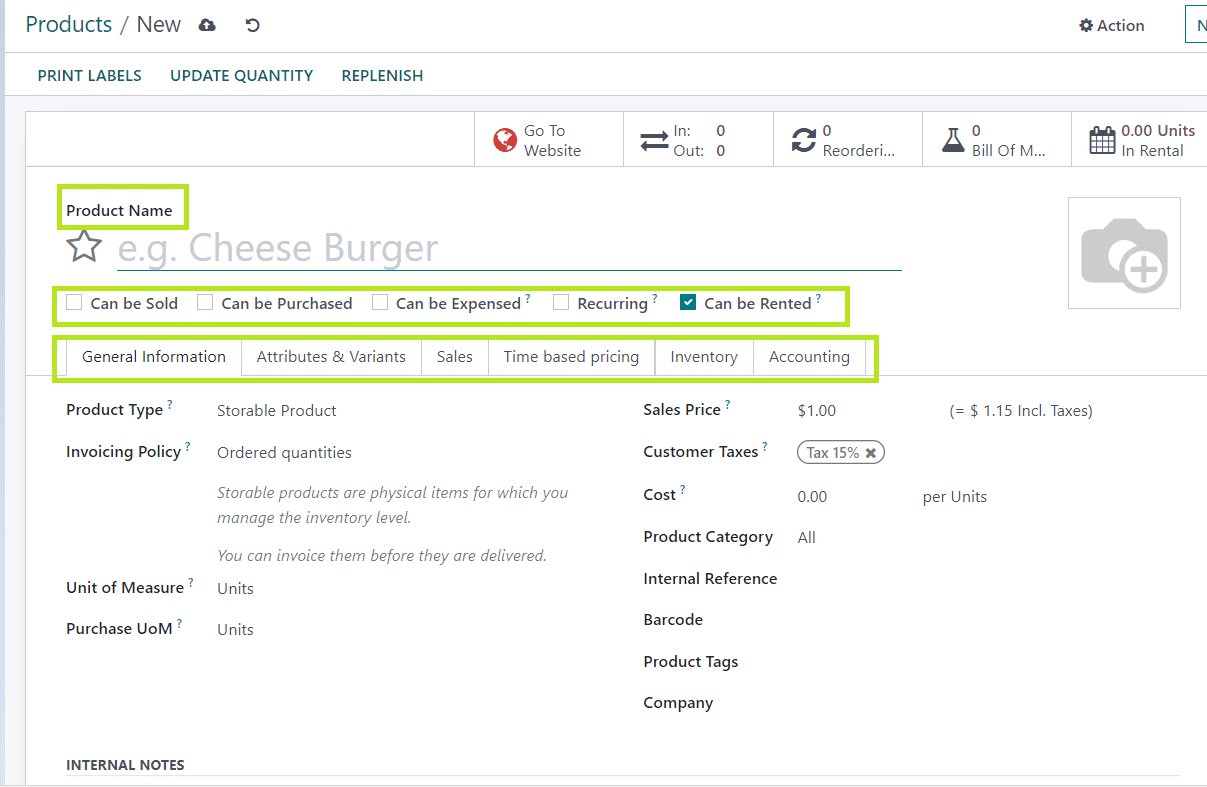
In this form view, we have to fill in the details and specifications regarding the product, and the form contains six sections.
* Product name - Any product that you want to create
* Product Variant - Select the options given below according to your intention, like, Can be rented, can be sold, and can be purchased, etc.
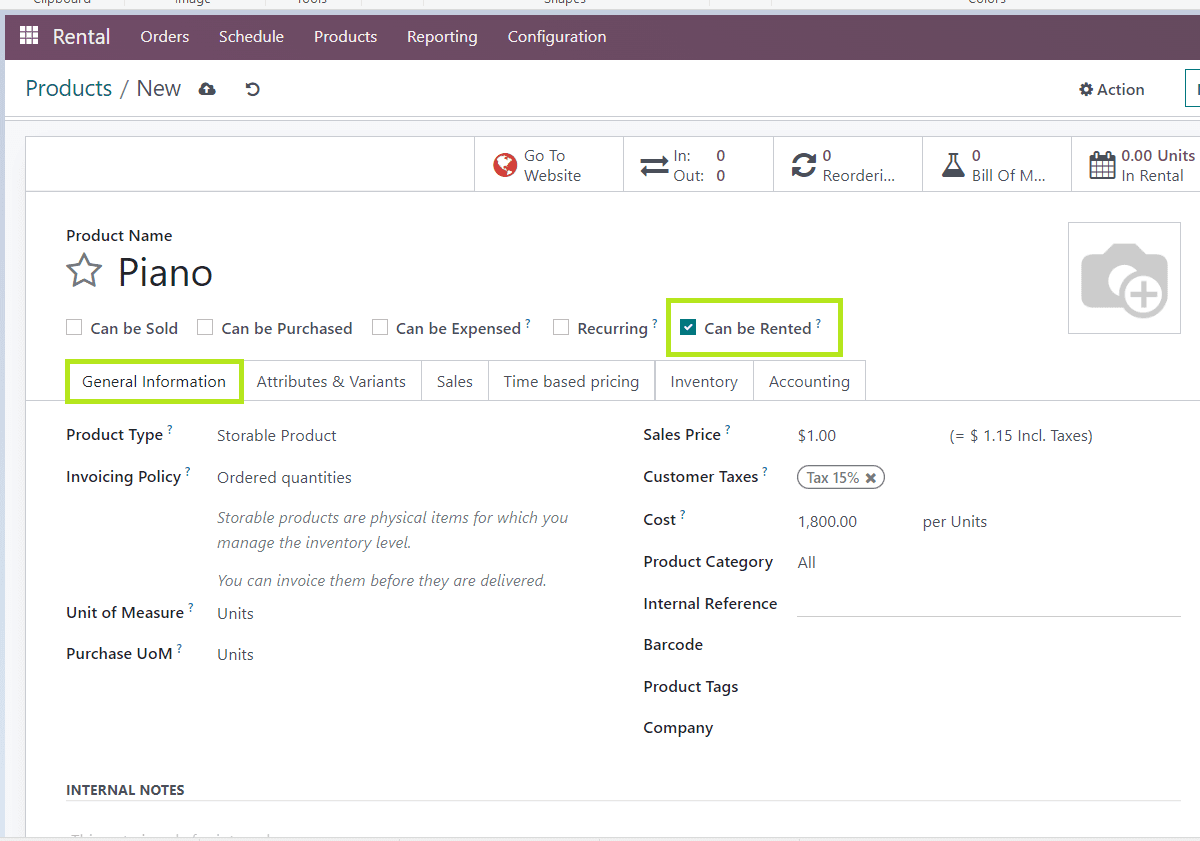
So I am giving the product name ‘Piano’ and selecting the ‘can be rented’ option.
Now Let’s check the six form configuration sections of the module.
1. General Information
In this section, fill in the details regarding the product, such as
* Product Type - To specify the type of product (Storable, Consumable, Service, Event Ticket, etc.)
* Invoicing Policy
* Units of Measure
* Purchase Unit of Measure
* Sales Price
* Customer Taxes
* Cost
* Product Category
* Internal Reference
* Barcode
* Product Tags
* Company
* Internal Notes
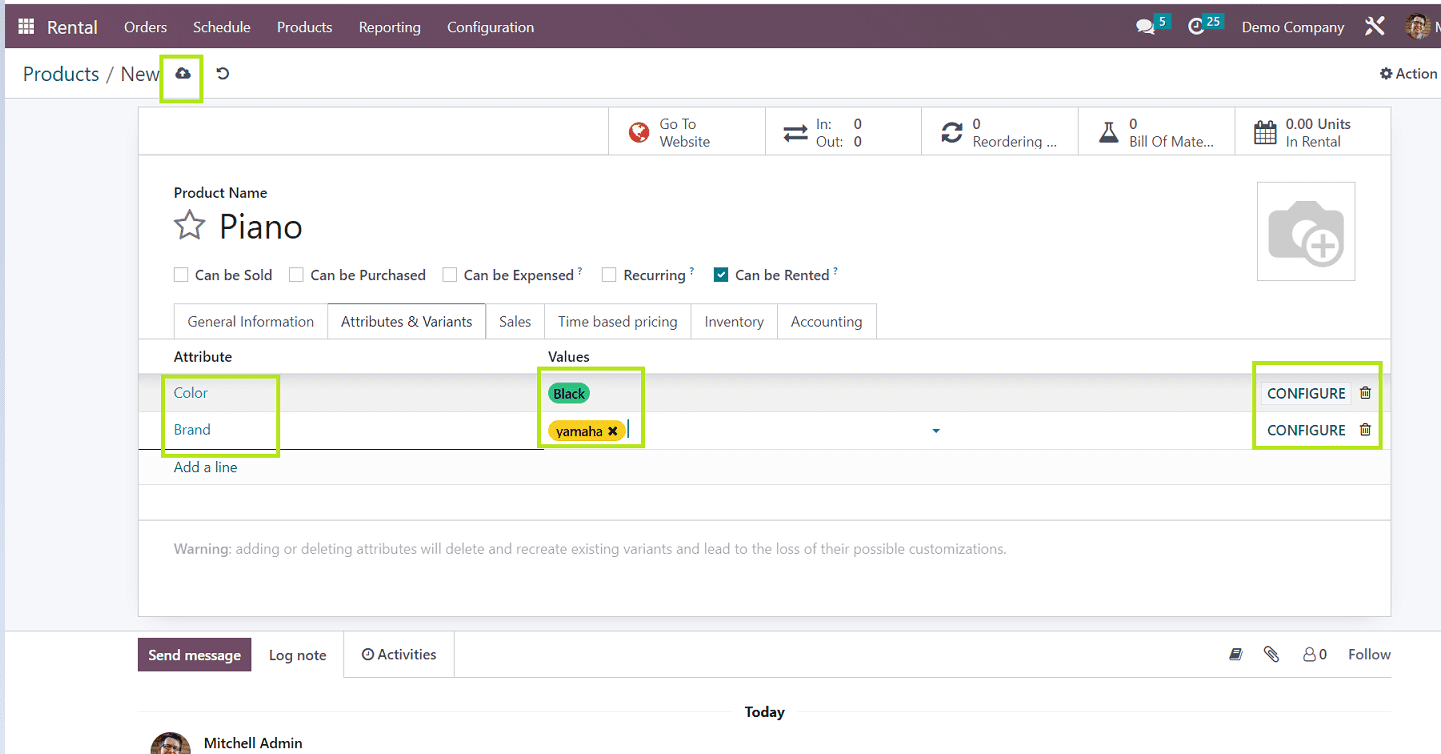
2. Attributes &Variants
This section refers to the various descriptions and values related to a particular product, such as Color, Size, etc.
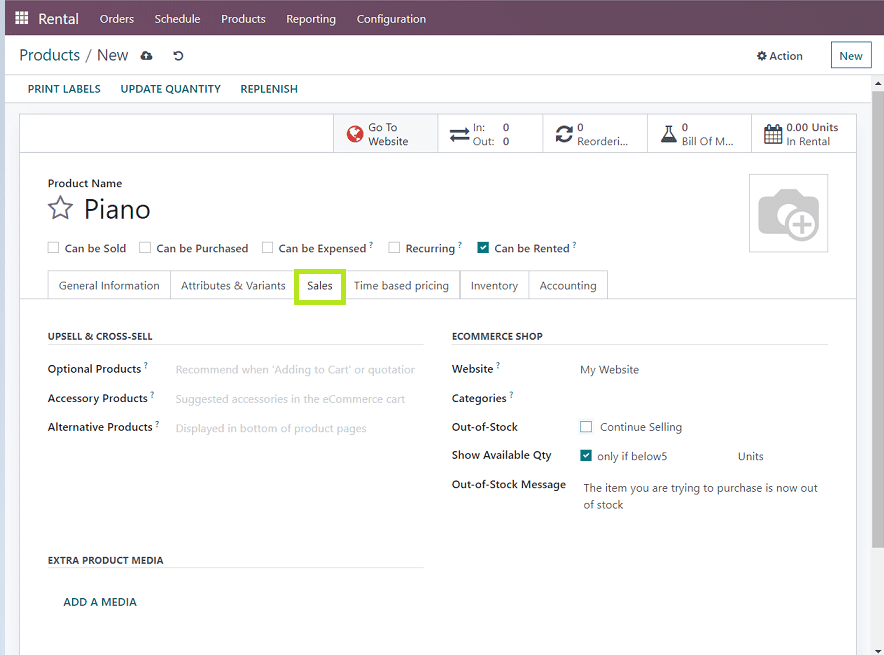
3. Sales
* Upsell & Cross-sell details
(This section contains optional products, Accessory Products, and Alternative products)
A. Optional products - This cross-sell strategy is used when the customer clicks the ‘Add to cart’ option, then the related products are suggested. For example, if a customer buys an electronic item, then its warranty will be shown so it can be purchased easily.
B. Accessory Products - The matching accessories for the Electronic item will be displayed so customers can easily purchase the items.
C. Alternative products - An suggestion shows the best alternative of the particular product.
* E-commerce shop
(Website, Categories, Out of stock, Show available quantity, Out of stock msg)
A. Website - Restricted publishing note
B. Categories -We can categorize particular products in different sections. So while checking into that category, the same product will be shown.
C. Out-of-stock - Users can select whether they need an Out-of-stock message while purchasing the item.
D. Show Available Quantity - If there are only limited quantities of the products there, then the available quantity will be shown. We can customize it by setting the limited quantity to a number.
E. Out-of-Stock Message - A msg will be displayed when the customer tries to order an unavailable product.
* Extra Product Media (media regarding the product such as Video, Images, etc.)
* Sales Description( sales orders and invoices)
4. Time-based pricing
* Price
* Extra Hour - Mention the overdue amount based on extra used hours.
* Extra Day - Mention the overdue amount based on extra used days.
* Security Time -Temporarily unavailable status will be shown before pickup.
5. Inventory
* Routes (Information about whether the product is Brought, Manufactured, or Replenished, etc.)
* Responsible (The person who is responsible for further actions regarding the product.)
* Weight
* Volume
* Manufacture Lead time (Required time if the product is manufactured by order)
* Days to prepare Manufacturing Order (No: of days to manufacture the product after ordering.)
* H.S Code (Standardized code for international shipping and goods declaration
* Origin of goods (Declaration notes about the origin of the Materials and Products used for Manufacturing)
* Tracking (Tracking Number, Codes, etc.)
* Description for receipts.
* Description for delivery orders.
6. Accounting
* Income Amount (Default value by the product category)
* Expense amount (Default value by the product category)
* Price difference account (An account related to the difference between purchase order and vendor bill)
In this scenario, I am giving the product name "Piano," selecting the “Can be rented” option from the checkboxes, and filling in the required fields, as shown in the below screenshot.
In attributes and variants, give attributes such as size, color, and brand, and variants such as color names, brand names, etc.
Step 4: While giving the attribute and value details, it will open a new page where you can add extra charges for particular attributes such as color, brand, size, etc. So the business can add extra charges when demand increases for a particular variant of the product. The charges are called product variant values.
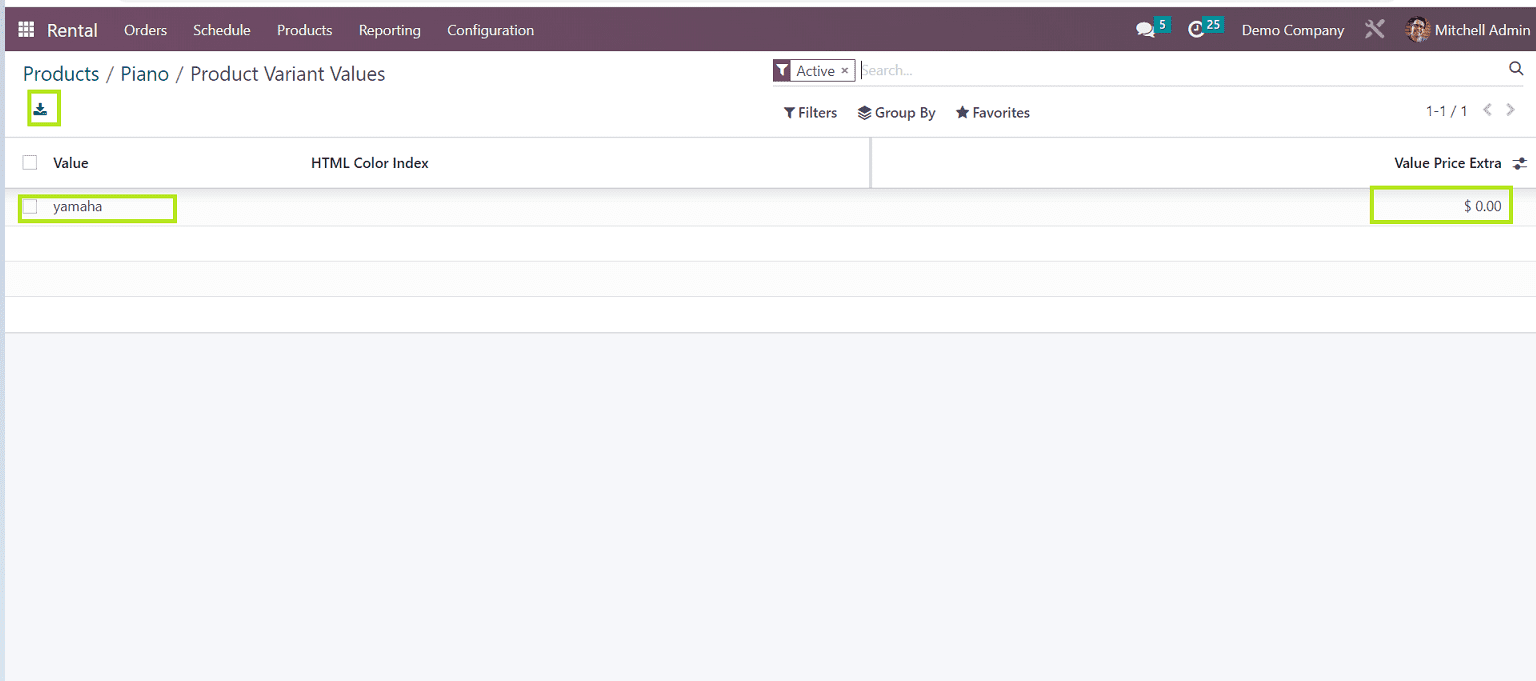
In this case, I am giving $ 200 extra as product variant values for a “Yamaha” brand piano.
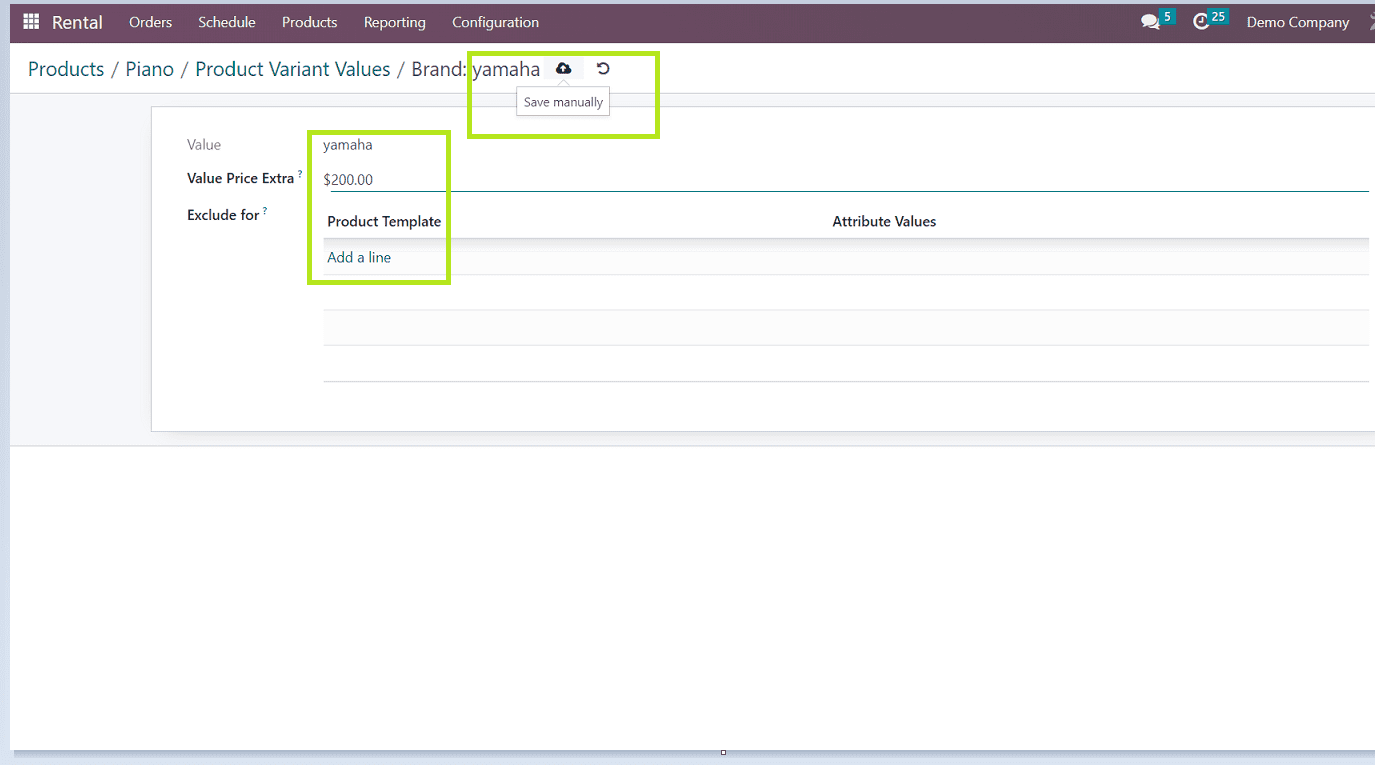
Step 5: After providing the values, save details for each attribute and variant.
Step 6: Fill in the details of the sales section.
Step 7: Time-based price section (Fill in the Overdue amounts on an hourly and day based)
Step 8: Inventory section and accounting section (Provided by the Person in charge of the full operations such as Delivery and Pickup of the product)
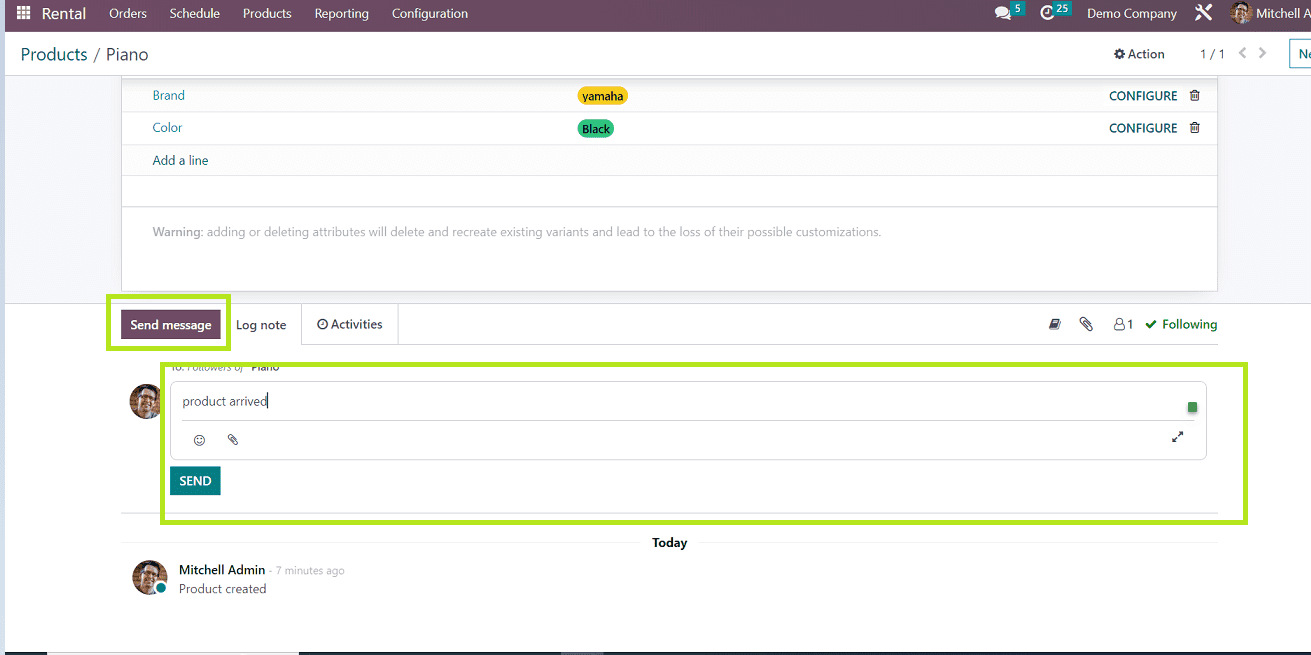
Step 9: After filling in the required fields, save the details and click on the SEND button so we can type a message to inform the customers about new product arrivals.
From the product menu, we can see that our new product has been created and is currently available for rental purposes.
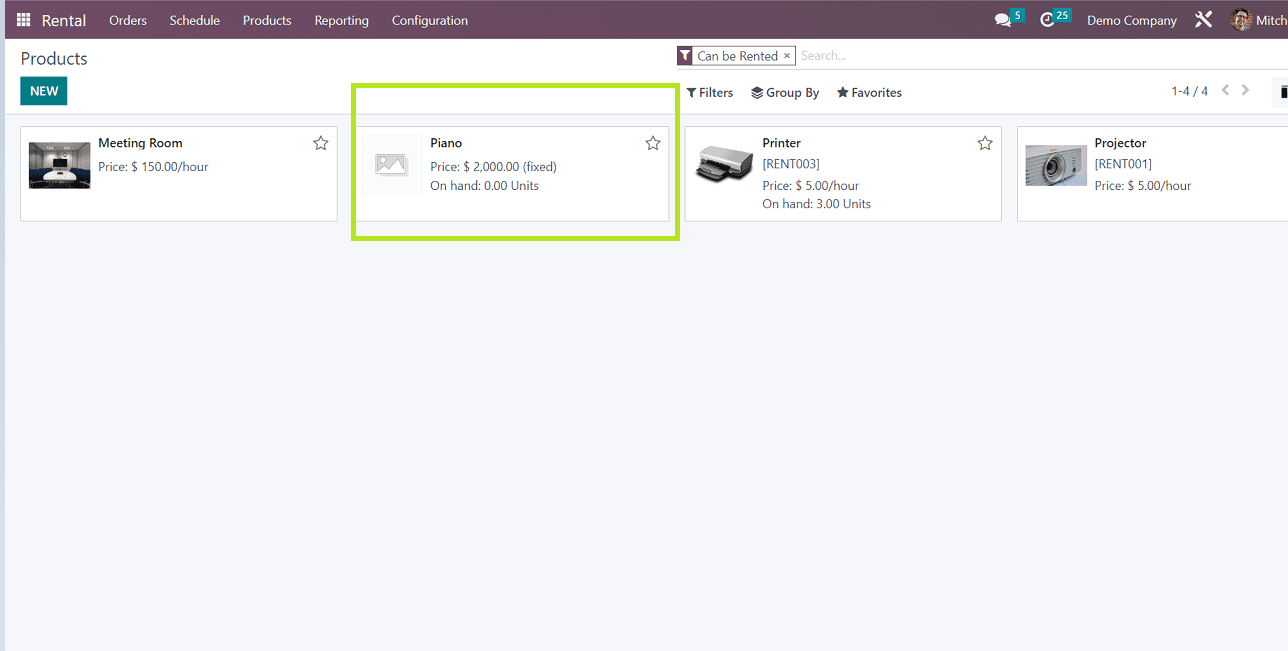
Now that our new product is out there and ready to be rented. The process just described is very helpful for handling all of the back-end operations and details of the created product needed for a rental business.
We have covered an overview of the development processes for creating new rental orders, managing the rental orders, and more in this blog. The various features and functions of the Odoo 16 Rental Module Application Platform were also covered. I'm hoping that this explanation will make the same thing clear to you.