Help desk software is a need for companies looking to boost customer satisfaction and speed up support processes. It simplifies the organization of support requests, the prioritization, and the response of customer requests by agents, and it gives customers a simple method to handle routine inquiries on their own. The program offers community forums, a knowledge base, email support, and self-service portals for users to ask questions. Tracking important indicators like agent productivity, customer happiness, and support costs enables reporting and analytics to enhance service quality and efficiency continuously. While freeing up agent time and maintaining consistency, automation specifies anticipated service levels and quality-based objectives. Customizations, integrations, and business needs can be added to it to expand functionality. To improve customer satisfaction, businesses require help desk software.
Managers have a difficult time ensuring that their help desks are operating efficiently in the complicated IT environments of today. IT administrators should set up a systematic help desk structure, categorize help desks into levels, and open a line of communication for escalations across levels in order to increase efficiency. Performance may be managed and enhanced by using automated assignment models, priority-based business rules, end-user surveys, self-service portals, and service catalogs. Collaboration and communication can be improved by using a help desk technology that sends and receives emails, and permits premade text for standard replies. Overall, help desks may provide great service by organizing their help desks, setting priorities, and producing reports with important performance metrics.
A specialized platform for handling customer inquiries and complaints regarding the business is the Odoo 16 Help Desk module. It makes it possible for the help desk division to address identified problems, create good relationships with customers, and ensure a nice experience. The Odoo Helpdesk application enables teams to track, prioritize, and handle customer complaints while managing their workflow in phases that may be customized. Using the platform, requests can either be manually or automatically assigned to support staff members. The ability to create tickets from the backend or web interface, see produced tickets, assign them to certain users or teams, set priorities and deadlines, manage tickets according to stages, add notes and attachments, and create reports to track ticket performance are some of the key features.
SLA Policies in Odoo HelpDesk
The desired quality of service from a provider is described in a service-level agreement (SLA), along with measurements and possible remedies. SLAs frequently occur between businesses and their outside supplier or inside their own departments. They could also include sanctions for failing to meet goals.
The SLA should outline the intended service levels, the metrics used to measure them, the parties' responsibilities, the remedies available in the event of a violation, and the process for adding and deleting metrics. Both parties should not engage in improper behavior, such as when a provider is not penalized for timely information supplied by the client.
Configuring Teams and Activating SLA Policies
You can create new teams and activate the SLA Policies by opening the “Team” option from the “Configuration” menu. You can see the list of various other available teams under the “Teams” dashboard choose the newly created team.
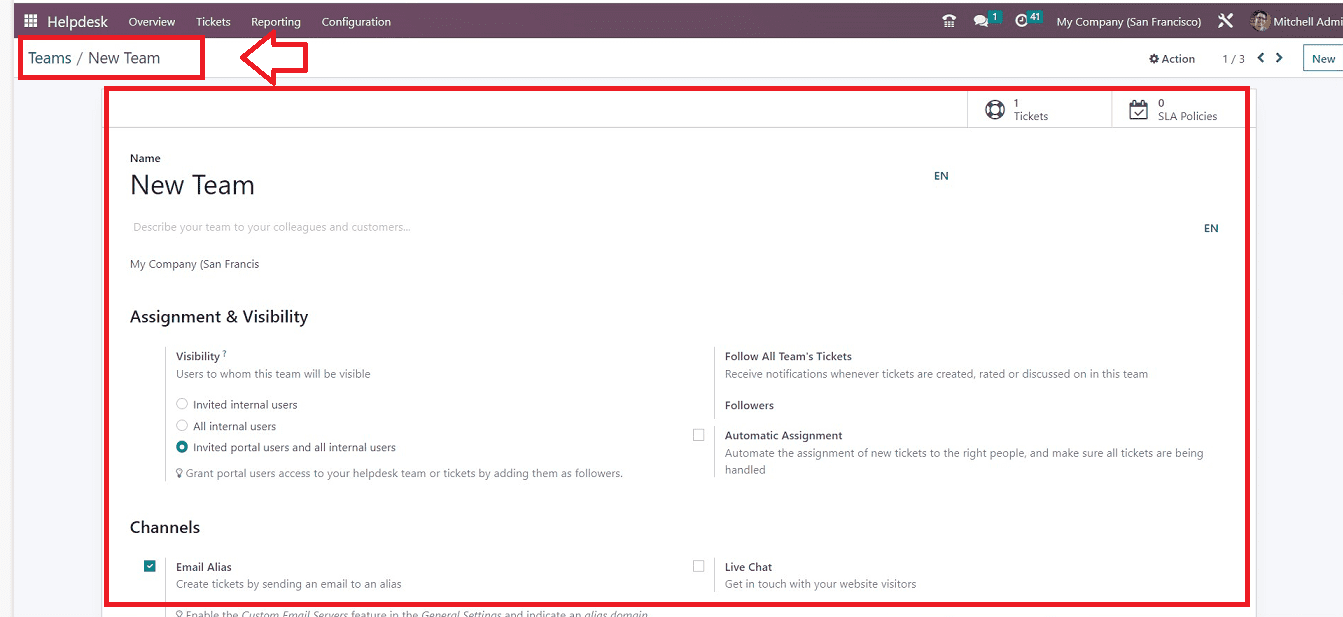
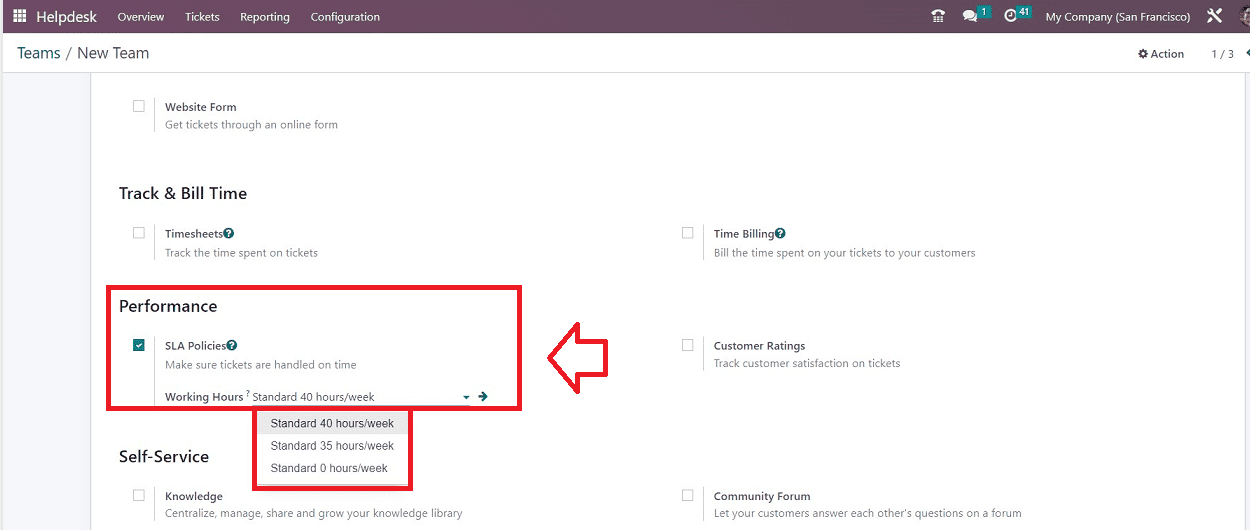
It is possible to activate various team settings from the team configuration window itself. These settings include “Assignment & Visibility,” “Channels,” “Track & Bill Time,” “Performance,” etc. To activate the SLA Policy, go to the “SLA Policies” option available in the “Performance” tab and choose the option. You can also set the “Working Hours” of the particular team by choosing an option as shown below.
Creating New SLA Policies In Odoo
We can configure the SLA Policies for various Helpdesk Services with the Odoo 16 Helpdesk Module from its “Configuration” menu. Opening the “SLA Policies” option from the Configuration menu will open the dashboard window of various previously created SLA Policies inside the Helpdesk Module.

You can see the Policy Name, Team, Priority, Types, and Reach Stages from the dashboard list view. Click the “NEW” button to create a new SLA Policy. You can edit further details in the displayed configuration form.
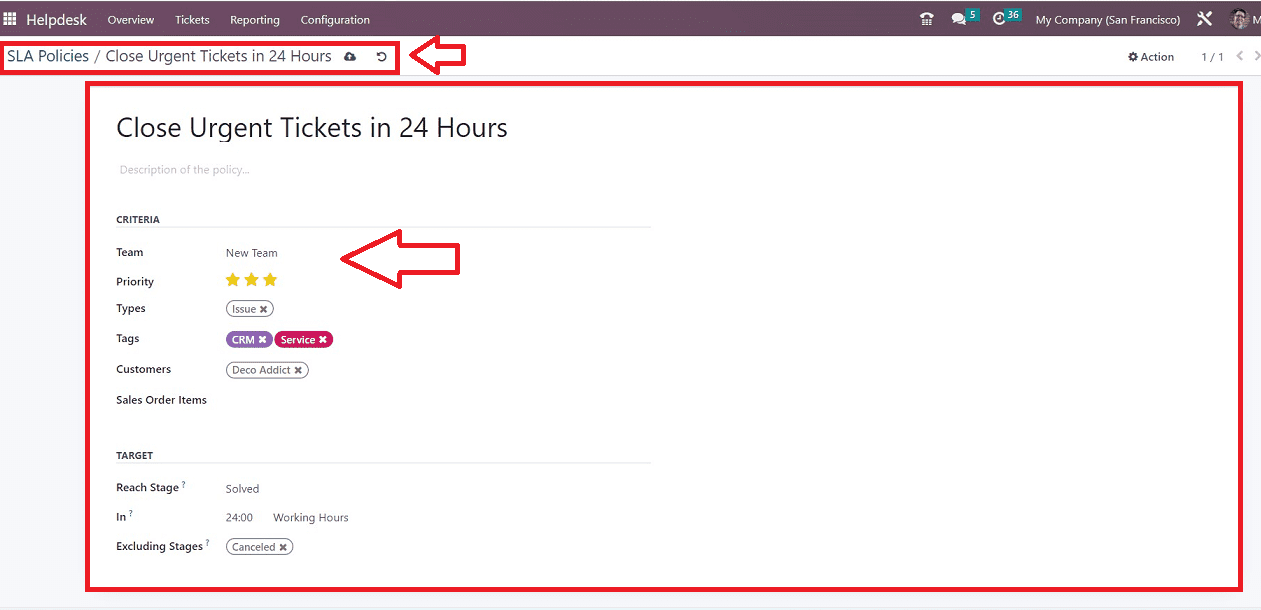
The provided form can be used to provide the Policy's name. You will have a text area under the title line to give a “Description of the policy.” You may provide the name of the “Team” that is permitted to utilize this policy under the “CRITERIA” tab. You can choose the “Priority,” ‘Types,” “Tags,” “Customers,” and “Sales Order Items” to which this SLA Policy will apply in the relevant areas.
The minimum stage that a ticket must achieve to be covered by this policy may be set under the “TARGET” tab as “Reach Stage.” The minimum working hours needed to attain the goal stage in order to comply with this policy might be mentioned in the ”In” field. If you want to exclude the time spent on a certain stage from the SLA calculation, add that stage to the “Excluding Stages” column. In the Odoo Helpdesk module, SLA Policies are created in this manner. Save your details after completing the editing process.
The newly created SLA Policy data will be saved in Odoo Helpdesk Database, and you can see it from the dashboard as shown below.

After creating the SLA Policy, you can create new tickets of the same type by clicking on the “TICKETS” button found inside the newly created ticket Kanban card illustrated in the screenshot below.
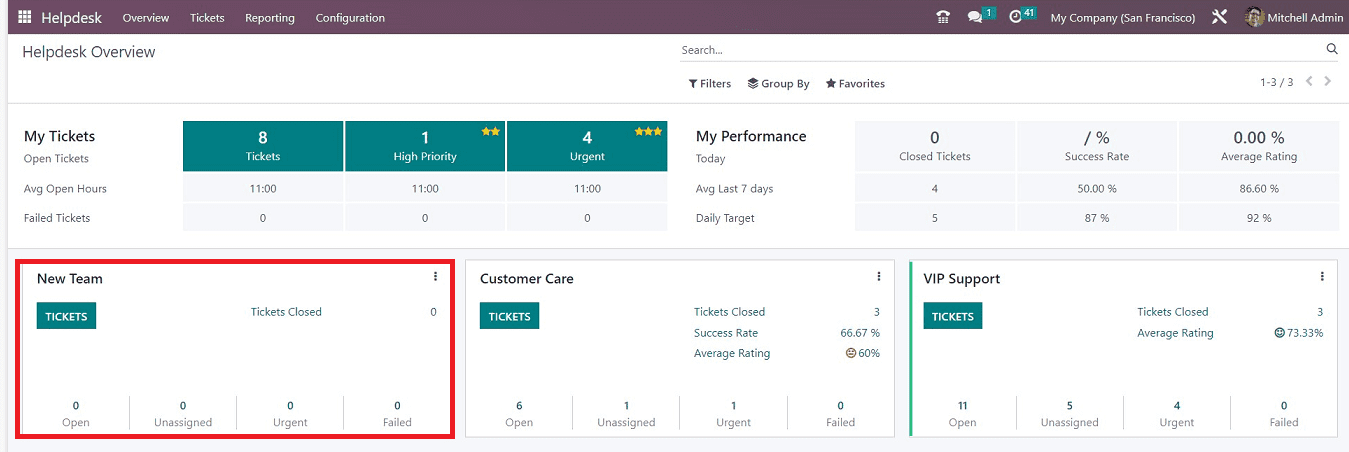
Opening the “TICKETS” button will lead you to the Helpdesk Overview Dashboard, where you can see all the available tickets created based on the team.
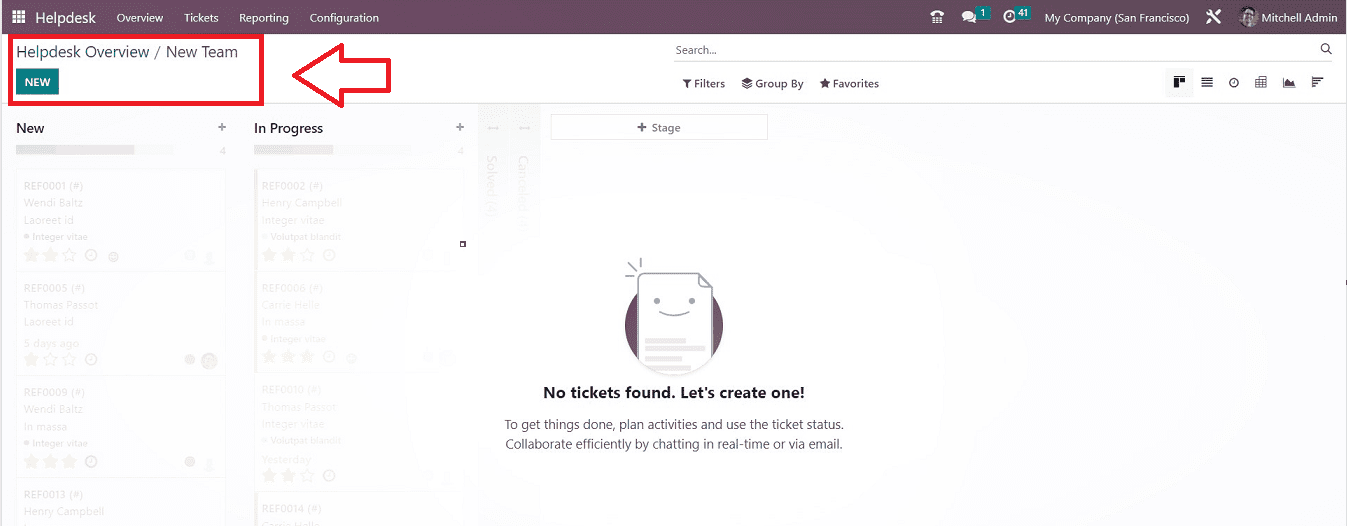
There aren't any tickets available here. So, by clicking the "NEW" button, we may start a new ticket. You will be transmitted to a form for configuring tickets. As a result, you can edit the ticket data as necessary.
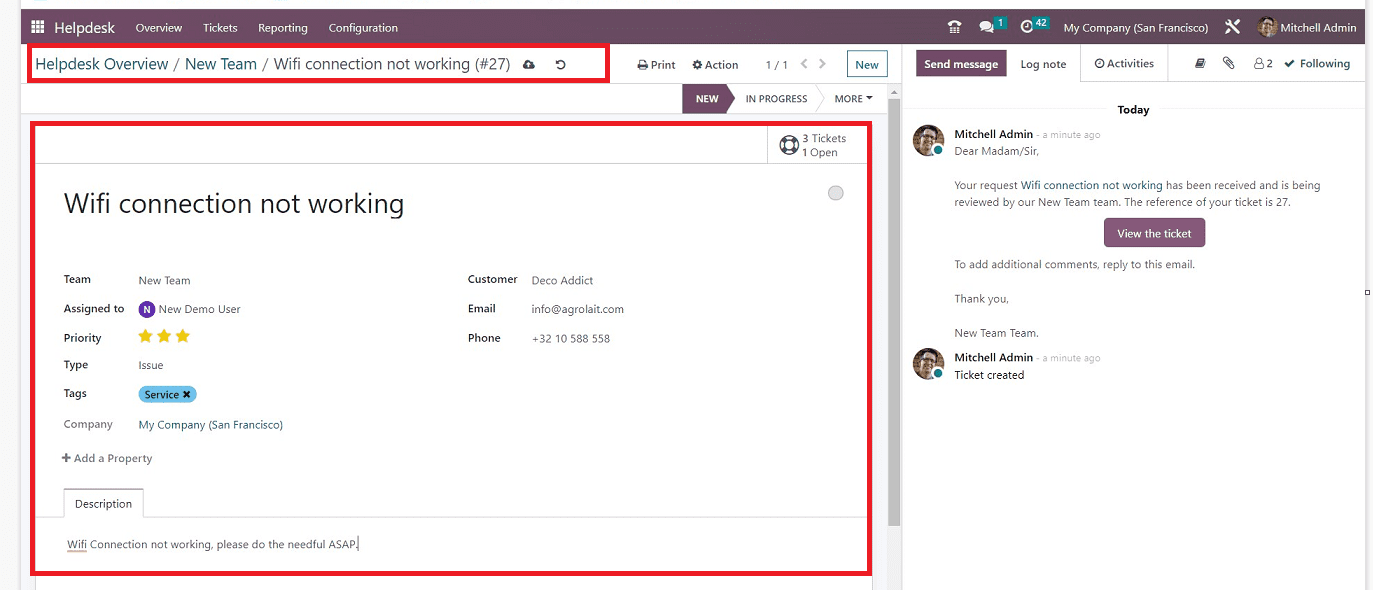
In the form, enter the Issue, Question, Query, etc., on the ticket name field found at the top of the form. The “Team” will be auto-updated, so you can select the assignee name from the “Assigned to” field and select the “Priority” level by choosing the stars. You can select a “Type” as per the nature of your ticket and select appropriate “Tags.”
In the "Customer" field, type the customer's name or select from the list. The "Email" and "Phone" information will be automatically filled in after selecting a client name from the dropdown list. Any notes or descriptions about the ticket issue can be edited in the "Description" tab. After saving the ticket information inside the configuration form, your ticket data will be stored in the associated Helpdesk Overview dashboard.
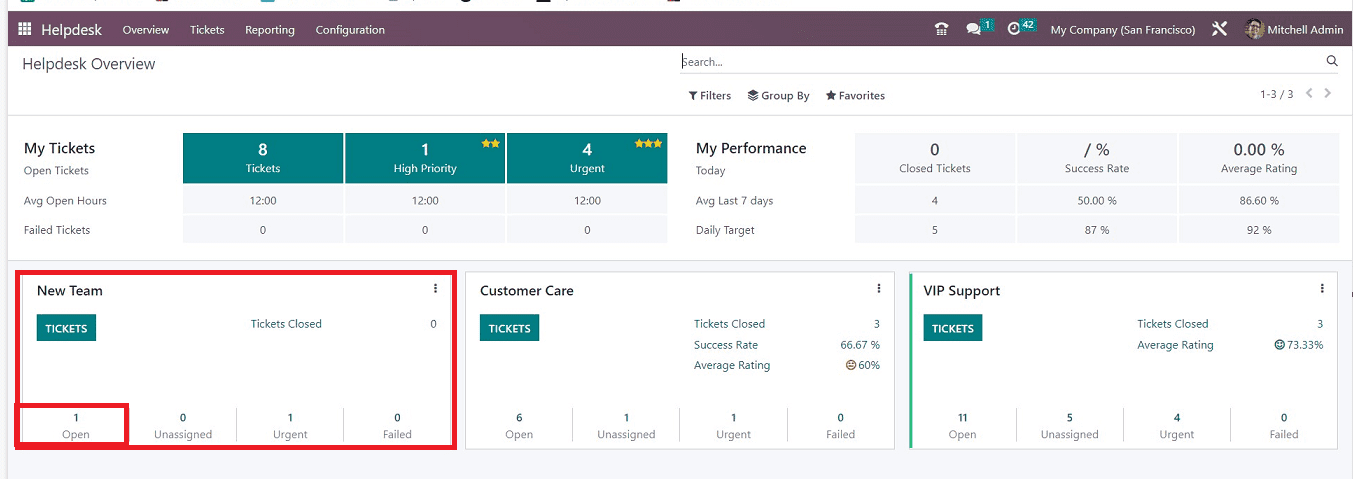
The corresponding Kanban card, which is displayed on the Helpdesk Overview dashboard, allows the administrative users to examine the freshly raised ticket. They can handle the tickets based on the current state of the ticket, which includes New, In Progress, Solved, Cancelled, etc., after opening the ticket information.

To record this status in the ticket configuration form, you can simply drag and drop the ticket Kanban card into the subsequent phase inside this window as the process progresses.
Configuring Customer Ratings
Next, we can discuss about the feature of “Customer Ratings” inside the Odoo 16 Helpdesk Module. So go to the team that we created earlier and go to the “Customer Ratings” option available in the “Performance” tab and activate the option.
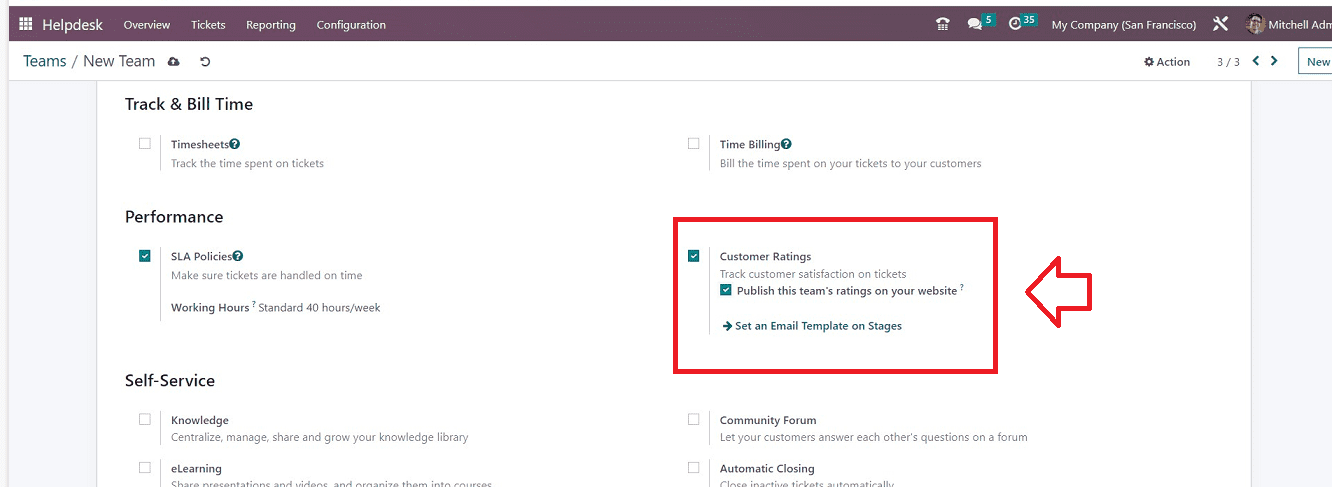
You can enable the “Publish this team’s ratings on your website” option to display the customer-provided team rating on your website. To configure more settings, just open the link provided below titled “Set an Email Template on stages.

In a dashboard, you can observe several stages and the teams that are accessible for each level. You can view the Email Template for a certain stage by entering that stage's column.
By stepping into the configuration page using the "NEW" button in this particular instance, we can establish a new stage and associated email template.
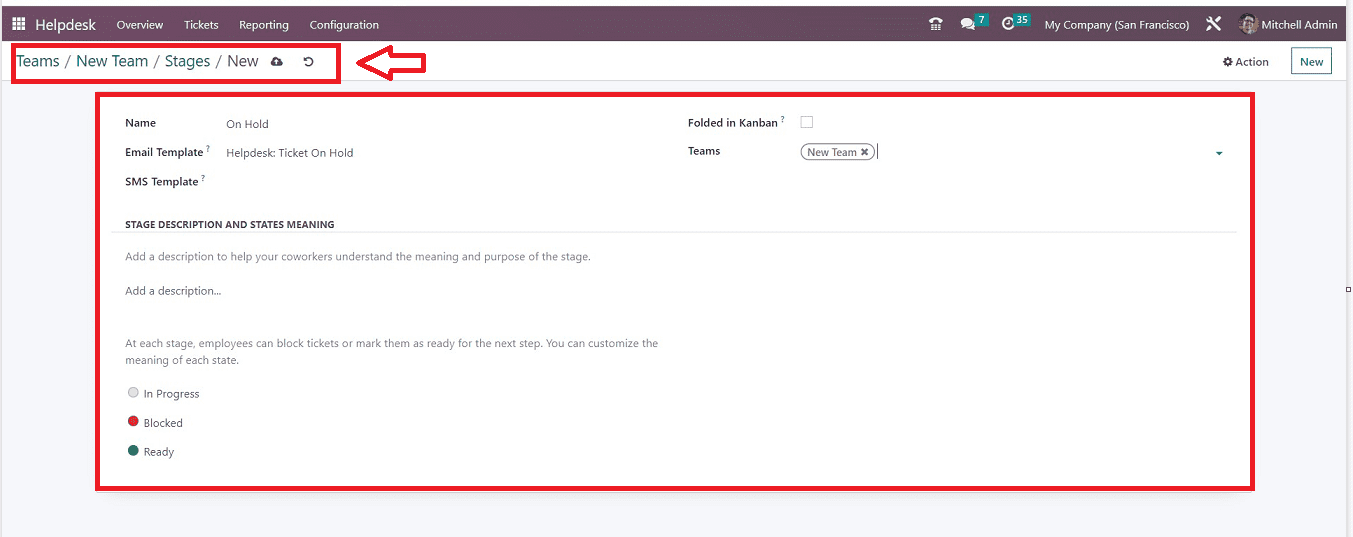
We can give the new stage name in the “Name” field and edit or choose an “Email Template” that is displayed while sending a mail related to that stage. Also, you can edit an “SMS Template” from this form. The “STAGE DESCRIPTION AND STATES MEANING” section can be used to edit any description about the new Stage, and you can customize the meaning of each state by selecting an appropriate color indicator. If required, you can choose the “Folded In Kanban” option and set the available teams by choosing them. after completing all the processes, save the data.
Creating Email Templates and Customer Rating Preview
To edit a detailed Email Template and other details, click on the “Internal Links” option available in the “Email Template” field; this will open a new form where you can edit the email specifics that include Content, Email Configurations, and other Settings.