Odoo 18 is the latest release in Odoo's extensive business management suite, renowned for its flexibility and comprehensive features. This update brings numerous enhancements and functionalities, further strengthening its value for businesses of all sizes. A standout feature of Odoo is its Customer Portal, which allows companies to provide customers with personalized access to their orders, invoices, support tickets, and more. To fully leverage the advantages of the Customer Portal, it is often crucial to customize it to meet specific business requirements.
The customer portal in Odoo 18 provides a secure online space for customers to manage their information and interact with your company’s services. This intuitive platform allows customers to easily keep track of their orders, view invoices, monitor deliveries, and access project tasks, among other features, depending on the modules you have enabled.
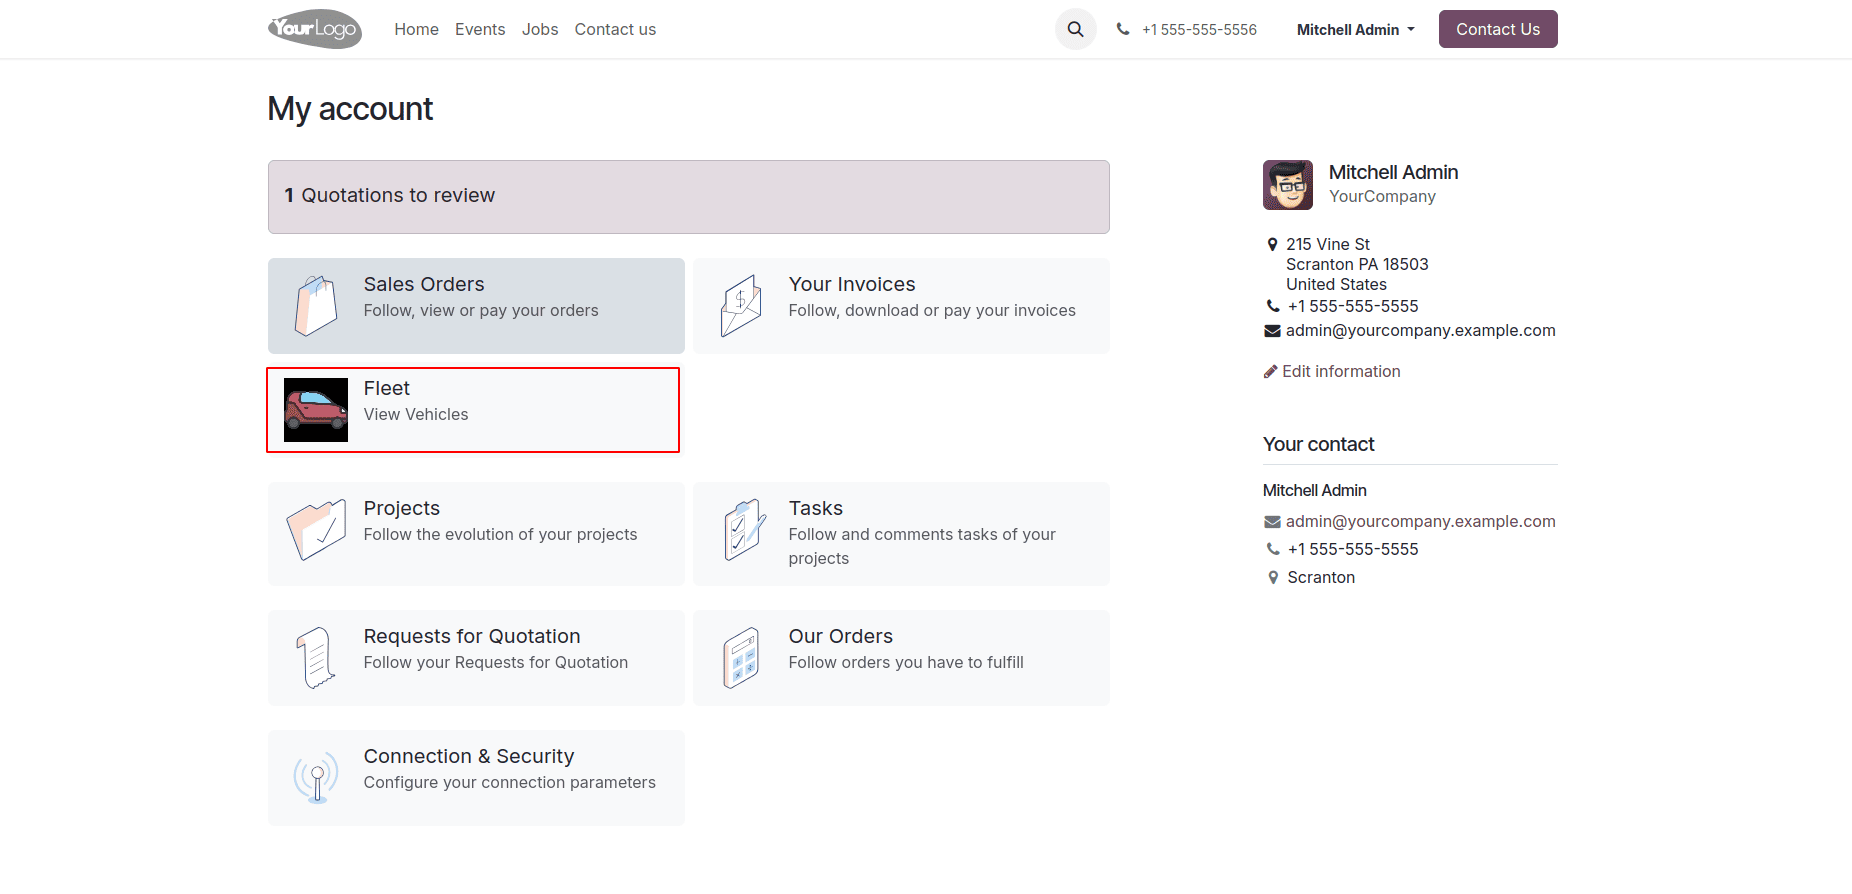
To create a new menu in the "My Accounts" portal and set up a list/form view in Odoo 18, follow these steps. For Example- The custom menu has now been added to the "Fleet" customer portal.
To add a custom menu to the website customer portal, use the following XML template:
<?xml version="1.0" encoding="utf-8"?>
<odoo>
    <template id="portal_fleet" name="Fleet" inherit_id="portal.portal_breadcrumbs" priority="30">
        <xpath expr="//ol[hasclass('o_portal_submenu')]" position="inside">
            <li t-if="page_name == 'fleet'" t-attf-class="breadcrumb-item #{'active ' if fleet else ''}">
                <a t-if="fleet" t-attf-href="/fleet?{{ keep_query() }}">Fleet</a>
                <t t-else="">Fleet</t>
            </li>
        </xpath>
    </template>
    <template id="portal_my_home_menu_fleet" name="Fleet" inherit_id="portal.portal_my_home"
              customize_show="True" priority="30">
        <xpath expr="//div[hasclass('o_portal_docs')]" position="before">
            <t t-set="portal_client_category_enable" t-value="True"/>
        </xpath>
        <div id="portal_client_category" position="inside">
            <t t-call="portal.portal_docs_entry">
                <t t-set="icon" t-value="'/customer_portal_custom/static/src/image/fleet_image.jpg'"/>
                <t t-set="title">Fleet</t>
                <t t-set="url" t-value="'/Fleet'"/>
                <t t-set="text">View Vehicles</t>
                <t t-set="placeholder_count" t-value="'portal_fleet'"/>
            </t>
        </div>
    </template>
    <template id="portal_my_home_fleet_views" name="My Fleet">
        <t t-call="portal.portal_layout">
            <t t-set="breadcrumbs_searchbar" t-value="True"/>
            <t t-call="portal.portal_searchbar">
                <t t-set="title">Fleet</t>
            </t>
            <t t-call="portal.portal_table">
                <thead>
                    <tr class="active">
                        <th class="text-left">Vehicle Name</th>
                        <th class="text-center">License Plate</th>
                        <th class="text-center">Model</th>
                        <th class="text-end">Status</th>
                    </tr>
                </thead>
                <t t-foreach="fleet" t-as="record">
                    <tr>
                        <td class='text-left'>
                            <span t-field="record.name"/>
                        </td>
                        <td class='text-center'>
                            <span t-field="record.license_plate"/>
                        </td>
                        <td class='text-center'>
                            <span t-field="record.model_id.name"/>
                        </td>
                        <td class='text-end'>
                            <span t-field="record.state_id"/>
                        </td>
                    </tr>
                </t>
            </t>
        </t>
    </template>

</odoo>
To create the custom menu and display it, a function must be defined in the Python controller. This can be implemented with the following Python code:
from odoo import http
from odoo.http import request
from odoo.addons.portal.controllers.portal import CustomerPortal

class CustomPortal(CustomerPortal):
    def _prepare_home_portal_values(self, counters):
        values = super()._prepare_home_portal_values(counters)
        if 'portal_fleet' in counters:
            values['portal_fleet'] = request.env[
                'fleet.vehicle'].sudo().search_count([])
        return values
To redirect to the fleet list view specified in the template, a controller function must be created to display the list view. It can be put in same python controller.
    @http.route(['/Fleet', '/Fleet/page/<int:page>'], type='http', auth="user", website=True)
    def portal_fleet(self, search=None, search_in='All'):
        """To search the fleet vehicles data in the portal"""
        searchbar_inputs = {
            'All': {'label': 'All', 'input': 'All', 'domain': []},
            'Vehicle Name': {'label': 'Vehicle Name', 'input': 'Vehicle Name', 'domain': [('name', 'like', search)]},
            'License Plate': {'label': 'License Plate', 'input': 'License Plate', 'domain': [('license_plate', 'like', search)]},
            'Status': {'label': 'Status', 'input': 'Status', 'domain': [('state_id.name', 'like', search)]},
        }
        search_domain = searchbar_inputs[search_in]['domain']
        fleet = request.env['fleet.vehicle'].sudo().search([
            ('driver_id', '=', request.env.user.partner_id.id)])
        search_fleet = fleet.search(search_domain)
        return request.render('customer_portal_custom.portal_my_home_fleet_views',
                              {
                                  'fleet': search_fleet,
                                  'page_name': 'fleet',
                                  'search': search,
                                  'search_in': search_in,
                                  'searchbar_inputs':searchbar_inputs
                              })
The following is the list view with a search option, where the records are extracted based on the specified search value.
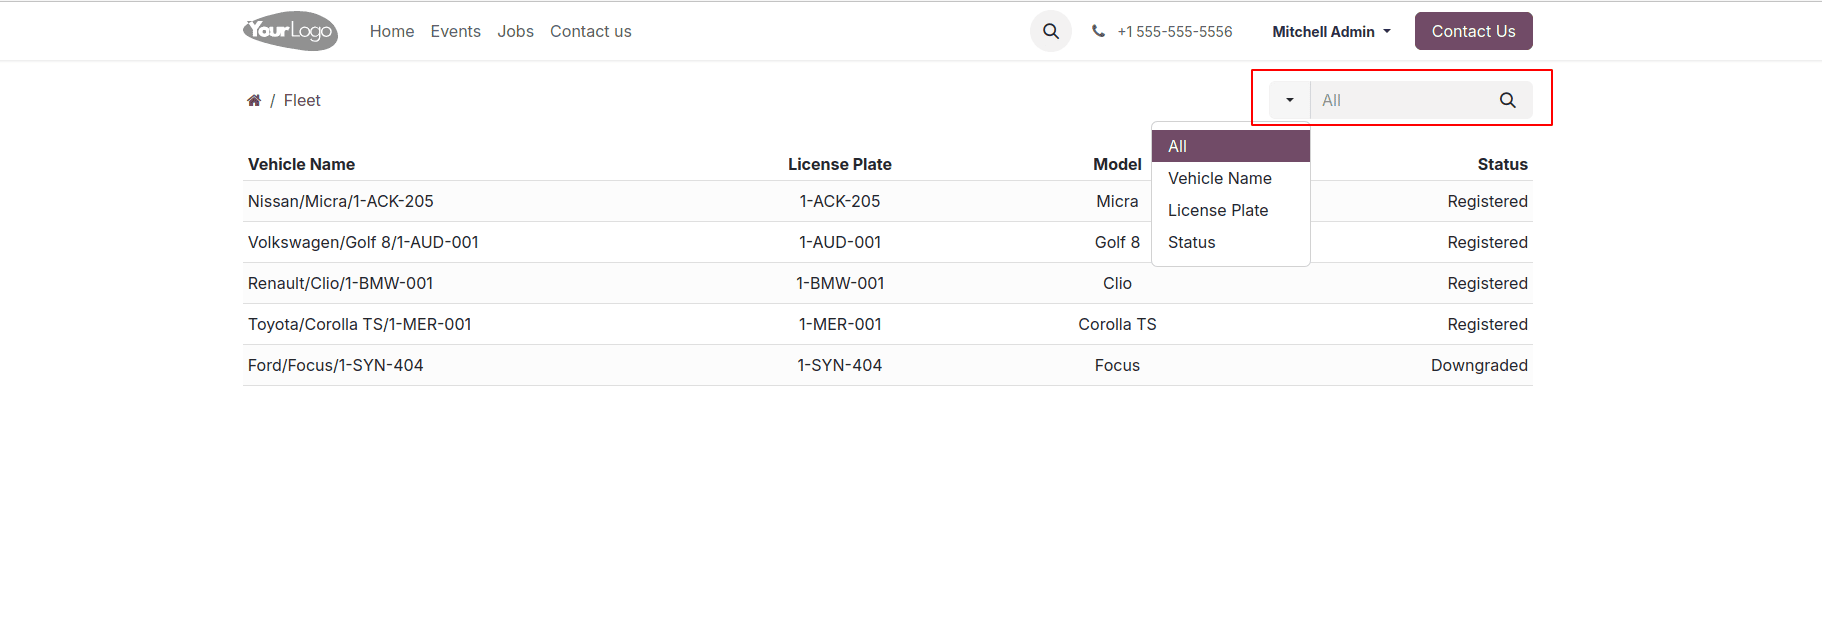
To add search bar filters in list view, you need to define them in a dictionary format, where each filter corresponds to a label and a domain. For example:
        # Define the search bar filters
        searchbar_filters = {
            'All': {'label': 'All', 'domain': []},
            'Registered': {'label': 'Registered', 'domain': [('state_id.name', '=', 'Registered')]},
            'Downgraded': {'label': 'Downgraded', 'domain': [('state_id.name', '=', 'Downgraded')]},
        }
filter_domain = searchbar_filters.get(filterby, searchbar_filters['All'])['domain']
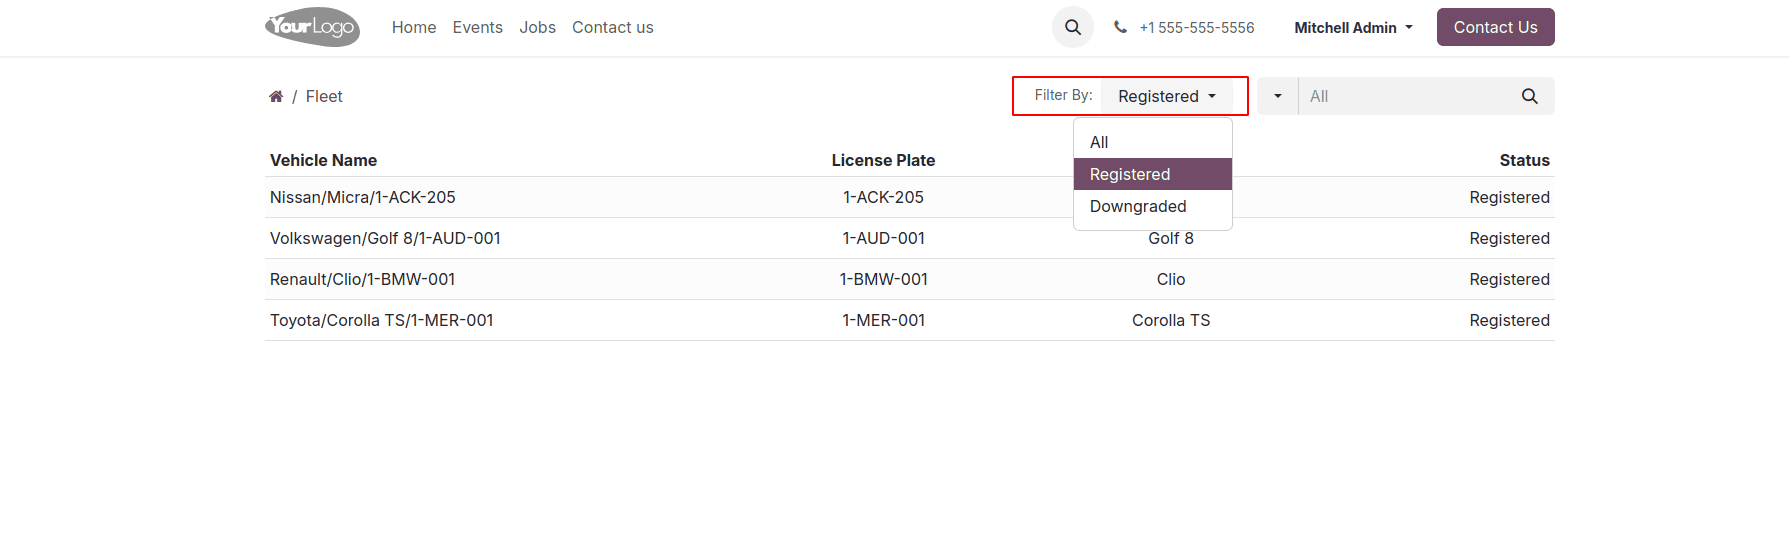
The following image represents the updated version of the list view with filters applied. In this example, the filter shows only registered vehicles. If selected ‘All’ it will show full list without any filter.
Here’s the fully updated controller for the list view, complete with updated filters and search functionality.
from odoo import http
from odoo.http import request
from odoo.addons.portal.controllers.portal import CustomerPortal
class CustomPortal(CustomerPortal):
    def _prepare_home_portal_values(self, counters):
        values = super()._prepare_home_portal_values(counters)
        if 'portal_fleet' in counters:
            values['portal_fleet'] = request.env[
                'fleet.vehicle'].sudo().search_count([])
        return values
    @http.route(['/Fleet', '/Fleet/page/<int:page>'], type='http', auth="user", website=True)
    def portal_fleet(self, search=None, search_in='All', filterby='All',groupby='none'):
        """To search the fleet vehicles data in the portal"""
        searchbar_inputs = {
            'All': {'label': 'All', 'input': 'All', 'domain': []},
            'Vehicle Name': {'label': 'Vehicle Name', 'input': 'Vehicle Name', 'domain': [('name', 'like', search)]},
            'License Plate': {'label': 'License Plate', 'input': 'License Plate', 'domain': [('license_plate', 'like', search)]},
            'Status': {'label': 'Status', 'input': 'Status', 'domain': [('state_id.name', 'like', search)]},
        }
        # Define the search bar filters
        searchbar_filters = {
            'All': {'label': 'All', 'domain': []},
            'Registered': {'label': 'Registered', 'domain': [('state_id.name', '=', 'Registered')]},
            'Downgraded': {'label': 'Downgraded', 'domain': [('state_id.name', '=', 'Downgraded')]},
        }
        search_domain = searchbar_inputs[search_in]['domain']
        filter_domain = searchbar_filters.get(filterby, searchbar_filters['All'])['domain']
        combined_domain = search_domain + filter_domain
        fleet = request.env['fleet.vehicle'].sudo().search([
            ('driver_id', '=', request.env.user.partner_id.id)])
        search_fleet = fleet.search(combined_domain)
        return request.render('customer_portal_custom.portal_my_home_fleet_views',
                              {
                                  'fleet': search_fleet,
                                  'page_name': 'fleet',
                                  'search': search,
                                  'search_in': search_in,
                                  'searchbar_inputs': searchbar_inputs,
                                  'filterby': filterby,
                                  'searchbar_filters': searchbar_filters,
                                  'default_url': '/Fleet',
                              })
In summary, enhancing the Customer Portal in Odoo 18 with a custom menu, list view, and filters significantly improves user interaction. By setting up specific menu items and developing controllers for data management, along with intuitive search and filter functionalities, you create a streamlined and user-friendly experience. This customization empowers users to easily access and manage their information, fostering greater engagement and satisfaction.
To read more about How to Add a Custom Menu in the Customer Portal of Odoo 16, refer to our blog How to Add a Custom Menu in the Customer Portal of Odoo 16.