In the Odoo 16 Point of Sale (PoS) system, users have the capability to craft tailored coupons and promotions suited to their unique business requirements. This entails defining parameters such as the discount value, expiration date, and conditions necessary for coupon or promotion redemption. Additionally, the system facilitates the tracking of coupon and promotion redemptions to assess their efficacy. Leveraging coupons and promotions can significantly enhance sales initiatives within the Odoo PoS environment. Through strategic utilization, businesses can attract new clientele, incentivize existing customers to increase spending, bolster profits, and target specific consumer segments.
The delineation of each promotional program's functionality within the Odoo 17 PoS ecosystem is elucidated as follows:
* Coupons: Coupons represent a form of discount redeemable by customers during checkout, offering percentage discounts, fixed monetary deductions, or complimentary shipping.
* Loyalty cards: Designed to reward repeat patronage, loyalty cards enable customers to accumulate points with each purchase, which can subsequently be exchanged for discounts, complimentary items, or other incentives.
* Promotions: These entail discounts applied either universally or to specific product categories, serving purposes such as product promotion, inventory liquidation, or customer acquisition.
* Discount codes: Functioning akin to online coupons, discount codes furnish customers with percentage discounts, fixed monetary deductions, or free shipping privileges.
* Buy X get Y: This promotion structure offers customers a complimentary item upon purchasing a specified quantity of other products, such as receiving an item of free clothing upon buying two pieces of cloth.
* Next-order coupons: Distributed via email post-purchase, these coupons furnish customers with discounts or monetary deductions applicable to subsequent orders, fostering repeat business.
In this blog post, detailed guidance is provided for configuring coupon programs, encompassing currency and points unit specification, validity parameters, usage limitations, and allocation to specific sales channels or business entities.
Configuring Promotions, Coupons, Gift Cards, and Loyalty Programs
The creation of coupons and promotions for retail or eating venues is made possible by activating the Promotions, Coupons, Gift Cards, and Loyalty Programs function in the PoS module's setup Settings box, as seen below.
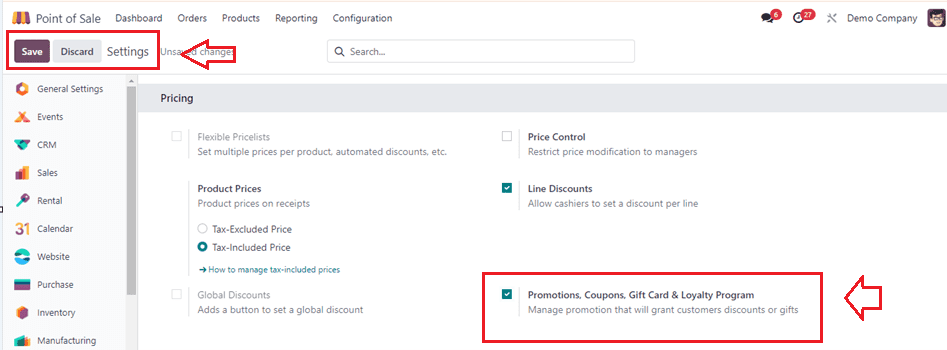
Upon activation, users will observe the discount and loyalty menus generated under the Product menu within the PoS interface.
Users will be sent to a dashboard page with pre-configured discounts and loyalty programs organized by program name, program type, items, website, point of sale, and company when they click on the "Loyalty Programmes" link.
Creating Discounts
Subsequently, the process of creating promotional programs for implementation in PoS sessions can be initiated. This is accomplished by initiating new programs through the "New" button within the Discount & Loyalty menu.

The selection of specific promotional programs is contingent upon individual business objectives and the nature of products or services offered. However, all such programs can be deployed to entice new customers through introductory discounts, thereby stimulating initial engagement. Moreover, they serve to foster sales growth by attracting fresh clientele, retaining existing patronage, and facilitating inventory clearance.
New Discounts or Loyalty programs can be created using the "New" button. Opening any item on the dashboard will reveal its corresponding program configuration form. Here, we are creating a new Discount program.
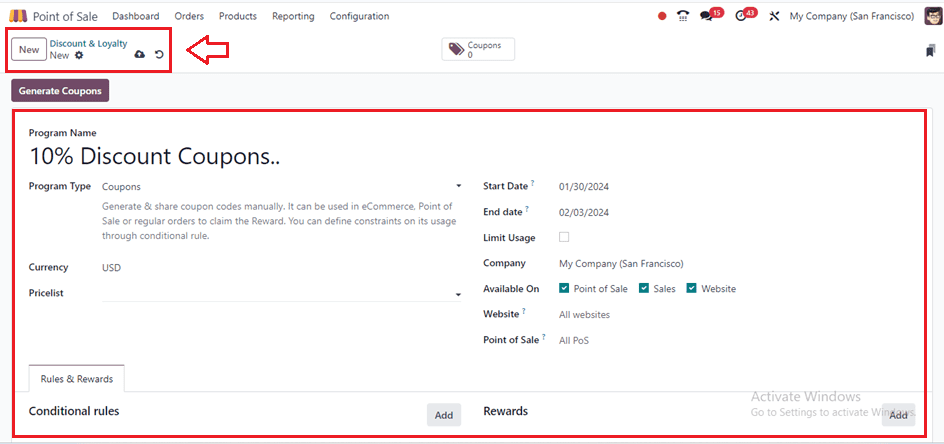
The name of the loyalty or discount program has to be updated in the "Programme Name" area. Also, you have to choose the "Program Type" from a drop-down menu with options like "Coupon, Promotion, Loyalty Card, Buy X Get Y, Discount Code," among others. The appropriate currency should be selected from the “Currency” area, and the validity of the program must be determined by choosing dates from the calendar provided in the ‘Start Date’ and ‘End Date’ sections. By entering the necessary information in the "Limit Usage" section, users may configure the use restriction for the relevant program.
Business details should be included in the "Company" section. You can streamline access to loyalty programs in specific categories like Point of Sale, Sales, and Website by choosing the "Available On" options.
To restrict the publication of the loyalty program to a specific website, users should specify the name of the relevant website in the "Website" field. Additionally, publication can be limited to specific stores by specifying their names in the "Point Of Sales" area.
Rules &Rewards Tab
Under the Rules & Rewards tab, the rules and regulations for a particular offer program can be set by defining purchase or sales conditions in the "Conditional Rules" section using the "Add" button.

Selecting the “Add” button will initiate a new condition configuration popup window, as illustrated in the accompanying screenshot.
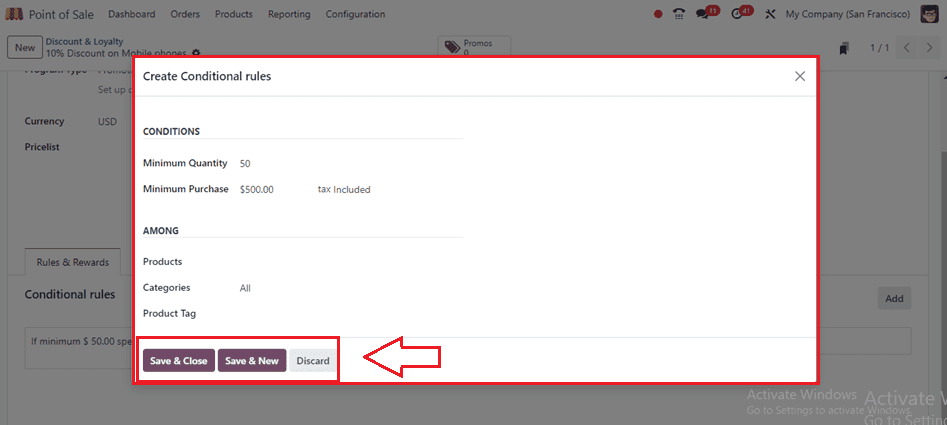
The conditions regarding the number of eligible coupons/gift cards can be specified within the “Minimum Quantity” area, while the "Maximum Purchase" amount required to qualify for the program can be provided in the subsequent line. Furthermore, the inclusion of specific "Products," "Categories," and "Product Tags" falls under the Loyalty Program rule. You have the option to either employ the "Save & Close" button to preserve the conditional rules or utilize the "Save & New" option to incorporate another condition.
You may create as many elaborate conditional rules as you like based on the same example as previously discussed.
Creating Rewards
Selecting the "Add" button located under the "Rewards" section initiates the opening of a popup window titled "Create Rewards," as depicted below.
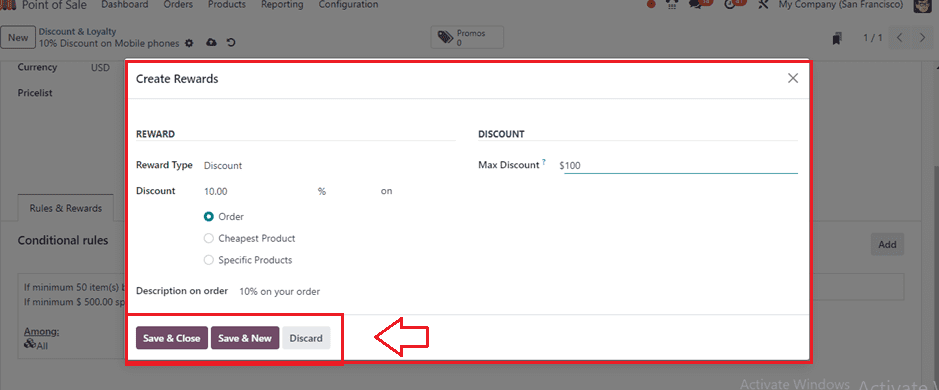
In this interface, you can set up new rewards by selecting the "Reward Type" from the dropdown menu. Specify the discount percentage in the "Discount" field, and then choose the appropriate option to apply the discount to either the "Order," "Cheapest Product," or "Specific Product."
The maximum discount offered as an incentive can be defined under the “DISCOUNT” tab’s ‘Max Discount’ field. You can change the reward's description by editing the "Description on order" column. Utilize the "Save & Close" button to save the configured rewards.
Generating Coupons
After editing the coupon specifics and conditions, we can generate the required number of coupons using the ‘Generate Coupon’ button.

A pop-up window will appear after pressing the ‘Generate Coupons’ button, as shown below.
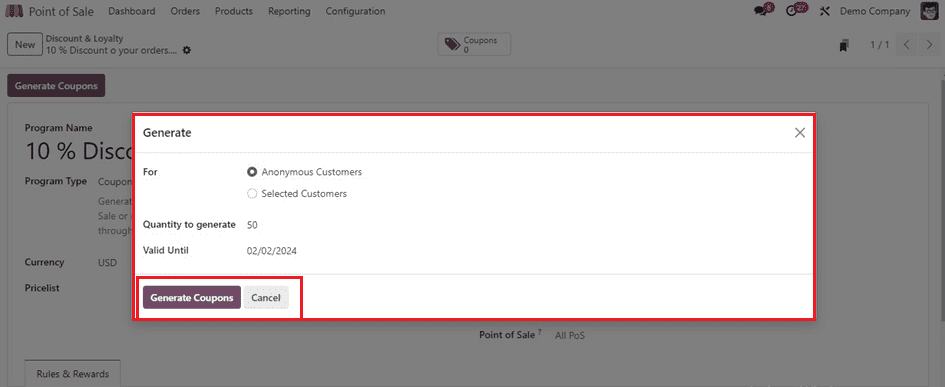
Please select the customer category for which you wish to generate coupons, such as "Anonymous Customers" or "Selected Customers." Input the desired quantity to generate and specify the validity period within the "Validity Until" fields. Subsequently, click the "Generate Coupons" button.
Your coupons will be generated, and the number of available coupons can be viewed inside the ‘Coupons’ smart button placed at the top of the configuration form.

Upon accessing the "Coupons" smart button, the dashboard displaying all generated coupons will be presented, showcasing their respective Code, Balance, Expiration Date, Program, and Partner details.
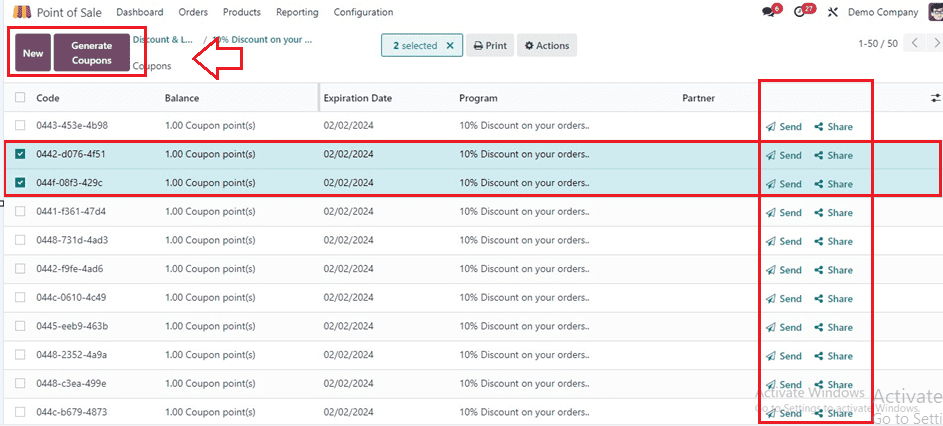
You can manage and create coupons from this interface, and if you are in need of extra coupons, click on the ‘Generate Coupons’ button provided next to the ‘New’ button.
Sending Coupons
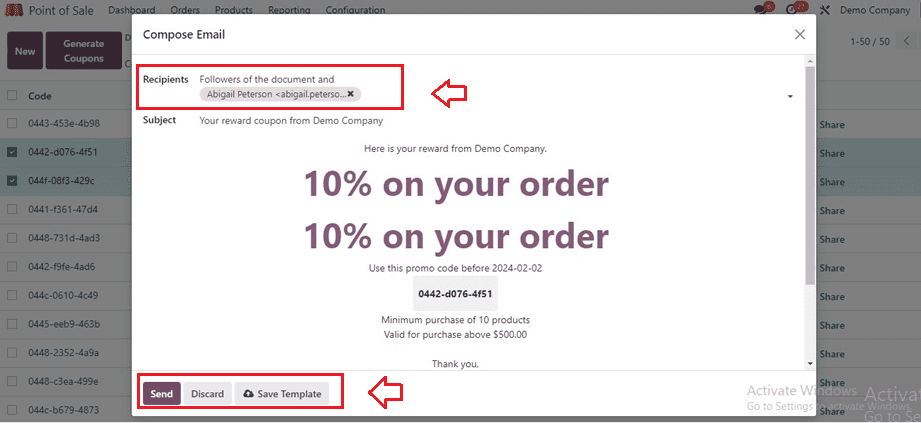
Admins can send coupons via email using the "Send" button in the coupon field. A popup window displays the coupon’s promo code will be appeared as shown below. Users can edit the email address and send the coupon to the selected contact.
Sharing Coupons
To share those coupon views via trendy URL links, click the "Share" button on the respective coupons column. Additionally, you may see that coupon cards become public if you provide the ID of a website in the "Website" area.
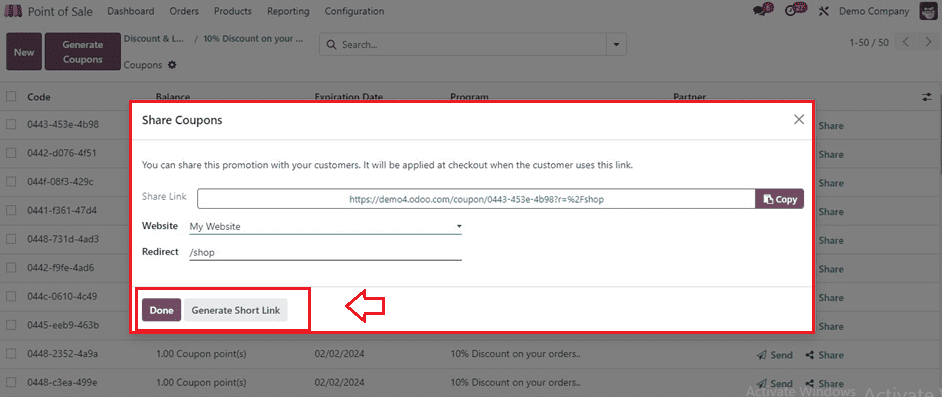
Additionally, you may copy the coupon's URL and share it on other social networking platforms.
Creating Promotions
No need to stress over initiating new promotion programs; the process seamlessly aligns with the coupon setup discussed in the preceding section of this blog.
Within the same "Discount&Loyalty" setup window of the "Products" menu, you can set up new promotions. Just be sure to modify the "Programme Type" to "Promotions," as seen below.
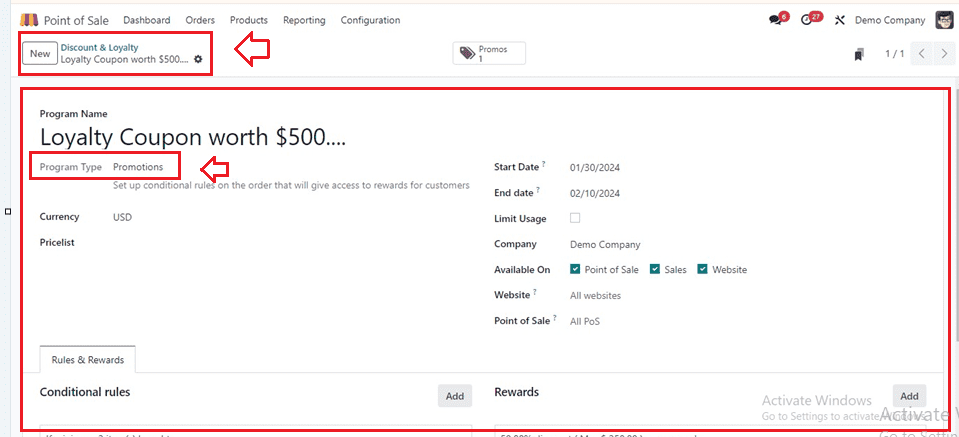
Fill in the basic Promotion program details, including the Program Name, Program Type, Start Date, End Date, Limit Usage, Company, Website, Available platforms, and Point of Sale details as per your program requirements.
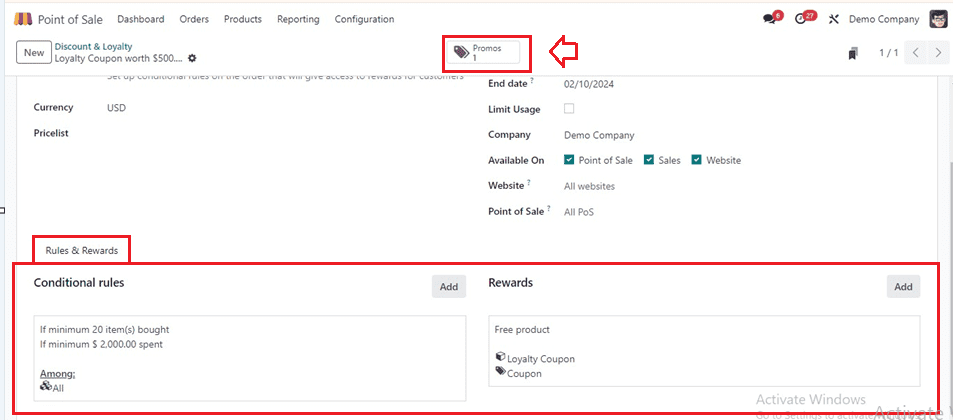
Inside the ‘Rules & Rewards’ tab section, the formulation of program parameters and incentive schemes can be explained, including guidelines for minimum purchase amounts, product details, and reward categories. Thus, as we covered in the Coupons scenario, use the "Add" option to provide Conditional Rules and Rewards for the promotion program and fill out the conditions and reward specifics inside the displayed wizards.
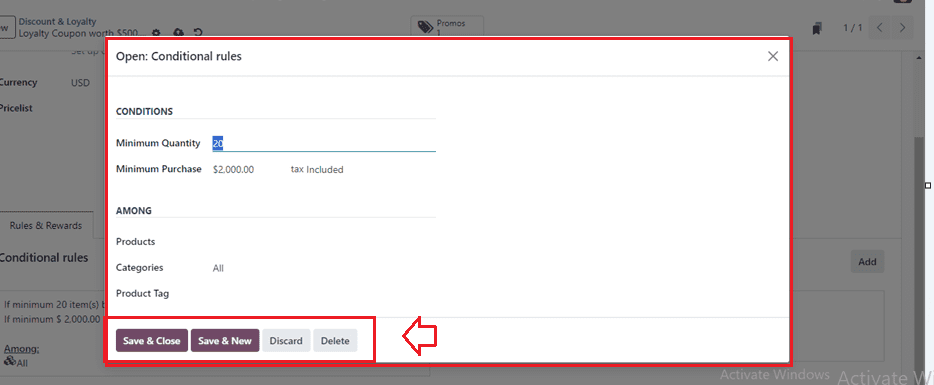
Conditional Rules
A consumer will be eligible for this promotion program if they purchase a minimum of 10 goods totaling $2000, as per the straightforward conditional rules I have supplied.
Rewards
As you can see from the picture below, I have decided to give a Loyalty Coupon card worth $500 for selected customers. So, click on the ‘Add’ button of the 'Rewards' area for this promotional program.
Here, I have chosen the ‘Reward Type’ as Free Product and provided the Quntity rewarded as 1. Next, choose the reward product by clicking on it in the Product field, then set the matching tags in the Product Tag area as illustrated below.
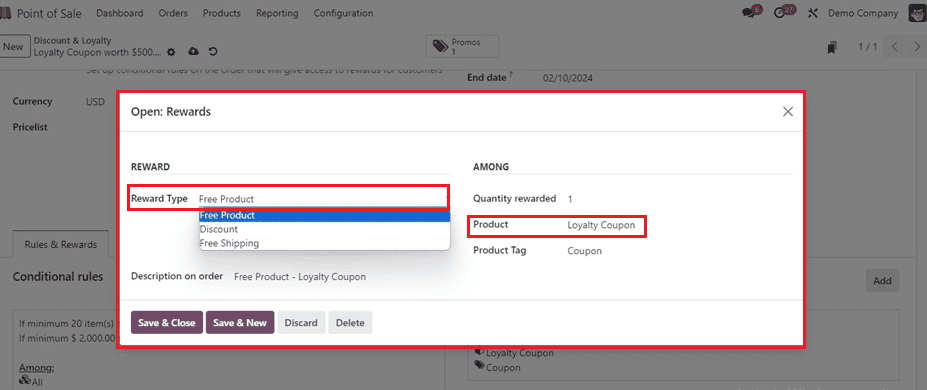
The Description on the order will be displayed inside the relevant field according to the reward settings, or you can edit them. Save the changes you've made to the promotion data, then return to the configuration form. Here, we can see the ‘Promos’ smart button.
Creating a new Promotion Code
Open the ‘Promos’ smart button to manage or create new promotion programs. You may view one of the promotion programs I previously developed by selecting the 'New' option on the dashboard.

While creating the new promotion program, you will see the Code inside the configuration window. Then, set the Expiration Date, Partner, and Balance promo points as shown below.

Finally, the administration of this promotion program involves dissemination to customers via email or direct application during PoS transactions, with provisions for tracking and redemption.
Applying Promotions & Coupons in a PoS Order
During a POS ordering session, we may make use of the preset Coupons and Promotions to make purchases. Thus, open the Dashboard window and select the available shop session to begin a new session.
Select the goods and continue with the ordering process within the Orders window. After that, use coupons by clicking the Enter Code button to receive the advantages or reductions for these product orders.
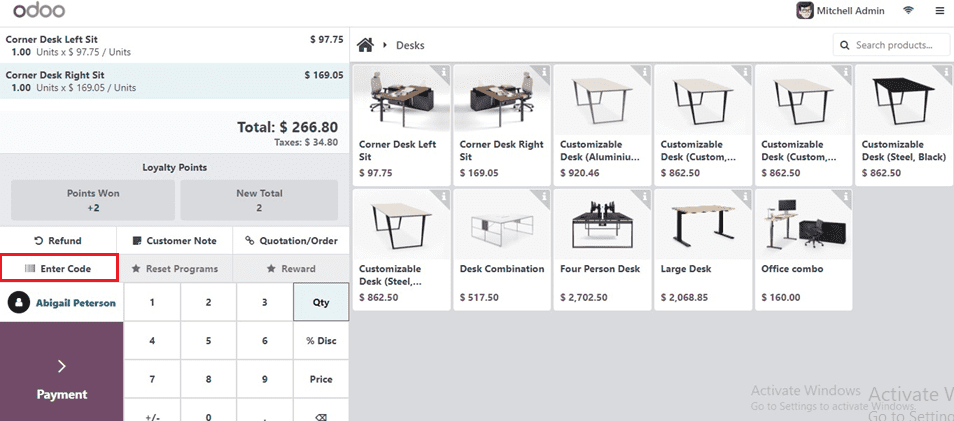
The Enter Code button will open a small window where we can enter a coupon code that is copied from the coupon window, as shown below.
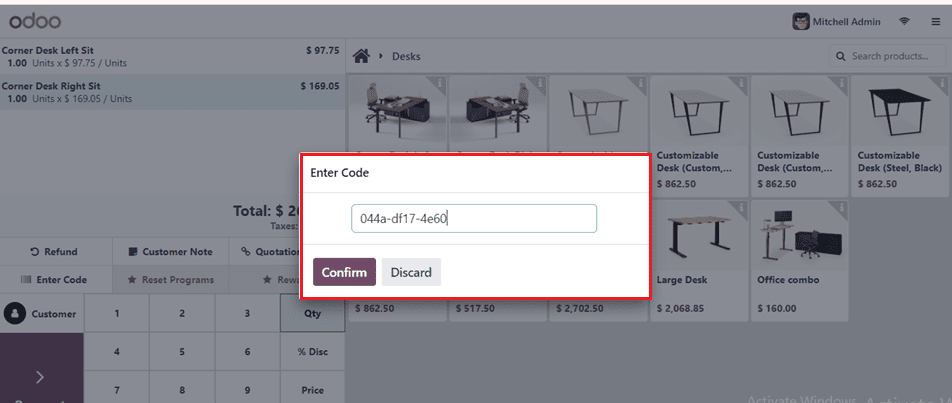
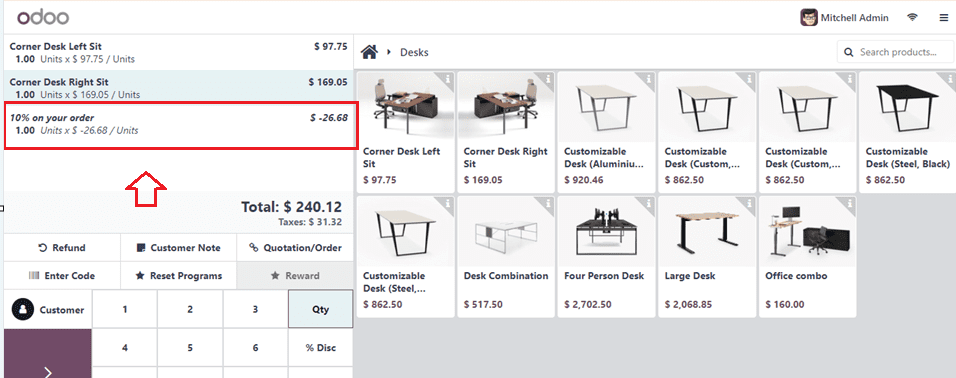
Upon entering the Coupon code and confirming it via the Confirm button, the discount will be applied to the current order and deducted immediately. This can be viewed from the orders window itself, as illustrated in the screenshot below.
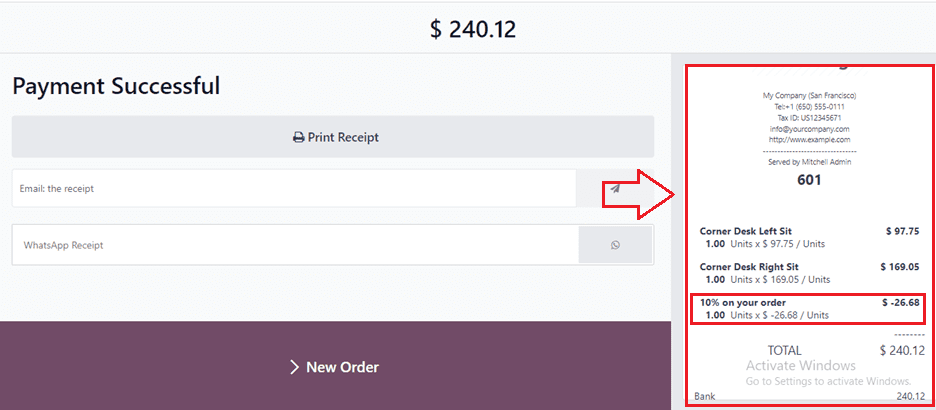
The payment process can be initiated by clicking the Payments button, also the coupon discount can be displayed in the generated invoice.
You may also apply the promotion codes in the same way as previously described.
A demonstration of Coupon & Promotion programs utilization within a PoS session underscores the seamless integration of promotional initiatives within the Odoo 17 ecosystem, exemplifying their role in achieving diverse business objectives.